Scenario
You are a DNS administrator responsible for maintaining split‑horizon DNS for your organization. Your Grid uses two DNS views: VPN for internal users connected through the corporate VPN, and External for clients accessing services from public networks. Your application team has requested an update to the host record ftp.techblue.net so that internal (VPN) clients receive the IP address 10.100.0.99, while external users receive 128.171.133.99. Your task is to update both views to ensure consistent resolution for all users.
Estimate Completion Time
-
10 to 15 minutes
Credentials
|
Description |
Username |
Password |
URL or IP |
|---|---|---|---|
|
Grid Manager UI |
admin |
infoblox |
Prerequisites
-
Read-write access to DNS records
-
Read-only access to IPAM or network data
Learning Content
Lab Initiation
Access jump-desktop
Once the lab is deployed, you can access the virtual machines required for this activity. To begin, select VM List from the navigation bar at the top, locate jump-desktop, and click the green play icon to open its console. Log in to the Linux UI.

Username: training
Password: infoblox
Initiate lab
To initiate the lab, double-click the Launch Lab icon on the Desktop.

Choose the lab number from the list and click OK.

After clicking OK, you will see a pop-up message with a brief description of the lab task. If the description looks correct, click Yes to continue lab initiation.

Lab initiation will take a couple of minutes to finish.
Once complete, you will see another pop-up message with the login credentials and the URL for the Grid Manager’s User Interface. Note that the credentials may differ from those from prior labs.

Tasks
Task 1: Verifying DNS resolution before making changes
Before modifying any records, verify how ftp.techblue.net currently resolves for both VPN-connected clients and external clients. Confirm that the hostname returns different answers depending on the DNS view in use, and note the differences so you can validate your updates later.
You may use the VMs testing-linux or testing-windows as clients connected over VPN. You may use the VM jump-desktop to simulate external clients (External).
Task 2: Update the record in the VPN view
Navigate to the VPN view, locate the record for ftp.techblue.net, and change its IP address to 10.100.0.99.
Task 3: Update the record in the External view
Navigate to the External view, locate the record for ftp.techblue.net, and change its IP address to 128.171.133.99.
Task 4: Verifying DNS resolution after making changes
Repeat the lookups from Task 1 to verify the new DNS resolution after making changes.
Alternative Method: Managing with Global Search
Instead of navigating to each view and zone, use the Global Search feature to perform the same updates.
Solutions
DNS views allow different clients to receive different DNS responses based on source IP or network blocks. In this lab, separate views ensure internal VPN users receive internal service addresses while external users receive publicly reachable addresses.
Task 1 Solution: Verifying DNS resolution before making changes
Before you change any DNS records, confirm how ftp.techblue.net currently resolves in each DNS view. This gives you a clear baseline for comparison after you make updates.
Verifying from testing-windows
-
Switch to the VM testing-windows and log in.
-
Navigate to the Tools folder on the desktop. Right-click on the file interface-dhcp.bat and select 'Run as administrator'. This connects the virtual machine to the network using DHCP.
-
Launch a command prompt by clicking on the icon in the systems tray.
-
Use the
nslookupcommand to verify DNS names. The example below performs two lookups, one for the forward-mapping name (ftp.techblue.net) and one for the reverse-mapping (10.100.0.22).C:\Users\training>nslookup ftp.techblue.net. Server: ibns1.techblue.net Address: 10.100.0.105 Name: ftp.techblue.net Address: 10.100.0.22 C:\Users\training>nslookup 10.100.0.22 Server: ibns1.techblue.net Address: 10.100.0.105 Name: ftp.techblue.net Address: 10.100.0.22 C:\Users\training>
Verifying from jump-desktop
-
Switch to the VM jump-desktop and log in.
-
Launch a Terminal Emulator by clicking on the icon in the systems tray.
-
Use the
digcommand to verify DNS lookup behavior. The example below shows how to verify both the forward-mapping (ftp.techblue.net) and the reverse-mapping (128.171.133.22).$ dig @10.100.0.105 ftp.techblue.net. +short 128.171.133.22 $ dig @10.100.0.105 -x 128.171.133.22 +short ftp.techblue.net.
Task 2 Solution: Update the record in the VPN view
Navigate to the VPN view, locate the record for ftp.techblue.net, and change its IP address to 10.100.0.99.
-
In Grid Manager, go to Data Management → DNS → Zones.
-
Click the VPN view from the list of views.
-
Click the authoritative zone techblue.net.
-
Scroll down to the record for ftp, highlight it, and click Edit.
-
Update its IP address to 10.100.0.99. Click Save & Close.
Task 3 Solution: Update the record in the External view
Navigate to the External view, locate the record for ftp.techblue.net, and change its IP address to 128.171.133.99.
-
In the Grid Manager, go to Data Management → DNS → Zones.
-
Because there are views configured, you will see the views External and VPN listed. If you see a list of zones instead, it means you are already inside one of the DNS views. Click the link DNS Home above the view name (beneath the Zones tab) to return to a list of all views.
-
Click on the External view.
-
Click on the authoritative zone techblue.net.
-
Scroll down to the record for ftp, highlight it, and click Edit.
-
Update its IP address to 128.171.133.99. Click Save & Close.
Task 4: Verifying DNS resolution after making changes
Verifying from testing-windows
-
Switch to the VM testing-windows and log in.
-
Launch a command prompt by clicking on the icon in the systems tray.
-
Use the
nslookupcommand to verify DNS lookup behavior. We look up the forward-mapping name and the IP address returned to check the reverse-mapping.C:\Users\training>nslookup ftp.techblue.net. Server: ibns1.techblue.net Address: 10.100.0.105 Name: ftp.techblue.net Address: 10.100.0.99 C:\Users\training>nslookup 10.100.0.99 Server: ibns1.techblue.net Address: 10.100.0.105 Name: ftp.techblue.net Address: 10.100.0.99 C:\Users\training>
Verifying from jump-desktop
-
Switch to the VM jump-desktop and log in.
-
Launch a Terminal Emulator by clicking on the icon in the systems tray.
-
Use the
digcommand to verify DNS lookup behavior. Again, we verify both the forward and reverse mappings.$ dig @10.100.0.105 ftp.techblue.net. +short 128.171.133.99 $ dig @10.100.0.105 -x 128.171.133.99 +short ftp.techblue.net.
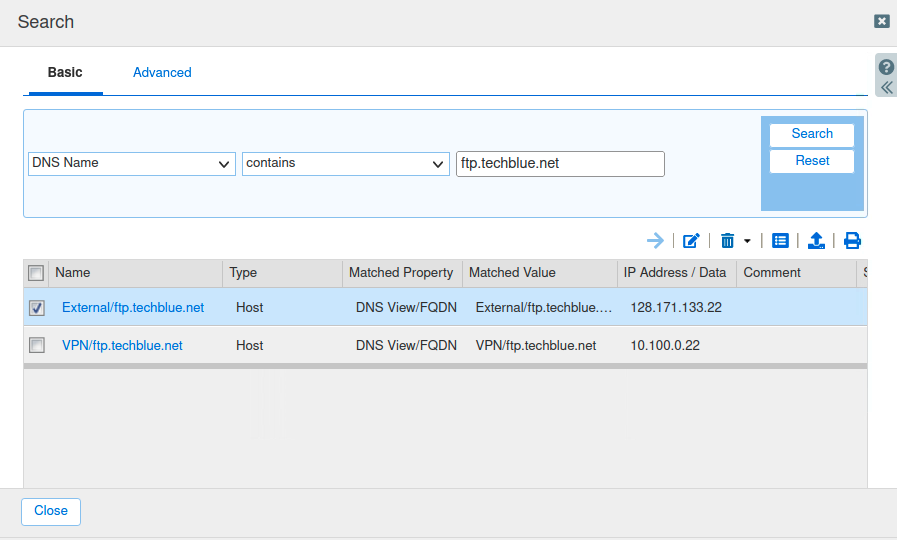
Alternative Method Solution: Managing with Global Search
A faster way to update records is to search for them using the Global Search feature and edit them in-line.
-
In the Grid Manager, click the Search icon near the upper-right corner.
-
This launches the Search dialog.
-
Perform a basic search for DNS Name contains ftp.techblue.net. Click Search.
-
Select the search results one entry at a time and Edit.