Scenario
You have been assigned multiple verification tasks to ensure the NIOS Grid is functioning as expected:
-
Service Status Check: Users have reported trouble receiving DHCP or DNS services from the grid member ibns2.techblue.net. Please verify that both services are running on this NIOS member.
-
NTP Configuration: The security and compliance team has requested that you verify the NIOS Grid and all Grid Members are configured to synchronize time with the company time server, 10.35.22.20. Please verify the current NTP configuration on the Grid.
-
Backup Configuration: The systems team has requested that you verify all NIOS Grid configuration is being backed up on a regular schedule to the remote server 10.100.0.11. Please verify every Grid Member is backing up its configuration and data.
-
Disaster Recovery Readiness: In preparation for a disaster recovery (DR) exercise, you have been assigned the task to verify that the NIOS Grid is configured to function out of the site Secondary Data Center. Please verify this configuration in the GM.
-
Status Monitoring: Your team would like to be able to put up a near real-time display of the DHCP service status on a screen. You know that both Grid Members ibns1 and ibns2 are running DHCP. Please create a Status Dashboard in NIOS that displays DHCP service and system information for both members.
Estimate Completion Time
-
60 to 70 minutes
Credentials
|
Description |
Username |
Password |
URL or IP |
|---|---|---|---|
|
Grid Manager UI |
ops |
infoblox |
https://10.100.0.100/ |
Requirements
-
Read-only access to Grid
Learning Content
Lab Initiation
Access jump-desktop
Once the lab is deployed, you can access the virtual machines required for this activity. To begin, select VM List from the navigation bar at the top, locate jump-desktop, and click the green play icon to open its console. Log in to the Linux UI.

Username: training
Password: infoblox
Initiate lab
To initiate the lab, double-click the Launch Lab icon on the Desktop.

Choose the lab number from the list and click OK.

After clicking OK, you will see a pop-up message with a brief description of the lab task. If the description looks correct, click Yes to continue lab initiation.

Lab initiation will take a couple of minutes to finish.
Once complete, you will see another pop-up message with the login credentials and the URL for the Grid Manager’s User Interface. Note that the credentials may differ from those from prior labs.

Tasks
Task 1: Verifying service status in GM
Login to the GM web interface and examine the service status of the member ibns2.techblue.net visually.
Task 2: Verifying service status in syslog
Use syslog to further verify both services are running. You may access syslog in the GM web interface for ibns2.techblue.net and use the display filter to only show syslog messages from DNS or DHCP.
Task 3: Verifying NTP configuration in GM
From the GM web interface and verify the Grid NTP configuration is set to synchronize with the time server 10.35.22.20
Task 4: Verifying member NTP configurations
Use the GM web interface to verify the NTP configuration for each Grid Member (ibgm, ibgmc, ibns1, ibns2, and ibrep). Ensure every member is configured identically to use the same time synchronization source.
Task 5: Verifying Grid backup configuration
From the GM web interface and verify the Grid configuration and data are being regularly backed up to the remote server 10.100.0.11.
Task 6: Verifying member backup configurations
From the GM web interface and verify that each Grid Member is on the same backup schedule, sending backups to the same remote server 10.100.0.11.
Task 7: Locating all members in the secondary site
From the GM web interface, using display filters or Smart Folder, locate all Grid Members that are in the Secondary Data Center.
Task 8: Verifying candidate configuration and status
Verify at least one member located at the Secondary Data Center is configured as the Grid Master Candidate (GMC), and that it is synchronized to the Grid.
Task 9: Creating a Status Dashboard and adding contents
From the GM web interface. Create a new Status Dashboard named DHCP Watcher. In the new dashboard, add the content DHCP Statistics and Member Status for both members ibns1 and ibns2. To receive near real-time updates be sure to enable auto-refresh. The result should have four (4) widgets displayed on the screen, clearly showing the DHCP service statistics (such as number of requests) and System Status (such as CPU and memory usage).
Solutions
Task 1 Solution: Verifying service status in GM
Login to the GM web interface and examine the service status of the member ibns2.techblue.net visually.
-
Login to NIOS GM web interface
-
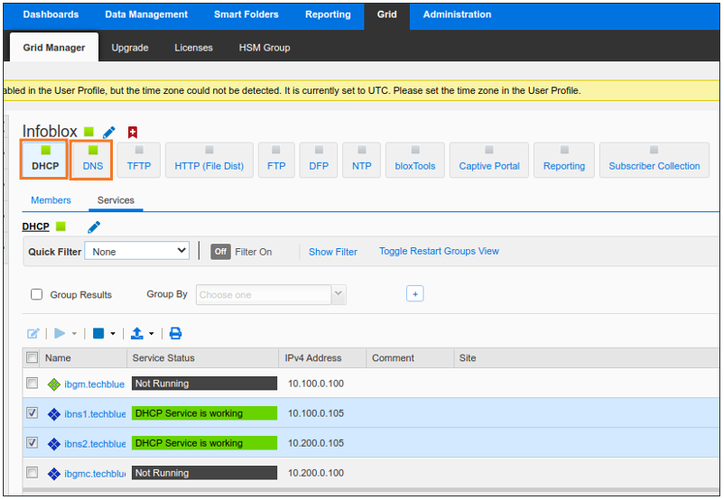
Navigate to Grid → Grid Manager → Services

-
Verify DNS and DHCP services are running for ibns2.techblue.net
Alternatively, you may find the same information in the web interface this way, one service at a time:
-
Login to NIOS GM web interface
-
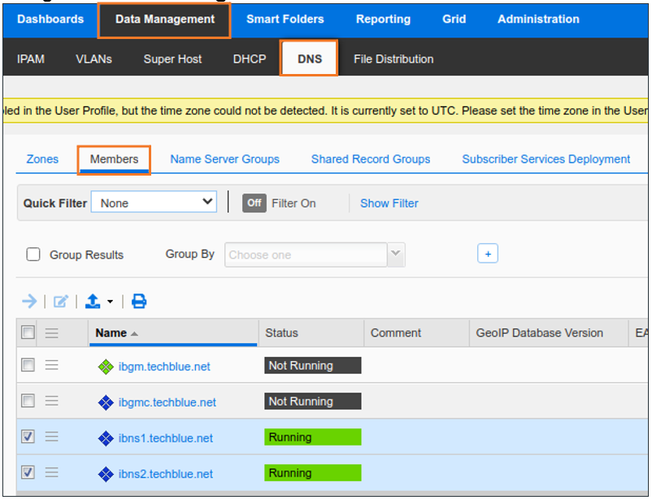
Navigate to Data Management → DNS → Members
-
Verify DNS service is running for ibns2.techblue.net
-
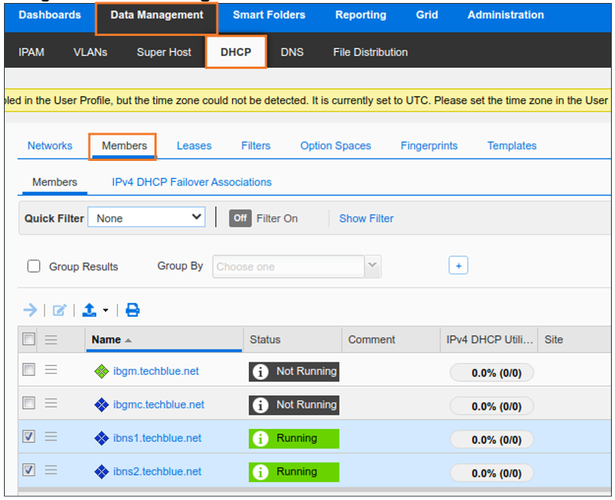
Navigate to Data Management → DHCP → Members
-
Verify DHCP service is running for ibns2.techblue.net
Task 2 Solution: Verifying service status in syslog
Use syslog to further verify both services are running. You may access syslog in the GM web interface for ibns2.techblue.net.
-
Login to NIOS GM web interface
-
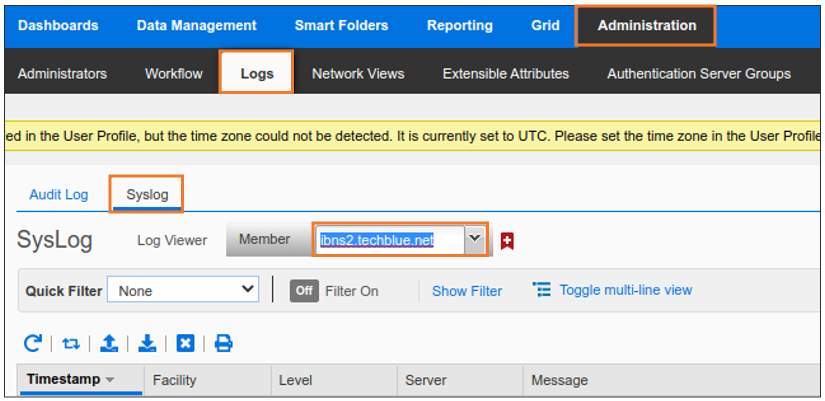
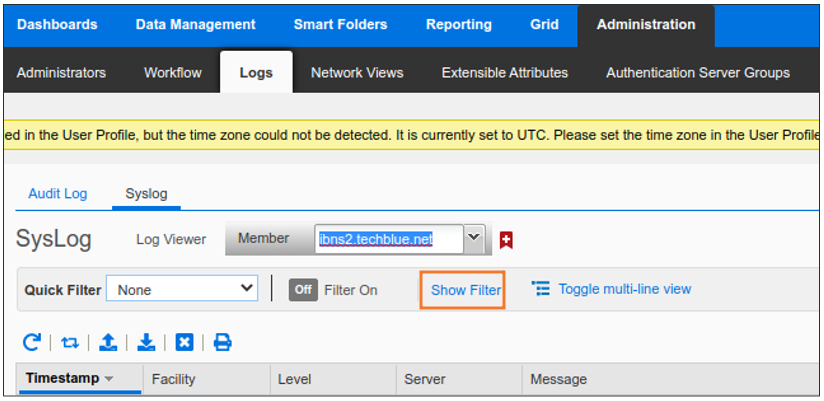
Navigate to Administration → Logs → Syslog
-
Select ibns2.techblue.net from the drop-down menu near the top of the screen
-
Click Show Filter
-
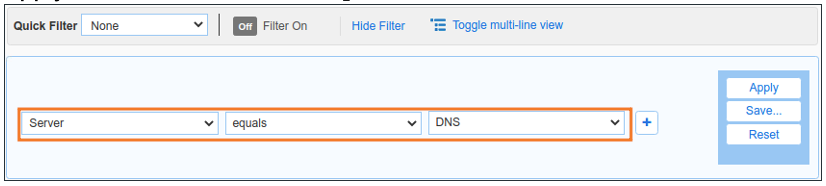
Apply filter criteria Server equals DNS
-
Verify there are recent DNS log messages
-
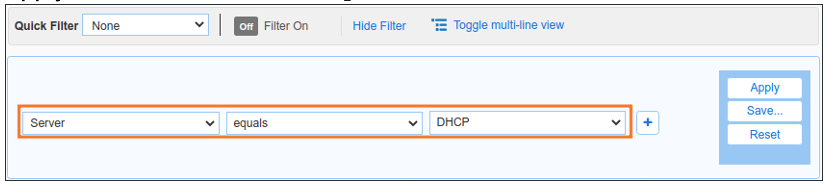
Apply filter criteria Server equals DHCP
-
Verify there are recent DHCP log messages
Task 3 Solution: Verifying NTP configuration in GM
Login to the GM web interface and verify the Grid NTP configuration is set to synchronize with the time server 10.35.22.20.
-
Login to NIOS GM web interface
-
Navigate to Grid → Grid Manager → Members
-
From the Toolbar, click the NTP dropdown and choose NTP Grid Config.
-
Verify that the GM is synchronizing with 10.35.22.20.
Task 4 Solution: Verifying member NTP configurations
Use the GM web interface to verify the NTP configuration for each Grid Member (ibgm, ibgmc, ibns1, ibns2, and ibrep). Ensure every member is configured identically to use the same time synchronization source.
The members, by default, synchronize their clocks with the GM unless specifically configured otherwise. We can double check this from the GUI and verify the NTP configuration for each Grid Member (ibgm, ibgmc, ibns1, ibns2, and ibrep).
-
Login to NIOS GM web interface
-
Navigate to Grid → Grid Manager → Members
-
Choose a member (example shows ibns1.techblue.net) by checking the box to the left of the member name.
-
From the Toolbar, click the NTP dropdown and choose NTP Member Config.
-
Check the NTP Synchronization configuration
-
Repeat for other members.
Task 5 Solution: Verifying Grid backup configuration
Login to the GM web interface and examine the service status of the member ibns2.techblue.net visually.
-
Login to NIOS GM web interface
-
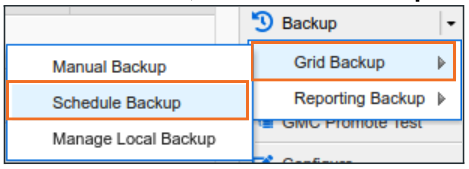
Navigate to Grid → Grid Manager
-
From the Toolbar, choose Grid Backup → Schedule Backup
If backups have been configured to a remote server, the operation should show the backup destination and protocol used for file transfer. Here, backups have not been configured. We can double-check by switching between the different protocols available for file transfer out of NIOS and check whether the configuration is present for TFTP, FTP or SCP. Screenshots below show configuration for each of the 3 supported protocols:
-
TFTP
-
FTP
-
SCP
Task 6 Solution: Verifying member backup configurations
Members do not have the ability to back up their databases individually. The GM holds the Grid Database, which is comprised of all member databases and configurations. One NIOS Grid, one backup file.
Task 7 Solution: Locating all members in the secondary site
“Primary/Secondary Data Center” is not a default attribute in NIOS, so it is safe to assume that this information is stored as an extensible attribute value. There are a couple of ways to find which Extensible attribute of the Grid Member holds this value.
Method 1:
-
Login to NIOS GM web interface
-
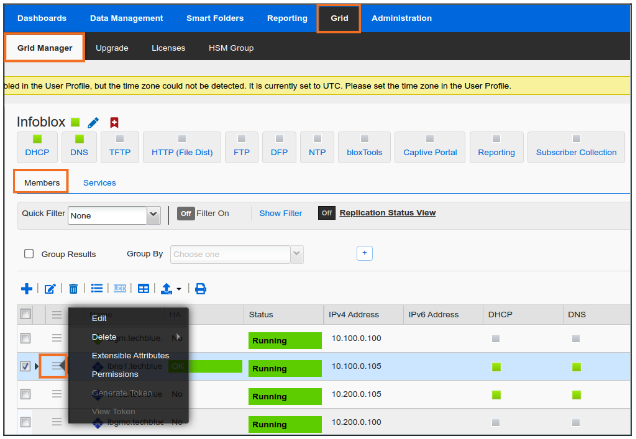
Navigate to Grid → Grid Manager → Members
-
Edit any member by clicking the hamburger icon to the left of member name
-
In the Grid Member Properties Editor window, Click Extensible Attributes
-
Here we see the Extensible Attribute field Site holds information about Data Centers
-
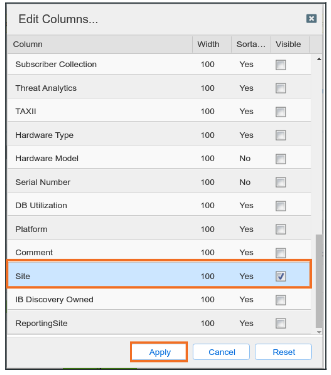
Navigate to Grid → Grid Manager → Members again and Edit Columns
-
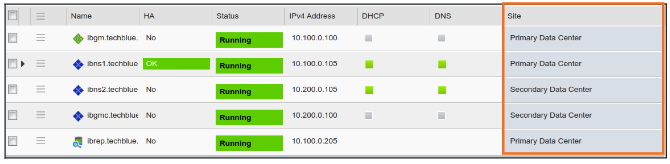
Scroll down to find the Site Column and check the box to make it Visible
-
Click Apply to see Site attribute value associated with all the members
Method 2:
-
Login to NIOS GM web interface
-
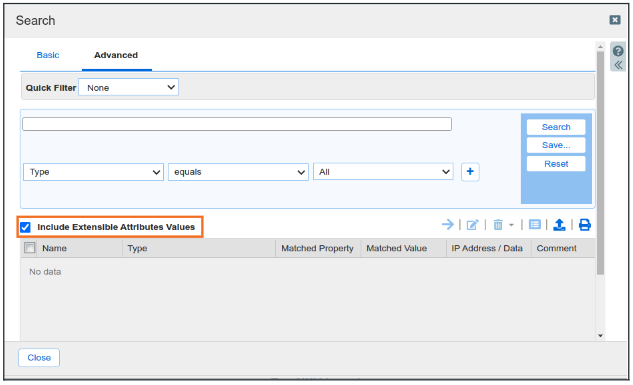
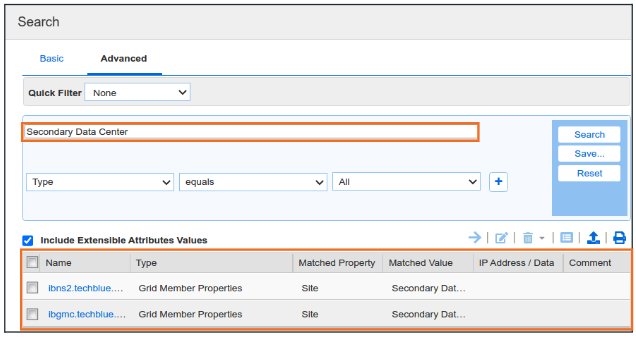
Navigate to Global Search → Advanced
-
Check the box to Include results from Extensible Attribute values
-
In the search box, provide search string Secondary Data Center and click Search
-
Results display all members that have this value in their Extensible Attribute fields
Task 8 Solution: Verifying candidate configuration and status
In the GUI, GMC is identifiable by an icon with two white and two green diamonds.
-
Login to NIOS GM web interface
-
Navigate to Grid → Grid Manager → Members
-
ibgmctechblue.net is the GMC
-
To confirm, select the member by checking the box to the left of member name and click Edit
-
We can see the box Master Candidate is checked
Task 9 Solution: Creating a Status Dashboard and adding contents
Login to the GM web interface and examine the service status of the member ibns2.techblue.net visually.
-
Login to NIOS GM web interface
-
Navigate to Dashboard → Status
-
Click on the dropdown next to the gear icon and select Add Dashboard
-
Name the Dashboard DHCP Watcher and click Save and Close
-
A new blank Dashboard is created
-
Click on the dropdown button next to the Dashboard name and choose Add Content
-
From the content list, add Member Status and DHCP Statistics by dragging them into the Dashboard or by clicking the +
-
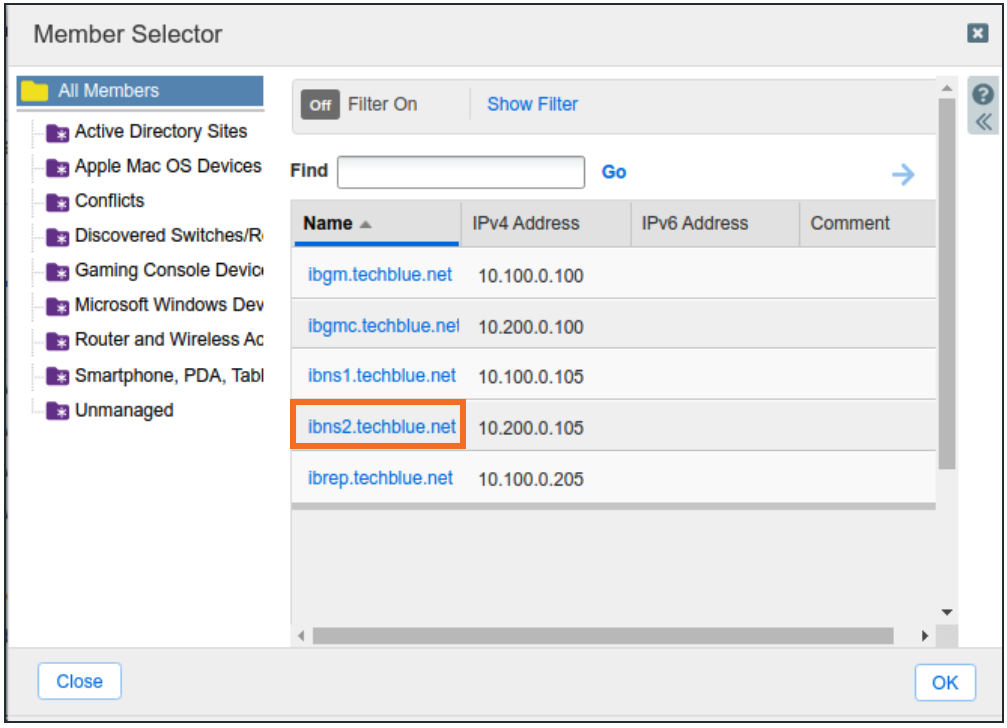
The Widget will default to displaying GM information. Change the member by clicking on Select Member
-
Choose ibns2.techblue.net from the list
-
If the configure option is not available, click on the gear icon at the top right of the widget
-
Set Auto Refresh Period to 60 seconds and check the box
-
Repeat the steps for DHCP Statistics
-
Add the same widgets again for ibns1.techblue.net
-
The resulting Dashboard should look like the below image (numbers will vary)