Scenario
Due to a recent incident, your team decided to increase the frequency of the NIOS Grid backup. Your team has acquired a new server for this purpose to store all the hourly backup files. Please configure the Grid to backup every hour and verify the backup files are accessible on the remote server.
Estimate Completion Time
-
10 to 15 minutes
Credentials
|
Description |
Username |
Password |
URL or IP |
|---|---|---|---|
|
Grid Manager UI |
admin |
infoblox |
Requirements
-
Administrative access to the Grid
Learning Content
Lab Initiation
Access jump-desktop
Once the lab is deployed, you can access the virtual machines required for this activity. To begin, select VM List from the navigation bar at the top, locate jump-desktop, and click the green play icon to open its console. Log in to the Linux UI.

Username: training
Password: infoblox
Initiate lab
To initiate the lab, double-click the Launch Lab icon on the Desktop.

Choose the lab number from the list and click OK.

After clicking OK, you will see a pop-up message with a brief description of the lab task. If the description looks correct, click Yes to continue lab initiation.

Lab initiation will take a couple of minutes to finish.
Once complete, you will see another pop-up message with the login credentials and the URL for the Grid Manager’s User Interface. Note that the credentials may differ from those from prior labs.

Tasks
Task 1: Scheduling backups
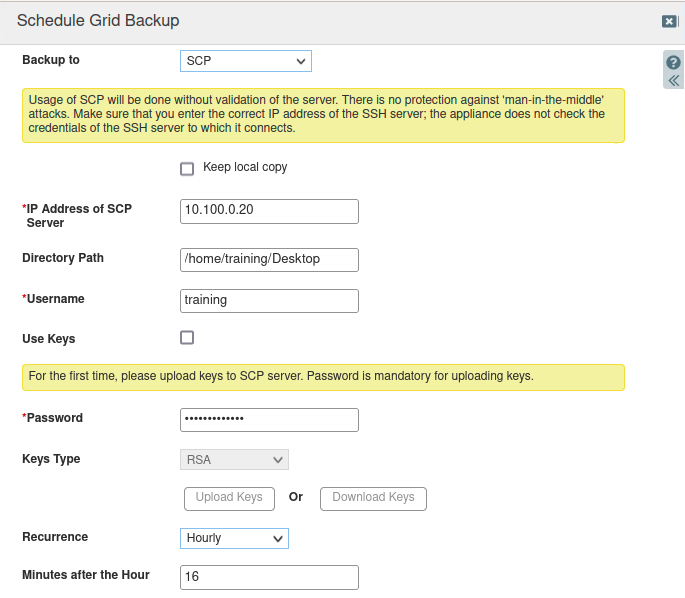
Login to the GM interface. Use the information provided in Table 2504-1 and schedule the Grid to perform an hourly backup.
Table 2504-1
|
Remote Server |
Protocol |
Path |
Username |
Password |
|---|---|---|---|---|
|
10.100.0.20 |
SCP |
/home/training/Documents |
training |
infoblox |
To see the backup file appear sooner, schedule the hourly backup time to 5 minutes after the current time. For example, if the current time is UTC 16:10, set the backup to occur at 15 minutes after the hour.
Task 2: Verifying backup in logs
On the Grid, observe logs to ensure the backup to remote server support-server is successful.
Task 3: Verifying on the remote server
Locate the backup file on the remote server support-server.
Solutions
Task 1 Solution: Scheduling backups
Login to the GM web interface and configure scheduled grid backups from the toolbar option.
-
Navigate to Grid → Grid Manager → Members.
-
From the Toolbar, select Backup → Grid Backup → Schedule Backup.
-
Configure the backup according to the information provided in Table 2504-1.
-
Set the Recurrence to Hourly. Choose a time that is 4 to 5 minutes after the current time, you can observe the backup occurring sooner.
-
Click Save & Close and accept the warning about SCP connection validation.
Task 2 Solution: Verifying backup in logs
-
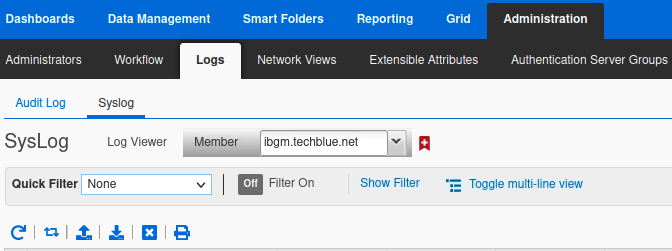
Navigate to Administration → Logs → Syslog.
-
In the Log Viewer selection, for Member, choose the GM (ibgm.techblue.net) from the drop-down list.
-
Whether the backup was successful or not, you will see a log entry. In the example screenshot below, we see the first entry showing the backup was successful along with the filename; in the third entry, we see that the backup failed, along with the reason why it failed.

You need to wait a few minutes for the scheduled backup to happen. While you wait, you may use the Auto-Refresh icon (second from the left, next to Refresh) to help you keep watch. When clicked, it will automatically refresh the logs every 2 seconds, displaying the latest entry on top.
Task 3 Solution: Verifying on the remote server
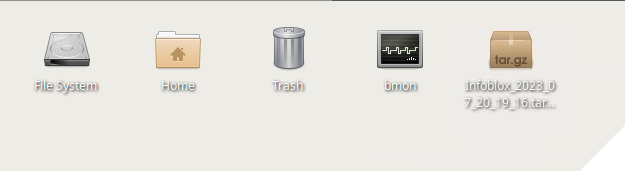
After you have verified in logs that the backup was successful, locate the actual backup file on the remote server.
-
Switch to the VM support-server.
-
Login using the credentials provided in Table 2504-1.
-
You should be able to see the backup file(s) on the desktop after you login.