Scenario
One of the Grid members has recently been added an IPv6 interface. Please verify that the DHCPv6 service has started on that Grid member.
Estimate Completion Time
-
5 to 10 minutes
Credentials
|
Description |
Username |
Password |
URL or IP |
|---|---|---|---|
|
Grid Manager UI |
admin |
infoblox |
Requirements
-
Administrative DHCP access to the Grid
Learning Content
Lab Initiation
Access jump-desktop
Once the lab is deployed, you can access the virtual machines required for this activity. To begin, select VM List from the navigation bar at the top, locate jump-desktop, and click the green play icon to open its console. Log in to the Linux UI.

Username: training
Password: infoblox
Initiate lab
To initiate the lab, double-click the Launch Lab icon on the Desktop.

Choose the lab number from the list and click OK.

After clicking OK, you will see a pop-up message with a brief description of the lab task. If the description looks correct, click Yes to continue lab initiation.

Lab initiation will take a couple of minutes to finish.
Once complete, you will see another pop-up message with the login credentials and the URL for the Grid Manager’s User Interface. Note that the credentials may differ from those from prior labs.

Tasks
To complete this lab, you need to perform the following tasks.
-
Verifying IPv6 interface on the member
-
Starting the DHCPv6 service
Task 1: Verifying the IPv6 interface on the member
Login to the GM user interface and verify that the member ibns2.techblue.net has been properly configured with the IPv6 address fd10:200::105.
Task 2: Starting the DHCPv6 service
Start the DHCPv6 address on the member ibns2.techblue.net.
Solutions
Task 1 Solution: Verifying the IPv6 interface on the member
Member settings of ibns2.techblue.net can help identify IPv6 configuration status.
-
Navigate to Grid → Grid Manager → Members.
-
Click the hamburger icon next to ibns2.techblue.net and choose Edit.
-
Select the Network tab from the left.
-
Check and make sure that IPv6 is available under Type of Network Connectivity.
-
Scroll down further to the section Ports and Addresses and check the IPv6 address assigned to LAN1.
-
Optionally, you can ping the IPv6 address from the jump-desktop to confirm reachability.
Task 2 Solution: Starting the DHCPv6 service
We can enable DHCP from the Services tab under Grid → Grid Manager
-
Navigate to Grid → Grid Manager
-
Click the DHCP menu item.
-
Check the box beside ibns2.techblue.net click the Edit button.
-
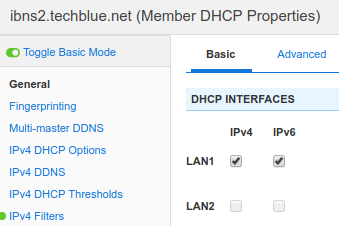
Select the General tab from the left.
-
Place a check mark in the box for IPv6 beside LAN1
-
Click Save & Close to save changes