Scenario
Infrastructure team has approved BGP-based anycast in the corporate network. Configure Infoblox DNS members, so multiple DNS members can be in an anycast group for increased DNS availability and redundancy.
Estimate Completion Time
-
25 to 30 minutes
Credentials
|
Description |
Username |
Password |
URL or IP |
|---|---|---|---|
|
Grid Manager UI |
admin |
infoblox |
Requirements
-
Administrative access to the Grid
Learning Content
Lab Initiation
Access jump-desktop
Once the lab is deployed, you can access the virtual machines required for this activity. To begin, select VM List from the navigation bar at the top, locate jump-desktop, and click the green play icon to open its console. Log in to the Linux UI.

Username: training
Password: infoblox
Initiate lab
To initiate the lab, double-click the Launch Lab icon on the Desktop.

Choose the lab number from the list and click OK.

After clicking OK, you will see a pop-up message with a brief description of the lab task. If the description looks correct, click Yes to continue lab initiation.

Lab initiation will take a couple of minutes to finish.
Once complete, you will see another pop-up message with the login credentials and the URL for the Grid Manager’s User Interface. Note that the credentials may differ from those from prior labs.

Tasks
Task 1: Configuring members for IPv4 DNS anycast
Configure members ibns1 and ibns2 with loopback address and BGP configuration for IPv4 using the following values:
-
Loopback Interface Address: 10.24.7.53
-
BGP Config:
-
ASN: 65400
-
Neighbor Router:
-
ibns1 → 10.100.0.1
-
ibns2 → 10.200.0.1
-
-
Remote ASN: 65247
-
Task 2: Configuring DNS services on members to listen on additional IPv4 addresses
Reconfigure the DNS services on members ibns1 and ibns2 to listen on the new anycast address 10.24.7.53.
Task 3: Verifying anycast address is reachable
Verify the anycast address 10.24.7.53 is reachable on the network. You may use the ping command on the jump-desktop.
Task 4: Verifying DNS service on anycast address
Use the dig utility on the jump-desktop to verify that the IPv4 anycast address is providing DNS services.
Task 5: Verifying redundancy on anycast address
Disable the DNS service on member ibns1 to simulate a systems failure. Then query the IPv4 anycast address to resolve a name. If anycast is working as expected, the same IPv4 address will still respond even when a member if offline.
You may use this dig query for both Tasks 4 and 5.
dig @10.24.7.53 test.techblue.net.
Solutions
Task 1 Solution : Configuring members for IPv4 DNS anycast
Repeat the following steps for both members ibns1 and ibns2.
-
Navigate to Grid → Grid Manager → Members.
-
Highlight the member (ibns1.techblue.net or ibns2.techblue.net) and choose Edit.
-
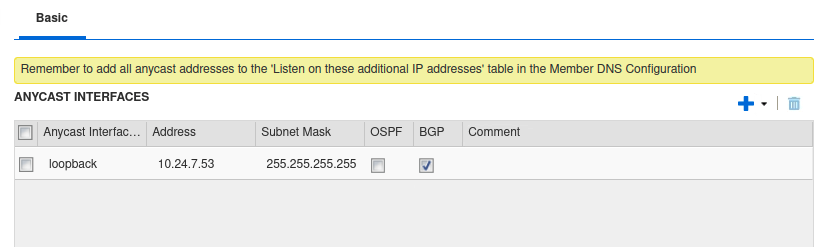
Select the section for Anycast
-
Under the Anycast Interfaces section, click the Add dropdown menu and select IPv4 Address
-
In the Address field, enter 10.24.7.53, and check the checkbox for BGP
-
Don’t save yet, scroll down to the BGP Configuration section.
-
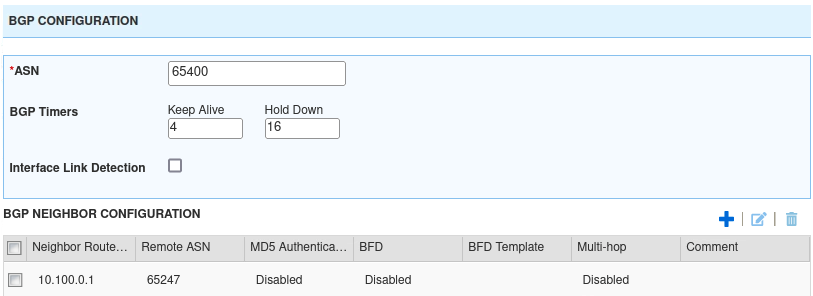
For the ASN, enter 65400.
-
In the BGP Neighbor Configuration section below, click the Add button.
-
In the field for Neighbor Router, enter the appropriate router IP for the member being configured:
-
ibns1 → 10.100.0.1
-
ibns2 → 10.200.0.1
-
-
In the Remote ASN field, enter 65247.
-
Click the Add button to add this entry.
-
Click Save & Close
-
A Warning message appears about changing network settings. Read and click Yes.
-
This member will be restarting. Repeat the same steps on the other member using the corresponding Neighbor router IP.
Task 2 Solution: Configuring DNS services on members to listen on additional IPv4 addresses
Perform the following steps on to reconfigure the DNS services on members ibns1 and ibns2.
-
Navigate to Grid → Grid Manager → Services → DNS.
-
Place a check mark in the box next to the member (ibns1.techblue.net or ibns2.techblue.net) and click the Edit button.
-
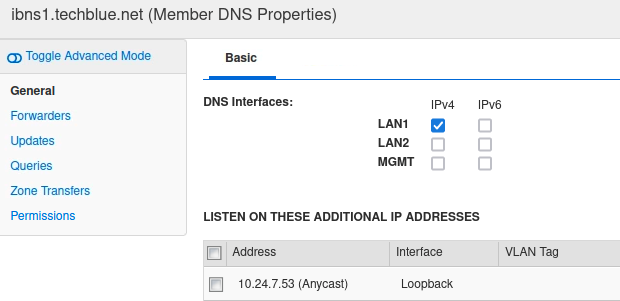
The Member DNS Properties dialog window appears.
-
Under the General tab (displayed by default), find the section Listen on these additional IP addresses. Click Add.
-
A new entry appears with a drop-down menu for Address selection. Choose 10.24.7.53 (Anycast).
-
Click Save & Close
-
Repeat the same steps on the other member.
-
Restart service after both members have been configured.
-
Wait until all members are back to the Running (green) state before starting the next task.
Task 3 Solution: Verifying anycast address is reachable
-
Wait until both ibns1 and ibns2 have finished restarting.
-
On the jump-desktop, open a Terminal window. Enter the command
ping 10.24.7.53.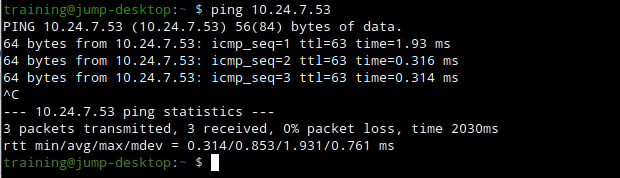
When dealing with DNS anycast, it is important to test each component separately. Remember that the DNS service is built on top of the anycast service. Test that anycast is working with ping. Then test DNS with dig.
Task 4 Solution : Verifying DNS service on anycast address
-
On the jump-desktop, open a Terminal window. Enter the command
dig @10.24.7.53 test1.techblue.net. -
What name we look up is not important, nor is the response. What is important here is that we see a DNS response from this IP address.

Task 5: Verifying redundancy on anycast address
Disable the DNS service on member ibns1 to simulate a systems failure. Then query the IPv4 anycast address to resolve a name. If anycast is working as expected, the same IPv4 address will still respond even when a member if offline.
Starting a contiguous ping to the anycast address
-
Before disabling the DNS service, start a contiguous
pingon jump-desktop to the anycast address 10.24.7.53 from a Terminal window. -
Keep this Terminal window open as you disable the DNS service. You can observe that the anycast address is available throughout the process.
Disabling the DNS service
-
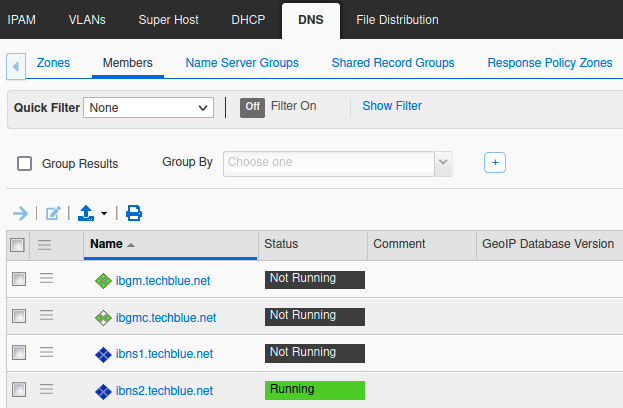
In the GM web interface, navigate to Data Management → DNS → Members.
-
Place a check in the box beside ibns1.techblue.net and click the Stop button in the Toolbar.
-
Click Yes to confirm the action.
-
Use the Refresh button in the bottom left of the window to update the display.
-
Wait for the Service Status for ibns1 to change to Not Running.
Verifying anycast functionality
-
Return to the Terminal window that has the contiguous
pingcommand running. -
You should see no packet loss to the IP address 10.24.7.53, and the address is still reachable even after one of the DNS members have been disabled.
Verifying DNS functionality
Repeat the dig lookup command from Task 4. You should receive the same results.
-
On the jump-desktop, open a Terminal window. Enter the command
dig @10.24.7.53 test1.techblue.net. -
What name we look up is not important, nor is the response. What is important here is that we still see a DNS response from this IP address, although one of the DNS members is now disabled.