Scenario
A new network container was added for the NAM area for ease of managing the supernet in the new geo location. Several tickets came in after this change was made, asking you to provision a new network, report on general network usage of a /24 subnet, and to provide details of a specific IP address usage. Please use the IPAM functions of Net Map and IP Map to complete these tasks.
Estimate Completion Time
-
10 to 15 minutes
Credentials
|
Description |
Username |
Password |
URL or IP |
|---|---|---|---|
|
Grid Manager UI |
admin |
infoblox |
Requirements
-
Administrative access to the Grid
Learning Content
Lab Initiation
Access jump-desktop
Once the lab is deployed, you can access the virtual machines required for this activity. To begin, select VM List from the navigation bar at the top, locate jump-desktop, and click the green play icon to open its console. Log in to the Linux UI.

Username: training
Password: infoblox
Initiate lab
To initiate the lab, double-click the Launch Lab icon on the Desktop.

Choose the lab number from the list and click OK.

After clicking OK, you will see a pop-up message with a brief description of the lab task. If the description looks correct, click Yes to continue lab initiation.

Lab initiation will take a couple of minutes to finish.
Once complete, you will see another pop-up message with the login credentials and the URL for the Grid Manager’s User Interface. Note that the credentials may differ from those from prior labs.

Tasks
Task 1: Using Net Map to allocate a new IPv4 network
Having a network container for the supernet 172.31.64.0/18 gives you the ability to use the Net Map function for network allocation. Please use this function to provision a IPv4 network of size /24.
Task 2: Using IP Map to determine which IP addresses are in use
Switching to IP Map for a more detailed view, examine the network 172.31.101.0/24. Note down which IP addresses are in use, and what they are being used for. This
Task 3: Using IP Map to provide details IP addresses
Using the IP Map view, find more information about the IP addresses 172.31.101.69 and 172.31.101.70.
Solutions
Task 1: Using Net Map to allocate a new IPv4 network
This task demonstrates how you can use the Net Map function to easily provision additional smaller networks. For this task, you are provisioning a /24 network within a /18 space.
-
In the GM web interface, navigate to Data Management → IPAM.
-
You should now see a list of all IPAM Networks.
-
Click on the 172.31.64.0/18 Network Container.
-
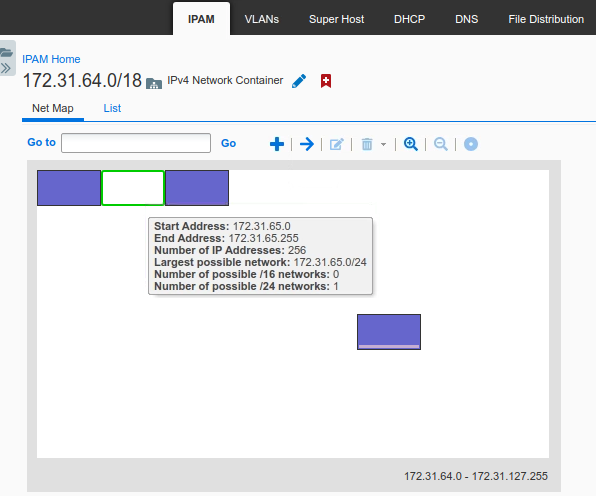
You should now see the Net Map view of the networks.
-
Click on the blank space between the two existing networks, the blank space should now have a green line around it. You may choose any blank space to your liking. For this example, we will choose the blank space nearest to the top left for the lowest-numbered addresses.
-
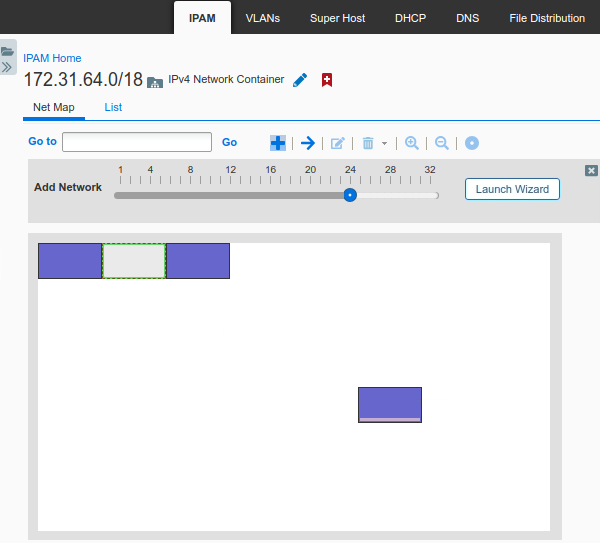
Click on the Add (+) button, notice the Add Network slider/size has automatically been set to /24.
-
Click on the Launch Wizard button to launch the Add Network Wizard.
-
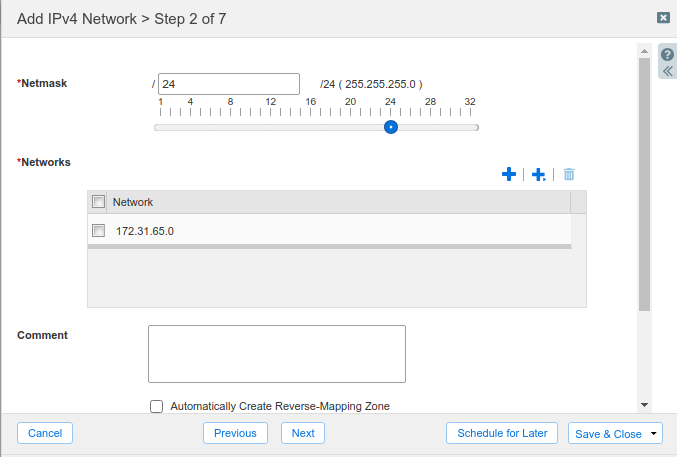
Select the options for Add Network and Manually, click Next.
-
Notice the Netmask and Network options have automatically been filled out.
-
You could now click next and configure this network for DHCP, but for this lab task just click Save & Close to create the IPv4 network.
-
The blank space in Net Map view will now be filled in with a blue leaf network.
-
Hover your mouse over the leaf network will display details about that leaf network.
Task 2: Using IP Map to determine which IP addresses are in use
Use the IP Map to determine which IP addresses are in use on the 172.31.101.0/24 network
-
In the GM web interface, navigate to Data Management→IPAM
-
If you are already inside of an IPAM network, click the IPAM Home link to return to the top level
-
Click the link for the 172.31.64.0/18 network container
-
Click on 'List'. Then select the network 172.31.101.0/24
-
Click on ‘IP Map’ for the 172.31.101.0/24 network.
-
In the IP Map view, the color of the squares corresponds to the color key on the right of the map, detailing the usage of the IP addresses in the network
Task 3: Using IP Map to provide details IP addresses
Find details about the IP address assigned to client testing-linux from IPAM.
-
Navigate to Data Management→IPAM
-
Click the link for the 172.31.64.0/18 network container.
-
Click on 'List'. Then select the network 172.31.101.0/24.
-
Click on ‘IP Map’ for the 172.31.101.0/24 network.
-
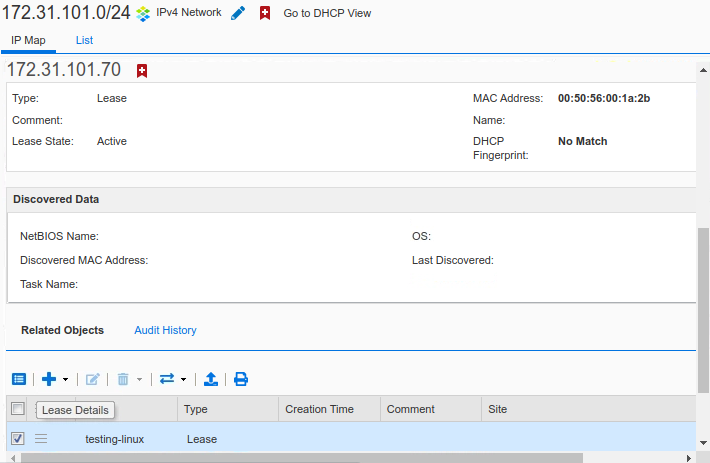
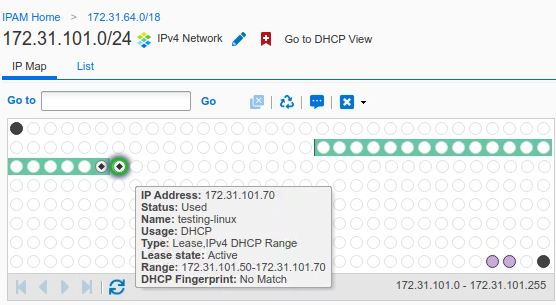
In the IP Map view, you can hover over an IP address to see more information. Below is the information for 172.31.101.70:
-
Click on the IP address and more information is available on the bottom of the screen (need to scroll down). Below is the example for 172.31.101.70.