Scenario
After provisioning the new network in one of your data center, you notice some clients that were not provisioned with your knowledge. Use the network discovery function in NIOS to help you discover what other devices may be on the network.
Estimate Completion Time
-
10 to 15 minutes
Credentials
|
Description |
Username |
Password |
URL or IP |
|---|---|---|---|
|
Grid Manager UI |
admin |
infoblox |
Requirements
-
Administrative access to the Grid
Learning Content
Lab Initiation
Access jump-desktop
Once the lab is deployed, you can access the virtual machines required for this activity. To begin, select VM List from the navigation bar at the top, locate jump-desktop, and click the green play icon to open its console. Log in to the Linux UI.

Username: training
Password: infoblox
Initiate lab
To initiate the lab, double-click the Launch Lab icon on the Desktop.

Choose the lab number from the list and click OK.

After clicking OK, you will see a pop-up message with a brief description of the lab task. If the description looks correct, click Yes to continue lab initiation.

Lab initiation will take a couple of minutes to finish.
Once complete, you will see another pop-up message with the login credentials and the URL for the Grid Manager’s User Interface. Note that the credentials may differ from those from prior labs.

Tasks
Task 1: Performing a discovery on a network
Perform a discovery on the network 10.100.0.0/24.
Hint: the Grid member ibns1.techblue.net provides DHCP service to this network. It is the most ideal member to perform the network discovery.
Task 2: Checking discovery progress
Use the dashboard to monitor the discovery progress.
Task 3: Investigating potential conflicts
After a successful discovery, investigate a potential conflict on the IP address 10.100.0.20.
Solutions
Task 1 Solution: Performing a discovery on a network
-
In the GM web interface, navigate to Data Management → IPAM.
-
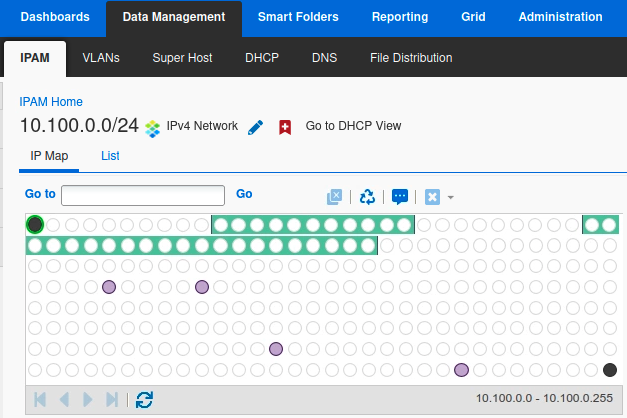
Go to the network 10.100.0.0/24, and select the IP Map view. You should see something similar to the screenshot below.
-
In the Toolbar, click Discovery → Discover Now.

-
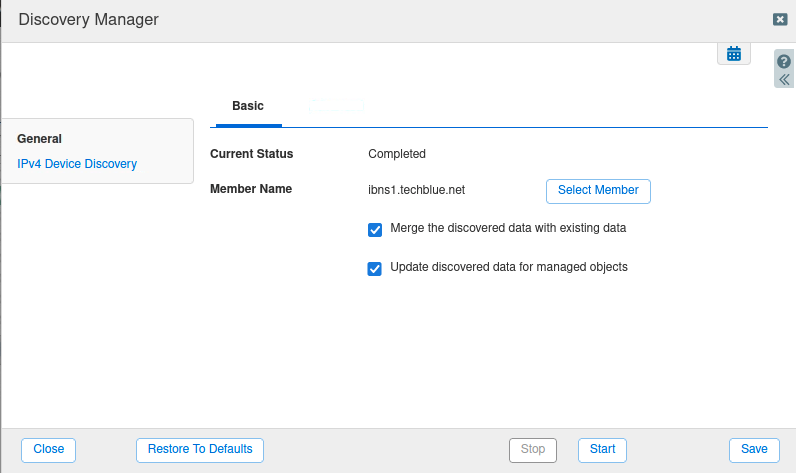
The Discovery Manager dialog appears.
-
In Member Name, change member by clicking on Select Member and choose ibns1.techblue.net.
-
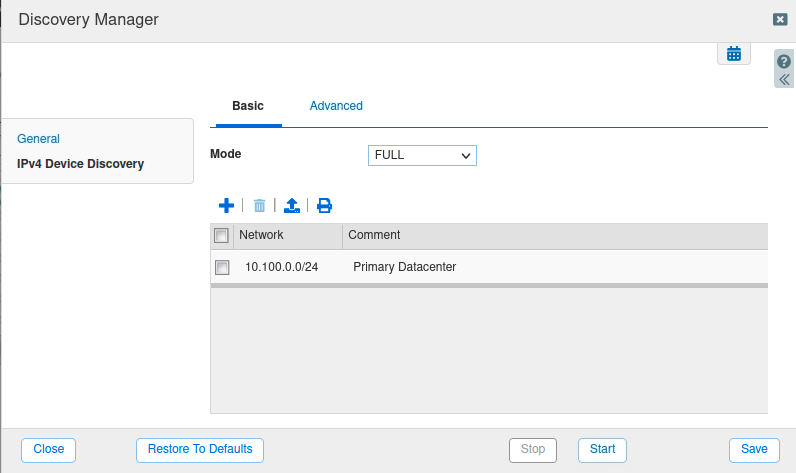
Click on the IPv4 Device Discovery tab and confirm the mode is FULL, and the network 10.100.0.0/24 is listed.
-
Click Save. Then click the Start button, this will perform a one-time discovery on the network.
-
You may click Close and the discovery will continue to run in the background.
Task 2 Solution: Checking discovery progress
-
To check on the status of the discovery, navigate to Dashboards → Status.
-
Find the Discovery Status widget. It displays the current discovery progress.

-
Wait for the discovery to be completed. This could take a few minutes.
Task 3 Solution: Investigating potential conflicts
-
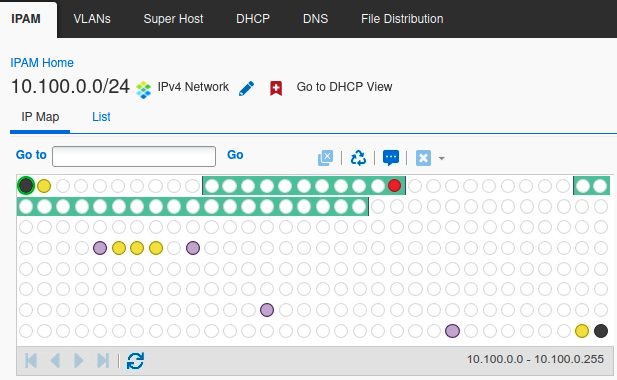
Navigate to Data Management → IPAM, to the network 10.100.0.0/24 → IP Map.
-
The IP Map is now updated with the results from the network discovery. You should see some yellow entries (unmanaged hosts), and one red entry (conflict).
-
Click on the red entry (conflict), the IP address 10.100.0.20. Additional information is displayed both when you hover over the entry, and at the bottom of the screen.
-
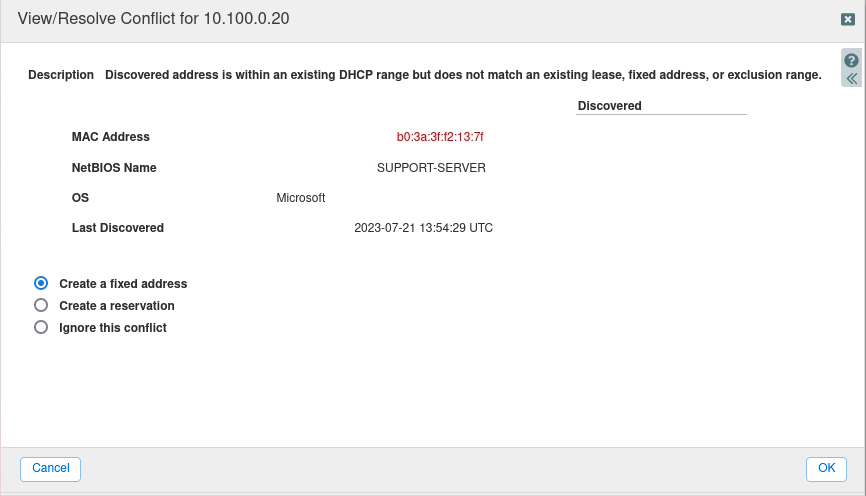
With the conflict entry highlighted, click Toolbar → Resolve Conflict.
-
The description reads: “Discovered address is within an existing DHCP range but does not match an existing lease, fixed address, or exclusion range.”
-
At this point you may choose one of the 3 resolutions:
-
Create a fixed address: If you chose this option, the IP address 10.100.0.20 will always be assigned to the MAC address b0:3a:3f:f2:13:7f.
-
Create a reservation: If you chose this option, the IP address 10.100.0.20 will be reserved and never assigned to anyone.
-
Ignore this conflict: You may need to investigate further before deciding what to do. If that is the case, choose this option.
-
The most likely option given the circumstances, would be Create a reservation. This will prevent a potential IP address conflict when the DHCP server hands out 10.100.0.20 to another device, while you investigate the root cause of why this MAC address b0:3a:3f:f2:13:7f is on this address. There are 2 possibilities: 1) it is configured statically/manually, or 2) it received this IP address from a different DHCP server. In the first case, you should still use Create a reservation, in addition to creating the appropriate DNS or Host information; in the second case, you need to locate the rogue DHCP server, so that all devices on this network receive DHCP leases only from the NIOS member.