Scenario
Recently, your IT department rolled out a new VPN solution, everyone is required to login to VPN when connecting. When using VPN, users are assigned addresses in the 172.31.101.0/24 network, and must connect to the internal or private IP addresses instead of the public IP addresses. For the time being, your team has decided to have your DNS members (ibns1 and ibns2) server both view, until you can acquire additional dedicated members. Please create a new DNS view for VPN users. Create appropriate authoritative zones in the new VPN view. Copy all the zone data from the existing view to the VPN view. Then, change some records in the new views to their private IP addresses.
Estimate Completion Time
25 to 35 minutes
Credentials
|
Description |
Username |
Password |
URL or IP |
|---|---|---|---|
|
Grid Manager UI |
admin |
infoblox |
Requirements
-
Administrative access to the Grid
-
Match-client list for the view created (who will receive the view)
-
Knowledge of which members will be assigned the DNS views and/or zones
Learning Content
Lab Initiation
Access jump-desktop
Once the lab is deployed, you can access the virtual machines required for this activity. To begin, select VM List from the navigation bar at the top, locate jump-desktop, and click the green play icon to open its console. Log in to the Linux UI.

Username: training
Password: infoblox
Initiate lab
To initiate the lab, double-click the Launch Lab icon on the Desktop.

Choose the lab number from the list and click OK.

After clicking OK, you will see a pop-up message with a brief description of the lab task. If the description looks correct, click Yes to continue lab initiation.

Lab initiation will take a couple of minutes to finish.
Once complete, you will see another pop-up message with the login credentials and the URL for the Grid Manager’s User Interface. Note that the credentials may differ from those from prior labs.

Tasks
You may use the VMs testing-linux or testing-windows as clients connected over VPN. You may use the VM jump-desktop to simulate other clients not on VPN.
|
FQDN |
Default View Answer |
VPN View Answer |
|---|---|---|
|
www.techblue.net |
128.171.133.11 |
10.100.0.11 |
|
ftp.techblue.net |
128.171.133.22 |
10.100.0.22 |
|
bar.techred.net |
128.171.133.33 |
10.100.0.33 |
Task 1: Verifying DNS resolution before change
Using the VM testing-linux or testing-windows, verify the current DNS resolution before making changes. You may query for the names listed in Table 2553-1 and verify they resolve to addresses listed under Default View Answer.
Hint: Make sure both forward-mapping and reverse-mapping resolutions work.
Task 2: Creating the VPN view
Create a new DNS view named VPN. Configure the view to match clients from the network 172.31.101.0/24.
Task 3: Creating authoritative zones
Create the appropriate authoritative zones in the new VPN view.
Task 4: Copying zone data
Instead of manually re-enter all DNS records, copy zone data from the default view to the VPN view.
Task 5: Updating DNS records in copied zone
Change records listed in Table 2553-1 to reflect the private IP addresses listed under VPN View Answer.
Task 6: Verifying DNS view ordering
Because your DNS members have more than 1 view, you need to verify order of DNS views on the members are correct.
Task 7: Verifying DNS resolution after change
Repeat the lookups from Task 1 to verify the new DNS resolution after making changes.
Solutions
Task 1 Solution: Verifying DNS resolution before change
Using the VM testing-linux or testing-windows, verify the current DNS resolution before making changes. You may query for the names listed in Table 2553-1 and verify they resolve to addresses listed under Default View Answer. You should also execute the same lookup queries from the VM jump-desktop to compare current behavior.
Verifying from testing-windows
-
Switch to the VM testing-windows and login.
-
Open the Tools folder on the Desktop and run the interface-static-nios.bat as an administrator.
-
This script configures a static IP address on the VM and sets ibns1 and ibns2 as the DNS servers.
-
-
Launch a command prompt by clicking on the icon in the systems tray.
-
Use the
nslookupcommand to verify DNS lookup behavior. We lookup the forward-mapping name, and lookup the IP address returned to check the reverse-mapping.C:\Users\training>nslookup www.techblue.net. Server: ibns1.techblue.net Address: 10.100.0.105 Name: www.techblue.net Address: 128.171.133.11 C:\Users\training>nslookup 128.171.133.11 Server: ibns1.techblue.net Address: 10.100.0.105 Name: www.techblue.net Address: 128.171.133.11 C:\Users\training> -
We can verify the answer(s) currently returned contain the public IP address(es) listed under the Default View Answer column.
Verifying from jump-desktop
-
Switch to the VM jump-desktop and login.
-
Launch a Terminal Emulator for command prompt by clicking on the icon in the systems tray.
-
Use the
digcommand to verify DNS lookup behavior. Again, we verify both the forward-mapping and the reverse-mapping.$ dig @10.100.0.105 www.techblue.net. +short 128.171.133.11 $ dig @10.100.0.105 -x 128.171.133.11 +short www.techblue.net. -
We can verify the answer(s) currently returned contain the public IP address(es) listed under the Default View Answer column.
Task 2 Solution: Creating a new DNS view
Create a new DNS view named VPN. Configure the view to match clients from the network 172.31.101.0/24.
-
Login to the GM interface. Navigate to Data Management → DNS.
-
From the Toolbar, click Add → DNS View. The Add DNS View dialog window appears.
-
Step 1 of 4, in the DNS View text field, enter
VPNfor the name of the view. Click Next. -
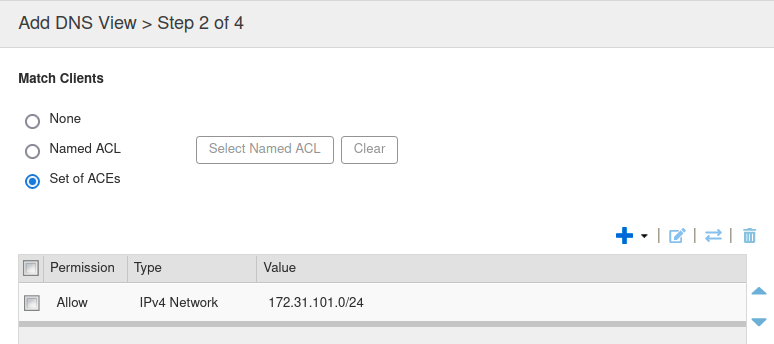
Step 2 of 4, for Match Clients, click the radio button Set of ACEs
-
Click Add (+) → IPv4 Network, the Add IPv4 Network section appears.
-
For the Address, enter 172.31.101.0.
-
Slide the Netmask bar to 24.
-
Click Add. The entry is added (see screenshot below).
-
Click Save & Close.
-
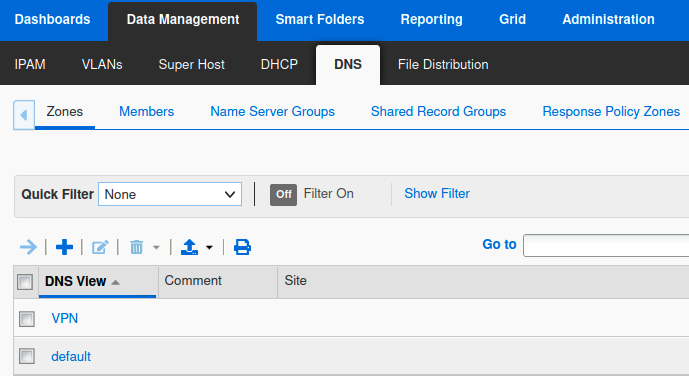
The display under Data Management → DNS → Zones is now updated to show the 2 DNS views: VPN and default.
-
You do not need to restart services yet. Even if you do restart now, there is no data in the new VPN view for you to test against.
Task 3 Solution: Creating authoritative zones
You need to review the list of authoritative zones in the default view and decide which ones you need to re-create in the VPN view.
Reviewing zones in the default view
-
Login to the GM web interface. Navigate to Data Management → DNS → Zones.
-
Click on the default view. We can see a list of currently configured zones. Note the Authoritative zones, techblue.net, techred.net, 10.in-addr.arpa, and 133.171.128.in-addr.arpa.
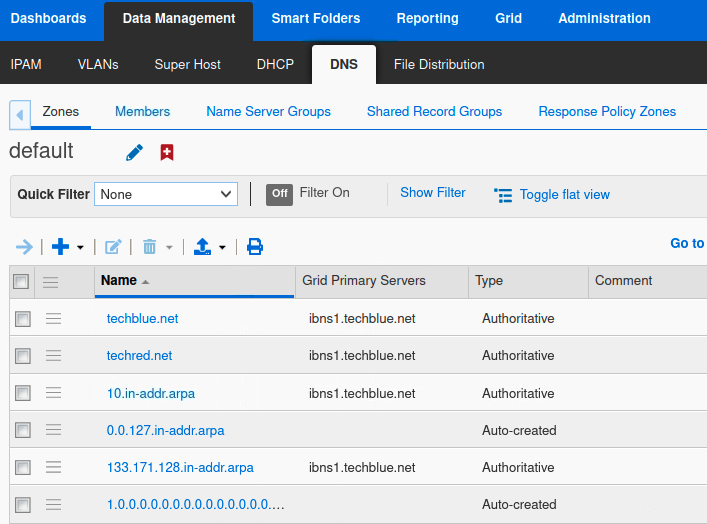
Since the new VPN view is intended for clients with private or internal IP addresses (10.x.x.x), we can conclude that we do not need to copy the external network space reverse zone (133.171.128.in-addr.arpa) to the new view. This is something you should confirm with your network architecture team.
Creating a zone in the VPN view
Use the steps below to create the 3 authoritative zones techblue.net, techred.net , and 10.in-addr.arpa:
-
Login to the GM web interface. Navigate to Data Management → DNS → Zones.
-
If you are already in the default view, click the DNS Home link on the upper left corner (above the name of the view) to return to the list of all view.
-
Click on the VPN view. There are currently no authoritative zones.
-
Click Add (+) → Authoritative Zone, this brings up the Add Authoritative Zone Wizard.
-
Step 1 of 6, select the zone type (forward-mapping for techblue.net and techred.net. , IPv4 reverse-mapping for 10.in-addr.arpa), click Next.
-
Step 2 of 6, enter the name of the zone (for techblue.net and techred.net ), or the IPv4 network 10.0.0.0/8 for the reverse-mapping zone. Click Next.
-
Step 3 of 6, leave the selection at Use this Name Server Group: Default NS.
-
Click Save & Close. This will map the zone to both members ibns1 and ibns2.
Task 4 Solution: Copying zone data
Instead of manually re-enter all DNS records, copy zone data from the default view to the VPN view.
Below are steps you need to take to copy all records in the zone from the default view to the zone in the VPN view. You need to repeat this for the zones techblue.net and techred.net.
You only need to do copy data for the zones techblue.net and techred.net, not for the reverse-mapping zone 10.in-addr.arpa. This is because NIOS will automatically generate reverse-mapping data from the forward-mapping data for you. You can verify this by clicking on the reverse-mapping zone before you copy any records. It should already have some records automatically populated based on system-generated information.
Copying data to the VPN view
Use the steps below to copy data from the default view to the VPN view.
-
In the GM web interface, navigate to Data Management → DNS → Zones.
-
If you are already in the VPN view, click the DNS Home link on the upper left corner (above the name of the view) to return to the list of all view.
-
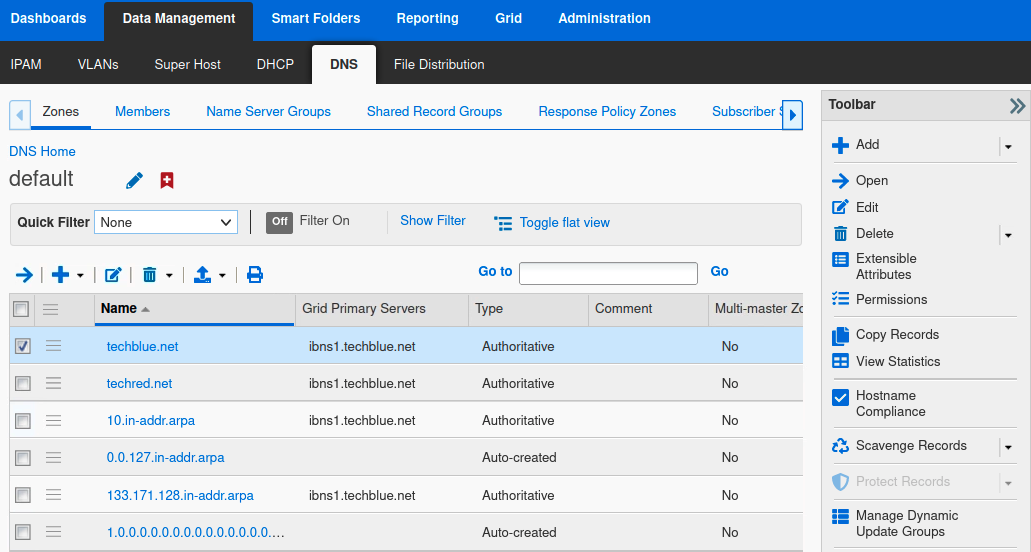
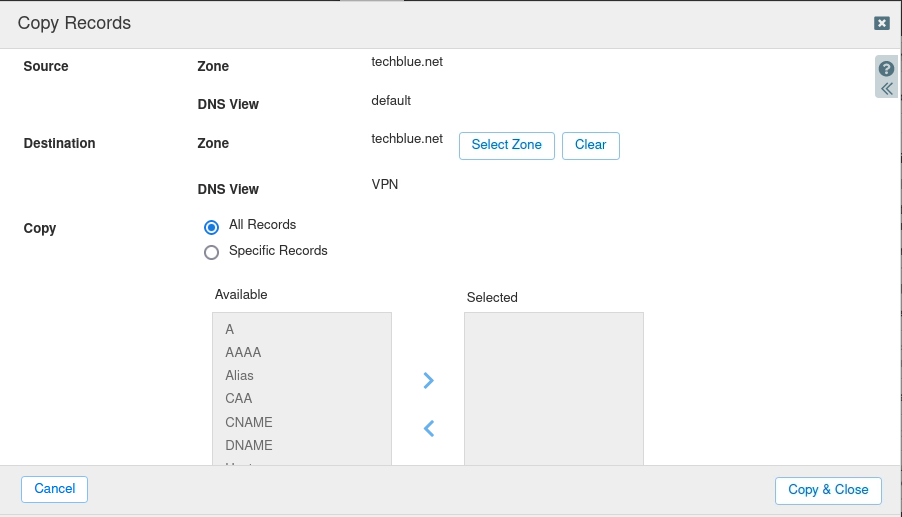
Select the zone to copy data from. Click Toolbar → Copy Records. Example below shows the zone techblue.net selected.
-
The Copy Records dialog window appears. In Destination, click Select Zone.
-
The Zone Selector dialog appears. Use the DNS View drop-down menu to switch to the VPN view.
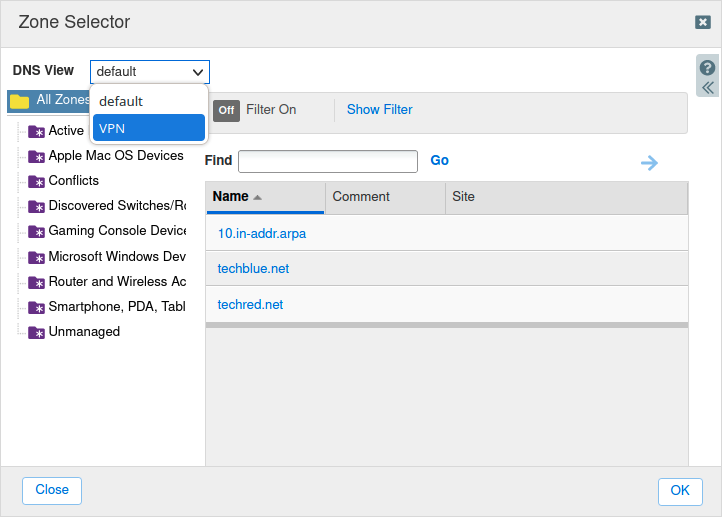
-
Select the zone in the VPN view to copy data to. Click OK. This returns you to the Copy Records dialog window. Click Copy & Close.
Task 5: Updating DNS records in copied zone
Change records listed in Table 2553-1 to reflect the private IP addresses listed under VPN View Answer.
-
Login to the GM web interface. Navigate to Data Management → DNS → Zones.
-
If you are already in the default view, click the DNS Home link on the upper left corner (above the name of the view) to return to the list of all view.
-
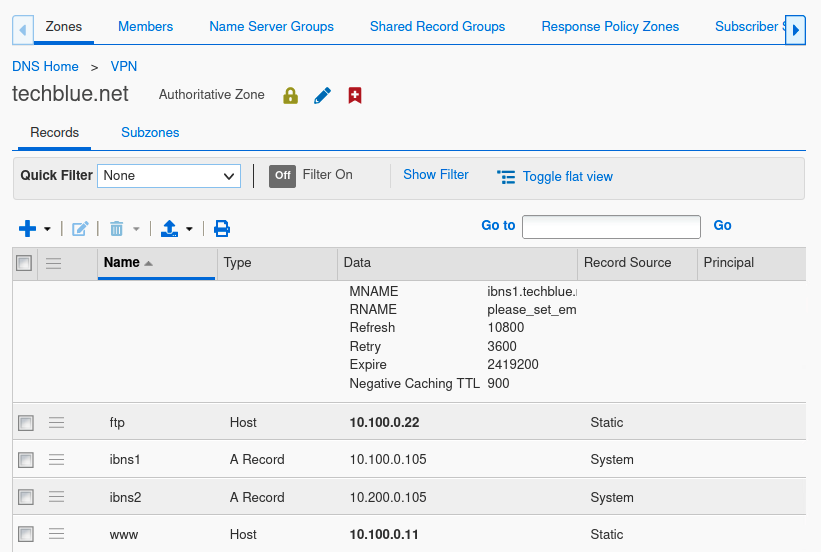
Click on the VPN view. There should be 3 authoritative zones that we created and copied data into here.
-
Click on the zone techblue.net to access all the records that were copied here in the previous task.
-
Edit the records ftp and www to the private IP addresses listed in Table 2553-1:
-
ftp.techblue.net → 10.100.0.22
-
www.techblue.net → 10.100.0.11
-
-
Navigate to the zone techred.net by clicking on the link VPN above the zone name, then click on the zone techred.net.
-
Edit the records bar to the private IP addresses listed in Table 2553-1:
-
bar.techred.net → 10.100.0.33
-
-
Navigate to the zone 10.in-addr.arpa by clicking on the link VPN above the zone name, then click on the zone 10.in-addr.arpa.
-
You can review that all the reverse-mapping records have been automatically generated here.
Task 6: Verifying DNS view ordering
Because your DNS members have more than 1 view, you need to verify order of DNS views on the members are correct.
Best practice recommends “one member, one view”, and there would be no DNS view ordering involved. However, since we are making our DNS members serve 2 views, we must verify the order of DNS views correct. In our case, we want the VPN view to be listed at the top, because it has a match-client statement for 172.31.101.0/24. The default view does not have any match-client statement. If the default view was listed first, no one will ever hit the VPN view, everyone will get matched into the default view.
Repeat the steps below for both ibns1 and ibns2.
-
In the GM web interface, navigate to Data Management → DNS → Members.
-
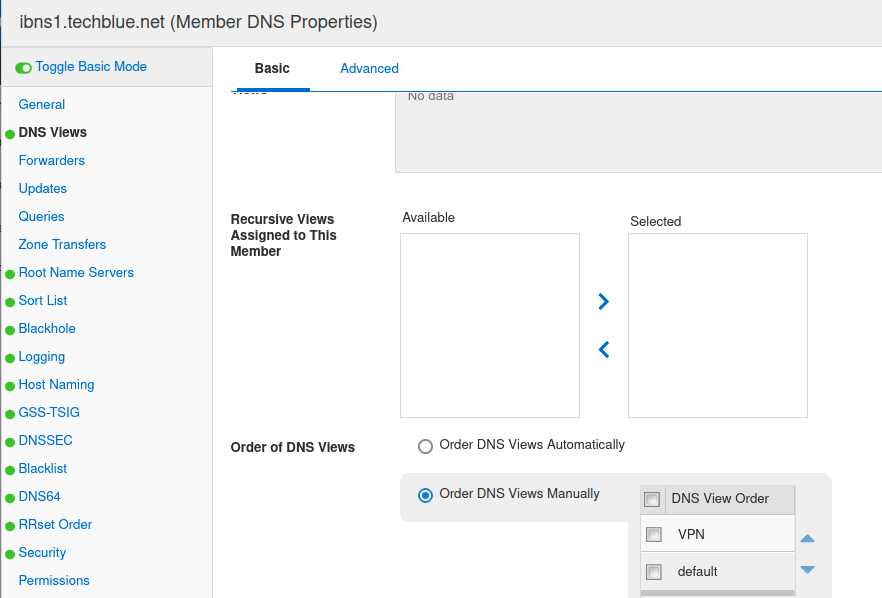
Select the member (ibns1 or ibns2) and click Edit. The Member DNS Properties dialog opens.
-
Toggle to the Advanced Mode if not already toggled.
-
Click the DNS Views tab on the left.
-
Scroll down to the section Order of DNS Views. Make sure VPN is listed first.
-
Click Save & Close.
-
Restart services when prompted.
Task 7 Solution: Verifying DNS resolution after change
Repeat the lookups from Task 1 to verify the new DNS resolution after making changes.
Verifying from testing-windows
-
Switch to the VM testing-windows and login.
-
Launch a command prompt by clicking on the icon in the systems tray.
-
Use the
nslookupcommand to verify DNS lookup behavior:C:\Users\training>nslookup www.techblue.net. Server: ibns1.techblue.net Address: 10.100.0.105 Name: www.techblue.net Address: 10.100.0.11 C:\Users\training>nslookup 10.100.0.11 Server: ibns1.techblue.net Address: 10.100.0.105 Name: www.techblue.net Address: 10.100.0.11 C:\Users\training> -
We can verify the answer(s) currently returned contain the private IP address(es) listed under the VPN View Answer column.
Verifying from jump-desktop
-
Switch to the VM jump-desktop and login.
-
Launch a Terminal Emulator for command prompt by clicking on the icon in the systems tray.
-
Use the
digcommand to verify DNS lookup behavior:$ dig @10.100.0.105 www.techblue.net. +short 128.171.133.11 $ dig @10.100.0.105 -x 128.171.133.11 +short www.techblue.net. -
We can verify the answer(s) currently returned contain the public IP address(es) listed under the Default View Answer column.