Scenario
Your organization utilizes DNS views to differentiate network traffic. VPN clients access the VPN DNS view, while external clients use the Default DNS view. This lab examines how DNS views function by verifying DNS resolution for both client types and analyzing query logs to understand the resulting DNS responses.
Estimate Completion Time
25 to 35 minutes
Credentials
|
Description |
Username |
Password |
URL or IP |
|---|---|---|---|
|
Grid Manager UI |
admin |
infoblox |
Requirements
-
Administrative access to the Grid
Learning Content
Lab Initiation
Access jump-desktop
Once the lab is deployed, you can access the virtual machines required for this activity. To begin, select VM List from the navigation bar at the top, locate jump-desktop, and click the green play icon to open its console. Log in to the Linux UI.

Username: training
Password: infoblox
Initiate lab
To initiate the lab, double-click the Launch Lab icon on the Desktop.

Choose the lab number from the list and click OK.

After clicking OK, you will see a pop-up message with a brief description of the lab task. If the description looks correct, click Yes to continue lab initiation.

Lab initiation will take a couple of minutes to finish.
Once complete, you will see another pop-up message with the login credentials and the URL for the Grid Manager’s User Interface. Note that the credentials may differ from those from prior labs.

Tasks
Here we use the VM testing-windows as a client connected over VPN, and the VM jump-desktop is used to simulate a client not on VPN.
Task 1: Check DNS Resolution on Jump-Desktop
Log in to the VM Jump-Desktop. Use the dig command to look up www.techblue.net. Observe the IP address returned by the DNS server.
Task 2: Check DNS Resolution on Testing-Windows
Log in to the VM testing-windows. Use the nslookup command to look up www.techblue.net. Observe the IP address returned by the DNS server.
Task 3: Review the DNS Views Configured in NIOS GUI
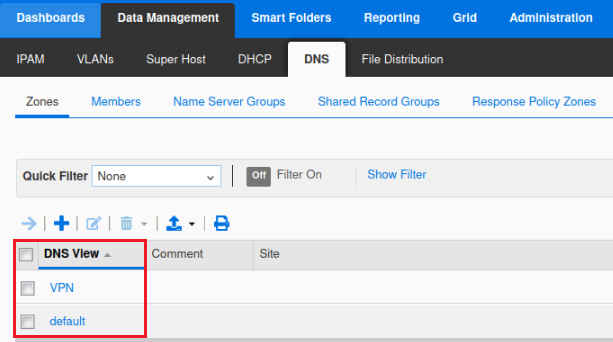
Log in to the Grid Manager web interface. Navigate to Data Management → DNS. Check the DNS views configured as “VPN” and “default”.
Task 4: Review Query and Response Logs
Log in to the GM web interface. Navigate to Data Management → DNS → Logs. Check the query and response logs for entries from tasks 1 and 2.
Solutions
Task 1 Solution: Check DNS Resolution on Jump-Desktop
To verify DNS resolution on the jump-desktop VM, follow these steps:
-
Log in to the VM jump-desktop.
-
Open the Terminal application on the application taskbar.
-
Use the
digcommand to verify DNS lookup behavior:$ dig @10.100.0.105 www.techblue.net. +short 128.171.133.11 -
Verify the answer returned contains only a public IP address.
Task 2 Solution: Check DNS Resolution on Testing-Windows
To verify DNS resolution on the testing-windows VM, follow these steps:
-
Switch to the testing-windows VM.
-
Launch a Command Prompt window.
-
Use the
nslookupcommand to verify DNS lookup behavior:C:\Users\training>nslookup www.techblue.net. Server: ibns1.techblue.net Address: 10.100.0.105 Name: www.techblue.net Address: 10.100.0.11 -
Verify the answer returned contains only a private IP address.
The DNS lookups for www.techblue.net in Tasks 1 and 2 demonstrate how DNS views provide different responses based on the client's connection.
Task 3 Solution: Review the DNS Views Configured in NIOS GUI
To review the current DNS views configuration, follow these steps:
-
Log in to the GM web interface.
-
Navigate to Data Management → DNS → Zones.
-
Verify that the “VPN” and “default” views are configured.
-
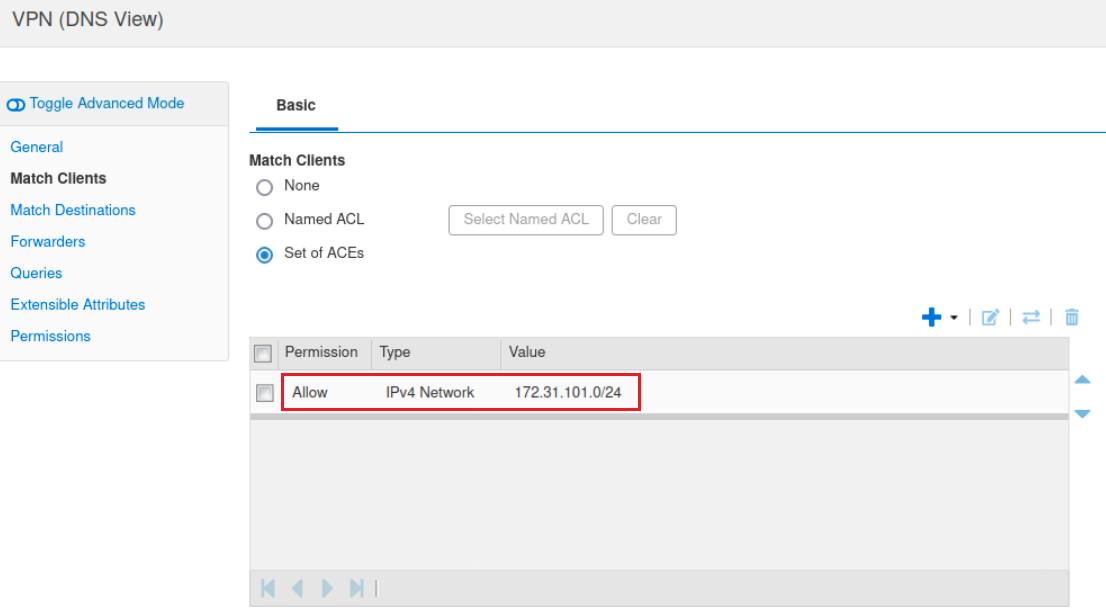
Select the view VPN and click Edit.
-
In the view settings, check the Match Clients configuration.
-
Repeat steps 4 and 5 for the default view.
You will notice that the VPN view has a match-client rule for clients from a particular network, allowing the DNS server to provide different responses based on the client's network segment. This is typically configured using a set of Access Control Entries (ACEs) to define which clients fall under the VPN view. For example, clients from the 172.31.101.0/24 network are matched to the VPN view, ensuring they receive internal IP addresses for specific DNS queries.
Task 4 Solution: Review Query and Response Logs
To review the query and response logs, follow these steps:
-
Log in to the GM web interface.
-
Navigate to Administration → Log → Syslog.
-
Select member ibns1.techblue.net and select DNS View Filter from the quick filter.
In the logs, you should see entries indicating the different responses provided based on the client's IP address.
-20240807-145007.png?cb=160dc011534b02add32bdd5c4d67a591)
These entries show how the DNS server provided different answers to different clients, depending on which DNS view was used. The logs will capture details such as the querying client's IP address, the query itself, and the response provided, illustrating how DNS views are applied in real-time.