Scenario
You have been approached by the Network Security Manager, who has identified a specific brand of Linux-based network cameras that are either at risk or have been breached. As the network and DHCP administrator, you are tasked with preventing these cameras from accessing the network.
The Network Security Manager has provided a packet capture showing one of these network cameras requesting and receiving DHCP leases. Your task is to use this information to block them from obtaining DHCP leases on the network.
Start by analyzing the DHCP capture with Wireshark. Once you have identified the fingerprint, create a corresponding DHCP fingerprint in NIOS and apply a filter to block the device from receiving any further DHCP leases. A Linux machine named ‘testing-linux' has been configured to mimic the behavior of these network cameras. You may use the Linux machine to verify your DHCP filter is working.
Estimate Completion Time
-
15 to 20 minutes
Credentials
|
Description |
Username |
Password |
URL or IP |
|---|---|---|---|
|
Grid Manager UI |
admin |
infoblox |
Requirements
-
Administrative DNS access to the Grid
Learning Content
Lab Initiation
Access jump-desktop
Once the lab is deployed, you can access the virtual machines required for this activity. To begin, select VM List from the navigation bar at the top, locate jump-desktop, and click the green play icon to open its console. Log in to the Linux UI.

Username: training
Password: infoblox
Initiate lab
To initiate the lab, double-click the Launch Lab icon on the Desktop.

Choose the lab number from the list and click OK.

After clicking OK, you will see a pop-up message with a brief description of the lab task. If the description looks correct, click Yes to continue lab initiation.

Lab initiation will take a couple of minutes to finish.
Once complete, you will see another pop-up message with the login credentials and the URL for the Grid Manager’s User Interface. Note that the credentials may differ from those from prior labs.

Tasks
Task 1: Identify the DHCP Fingerprint from the Packet Capture
Once the lab is deployed, the 2564-task1.pcap file will be located on the jump-desktop for you to analyze. This file contains the DHCP traffic for the client that needs to be blocked based on the DHCP fingerprint.
-
From the jump-desktop, double-click the 2564-task1.pcap file to open it in Wireshark.
-
The network manager has provided the MAC address of one of the network cameras, it is 00:50:56:00:1a:2b. Apply the following filter to locate the client’s DHCPDISCOVER packet:
dhcp and dhcp.hw.mac_addr == 00:50:56:00:1a:2b -
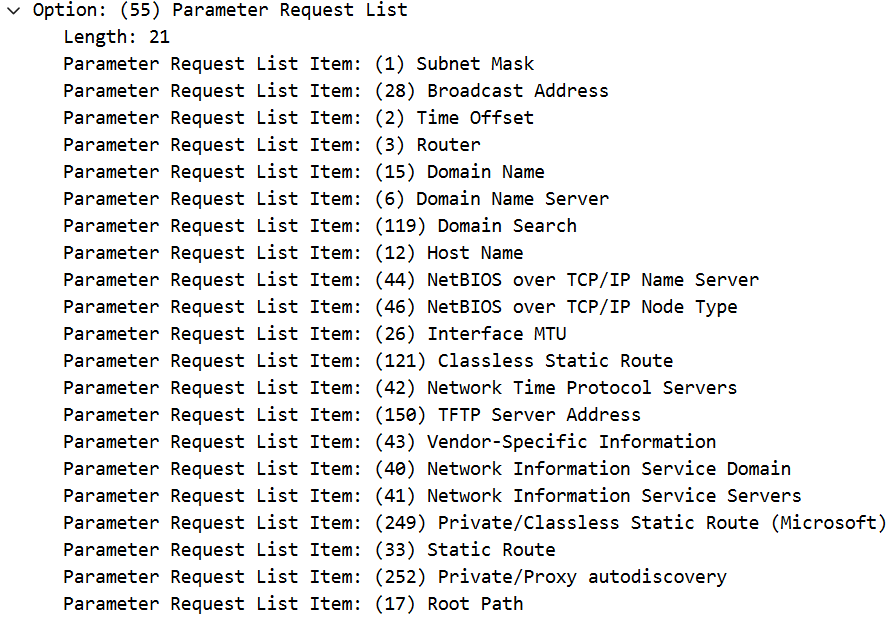
Identify the Options specified in the Parameter Request List (Option 55).
Task 2: Create a DHCP Fingerprint in NIOS
-
Create a new DHCP Fingerprint in the Grid Manager UI using the options identified from the Parameter Request List (Option 55), with the name
Bad-Network-Cameras
Task 3: Create and Apply a New IPv4 Fingerprint Filter
-
In the Grid Manager UI, create a new IPv4 Fingerprint Filter named
Device_banthat utilizes the previously created fingerprintBad-Network-Cameras. -
Once created, apply this Fingerprint Filter to the DHCP range 172.31.101.75-172.31.101.85 to prevent the concerned devices from obtaining a DHCP lease.
Task 4: Confirm the Client Does Not Receive a DHCP Lease
-
Open Terminal on the testing-linux VM to release the IP address using the command:
set-network-disable -
Then, attempt to renew the IP address using the command:
set-network-dhcp -
Confirm that there is no IP address assigned to the interface using
ifconfig ens160command.
Solutions
Task 1 Solution: Identify the DHCP Fingerprint from the Packet Capture
To complete this task, follow these steps:
-
From the jump-desktop, double-click the 2564-task1.pcap file to open it in Wireshark.
-
Apply the following filter to view DHCP packets:
dhcp and dhcp.hw.mac_addr == 00:50:56:00:1a:2b -
Find the DHCPDISCOVER packet in the filtered packet list.
-
Click on the DHCPDISCOVER packet to highlight it.
-
In the Packet Details pane, expand the Dynamic Host Configuration Protocol section.
-
Scroll down to Option 55 (Parameter Request List) and expand it by clicking the arrow to view the list of options requested by the client.
-
This will reveal the specific DHCP options the client requests in the DHCPDISCOVER message. Make a note of the options listed in the PRL for use in Task 2.
Task 2 Solution: Create a DHCP Fingerprint in NIOS
-
Access the Grid Manager UI from the jump-desktop VM.
-
Navigate to Data Management > DHCP > Fingerprint.
-
Click
to open Add DHCP Fingerprint Wizard.
-
In the Add DHCP Fingerprint Wizard:
-
In the Name field, enter:
Bad-Network-Cameras -
In the Device Class drop-down, select: Linux OS.
-
Under Option Number, click the
-
Select Protocol as IPV4, and enter the Option Number Sequence:
1,28,2,3,15,6,119,12,44,46,26,121,42,150,43,40,41,249,33,252,17(Options identified in the Parameter Request List (Option 55) from the packet capture in Task 1).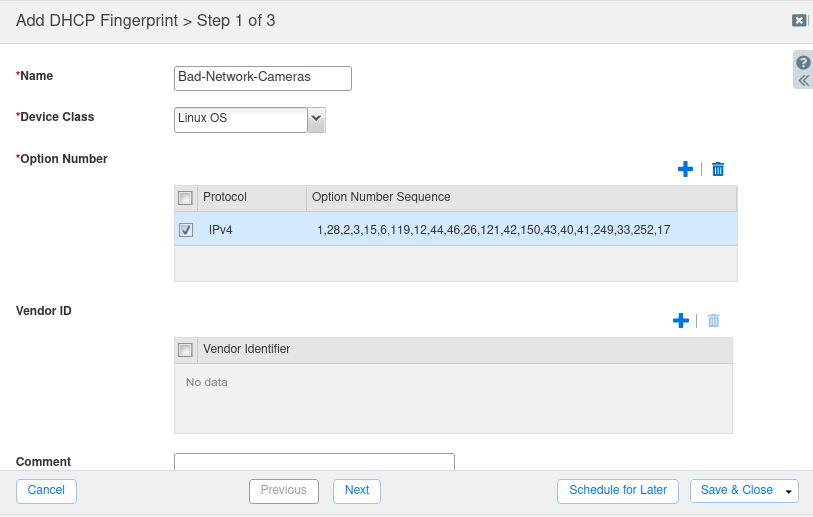
-
Click Save & Close
-
Task 3 Solution: Create and Apply a New IPv4 Fingerprint Filter
To create and apply the IPv4 Fingerprint Filter, follow these steps:
-
Navigate to Data Management > DHCP > Filters.
-
From the Toolbar click Add -> IPv4 Fingerprint Filter.
-
In the Add IPv4 MAC Filter Wizard:
-
For Name, enter:
Device_Ban. -
Click Next.
-
Click the
-
In the Fingerprint Selector window, use Find to locate the previously created fingerprint Bad-Network-Cameras.
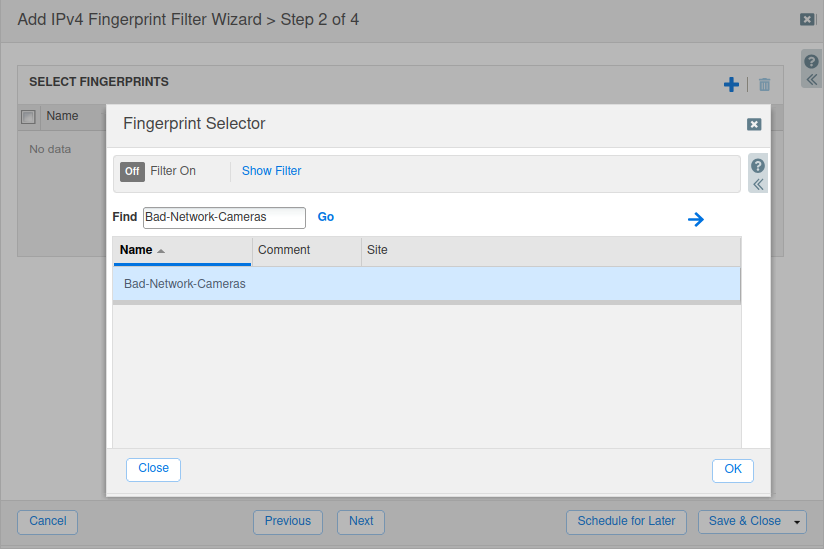
-
Select the fingerprint and click Save & Close.
-
-
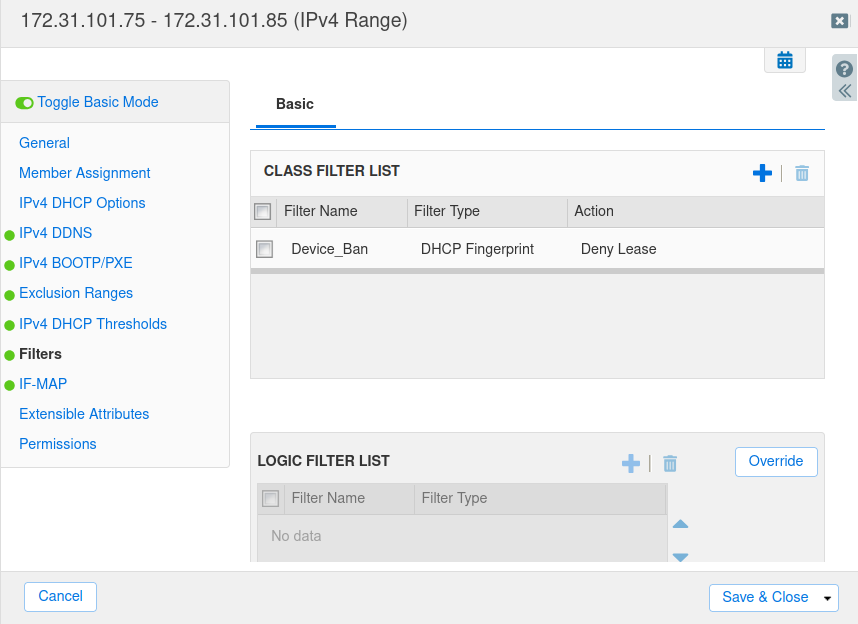
Navigate to Data Management > DHCP > Networks >
172.31.101.0/24. -
Select the range 172.31.101.75-172.31.101.85 and click Edit.
-
Toggle Advanced Mode if it's not already enabled.
-
Go to Filters > Basic, and in the CLASS FILTER LIST, click the
-
Select the Device_Ban Fingerprint Filter and change the action to Deny Lease from the drop-down menu.
-
Click Save & Close.
-
-
Restart services when prompted.
In an ideal scenario, the filter would need to be applied to all relevant DHCP ranges to prevent the identified devices from receiving DHCP leases. For the purpose of this lab, the Device_Ban filter is applied only to the range 172.31.101.75-172.31.101.85, as that is the only DHCP range in the lab, to block the identified Linux-based network cameras.
Task 4 Solution: Confirm the Client Does Not Receive a DHCP Lease
To verify that the client does not receive a lease from the DHCP range, perform the following steps:
-
On the testing-linux VM, open Terminal to release the IP address with the following command:
sudo set-network-disable-
If prompted for a password, enter:
infoblox.
-
-
Attempt to renew the IP address using the command:
sudo set-network-dhcp -
Verify that the client does not receive an IP address by using the command:
ifconfig ens160
Expected Output
After executing the sudo set-network-dhcp command, the system will attempt to obtain an IP address from the DHCP server. However, due to the Fingerprint filter, the DHCP server will not assign an IP address to the client from the DHCP range.
The output of the ifconfig ens160 command will display the ens160 interface details without an IP address, as seen below:
$ ifconfig ens160
ens160: flags=4163<UP,BROADCAST,RUNNING,MULTICAST>  mtu 1500
        ether 00:50:56:00:1a:2b  txqueuelen 1000  (Ethernet)
        RX packets 5501  bytes 635488 (635.4 KB)
        RX errors 0  dropped 1  overruns 0  frame 0
        TX packets 16297  bytes 1592199 (1.5 MB)
        TX errors 0  dropped 0 overruns 0  carrier 0  collisions 0