Scenario
Your organization is undergoing several DNS management changes to support new operational requirements across different departments. These changes involve:
-
Setting up primary zones for new divisions.
-
Delegating specific subzones to different departments, such as sales and engineering, while ensuring proper permissions and control.
-
Configuring forward and reverse DNS zones to manage both IPv4 and IPv6 networks.
-
Ensuring that DNS members are properly configured to forward queries.
Estimate Completion Time
-
70 to 80 minutes
Credentials
|
Description |
Username |
Password |
URL or IP |
|---|---|---|---|
|
Grid Manager UI |
admin |
infoblox |
Requirements
-
Administrative access to the NIOS Grid
Learning Content
Lab Initiation
Access jump-desktop
Once the lab is deployed, you can access the virtual machines required for this activity. To begin, select VM List from the navigation bar at the top, locate jump-desktop, and click the green play icon to open its console. Log in to the Linux UI.

Username: training
Password: infoblox
Initiate lab
To initiate the lab, double-click the Launch Lab icon on the Desktop.

Choose the lab number from the list and click OK.

After clicking OK, you will see a pop-up message with a brief description of the lab task. If the description looks correct, click Yes to continue lab initiation.

Lab initiation will take a couple of minutes to finish.
Once complete, you will see another pop-up message with the login credentials and the URL for the Grid Manager’s User Interface. Note that the credentials may differ from those from prior labs.

Tasks
Task 1: Creating an Authoritative Primary Zone
Your organization has expanded into a new division, and you need to create a new domain to represent this division. The zone for techblue.net will be managed and hosted on the NIOS Grid. The zone needs to be set up with a primary and secondary Grid server.
Create the zone techblue.net. Configure it to use the Grid primary ibns1.techblue.net and its Grid secondary ibns2.techblue.net.
Task 2: Creating an Authoritative Subzone
The sales department within your organization needs to manage its own namespace, sales.techblue.net. The department will not have its own DNS servers and will rely on the same DNS servers as the parent zone.
Create the authoritative subzone sales.techblue.net. Configure it to use the same name servers as techblue.net, with ibns1.techblue.net as the primary and ibns2.techblue.net as the secondary.
Task 3: Configuring Subzone Permissions
As the administrator, you want to allow operators to manage entries in this space for you.
Please set up the necessary configurations on the NIOS Grid, allowing the operators group to have read-write access to the sales.techblue.net subzone.
Task 4: Creating a Delegated Zone (Delegation)
Your company's engineering department has set up its own DNS server and would like full control of its namespace, ad.techblue.net. As the parent zone (techblue.net) administrator, delegate this subzone to the engineering department.
Create a delegated zone ad.techblue.net and configure it to delegate authority to support-server.ad.techblue.net with the IP address 10.100.0.20.
Task 5: Verifying Recursion is Enabled on Members
The DNS members ibns1 and ibns2 will be used to forward DNS queries to external servers. For forwarding to work correctly, recursion needs to be enabled on these members.
Verify that recursion is enabled on the DNS members ibns1 and ibns2 so they can forward queries.
Task 6: Creating a Forward Zone
Your organization has formed a partnership with ACME Corporation, which hosts a private namespace, hr.techblue.io. Use the following command on the jump-desktop VM to identify the current IP address of ginan.techblue.io: dig ginan.techblue.io. +short
Create a forward zone for hr.techblue.io that forwards queries to ginan.techblue.io.
Task 7: Creating an IPv4 Authoritative Reverse-Mapping Zone
Your team has recently been assigned to manage the DNS name entries for the network 172.16.0.0/16. You need to create an authoritative reverse-mapping zone in the NIOS Grid to manage these name entries.
Create an authoritative reverse-mapping zone for the network 172.16.0.0/16, using the name server group Internal NSG.
Task 8: Creating an IPv6 Authoritative Reverse-Mapping Zone
Your team is now responsible for managing the name entries in the IPv6 network fdac:31::/32. The zone must be added to the NIOS Grid to ensure proper reverse mapping for this network.
Create an authoritative reverse-mapping zone for the network fdac:31::/32, using the name server group Internal NSG.
Solutions
Task 1 Solution: Creating an Authoritative Primary Zone
To create a new authoritative primary zone for techblue.net, follow the steps below:
-
Navigate to Data Management → DNS → Zones.
-
Click the Add (+) dropdown menu and select Authoritative Zone.
-
Leave the radio button set to Add an authoritative forward-mapping zone.
-
Click Next.
-
For Name, enter
techblue.net. -
For Comment, enter
Parent zone for TechBlue. -
Leave the remaining settings unchanged and click Next.
-
Select the radio button for Use this set of name servers.
-
Click the Add (+) dropdown menu and select Grid Primary.
-
In the Add Grid Primary section, click Select to display the Member Selector.
-
In the Member Selector window, click the entry for ibns1.techblue.net.
-
The selected device ibns1.techblue.net appears in the Add Grid Primary section.
-
Click the Add (+) button to add ibns1.techblue.net as the primary server.
-
Add a Grid Secondary device by clicking Add (+) → Grid Secondary.
-
In the section for Add Grid Secondary, click Select to open the Member Selector window.
-
Click on ibns2.techblue.net.
-
The device ibns2.techblue.net appears as the selected Grid Secondary.
-
Click the Add (+) button to add ibns2.techblue.net as a Grid Secondary server.
-
The table shows ibns1 as Grid Primary and ibns2 as Grid Secondary.
-
Click Save & Close.
-
The Zones table now contains a new entry for the techblue.net Authoritative zone.
Task 2 Solution: Creating an Authoritative Subzone
Follow these steps to create an authoritative subzone for sales.techblue.net:
-
Navigate to Data Management → DNS → Zones.
-
Click the Add (+) dropdown menu and select Authoritative Zone.
-
Leave the radio button set to Add an authoritative forward-mapping zone.
-
Click Next.
-
For Name, enter
sales.techblue.net. -
Leave the remaining settings unchanged and click Next.
-
Select the radio button for Use this set of name servers.
-
Click the Add (+) dropdown menu and select Grid Primary.
-
In the Add Grid Primary section, click Select to display the Member Selector.
-
In the Member Selector window, click the entry for ibns1.techblue.net.
-
The selected device ibns1.techblue.net appears in the Add Grid Primary section.
-
Click the Add (+) button to add ibns1.techblue.net as the primary server.
-
Add a Grid Secondary device by clicking Add (+) → Grid Secondary.
-
In the section for Add Grid Secondary, click Select to open the Member Selector window.
-
Click on ibns2.techblue.net.
-
The device ibns2.techblue.net appears as the selected Grid Secondary.
-
Click the Add (+) button to add ibns2.techblue.net as a Grid Secondary server.
-
The table shows ibns1 as Grid Primary and ibns2 as Grid Secondary.
-
Click Save & Close.
The subzones tab under techblue.net now contains a new entry for the sales.techblue.net authoritative zone.
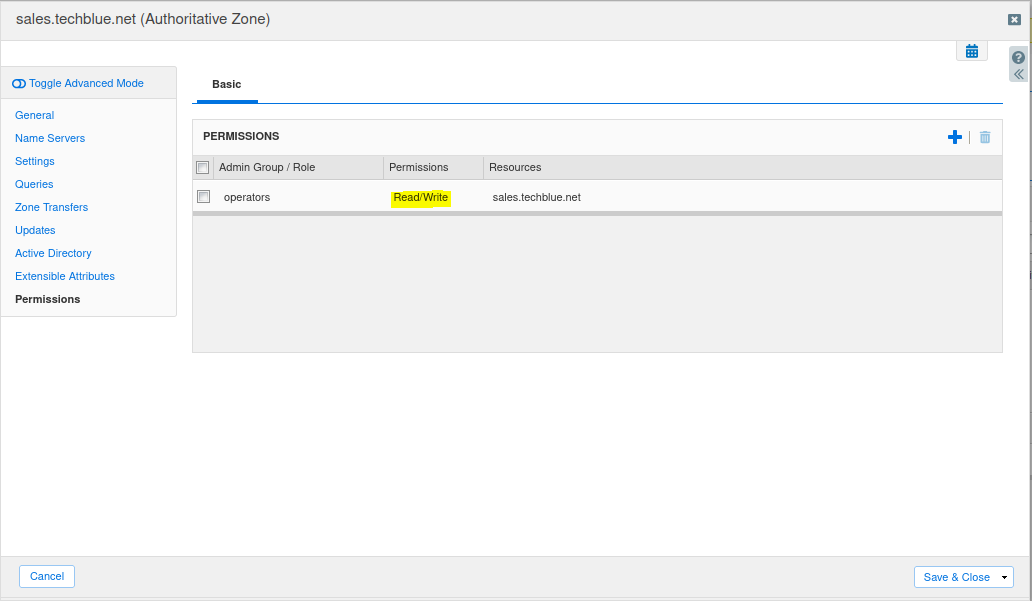
Task 3 Solution: Configuring Subzone Permissions
The easiest way to edit the subzone's permissions is to edit the zone settings:
-
Navigate to Data Management → DNS → Zones → techblue.net → Subzones and edit sales.techblue.net.
-
Navigate to the Permissions tab.
-
Click + and select the operators group.
-
Once the operators group name populates, edit the Permissions field using the drop-down box, set the permissions to Read/Write.
-
Click Save and Close.
-
Now, users in the operators group will be allowed read-write access to manipulate the sales.techblue.net subzone configurations and records.
Task 4 Solution: Creating a Delegated Zone (Delegation)
To create a delegated zone for ad.techblue.net, follow the steps below:
-
Navigate to Data Management → DNS → Zones.
-
Place a check in the techblue.net zone.
-
Click the Add (+) dropdown menu and select Delegation.
-
For the Name, enter
ad(techblue.net will automatically be added), and click Next. -
Select Use this set of name servers, and click on the Add (+) icon.
-
For the Name Server Name, enter
support-server.ad.techblue.net -
For the Name Server Address, enter
10.100.0.20. -
Click Save & Close.
-
The Zones table now displays the new ad.techblue.net delegation zone ( you may need to click on Toggle flat view).
Task 5 Solution: Verifying Recursion is Enabled on Members
Recursion must be enabled on DNS servers for forwarding to work. We need to verify that recursion is configured correctly
-
Navigate to Data Management → DNS → Zones.
-
Click Grid DNS Properties from the toolbar.
-
In the Queries tab, scroll down and verify Allow Recursion box is checked.
-
Check this configuration at the member level (Data Management → DNS → Members) as well.
Task 6 Solution: Creating a Forward Zone
To create a forward zone for hr.techblue.io, follow these steps:
-
Lookup the IP address for ginan.techblue.io:
-
On the jump-desktop, open a terminal and run the following command to find the IP address:
dig ginan.techblue.io. +short -
Note the returned IP address for later use.
-
-
Under Data Management → DNS → Zones, click (+) dropdown and choose Forward Zone. The Add Forward Zone Wizard appears.
-
In Step 1 of the wizard, Leave the radio button set to Add a forward forward-mapping zone, and click Next.
-
In Step 2, For Name, enter
hr.techblue.io. -
Leave the remaining settings unchanged and click Next.
-
In Step 3, Select Use this set of name servers and click on the Add (+) icon.
-
For the Name Server Name, enter
ginan.techblue.io. -
For the Name Server Address, enter the IP address we obtained in step 1.
-
Check the box for Use forwarders only.
-
Click Next.
-
In Step 4 of the wizard, select Use this set of name servers and click on the Add (+) icon.
-
Select ibns1.techblue.net from the name server list.
-
Click on the Add (+) icon again.
-
Select ibns2.techblue.net from the name server list.
-
Click Save & Close.
-
The Zones window now displays the new hr.techblue.io forward zone.
Task 7 Solution: Creating an IPv4 Authoritative Reverse-Mapping Zone
To create an IPv4 authoritative reverse-mapping zone, follow the steps below:
-
Navigate to Data Management → DNS → Zones
-
Click the Add (+) dropdown menu and select Authoritative Zone.
-
At Step 1 of 6, select the radio button for Add an authoritative IPv4 reverse-mapping zone.
-
Click Next.
-
At Step 2 of 6, select the radio button for IPv4 Network.
-
For the network, enter
172.16.0.0. -
Change the Netmask to 16.
-
For Comment, enter
TechBlue Branch Networks. -
Click Next.
-
At Step 3 of 6, select the radio button for Use this name server group.
-
Select Name Server Group Internal NSG.
-
Click Save & Close.
-
The Zones table now displays the new 16.172.in-addr.arpa authoritative zone.
Task 8 Solution: Creating an IPv6 Authoritative Reverse-Mapping Zone
To create an authoritative reverse-mapping zone for the IPv6 network, follow these steps:
-
Navigate to Data Management → DNS → Zones.
-
Click the Add dropdown menu and select Authoritative Zone.
-
At Step 1 of 6, select the radio button for Add an authoritative IPv6 reverse-mapping zone.
-
Click Next.
-
In Step 2 of 6, select the radio button for IPv6 Network Prefix.
-
For the network, enter
fdac:31::. -
Change the Netmask to 32.
-
For Comment, enter
TechBlue Branch Networks. -
Click Next.
-
At Step 3 of 6, select the radio button for Use this name server group.
-
Select Name Server Group Internal NSG.
-
Click Save & Close.
-
The Zones table now displays the new 1.3.0.0.c.a.d.f.ip6.arpa authoritative zone.
-
Restart Services by clicking the Restart button in the notification banner at the top of Grid Manager UI.

-
At the Restart Grid Services window, click Restart.