Scenario
Your organization is implementing new security measures, optimizing DNS services, and enhancing the infrastructure across the Grid. As a DNS administrator, your task is to configure various DNS settings to boost performance, ensure redundancy, and improve overall network efficiency. The key areas of focus include:
-
Configuring DNS resolution to ensure accurate domain name resolution by Grid members.
-
Creating authoritative server groups to effectively manage DNS zone mappings.
-
Updating DNS resolvers to enable Grid members to resolve external domain names seamlessly.
-
Enabling anycast for redundancy to enhance DNS availability and resilience.
-
Applying DNS views to provide different DNS responses based on whether the queries originate from internal or external clients.
Estimate Completion Time
-
100 to 120 minutes
Credentials
|
Description |
Username |
Password |
URL or IP |
|---|---|---|---|
|
Grid Manager UI |
admin |
infoblox |
Requirements
-
Administrative access to the NIOS Grid
Learning Content
Lab Initiation
Access jump-desktop
Once the lab is deployed, you can access the virtual machines required for this activity. To begin, select VM List from the navigation bar at the top, locate jump-desktop, and click the green play icon to open its console. Log in to the Linux UI.

Username: training
Password: infoblox
Initiate lab
To initiate the lab, double-click the Launch Lab icon on the Desktop.

Choose the lab number from the list and click OK.

After clicking OK, you will see a pop-up message with a brief description of the lab task. If the description looks correct, click Yes to continue lab initiation.

Lab initiation will take a couple of minutes to finish.
Once complete, you will see another pop-up message with the login credentials and the URL for the Grid Manager’s User Interface. Note that the credentials may differ from those from prior labs.

Tasks
Task 1: Allowing and Restricting DNS Queries on Members
Your team decided to apply different security policies to two Grid members serving DNS. The first DNS member, ibns1.techblue.net, will accept DNS queries from any client. The second member, ibns2.techblue.net, will only accept queries originating from internal address space. Please make the necessary configuration changes in the Grid.
Subtask 1.1: Allowing DNS queries on a member
The Grid member ibns1.techblue.net needs to accept DNS connections from any client. Please configure it as such.
Subtask 1.2: Restricting DNS queries on a member
The Grid member ibns2.techblue.net should only accept DNS connections from clients originating from the 10.100.0.0/16 network. Please configure it as such.
Subtask 1.3: Restarting Grid services
After making these changes, you should have been prompted to restart Grid services. If not, please manually restart them.
Task 1 Solution: Allowing and Restricting DNS Queries on Members
Task 1 Solution – Expand/Collapse Section
Subtask 1.1 Solution: Allowing DNS queries on a member
DNS Access Control can be applied at any level of the DNS hierarchy. In this lab, we will be applying it on members.
-
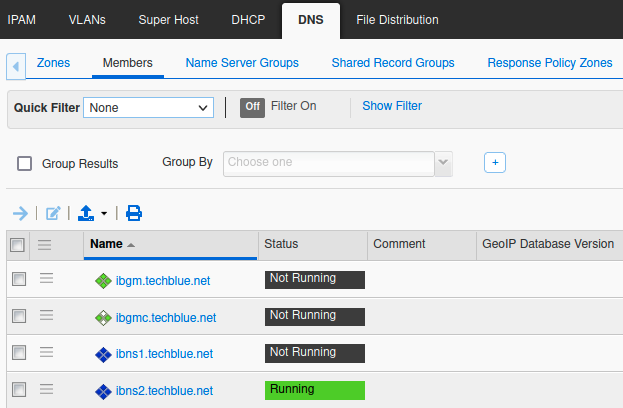
Navigate to Data Management → DNS → Members
-
Check the box next to ibns1.techblue.net and click Edit
-
In the Member DNS Properties window, click on the Queries tab
-
Click Override in the Allow queries from section
-
Choose Set of ACEs radio button and click Add
dropdown
-
Select Any Address/Network and click Save & Close
Subtask 1.2 Solution: Restricting DNS queries on a member
For ibns2.techblue.net we will allow one network and deny all others
-
Navigate to Data Management → DNS → Members
-
Check the box next to ibns2.techblue.net and click Edit
-
In the Member DNS Properties window, click on Queries tab
-
Click Override in the Allow queries from section
-
Choose Set of ACEs radio button and click Add
-
Select IPv4 Network
-
Use the slider to set Netmask as /16
-
In the Address box, type in 10.100.0.0 and click Add
-
Click Save & Close
Subtask 1.3 Solution: Restarting Grid services
Changes made to DNS configuration will only take effect after a service restart on all members that were involved.
-
Restart the Service when prompted by clicking Restart in the banner
-
In the Restart Grid Services window, click Restart
Alternatively, we can also restart services from the Members menu by navigating to Grid → Grid Manager → Members or Data Management → DNS → Members
-
From the Toolbar on the right, click Restart Services
-
Select the radio button for Force restart services
-
Click Restart
Task 2: Creating Authoritative Name Server Groups
You are consolidating types of name server mappings used for your internal authoritative zones. Some zones are mapped to members on the same Grid; others have the primaries on the Grid but send copies to external secondaries. Additionally, some zones have external primaries that synchronize with internal Grid members. Please create these three types of mappings as different name server groups.
Subtask 2.1: Creating an authoritative name server group with all Grid members
Create a name server group called Internal NSG with ibns1.techblue.net as Grid Primary and ibns2.techblue.net as Grid Secondary.
Subtask 2.2: Creating an authoritative name server group with an external secondary
Create a name server group called Dev NSG with ibns1.techblue.net, ibns2.techblue.net, and an External Secondary at devns.techred.net (10.100.1.44).
Subtask 2.3: Creating an authoritative name server group with an external primary
Create a name server group called MS NSG with an External Primary at dc01.techred.net (10.100.1.33) and ibns1.techblue.net, ibns2.techblue.net as Grid Secondaries.
Task 2 Solution: Creating Authoritative Name Server Groups
Task 2 Solution – Expand/Collapse Section
Subtask 2.1 Solution: Creating an authoritative name server group with all Grid members
-
Navigate to Data Management → DNS → Name Server Groups
-
Click on the Add
-
For Name, enter
Internal NSG -
Click the Add dropdown menu and select Grid Primary
-
In the Add Grid Primary section, click Select to display the Member Selector
-
In the Member Selector window click the entry for ibns1.techblue.net
-
The selected device (ibns1.techblue.net) appears in the Add Grid Primary section
-
Click the Add button to add ibns1.techblue.net as primary server
-
Add the Grid Secondary device to the Name Server Group by clicking Add
-
In the section for Add Grid Secondary, click Select to open the Member Selector window
-
Click on ibns2.techblue.net
-
The device ibns2.techblue.net appears as the selected Grid Secondary
-
The Name Servers table for this group now shows ibns1 as Grid Primary and ibns2 as Grid Secondary
-
Click Save & Close
Subtask 2.2 Solution: Creating an authoritative name server group with an external secondary
-
Navigate to Data Management → DNS → Name Server Groups
-
Click on the Add drop-down menu and select Authoritative
-
For Name, enter
Dev NSG -
Click the Add dropdown menu and select Grid Primary
-
In the Add Grid Primary section, click Select to display the Member Selector
-
In the Member Selector window click the entry for ibns1.techblue.net
-
The selected device (ibns1.techblue.net) appears in the Add Grid Primary section
-
Click the Add button to add ibns1.techblue.net as primary server
-
Add the Grid Secondary device to the Name Server Group by clicking Add
-
In the section for Add Grid Secondary, click Select to open the Member Selector window
-
Click on ibns2.techblue.net
-
The device ibns2.techblue.net appears as the selected Grid Secondary
-
Add the External Secondary device to the Name Server Group by clicking Add
-
In the Add External Secondary section, provide Name
devns.techred.netand for Address type in10.100.1.44 -
Click the Add button to add devns.techred.net as External Secondary server
-
The Name Servers table for this group now shows ibns1 as Grid Primary, ibns2 as Grid Secondary and devns.techred.net as External Secondary
-
Click Save & Close
Subtask 2.3 Solution: Creating an authoritative name server group with an external primary
-
Navigate to Data Management → DNS → Name Server Groups
-
Click on the Add drop-down menu and select Authoritative
-
For Name, enter
MS NSG -
Click the Add dropdown menu and select External Primary
-
In the Add External Primary section, provide Name
dc01.techred.netand for Address type in10.100.1.33 -
Click the Add button to add
dc01.techred.netas the primary server -
Add the Grid Secondary device to the Name Server Group by clicking Add
-
In the section for Add Grid Secondary, click Select to open the Member Selector window
-
Click on ibns1.techblue.net
-
The device ibns1.techblue.net appears as the selected Grid Secondary
-
Add the other Grid Secondary device to the Name Server Group by clicking Add
-
In the section for Add Grid Secondary, click Select to open the Member Selector window
-
Click on ibns2.techblue.net
-
The device ibns2.techblue.net appears as the selected Grid Secondary
-
The Name Servers table for this group now shows dc01.techred.net as External Primary, ibns1 and ibns2 as Grid Secondary devices.
-
Click Save & Close
Task 3: Creating and Applying a Named ACL
You are configuring access to DNS services and realize that you are repeatedly entering the same subnet information when defining access policies. This information can be captured in a reusable Named ACL, which can then be applied to each Grid object, making security policies more straightforward and more consistent. Please create a Named ACL object with the required subnet information.
Subtask 3.1: Creating a named ACL
Create a Named ACL with the information listed in Table 2582-1 and name it Company Internet Subnets.
Table 2582-1
|
Type |
Value |
Operation |
|---|---|---|
|
IPv4 Network |
172.31.0.0/16 |
Allow |
|
IPv4 Network |
10.100.0.0/24 |
Allow |
|
IPv4 Network |
10.200.0.0/24 |
Allow |
|
IPv4 Address |
127.0.0.1 |
Allow |
|
IPv6 Network |
fdac:31::/32 |
Allow |
|
IPv6 Network |
fd10:100::/32 |
Allow |
|
IPv6 Network |
fd10:200::/32 |
Allow |
|
IPv6 Address |
::1 |
Allow |
Subtask 3.2: Applying the Named ACL to existing objects
Update both DNS members ibns1 and ibns2 to only allow recursive queries from the Company Internet Subnets ACL.
Task 3 Solution: Creating and Applying a Named ACL
Task 4: Configuring DNS Resolvers on Members
While attempting to add an external NTP server, your team realized that the Grid is providing DNS services to other devices, but the Grid members themselves cannot resolve names such as time.apple.com. Please update the Grid configuration to use ibns1.techblue.net and ibns2.techblue.net as the default DNS resolvers for the entire Grid.
Subtask 4.1: Verifying resolver functionality
Verify that both ibns1 and ibns2 are configured to allow recursion from other Grid members.
Subtask 4.2: Configuring Grid DNS resolvers
Configure the DNS resolver settings on the Grid to use ibns1.techblue.net 10.100.0.105 and ibns2.techblue.net 10.200.0.105 as the default DNS resolvers.
Subtask 4.3: Verifying DNS resolution from NIOS Grid
Verify that the Grid can now resolve external domain names by attempting to add an external NTP server time.apple.com by name.
Task 4 Solution: Configuring DNS Resolvers on Members
Task 4 Solution – Expand/Collapse Section
Subtask 4.1 Solution: Verifying resolver functionality
There are 2 ways to execute dig from the Grid, from the Dashboard, or from the CLI.
Using dig From Dashboards
-
In the GM web interface, navigate to Dashboards → Status.
-
Scroll down to the Dig Request widget.
-
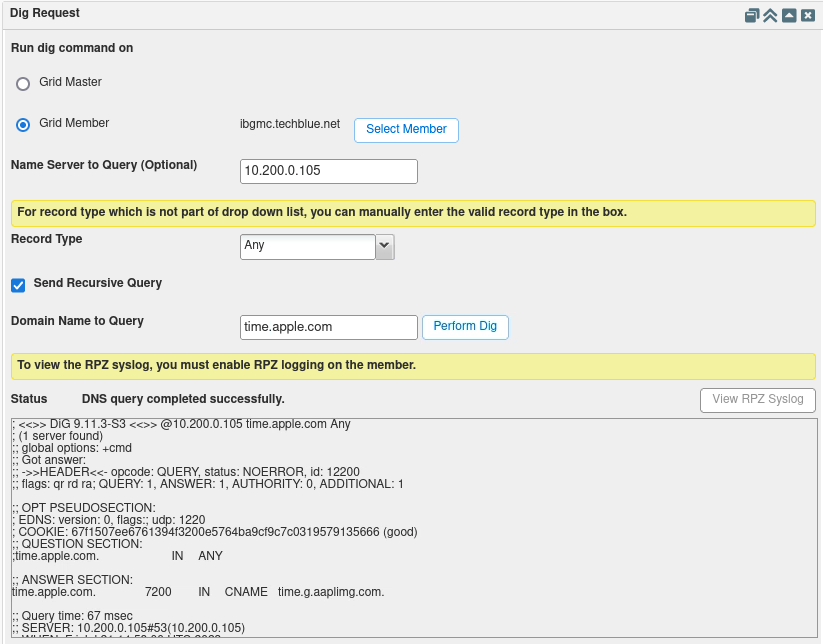
You want to make sure other members, such as ibgmc.techblue.net and ibrep.techblue.net can use ibns1 (10.100.0.105) and ibns2 (10.200.0.105) for DNS lookups. Use this widget several times to make sure you can successfully resolve external names such as time.apple.com. Screenshot below shows a dig originating from ibgmc.techblue.net to 10.200.0.105 (ibns2) to lookup the name time.apple.com.
Using dig From CLI
-
Switch to the console of the NIOS VM, and use the dig command from the CLI to perform the query to either ibns1 (10.100.0.105) or ibns2 (10.200.0.105).
-
You may use the commands
dig @10.100.0.105 time.apple.com.anddig @10.200.0.105 time.apple.com.to verify DNS lookup functionality. -
Screenshot below shows a successful query from one of the NIOS devices.

Subtask 4.2 Solution: Configuring Grid DNS resolvers
-
Navigate to Grid→Grid Manager→Members.
-
Click on Toolbar → Grid Properties.
-
Click on the DNS Resolver tab on the left.
-
Place a check mark next to Enable DNS Resolver.
-
In the Name Servers box, click add (+) twice to add two rows.
-
Click in each row and enter in the DNS server IP addresses:
10.100.0.105and10.200.0.105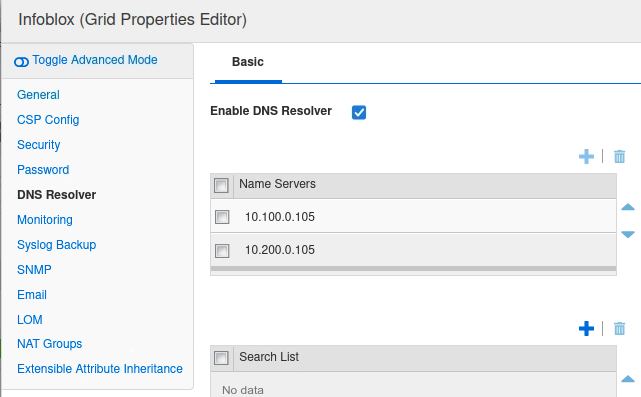
-
Click Save & Close
Subtask 4.3 Solution: Verifying DNS resolution from NIOS Grid
-
Navigate to Grid → Grid Manager.
-
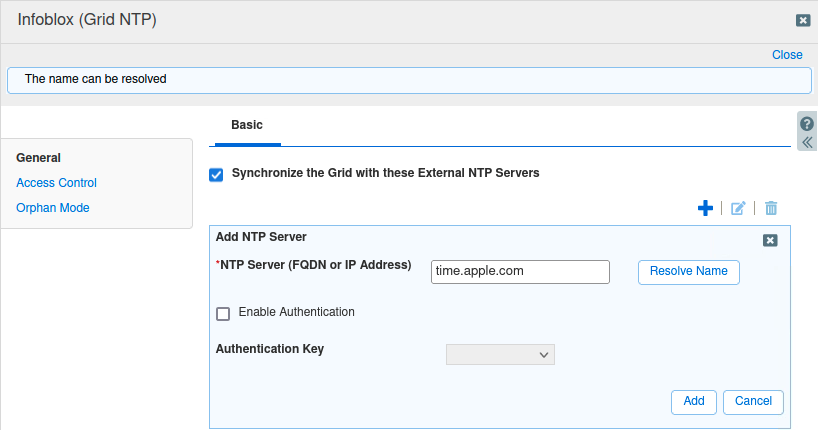
Click on the NTP tile near the top, to switch to the NTP services section.
-
Click on Toolbar → Edit → Grid NTP Properties. This brings up the Grid NTP properties dialog window.
-
Place a check mark next to Synchronize the Grid with these External NTP Servers.
-
In the section Synchronize the Grid with these External NTP Servers, click Add
-
The Add NTP Server wizard appears.
-
In the section NTP Server (FQDN or IP Address), enter
time.apple.com -
Click the button Resolve Name.
-
You should see a light blue banner across the top informing you the name can be resolved.
Task 5: Configuring Allow Recursion on Members
Your team decided to provide recursive services on the Infoblox Grid and selected two members to do so. After an architectural design session, your team decided it’s best to allow these two members to query the Internet root servers directly.
Subtask 5.1: Verifying the current lookup behavior
Use dig tool to verify the current lookup behavior. Query both ibns1.techblue.net and ibns2.techblue.net for an external domain, such as www.example.com.
Subtask 5.2: Enabling Recursion on Members
Configure DNS members ibns1.techblue.net and ibns2.techblue.net to allow recursive queries from any subnet.
Subtask 5.3: Verifying the lookup behavior
Verify the lookup behavior again by running the same query for www.example.com and checking the difference in results.
Task 5 Solution: Configuring Allow Recursion on Members
Task 5 Solution – Expand/Collapse Section
Why configure this at the member level? You might be wondering why we are repeating the same set of steps twice, once on each member. Why can’t we just do this once at the Grid level? We could, but that will apply this setting to every member on the Grid. That is rarely the case when configuring something like allowing DNS recursion. This is usually configured on a per-member basis. Our instructions assume this common use-case.
Subtask 5.1 Solution: Verifying the current lookup behavior
Before configuring recursion on Grid members, you should verify the current lookup behavior. Lookup command-line tools such as dig are ideal for testing DNS resolution behaviors. By looking up an external domain, that is, a domain that is not configured as authoritative on the Grid, we can test the current recursive lookup behavior. For the following instructions, we are repeating many of the same operations twice.
-
Login to jump-desktop, run the command
dig @10.100.0.105 www.example.com.This verifies the behavior for ibns1. -
Still on jump-desktop, run the command
dig @10.200.0.105 www.example.com.This verifies the behavior for ibns2. Below is an example output of executing this command. Notice the REFUSED code on line 7. This is a clear indication that currently this member is refusing or not accepting recursive queries.
$ dig @10.200.0.105 www.example.com.
; <<>> DiG 9.18.12-0ubuntu0.22.04.1-Ubuntu <<>> @10.200.0.105 www.example.com.
; (1 server found)
;; global options: +cmd
;; Got answer:
;; ->>HEADER<<- opcode: QUERY, status: REFUSED, id: 27364
;; flags: qr rd; QUERY: 1, ANSWER: 0, AUTHORITY: 0, ADDITIONAL: 1
;; WARNING: recursion requested but not available
;; OPT PSEUDOSECTION:
; EDNS: version: 0, flags:; udp: 1220
; COOKIE: 888e2ee4f4281fdee7f0be7564b83649901d42acb5a86910 (good)
;; QUESTION SECTION:
;www.example.com.		IN	A
;; Query time: 3 msec
;; SERVER: 10.200.0.105#53(10.200.0.105) (UDP)
;; WHEN: Wed Jul 19 19:15:21 UTC 2023
;; MSG SIZE  rcvd: 72
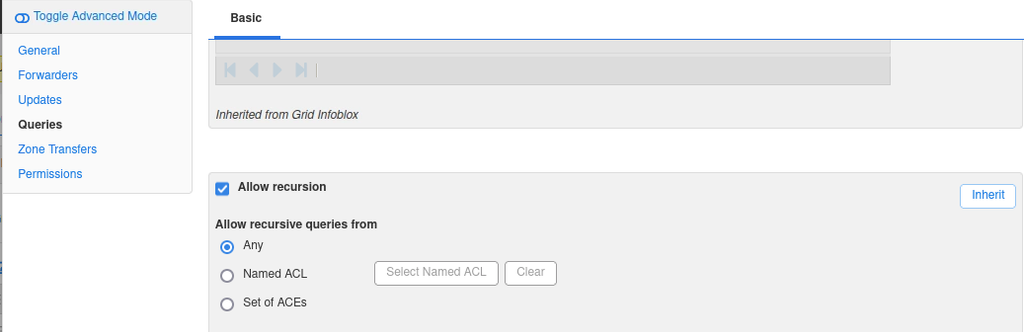
Subtask 5.2 Solution: Enabling Recursion on Members
Now that we have verified the behaviors, we may configure the DNS members ibns1 and ibns2 to allow recursive queries from any subnet.
For ibns1.techblue.net
-
In the GM web interface, navigate to Data Management → DNS → Members.
-
Check the box next to the member (ibns1.techblue.net ) and click Edit.
-
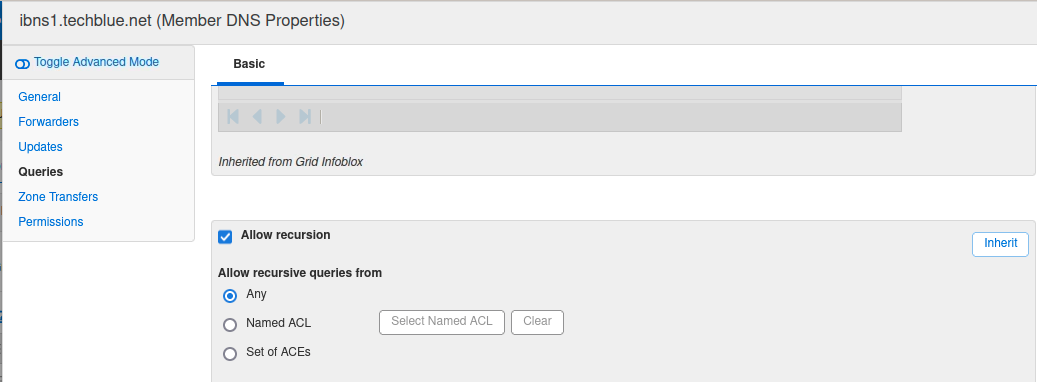
The Member DNS Properties dialog appears. Click on the Queries tab.
-
Scroll down to the section Allow recursion.
-
Select the radio button for Any.
-
Click Save & Close
For ibns2.techblue.net
-
In the GM web interface, navigate to Data Management → DNS → Members.
-
Check the box next to the member (ibns2.techblue.net ) and click Edit.
-
The Member DNS Properties dialog appears. Click on the Queries tab.
-
In the Allow queries from section, Choose Set of ACEs radio button.
-
Remove the existing entry for 10.100.0.0/16 by checking the box next to it and clicking on Delete.
-20240827-111033.png?cb=3ca088b0e2ab87e8da41714d22c67a83)
-
Now click Add
-
Select Any Address/Network.
-
Then Scroll down to the section Allow recursion.
-
Select the radio button for Any
-
Click Save & Close
After you have updated both ibns1 and ibns2, restart Grid services following the system banner across the top of the screen.
Subtask 5.3: Verifying the lookup behavior
After restarting services on the Grid, you should run the same lookup commands from Task 1. The same commands now should yield different results. We should look at the example from querying ibns1 below. Notice the status code on line 6 is now NOERROR, and we have the answer on line 14.
$ dig @10.100.0.105 www.example.com.
; <<>> DiG 9.18.12-0ubuntu0.22.04.1-Ubuntu <<>> @10.100.0.105 www.example.com.
; (1 server found)
;; global options: +cmd
;; Got answer:
;; ->>HEADER<<- opcode: QUERY, status: NOERROR, id: 9990
;; flags: qr rd ra; QUERY: 1, ANSWER: 1, AUTHORITY: 0, ADDITIONAL: 1
;; OPT PSEUDOSECTION:
; EDNS: version: 0, flags:; udp: 1220
; COOKIE: ac54fe73314316b3c6021c2f64b84189ce3dcc70a51e6c8a (good)
;; QUESTION SECTION:
;www.example.com.		IN	A
;; ANSWER SECTION:
www.example.com.	86400	IN	A	93.184.216.34
;; Query time: 247 msec
;; SERVER: 10.100.0.105#53(10.100.0.105) (UDP)
;; WHEN: Wed Jul 19 20:03:21 UTC 2023
;; MSG SIZE  rcvd: 88
Task 6: Implementing DNS Anycast
Your infrastructure team has approved BGP-based anycast in the corporate network. Configure the Infoblox DNS members so that multiple DNS members can be in an anycast group for increased DNS availability and redundancy.
Subtask 6.1: Configuring members for IPv4 DNS Anycast
Configure the members ibns1 and ibns2 with the loopback address 10.24.7.53 and BGP configuration for IPv4 using the specified values.
-
Loopback Interface Address: 10.24.7.53
-
BGP Config:
-
ASN: 65400
-
Neighbor Router: 10.100.0.1
-
Remote ASN: 65247
-
Subtask 6.2: Configuring DNS services on members to listen on additional IPv4 addresses
Reconfigure DNS services on members ibns1 and ibns2 listen on the new anycast address 10.24.7.53.
Subtask 6.3: Verifying anycast address is reachable
Verify the anycast address 10.24.7.53 is reachable on the network. You may use the ping command on the jump-desktop.
Subtask 6.4: Verifying DNS service on anycast address
Use the dig utility on the jump-desktop to verify that the IPv4 anycast address is providing DNS services.
Subtask 6.5: Verifying DNS service on anycast address
Disable the DNS service on member ibns1 to simulate a systems failure. Then query the IPv4 anycast address to resolve a name. If anycast is working as expected, the same IPv4 address will still respond even when a member if offline.
You may use this dig query for both Tasks 4 and 5.
dig @10.24.7.53 test.techblue.net.
Task 6 Solution: Implementing DNS Anycast
Task 6 Solution – Expand/Collapse Section
Subtask 6.1 Solution: Configuring members for IPv4 DNS Anycast
Repeat the following steps for both members ibns1 and ibns2.
-
Navigate to Grid → Grid Manager → Members.
-
Highlight the member (ibns1.techblue.net or ibns2.techblue.net) and choose Edit.
-
Select the section for Anycast.
-
Under the Anycast Interfaces section, click the Add dropdown menu and select IPv4 Address.
-
In the Address field, enter
10.24.7.53, and check the checkbox for BGP
-
Don’t save yet, scroll down to the BGP Configuration section.
-
For the ASN, enter
65400. -
In the BGP Neighbor Configuration section below, click the Add button.
-
In the field for Neighbor Router, enter the appropriate router IP for the member being configured:
-
ibns1 → 10.100.0.1
-
ibns2 → 10.200.0.1
-
-
In the Remote ASN field, enter
65247. -
Click the Add button to add this entry.

-
Click Save & Close
-
A Warning message appears about changing network settings. Read and click Yes.
-
This member will be restarting. Repeat the same steps on the other member using the corresponding Neighbor router IP.
Subtask 6.2 Solution: Configuring DNS services on members to listen on additional IPv4 addresses
Perform the following steps to reconfigure the DNS services on members ibns1 and ibns2.
-
Navigate to Grid → Grid Manager → Services → DNS.
-
Place a check mark in the box next to the member (ibns1.techblue.net or ibns2.techblue.net) and click the Edit button.
-
The Member DNS Properties dialog window appears.
-
Under the General tab (displayed by default), find the section Listen on these additional IP addresses. Click Add.
-
A new entry appears with a drop-down menu for Address selection. Choose 10.24.7.53 (Anycast).
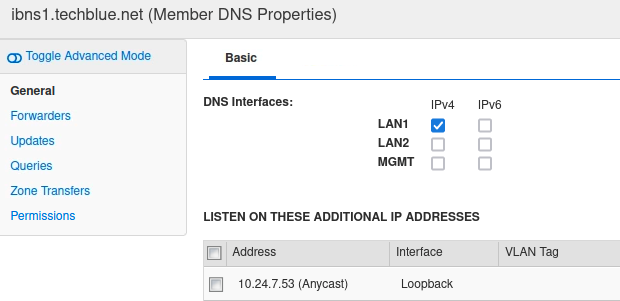
-
Click Save & Close
-
Repeat the same steps on the other member.
-
Restart service after both members have been configured.
-
Wait until all members are back to the Running (green) state before starting the next task.
Subtask 6.3 Solution: Verifying anycast address is reachable
-
Wait until both ibns1 and ibns2 have finished restarting.
-
On the jump-desktop, open a Terminal window. Enter the command
ping 10.24.7.53.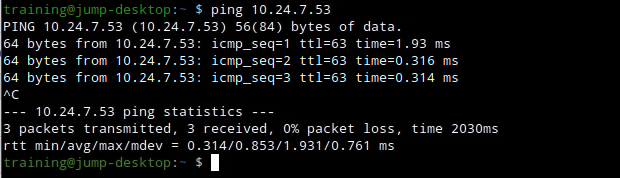
When dealing with DNS anycast, it is important to test each component separately. Remember that the DNS service is built on top of the anycast service. Test that anycast is working with ping. Then test DNS with dig.
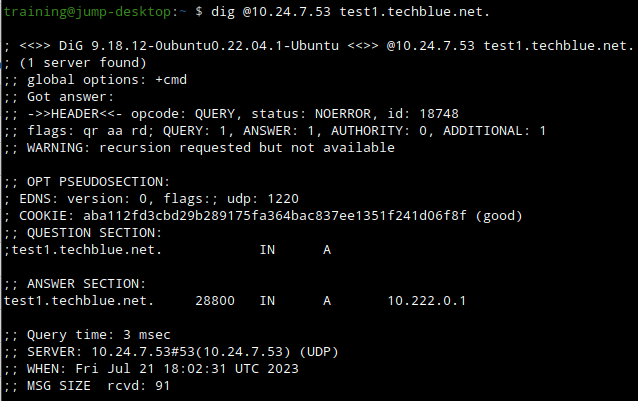
Subtask 6.4 Solution: Verifying DNS service on anycast address
-
On the jump-desktop, open a Terminal window. Enter the command
dig @10.24.7.53 test1.techblue.net. -
What name we look up is not important, nor is the response. What is important here is that we see a DNS response from this IP address.
Subtask 6.5: Verifying redundancy on anycast address
Disable the DNS service on member ibns1 to simulate a systems failure. Then query the IPv4 anycast address to resolve a name. If anycast is working as expected, the same IPv4 address will still respond even when a member if offline.
Starting a contiguous ping to the anycast address
-
Before disabling the DNS service, start a contiguous
pingon jump-desktop to the anycast address 10.24.7.53 from a Terminal window. -
Keep this Terminal window open as you disable the DNS service. You can observe that the anycast address is available throughout the process.
Disabling the DNS service
-
In the GM web interface, navigate to Data Management → DNS → Members.
-
Place a check in the box beside ibns1.techblue.net and click the Stop button in the Toolbar.
-
Click Yes to confirm the action.
-
Use the Refresh button in the bottom left of the window to update the display.
-
Wait for the Service Status for ibns1 to change to Not Running.
Verifying anycast Functionality
-
Return to the Terminal window that has the contiguous
pingcommand running. -
You should see no packet loss to the IP address 10.24.7.53, and the address is still reachable even after one of the DNS members have been disabled.
Verifying DNS Functionality
Repeat the dig lookup command from Subtask 6.4 . You should receive the same results.
-
On the jump-desktop, open a Terminal window. Enter the command
dig @10.24.7.53 test1.techblue.net. -
What name we look up and the response is not important. What is important here is that we still see a DNS response from this IP address, although one of the DNS members is now disabled.
Enabling the DNS service
-
In the GM web interface, navigate to Data Management → DNS → Members.
-
Place a check in the box beside ibns1.techblue.net and click the Start button in the Toolbar.
-
Click Yes to confirm the action.
-
Use the Refresh button in the bottom left of the window to update the display.
-
Wait for the Service Status for ibns1 to change to Running prior to proceeding to the next task.
Task 7: Adding default forwarders for DNS members
The NIOS Grid you are responsible for has two members performing recursive lookups. Currently, they are configured to query the DNS root servers directly. Due to architectural changes, your team has decided to forward all recursive queries to 2 external IP addresses provided by your DNS service provider. Please make the necessary configurations in the NIOS Grid.
Add the IP addresses 8.8.8.8 and 9.9.9.9 as forwarders for both ibns1 and ibns2.
Task 7 Solution: Adding default forwarders for DNS members
Task 7 Solution – Expand/Collapse Section
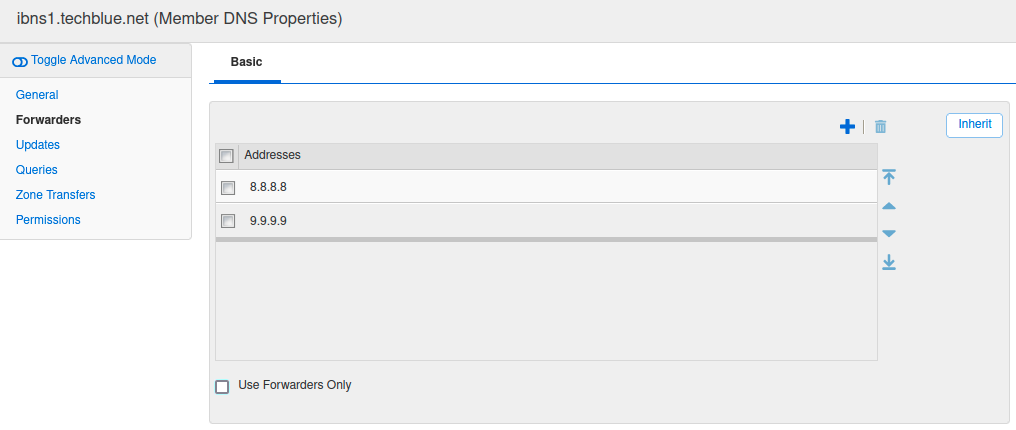
Follow the steps below to add default forwarders for ibns1 and ibns2 to forward all recursive queries to the IP address 8.8.8.8 and 9.9.9.9.
-
Navigate to Grid → Grid Manager → Services → DNS
-
Check the box next to the member (such as ibns1.techblue.net or ibns2.techblue.net) and click Edit
-
This displays the Member DNS Properties dialog window. Click on the Forwarders tab.
-
Click the Override button.
-
Click + to add a row. In the empty Address field, enter the address
8.8.8.8. -
Click + to add another row. In the empty Address field, enter the address
9.9.9.9. -
Leave the checkbox next to Use Forwarders Only unchecked. (See notes below).
-
Click Save & Close
-
Do not restart the service yet; repeat the same steps on the second member.
After you have updated both ibns1 and ibns2, restart Grid services following the system banner across the top of the screen.
Use Forwarders Only. This checkbox controls the behavior of the NIOS member whether or not to fall back to using the DNS root servers for name resolution. When this box is checked, NIOS will only use the forwarder(s) defined in the section above. When this box is unchecked, NIOS will prefer the forwarder(s) defined above and fall back to using the root servers if needed. In this scenario, since we are forwarding to external or public IP addresses, this implies the NIOS members already have Internet access. Thus, it makes sense to assume that if the forwarders (8.8.8.8 and 9.9.9.9 in this case) become unreachable, the NIOS members (ibns1 and ibns2) has the ability to fall back to querying the root servers directly.
Ultimately, the decision whether or not to check this box is up to you. There is no right or wrong answer, it’s how you want your DNS resolution to behave. If you want all queries to only go through the forwarder (8.8.8.8 and 9.9.9.9 in this case), then you can check the box. With the box checked, should 8.8.8.8 and 9.9.9.9 become unreachable, your DNS members (ibns1 and ibns2) will stop resolving domain names that require recursion (i.e. domain names that are outside of the Grid).
Task 8: Configuring DNS Views
Recently, your IT department rolled out a new VPN solution; everyone is required to log in to the VPN when connecting. When using VPN, users are assigned addresses in the 172.31.101.0/24 network and must connect to the internal or private IP addresses instead of public IP addresses. For the time being, your team has decided to have your DNS members (ibns1 and ibns2) server both view, until you can acquire additional dedicated members. Please create a new DNS view for VPN users. Create appropriate authoritative zones in the new VPN view. Copy all the zone data from the existing view to the VPN view. Then, change some records in the new views to their private IP addresses.
You may use the VMs testing-linux or testing-windows as clients connected over VPN. You may use the VM jump-desktop to simulate other clients who are not on VPN.
Table 2582-2
|
FQDN |
Default View Answer |
VPN View Answer |
|---|---|---|
|
www.techblue.net |
128.171.133.11 |
10.100.0.11 |
|
ftp.techblue.net |
128.171.133.22 |
10.100.0.22 |
|
bar.techred.net |
128.171.133.33 |
10.100.0.33 |
Subtask 8.1: Verifying DNS resolution before change
Using the VM testing-linux or testing-windows, verify the current DNS resolution before making changes. You may query for the names listed in Table 2582-2 and verify they resolve to addresses listed under Default View Answer.
Hint: Make sure both forward-mapping and reverse-mapping resolutions work.
Subtask 8.2: Creating the VPN view
Create a new DNS view named VPN. Configure the view to match clients from the network 172.31.101.0/24.
Subtask 8.3: Creating authoritative zones
Create the appropriate authoritative zones in the new VPN view.
Subtask 8.4: Copying zone data
Instead of manually re-enter all DNS records, copy zone data from the default view to the VPN view.
Subtask 8.5: Updating DNS records in the copied zone
Change records listed in Table 2582-2 to reflect the private IP addresses listed under VPN View Answer.
Subtask 8.6: Verifying DNS view ordering
Because your DNS members have more than 1 view, you need to verify order of DNS views on the members are correct.
Subtask 8.7: Verifying DNS resolution after change
Repeat the lookups from Task 1 to verify the new DNS resolution after making changes.
Task 8 Solution: Configuring DNS Views
Task 8 Solution – Expand/Collapse Section
Subtask 8.1 Solution: Verifying DNS resolution before change
Using the VM testing-linux or testing-windows, verify the current DNS resolution before making changes. You may query for the names listed in Table 2582-2 and verify they resolve to addresses listed under Default View Answer. You should also execute the same lookup queries from the VM jump-desktop to compare current behavior.
Verifying from testing-windows
-
Switch to the VM testing-windows and login.
-
Open the Tools folder on the Desktop and run the interface-static-nios.bat as an administrator.
-
This script configures a static IP address on the VM and sets ibns1 and ibns2 as the DNS servers.
-
-
Launch a command prompt by clicking on the icon in the systems tray.
-
Use the
nslookupcommand to verify DNS lookup behavior. We lookup the forward-mapping name, and lookup the IP address returned to check the reverse-mapping.C:\Users\training>nslookup www.techblue.net. Server: ibns1.techblue.net Address: 10.100.0.105 Name: www.techblue.net Address: 128.171.133.11 C:\Users\training>nslookup 128.171.133.11 Server: ibns1.techblue.net Address: 10.100.0.105 Name: www.techblue.net Address: 128.171.133.11 C:\Users\training> -
We can verify the answer(s) currently returned contain the public IP address(es) listed under the Default View Answer column.
Verifying from jump-desktop
-
Switch to the VM jump-desktop and login.
-
Launch a Terminal Emulator for command prompt by clicking on the icon in the systems tray.
-
Use the
digcommand to verify DNS lookup behavior. Again, we verify both the forward-mapping and the reverse-mapping.$ dig @10.100.0.105 www.techblue.net. +short 128.171.133.11 $ dig @10.100.0.105 -x 128.171.133.11 +short www.techblue.net. -
We can verify the answer(s) currently returned contain the public IP address(es) listed under the Default View Answer column.
Subtask 8.2 Solution: Creating a new DNS view
Create a new DNS view named VPN. Configure the view to match clients from the network 172.31.101.0/24.
-
Login to the GM interface. Navigate to Data Management → DNS.
-
From the Toolbar, click Add → DNS View. The Add DNS View dialog window appears.
-
Step 1 of 4, in the DNS View text field, enter
VPNfor the name of the view. Click Next. -
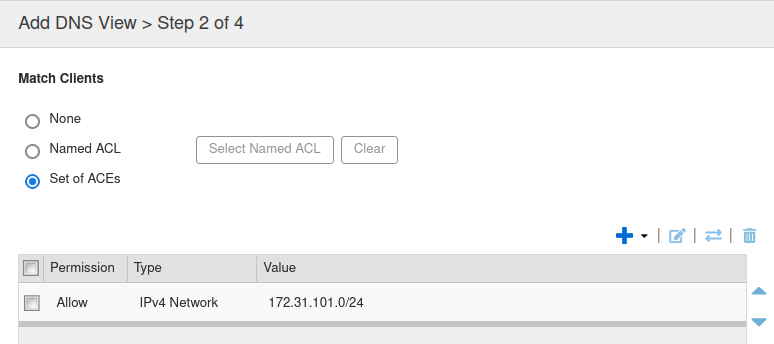
Step 2 of 4, for Match Clients, click the radio button Set of ACEs
-
Click Add (+) → IPv4 Network, the Add IPv4 Network section appears.
-
For the Address, enter
172.31.101.0. -
Slide the Netmask bar to 24.
-
Click Add. The entry is added (see screenshot below).
-
Click Save & Close.
-
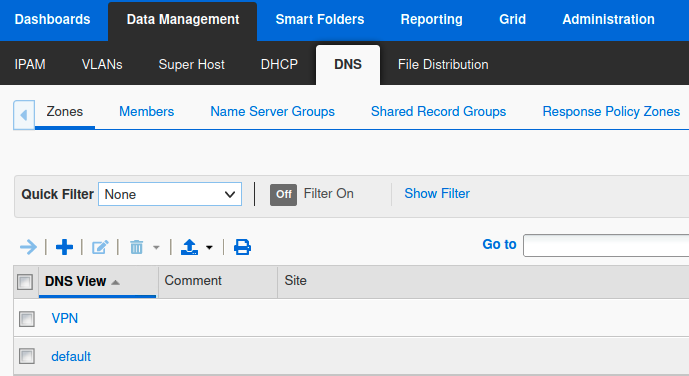
The display under Data Management → DNS → Zones is now updated to show the 2 DNS views: VPN and default.
-
You do not need to restart services yet. Even if you do restart now, there is no data in the new VPN view for you to test against.
Subtask 8.3 Solution: Creating authoritative zones
You need to review the list of authoritative zones in the default view and decide which ones you need to re-create in the VPN view.
Reviewing zones in the default view
-
Login to the GM web interface. Navigate to Data Management → DNS → Zones.
-
Click on the default view. We can see a list of currently configured zones. Note the Authoritative zones, techblue.net, techred.net , 10.in-addr.arpa, and 133.171.128.in-addr.arpa.
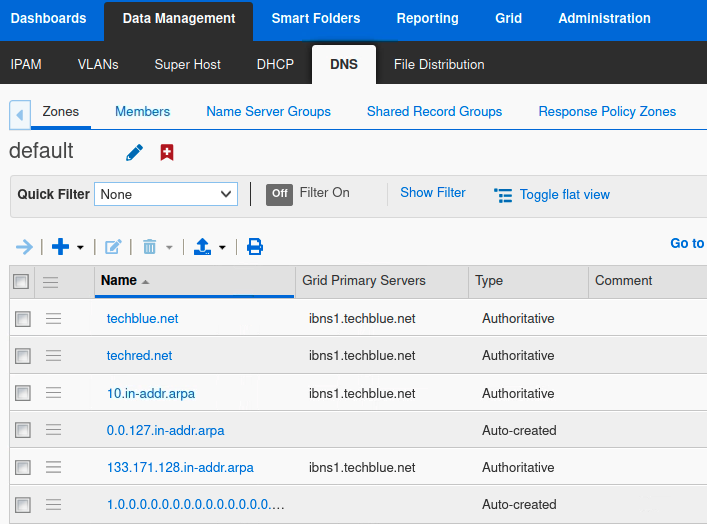
Since the new VPN view is intended for clients with private or internal IP addresses (10.x.x.x), we can conclude that we do not need to copy the external network space reverse zone (133.171.128.in-addr.arpa) to the new view. This is something you should confirm with your network architecture team.
Creating a zone in the VPN view
Use the steps below to create the 3 authoritative zones techblue.net, techred.net, and 10.in-addr.arpa:
-
Login to the GM web interface. Navigate to Data Management → DNS → Zones.
-
If you are already in the default view, click the DNS Home link on the upper left corner (above the name of the view) to return to the list of all view.
-
Click on the VPN view. There are currently no authoritative zones.
-
Click Add (+) → Authoritative Zone, this brings up the Add Authoritative Zone Wizard.
-
In step 1 of 6, select the zone type (forward mapping for techblue.net and techred.net, IPv4 reverse mapping for 10.in-addr.arpa) and click Next.
-
In step 2 of 6, enter the zone name (for techblue.net and techred.net ) or the IPv4 network 10.0.0.0/8 for the reverse-mapping zone. Click Next.
-
Step 3 of 6, leave the selection at Use this Name Server Group: Internal NSG.
-
Click Save & Close. This will map the zone to both members ibns1 and ibns2.
Subtask 8.4 Solution: Copying zone data
Instead of manually re-entering all DNS records, copy zone data from the default view to the VPN view.
Below are steps you need to take to copy all records in the zone from the default view to the zone in the VPN view. You need to repeat this for the zones techblue.net and techred.net.
You only need to do copy data for the zones techblue.net and techred.net , not for the reverse-mapping zone 10.in-addr.arpa. This is because NIOS will automatically generate reverse-mapping data from the forward-mapping data for you. You can verify this by clicking on the reverse-mapping zone before you copy any records. It should already have some records automatically populated based on system-generated information.
Copying data to the VPN view
Use the steps below to copy data from the default view to the VPN view.
-
In the GM web interface, navigate to Data Management → DNS → Zones .
-
If you are already in the VPN view, click the DNS Home link on the upper left corner (above the name of the view) to return to the list of all view.
-
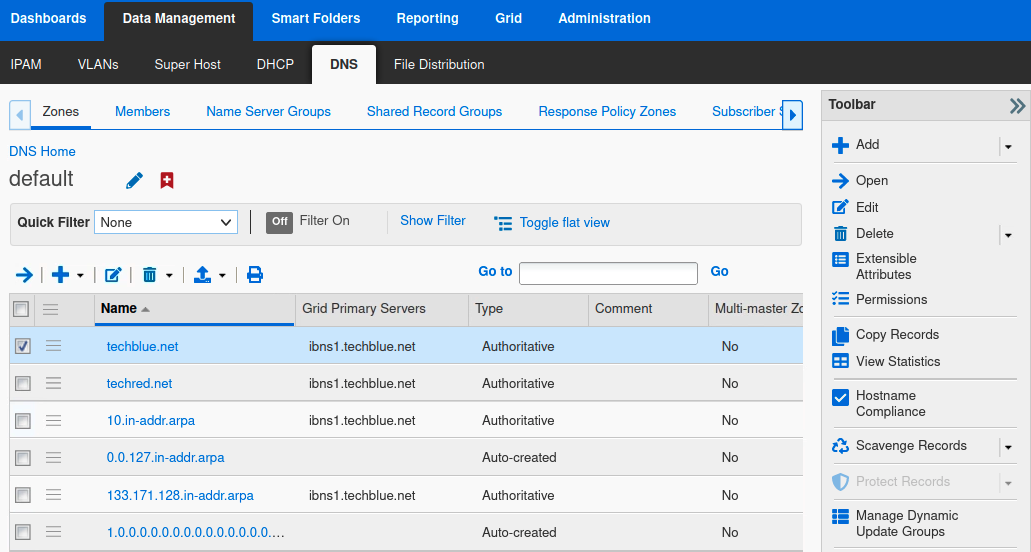
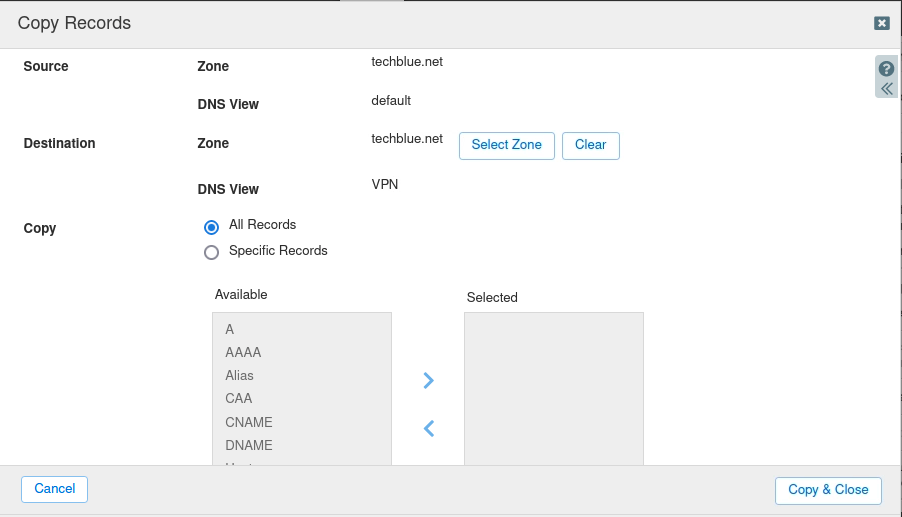
Click on the VPN view. Select the zone to copy data from. Click Toolbar → Copy Records. The example below shows the zone techblue.net selected.
-
The Copy Records dialog window appears. In Destination, click Select Zone.
-
The Zone Selector dialog appears. Use the DNS View drop-down menu to switch to the VPN view.
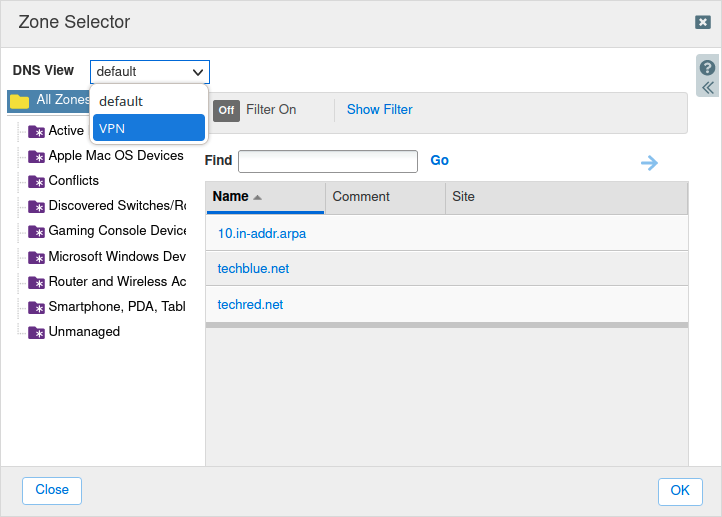
-
Select the zone in the VPN view to copy data to. Click OK. This returns you to the Copy Records dialog window. Click Copy & Close.
Sub Task 8.5: Updating DNS records in the copied zone
Change records listed in Table 2582-2 to reflect the private IP addresses listed under VPN View Answer.
-
Login to the GM web interface. Navigate to Data Management → DNS → Zones.
-
If you are already in the default view, click the DNS Home link on the upper left corner (above the name of the view) to return to the list of all view.
-
Click on the VPN view. There should be 3 authoritative zones that we created and copied data into here.
-
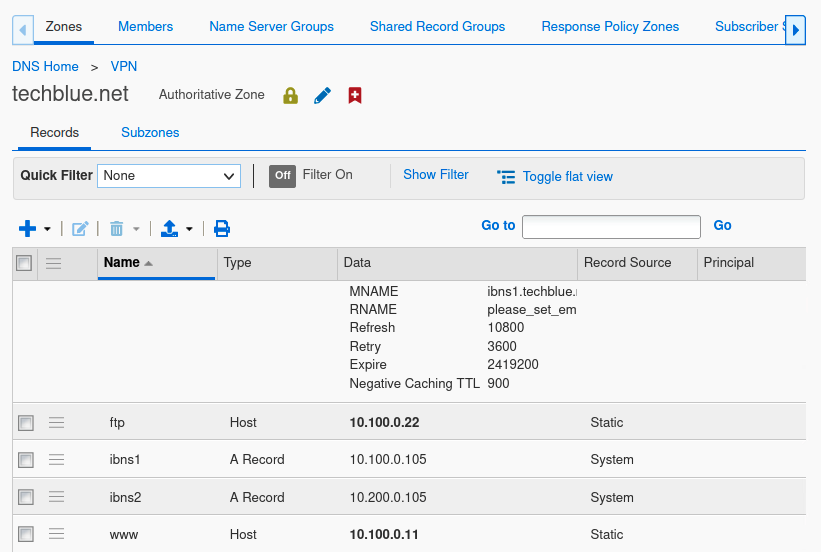
Click on the zone techblue.net to access all the records that were copied here in the previous task.
-
Edit the records ftp and www to the private IP addresses listed in Table 2582-2:
-
ftp.techblue.net → 10.100.0.22
-
www.techblue.net → 10.100.0.11
-
-
Navigate to the zone techred.net by clicking on the link VPN above the zone name, then click on the zone techred.net.
-
Edit the records bar to the private IP addresses listed in Table 2582-2:
-
bar.techred.net → 10.100.0.33
-
-
Navigate to the zone 10.in-addr.arpa by clicking on the link VPN above the zone name, then click on the zone 10.in-addr.arpa.
-
You can review that all the reverse-mapping records have been automatically generated here.
Subtask 8.6: Verifying DNS view ordering
Because your DNS members have more than 1 view, you need to verify order of DNS views on the members are correct.
Best practice recommends “one member, one view”, and there would be no DNS view ordering involved. However, since we are making our DNS members serve 2 views, we must verify the order of DNS views correct. In our case, we want the VPN view to be listed at the top, because it has a match-client statement for 172.31.101.0/24. The default view does not have any match-client statement. If the default view was listed first, no one will ever hit the VPN view, everyone will get matched into the default view.
Repeat the steps below for both ibns1 and ibns2.
-
In the GM web interface, navigate to Data Management → DNS → Members.
-
Select the member (ibns1 or ibns2) and click Edit. The Member DNS Properties dialog opens.
-
Toggle to the Advanced Mode if not already toggled.
-
Click the DNS Views tab on the left.
-
Scroll down to the section Order of DNS Views. Make sure VPN is listed first.
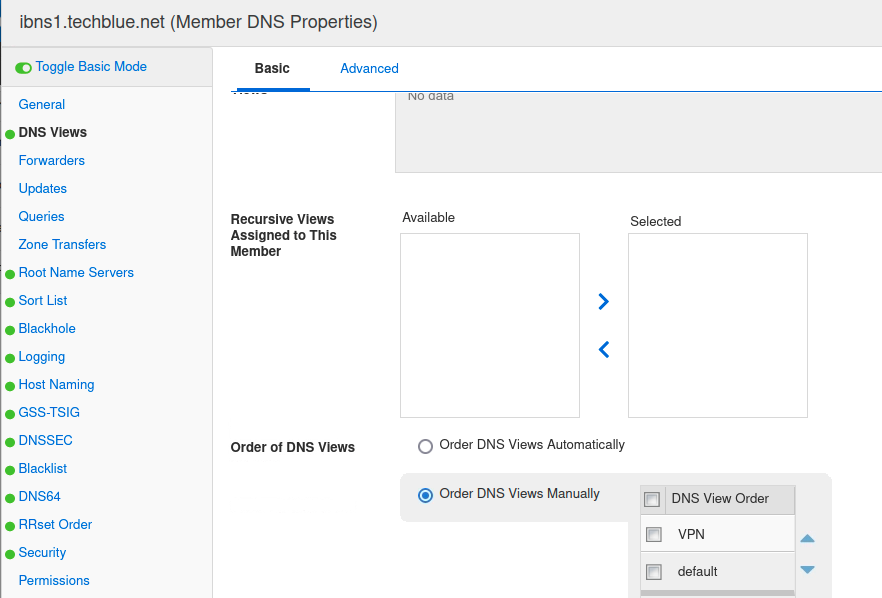
-
Click Save & Close.
-
Restart services when prompted.
Subtask 8.7 Solution: Verifying DNS resolution after change
Repeat the lookups from Task 1 to verify the new DNS resolution after making changes.
Verifying from testing-windows
-
Switch to the VM testing-windows and login.
-
Launch a command prompt by clicking on the icon in the systems tray.
-
Use the
nslookupcommand to verify DNS lookup behavior:C:\Users\training>nslookup www.techblue.net. Server: ibns1.techblue.net Address: 10.100.0.105 Name: www.techblue.net Address: 10.100.0.11 C:\Users\training>nslookup 10.100.0.11 Server: ibns1.techblue.net Address: 10.100.0.105 Name: www.techblue.net Address: 10.100.0.11 C:\Users\training> -
We can verify the answer(s) currently returned contain the private IP address(es) listed under the VPN View Answer column.
Verifying from jump-desktop
-
Switch to the VM jump-desktop and login.
-
Launch a Terminal Emulator for command prompt by clicking on the icon in the systems tray.
-
Use the
digcommand to verify DNS lookup behavior:$ dig @10.100.0.105 www.techblue.net. +short 128.171.133.11 $ dig @10.100.0.105 -x 128.171.133.11 +short www.techblue.net. -
We can verify the answer(s) currently returned contain the public IP address(es) listed under the Default View Answer column.
Task 9: Configuring NAT'ed Glue Records
Your organization has decided to move the DNS configuration into production. To avoid confusion, rename the default view to External and the VPN view to Internal. In addition, the DNS servers are behind NAT, and the glue records must reflect the NAT’ed public IP addresses instead of private ones to ensure external users can properly resolve these DNS records.
Subtask 9.1: Renaming the DNS View
Rename the DNS view from default to External, and rename the VPN view to Internal.
Subtask 9.2: Configuring NAT'ed IP Addresses for Glue Records
Configure glue records in the new view to reflect the NAT'ed public IP addresses of DNS servers, instead of the private IP addresses assigned to their interfaces. Please refer to Table 2582-3 for details.
Table 2582-3
|
Name Server |
Internal/Private IP Address |
External/Public IP Address |
|---|---|---|
|
ibns1.techblue.net |
10.100.0.105 |
203.0.113.50 |
|
ibns2.techblue.net |
10.200.0.105 |
203.0.113.51 |
Glue records are A or AAAA records that belong to NS records.
Subtask 9.3: Verifying resolution
Test and confirm that the external clients are now getting the NAT'ed IP addresses when querying the glue records for both ibns1.techblue.net and ibns2.techblue.net.
Task 9 Solution: Configuring NAT'ed Glue Records
Task 9 Solution – Expand/Collapse Section
Subtask 9.1 Solution: Renaming the DNS View
-
In Data Management → DNS → Zones, you should see both views (VPN and default).
-
Select the view default and click Edit.
-
In the DNS View field, change the name to External. Click Save & Close.
-
Now select the view VPN and click Edit.
-
In the DNS View field, change the name to Internal. Click Save & Close.
If you do not see multiple DNS views under Data Management → DNS → Zones, you might be inside of a zone. Look for the DNS Home link on the upper left corner, it should be located between the name of the view and the sub menus. This link will display all of the DNS views configured for the Grid.
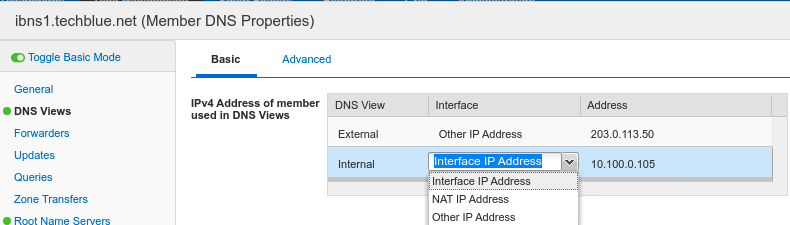
Subtask 9.2 Solution: Configuring NAT'ed IP Addresses for Glue Records
The DNS member configuration needs to be updated. After the update, the Infoblox Grid will automatically reconfigure the zone records in the external DNS view.
Perform the following steps on the members ibns1 and ibns2:
-
Navigate to Data Management → DNS → Members, edit the Member DNS Properties.
-
Toggle into Advanced Mode and select DNS Views from the side menu.
-
In the section IPv4 Address of Member Used in DNS Views, look for External. It defaults to Interface IP address. Change it from Interface IP Address to Other IP Address, and enter the public or external IP address for this member. The example screenshot shows the completed configuration for the member ibns1.techblue.net. Please refer to Table 2582-3 for details.
-
Click Save & Close. You will be prompted to restart the service. Wait until you have configured both members, then restart the service.
Subtask 9.3 Solution: Verifying resolution
Verifying from testing-windows
-
Switch to the VM testing-windows and login.
-
Launch a command prompt by clicking on the icon in the systems tray.
-
Use the
nslookupcommand to verify DNS lookup behavior:
When we run the query from testing-windows, the answer comes from the Internal view, and we can verify that it is correct. Notice the presence of the private IP address, which confirms that the response is sourced from the Internal DNS view on member 10.100.0.105.C:\Users\training>nslookup ibns1.techblue.net. Server: ibns1.techblue.net Address: 10.100.0.105 Name: ibns1.techblue.net Address: 10.100.0.105 C:\Users\training>nslookup 10.100.0.105 Server: ibns1.techblue.net Address: 10.100.0.105 Name: ibns1.techblue.net Address: 10.100.0.105
Verifying from jump-desktop
-
Switch to the VM jump-desktop and log in.
-
Launch a Terminal Emulator for command prompt by clicking on the icon in the systems tray.
-
Use the
digcommand to verify DNS lookup behavior:
When we run the same query, the answer comes from the External view, and we can verify that it is correct. Notice the presence of the AA flag, which confirms that we are receiving this authoritative answer from member 10.100.0.105.$ dig @10.100.0.105 ibns1.techblue.net. A ; <<>> DiG 9.11.12 <<>> @10.100.0.105 ibns1.techblue.net. A ; (1 server found) ;; global options: +cmd ;; Got answer: ;; ->>HEADER<<- opcode: QUERY, status: NOERROR, id: 59671 ;; flags: qr aa rd ra; QUERY: 1, ANSWER: 1, AUTHORITY: 0, ADDITIONAL: 1 ;; OPT PSEUDOSECTION: ;; QUESTION SECTION: ;ibns1.techblue.net. IN A ;; ANSWER SECTION: ibns1.techblue.net. 28800 IN A 203.0.113.50 ;; Query time: 5 msec ;; SERVER: 10.100.0.105#53(10.100.0.105) ;; WHEN: Thu Aug 19 20:50:16 UTC 2021 ;; MSG SIZE rcvd: 91