Scenario
Your organization is undergoing several network and IPAM management changes to meet evolving operational requirements across departments and geographic locations. These changes are designed to improve the organization and tracking of network resources, streamline provisioning, and automate configurations. Specifically, you will:
-
Create extensible attributes (EAs) to tag infrastructure and client devices with department-specific information, ensuring mandatory tracking for IPv4 and IPv6 Network objects.
-
A new branch of your organization has been established in New York, USA. Create a /18 network container for the NAM area to easily manage the supernet in the new geo location.
-
Utilize Net Maps to provision new networks and IP Maps to analyze network usage and investigate specific IP address details.
-
Perform a network discovery to identify and resolve unauthorized devices and address potential IP conflicts.
-
Use CSV imports to streamline the addition of DNS zones, networks, and IPAM data while addressing and correcting import errors.
Estimate Completion Time
-
60 to 70 minutes
Credentials
|
Description |
Username |
Password |
URL or IP |
|---|---|---|---|
|
Grid Manager UI |
admin |
infoblox |
Requirements
-
Administrative access to the NIOS Grid
Learning Content
Lab Initiation
Access jump-desktop
Once the lab is deployed, you can access the virtual machines required for this activity. To begin, select VM List from the navigation bar at the top, locate jump-desktop, and click the green play icon to open its console. Log in to the Linux UI.

Username: training
Password: infoblox
Initiate lab
To initiate the lab, double-click the Launch Lab icon on the Desktop.

Choose the lab number from the list and click OK.

After clicking OK, you will see a pop-up message with a brief description of the lab task. If the description looks correct, click Yes to continue lab initiation.

Lab initiation will take a couple of minutes to finish.
Once complete, you will see another pop-up message with the login credentials and the URL for the Grid Manager’s User Interface. Note that the credentials may differ from those from prior labs.

Tasks
Task 1: Creating an extensible attribute
Create an extensible attribute named Department. This EA should allow users to select the correct department from a drop-down list. This list should contain:
-
Engineering
-
IT
-
Sales
-
Training
Task 2: Creating a IPv4 Network Container for NAM Branch Networks
Create a Network Container for the supernet 172.31.64.0/18 to contain all of the NAM Branch Networks.
Task 3: Using Net Map to allocate a new IPv4 network
Having a network container for the supernet 172.31.64.0/18 gives you the ability to use the Net Map function for network allocation. Please use this function to provision a IPv4 network of size /24.
Task 4: Using IP Map to determine which IP addresses are in use
Switching to IP Map for a more detailed view, examine the network 172.31.101.0/24. Note down which IP addresses are in use, and what they are being used for. This
Task 5: Using IP Map to provide details IP addresses
Using the IP Map view, find more information about the IP addresses 172.31.101.69 and 172.31.101.70.
Task 6: Performing a discovery on a network
Perform a discovery on the network 10.100.0.0/24.
Hint: the Grid member ibns1.techblue.net provides DHCP service to this network. It is the most ideal member to perform the network discovery.
Task 7: Checking discovery progress
Use the dashboard to monitor the discovery progress.
Task 8: Investigating potential conflicts
After a successful discovery, investigate a potential conflict on the IP address 10.100.0.20.
Task 9: Import a DNS Zone Using the CSV Import Function
Navigate to the Grid Manager web interface and use the CSV Import function to import the AuthZone-Engineering.csv file. Ensure the import is successful.
Task 10: Import a CSV File Containing Errors
Use the CSV import function to import the AuthZone-Regions.csv file and download the error report to troubleshoot the import issues.
Task 11: Fix the CSV File Errors and Re-import the Data
Correct the errors in the CSV error report downloaded in Task 10, and re-import the data into the NIOS Grid.
Task 12: Import a CSV File Containing Network Data
Use the CSV import function to import the Network-techblue.net.csv file and verify that the network information has been imported correctly.
Task 13: Use a CSV File to Import Missing IPAM Information
Use the CSV import function to import the IPAM-techblue.net.csv file and verify that the IPAM data has been updated for the networks.
Solutions
Task 1 Solution: Create an extensible attribute
-
Navigate to Administration→Extensible Attributes
-
Click the Add button
-
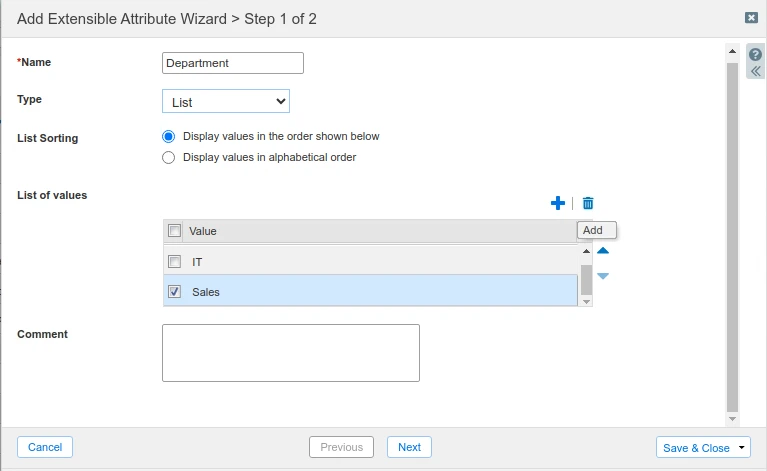
For Name, enter Department
-
For Type, select List
-
To add the values, click the Add button and enter the first department name in the Value field
-
Repeat previous step, entering the values for remaining departments.
-
Click Next to proceed to Step 2 of the Add Extensible Attribute Wizard.
-
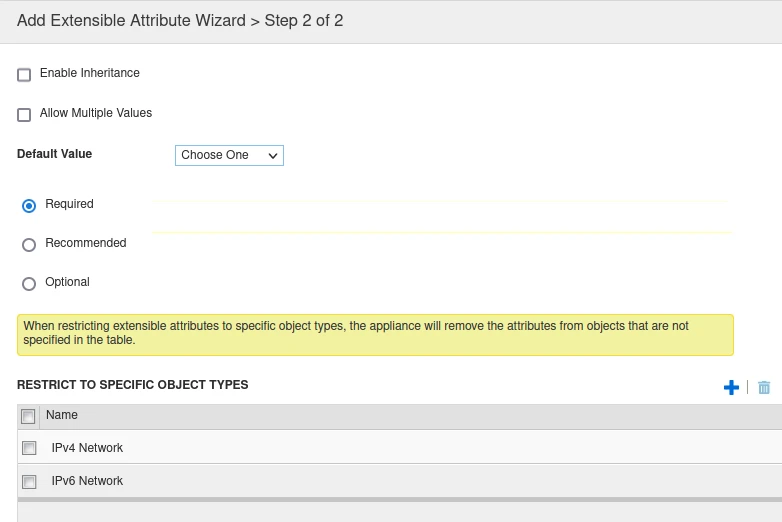
In the section Default Value, click the radio button Required.
-
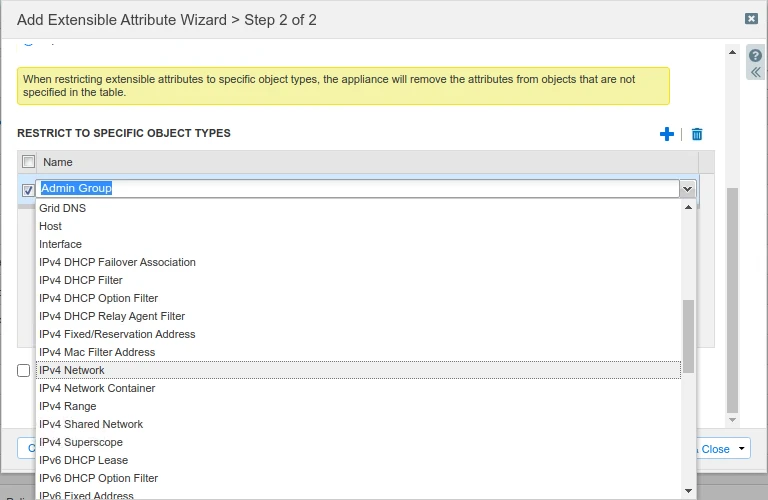
Under the heading Restrict to Specific Object Types, click Add.
-
Click the Name field, the object list opens. Scroll to locate IPv4 Network.
-
With IPv4 Network in the Object Type list, click Add again.
-
Click the Name field, the object list opens. Scroll to locate IPv6 Network.
-
When complete, verify that your table contains both entries for IPv4 Network and IPv6 Network
-
Click Save & Close
Task 2 Solution: Creating a IPv4 Network Container for NAM Branch Networks
Create a Network Container for the supernet 172.31.64.0/18 to contain all of the NAM Branch Networks.
-
In the GM web interface, navigate to Data Management → IPAM
-
Click on Add (+) and choose IPv4 Network
-
Select the Add Network Container radio button, click Next
-
For Netmask, enter 18
-
Click Add (+) to add a network, and specify 172.31.64.0
-
For Comment, enter NAM Branch Networks
-
Click Save & Close
-
Click Restart in the Restart Services banner (appears automatically near the top)
-
The IPAM network list will now show the network container/folder for 172.31.64.0/18
Task 3 Solution: Using Net Map to allocate a new IPv4 network
This task demonstrates how you can use the Net Map function to easily provision additional smaller networks. For this task, you are provisioning a /24 network within a /18 space.
-
In the GM web interface, navigate to Data Management → IPAM.
-
You should now see a list of all IPAM Networks.
-
Click on the 172.31.64.0/18 Network Container.
-
You should now see the Net Map view of the networks.
-
Click on the blank space between the two existing networks, the blank space should now have a green line around it. You may choose any blank space to your liking. For this example, we will choose the blank space nearest to the top left for the lowest-numbered addresses.
-
Click on the Add (+) button, notice the Add Network slider/size has automatically been set to /24.
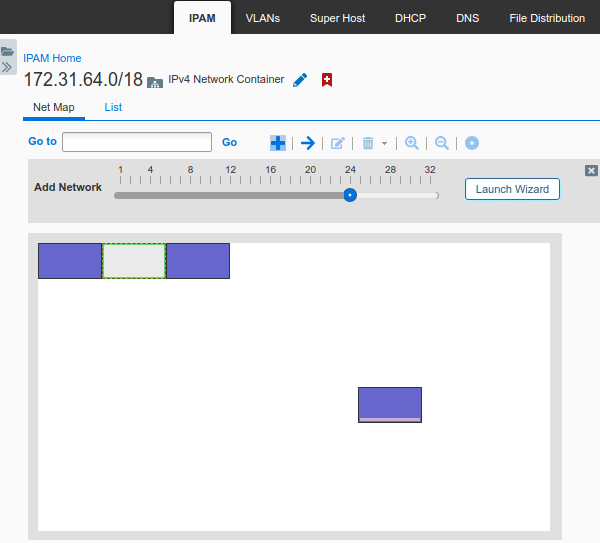
-
Click on the Launch Wizard button to launch the Add Network Wizard.
-
Select the options for Add Network and Manually, click Next.
-
Notice the Netmask and Network options have automatically been filled out.
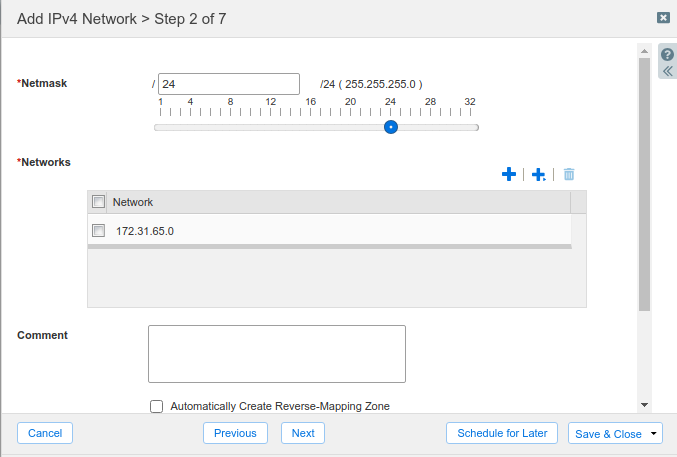
-
Click Next and continue through the wizard until you reach Step 6 of 7.
-
At Step 6, locate the Extensible Attributes section.
-
Locate the attribute Department.
-
In the Value column, click the dropdown menu and select Training as the value for the attribute.
-
-
Click Save & Close to create the IPv4 network.
-
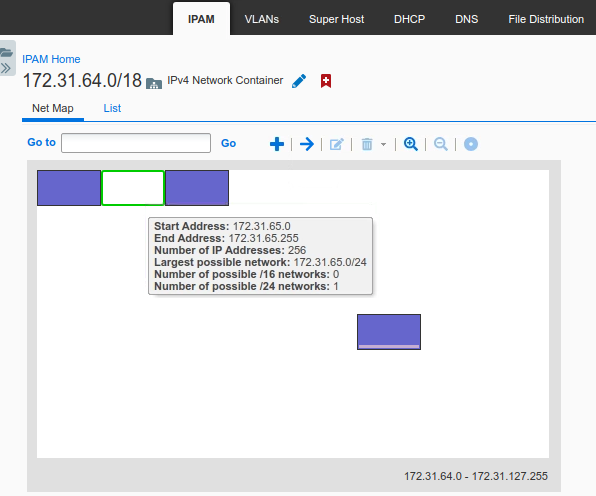
The blank space in Net Map view will now be filled in with a blue leaf network.
-
Hover your mouse over the leaf network will display details about that leaf network.
Task 4 Solution: Using IP Map to determine which IP addresses are in use
Use the IP Map to determine which IP addresses are in use on the 172.31.101.0/24 network
-
In the GM web interface, navigate to Data Management→IPAM
-
If you are already inside of an IPAM network, click the IPAM Home link to return to the top level
-
Click the link for the 172.31.64.0/18 network container
-
Click on 'List'. Then select the network 172.31.101.0/24
-
Click on ‘IP Map’ for the 172.31.101.0/24 network.
-
In the IP Map view, the color of the squares corresponds to the color key on the right of the map, detailing the usage of the IP addresses in the network.
Task 5 Solution: Using IP Map to provide details IP addresses
Find details about the IP address assigned to client testing-linux from IPAM.
-
Navigate to Data Management→IPAM
-
If you are already inside of an IPAM network, click the IPAM Home link to return to the top level.
-
Click the link for the 172.31.64.0/18 network container.
-
Click on 'List'. Then select the network 172.31.101.0/24.
-
Click on ‘IP Map’ for the 172.31.101.0/24 network.
-
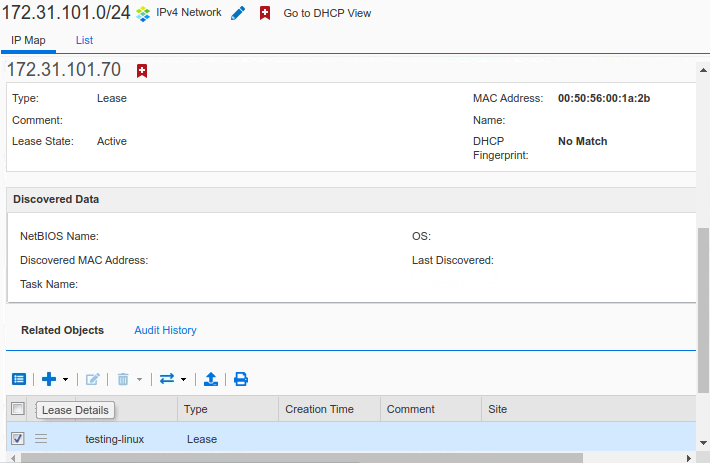
In the IP Map view, you can hover over an IP address to see more information. Below is the information for 172.31.101.70:

-
Click on the IP address and more information is available on the bottom of the screen (need to scroll down). Below is the example for 172.31.101.70.
Task 6 Solution: Performing a discovery on a network
-
In the GM web interface, navigate to Data Management → IPAM.
-
If you are already inside of an IPAM network, click the IPAM Home link to return to the top level.
-
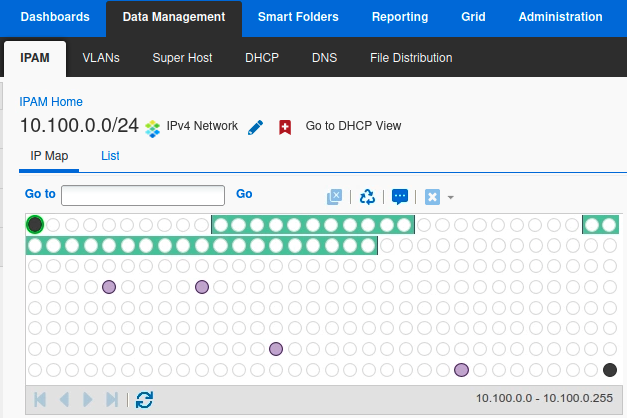
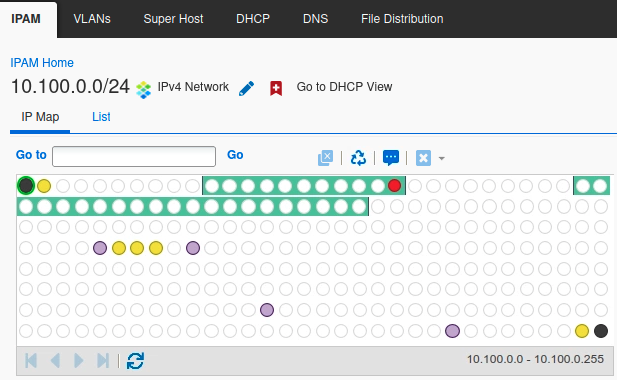
Go to the network 10.100.0.0/24, and select the IP Map view. You should see something similar to the screenshot below.
-
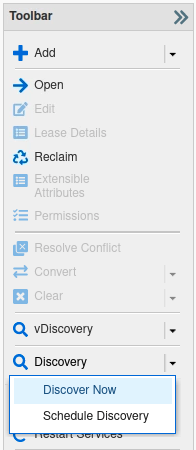
In the Toolbar, click Discovery → Discover Now.
-
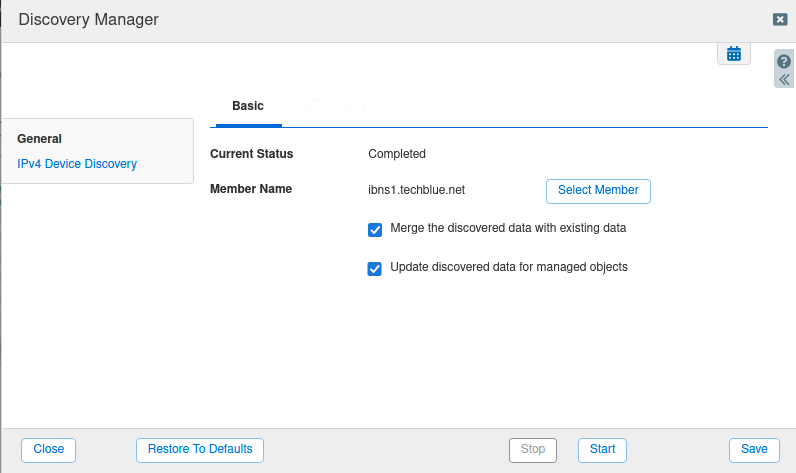
The Discovery Manager dialog appears.
-
In Member Name, change member by clicking on Select Member and choose ibns1.techblue.net.
-
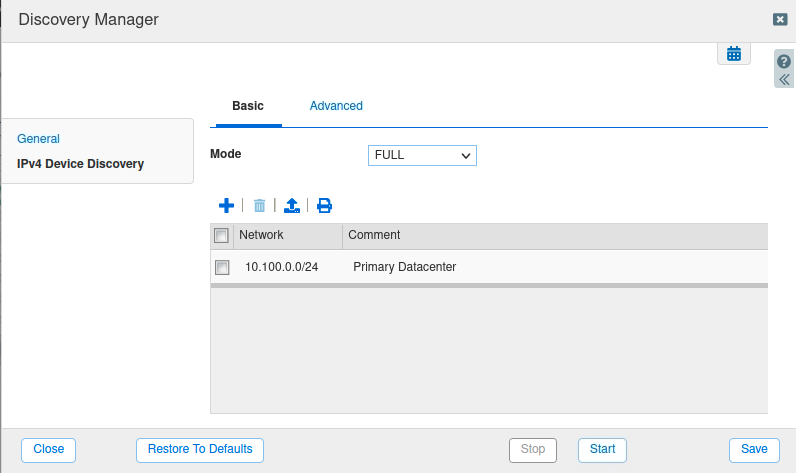
Click on the IPv4 Device Discovery tab and confirm the mode is FULL, and the network 10.100.0.0/24 is listed.
-
Click Save. Then click the Start button, this will perform a one-time discovery on the network.
-
You may click Close and the discovery will continue to run in the background.
Task 7 Solution: Checking discovery progress
-
To check on the status of the discovery, navigate to Dashboards → Status.
-
Find the Discovery Status widget. It displays the current discovery progress.
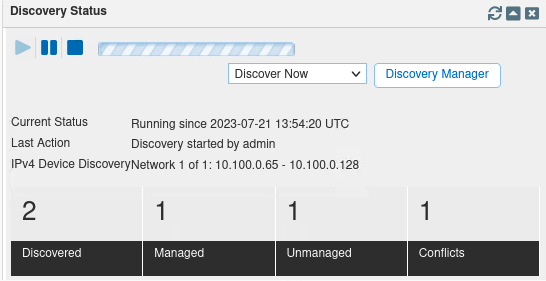
-
Wait for the discovery to be completed. This could take a few minutes.
Task 8 Solution: Investigating potential conflicts
-
Navigate to Data Management → IPAM, to the network 10.100.0.0/24 → IP Map.
-
The IP Map is now updated with the results from the network discovery. You should see some yellow entries (unmanaged hosts), and one red entry (conflict).
-
Click on the red entry (conflict), the IP address 10.100.0.20. Additional information is displayed both when you hover over the entry, and at the bottom of the screen.
-
With the conflict entry highlighted, click Toolbar → Resolve Conflict.
-
The description reads: “Discovered address is within an existing DHCP range but does not match an existing lease, fixed address, or exclusion range.”

-
At this point you may choose one of the 3 resolutions:
-
Create a fixed address: If you chose this option, the IP address 10.100.0.20 will always be assigned to the MAC address b0:3a:3f:f2:13:7f.
-
Create a reservation: If you chose this option, the IP address 10.100.0.20 will be reserved and never assigned to anyone.
-
Ignore this conflict: You may need to investigate further before deciding what to do. If that is the case, choose this option.
-
The most likely option given the circumstances, would be Create a reservation. This will prevent a potential IP address conflict when the DHCP server hands out 10.100.0.20 to another device, while you investigate the root cause of why this MAC address b0:3a:3f:f2:13:7f is on this address. There are 2 possibilities: 1) it is configured statically/manually, or 2) it received this IP address from a different DHCP server. In the first case, you should still use Create a reservation, in addition to creating the appropriate DNS or Host information; in the second case, you need to locate the rogue DHCP server, so that all devices on this network receive DHCP leases only from the NIOS member.
Task 9 Solution: Import a DNS Zone Using the CSV Import Function
To import DNS zones into NIOS using CSV, follow these steps:
-
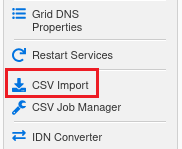
In the GM web interface, navigate to Data Management → DNS → Zones.
-
From the toolbar on the right, click CSV Import.
-
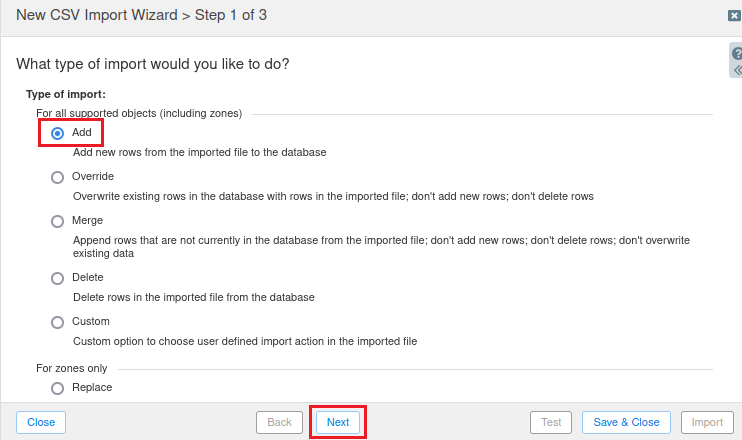
At Step 1 of 3, leave the radio button set to Add.
-
Click Next.
-
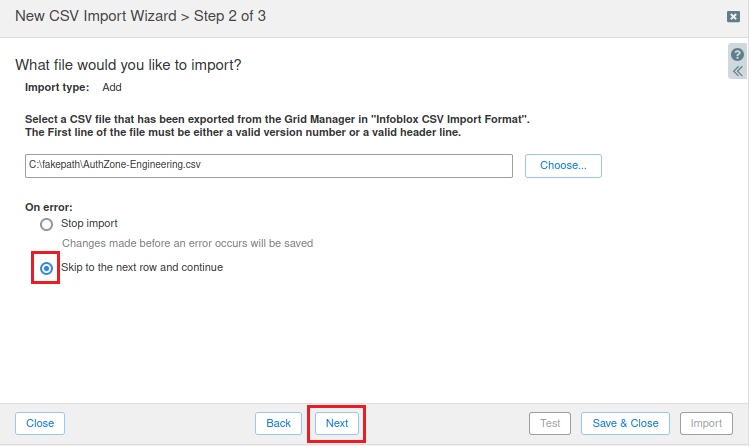
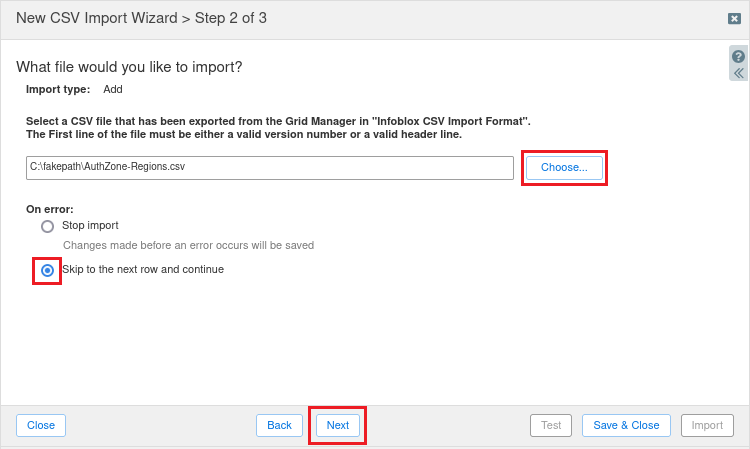
At Step 2 of 3, click Choose.
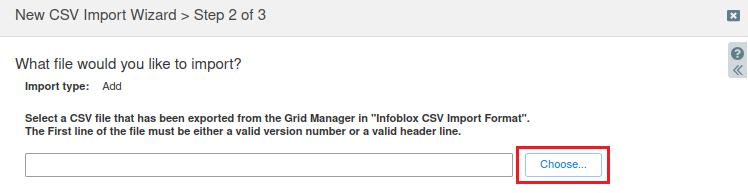
-
Open the Desktop and select the
AuthZone-Engineering.csvfile.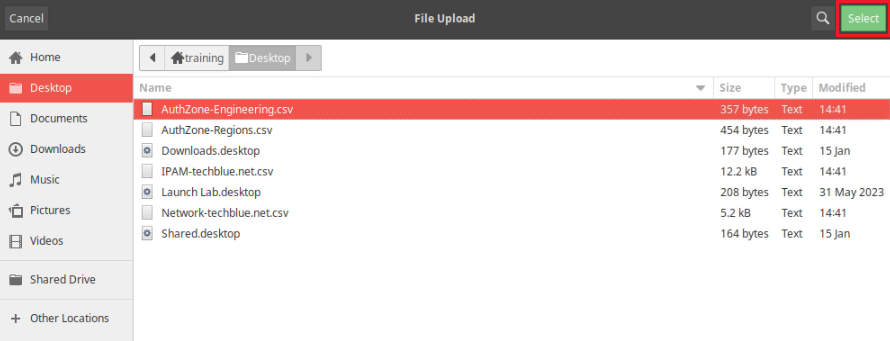
-
Select the radio button Skip to the next row and continue.
-
Click Next.
-
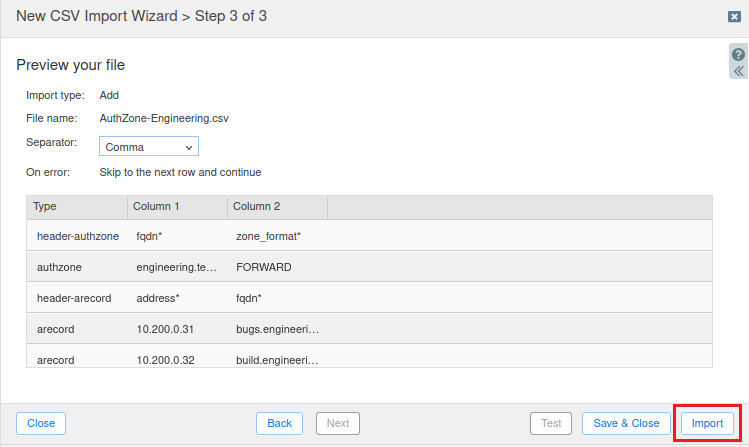
At Step 3 of 3, leave the settings unchanged.
-
Click Import.
-
At the Start CSV Import window, click Yes to proceed.

-
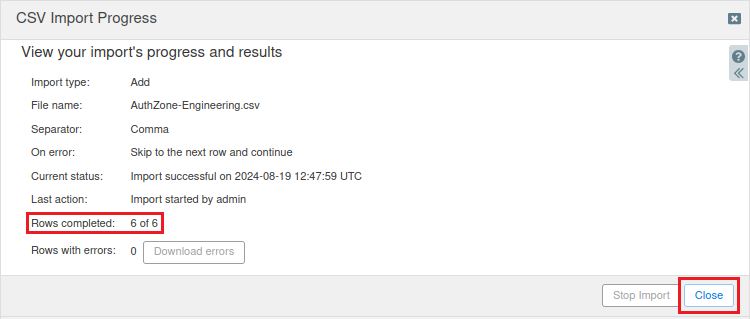
At the CSV Import Progress window, wait until the Rows completed section displays 6 of 6, indicating that the import process is complete.
-
Click Close.
-
Restart Services by clicking the Restart button in the notification banner at the top of Grid Manager UI

-
At the Restart Grid Services window, click Restart.
-
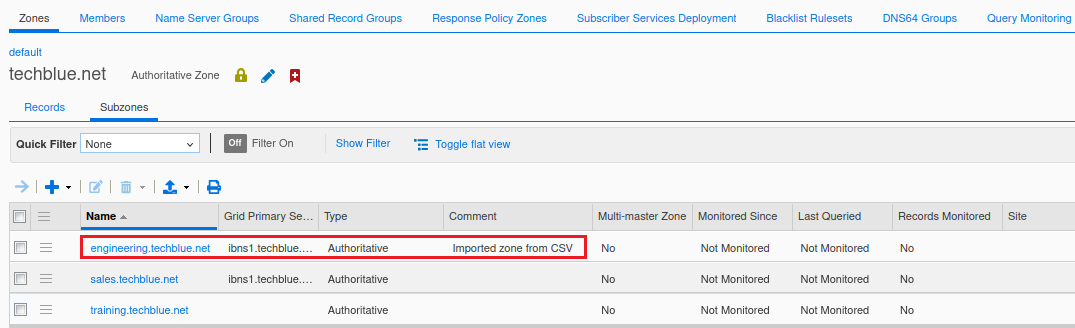
Navigate to Data Management → DNS → Zones → techblue.net → Subzones to verify that the new DNS zone has been imported successfully.
Task 10 Solution: Import CSV File with Errors and Fix the Errors
To import the AuthZone-Regions.csv file, follow these steps:
-
In the GM web interface, navigate to Data Management → DNS → Zones.
-
From the toolbar on the right, click CSV Import.
-
At Step 1 of 3, leave the radio button set to Add.
-
Click Next.
-
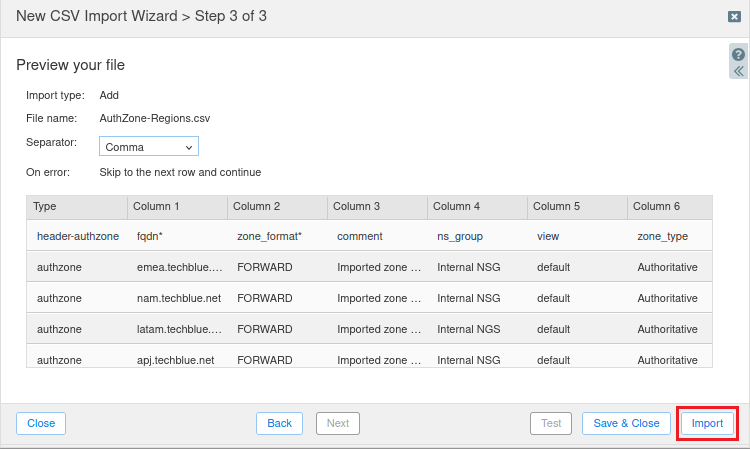
At Step 2 of 3, click Choose.
-
Select the
AuthZone-Regions.csvfile from the Desktop. -
Select the radio button Skip to the next row and continue.
-
Click Next.
-
At Step 3 of 3, leave the settings unchanged.
-
Click Import.
-
At the Start CSV Import window, click Yes to proceed.
-
At the CSV Import Progress window, wait until the Current Status section no longer shows that it is pending.
-
Note that the Rows with errors section indicates that some rows were not imported.
-
Click the Download errors button.
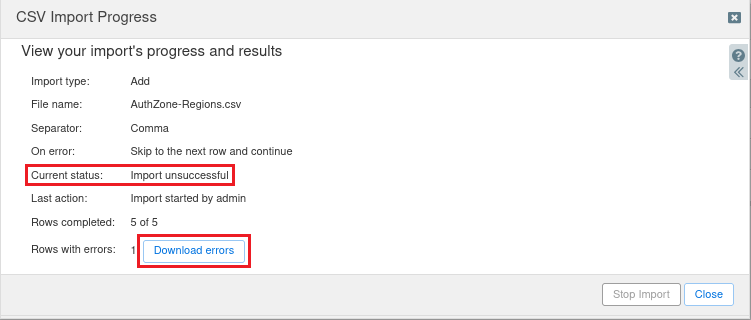
-
Save the error file to the Downloads folder and make a note of the file name (e.g.,
csv-error.2.csv). This file will be used in Task 11.
Task 11 Solution: Fix the CSV File Errors and Re-import the Data
To fix the errors in the CSV file downloaded in Task 10, follow these steps:
-
Open the Downloads folder icon from the Linux Desktop.
-
Double-click the error file you downloaded (e.g.,
csv-error.2.csv) to open it in LibreOffice. -
At the Text Import window, ensure the Character set is configured to UTF-8, leave the remaining settings unchanged, and click OK.
-
When the spreadsheet opens in LibreOffice , note that there is a new column at the beginning that includes the error.

-
Fix the errors by following these steps:
-
Scroll to the right until you see Column F.
-
Change the text from Internal NGS to Internal NSG.
-
Scroll back to Column A.
-
Click the column header labeled A to highlight the entire column.
-
Click Sheet from the menu.
-
Select Delete Columns.
-
-
Click File, then Save, and then click the Use Text CSV Format option.
-
Click File, then Exit LibreOffice to close the spreadsheet file and return to the browser window.
-
At the CSV Import Progress window, click Close.
-
Repeat the CSV Import process to import the newly edited file (e.g.,
csv-error.2.csv) from the Downloads folder. -
Once completed, Restart Services by clicking the Restart button in the notification banner at the top of Grid Manager UI
-
At the Restart Grid Services window, click Restart.
-
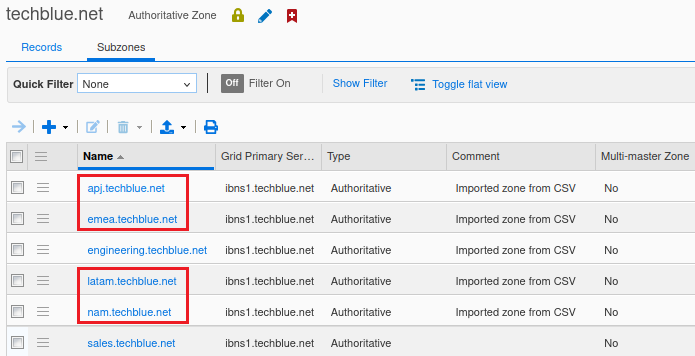
Navigate to Data Management → DNS → Zones → techblue.net → Subzones.
-
Check the Zone list and verify that the following zones were imported successfully:
-
apj.techblue.net
-
emea.techblue.net
-
nam.techblue.net
-
latam.techblue.net (imported after the error was fixed).
-
Task 12 Solution: Import a CSV File Containing Network Data
To import the Network-techblue.net.csv file, follow these steps:
-
In the GM web interface, navigate to Data Management → IPAM.
-
From the toolbar on the right, click CSV Import.
-
At Step 1 of 3, leave the radio button set to Add.
-
Click Next.
-
At Step 2 of 3, click Choose.
-
Select the
Network-techblue.net.csvfile from the Desktop. -
Select the radio button Skip to the next row and continue.
-
Click Next.
-
Click Import.
-
Click Yes at the Start CSV Import confirmation box.
-
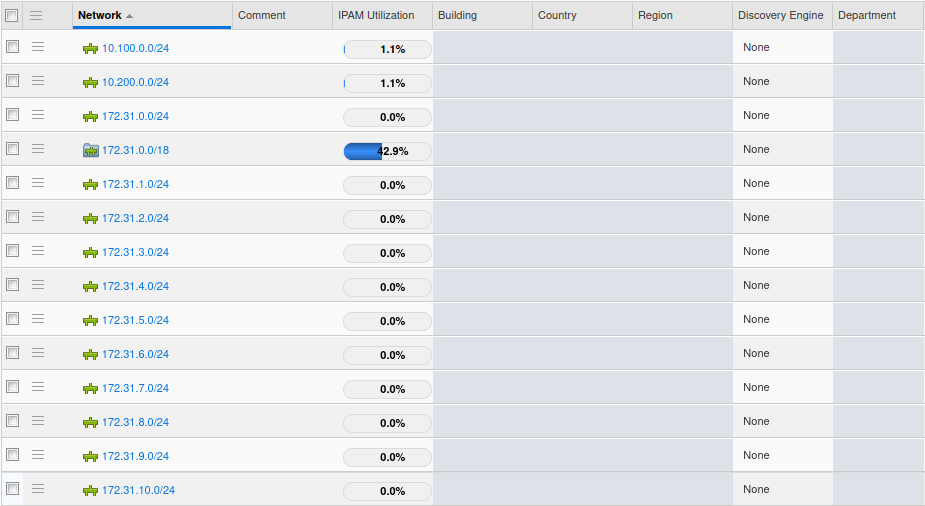
Wait until 138 of 138 rows are imported with 0 errors.
-
Click Close to close the CSV Import Progress window.
-
Restart services if prompted.
-
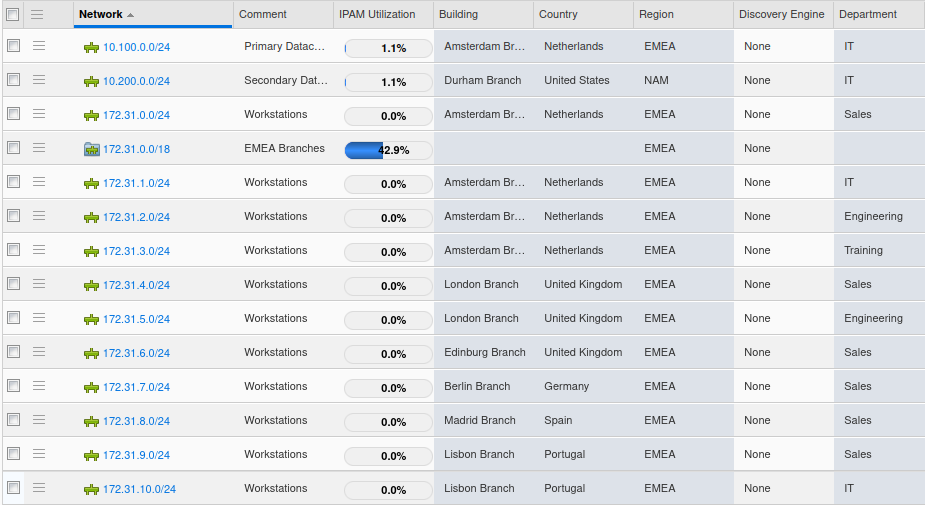
Verify that the new networks are visible in IPAM. If the networks are not visible, click Toggle flat view to switch from hierarchical to flat view and display the networks as shown in the image below.
Task 13 Solution: Use a CSV File to Import Missing IPAM Information
To import the IPAM-techblue.net.csv file, follow these steps:
-
In the GM web interface, navigate to Data Management → IPAM.
-
From the toolbar on the right, click CSV Import.
-
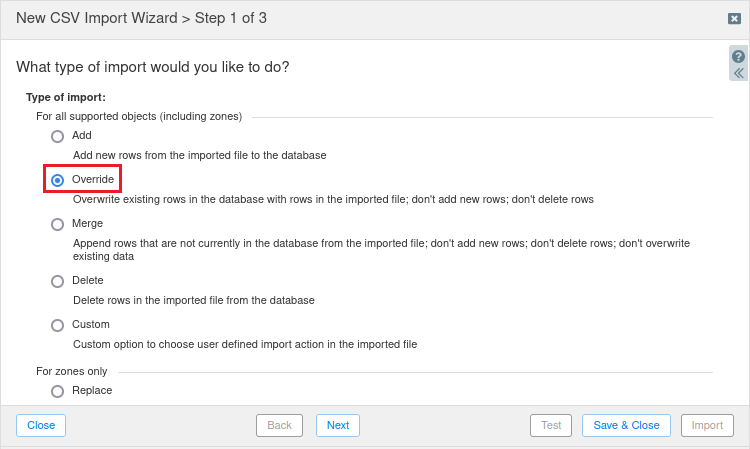
At Step 1 of 3, change the radio button to Override.
-
Click Next.
-
At Step 2 of 3, click Choose.
-
Select the
IPAM-techblue.net.csvfile from the Desktop. -
Select the radio button Skip to the next row and continue.
-
Click Next.
-
Click Import.
-
Click Yes at the Start CSV Import confirmation box.
-
Wait until the 145 of 145 rows are imported with 0 errors.
-
Click Close to close the CSV Import Progress window.
-
Restart services if requested.
-
Review the networks and you can see they have now been updated with additional information.