Scenario
Your organization is enhancing its DHCP infrastructure to improve service reliability, optimize network provisioning, and accommodate new devices with custom DHCP configurations. As a DHCP administrator, your task is to configure various DHCP settings to ensure seamless service delivery, enhance redundancy, and improve overall network efficiency. The tasks assigned to you include:
-
Ensuring DHCP service availability by verifying and managing DHCPv4 services across Grid members.
-
Standardizing DHCP configurations by setting global DHCPv4 options, including domain names, DNS servers, and lease times.
-
Provisioning DHCP networks and ranges to support organizational growth and prepare for future DHCP service activation.
-
Implementing DHCP failover to enable redundancy and ensure uninterrupted DHCP service in case of failures.
-
Configuring failover networks to extend DHCP failover support and associate networks with configured failover pairs.
-
Configuring and troubleshooting DHCP option spaces and filters to ensure that vendor-specific options are correctly delivered to the intended devices.
Estimated Completion Time
-
120 to 140 minutes
Credentials
|
Description |
Username |
Password |
URL or IP |
|---|---|---|---|
|
Grid Manager UI |
admin |
infoblox |
Requirements
-
Administrative access to the NIOS Grid
Learning Content
Lab Initiation
Access jump-desktop
Once the lab is deployed, you can access the virtual machines required for this activity. To begin, select VM List from the navigation bar at the top, locate jump-desktop, and click the green play icon to open its console. Log in to the Linux UI.

Username: training
Password: infoblox
Initiate lab
To initiate the lab, double-click the Launch Lab icon on the Desktop.

Choose the lab number from the list and click OK.

After clicking OK, you will see a pop-up message with a brief description of the lab task. If the description looks correct, click Yes to continue lab initiation.

Lab initiation will take a couple of minutes to finish.
Once complete, you will see another pop-up message with the login credentials and the URL for the Grid Manager’s User Interface. Note that the credentials may differ from those from prior labs.

Tasks
Task 1: Starting DHCPv4 services
Login to the GM user interface and verify that DHCPv4 services have been started on both 10.100.0.105 and 10.200.0.105. If not, please start the services.
Task 1 Solution: Starting DHCPv4 services
Task 2: Configuring global DHCPv4 options in NIOS
The DHCP team has decided that some DHCPv4 options should be set as global defaults. You have been given these options and values, please configure them in the Grid.
Subtask 2.1: Configuring the default domain name option
The default domain name (DHCPv4 option 15) for your organization is techblue.net. Please configure the NIOS Grid DHCP service with this as the global default.
Subtask 2.2: Configuring default DNS servers
The default DNS servers (DHCPv4 option 6) for your organization are 10.100.0.105 and 10.200.0.105. Please configure the NIOS Grid DHCP service with this as the global default.
Subtask 2.3: Configuring default lease time
The global default lease time has been determined to be 5 minutes. Please configure the NIOS Grid DHCP service with this as the global default.
Subtask 2.4: Configuring DHCP servers to be authoritative
Since the Infoblox Grid members are the authoritative DHCPv4 servers on the network, this means they are allowed to send DHCPNAK messages, informing clients to release leases they may have received from other, unauthorized, DHCP servers. Please make the configuration to set NIOS DHCP servers as authoritative.
Subtask 2.5: Restarting DHCPv4 services
Please restart services for all of these DHCP changes to take effect.
Task 2 Solution: Configuring global DHCPv4 options in NIOS
Task 3: Creating DHCPv4 networks and ranges in NIOS
Your organization has expanded into a new office. As part of the network provisioning, you need to configure a network that is expected to provide DHCP service in the near future. Please provision a DHCPv4 network in NIOS.
Subtask 3.1: Creating a DHCPv4 network
The IPv4 network that has been provisioned for this location is 172.31.101.0/24, with the default gateway 172.31.101.1. Shortly, more provisions will be done so DHCP service is provided by the member ibns1.techblue.net. Create the DHCP Network and set the default gateway for this network.
Subtask 3.2: Creating a DHCPv4 range for clients
From the GM web interface, navigate to the network 172.31.101.0/24. The request is to support up to 50 clients so please create a range suitable for it.
Subtask 3.3: Restarting Grid services
After saving changes, you should be prompted to restart services. If not, please manually restart services
Task 3 Solution: Creating DHCPv4 networks and ranges in NIOS
Task 3 Solution – Expand/Collapse Section
Subtask 3.1 Solution: Creating a DHCPv4 network
-
Navigate to Data Management → DHCP → Networks → Networks
-
Click the Add dropdown menu and select IPv4 Network
-
Select the radio button for Add Network
-
Click Next
-
At Step 2 of 6 of the Wizard, leave the Netmask set to 24
-
Next to Networks, click the Add button.
-
Under the Network column, enter 172.31.101.0
-
Click Next
-
At Step 3 of 6, click the Add dropdown menu and select Add Infoblox Member
-
Click on the link for ibns1.techblue.net from the Member Selector window
-
Click Next after the Member info is populated
-
At Step 4 of 7, click the Override button in the section for Routers (this will change the button color to black and the button will now say Inherit)
-
Click the IP Address field in the Routers section
-
Enter the IP address for the router on this network – 172.31.101.1
-
Click Save & Close to save changes
Subtask 3.2 Solution: Creating a DHCPv4 range for clients
-
Login to NIOS GM web interface.
-
Navigate to Data Management → DHCP → Networks.
-
In the Go to field, type in 172.31.101 and click on the first match (172.31.101.0).
-
Open the network object 172.31.101.0/24 by clicking on Open (→)
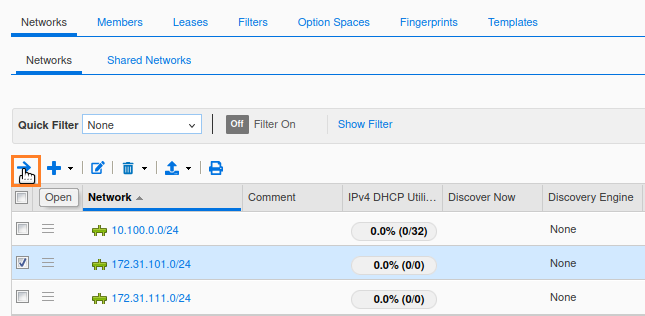
-
Once inside 172.31.101.0/24, click + from the dropdown and choose Range.
-
Click Next for the first step of Add IPv4 Range Wizard (no templates available).
-
In step 2 provide Start and End IP addresses along with a name for the range. In our example below, we are creating a range of 61 addresses although the requirement is only for 50 clients. It is recommended to have 10-20% extra IP addresses in client ranges.
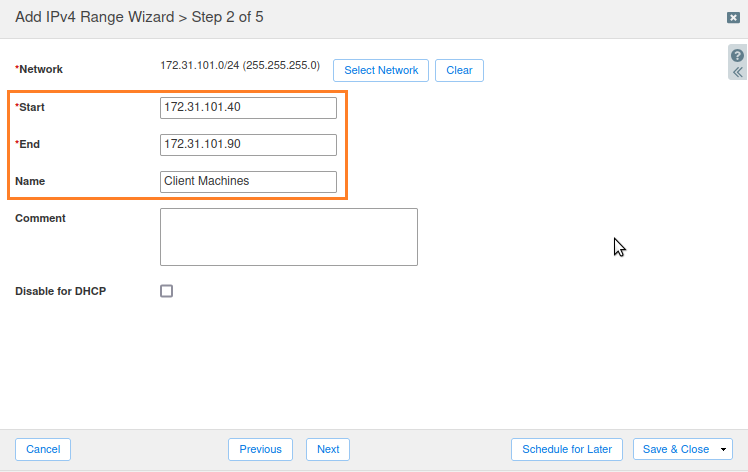
-
In Step 3, choose Grid Member and select ibns1.techblue.net from the drop-down.
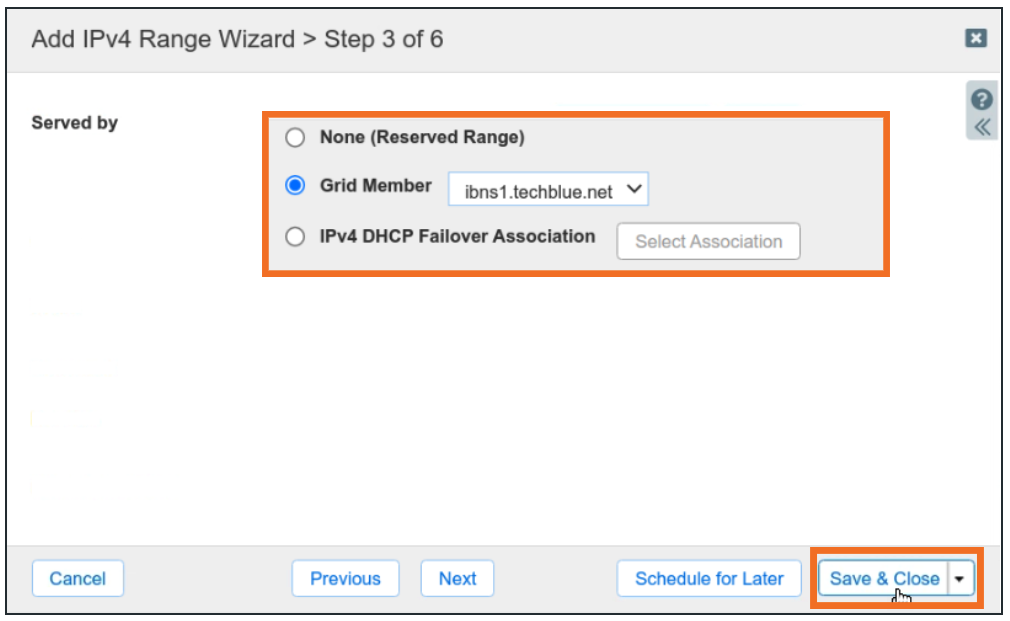
-
Click Save and Close.
Subtask 3.3 Solution: Restarting Grid services
Changes made to the DHCP configuration during Network creation only take effect after a service restart.
-
Restart the DHCP Service by clicking the Restart button in the notification banner at the top of Grid Manager
-
At the Restart Grid Services window, click Restart
Alternatively, we can also restart services from the Members menu.
-
Navigate to Grid → Grid Manager → Members
-
Place a checkmark in the box beside ibns1.techblue.net
-
From the Toolbar on the right, click Restart Services
-
Select the radio button to Force service restart
-
Click Restart
Task 4: Creating DHCPv4 failover associations in NIOS
Your team has decided to take the first step towards DHCP service redundancy. Please create a DHCPv4 failover association, so other network administrators can leverage this redundant service.Create a DHCPv4 failover association named D1-D2. Assign ibns1.techblue.net as the failover primary, and ibns2.techblue.net as the failover secondary.
Task 4 Solution: Creating DHCPv4 failover associations in NIOS
Task 5: Creating DHCPv4 failover networks in NIOS
Your team has already created a DHCPv4 failover association. It is now time to provision a network to leverage this redundant service.The IPv4 network that needs the redundant DHCP service is 172.31.111.0/24, with the default gateway 172.31.111.1.
Task 5 Solution: Creating DHCPv4 failover networks in NIOS
Task 6: Overriding inherited DHCP options in NIOS
You realized that one of the Grid members serving DHCP for a branch office can be better managed by changing all of its default lease time to something different than the inherited value from the Grid. Please override this inherited configuration and verify it has taken effect.
Subtask 6.1: Overriding inherited options
The default lease time for the Grid does not work for the member ibns2.techblue.net. Please make the necessary changes so all networks served by ibns2 have the default lease time of 900 seconds (15 minutes).
Subtask 6.2: Restarting Grid services
After saving changes, you should be prompted to restart services. If not, please manually restart services.
Subtask 6.3: Reading the DHCP member configuration
Please verify by examining the DHCP configuration file for ibns2.techblue.net.
Task 6 Solution: Overriding inherited DHCP options in NIOS
Task 7: Creating a DHCPv4 option in NIOS
Your team has recently purchased some new network printers that require DHCPv4 option 150. Unfortunately, option 150 is not on the pre-defined DHCP options list. Please make the necessary configuration changes.
Subtask 7.1: Creating a DHCPv4 option
You have the following information from the printer vendor, on how to create the DHCPv4 option with code 150:
Table 2588-1
|
Name |
Code |
Type |
|
tftp-server |
150 |
array of ip-addresses |
Subtask 7.2: Assigning the new option to Grid
After creating the new DHCPv4 option, please assign this option at the DHCP Grid level, pointing all printers to the TFTP server 10.200.0.20.
Subtask 7.3: Restarting Grid services
After saving changes, you should be prompted to restart services. If not, please manually restart services.
Task 7 Solution: Creating a DHCPv4 option in NIOS
Task 7 Solution – Expand/Collapse Section
Subtask 7.1 Solution: Creating a DHCPv4 option
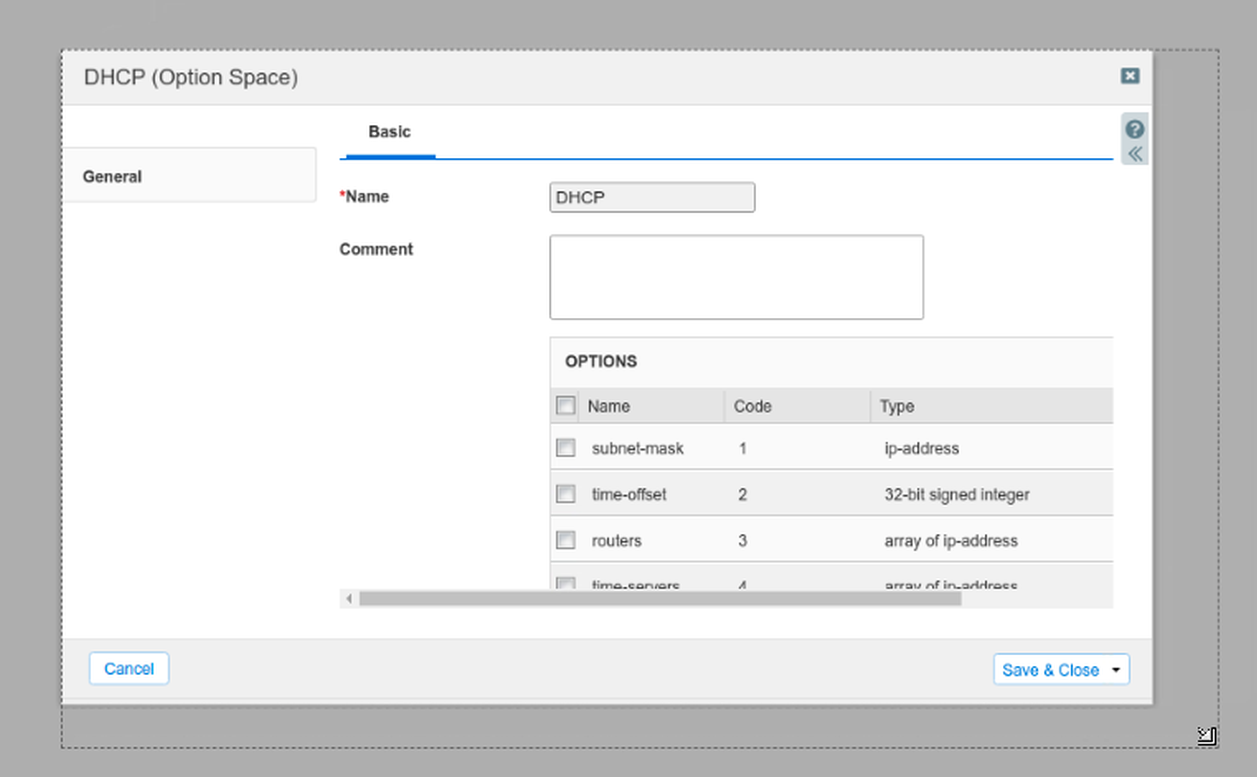
DHCP Option 150(rfc5859) is an IANA-recognized option, which is not included in the default DHCP Option Space in NIOS. Therefore, we need to create a new IPv4 DHCP option according to IANA specifications. The Option Name, Option Code and Data type are all defined in the RFC.
-
Navigate to Data Management → DHCP → Option Spaces
-
Place a check mark in the box beside DHCP and click Edit
-
Expand the DHCP (Option Space) window by clicking and dragging from the lower-right corner. This will make it easier to locate and add the necessary details in the following steps.
-
In the DHCP(Option Space) window, click the Add button
-
Scroll to the end of the list to find the blank entry
-
For Name, enter tftp-servers
-
For Code, enter 150
-
For Type, use the list to select array of ip-address
-
Click Save & Close
Subtask 7.2 Solution: Assigning the new option to Grid
Edit the DHCP Grid Properties and add 10.200.0.20 to the tftp-servers option for all IPv4 network
-
Navigate to Data Management → DHCP → Networks
-
From the Toolbar on the right, click Grid DHCP Properties
-
Select the section labeled IPv4 DHCP Options
-
Use the drop-down list for Custom DHCP Options to locate the entry for tftp-servers (150) (it will be at the very end of the list)
-
Enter 10.200.0.20 for the value
-
Click Save & Close
Subtask 7.3 Solution: Restarting Grid services
Changes made to the DHCP configuration only take effect after service restart.
-
Restart the DHCP Service by clicking the Restart button in the notification banner at the top of Grid Manager
-
At the Restart Grid Services window, click Restart
Task 8: Configuring and Troubleshooting Vendor-Specific DHCP Options in NIOS
The appliance you ordered, Luminous Online Temperature Regulator (LOTR), has finally arrived! You can’t wait to see its magic! However, it won’t boot up correctly on the network. Upon contacting the company, Tolkien’s Inc., they inform you that you will need to supply special DHCP options to make the appliance function properly. The special options are: option 10 Config Filename and option 15 Controller IP Address. These conflict with your existing DHCP options numbers. Additionally, you want to make sure special vendor DHCP options are only delivered to the LOTR appliances, not any others. Please make the necessary DHCP configurations on the Grid to bring the LOTR appliances online.
Hint: You may use DHCP options filter on the DHCP server to identify LOTR devices. Once identified, send special options to these devices only.
Subtask 8.1: Capture DHCP information
You need to find out what the client is sending in its DHCPDISCOVER message and find something that you can use to identify the client. Enable DHCP on the VM testing-linux, while performing traffic capture on the DHCP member ibns1.
In this lab, we are using the VM testing-linux to emulate the LOTR appliance. The VM is sending special DHCP options, as would the LOTR appliances
Subtask 8.2: Analyze the captured traffic
Download and examine the traffic capture to locate relevant DHCP option information.
Hint: Many devices use option 60 to list their make and model.
Subtask 8.3: Create a new IPv4 option space
Since the device requires DHCP option numbers (10 and 15) that conflict with existing ones, we must create a new IPv4 option space. Create a new space named Tolkien, and create the following 2 DHCP options according to the vendor’s documentation listed in Table 2588-2:
Table 2588-2
|
DHCP Code |
DHCP Data Type |
Name or Description |
|---|---|---|
|
10 |
text |
Configuration Filename |
|
15 |
ip-address |
Controller IP Address |
Subtask 8.4: Create an IPv4 option filter
You want to make sure that no other devices receive these special vendor options. Please create a DHCP filter that would help the DHCP servers identify these LOTR devices. Although you are only placing these devices on the subnet 172.31.101.0/24 for now, you plan on adding more to other networks. Thus, you need to apply the filter as a global DHCP class, so this filtering behavior is applied on every network.
Subtask 8.5: Check if the Vendor Options Are Provided
Verify whether the LOTR appliance receives the expected vendor-specific DHCP options.
You may use these 4 commands to help you on the testing-linux VM:
-
To disable DHCP on the testing-linux, type: sudo set-network-disable
-
To clear DHCP lease on the testing-linux, type: sudo clear-dhcp-leases
-
To enable DHCP on the testing-linux, type: sudo set-network-dhcp
-
To show the current eth2 DHCP lease information, type: sudo show-dhcp-lease
When successfully configured, the command sudo show-dhcp-lease will print out the encapsulated options as follows:
-- Encapsulated DHCP Options (vendor-encapsulated-options)

Decoding part 1: a:c:62:6f:6f:74:66:69:6c:65:2e:63:66:67:f:4
Option ID: 10
Option length: 12
Option value: "bootfile.cfg"

Decoding part 2: f:4:a:64:34:34
Option ID: 15
Option length: 4
Option value: "10.100.52.52"
Subtask 8.6: Troubleshoot DHCP Custom Vendor Option delivery
Check Option Space and Option Filter configuration to investigate why the Client is not getting the correct value in DHCP Option 43.
Subtask 8.7: Add the DHCP options to the network
The special appliances are located on the network 172.31.101.0/24. Please update the DHCP options setting on this network, so that it contains the new vendor options. Please use these values for this network:
-
Option 10: bootfile.cfg
-
Option 15: 10.100.52.52
Subtask 8.8: Verify the client behavior
Test your shiny LOTR appliance to make sure it receives a DHCP lease with all the correct special options.
Task 8 Solution: Configuring DHCP option space and filter in NIOS
Task 8 Solution – Expand/Collapse Section
Subtask 8.1 Solution: Capture DHCP information
You need to find out what the client is sending in its DHCPDISCOVER message and find something that you can use to identify the client. Enable DHCP on the VM testing-linux, while performing traffic capture on the DHCP member ibns1.
Starting the traffic capture in the GM
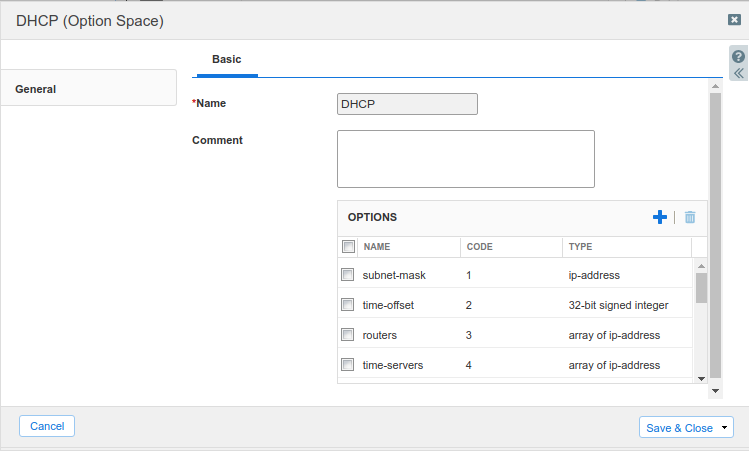
Switch to the VM jump-desktop.
-
In the GM web interface, navigate to Grid→Grid Manager→Members.
-
From the Toolbar on the right, scroll down and click Traffic Capture, this brings out the Traffic Capture dialog.
-
In the Traffic Capture dialog, click the Add (+) button and select ibns1.techblue.net from the Member Selector window.
-
Verify that the the Interface for this is set to ALL (drop-down list).
-
Click the Capture Control Start button to start the capture.
-
If prompted about overwriting existing capture files, answer Yes.
-
Leave the Traffic Capture dialog open and continue to the next step.
Enabling DHCP in the test client
Switch to the VM testing-linux.
-
Open a Terminal window on the VM testing-linux.
-
Use the command
sudo set-network-disable(sudo password: infoblox) to disable DHCP. -
Use the command
sudo clear-dhcp-leasesto clear any previous leases. -
Use the command
sudo set-network-dhcpto re-enable DHCP. -
Use the command
sudo show-dhcp-leaseto see the lease details. Below is an example of the output of this command:--- Raw DHCP Lease Information lease { interface "ens160"; fixed-address 172.31.101.79; option subnet-mask 255.255.255.0; option dhcp-lease-time 43200; option routers 172.31.101.1; option dhcp-message-type 5; option dhcp-server-identifier 10.100.0.105; option domain-name-servers 10.100.0.105,10.200.0.105; option domain-name "techblue.net"; renew 5 2023/08/11 01:33:38; rebind 5 2023/08/11 06:19:36; expire 5 2023/08/11 07:49:36; }
Stopping the traffic capture in the GM
Switch to the VM jump-desktop.
-
Back in the Grid Manager, click the Stop button to halt traffic capture.
-
Place a checkmark beside ibns1.techblue.net.
-
Click the Download button.
-
If prompted, save the file to the Downloads folder. The filename will contain the name of the member, the word tcpdump, and has the file extension tar.gz.
While you are in the GM, you can also verify that you can see the client’s lease file under Data Management → DHCP → Leases.
Subtask 8.2 Solution: Analyze the captured traffic
Download and examine the traffic capture to locate relevant DHCP option information.
-
On the jump-desktop, open the Downloads folder.
-
Right-click on the packet capture file downloaded in Task 1 and choose Extract Here. This action creates a new folder in the Downloads folder.
-
Open the newly created folder and double click on the entry traffic.cap to open it with Wireshark.
-
In the Display Filter text field near the top, enter dhcp, and press the enter key to apply the filter. This hides all other packets, leaving only DHCP packets.
-
Locate the DHCPDISCOVER packet from the client. It should show the source address 10.100.0.1 (the router interface), destination address 10.100.0.105 (DHCP server), and in the Info section shows DHCP Discover followed by the transaction ID.
-
With the packet selected, scroll down and expand the Dynamic Host Configuration Protocol (Discover) section.
-
Scroll down further to expand DHCP options to examine. Some common options that can be used to identify the client are: Option 12 (Host Name), Option 55 (Parameter Request List, or PRL), and Option 60 (Vendor class identifier).
-
Expand Option 60. You can see the string IBEDU.sauron-2022_10_21 (example shown below.)

-
Note this string down. You will use this to create an DHCP option filter later.
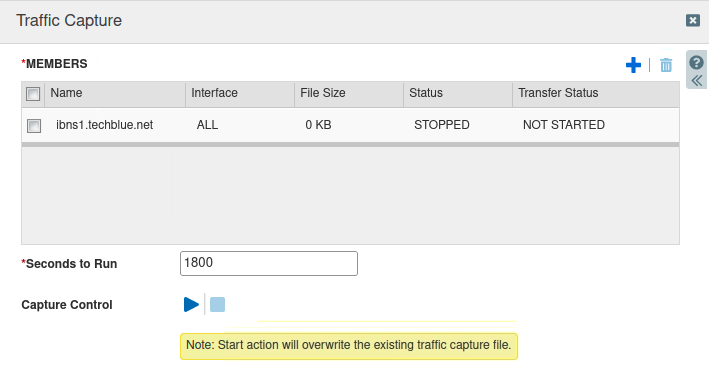
Subtask 8.3 Solution: Create a new IPv4 option space
Since the device requires DHCP option numbers (10 and 15) that conflict with existing ones, we must create a new IPv4 option space. Create a new space named Tolkien, and create the following 2 DHCP options according to the vendor’s documentation listed in Table 2532-1:
-
In GM web interface, navigate to Data Management→DHCP→Option Spaces.
-
Click the Add drop-down button and choose IPv4 Option Space. The Add IPv4 Option Space Wizard appears.
-
For Name, enter Tolkien.
-
Click the Add button to create a new option (Information taken from Table 2532-1):
-
Name: ConfigFile
-
Code: 10
-
Type: text
-
-
Click the Add button again to create another new option:
-
Name: ControllerIP
-
Code: 15
-
Type: array of ip-address
-
-
The end screen should look like this:
-
Click Save & Close.
Subtask 8.4 Solution: Create an IPv4 option filter
Create an IPv4 Option Filter called Tolkien Filter. This filter will search for an Option 60 value from all clients. If a match is found, the DHCP server will return options in the standard DHCPv4 option space as well as the newly created Tolkien option space.
-
Navigate to Data Management→DHCP→Filters.
-
Click Add → IPv4 Option Filter. This brings out the Add IPv4 Option Filter Wizard.
-
In Step 1 of 5 of the Wizard, for the filter Name, enter Tolkien Filter.
-
Ensure Apply this filter as a global DHCP class is checked. This will apply the filter to every incoming DHCP message.
-
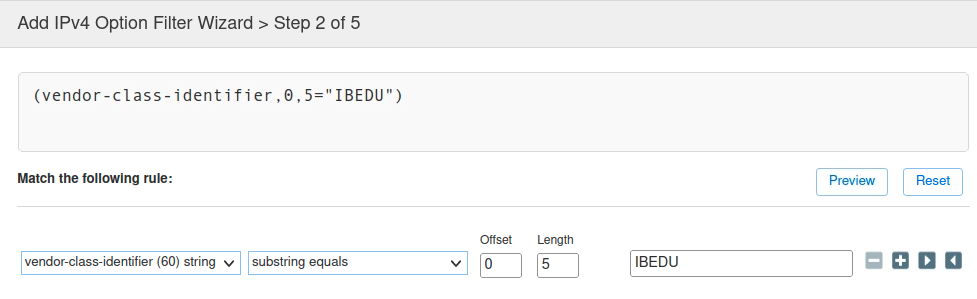
At Step 2 of 5 of the Wizard, create a rule that matches for any vendor-class-identifier string that begins with IBEDU:
-
In the drop-down menu Choose Filter, select vendor-class-identifier (60) string.
-
In the drop-down menu Choose Operator, select substring equals, set the offset to 0 and length to 5.
-
In the value field, enter IBEDU. Click Next.
-
-
At Step 3 of 5 of the Wizard, in the Option Space drop-down menu, select DHCP+Tolkien.
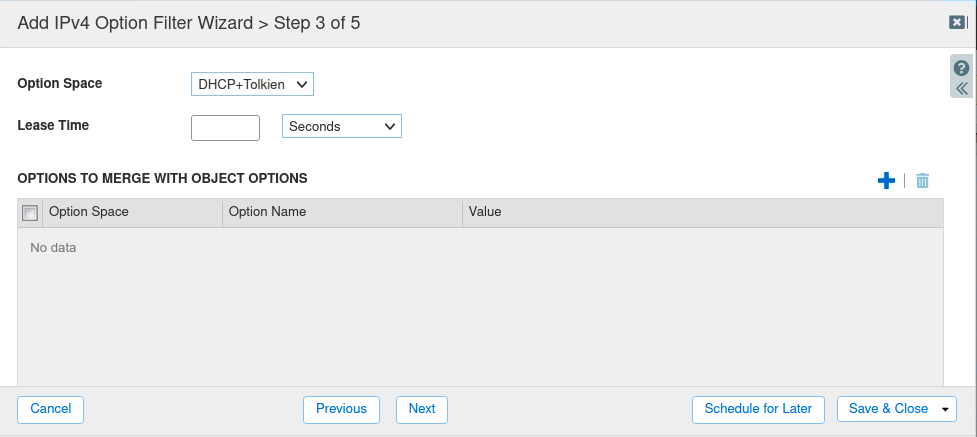
-
Click Save & Close.
-
Restart services when prompted.
In Step 2 of 5 of the Add IPv4 Option Filter Wizard, We are matching for just the first five letters of Option 60, IBEDU, rather than the entire string, IBEDU.sauron-2022_10_21. You can certainly match for the entire string, especially if you are looking to match for specific model numbers. In our example here, this closely resembles matching for the make or product family, rather than the specific model.
Subtask 8.5 Solution: Check if the Vendor Options Are Provided
-
Open a Terminal window on the VM testing-linux.
-
Use the command
sudo set-network-disable(sudo password: infoblox) to disable DHCP. -
Use the command
sudo clear-dhcp-leasesto clear any previous leases. -
Use the command
sudo set-network-dhcpto re-enable DHCP. -
Use the command
sudo show-dhcp-leaseto see the lease details. -
The output should follow a format similar to the example below:
--- Raw DHCP Lease Information lease { interface "ens160"; fixed-address 172.31.101.85; option subnet-mask 255.255.255.0; option dhcp-lease-time 43200; option routers 172.31.101.1; option dhcp-message-type 5; option dhcp-server-identifier 10.100.0.105; option domain-name-servers 10.100.0.105,10.200.0.105; option domain-name "techblue.net"; renew 5 2023/08/11 01:33:38; rebind 5 2023/08/11 06:19:36; expire 5 2023/08/11 07:49:36; } -
The lease should NOT contain the expected vendor options (such as option 10 and option 15). Proceed with troubleshooting in Subtask 8.6.
Subtask 8.6 Solution: Troubleshoot DHCP Custom Vendor Option delivery
Review the DHCP Member Configuration
-
Switch to the VM jump-desktop and Navigate to Data Management → DHCP → Member on Grid Manager UI.
-
Select ibns1.techblue.net, the DHCP member serving 172.31.101.0/24.
-
Click Toolbar → View DHCP Configuration → IPv4.
-
Verify that the option space Tolkien is properly setup. However, these option values are not specified in the network 172.31.101.0/24.
-
Check Network-Specific DHCP Options
-
Navigate to Data Management → DHCP → Networks → Networks.
-
Select 172.31.101.0/24, then click Edit.
-
Open the IPv4 DHCP Options tab.
-
Under Custom DHCP Options, verify if the expected options are configured.
-
Observations
-
The option space is defined at the member level, but the required options are missing for the 172.31.101.0/24 network.
-
The Custom DHCP Options fields only contain tftp-servers , confirming the missing configuration.
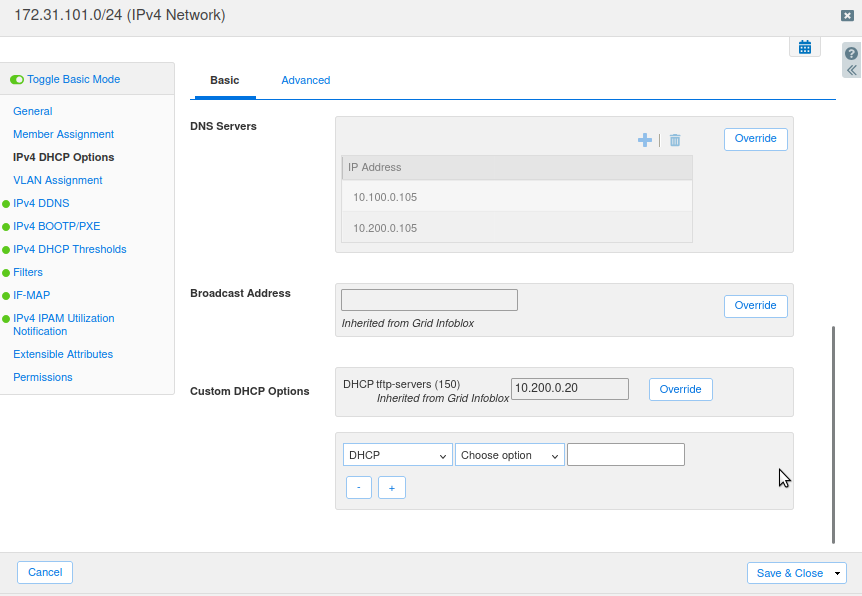
Subtask 8.7 Solution: Add the DHCP options to the network
Edit the 172.31.101.0/24 network and configure values for the newly defined custom DHCP options.
-
Navigate to Data Management → DHCP → Networks → Networks.
-
Select 172.31.101.0/24, and click Edit.
-
Select the IPv4 DHCP Options tab on the left.
-
Scroll down to the bottom to the Custom DHCP Options section.
-
Scroll all the way to the bottom of the list to add a new Custom DHCP Option
-
Configure the first custom option (option 10):
-
Use the drop-down menu to select the DHCP option space Tolkien.
-
Use the drop-down menu to select ConfigFile (10) text.
-
In the text field, enter bootfile.cfg.
-
-
Click the plus (+) button to add another custom option (option 15):
-
Use the drop-down menu to select the DHCP option space Tolkien.
-
Use the drop-down menu to select ControllerIP (15) array of ip-address.
-
In the text field, enter 10.100.52.52.
-
-
The configuration should look like this:

-
Click Save & Close.
-
Restart services when prompted.
Subtask 8.8 Solution: Verify the client behavior
Switch to the VM testing-linux.
-
Open a Terminal window on the VM testing-linux.
-
Use the command
sudo set-network-disable(sudo password: infoblox) to disable DHCP. -
Use the command
sudo clear-dhcp-leasesto clear any previous leases. -
Use the command
sudo set-network-dhcpto re-enable DHCP. -
Use the command
sudo show-dhcp-leaseto see the lease details. You should be able to see additional vendor encapsulated options (option 43) information near the bottom like this:
-- Encapsulated DHCP Options (vendor-encapsulated-options)

Decoding part 1: a:c:62:6f:6f:74:66:69:6c:65:2e:63:66:67:f:4
Option ID: 10
Option length: 12
Option value: "bootfile.cfg"

Decoding part 2: f:4:a:64:34:34
Option ID: 15
Option length: 4
Option value: "10.100.52.52"