Scenario
Congratulations! Your team has acquired a few Infoblox NIOS virtual appliances. You are tasked with initializing these appliances and joining them together to form a basic Grid.
As part of this lab, the Grid will be broken up and must be joined back by you. If you failed to complete this lab (building a Grid), you will NOT be able to do any other labs. You will have to request another lab instance with a fully functioning Grid.
Estimate Completion Time
-
30 to 60 minutes
Credentials
|
Description |
Username |
Password |
URL or IP |
|---|---|---|---|
|
Grid Manager UI |
admin |
infoblox |
|
|
nios-2 |
admin |
infoblox |
10.100.0.101 |
|
nios-4 |
admin |
infoblox |
10.200.0.105 |
|
nios-5 |
admin |
infoblox |
10.200.0.100 |
Requirements
-
Administrative access to the Grid devices
-
Network information for all members
-
Name of the Grid (default: Infoblox)
-
Grid shared secret (default: test)
Learning Content
Lab Initiation
Access jump-desktop
Once the lab is deployed, you can access the virtual machines required for this activity. To begin, select VM List from the navigation bar at the top, locate jump-desktop, and click the green play icon to open its console. Log in to the Linux UI.

Username: training
Password: infoblox
Initiate lab
To initiate the lab, double-click the Launch Lab icon on the Desktop.

Choose the lab number from the list and click OK.

After clicking OK, you will see a pop-up message with a brief description of the lab task. If the description looks correct, click Yes to continue lab initiation.

Lab initiation will take a couple of minutes to finish.
Once complete, you will see another pop-up message with the login credentials and the URL for the Grid Manager’s User Interface. Note that the credentials may differ from those from prior labs.

Tasks
Table 3500-1
|
NIOS Appliance |
IP Address |
Netmask |
Gateway |
|---|---|---|---|
|
nios-1 |
10.100.0.100 |
255.255.255.0 |
10.100.0.1 |
|
nios-2 |
10.100.0.101 |
255.255.255.0 |
10.100.0.1 |
|
nios-3 |
N/A |
N/A |
N/A |
|
nios-4 |
10.200.0.105 |
255.255.255.0 |
10.200.0.1 |
|
nios-5 |
10.200.0.100 |
255.255.255.0 |
10.200.0.1 |
Task 1: Initializing and configuring the Grid Master
Access the Grid Master command line interface. Use the set network command to change the default IP address. After address change, login to the web interface and complete the Setup Wizard.
Task 2: Pre-configuring the Grid before members joining
Use the GM interface to add definitions for the Grid members ibns1, ibn2, and ibgmc prior to these devices joining the Grid.
Task 3: Joining members to the Grid
Use CLI on each device to join the Grid. You need to first change the network settings on each device, then instruct the device to join the Grid using the correct GM IP address, Grid name, and shared secret. You need to do this for all 3 devices, nios-2, nios-4, and nios-5. They will join the Grid and become ibns1, ibns2, and ibgmc, respectively.
Solutions
Task 1 Solution: Initializing and configuring the Grid Master
In this task, we will configure the nios-1 device that will become our Grid Master (GM) by accessing its CLI, changing its network settings, verifying its connectivity, and logging in to the web interface after reconfiguration.
Changing Networking Settings
We will use the command set network to change the device's network information through the CLI.
-
Switch to nios-1 VM to access its console
-
Log in using the default username admin, default password infoblox.
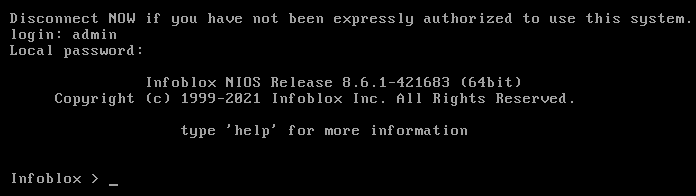
-
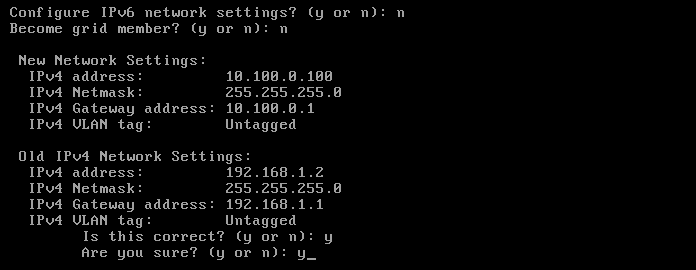
At the device CLI prompt, use the command
set networkto change the default network information:-
IP Address: 10.100.0.100
-
Netmask: 255.255.255.0
-
Gateway address: 10.100.0.1
-
VLAN tag: Untagged
-
Configure IPv6 network settings? No
-
Become grid member? No
-
-
Review settings and apply changes. The device will restart.
Verifying Network Connectivity
-
Wait for the device to finish restarting.
-
Log back into the nios-1 command prompt console. Use the command
show networkto verify the settings. -
Use the command
pingto verify basic network connectivity. You may ping the jump-desktop from nios-1 with the following command:
ping 10.35.22.10
If your network settings are correct but still unable to ping successfully, double check that the virtual router vyos-router is powered on.
At the NIOS CLI prompt, you can also modify the command prompt so you can most easily tell which NIOS device you are logged in to. Use the command set prompt user@hostname. This changes the terminal prompt to show the current logged in username and appliance hostname. As you configure and join each Member to the Grid, this prompt will update automatically to display which member you are connected logged into at the CLI.
Logging in to Grid Web Interface
-
Switch to the jump-desktop.
-
Use a web browser such as Firefox to connect to the GM web interface at https://10.100.0.100.
-
Accept the self-signed SSL/TLS certificate to proceed. This is normal when first setting up a NIOS device, it always comes with a self-signed certificate that you can replace later.
-
At the GM login screen, login using the default Infoblox credential:
-
Username: admin
-
Password: infoblox
-
Completing the Grid Setup Wizard
-
Accept the Infoblox End-User License Agreement by clicking I Accept.
-
At the Data Collection and Opt-Out Notice, leave the box unchecked and click OK to proceed.
-
As you are logging into the web interface for the first time, the Grid Setup Wizard is launched. Please use the information in Table 3500-2 to complete the setup wizard.
Table 3500-2
|
Step |
Item |
Value |
|---|---|---|
|
1 |
Are you configuring a grid master or joining the member to an existing grid? |
Configure a Grid Master |
|
2. Grid Properties |
Grid Name |
Infoblox |
|
Shared Secret |
test |
|
|
Confirm Shared Secret |
test |
|
|
Host Name |
ibgm.techblue.net |
|
|
Type of Network Connectivity |
IPv4 |
|
|
Is the grid master an HA pair? |
No |
|
|
3. IP Address Settings |
Interface |
LAN1 (IPv4) |
|
Address |
10.100.0.100 |
|
|
Subnet Mask |
255.255.255.0 |
|
|
Gateway |
10.100.0.1 |
|
|
VLAN Tag |
Empty (leave blank) |
|
|
Port Settings |
Automatic |
|
|
4. Admin Password |
Would you like to set the admin password? |
No |
|
5. Time Settings |
Time Zone |
UTC |
|
Would you like to enable NTP? |
No |
|
|
Date |
default (leave unchanged) |
|
|
Time |
default (leave unchanged) |
At the final step, step 6, review all the settings, and click Finish.
If you need to re-run the Grid Setup Wizard again, you may navigate to Grid → Toolbar → Grid Properties → Setup Wizard.
Task 2 Solution: Pre-configuring the Grid before members joining
In the newly configured GM, create new entries for each of the members that are about to join. This is also referred to as Pre-configuring grid members.
-
Navigate to the Grid → Grid Manager → Members.
-
Click the Add(+) button to add a new Grid Member.
-
Use the information provided in Table 3500-3 to complete the Add Grid Member wizard. You will need to pre-configure 3 members total.
-
Here is an example screenshot of what it looks like when you have finished this task, all 3 new members should show as Offline.
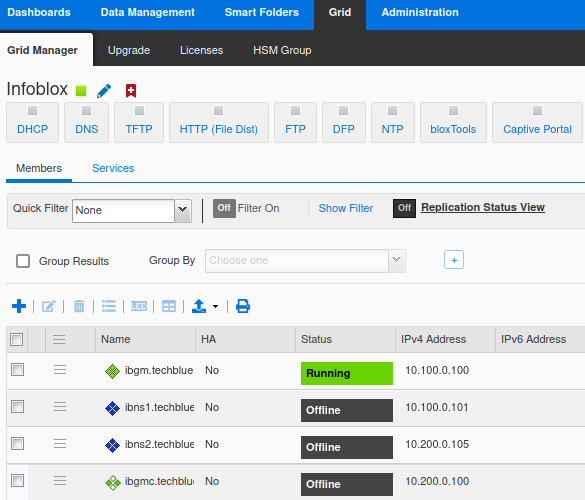
Table 3500-3
|
Step |
Item |
Values for ibns1.techblue.net |
Values for ibns2.techblue.net |
Values for ibgmc.techblue.net |
|---|---|---|---|---|
|
1 |
Member Type |
virtual NIOS |
virtual NIOS |
virtual NIOS |
|
Host Name |
ibns1.techblue.net |
ibns2.techblue.net |
ibgmc.techblue.net |
|
|
Grid Master Candidate |
No |
No |
Yes |
|
|
2 |
Type of Network Connectivity |
IPv4 |
IPv4 |
IPv4 |
|
Type of Member |
Standalone Member |
Standalone Member |
Standalone Member |
|
|
LAN1 Address |
10.100.0.101 |
10.200.0.105 |
10.200.0.100 |
|
|
Subnet Mask |
255.255.255.0 |
255.255.255.0 |
255.255.255.0 |
|
|
Gateway |
10.100.0.1 |
10.200.0.1 |
10.200.0.1 |
|
|
3 |
Extensible Attributes Screen |
None |
None |
None |
Task 3 Solution: Joining members to the Grid
In this task, you will use the CLI on the NIOS appliances nios-2, nios-4, and nios-5 to join them to the Grid. They will respectively become ibns1, ibns2, and ibgmc. There are two parts to this. The first half is changing the network settings or IP address on each NIOS appliance. The second half is instructing the NIOS appliance to join to the GM, using the newly configured IP address.
There are 2 parts of configuration for each NIOS appliance. The first part is changing the network settings or IP address on each NIOS appliance. The second part is instructing the NIOS appliance to join the Grid. Both can be done with one single command, set network (and answer Yes when asked to become a grid member). Or you can choose to run them separately, with set network (changing IP address), wait for the reboot, then execute set membership (joining the Grid). The example here shows how to perform the 2 parts separately, allowing you to validate the network connectivity before joining the Grid.
Changing the network settings on the NIOS appliance
-
Switch to the VM (nios-2, nios-4, or nios-5)
-
Login with the default administrative credential
-
Use the command set network and the information provided in Table 3500-4 to reconfigure network settings. Below is an example screenshot of running this CLI command:
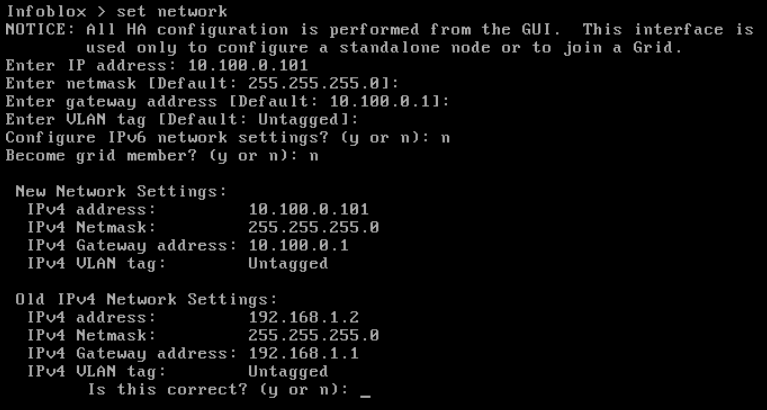
Table 3500-4
|
Configuration |
Values for nios-2 |
Values for nios-4 |
Values for nios-5 |
|---|---|---|---|
|
IP Address |
10.100.0.101 |
10.200.0.105 |
10.200.0.100 |
|
Netmask |
255.255.255.0 |
255.255.255.0 |
255.255.255.0 |
|
Gateway Address |
10.100.0.1 |
10.200.0.1 |
10.200.0.1 |
|
VLAN tag |
Untagged |
Untagged |
Untagged |
|
Configure IPv6 Network Settings |
n |
n |
n |
|
Become grid member |
n |
n |
n |
Verifying network connectivity
After you have confirmed the network settings change, the NIOS appliance will reboot.
-
Wait for it to finish rebooting, and login again.
-
You may use the show network command to view the current network settings.
-
You may use the
pingcommand to check whether or not the NIOS appliance can reach the gateway.
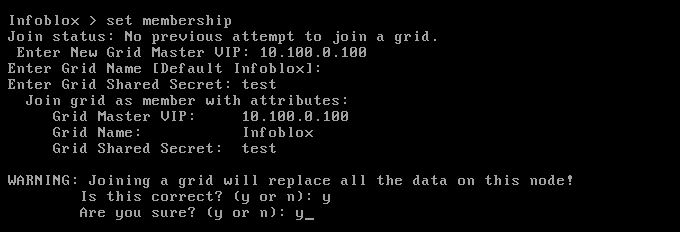
Joining the grid
After you have verified that the NIOS appliance has network connectivity, it is time to join it to the Grid.
-
Switch to the VM (nios-2, nios-4, or nios-5)
-
Login with the default administrative credential
-
Use the command set membership to join the Grid. The information to join the Grid is the same for all appliances, they are:
-
Grid Master VIP: 10.100.0.100
-
Grid Name: Infoblox
-
Grid Shared Secret: test
-
-
Below is an example screenshot of running this CLI command:
Checking the GM for status update
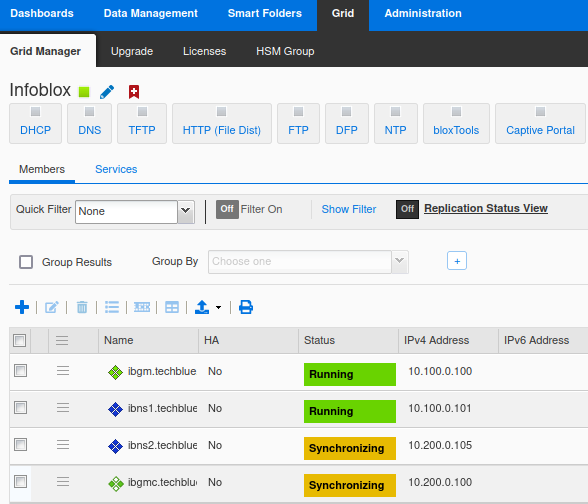
You may switch back to the GM web interface to view the joining status.
-
Switch to the VM jump-desktop, open the GM web interface.
-
Navigate to Grid → Grid Manager → Members. You will see the members joining status here. During the joining process, you may see the member status change several times through these different status messages.
-
Offline (black)
-
Connecting (yellow)
-
Offline (red)
-
Error (red)
-
Warning (yellow)
-
Synchronizing (yellow)
-
Running (green)
-
-
Below is an example screenshot taken during the members joining the Grid.