Scenario
Your current NIOS Grid is comprised of all stand-alone members. To take full advantage of the redundancy features, your team has acquired a new virtual appliance, so that you can convert an existing stand-alone member into a high-availability (HA) pair. Please perform necessary steps for the conversion to HA.
Estimate Completion Time
-
20 to 40 minutes
Credentials
|
Description |
Username |
Password |
URL or IP |
|---|---|---|---|
|
Grid Manager UI |
admin |
infoblox |
Requirements
-
Administrative access to the Grid
-
Network information for high availability (HA) pair
-
VRID for the HA pair (example: 105)
-
Address of the GM (example: 10.100.0.100)
-
Name of the Grid (default: Infoblox)
-
Grid shared secret (default: test)
Learning Content
Lab Initiation
Access jump-desktop
Once the lab is deployed, you can access the virtual machines required for this activity. To begin, select VM List from the navigation bar at the top, locate jump-desktop, and click the green play icon to open its console. Log in to the Linux UI.

Username: training
Password: infoblox
Initiate lab
To initiate the lab, double-click the Launch Lab icon on the Desktop.

Choose the lab number from the list and click OK.

After clicking OK, you will see a pop-up message with a brief description of the lab task. If the description looks correct, click Yes to continue lab initiation.

Lab initiation will take a couple of minutes to finish.
Once complete, you will see another pop-up message with the login credentials and the URL for the Grid Manager’s User Interface. Note that the credentials may differ from those from prior labs.

Tasks
Task 1: Changing network information for the current member
Login to the GM interface. Change the network settings for the member ibns1.techblue.net according to the information listed in Table 3503-1.
For the Virtual Router ID, use 105.
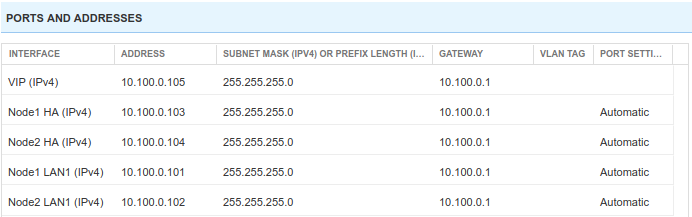
Table 3503-1
|
Interface |
Address |
Subnet Mask |
Gateway |
|---|---|---|---|
|
VIP (IPv4) |
10.100.0.105 |
255.255.255.0 |
10.100.0.1 |
|
Node 1 HA (IPv4) |
10.100.0.103 |
255.255.255.0 |
10.100.0.1 |
|
Node 2 HA (IPv4) |
10.100.0.104 |
255.255.255.0 |
10.100.0.1 |
|
Node 1 LAN1 (IPv4) |
10.100.0.101 |
255.255.255.0 |
10.100.0.1 |
|
Node 2 LAN1 (IPv4) |
10.100.0.102 |
255.255.255.0 |
10.100.0.1 |
Task 2: Obtaining Grid information
Login to the GM interface, and research for the following information on the Grid before attempting to join the replacement member. You already know the shared secret is set to test. You may use Table 3503-2 below to organize your findings.
Table 3503-2
|
GM Virtual IP |
Grid Name |
Shared Secret |
|---|---|---|
|
|
|
test |
Task 3: Configuring a new device to join the Grid
Access the virtual device named nios-3. Using the information in both Table 3503-1 and 3503-2, join the device to the Grid as a node of the newly defined HA pair.
Task 4: Verifying joining successful
Login into the GM user interface and verify the new node has joined successfully.
Task 5: Performing HA failover
Login into the GM user interface and perform HA failover on the HA member. The easiest way monitor is to start a contiguous ping command to the virtual IP 10.100.0.105 from the Linux jump-desktop terminal, while performing the failover.
Solutions
Task 1 Solution: Changing network information for the current member
In the GM, edit the Network settings for the member ibns1.techblue.net, using information provided in Table 3503-1.
-
Login to NIOS GM web interface
-
Navigate to Grid → Grid Manager → Members.
-
Click the menu (hamburger) icon next to ibns1.techblue.net and choose Edit.
-
Select the Network section or tab from the left.
-
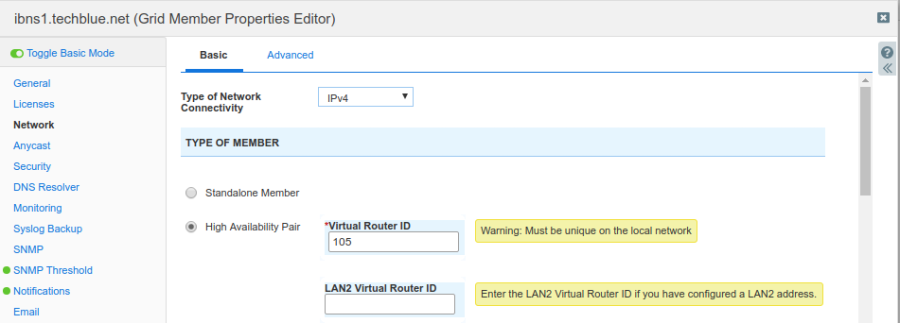
Change the Type of Member to High Availability Pair by selecting the radio button.
-
For Virtual Router ID, enter 105
-
Uncheck the Public Cloud option if it is checked.
-
Configure Ports and Addresses using IP addresses from table.
-
Click Save & Close and Yes to confirm restart.
Task 2 Solution: Obtaining Grid information
-
Login to NIOS GM web interface.
-
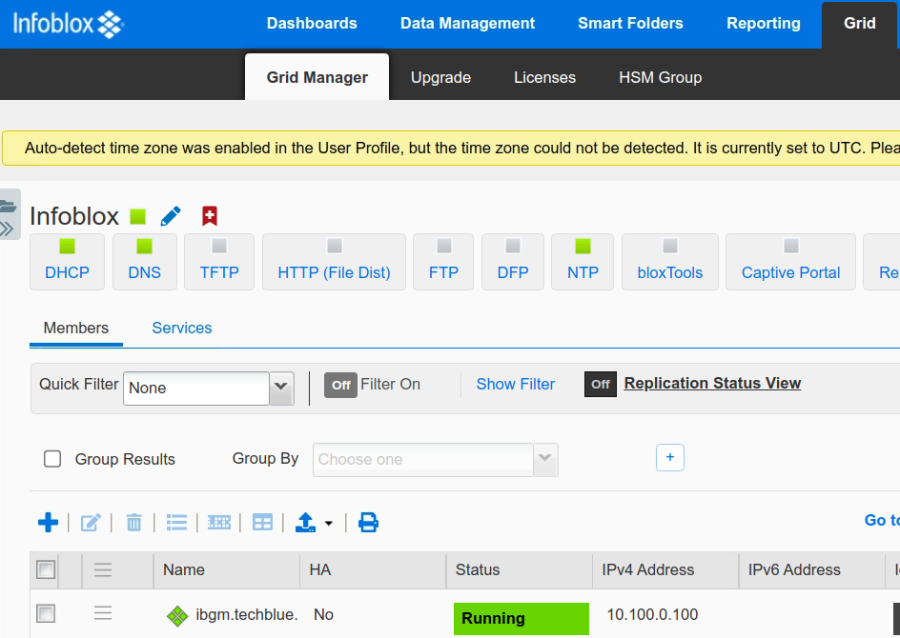
Navigate to Grid → Grid Manager.
-
GM IP address and Grid Name are both available in this screen: IPv4 address is 10.100.0.100, and Grid Name is Infoblox.
Task 3 Solution: Configuring networking on a new device
-
Access the console for to the nios-3 VM.
-
Press Enter to see the login prompt and login using default admin credentials.
-
At the prompt, use the set network command, to apply the following network configuration information to the appliance:
-
IP Address: 10.100.0.102
-
Netmask: 255.255.255.0
-
Gateway Address: 10.100.0.1
-
VLAN Tag: Untagged
-
Configured IPv6 Network Settings? n
-
Become grid member? n
-
-
Verify the settings are correct, and confirm the change. The appliance will restart.
-
After the appliance restarts, log back to verify the settings are applied.
-
You may use the
pingcommand to verify that you can ping the GM (10.100.0.100).
Task 4 Solution: Joining the new device to the Grid
-
Log in to the CLI prompt of the nios-3 VM.
-
Enter the command set membership.
-
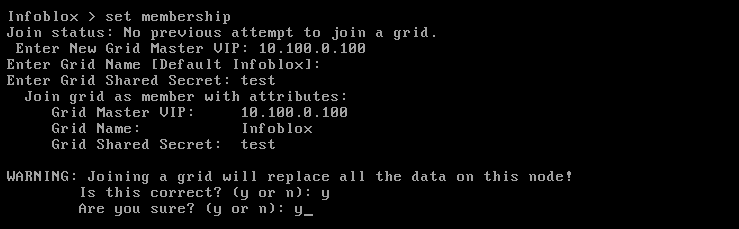
Use the command set membership to join the Grid. The information to join the Grid is collected in Task 2 (Table 3503-2):
-
Grid Master VIP: 10.100.0.100
-
Grid Name: Infoblox
-
Grid Shared Secret: test
-
-
Confirm the changes and allow the device to restart.
-
Below is an example screenshot:
-
Allow the device to restart.
Task 5 Solution: Verifying joining successful
-
From Grid → Grid Manager → Members screen, use the Refresh button to update the display.

-
The arrow button to the left of the member name indicates that this is an HA member
Task 5 Solution: Performing HA failover
-
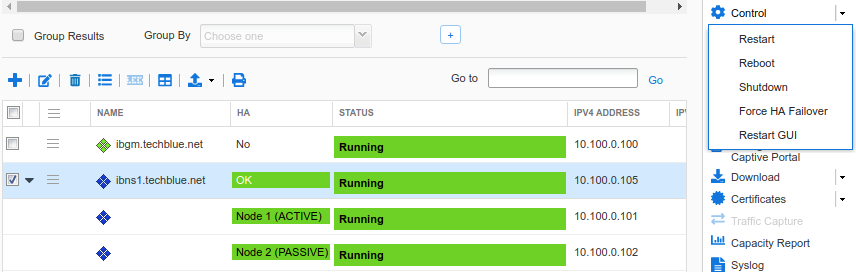
From Grid → Grid Manager → Members, expand the entry for ibns1.techblue.net.
-
Place a check mark in the box next to ibns1.techblue.net.
-
Note which node is active and which node is passive by clicking the small triangle icon to expand the entry.
-
With the entry ibns1.techblue.net selected, from the Toolbar on the right, select Control → Force HA Failover
-
At the Force HA Failover window, click OK to confirm.
-
Every few seconds, click the Refresh button to update the status of the HA pair ibns1.techblue.net.
-
The status will change several times, from Running to HA Broken, then back to Running.

-
Once HA Failover has finished, notice that the HA status of the nodes are different; the previous ACTIVE is now PASSIVE.