Scenario
Your team is performing a Disaster Recovery (DR) exercise, during which you need to switch all Grid management functions to the backup or secondary site, verify everything works, and then switch back to the primary site.
Estimate Completion Time
-
30 to 45 minutes
Credentials
|
Description |
Username |
Password |
URL or IP |
|---|---|---|---|
|
Grid Manager UI |
admin |
infoblox |
Requirements
-
Administrative access to the Grid
-
Console access to NIOS appliances
Learning Content
Lab Initiation
Access jump-desktop
Once the lab is deployed, you can access the virtual machines required for this activity. To begin, select VM List from the navigation bar at the top, locate jump-desktop, and click the green play icon to open its console. Log in to the Linux UI.

Username: training
Password: infoblox
Initiate lab
To initiate the lab, double-click the Launch Lab icon on the Desktop.

Choose the lab number from the list and click OK.

After clicking OK, you will see a pop-up message with a brief description of the lab task. If the description looks correct, click Yes to continue lab initiation.

Lab initiation will take a couple of minutes to finish.
Once complete, you will see another pop-up message with the login credentials and the URL for the Grid Manager’s User Interface. Note that the credentials may differ from those from prior labs.

Tasks
Task 1: Obtaining information on GMC
Login to the GM web interface and collect the network information of the Grid Master Candidate. If more than one GMC is configured, please write down all their network information. You will need this information for the next task.
Task 2: Documenting service impact
As part of the DR exercise, you need to provide the service impact and plan for an outage (if appropriate). Please answer the following questions:
-
Are DNS/DHCP/IPAM services affected by this activity?
-
Will the service be unreachable for more than 60 minutes?
-
After promoting the backup site, do NIOS administrators need to log in to a different address to access the GM user interface to make changes?
Task 3: Testing the GMC connection to Grid members
Test whether the Grid Master Candidate is connected to the rest of the Grid members using the GMC Promote Test tool
Task 4: Promoting the GMC
Login to the GMC via console access. Execute the command set promote_master.
Task 5: Verifying functionality
Login to the newly promoted GM at its IP address. Please verify that all members have rejoined successfully. The original GM (nios-1) should have rejoined the Grid, and automatically change its role to the new GMC.
Task 6: Promoting original GM
Login to the original GM (nios-1) via console access. Execute the command set promote_master.
Task 7: Verifying functionality
Login to the original GM at its IP address. Please note that all members have rejoined successfully. The GMC (nios-5) should have rejoined the Grid, and automatically change its role to GMC.
Solutions
Task 1 Solution: Obtaining information on GMC
Log in to the GM web interface and examine the services active in the grid and the members on which these services run.
-
Login to the NIOS GM web interface.
-
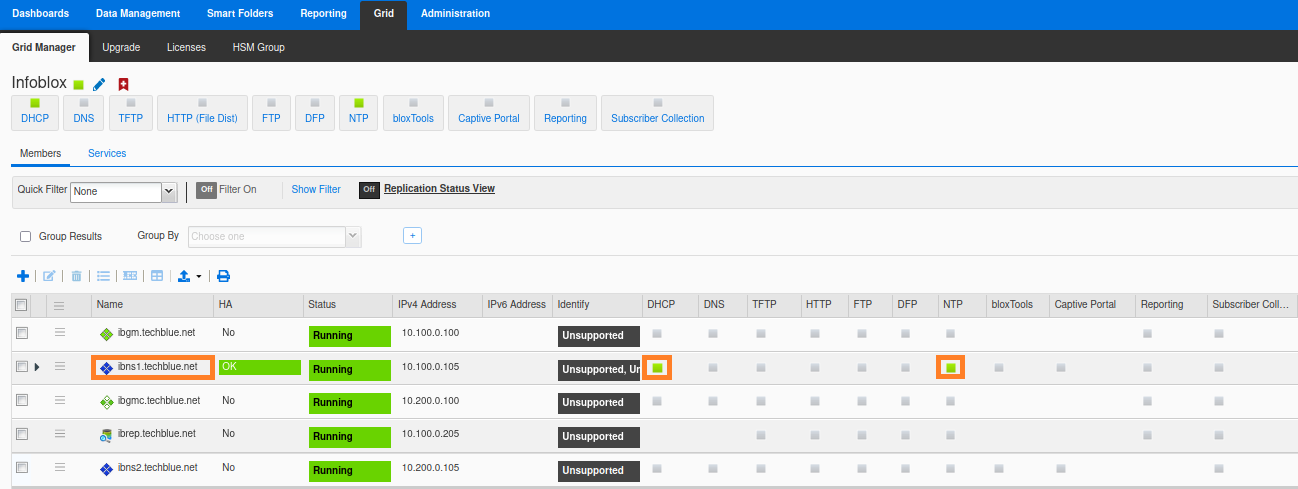
Navigate to Grid → Grid Manager → Members.
-
Note the services running for ibns2.techblue.net and ibns1.techblue.net. If a service runs correctly, it will be shown with a green icon.
Alternatively, you may find the same information in the web interface this way, one service at a time:
-
Login to NIOS GM web interface
-
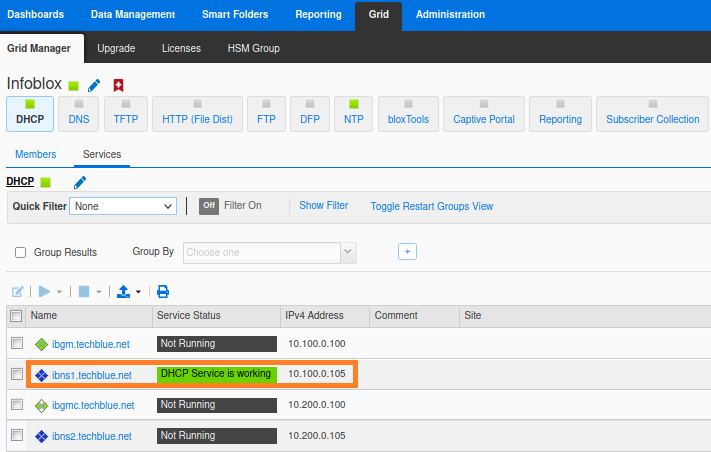
Navigate to Grid → Grid Manager → Services.
-
Click on DHCP to verify if DHCP service is running for ibns2.techblue.net and ibns1.techblue.net .
-
Repeat the same step for DNS and other services.
Task 2 Solution: Documenting service impact
As part of the DR exercise, you need to provide the service impact and plan for an outage (if appropriate). Please answer the following questions:
-
Are DNS/DHCP/IPAM services affected by this activity?
Answer: Yes, services will restart as a result of GMC promotion. Depending on the configuration and dataset, this can take several minutes. You may choose to restart services one member at a time at an interval (default 30 seconds), instead of restarting services on all members at the same time. This may or may not introduce service disruption, depending on your architecture design. For example, if you have DNS anycast or DHCP failover between members and sites, you may not have a service impact during a GMC promotion. -
Do HA pairs protect me from service disruptions during a GMC promotion?
Answer: No. During a GMC promotion, the HA failover does not occur. Services on the active node will restart. -
Will the service be unreachable for more than 60 minutes?
Answer: This is unlikely. Services will only be affected during the service restart window. -
After promoting the backup site, do NIOS administrators need to log in to a different address to access the GM user interface to make changes?
Answer: Administrators are automatically redirected to the new GM’s login page.
Task 3 Solution: Testing the GMC connection to Grid members
Before promoting a Grid Master Candidate, It is highly recommended to check whether the Grid Master Candidate is connected to the rest of the Grid members using the GMC Promote Test feature, this is to avoid any service disruptions during or after the GMC promotion due to blocked ports needed to communicate with the rest of the Grid members.
-
Login to the NIOS GM web interface.
-
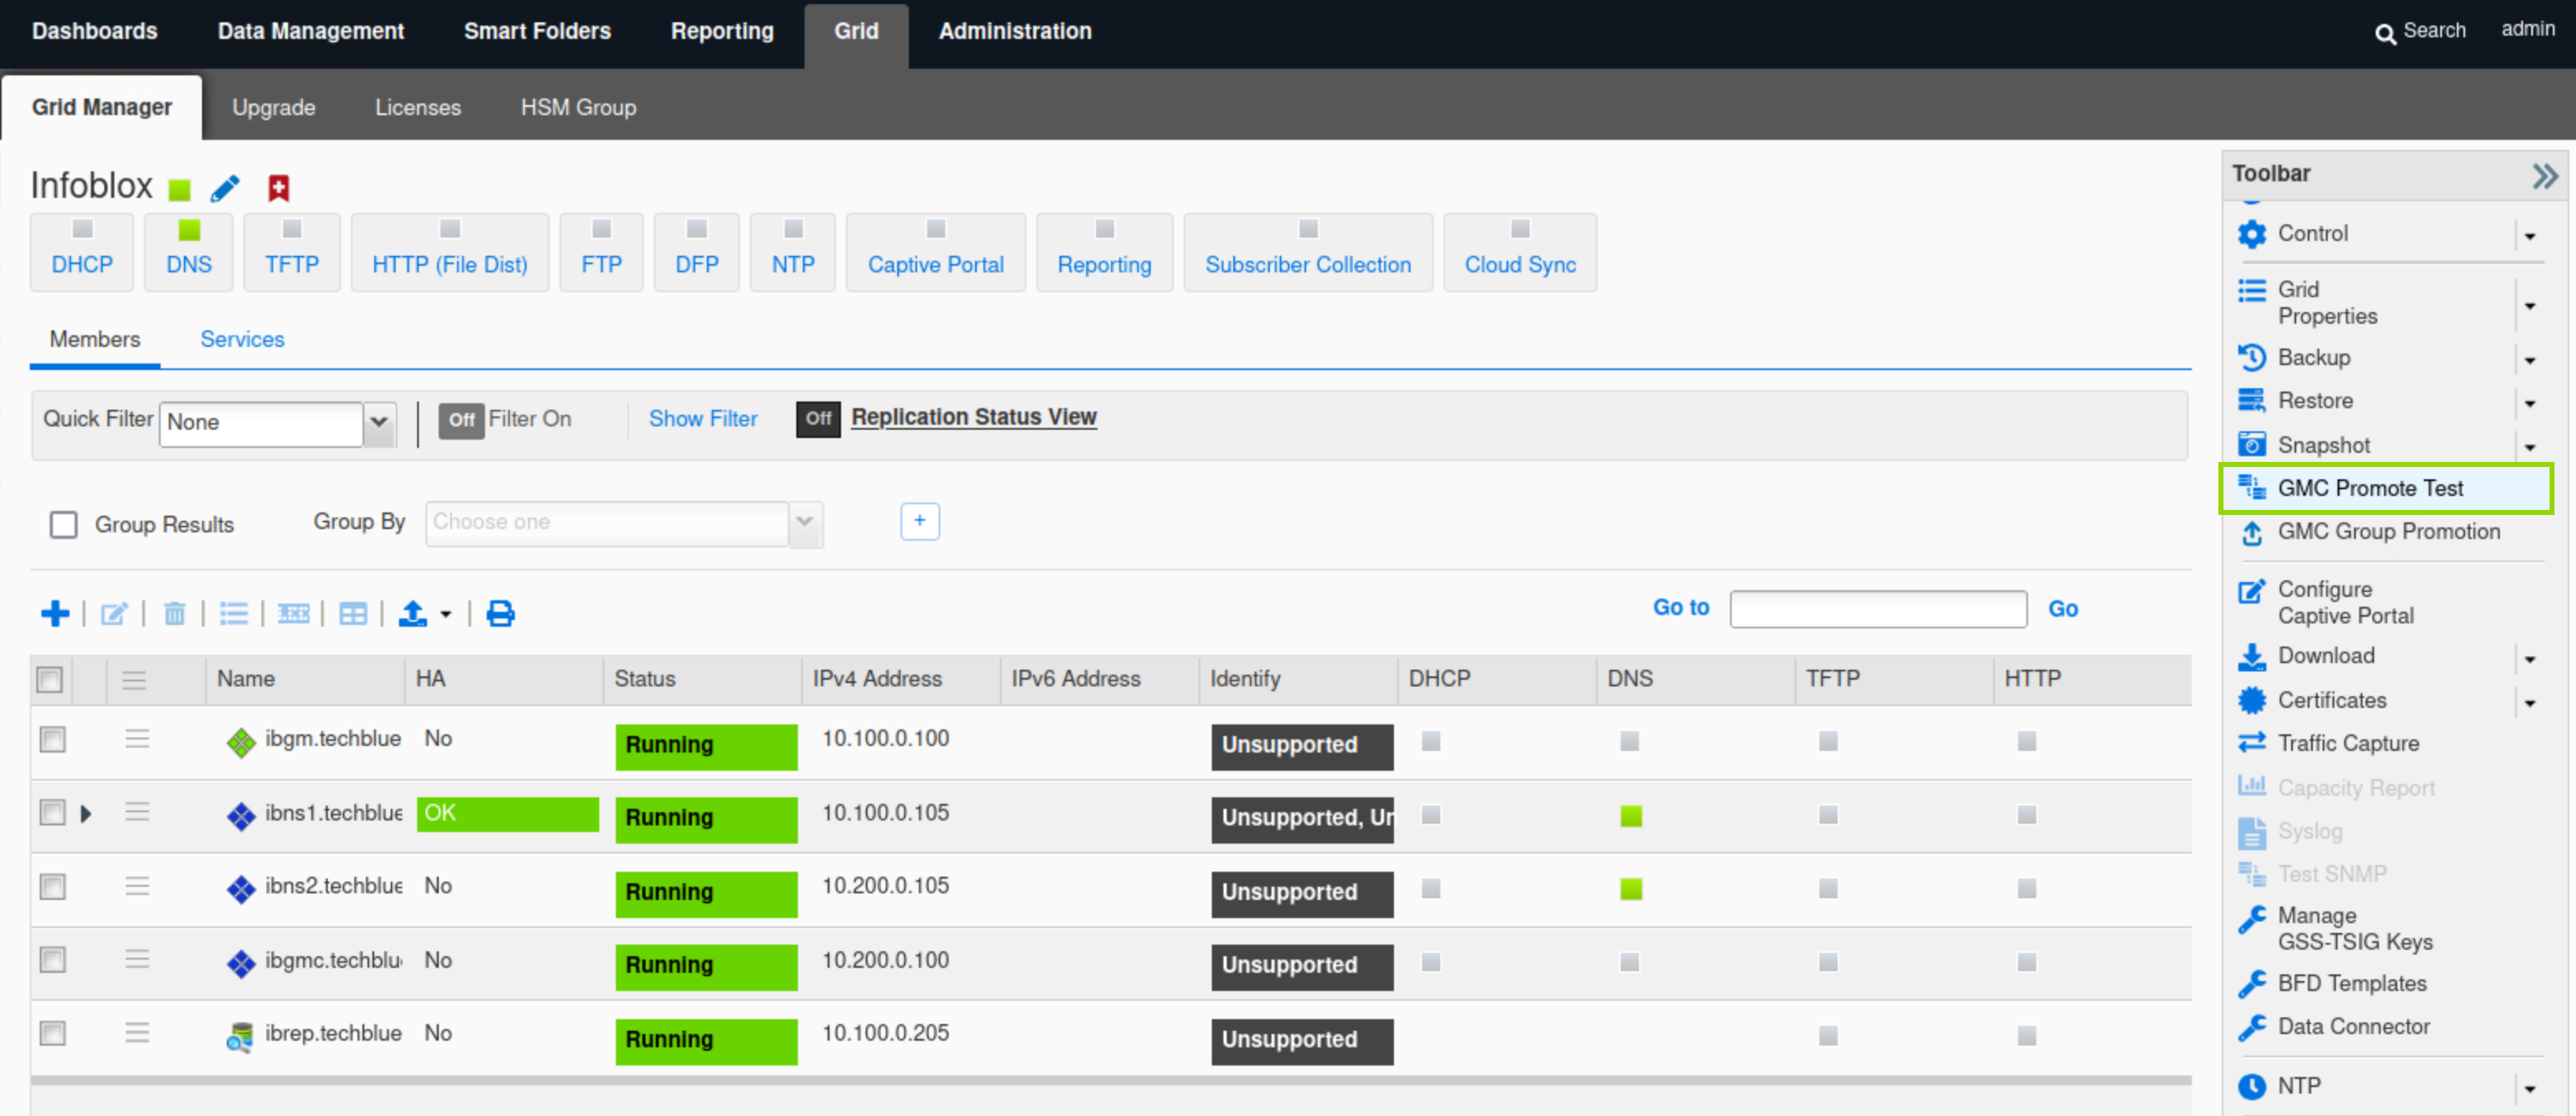
Navigate to Grid → Grid Manager.
-
From the Toolbar click GMC Promote Test.
-
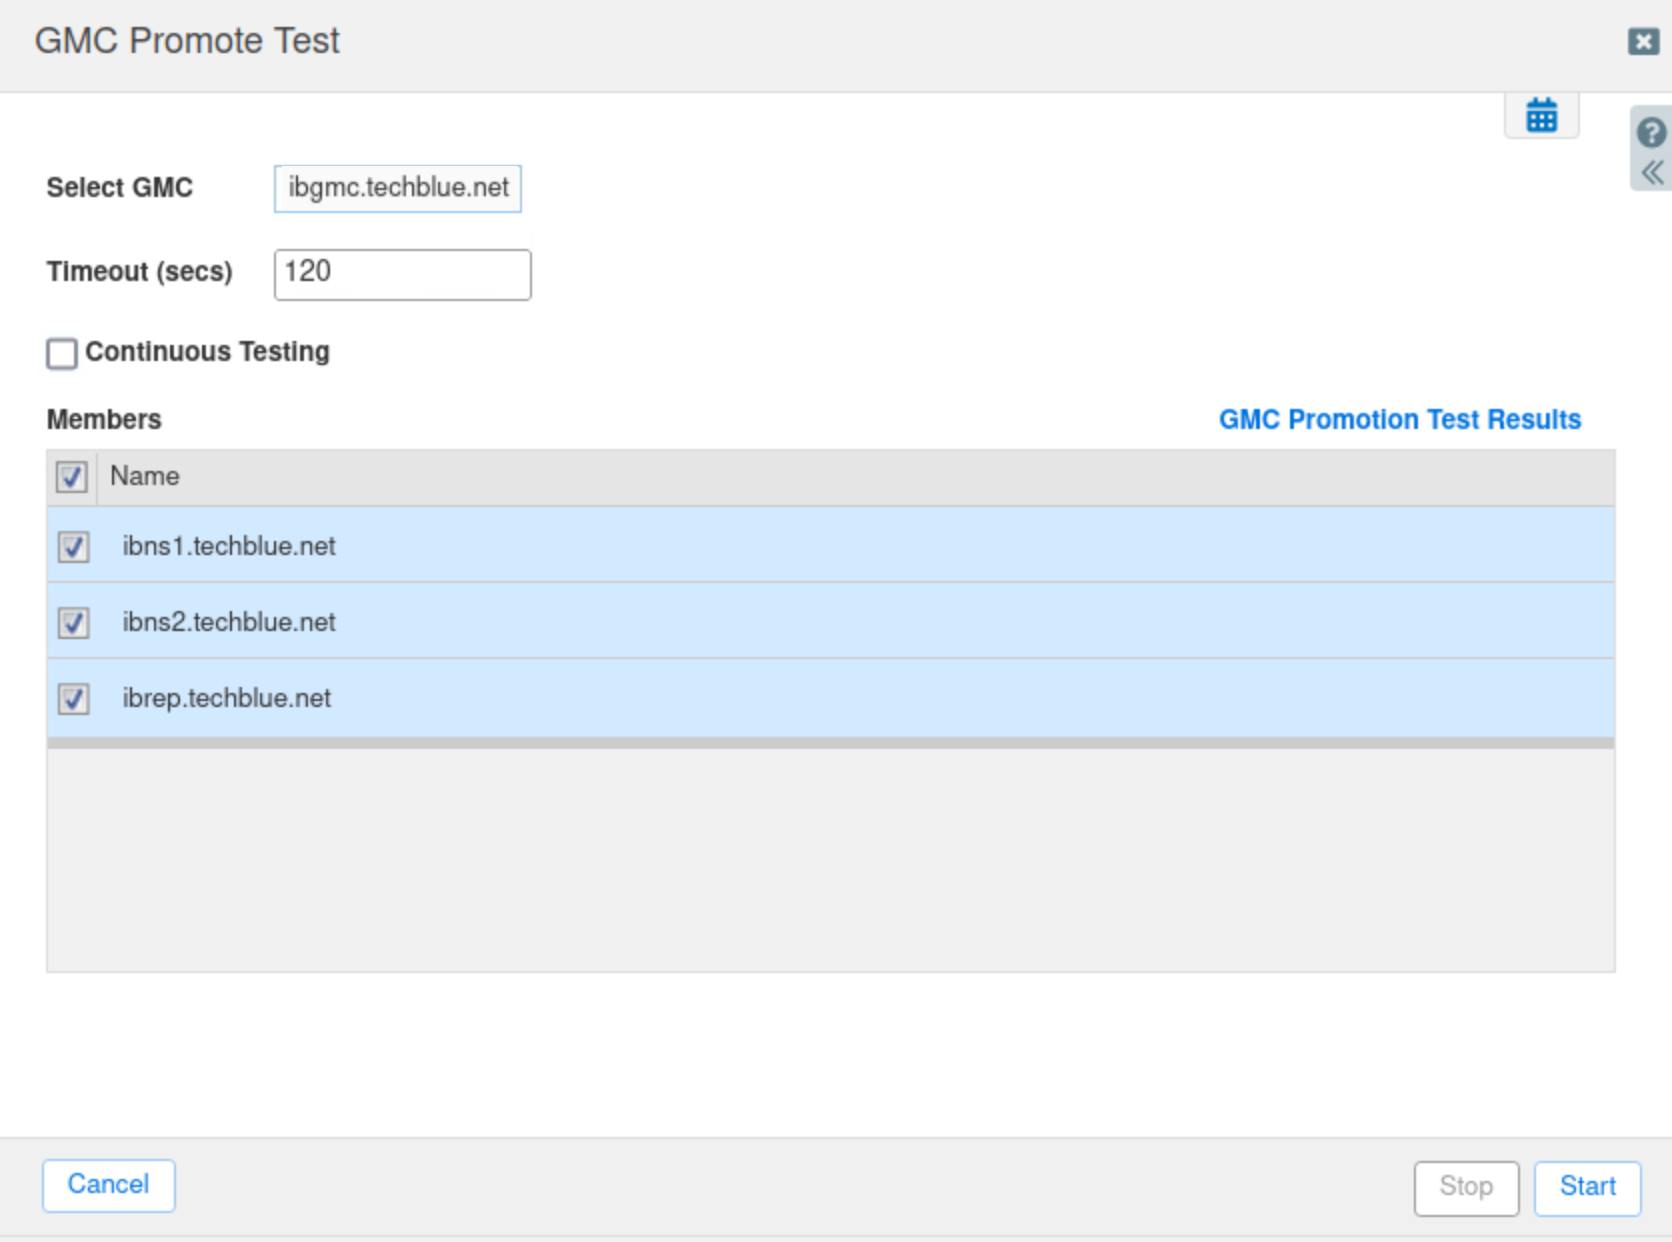
From the Select GMC drop-down list, select the Grid Master Candidate that you want to promote to Grid Master.
-
Leave the default timeout timer at 120 seconds.
-
In the Members table, select all the Grid members.
NOTE: The Grid Master Candidate must establish a connection with all the selected members. -
Click Start to start the test promotion.
-
Click GMC Promotion Test Results to view the status of the test promotion.
-
Task 4 Solution: Promoting the GMC
Login to the GMC via console access. Execute the command set promote_master.
-
Access the console of nios-5 VM using default credentials.
-
At the prompt, type the command set promote_master.
-
When prompted to add a delay between notification to Grid members, say Y, and accept the default delay of 30 seconds.
-
When prompted to confirm you want to promote this candidate, say Y to accept.
-
You will now see the NIOS appliance restart.
-
Go back to the VM jump-desktop.
-
Wait a couple of minutes and then refresh your web browser.
-
If the web browser says, “Refused to connect” wait a few more minutes and refresh again.
-
-
You will be automatically redirected to the new GM’s IP address (10.200.0.100).
-
Login with the default credentials
-
Go to Grid→Grid Manager→Members
-
All members should be online and running
-
You will now see that the icons for ibgm and ibgmc have been swapped around, ibgmc is now the Grid Master, ibgm is a Grid Master Candidate.
Task 5 Solution: Verifying functionality
Login to the newly promoted GM at its IP address (10.200.0.100). Please verify that all members have rejoined successfully. The original GM (nios-1) should have rejoined the Grid, and automatically change its role to the new GMC.
-
Go to Grid→Grid Manager→Members.
-
Check the Status of members and verify that they have all successfully joined the newly promoted ibgmc
Task 6 Solution: Promoting original GM
Login to the original GM (nios-1) via console access. Execute the command set promote_master.
-
Access the console of nios-1 VM using default credentials.
-
At the prompt, type the command set promote_master
-
When prompted to add a delay between notification to Grid members, say Y, and accept the default delay of 30 seconds
-
When prompted to confirm you want to promote this candidate, say Y to accept
-
You will no see the NIOS appliance restart.
-
Go back to jump-desktop.
-
Wait a couple of minutes and then refresh your web browser
-
If the web browser says, “Refused to connect” wait a few more minutes and refresh again.
-
-
You will be automatically redirected to the new Grid Master’s IP address (10.100.0.100).
-
Login with the default credentials.
-
Go to Grid→Grid Manager→Members.
-
All members should be online and running.
-
You will now see that the icons for ibgm and ibgmc have once again swapped around, ibgm is once again the Grid Master, ibgmc is back to being the Grid Master Candidate.
Task 7 Solution: Verifying functionality
Login to the newly promoted GM at its IP address (10.100.0.100). Please verify that all members have rejoined successfully.
-
Go to Grid→Grid Manager→Members.
-
Check the Status of members and verify that they have all successfully joined the newly promoted ibgm