Scenario
Your colleagues have created a new subnet and the associated objects to provide leases to newly installed workstations in the 172.31.101.0/24 subnet. Clients are somehow unable to obtain leases on this subnet. Please investigate and troubleshoot the root cause(s). The DHCP server should be ibns1.techblue.net (10.100.0.105).
Hint: You may log in to the VM testing-windows and use it to simulate client behavior. When working, the testing-windows device should receive a 172.31.101.x IP address.
Estimate Completion Time
-
15 to 25 minutes
Credentials
|
Description |
Username |
Password |
URL or IP |
|---|---|---|---|
|
Grid Manager UI |
admin |
infoblox |
Learning Content
Lab Initiation
Access jump-desktop
Once the lab is deployed, you can access the virtual machines required for this activity. To begin, select VM List from the navigation bar at the top, locate jump-desktop, and click the green play icon to open its console. Log in to the Linux UI.

Username: training
Password: infoblox
Initiate lab
To initiate the lab, double-click the Launch Lab icon on the Desktop.

Choose the lab number from the list and click OK.

After clicking OK, you will see a pop-up message with a brief description of the lab task. If the description looks correct, click Yes to continue lab initiation.

Lab initiation will take a couple of minutes to finish.
Once complete, you will see another pop-up message with the login credentials and the URL for the Grid Manager’s User Interface. Note that the credentials may differ from those from prior labs.

Tasks
Task 1: Verifying the symptoms
Use the testing-windows VM to verify the symptoms experienced by the users.
Hint: You may use the command ipconfig to view the current lease. Use ipconfig /release to release the lease, and ipconfig /renew to obtain or renew a new lease. Observe server logs while the client is requesting a lease.
Task 2: Reviewing DHCP Member Configuration
Based on the findings from the first task, investigate the DHCP member configuration in the Grid to locate the misconfiguration.
Solutions
Task 1 Solution: Verifying the symptoms
Use the VM testing-windows to verify the symptoms experienced by the users.
-
Switch to the VM testing-windows and launch a Command Prompt window.
-
The command
ipconfigshows the device currently does not have a DHCP lease.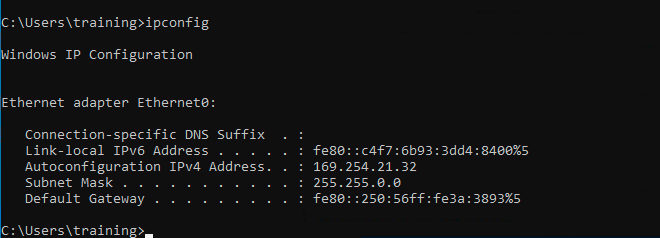
-
Use the command
ipconfig /renewto force the device to request for a new DHCP lease. It will fail with an error message about unable to contact DHCP server. This should have generated logs on the DHCP server.
-
Switch to the VM jump-desktop to the GM web interface.
-
Navigate to Administration → Logs → Syslog. In Log Viewer Member, select ibns1.techblue.net from the drop-down list.
-
You can see numerous DHCPDISCOVER messages, each with the detail via 172.31.101.1: unknown network segment.
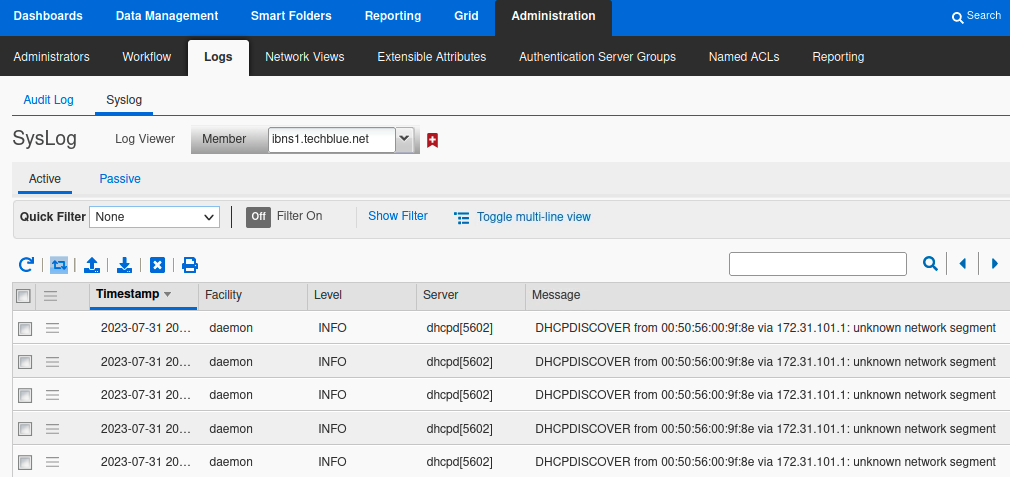
The message unknown network segment suggests that the server ibns1.techblue.net is not configured to serve this subnet, 172.31.101.0/24. We need to investigate the DHCP server configuration next.
Task 2 Solution: Reviewing DHCP Member Configuration
There are 2 places that we should check in the Grid for DHCP configuration: 1) The DHCP member’s configuration, and 2) The DHCP networks' configuration.
Reviewing Member Configuration
-
Navigate to Data Management → DHCP → Members, select the member ibns1.techblue.net (10.100.0.105). From the Toolbar, click View DHCP Configuration → IPv4.
-
This brings out the member’s DHCP configuration file. We can read this configuration file and confirm that there is no subnet for 172.31.101.0/24.
Reviewing Network Configuration
-
Navigate to Data Management → DHCP → Networks.
-
We can see that there is no network for 172.31.101.0/24 defined.
The likely conclusion at this point is that someone made a mistake entering the network 172.31.101.0/24, and typed in 172.31.10.0/24 instead. Unfortunately, you cannot edit the network once it has been created. To fix the issue, you will need to create a subnet (172.31.101.0/24) and a range (172.31.101.75-172.31.101.85) for the DHCP service to work.
Why not delete the 172.31.10.0/24 network? It may seem obvious in the lab that this network was created by mistake. However, it is rarely this obvious or simple. Until we have confirmed with the network team that this indeed is a mistake, we should leave the entry in, to avoid disrupting DHCP services for clients on that subnet.
Adding DHCP Configuration
-
Navigate to Data Management → DHCP → Networks.
-
Click + to add a new IPv4 network.
-
Step through the Add IPv4 Network Wizard to add the network 172.31.101.0/24. Assign it to the member ibns1.techblue.net.
-
Click on the newly added network 172.31.101.0/24 to open it.
-
Click + to add a new range.
-
Step through the Add IPv4 Range Wizard to add the range 172.31.101.75-172.31.101.85. Assign it to the member ibns1.techblue.net.
-
Restart services when prompted.
Testing DHCP Configuration
-
Switch to the VM testing-windows.
-
Run the command
ipconfig /renew. The client should receive a DHCP lease this time.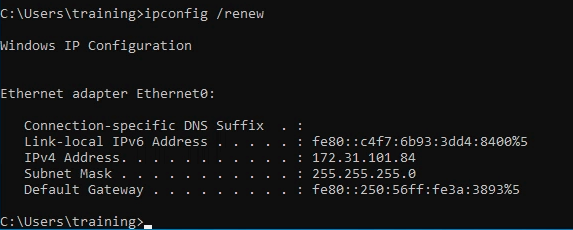
-
You can confirm this by observing server logs next.
Verifying Server Logs
-
Switch to the VM jump-desktop.
-
In the GM web interface, navigate to to Administration → Logs → Syslog. In Log Viewer Member, select ibns1.techblue.net from the drop-down list. You can verify that we see DISCOVER, OFFER, REQUEST, and ACK messages related to this client (testing-windows).
