Scenario
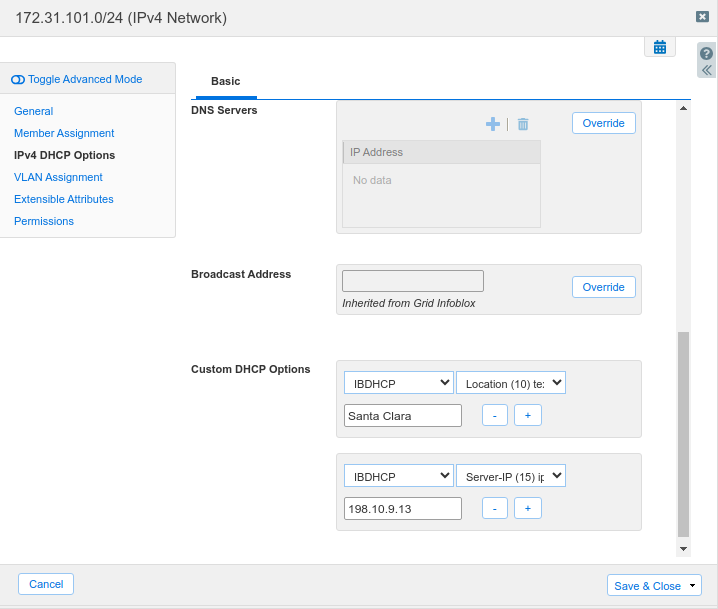
A custom client has been deployed on the network 172.31.101.0/24 that requires vendor specific option (option 42), details listed in the table below. The network team has already setup the custom DHCP option space named IBDHCP, configured it with the 2 custom codes (10 and 15), and set up a filter to look for the special client IBEDU.sauron-2022_10_21.
|
Option Space |
Option Number |
Option Name |
Option Type |
Option Value |
|
IBDHCP |
10 |
Location |
text |
Santa Clara |
|
IBDHCP |
15 |
Server-IP |
ip-address |
198.10.9.13 |
However, client is not receiving these options. Please troubleshoot. You may use these 3 commands to help you on the testing-linux:
-
To enable DHCP on the testing-linux, type: sudo set-network-dhcp
-
To disable DHCP on the testing-linux, type: sudo set-network-disable
-
To clear DHCP lease on the testing-linux, type: sudo clear-dhcp-leases
-
To show the current eth2 DHCP lease information, type: sudo show-dhcp-lease
When successfully configured, the command sudo show-dhcp-lease will print out the encapsulated options as follows:
 --- Encapsulated DHCP Options (vendor_encapsulated_options)
Decoding part 1: a:b:53:61:6e:74:61:20:43:6c:61:72:61
 Option ID: 10
 Option length: 11
 Option value: "Santa Clara"
Decoding part 2: f:4:c6:a:9:d
 Option ID: 15
 Option length: 4
 Option value: "198.10.9.13"
Estimate Completion Time
-
25 to 30 minutes
Credentials
|
Description |
Username |
Password |
URL or IP |
|---|---|---|---|
|
Grid Manager UI |
admin |
infoblox |
Requirements
-
Administrative access to the Grid
Learning Content
Lab Initiation
Access jump-desktop
Once the lab is deployed, you can access the virtual machines required for this activity. To begin, select VM List from the navigation bar at the top, locate jump-desktop, and click the green play icon to open its console. Log in to the Linux UI.

Username: training
Password: infoblox
Initiate lab
To initiate the lab, double-click the Launch Lab icon on the Desktop.

Choose the lab number from the list and click OK.

After clicking OK, you will see a pop-up message with a brief description of the lab task. If the description looks correct, click Yes to continue lab initiation.

Lab initiation will take a couple of minutes to finish.
Once complete, you will see another pop-up message with the login credentials and the URL for the Grid Manager’s User Interface. Note that the credentials may differ from those from prior labs.

Tasks
To complete this lab, you need to perform the following tasks.
-
Investigate and troubleshoot Custom Vendor Option delivery
Task 1: Troubleshoot DHCP Custom Vendor Option delivery
Check Option Space and Option Filter configuration to investigate why the Client is not getting the correct value in DHCP Option 43
Solutions
Task 1 Solution: Troubleshoot DHCP Custom Vendor Option delivery
sudo set-network-dhcp command will get the client a DHCP lease, but not the correct vendor-specific options:
$ sudo show-dhcp-lease

--- Raw DHCP Lease Information

lease {
  interface "ens160";
  fixed-address 172.31.101.252;
  option subnet-mask 255.255.255.0;
  option dhcp-lease-time 43200;
  option dhcp-message-type 5;
  option dhcp-server-identifier 10.100.0.105;
  renew 1 2023/06/19 15:08:50;
  rebind 1 2023/06/19 20:53:49;
  expire 1 2023/06/19 22:23:49;
}
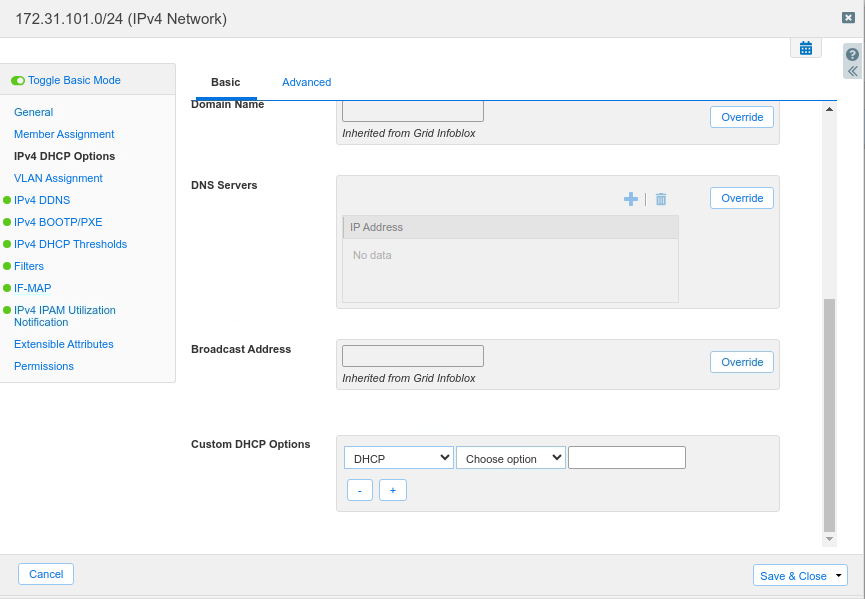
At this point, you should review the member configuration before running a traffic capture. The member configuration file (Data Management DHCP Member, select member, click Toolbar View DHCP Configuration IPv4) will show that the option space is properly setup, but in the network 172.31.101.0/24, these option values are not specified (blank).
If you navigate to the network 172.31.101.0/24, you will see that the fields under Custom DHCP Options are empty:
To properly finish the configuration, edit the network 172.31.101.0/24, click IPv4 DHCP options, under Custom DHCP Options, enter the correct values as shown below: