Scenario
You are responsible for updating your organization’s DNS Infrastructure Protection ruleset to accommodate an important customer, ensuring their traffic is never interrupted.
Your first task was to create a custom Allowlist (Whitelist) rule for the customer’s IP address, 203.0.113.254, to guarantee continuous service, as the organization had a legal obligation to provide 24/7 support.
Some time after implementing the rule, you noticed that the customer's IP was generating excessive traffic. To prevent potential overload, and after careful observation and calculations, you set a Queries Per Second (QPS) limit of 100 using a Rate-Limiting rule. This limit effectively managed customer flow while avoiding system overload. You also informed your organization’s security team and management about the sudden, unexpected increase in traffic.
The security team then alerted you that the IP address had been compromised and was attempting to launch an attack on the organization. In response, you created a Denylist (Blacklist) rule to block all traffic from 203.0.113.254 and updated your management to inform the customer.
Estimate Completion Time
-
25 to 35 minutes
Prerequisites
Related Lab Guides:
Credentials
|
Description |
Username |
Password |
URL or IP |
|---|---|---|---|
|
Grid Manager UI |
admin |
infoblox |
|
|
Jump-Desktop |
training |
infoblox |
|
|
Support-Server |
training |
infoblox |
|
Requirements
-
Administrative access to the Grid
-
Usage of the NIOS Lab Environment (DNS Infrastructure Protection) Lab environment
Learning Content
Tasks
-
Create and test a custom Allowlist (Whitelist) rule
-
Create and test a custom Rate-Limiting rule
-
Create and test a custom Denylist (Blacklist) rule
Task 1: Create and test a custom Allowlist (Whitelist) rule
After completing the task, disable the rule and publish changes. This is to allow you to test upcoming rules in later steps, as they all affect the same IP address.
Create a custom Allowlist (Whitelist) rule under the 20250702-16 ruleset, to allow traffic from the IP Address 203.0.113.254, which is the IP Address of an important customer your organization has a legal obligation to support 24/7. Use the queryperf and bmon tools on the support-server VM to test your rule gets triggered by sending 1000 QPS to extibns.techblue.net, which is over the threshold for the system rule threshold for rule ID 130000200 (WARN & BLOCK about high rate inbound UDP DNS queries) in the 20250702-16 ruleset.
Task 2: Create and test a custom Rate-Limiting rule
After completing the task, disable the rule and publish changes. This is to allow you to test upcoming rules in later steps, as they all affect the same IP address.
Create a custom Rate-Limiting rule under the 20250702-16 ruleset, to control traffic from the IP Address 203.0.113.254, as it is sending an excessive amount of traffic, and we want to reduce the QPS to 100 before it gets rate-limited. Use the following parameters for the rule:
-
Log Severity: Critical
-
Packets per second: 100
-
Drop interval: 5
-
Events per second: 1
-
IP address: 203.0.113.254
-
Rate algorithm: Rate_Limiting
Use the queryperf and bmon tools on the support-server VM to test your configuration: use a number below the threshold (< 100), then one above the threshold (> 100) to verify that the rule gets activated only after the threshold is exceeded.
Task 3: Create and test a custom Denylist (Blacklist) rule
After completing the task, disable the rule and publish changes. This IP address cannot be blocked as it will be used in later DNS Infrastructure Protection labs.
Create a custom Denylist (Blacklist) rule under the Authoritative - Tuned profile, to block traffic from the IP Address 203.0.113.254, as it has been compromised and was attempting to launch an attack on the organization. Use the queryperf and bmon tools on the support-server VM to verify that traffic will be blocked.
Solutions:
Task 1 Solution: Create and test a custom Allowlist (Whitelist) rule
In this task, you will create a custom Allowlist (whitelist) rule for the customer's IP address, 203.0.113.254, to ensure continuous service, as the organization must provide 24/7 support. Without this rule, system rule ID 130000200 (WARN & BLOCK about high rate inbound UDP DNS queries) in the 20250702-16 ruleset would block this customer’s traffic if it exceeds the threshold of 500 QPS. Currently, the customer’s average QPS does not exceed 100, but given their importance, you will create a custom Allowlist (whitelist) rule while monitoring their traffic patterns for abnormalities.
You will implement the WHITELIST PASS UDP IP rule to allow UDP traffic from the IP address 203.0.113.254. This is sufficient for testing in a lab environment. However, in a production environment, consider pairing this rule with a WHITELIST PASS TCP IP rule, as some DNS traffic uses TCP alongside UDP. Carefully investigate this pairing, as it can significantly impact the volume of allowed traffic.
After creating the rule, you will use the lab’s support-server VM to simulate the client sending DNS traffic using the queryperf tool and monitor the Grid’s behaviour towards the traffic using the bmon tool. The traffic should be allowed to pass.
After completing the task, we will disable the rule and publish the changes. This is to allow us to test upcoming rules in later steps, as they all affect the same IP address.
-
On the jump-desktop machine, open a browser window to https://10.100.0.100.
-
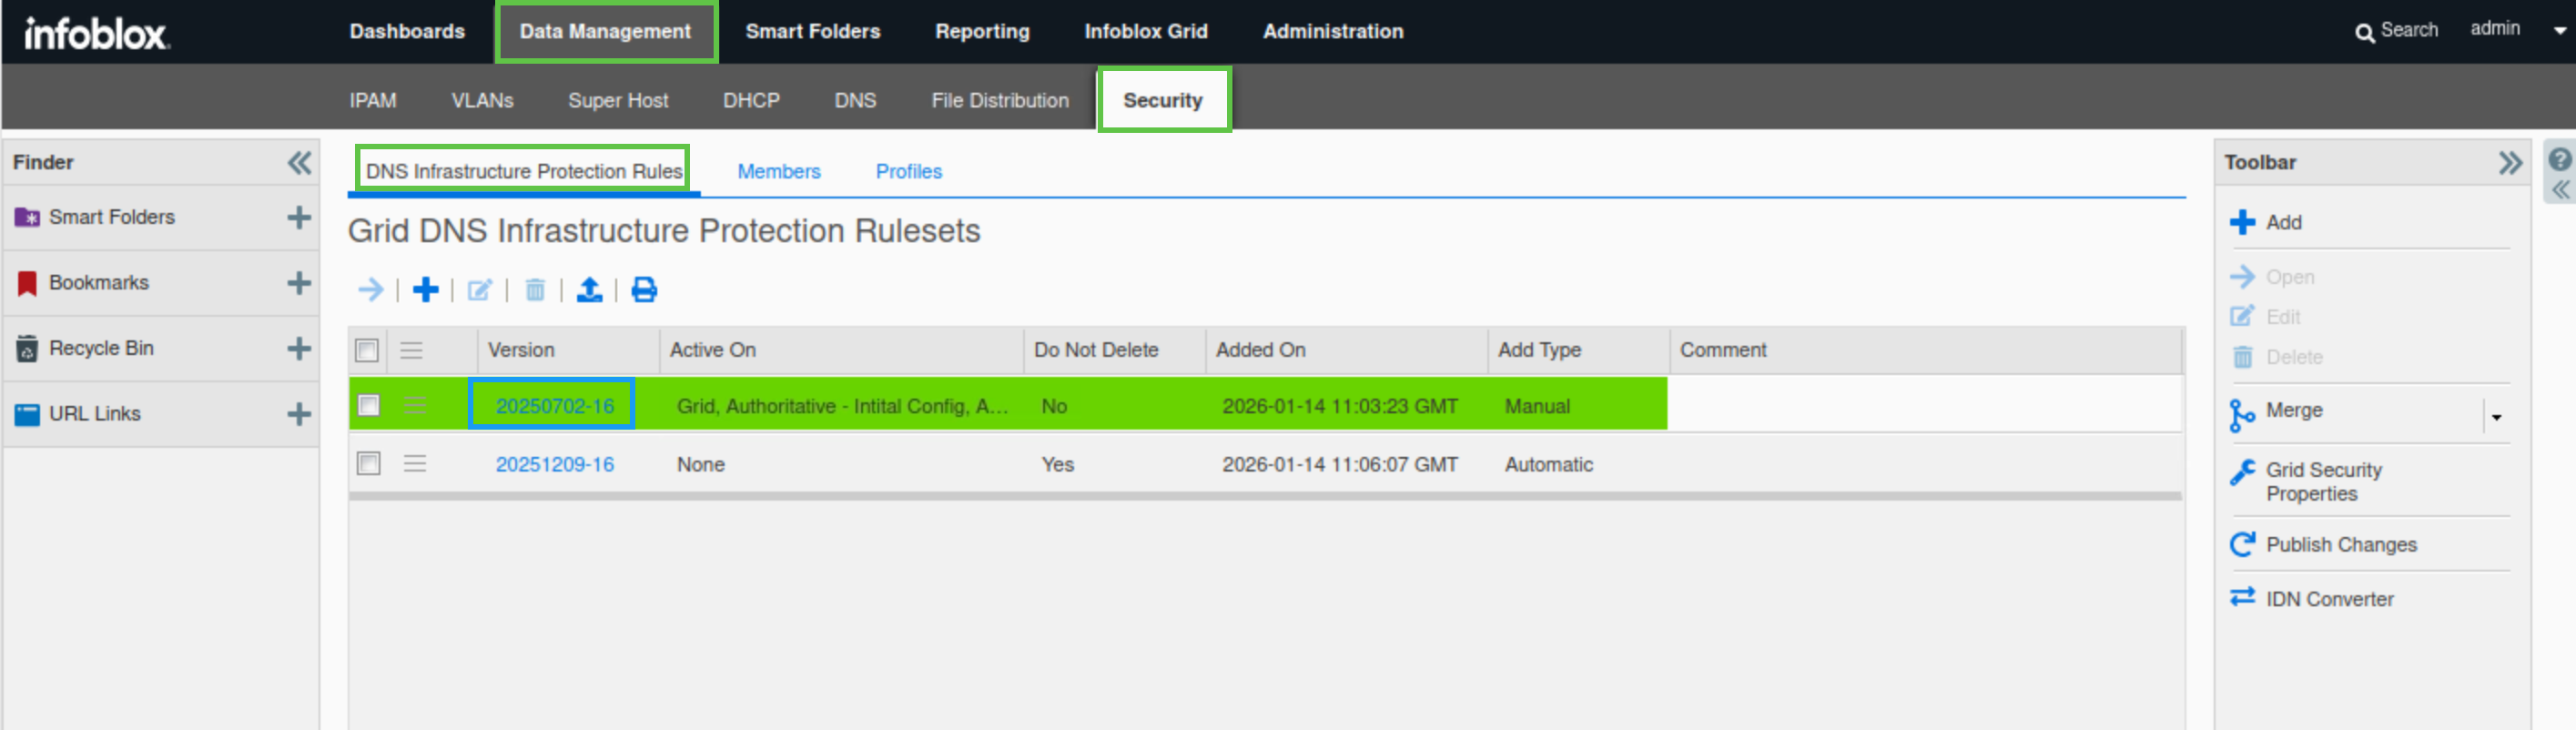
Navigate to Data Management → Security → DNS Infrastructure Protection Rules.
-
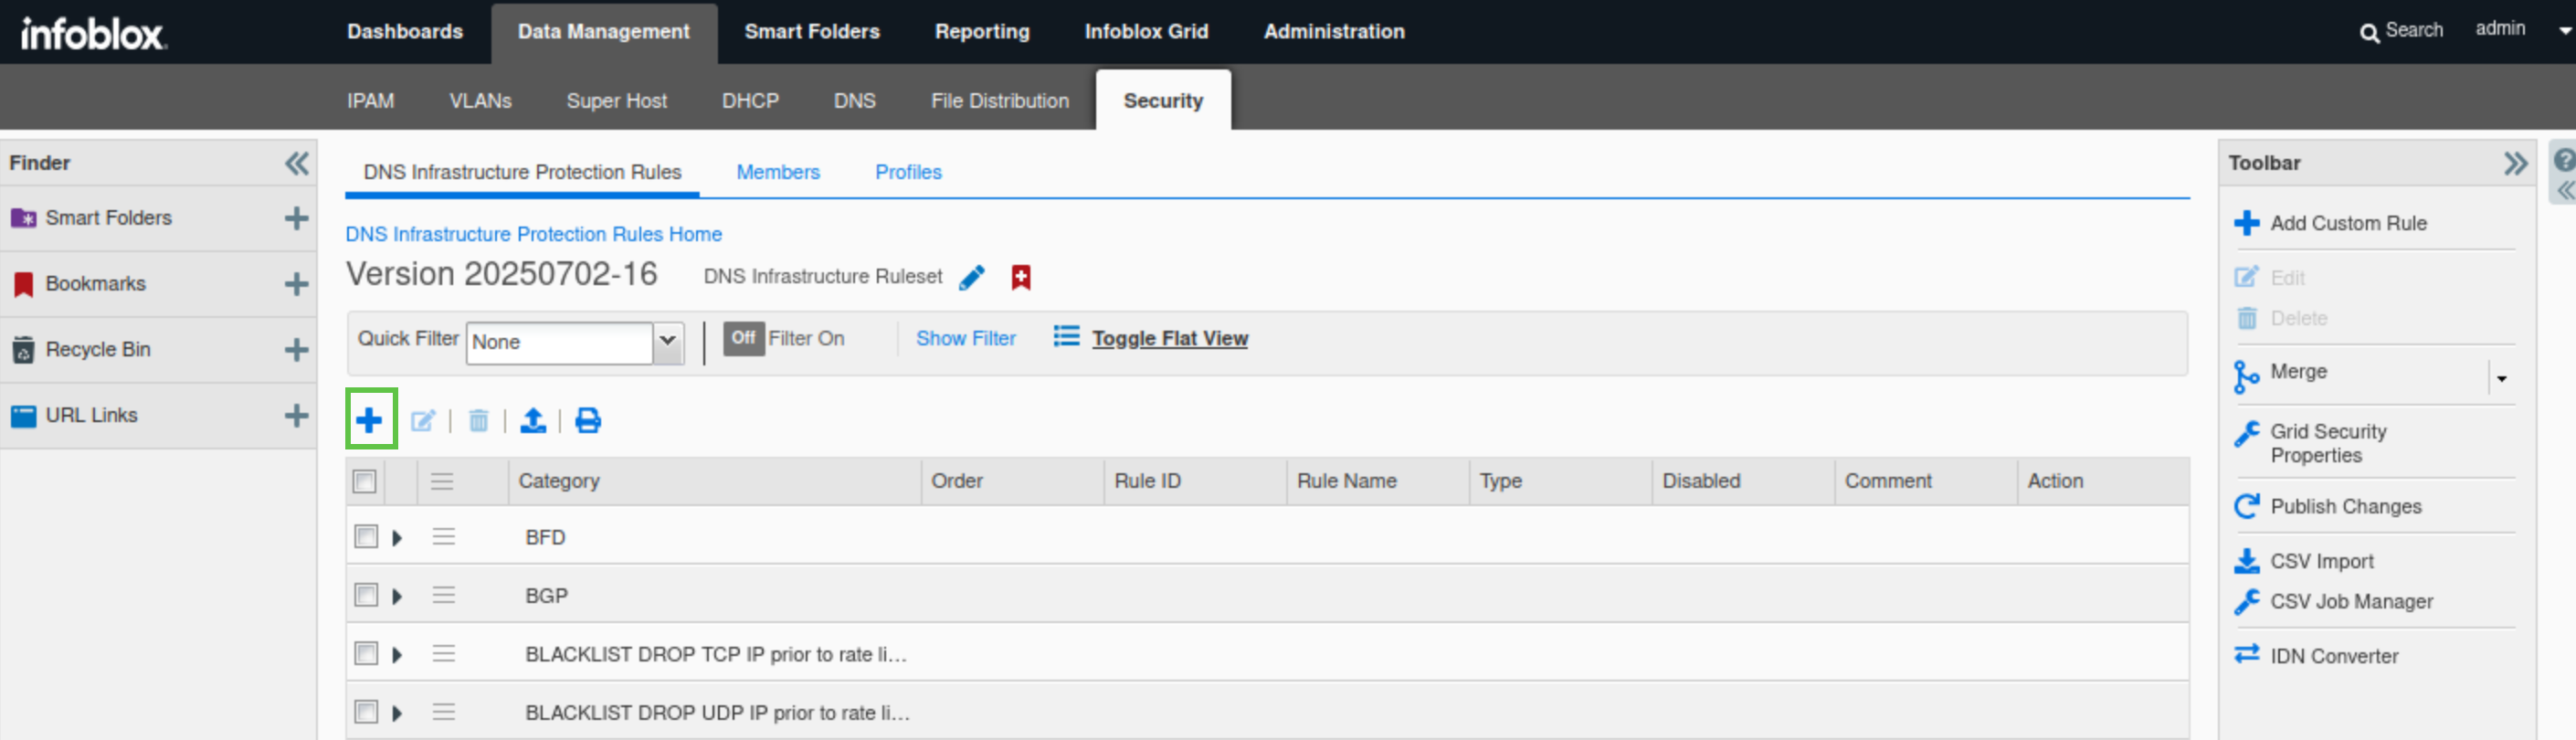
Click on the link for the 20250702-16 rule.
-
Click the plus (+) symbol to add a custom rule.
-
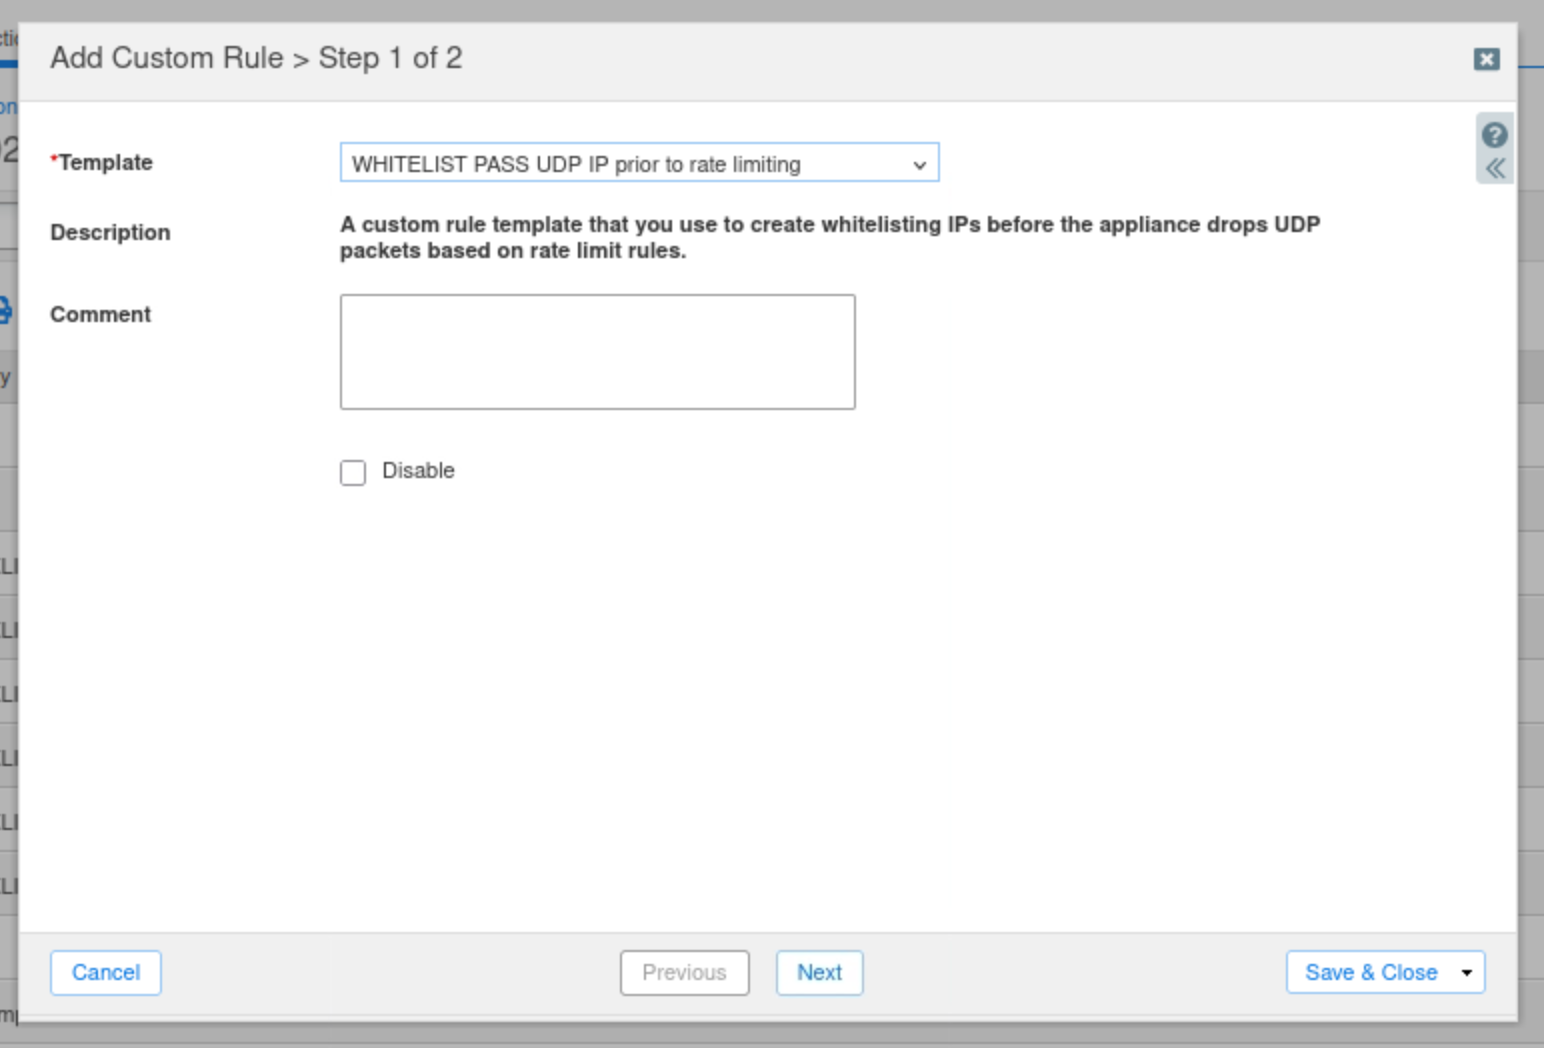
Choose the Allowlist WHITELIST PASS UDP IP prior to rate limiting from the drop-down template list.
-
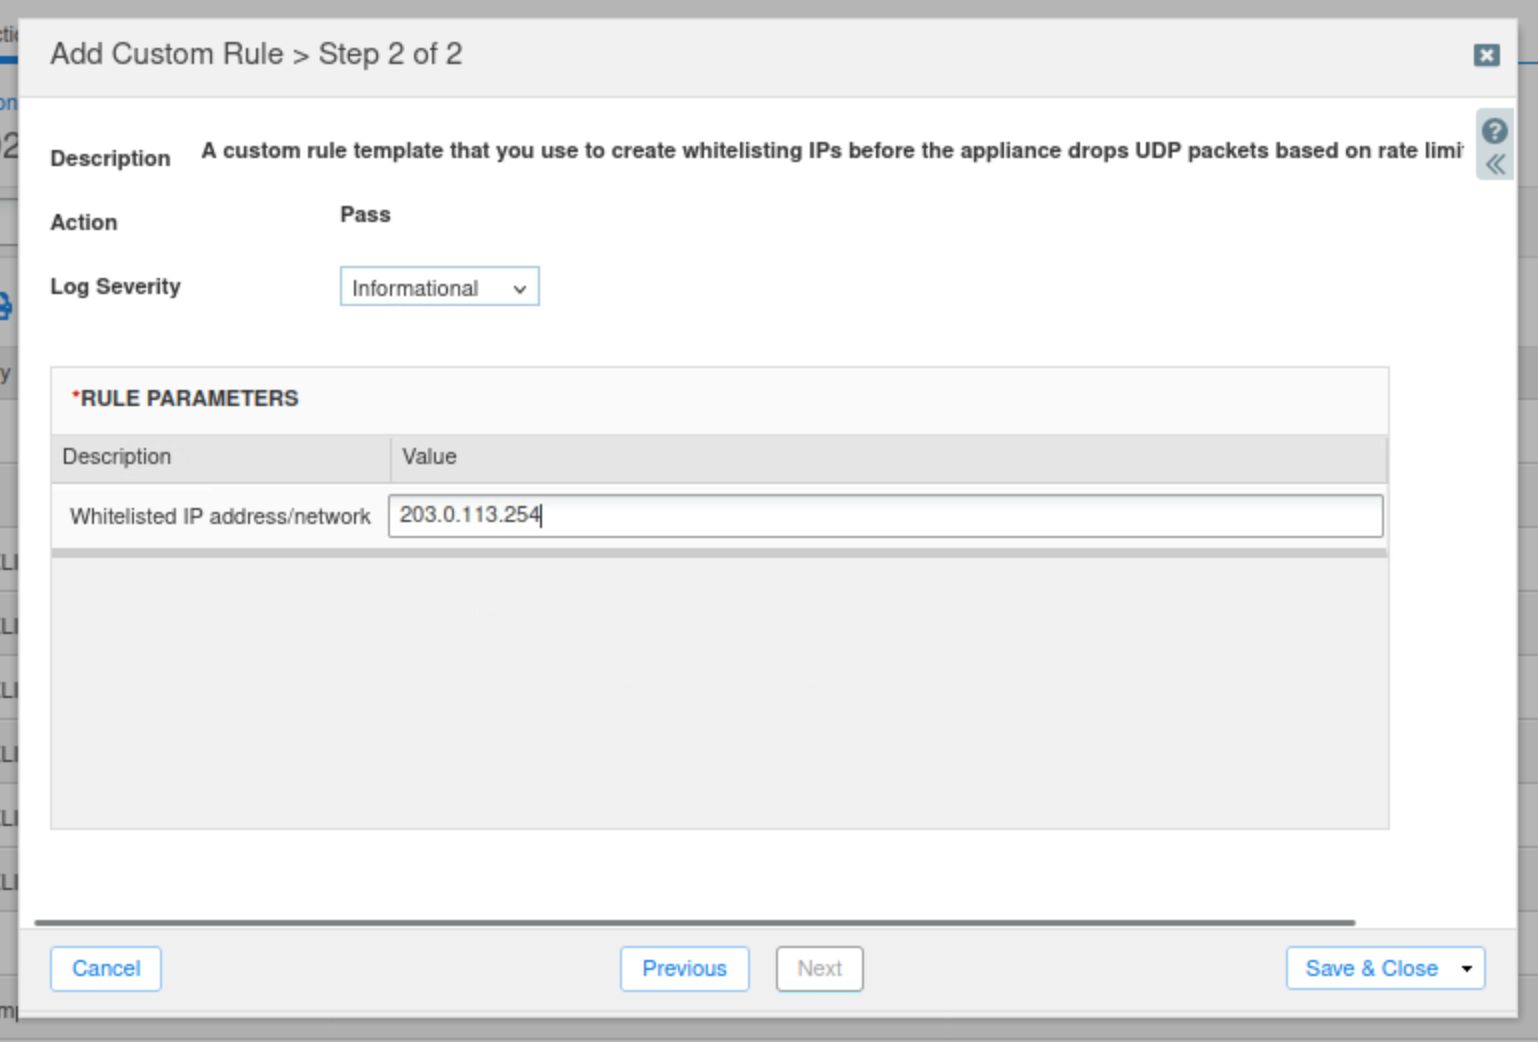
Click Next to configure the rule parameters.
-
Enter the IP Address 203.0.113.254 as the value for the Whitelisted IP address/network field.
-
Click Save and Close.
-
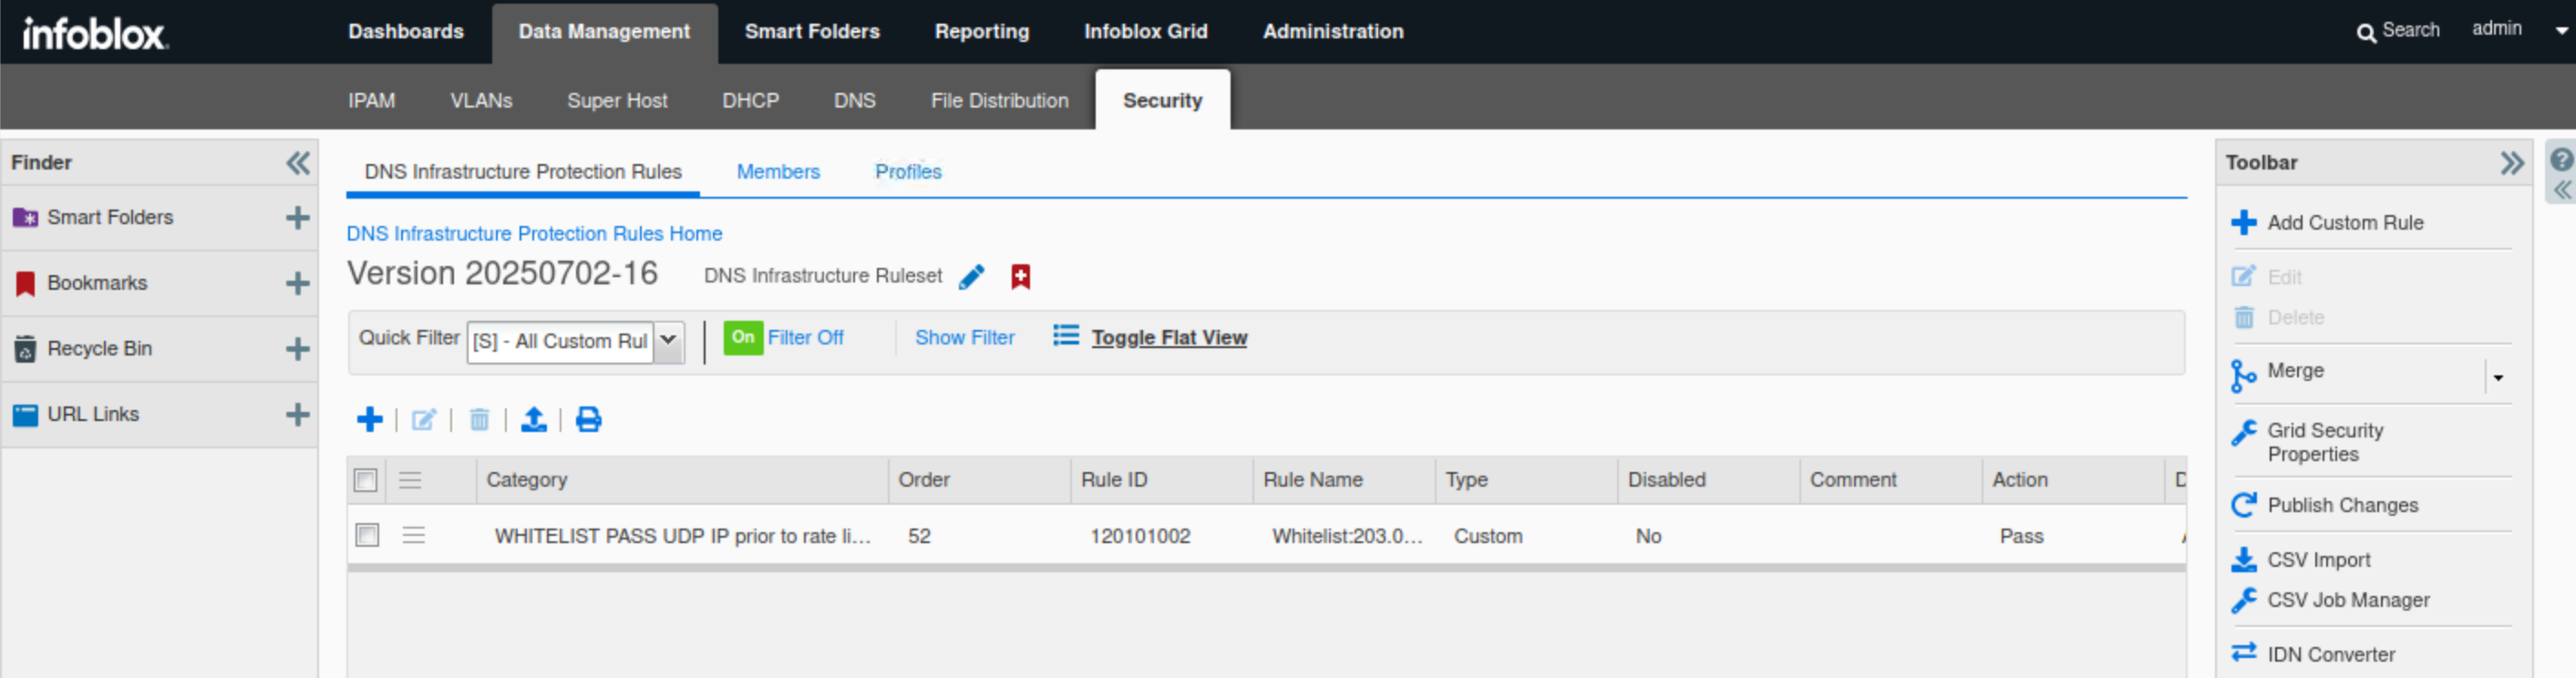
Click the Quick Filter drop-down list.
-
Select All Custom Rules.
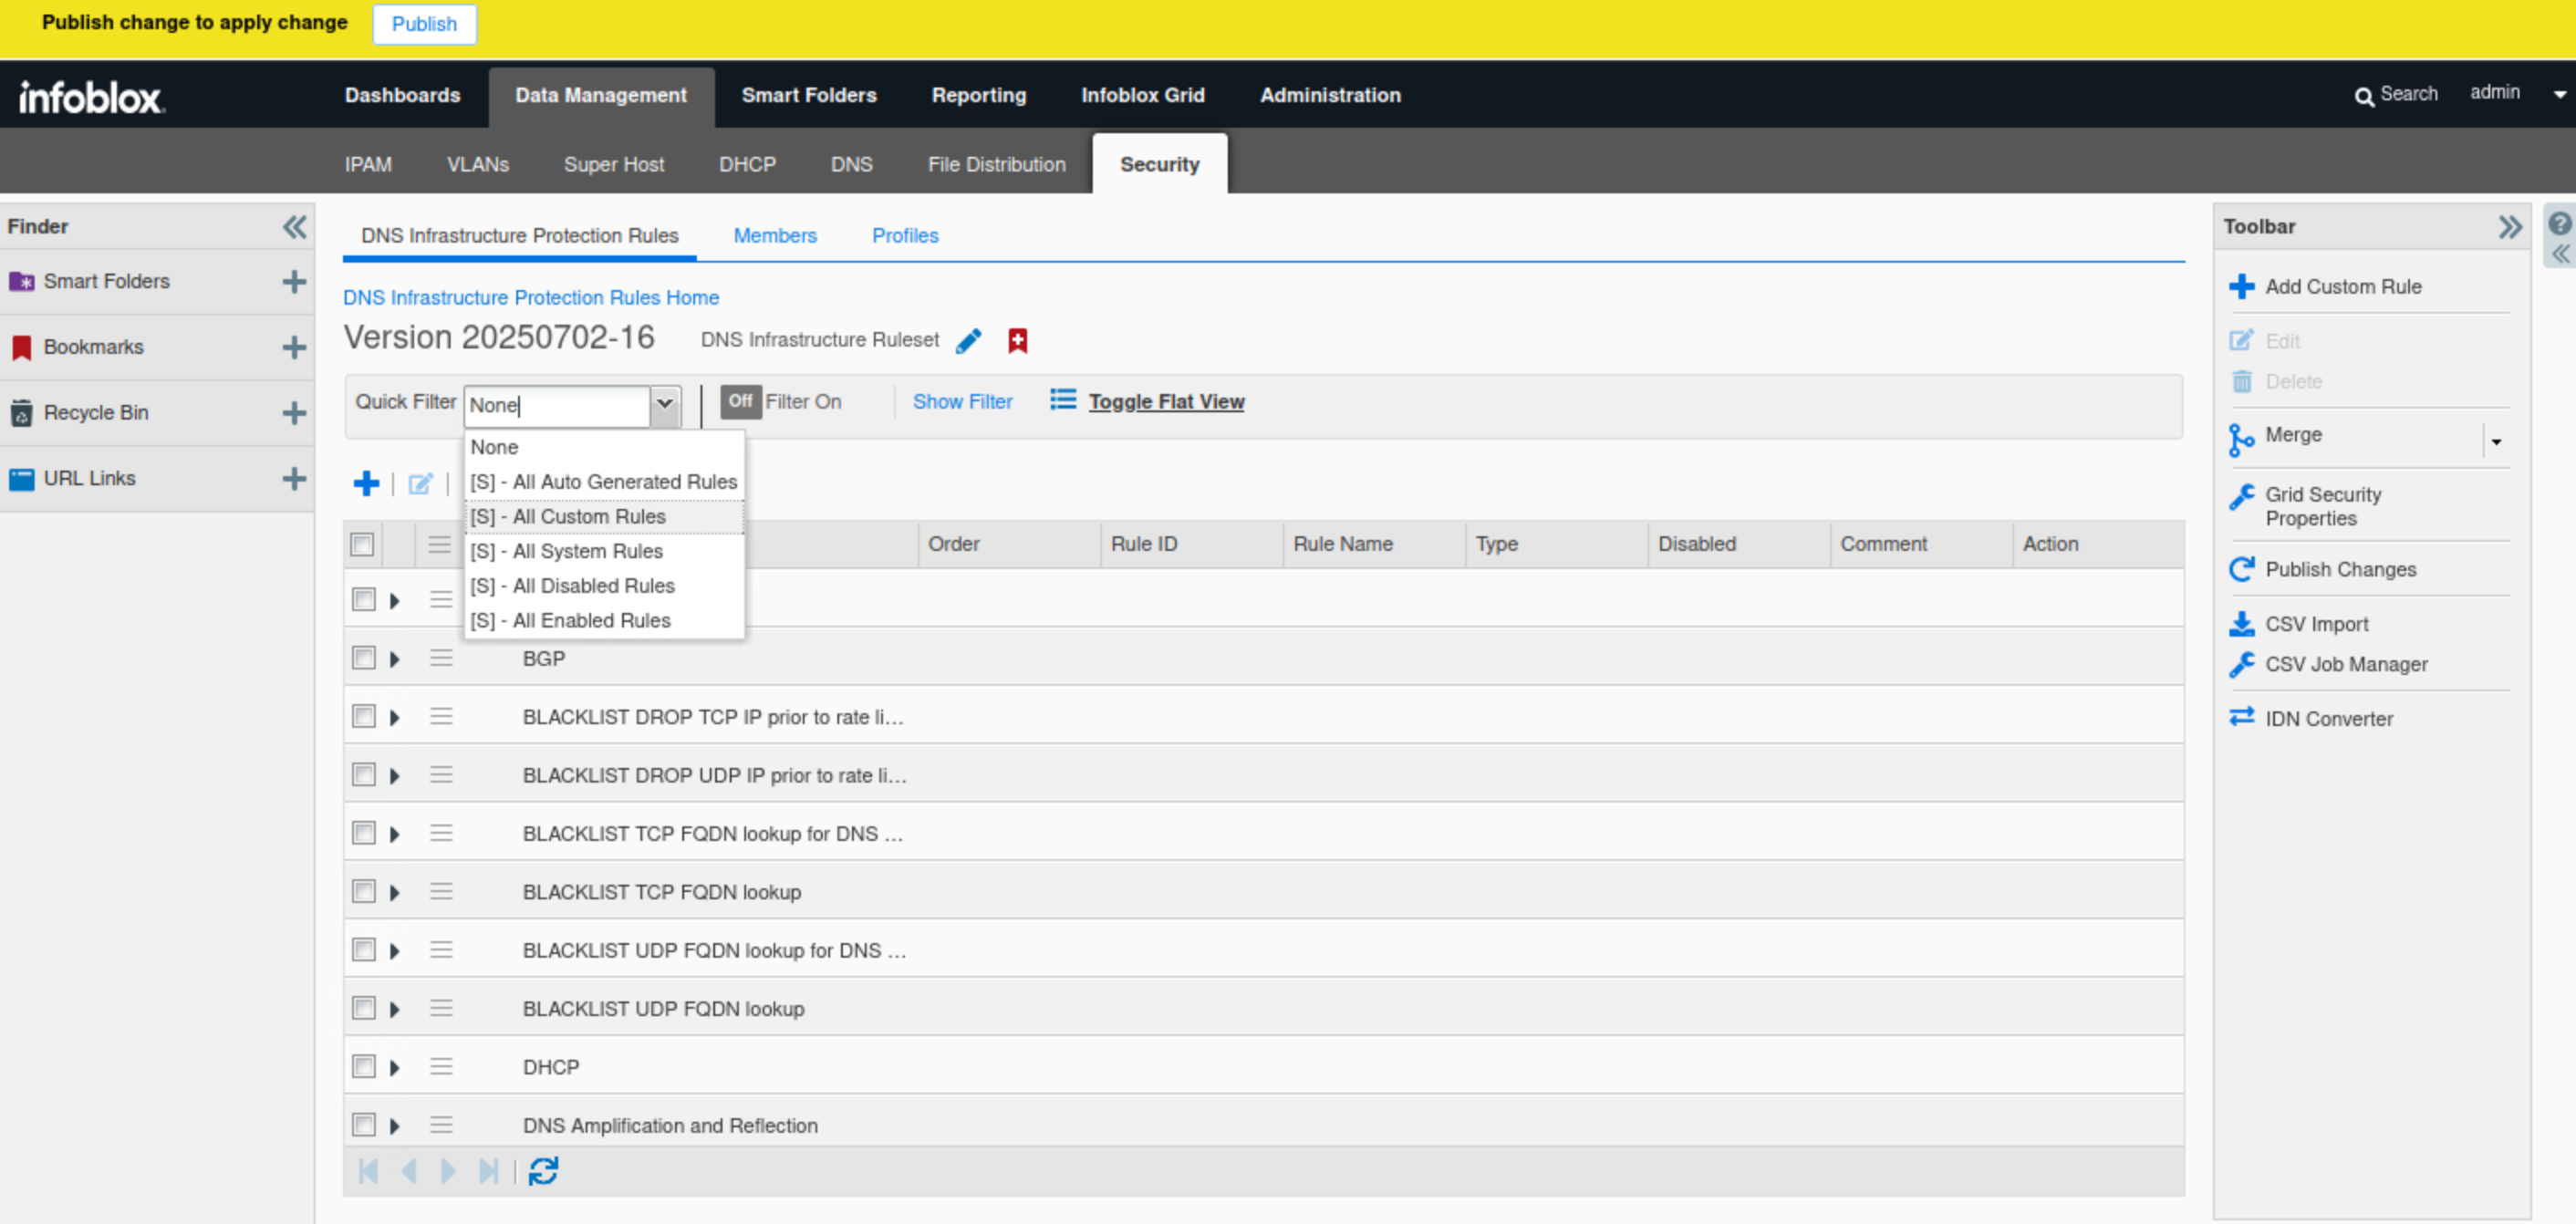
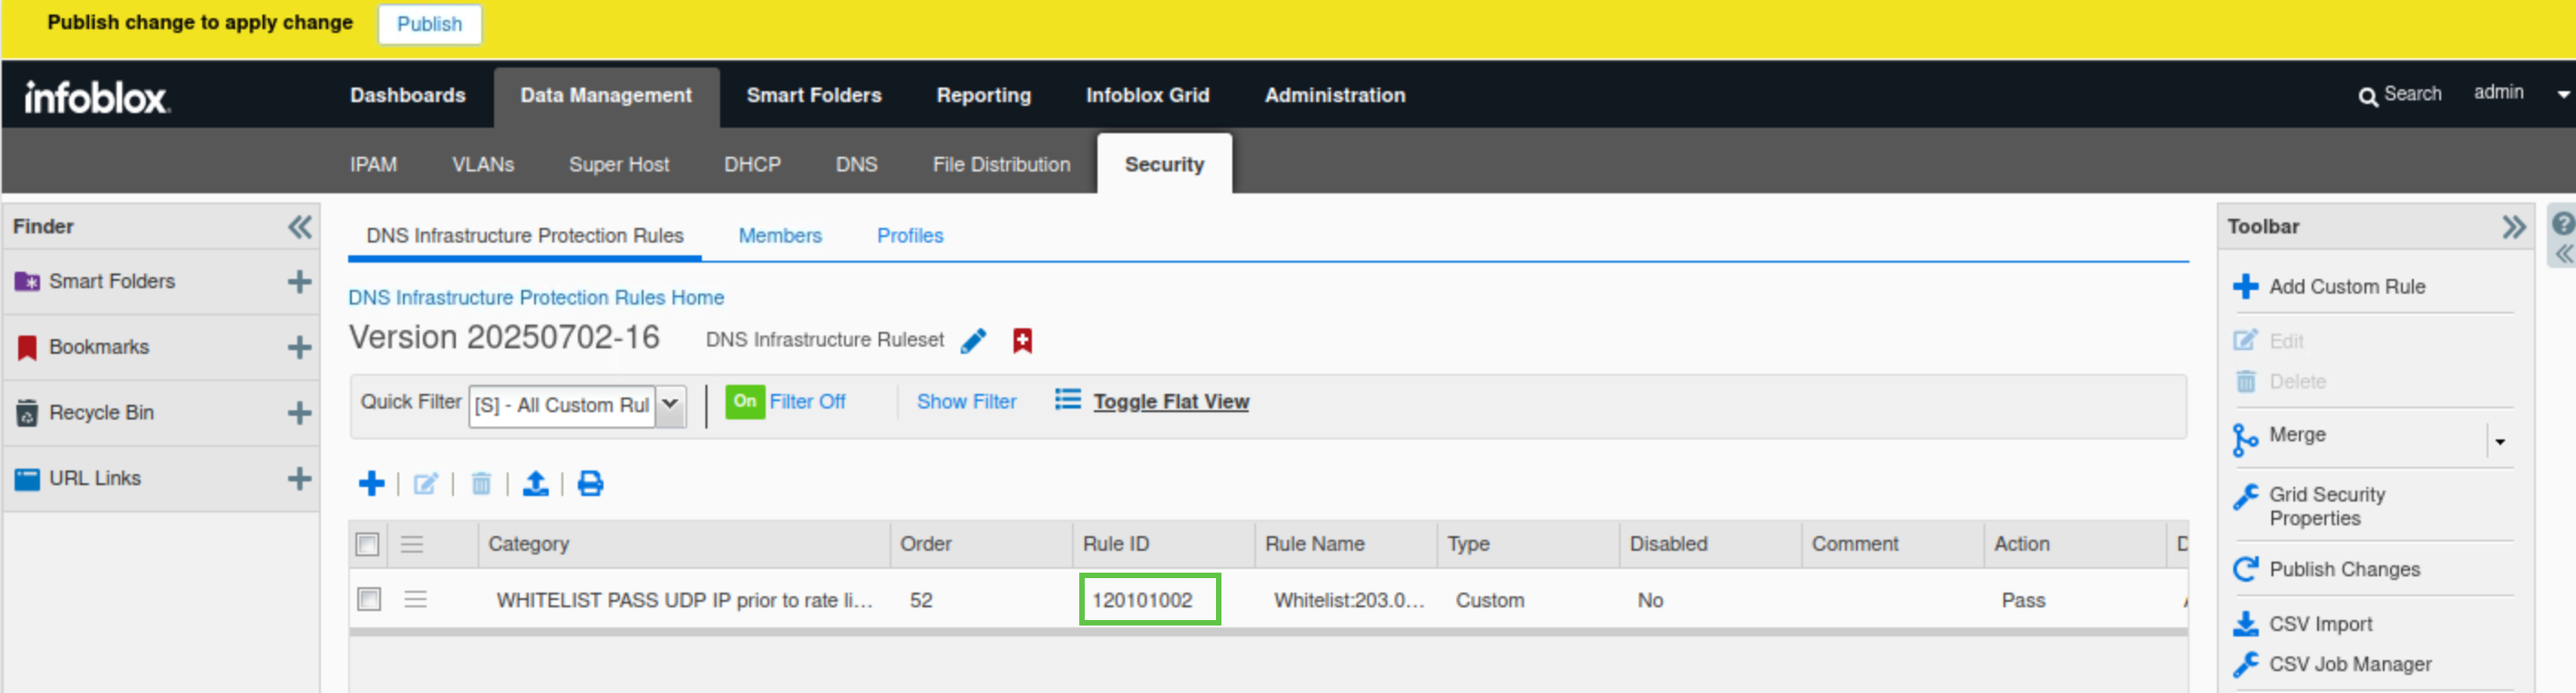
-
Note the rule ID for the newly created rule (120101002).
-
You can use the text editor Geany under Application List -> Geany on jump-desktop to save your rule ID.
-
-
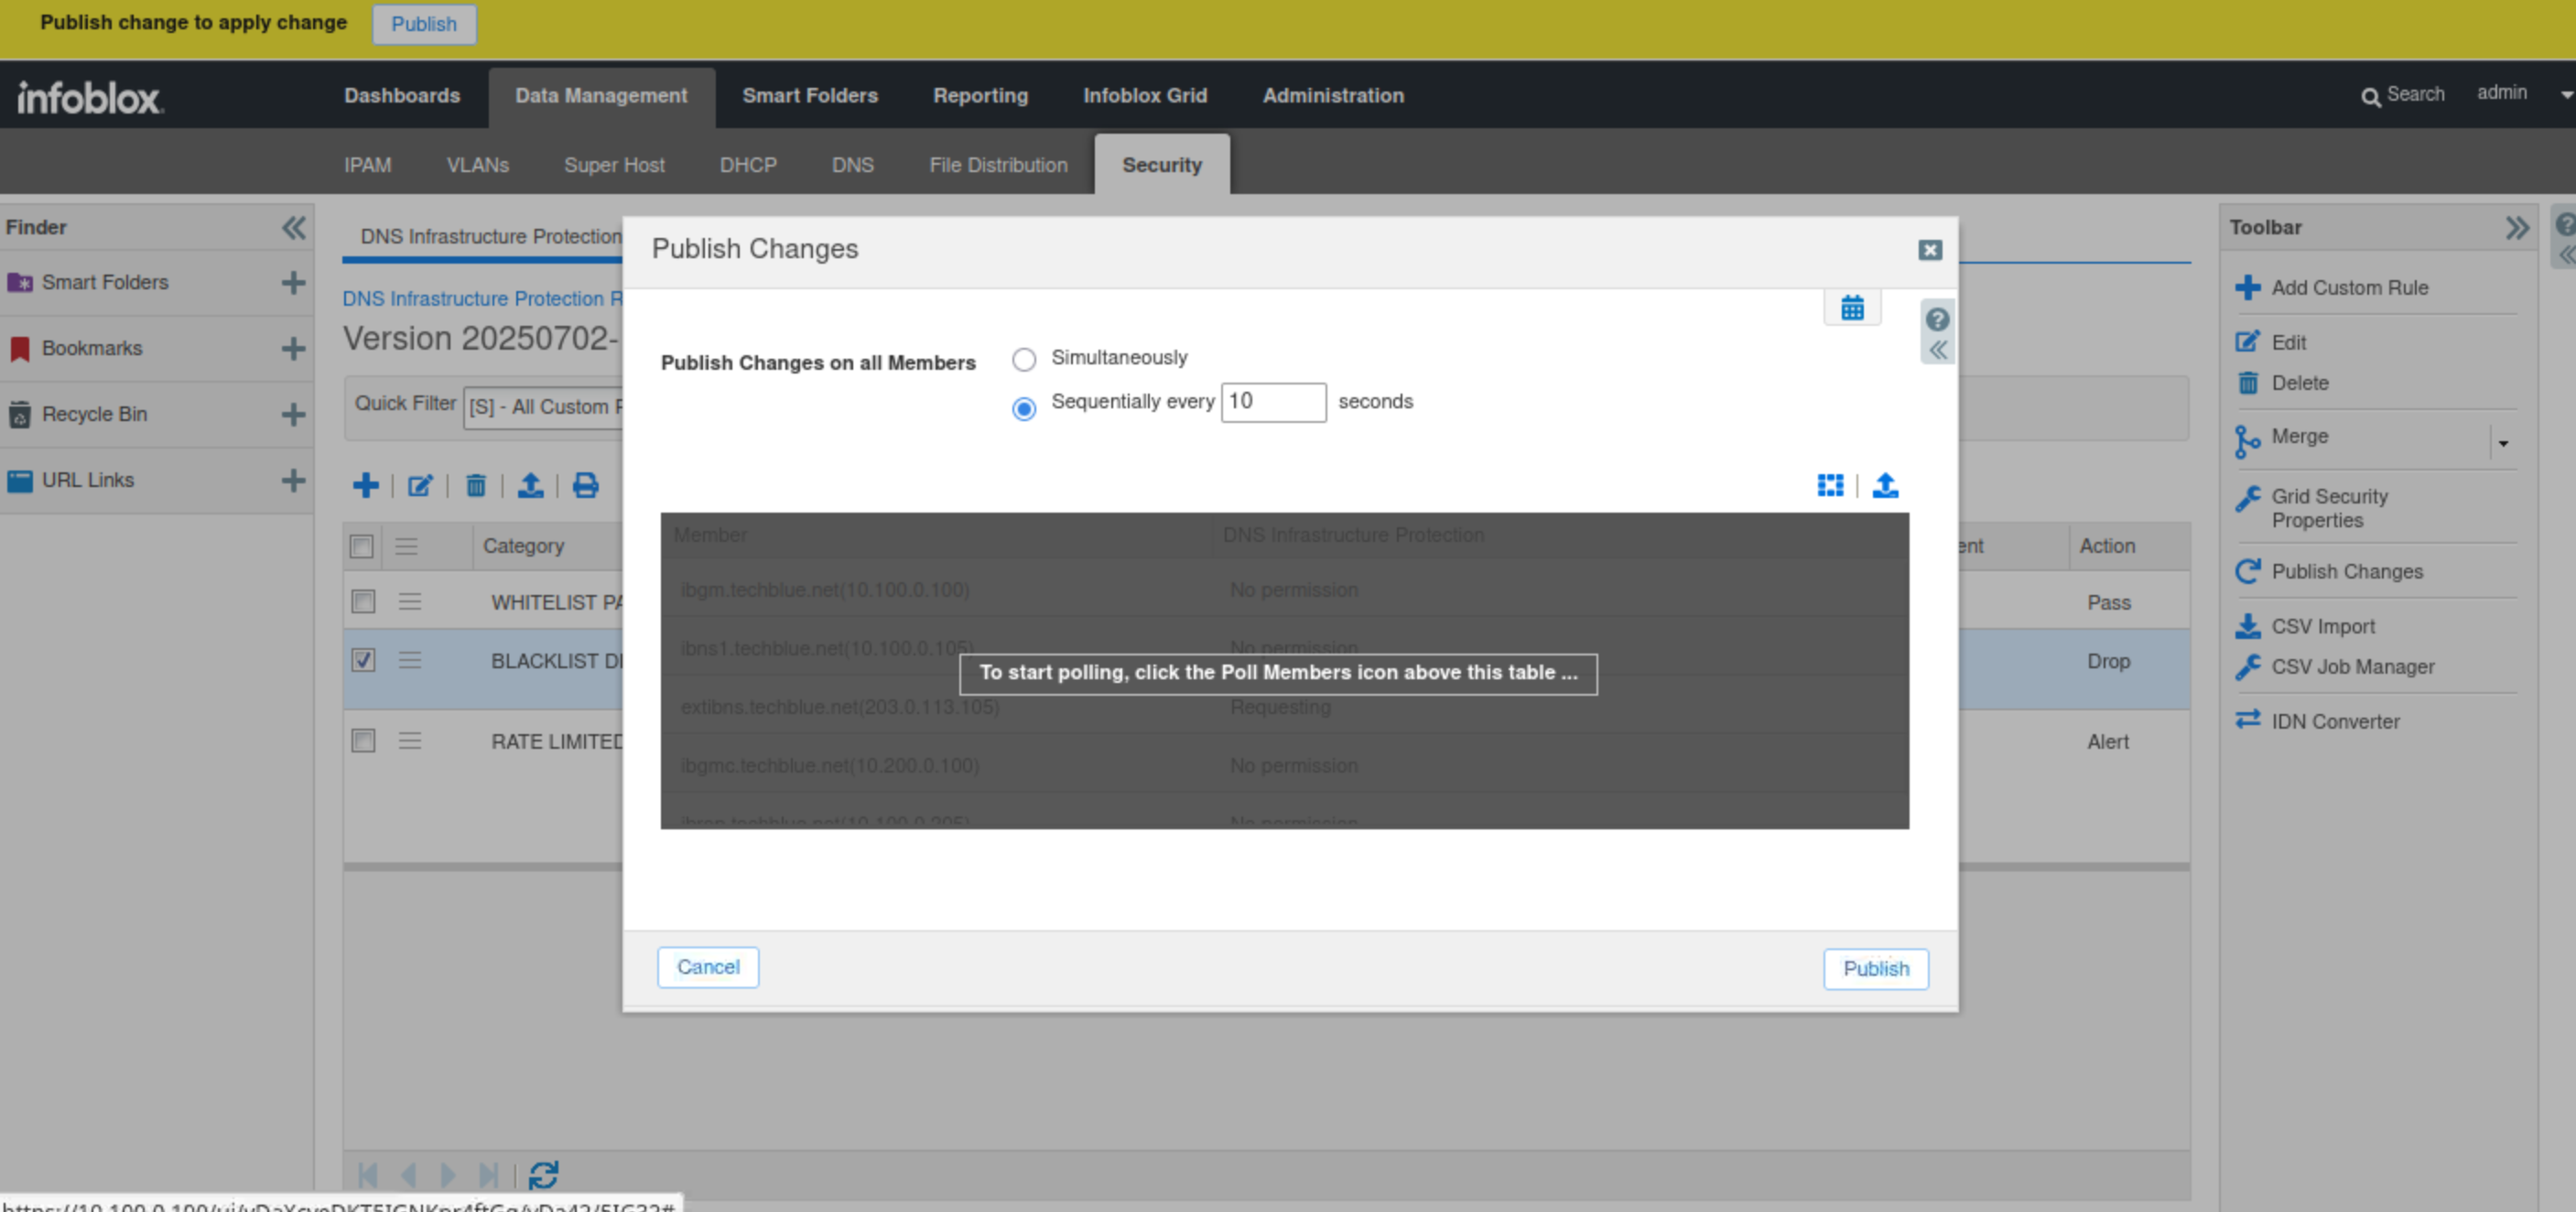
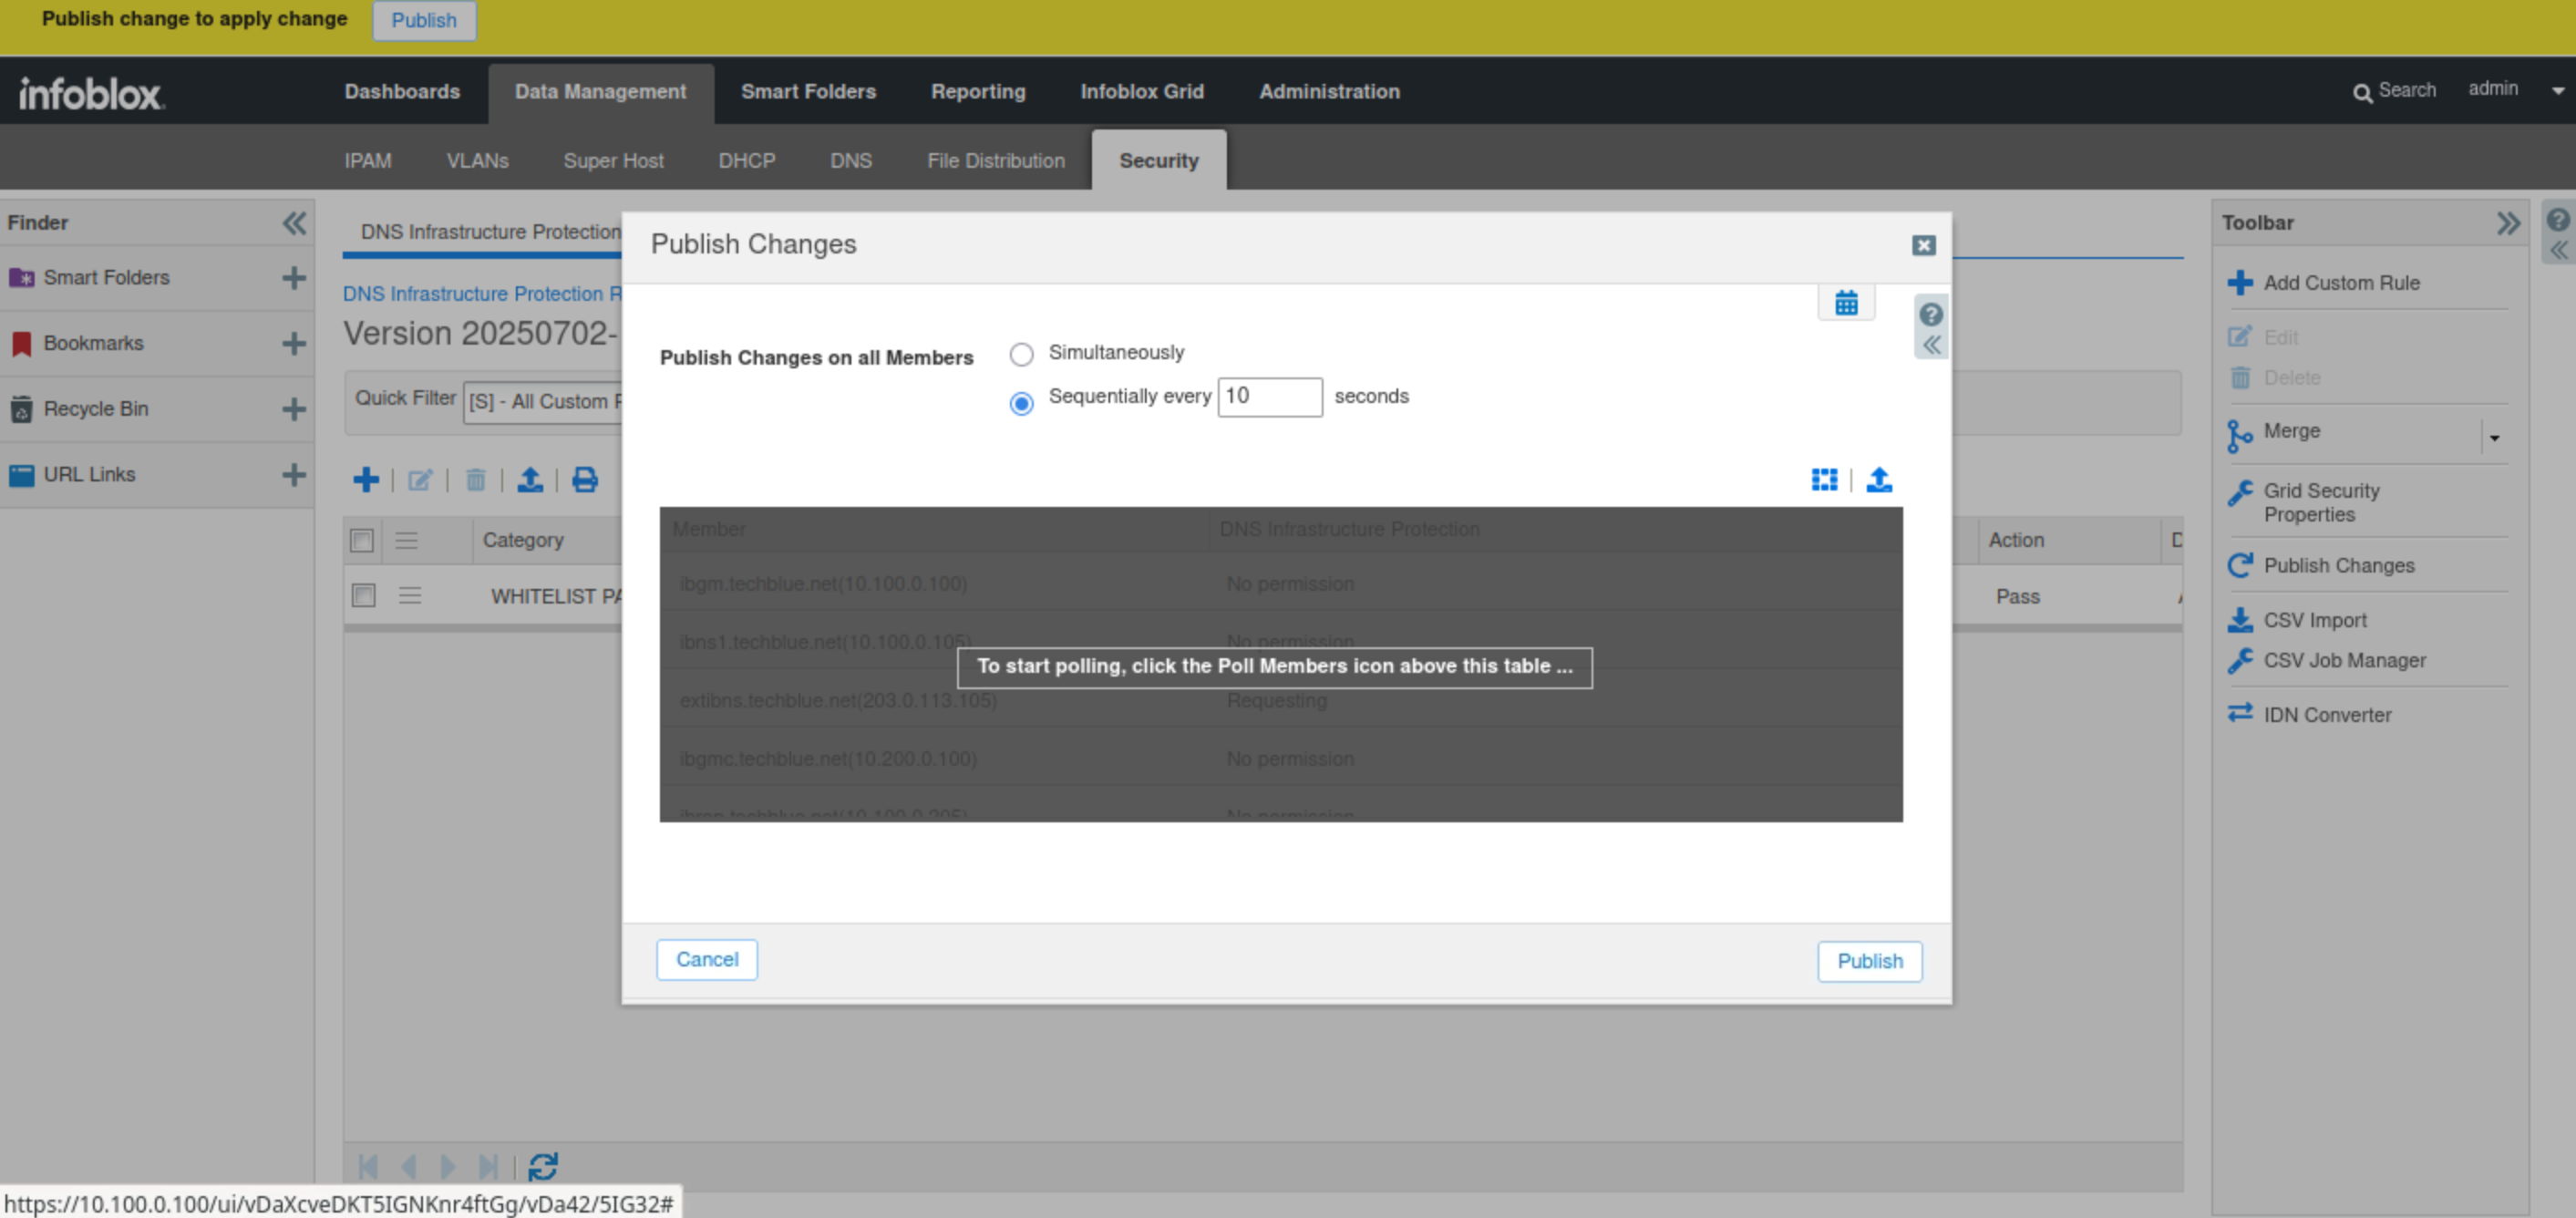
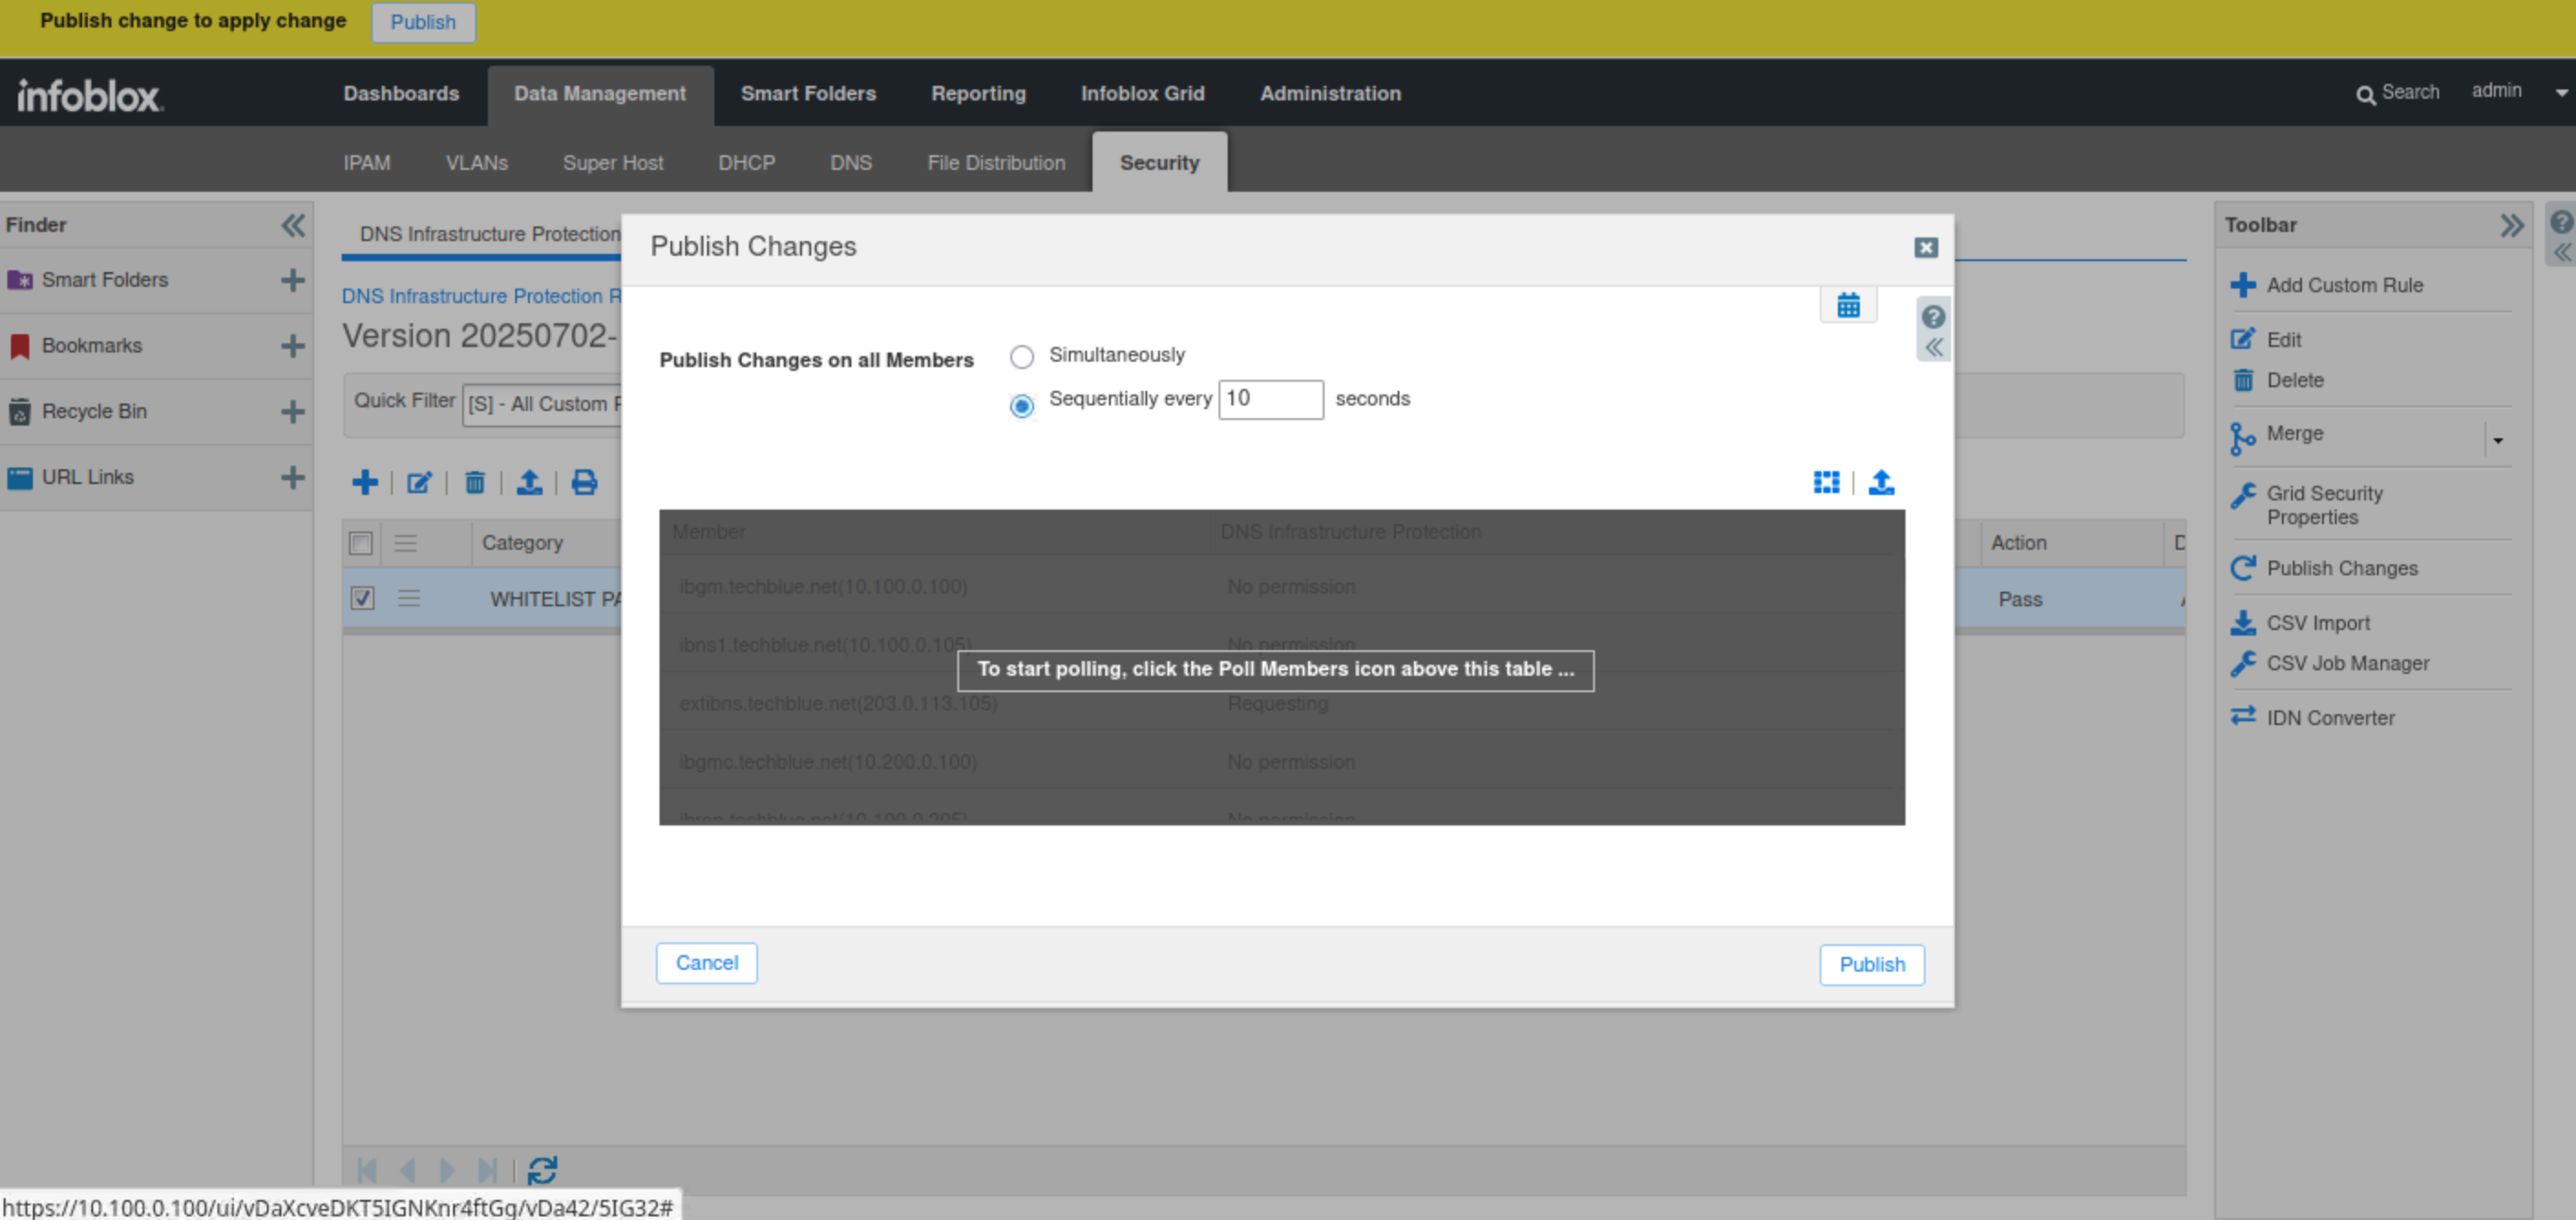
Publish the changes when prompted.
-
Publishing involves applying new or updated rules and configurations, including profiles or downloaded rulesets, from the Grid Master to the Grid members.
-
-
Log in to the support-server VM (training/infoblox).
-
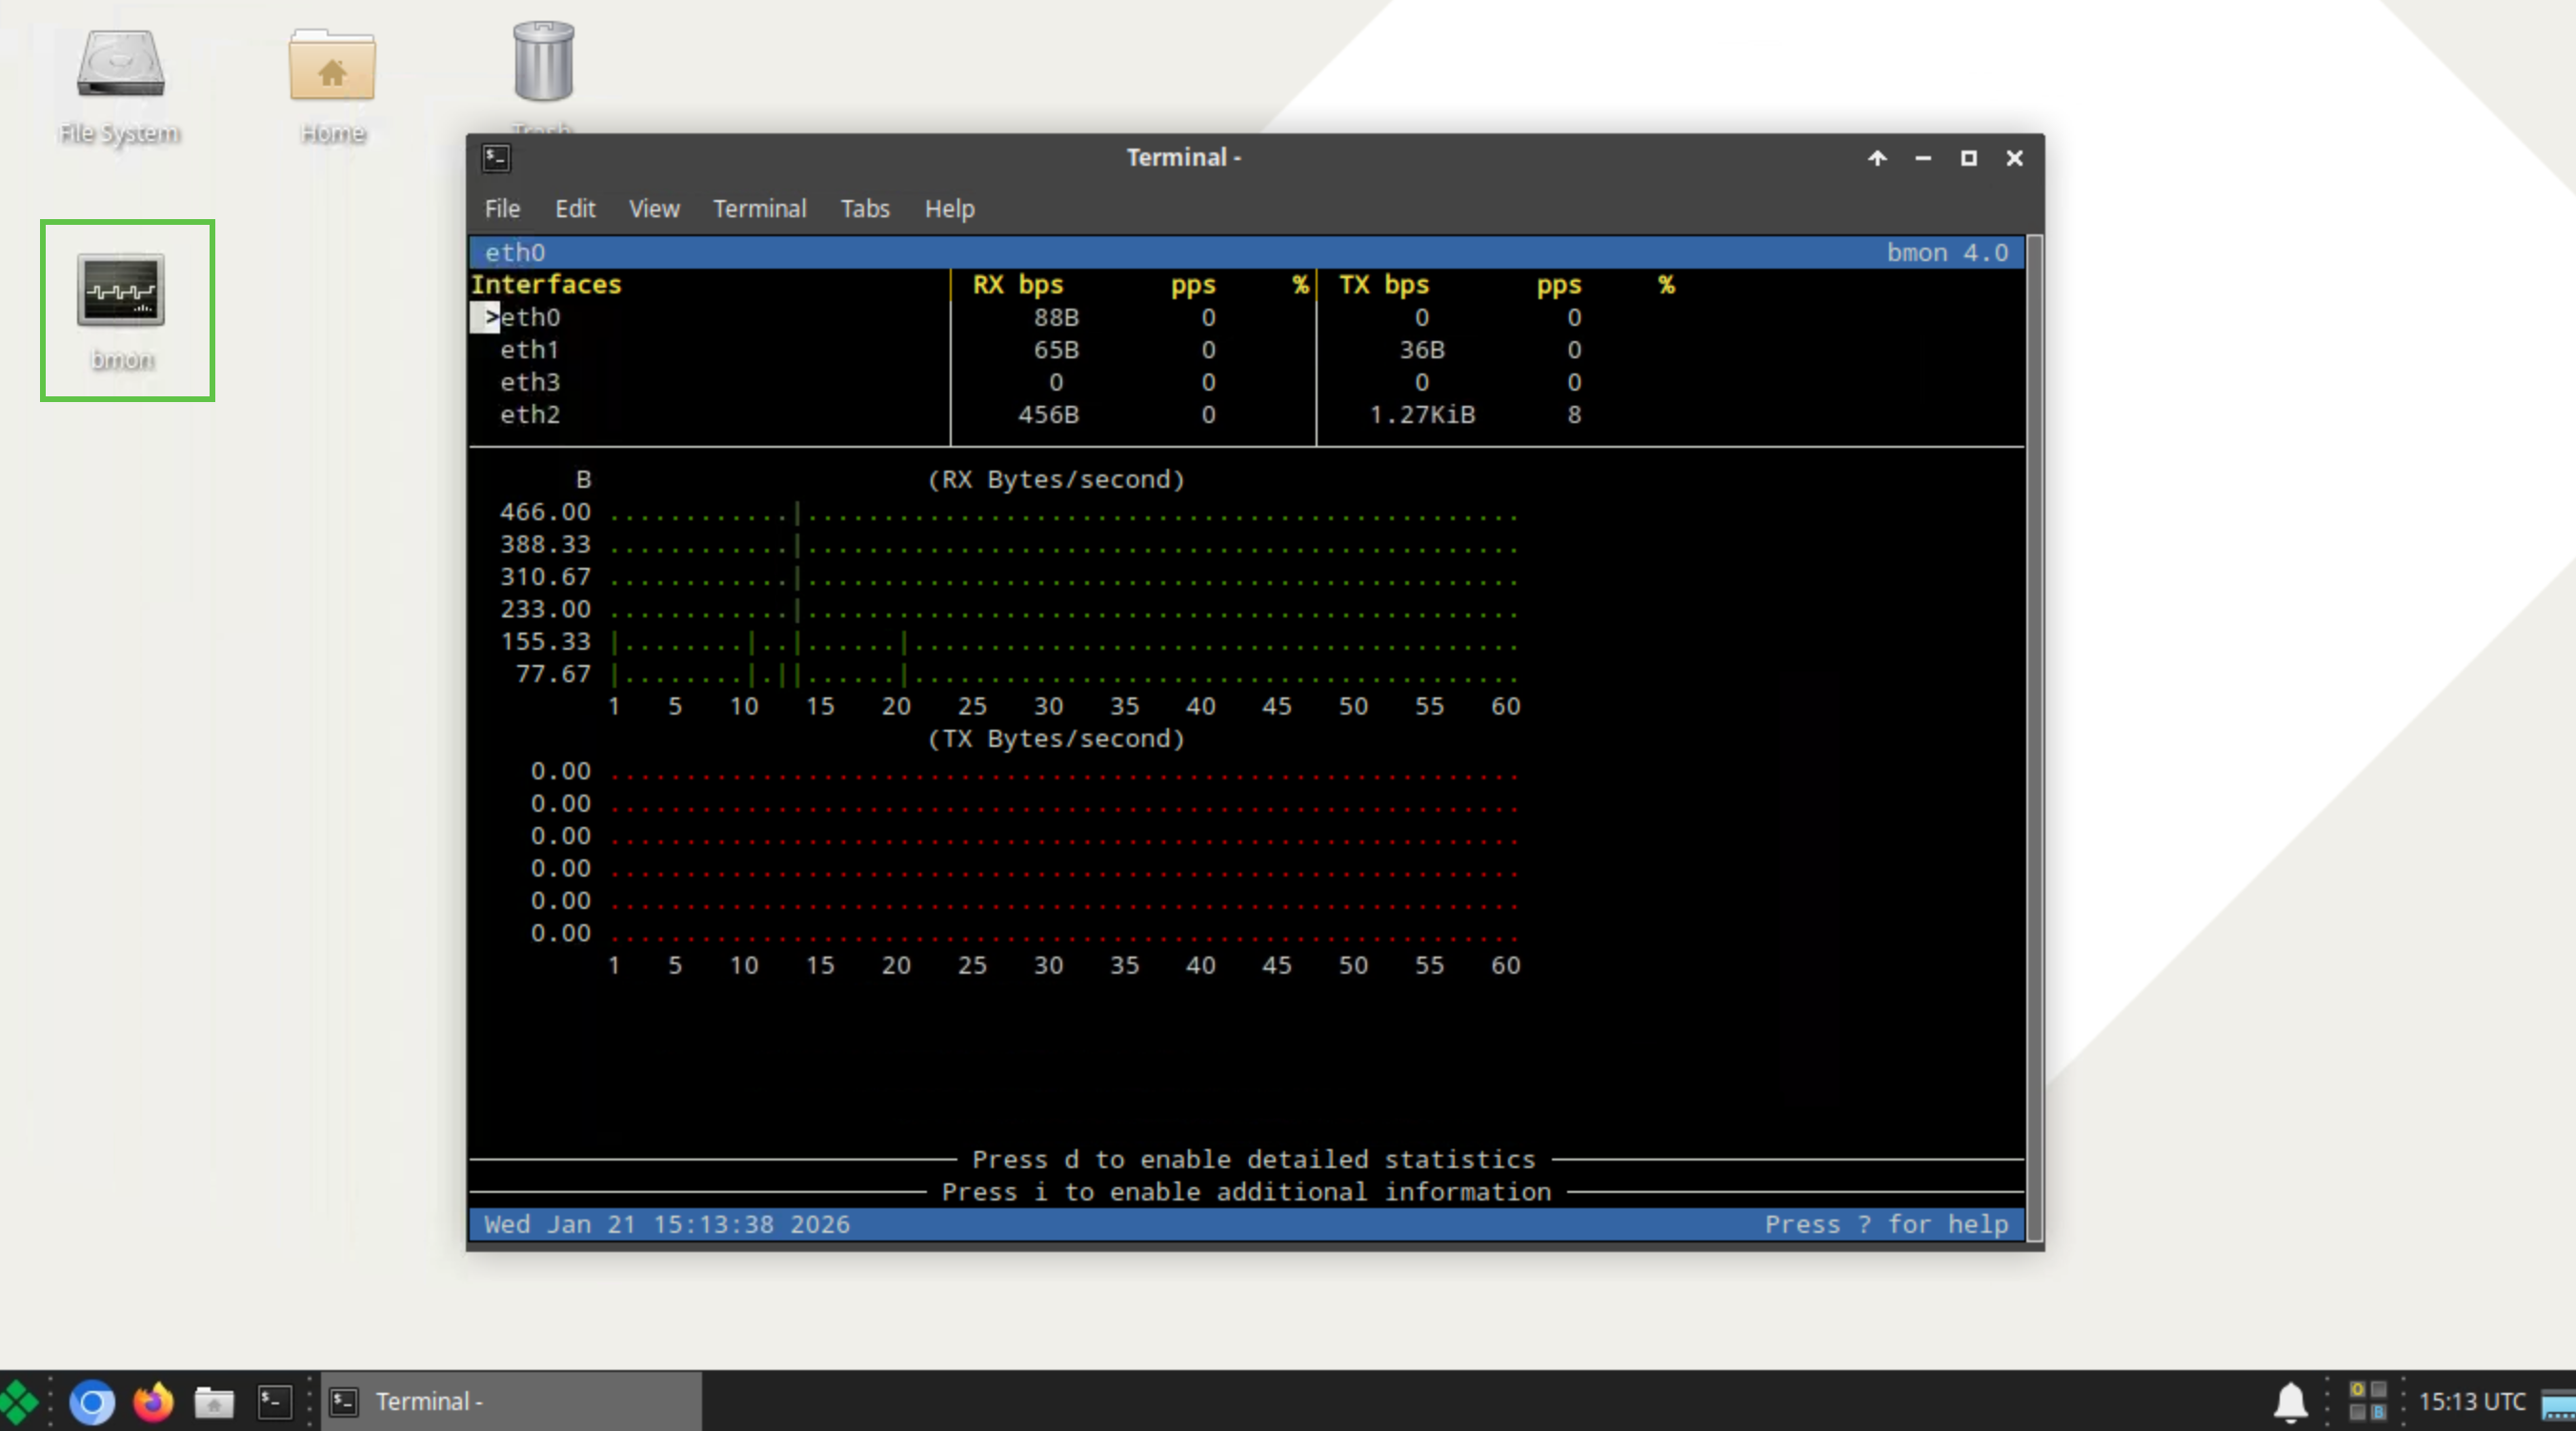
Open the bmon tool.
-
Expand the terminal window so you can see the colored charts that visualize DNS traffic flow during our tests.
-
-
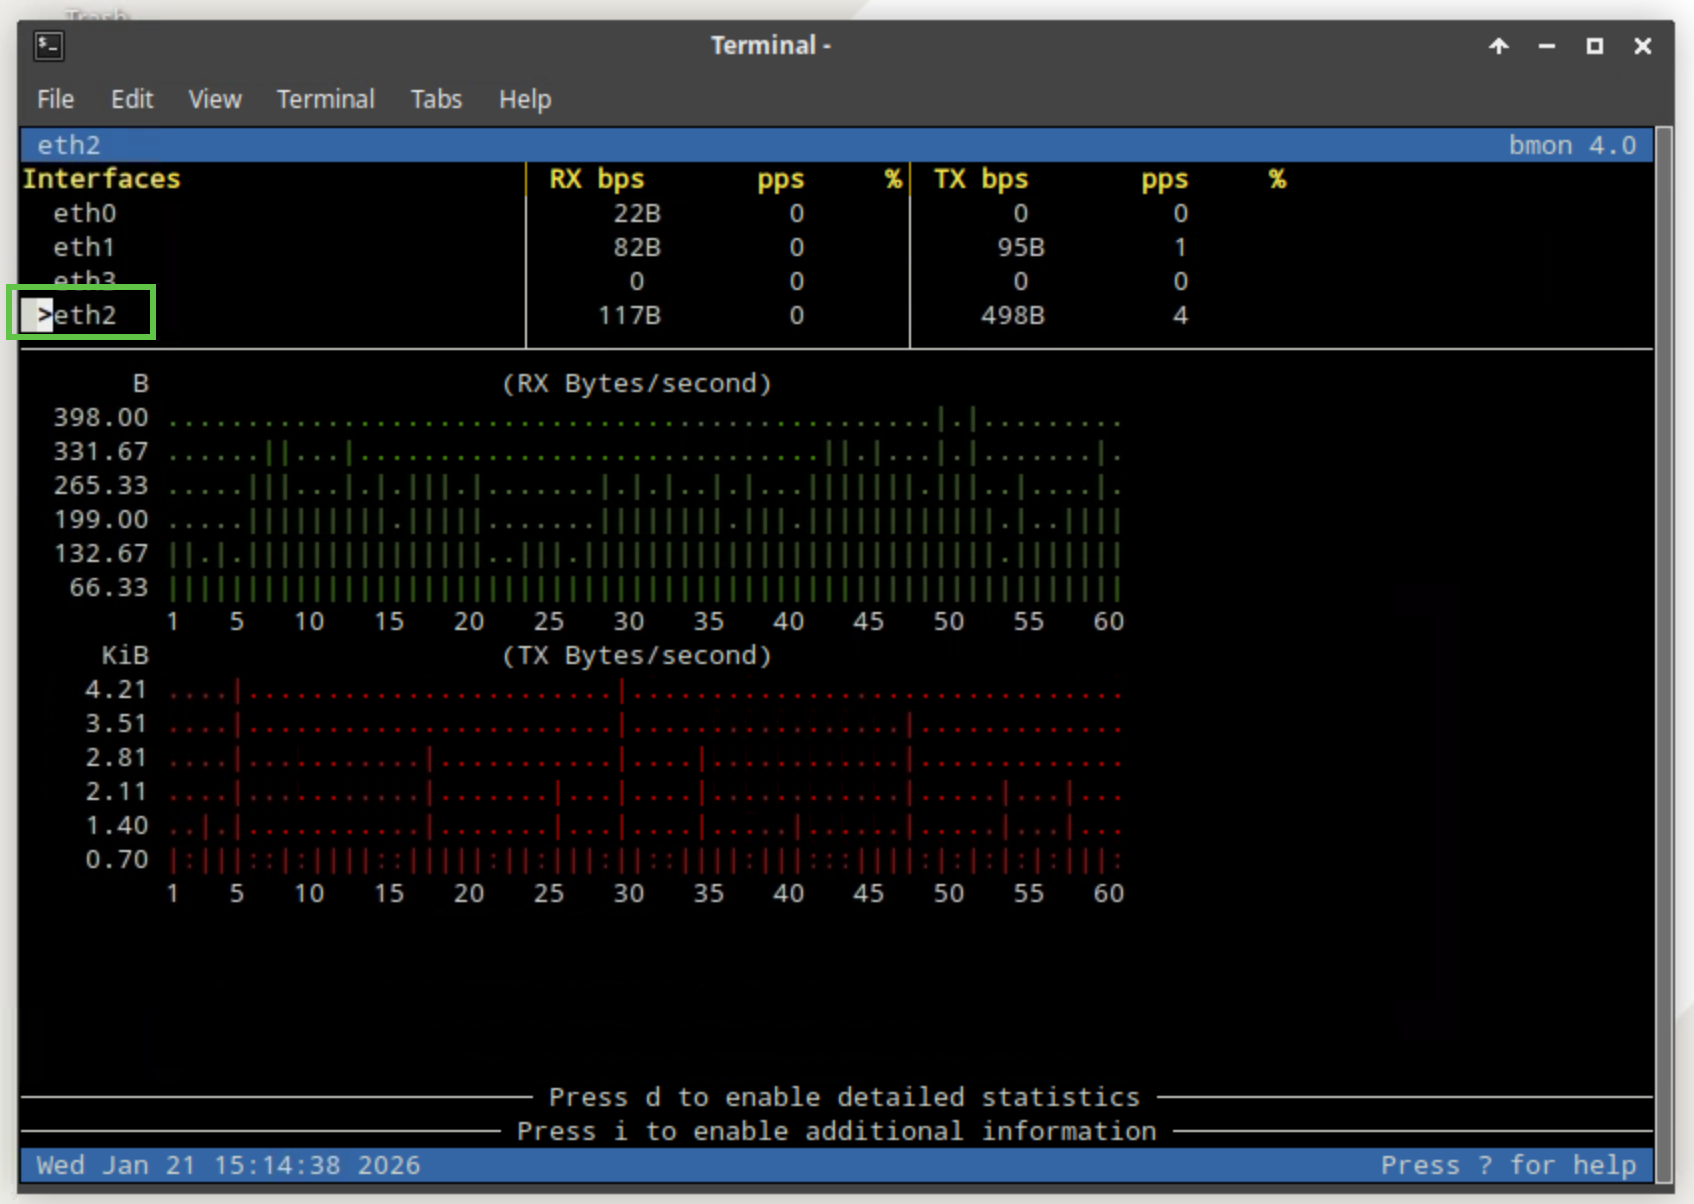
Press the down arrow key on your keyboard to select the eth2 interface.
-
This indicates that you are monitoring traffic on the eth2 interface, which is connected to the 203.0.113.0 network.
-
-
Open another terminal window.
-
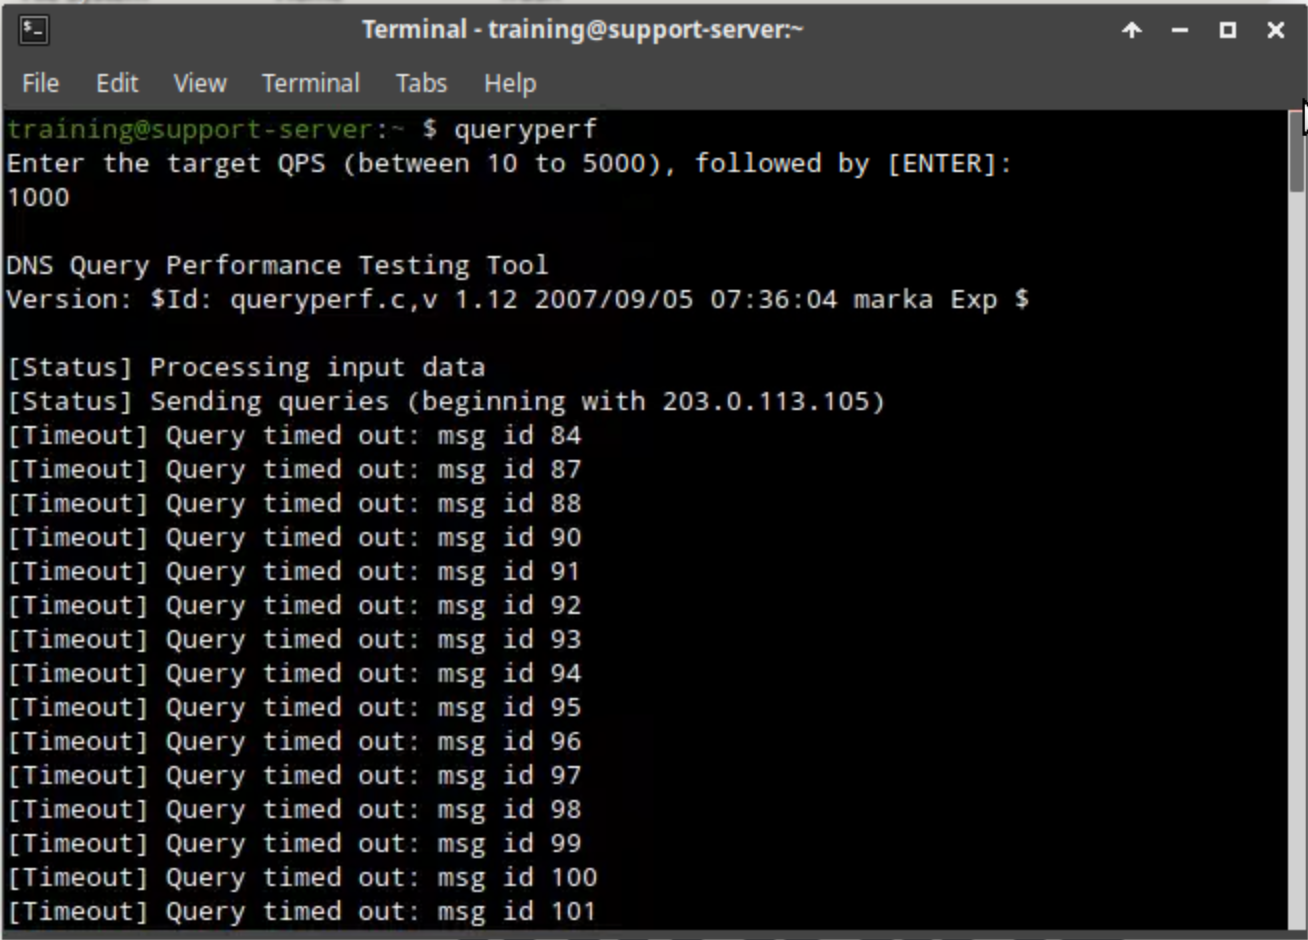
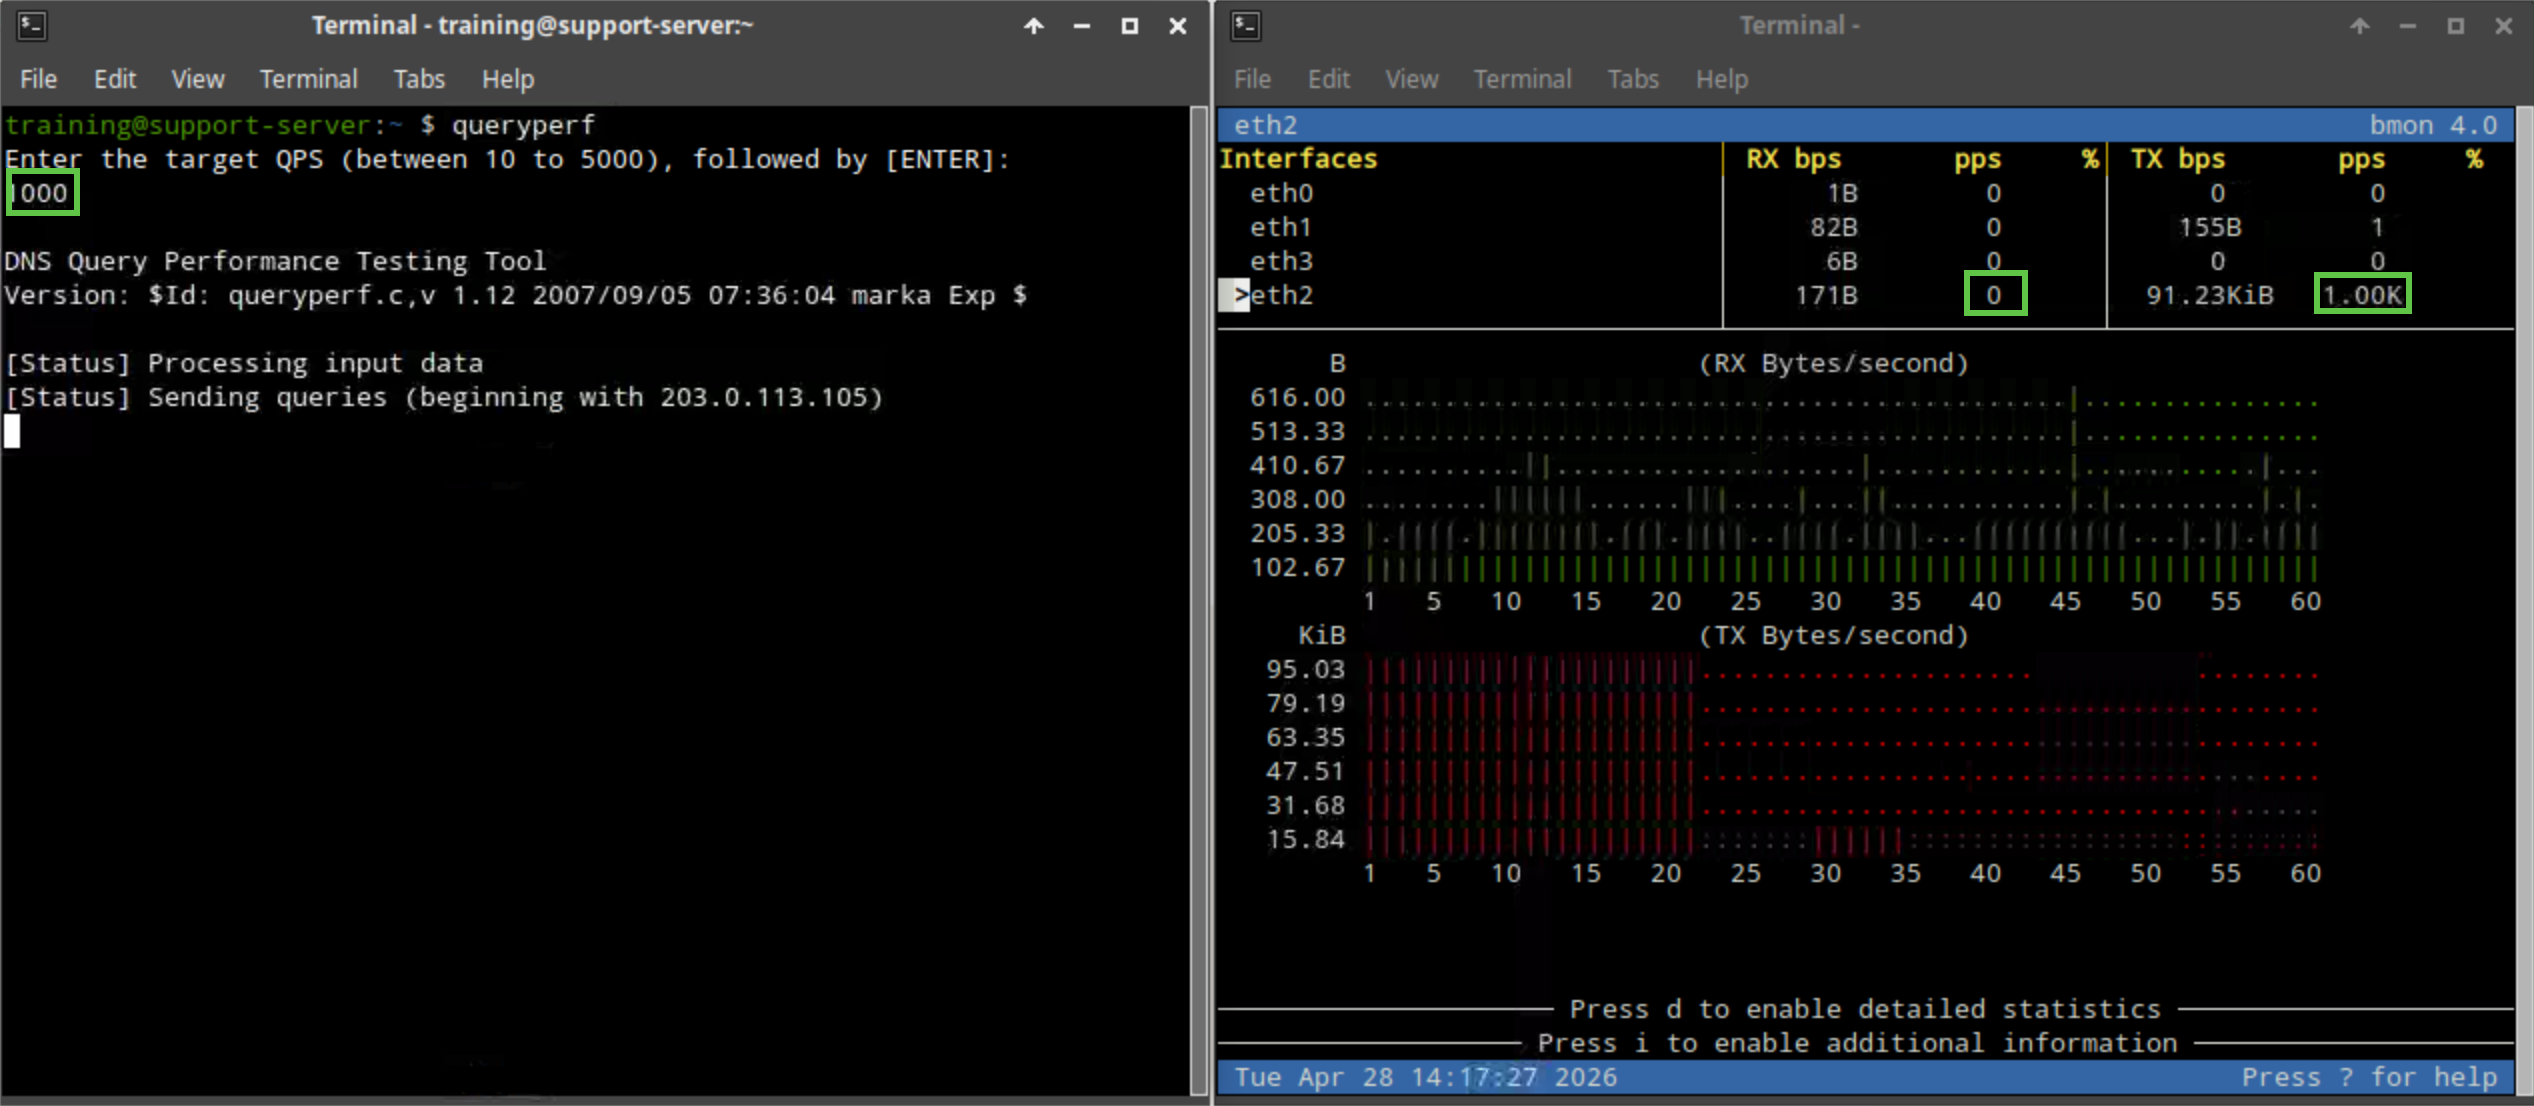
Type the command queryperf.
-
Enter 1000 for the Query Per Second (QPS) value to use.
-
This value exceeds the system rule threshold for rule ID 130000200 (WARN & BLOCK about high rate inbound UDP DNS queries) in the 20250702-16 ruleset and would be blocked without the Allowlist (Whitelist) rule, confirming that our custom rule is working.
-
-
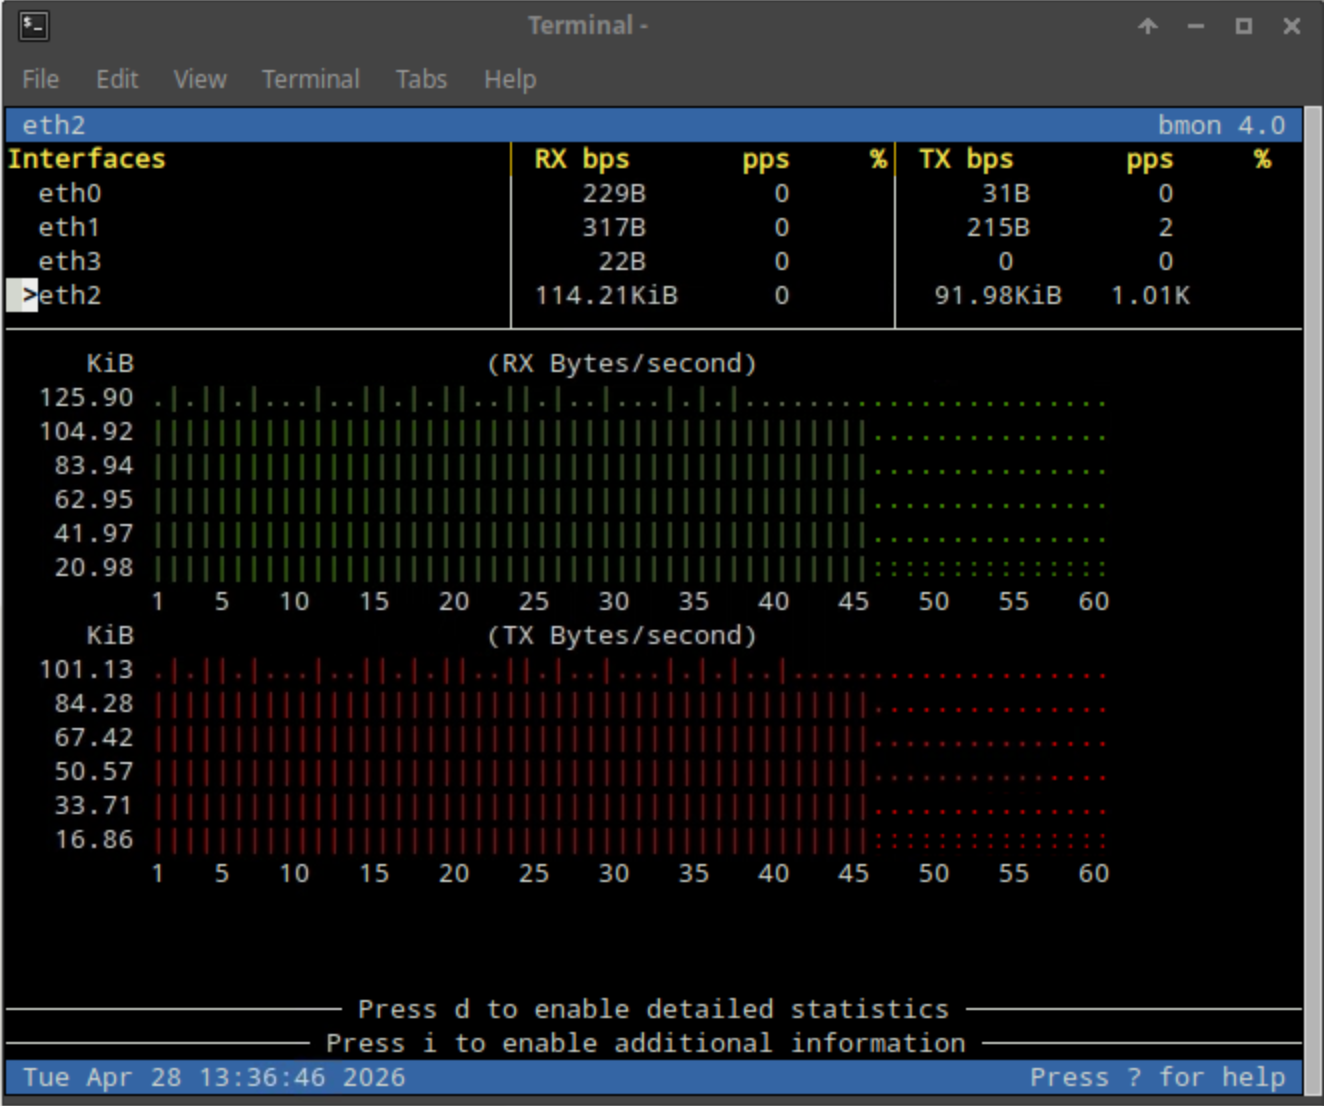
The bmon tool should show a static line of RX (Byte/second) or received traffic at around 1000 QPS, which verifies that our custom rule has been triggered.
-
Since this is an Allowlist (whitelist) rule, its action will be set to PASS and cannot be changed. PASS means that traffic will be allowed and not logged by the Grid. So for this rule we will verify that our rule is working using bmon and by the lack of any logs for the IP address 203.0.113.254.
-
-
Switch back to jump-desktop.
-
On the Grid Manager UI, navigate to Administration → Logs → Syslog.
-
Choose extibns.techblue.net from the Log Viewer drop-down menu.
-
Click the Toggle multi-line view link.
-
Select Threat Detection Event Logs from the Quick Filter drop-down list.

-
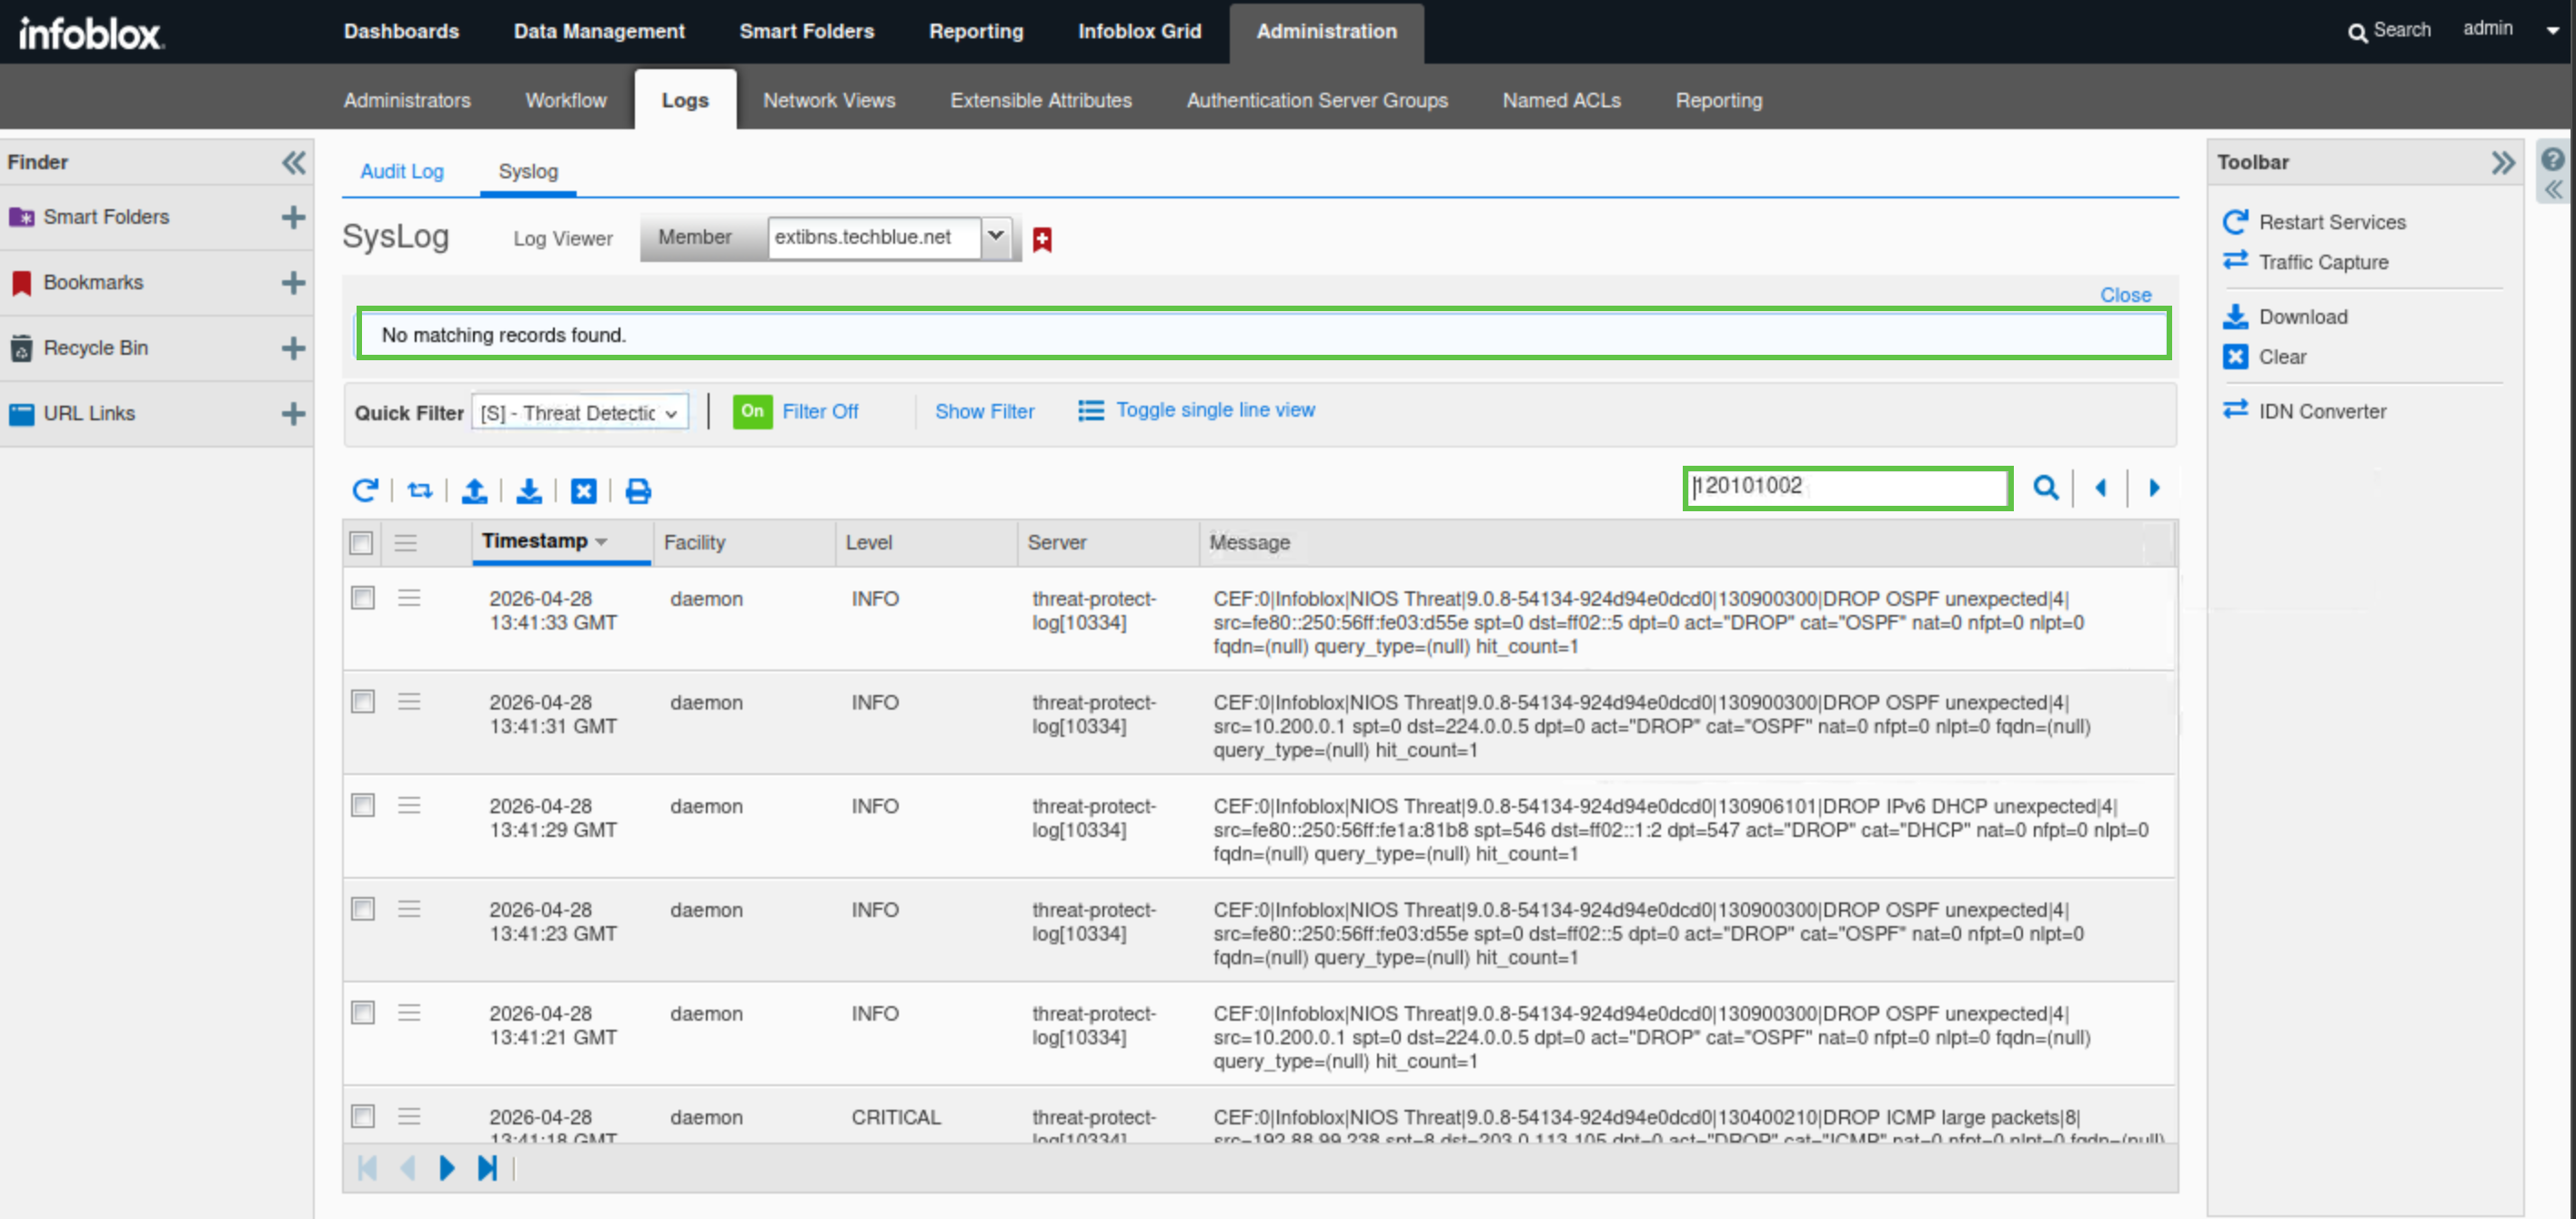
Enter the rule ID for the custom rule you noted earlier (120101002) in the search bar.
-
Note the lack of any recent syslog entries for the IP address, verifying that our rule is working. As it will be otherwise blocked by the system rule ID 130000200 (WARN & BLOCK about high rate inbound UDP DNS queries) in the 20250702-16 ruleset.
-
-
Navigate to Data Management → Security → Profiles.
-
Click on the link for the 20250702-16 ruleset.
-
Click the Quick Filter drop-down list.
-
Select All Custom Rules.
-
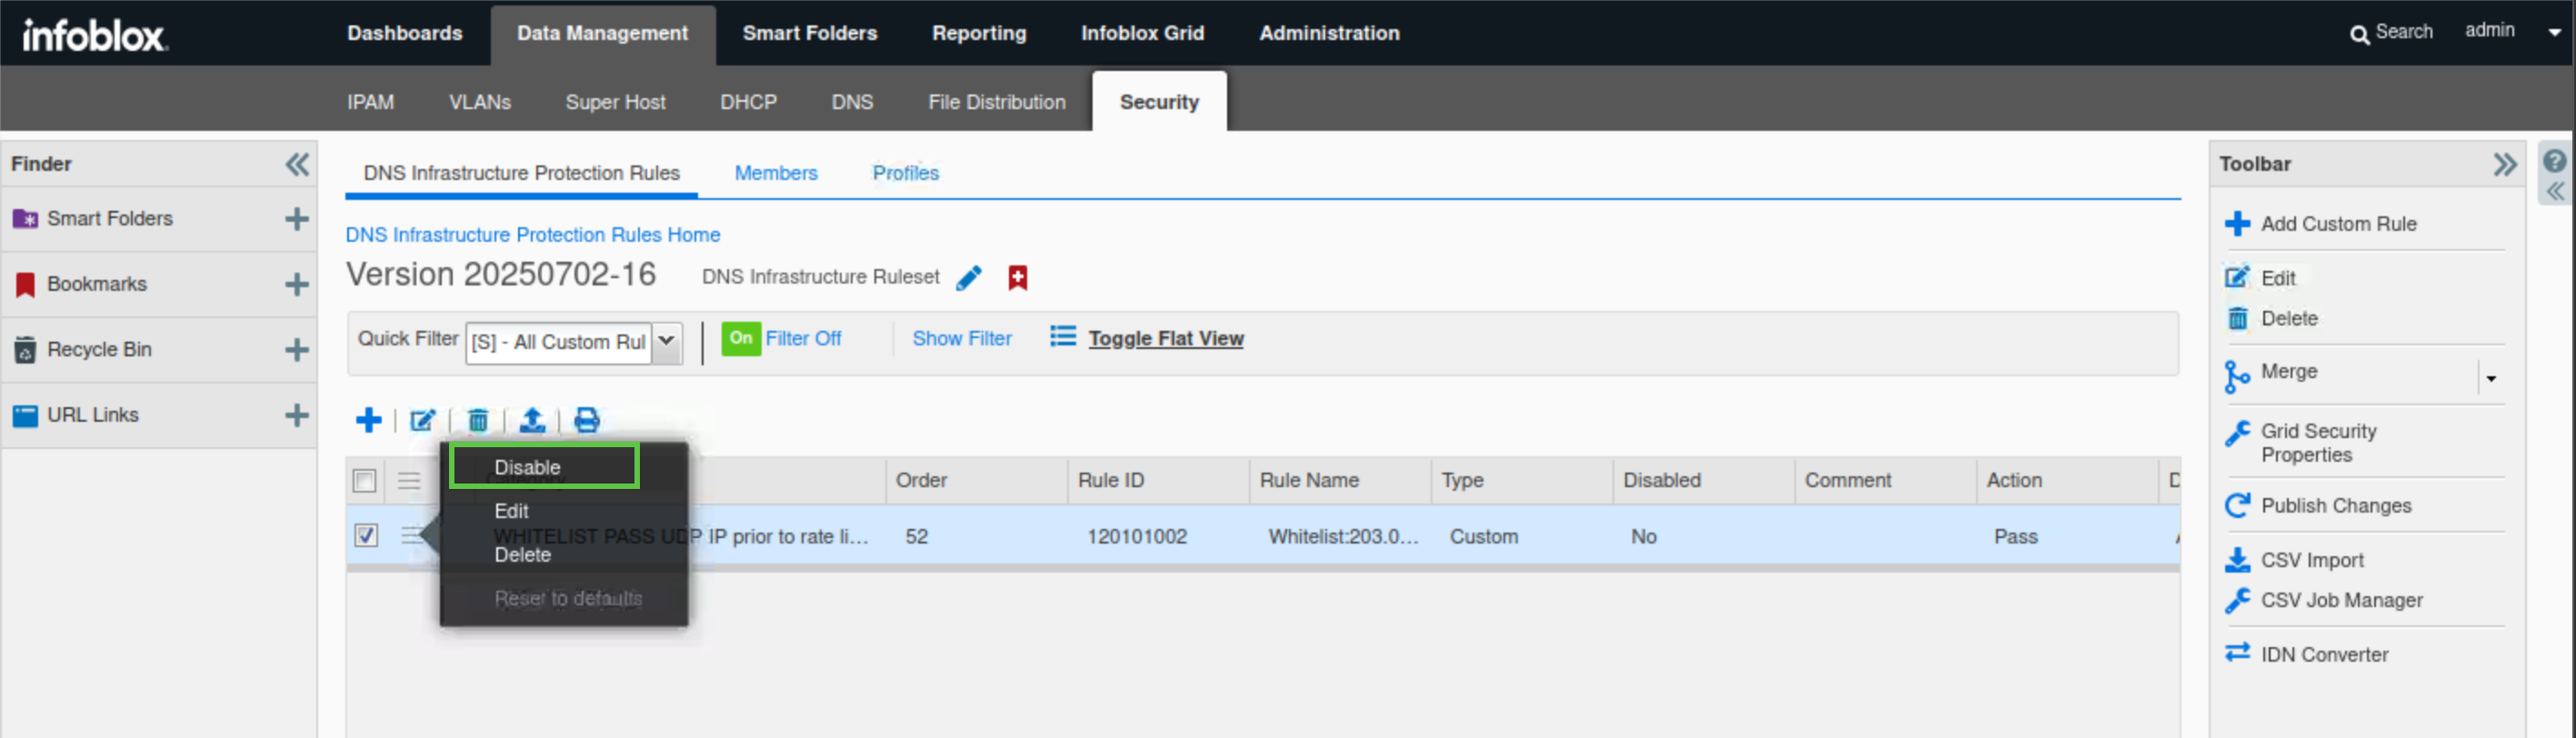
Click the hamburger icon next to the custom ALLOWLIST PASS UDP IP prior to rate limiting rule for 203.0.113.254.
-
Click Disable.
-
We will disable the rule and publish the changes. This is to allow us to test upcoming rules in later steps, as they all affect the same IP address.
-
-
Publish the changes when prompted.
Task 2 Solution: Create and test a custom Rate-Limiting rule
In this task, you will create a custom Rate-Limiting rule for the customer's IP address, 203.0.113.254, to ensure continuous service and prevent potential overload, as you noticed that the customer's IP was generating excessive traffic. You will implement the RATE LIMITED UDP IP rule in a way that will Rate-Limit UDP traffic from the IP address 203.0.113.254 if it exceeds 100 QPS for 5-second intervals. This limit was decided after careful observation and calculations, effectively managing customer flow while avoiding system overload.
This will suffice for testing purposes in a lab environment. However, in a production environment, it is recommended to pair this rule with a RATE LIMITED TCP IP rule, as some DNS traffic uses TCP in addition to UDP.
After creating the rule, you will use the lab’s support-server VM to simulate the client sending DNS traffic using the queryperf tool and monitor the Grid’s behaviour towards the traffic using the bmon tool. The traffic should be allowed to pass.
After completing the task, we will disable the rule and publish the changes. This is to allow us to test upcoming rules in later steps, as they all affect the same IP address.
-
Navigate to Data Management → Security → DNS Infrastructure Protection Rules.
-
Click on the link for the 20250702-16 rule.
-
Click the plus (+) symbol to add a custom rule.
-
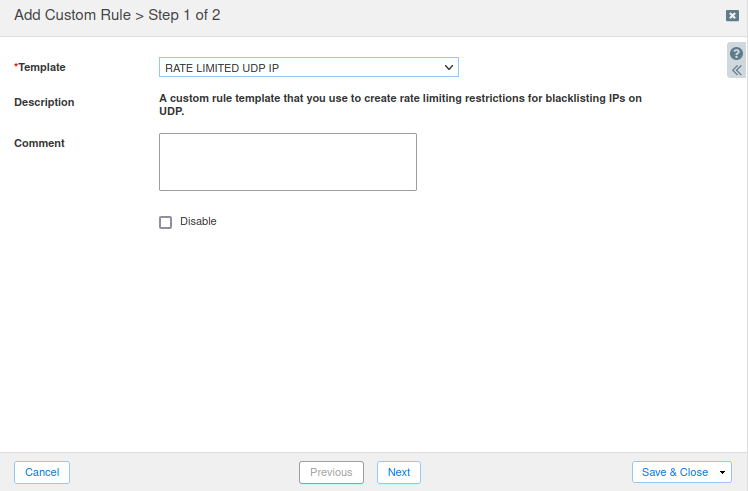
Choose RATE LIMITED UDP IP from the drop-down template list.
-
Click Next to configure the rule parameters.
-
Use the following parameters for the rule:
-
Log Severity: Critical.
-
Packets per second: 100.
-
Drop interval: 5.
-
Events per second: 1.
-
Rate limited IP address/network: 203.0.113.254.
-
Rate algorithm: Rate_Limiting
-
-
Click Save & Close.

-
Click the Quick Filter drop-down list.
-
Select All Custom Rules.
-
Note the rule ID for the newly created rule (120201001).
-
You can use the text editor Geany under Application List -> Geany on jump-desktop to save your rule ID.

-
-
Publish the rule when prompted.

-
Switch back to the support-server VM (training/infoblox).
-
Open the bmon tool.
-
Expand the terminal window so you can see the colored charts that visualize DNS traffic flow during our tests.
-
-
Press the down arrow key on your keyboard to select the eth2 interface.
-
This indicates that you are monitoring traffic on the eth2 interface, which is connected to the 203.0.113.0 network.
-
-
Open another terminal window.
-
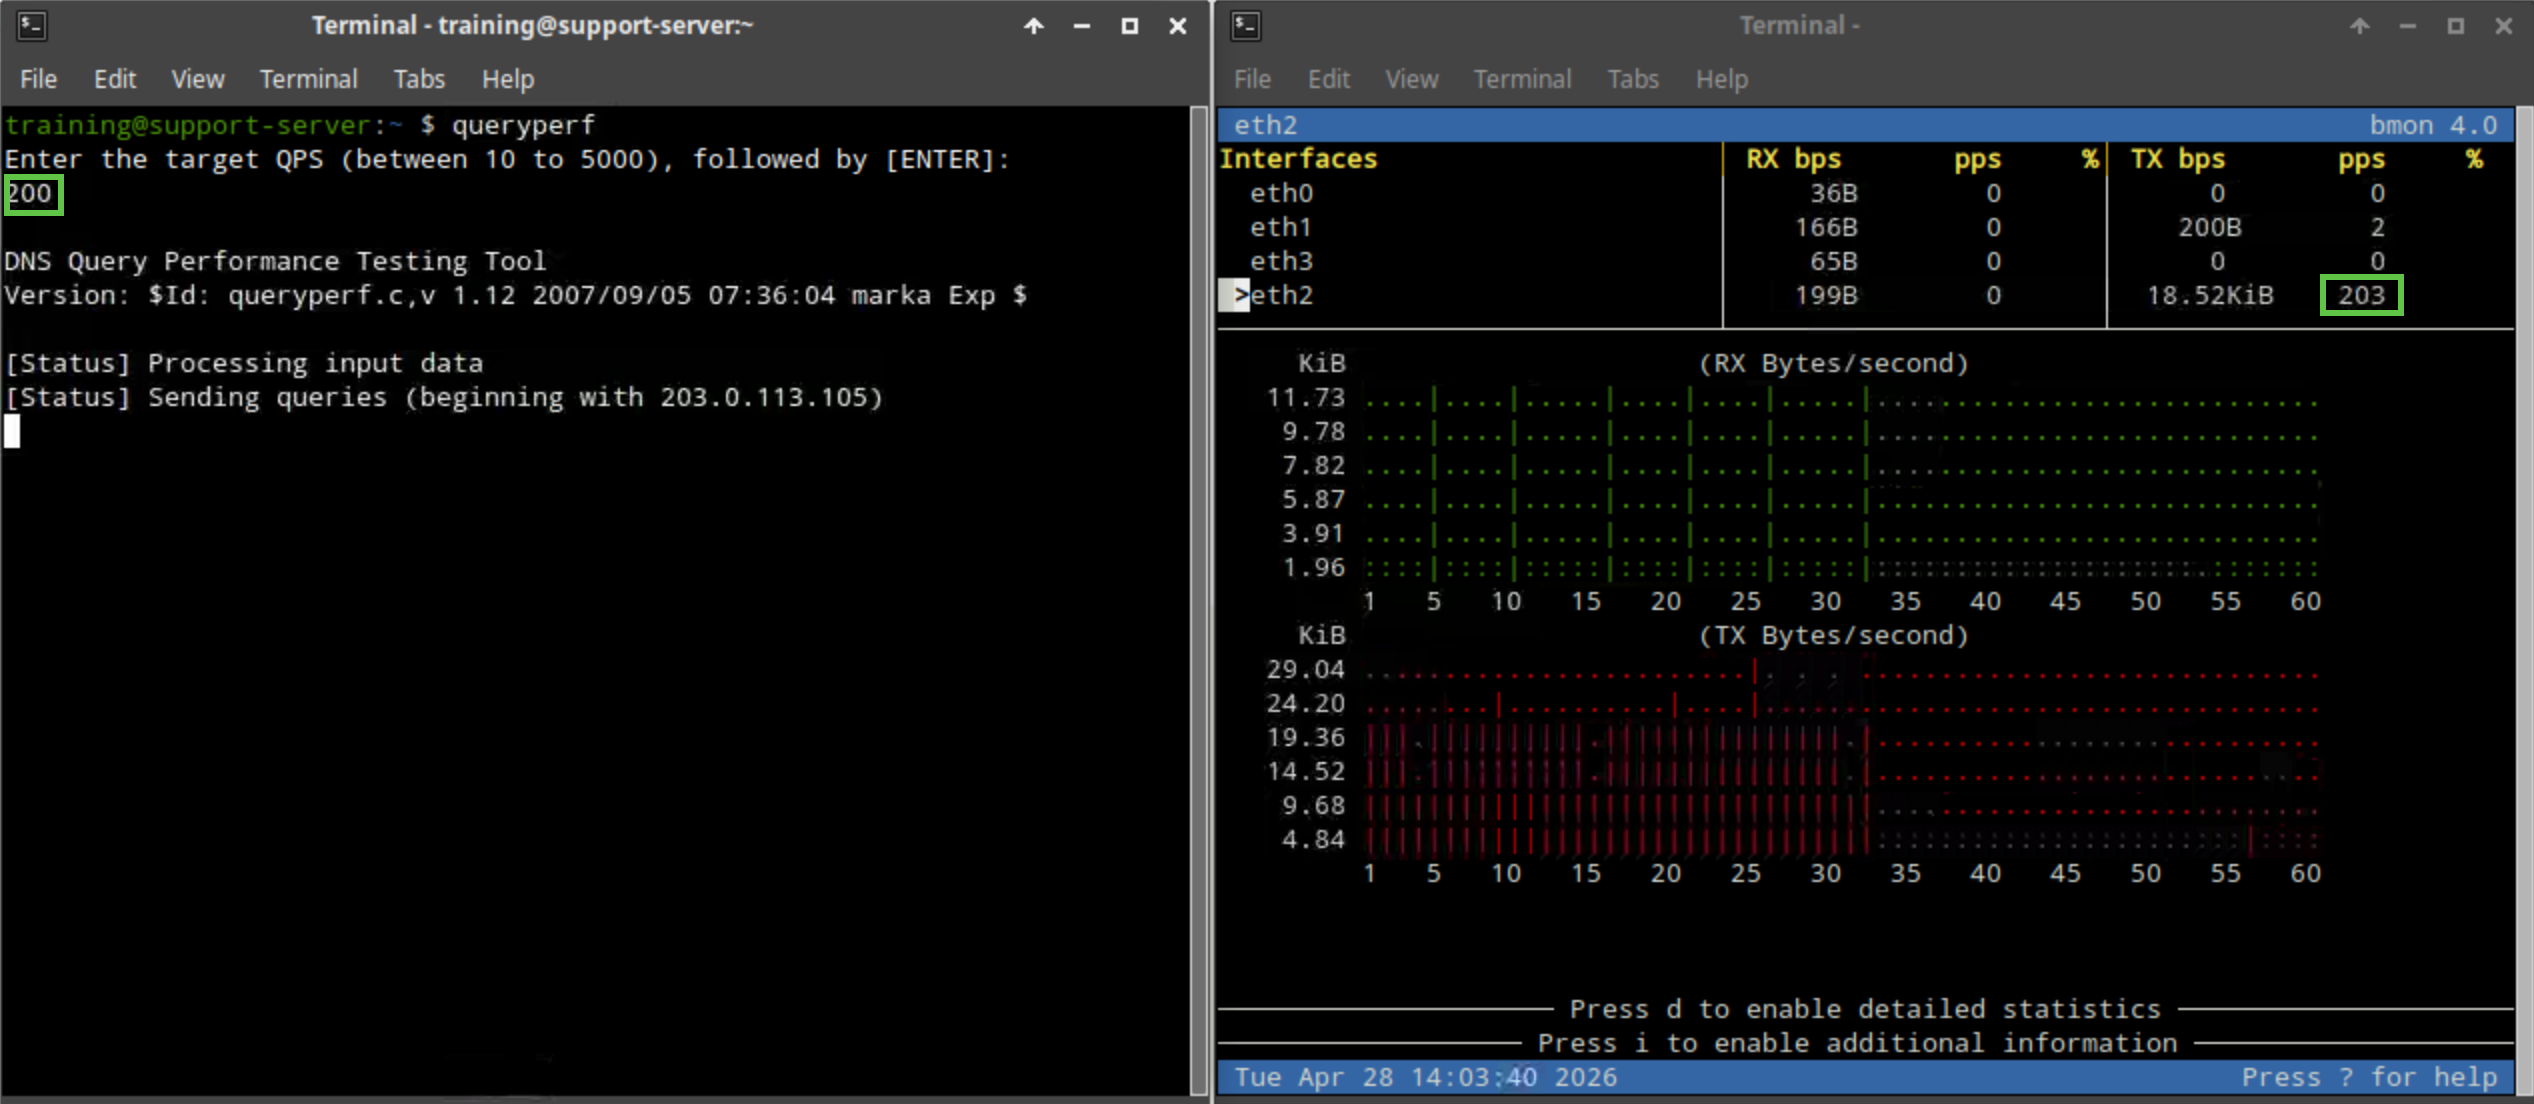
Type the command queryperf.
-
Use 50 QPS.
-
This value is half our Rate-Limiting threshold, so it shouldn’t trigger the rule, and the bmon window should show RX (Byte/second) or received traffic at around 50 QPS.

-
-
Switch back to jump-desktop.
-
On the Grid Manager UI, navigate to Administration → Logs → Syslog.
-
Choose extibns.techblue.net from the Log Viewer drop-down menu.
-
Click the Toggle multi-line view link.
-
Select Threat Detection Event Logs from the Quick Filter drop-down list.
-
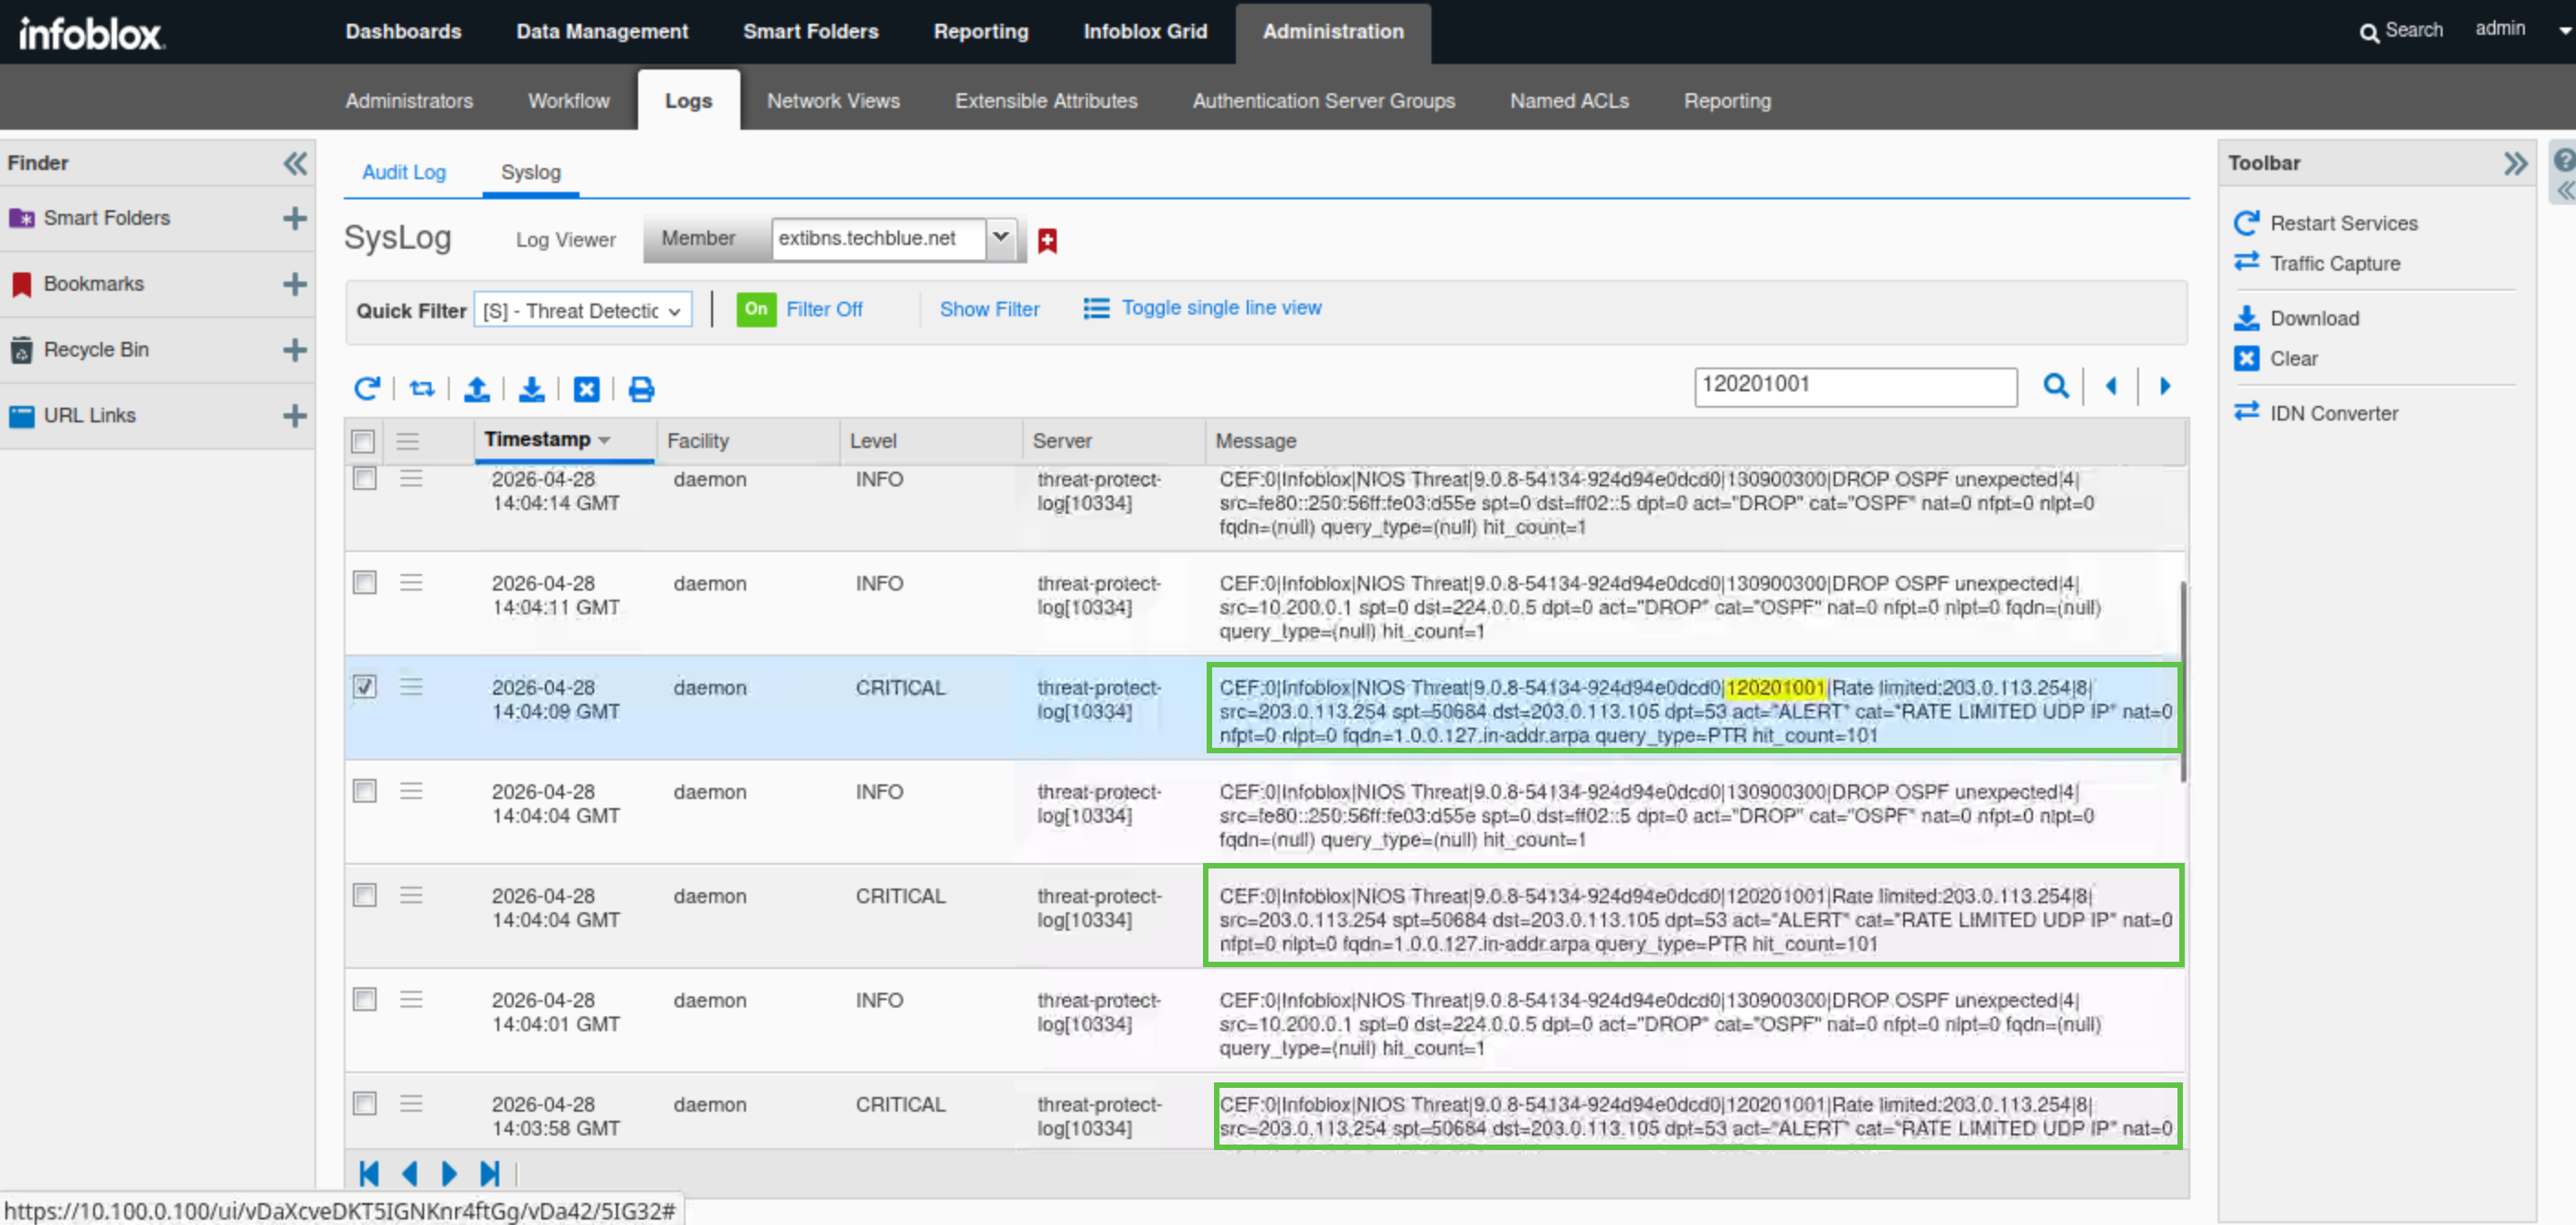
Enter the rule ID for the custom rule you noted earlier (120201001) in the search bar.
-
Note the lack of recent syslog entries for the IP address, since we have not yet triggered the rule.

-
Switch back to the support-server VM (training/infoblox).
-
In a terminal window, type the command queryperf.
-
Now, let’s send 200 QPS.
-
This is higher than the allowed custom rule value but lower than the global alert value (250) configured in rule ID 130000100 (WARN about high rate inbound UDP DNS queries) and the drop value (500) configured in rule ID 130000200 (WARN & BLOCK about high rate inbound UDP DNS queries) set in a previous lab.
-
-
The bmon window should show continuous spikes of queries, then drops for 5-second intervals, which verifies that our custom Rate-Limiting rule has been triggered properly.
-
Switch back to jump-desktop.
-
On the Grid Manager UI, navigate to Administration → Logs → Syslog.
-
Choose extibns.techblue.net from the Log Viewer drop-down menu.
-
Click the Toggle multi-line view link.
-
Select Threat Detection Event Logs from the Quick Filter drop-down list.
-
Enter the rule ID for the custom rule you noted earlier (120201001) in the search bar.
-
New syslog entries with a rule ID matching the custom rule ID (120201001) should indicate that the rule triggered an ALERT action with category of RATE LIMITED UDP IP, and a 5-second gap between entries, verifying our observations in bmon.
-
Navigate to Data Management → Security → DNS Infrastructure Protection Rules.
-
Click on the link for the 20250702-16 ruleset.
-
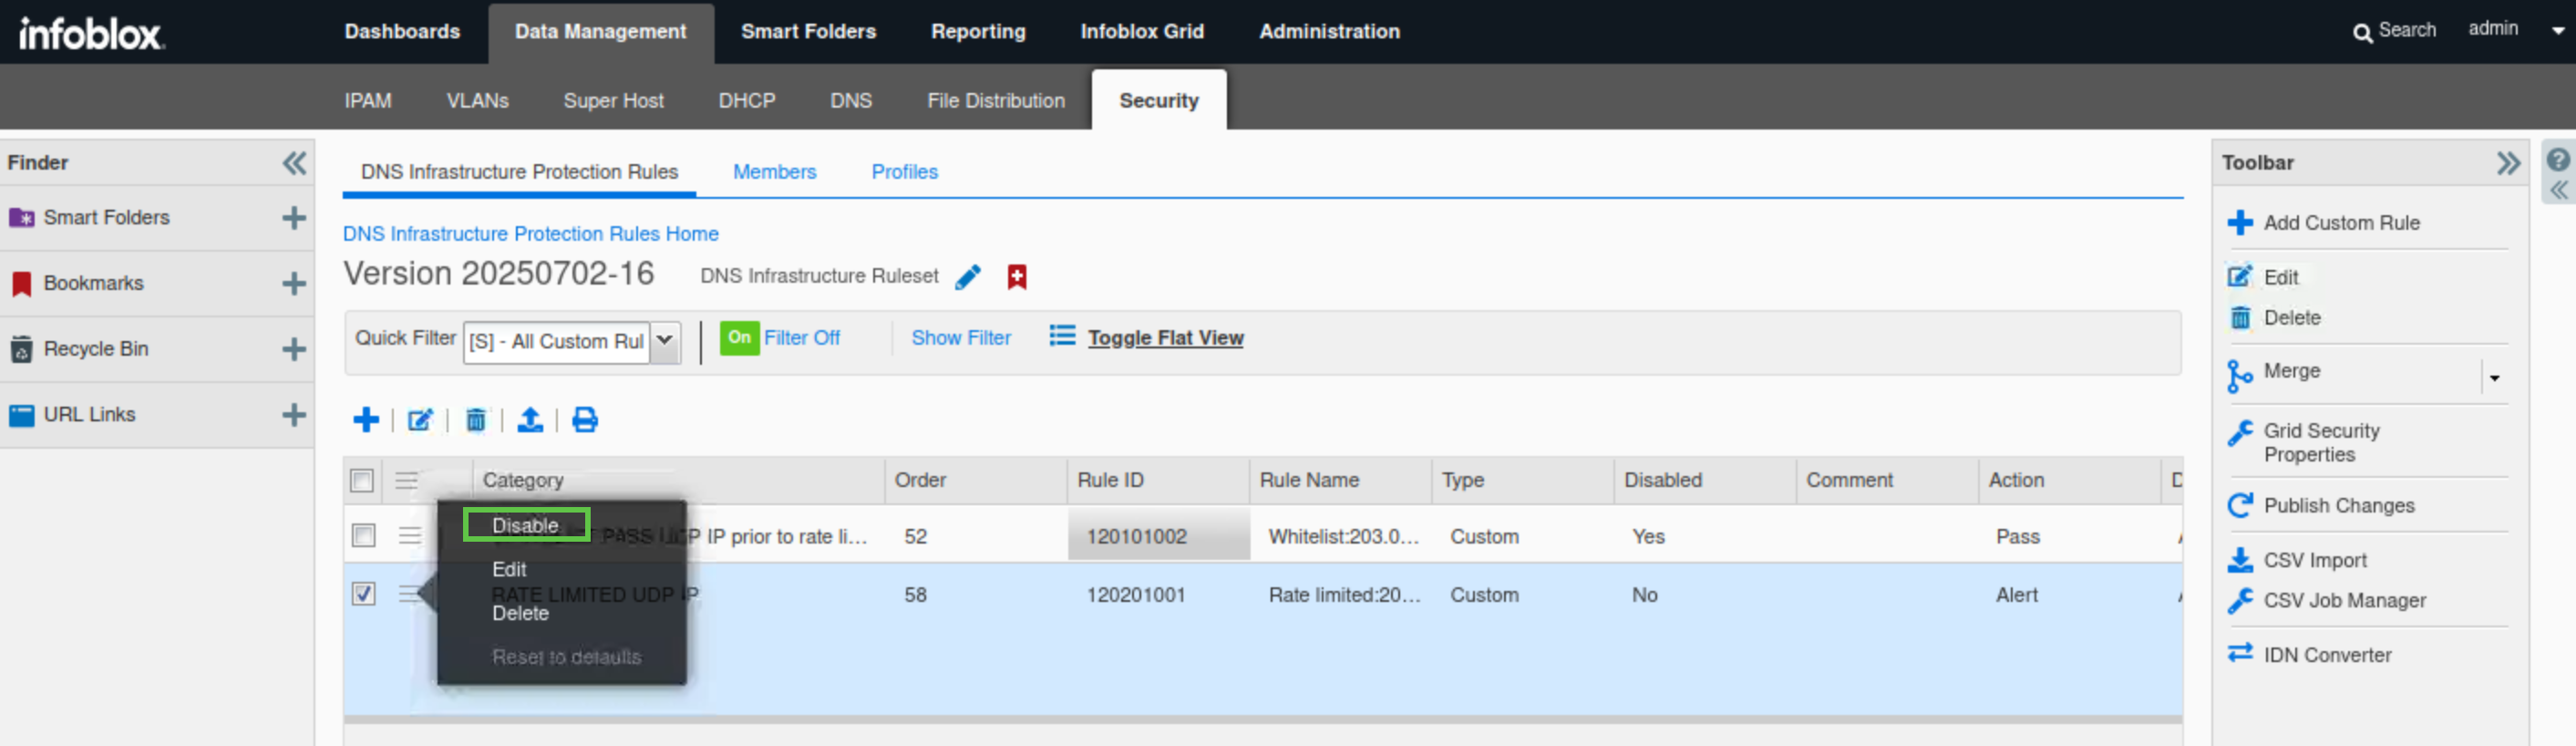
Click the Quick Filter drop-down list.
-
to select All Custom Rules.
-
Click the hamburger icon next to the custom RATE LIMITED UDP IP rule for 203.0.113.254.
-
Click Disable.
-
We will disable the rule and publish the changes. This is to allow us to test upcoming rules in later steps, as they all affect the same IP address.
-
-
Publish the changes when prompted.

Task 3 Solution: Create and test a custom Denylist (Blacklist) rule
In this task, you will create a custom Denylist (Blacklist) rule for the customer's IP address, 203.0.113.254, as your organization’s security team has informed you that the IP address has been compromised and was attempting to launch an attack on the organization. You will implement the BLACKLIST DROP UDP IP prior to rate limiting rule to block all traffic from the IP address 203.0.113.254.
This will suffice for testing purposes in a lab environment. However, in a production environment, it is recommended to pair this rule with a BLACKLIST DROP TCP IP prior to rate limiting rule, as some DNS traffic uses TCP in addition to UDP.
After creating the rule, you will use the lab’s support-server VM to simulate the client sending DNS traffic using the queryperf tool and monitor the Grid’s behaviour towards the traffic using the bmon tool. The traffic should be allowed to pass.
After completing the task, we will disable the rule and publish the changes. This is to allow us to test upcoming rules in later steps, as they all affect the same IP address.
-
Navigate to Data Management → Security → DNS Infrastructure Protection Rules.
-
Click on the link for the 20250702-16 rule.
-
Click the plus (+) symbol to add a custom rule.
-
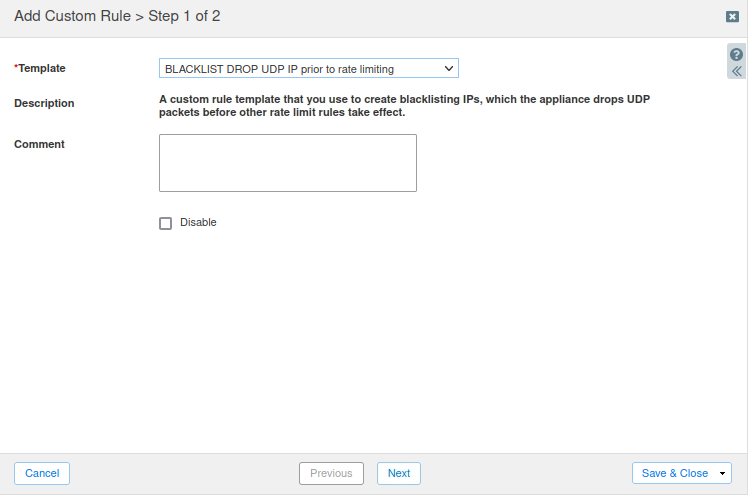
Choose the Denylist BLACKLIST DROP UDP IP prior to rate limiting from the drop-down template list.
-
Click Next to configure the rule parameters.
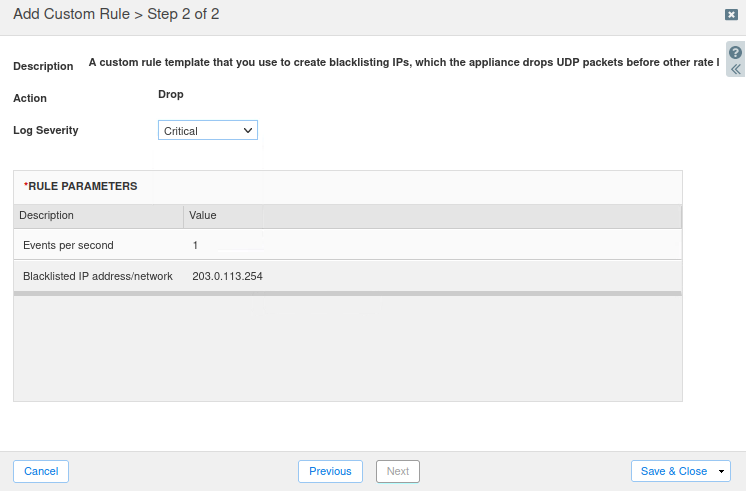
-
Set the Severity Level to Critical.
-
Set the Blacklisted IP address/network to 203.0.113.254.
-
Click Save and Close.
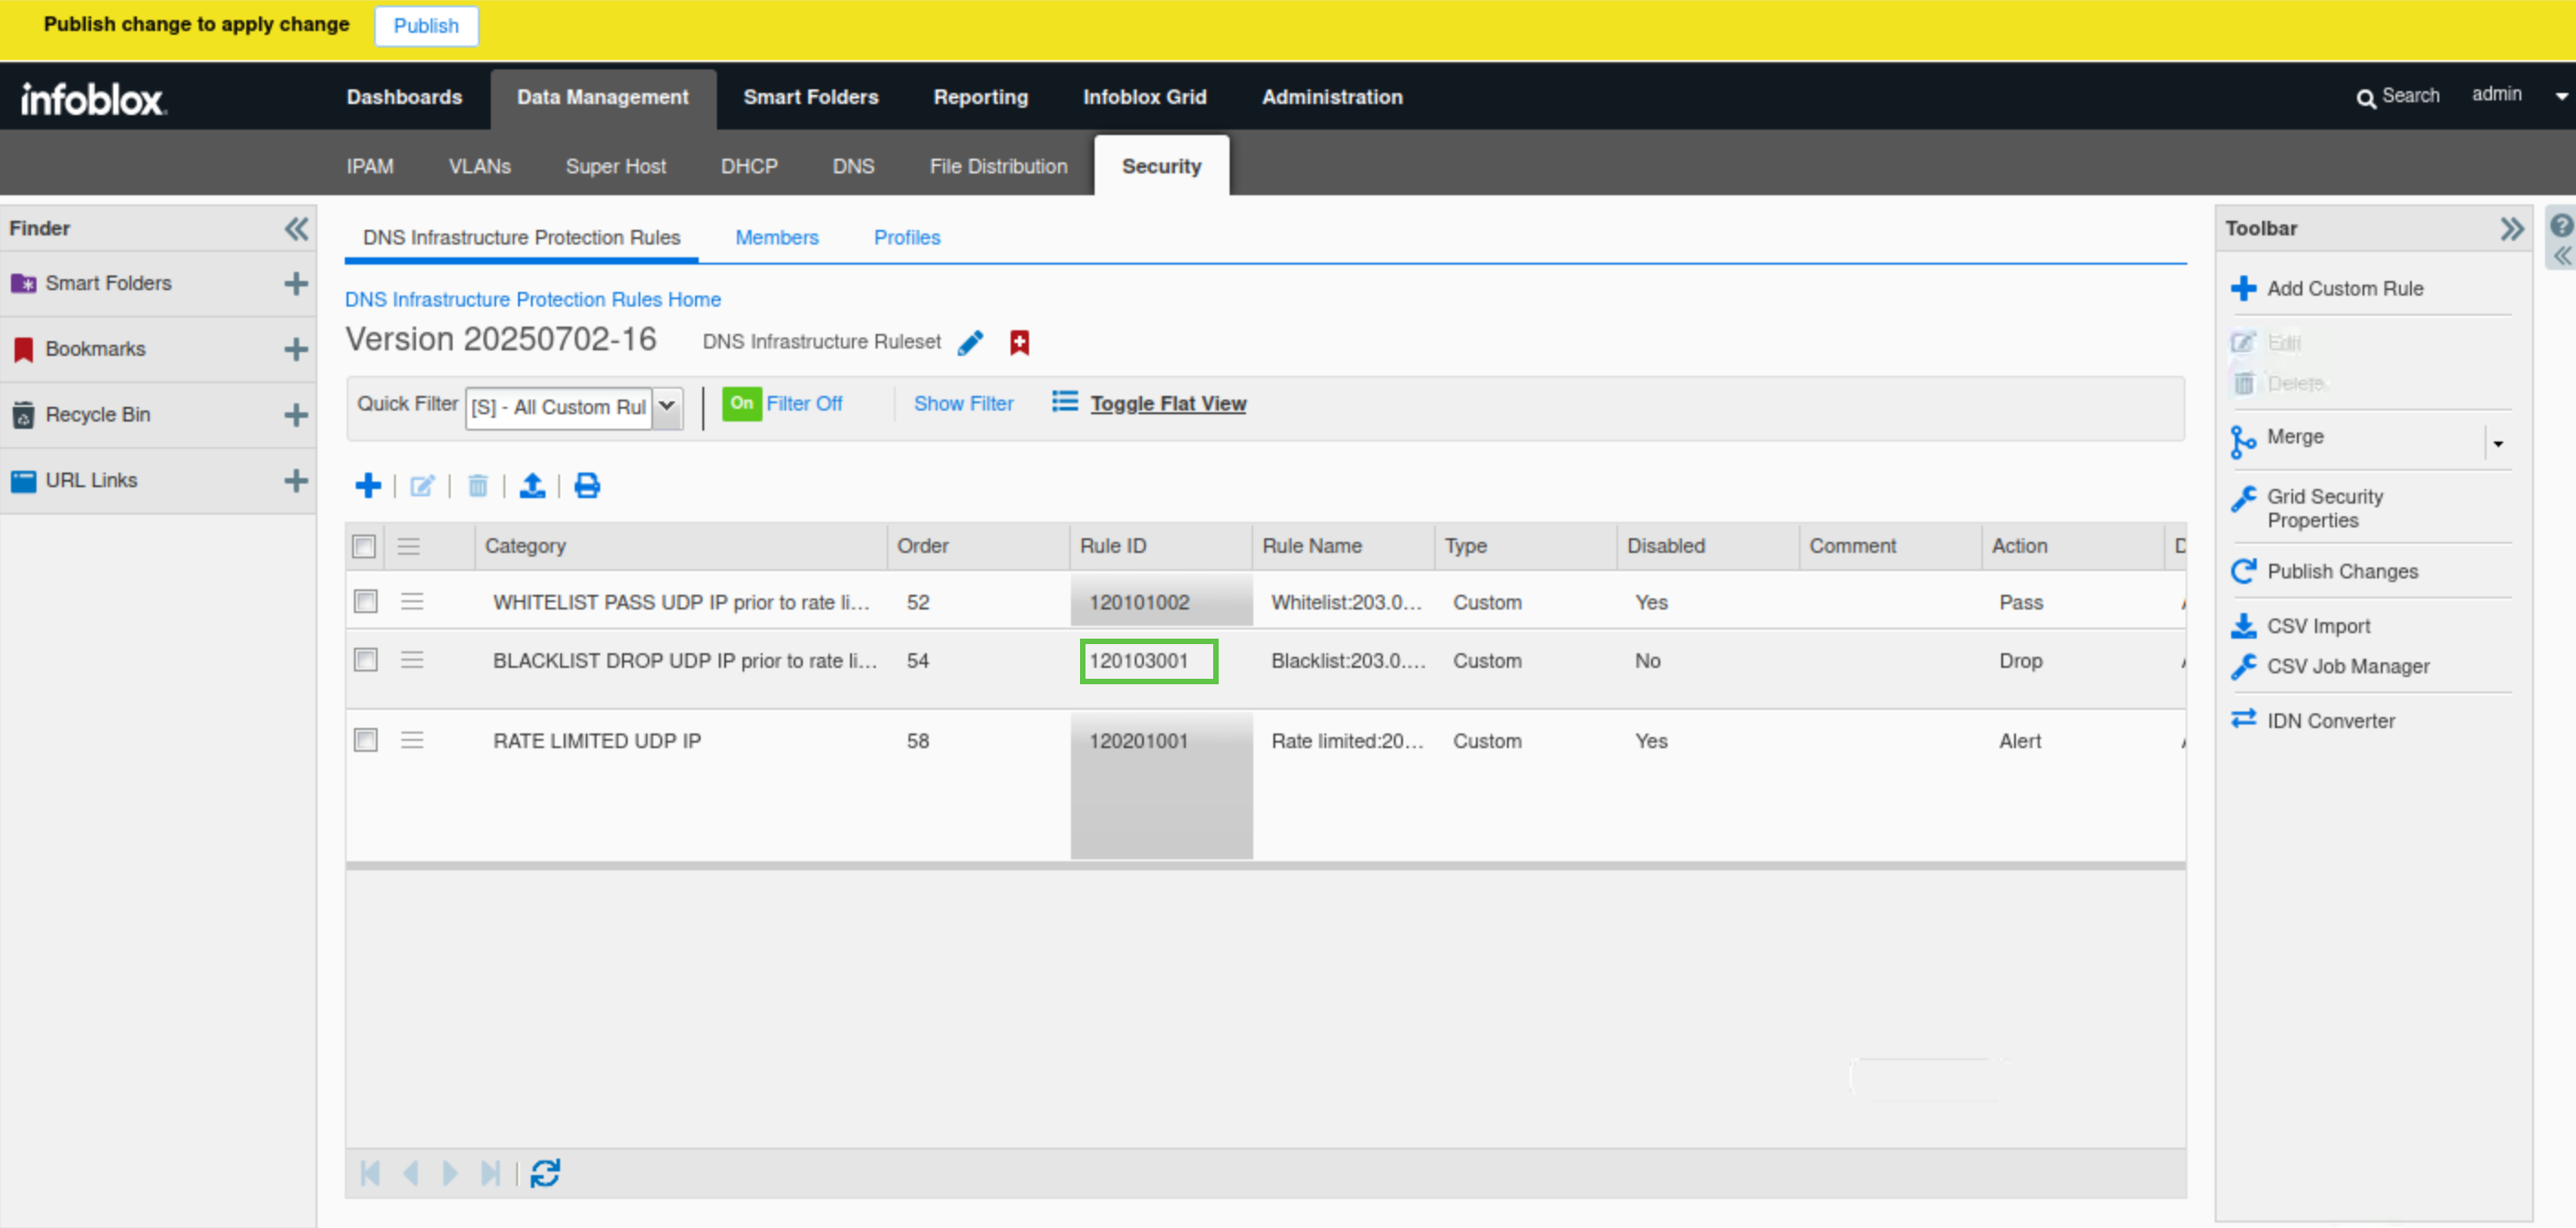
-
Select All Custom Rules.
-
Note the rule ID for the newly created rule (120103001).
-
You can use the text editor Geany under Application List -> Geany on jump-desktop to save your rule ID.
-
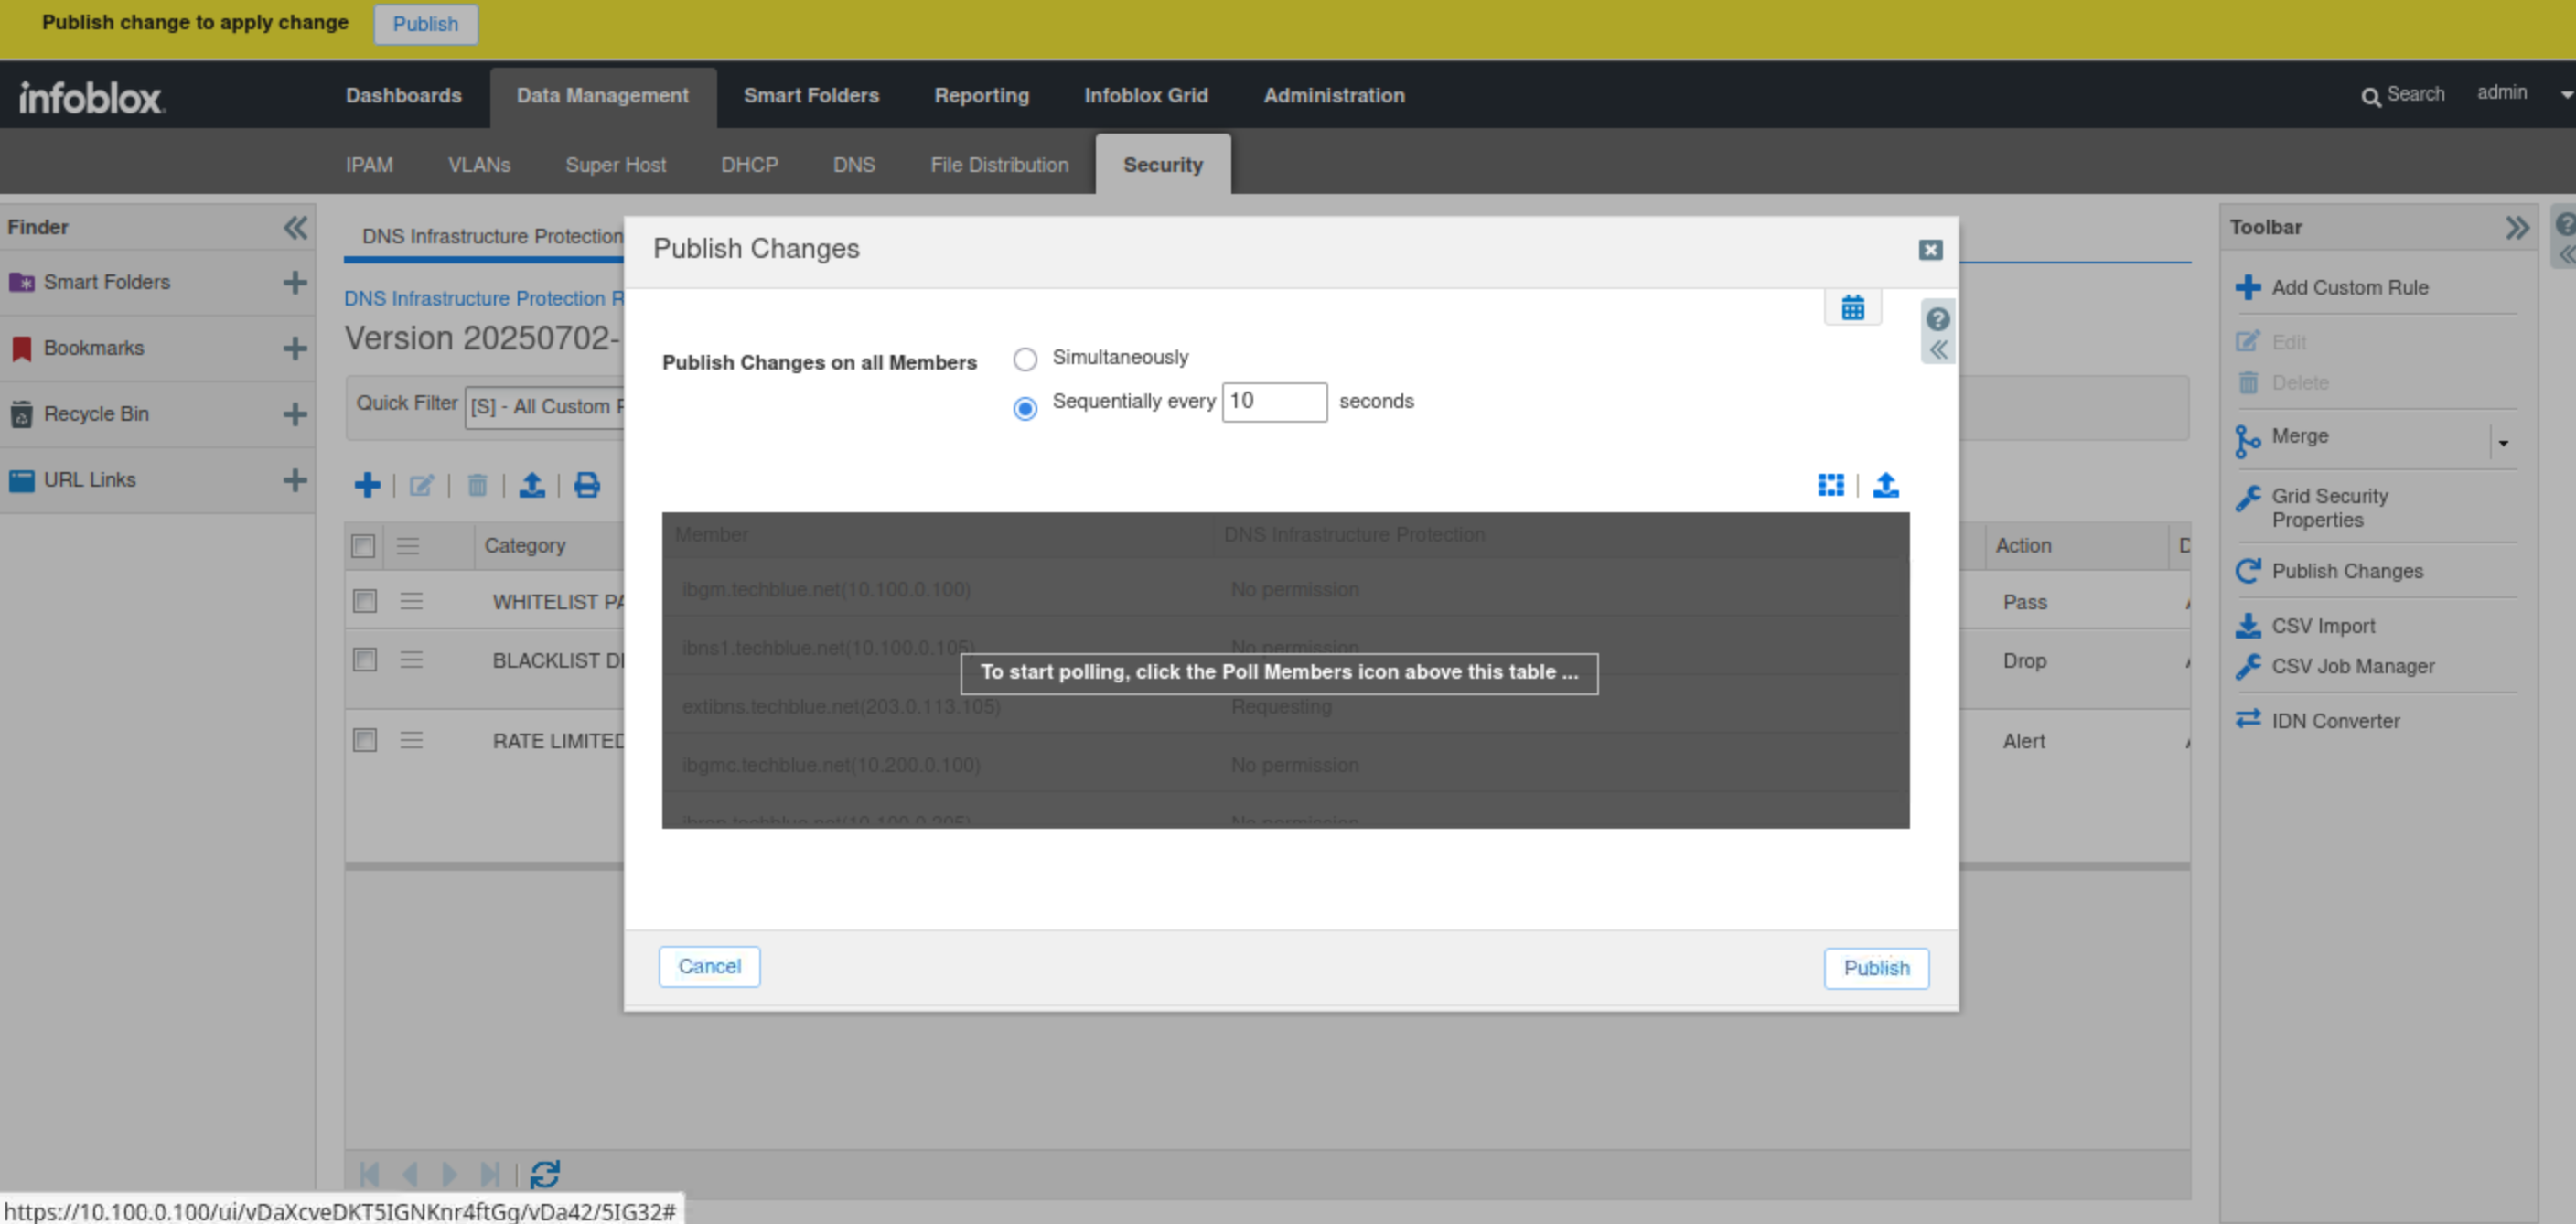
-
Publish the rule when prompted.
-
Switch back to the support-server VM (training/infoblox).
-
Open the bmon tool.
-
Expand the terminal window so you can see the colored charts that visualize DNS traffic flow during our tests.
-
-
Press the down arrow key on your keyboard to select the eth2 interface.
-
This indicates that you are monitoring traffic on the eth2 interface, which is connected to the 203.0.113.0 network.
-
-
Open another terminal window.
-
Type the command queryperf.
-
Use 1000 QPS.
-
This value is arbitrary; we can use any value we want. Any volume of traffic should be blocked.
-
-
The bmon window should show a very brief spike in queries just before the rule gets triggered, followed by no traffic at all after the rule is triggered, which verifies that our traffic from the malicious IP 203.0.113.254 is being blocked and our custom rule has been triggered properly.
-
Switch back to jump-desktop.
-
On the Grid Manager UI, navigate to Administration → Logs → Syslog.
-
Choose extibns.techblue.net from the Log Viewer drop-down menu.
-
Click the Toggle multi-line view link.
-
Select Threat Detection Event Logs from the Quick Filter drop-down list.
-
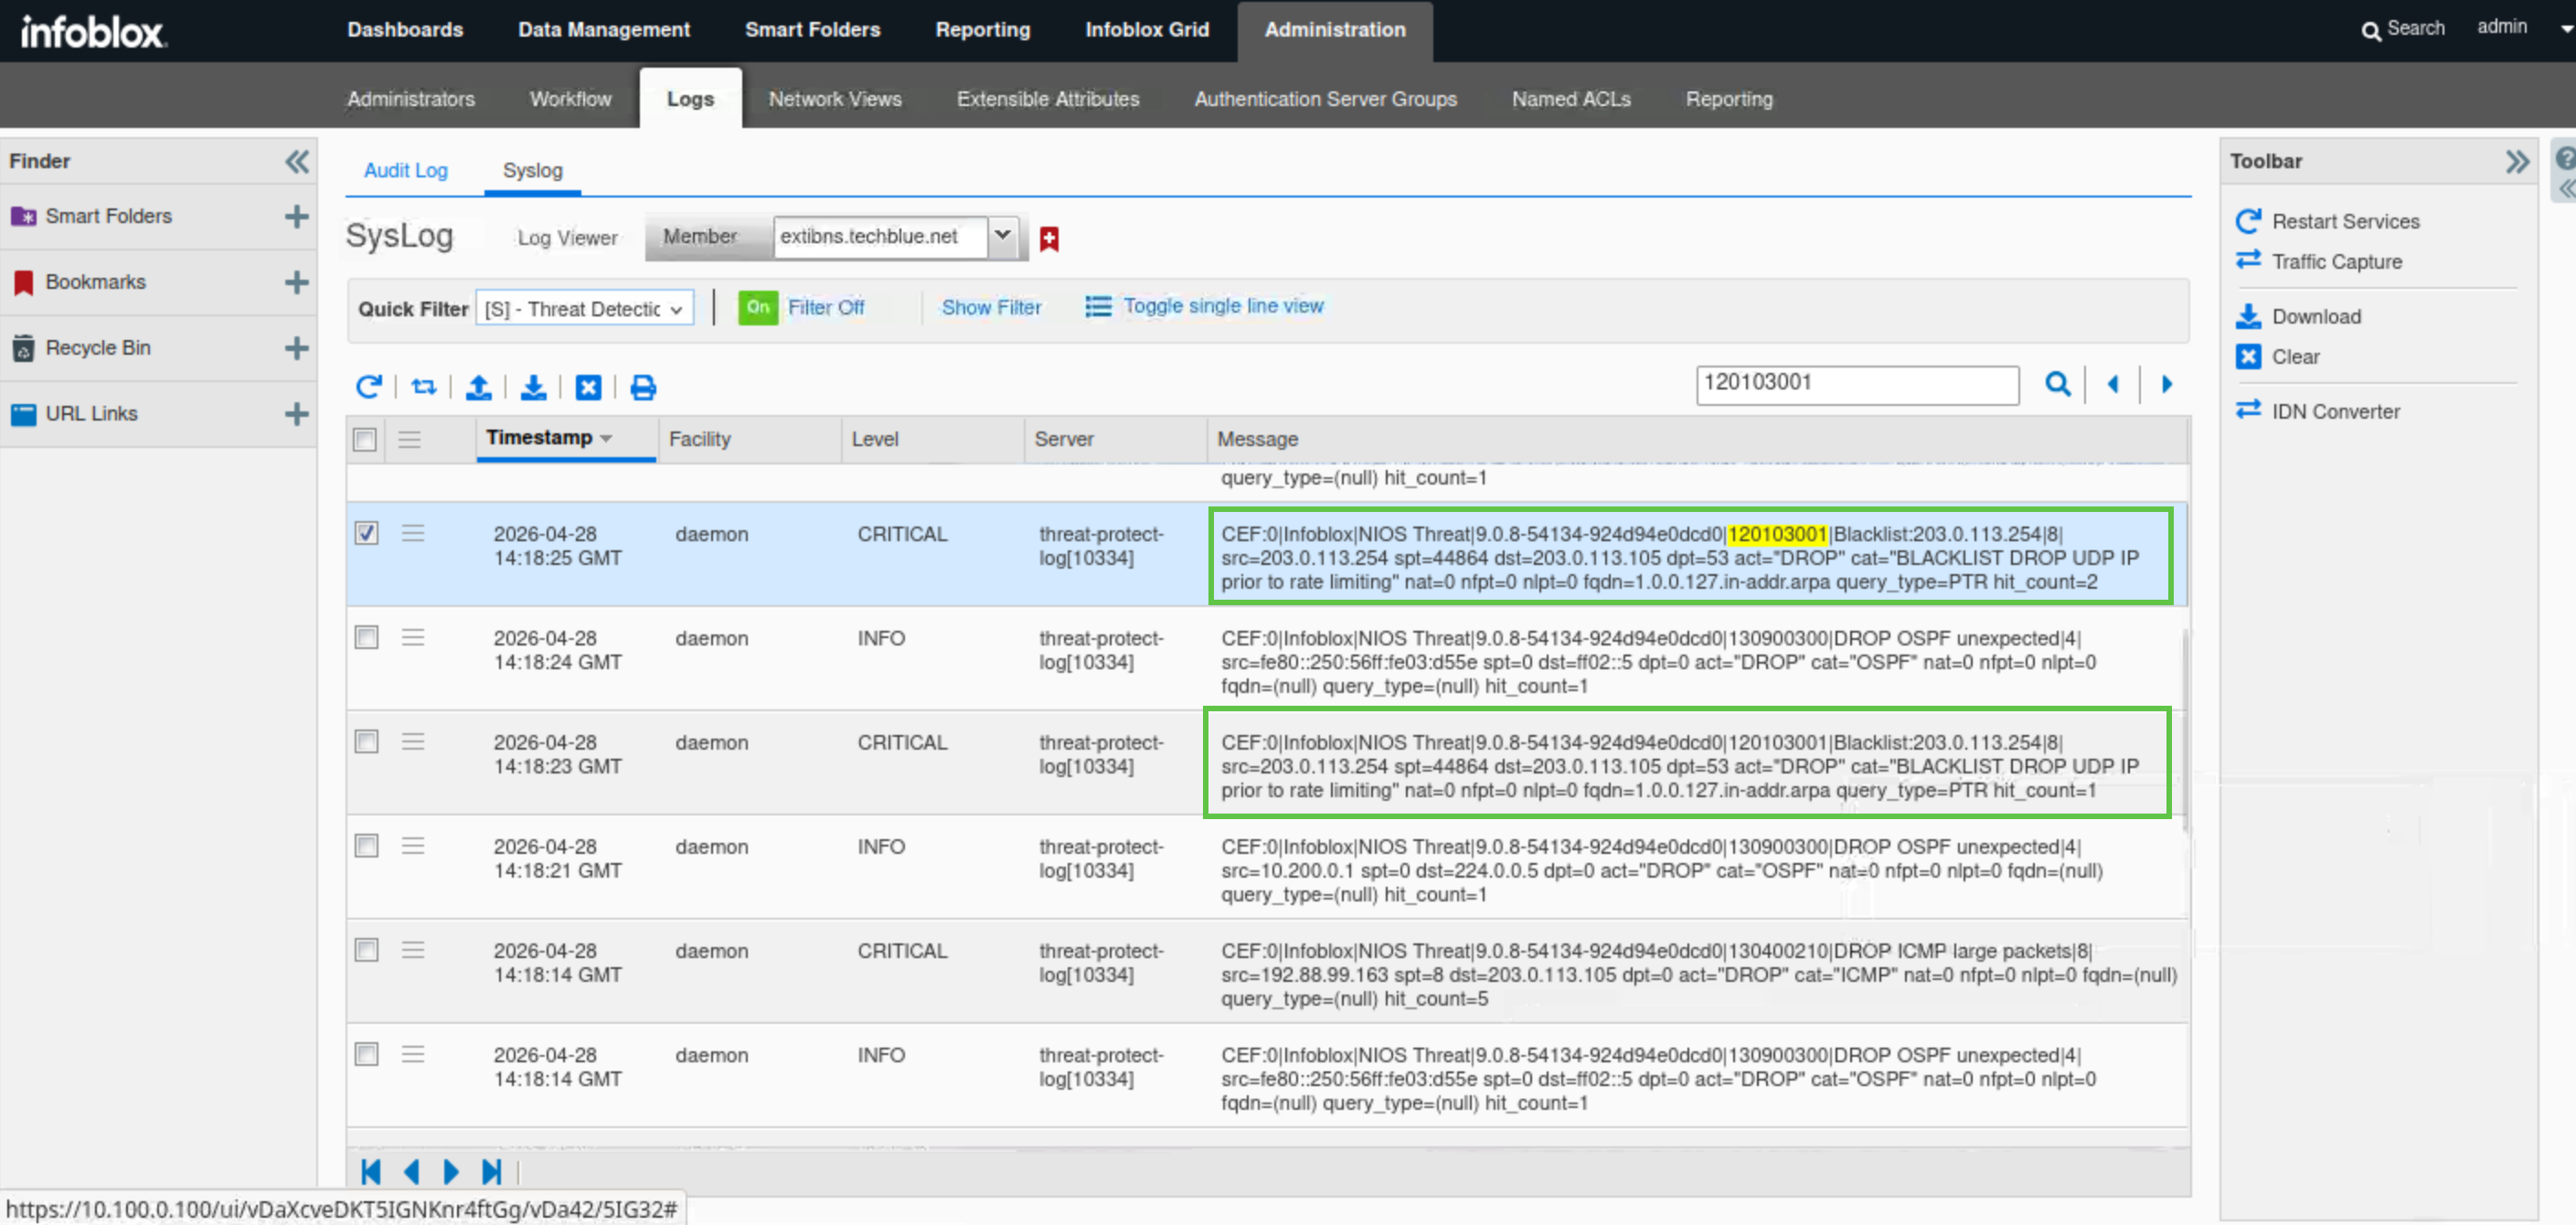
Enter the rule ID for the custom rule you noted earlier (120103001).
-
New syslog entries with a rule ID matching the custom rule ID (120103001) should indicate that the rule triggered a DROP action, with category of BLACKLIST DROP UDP IP prior to rate limiting, verifying our observations in bmon.
-
Navigate to Data Management → Security → DNS Infrastructure Protection Rules.
-
Click on the link for the 20250702-16 ruleset.
-
Click the Quick Filter drop-down list.
-
to select All Custom Rules.
-
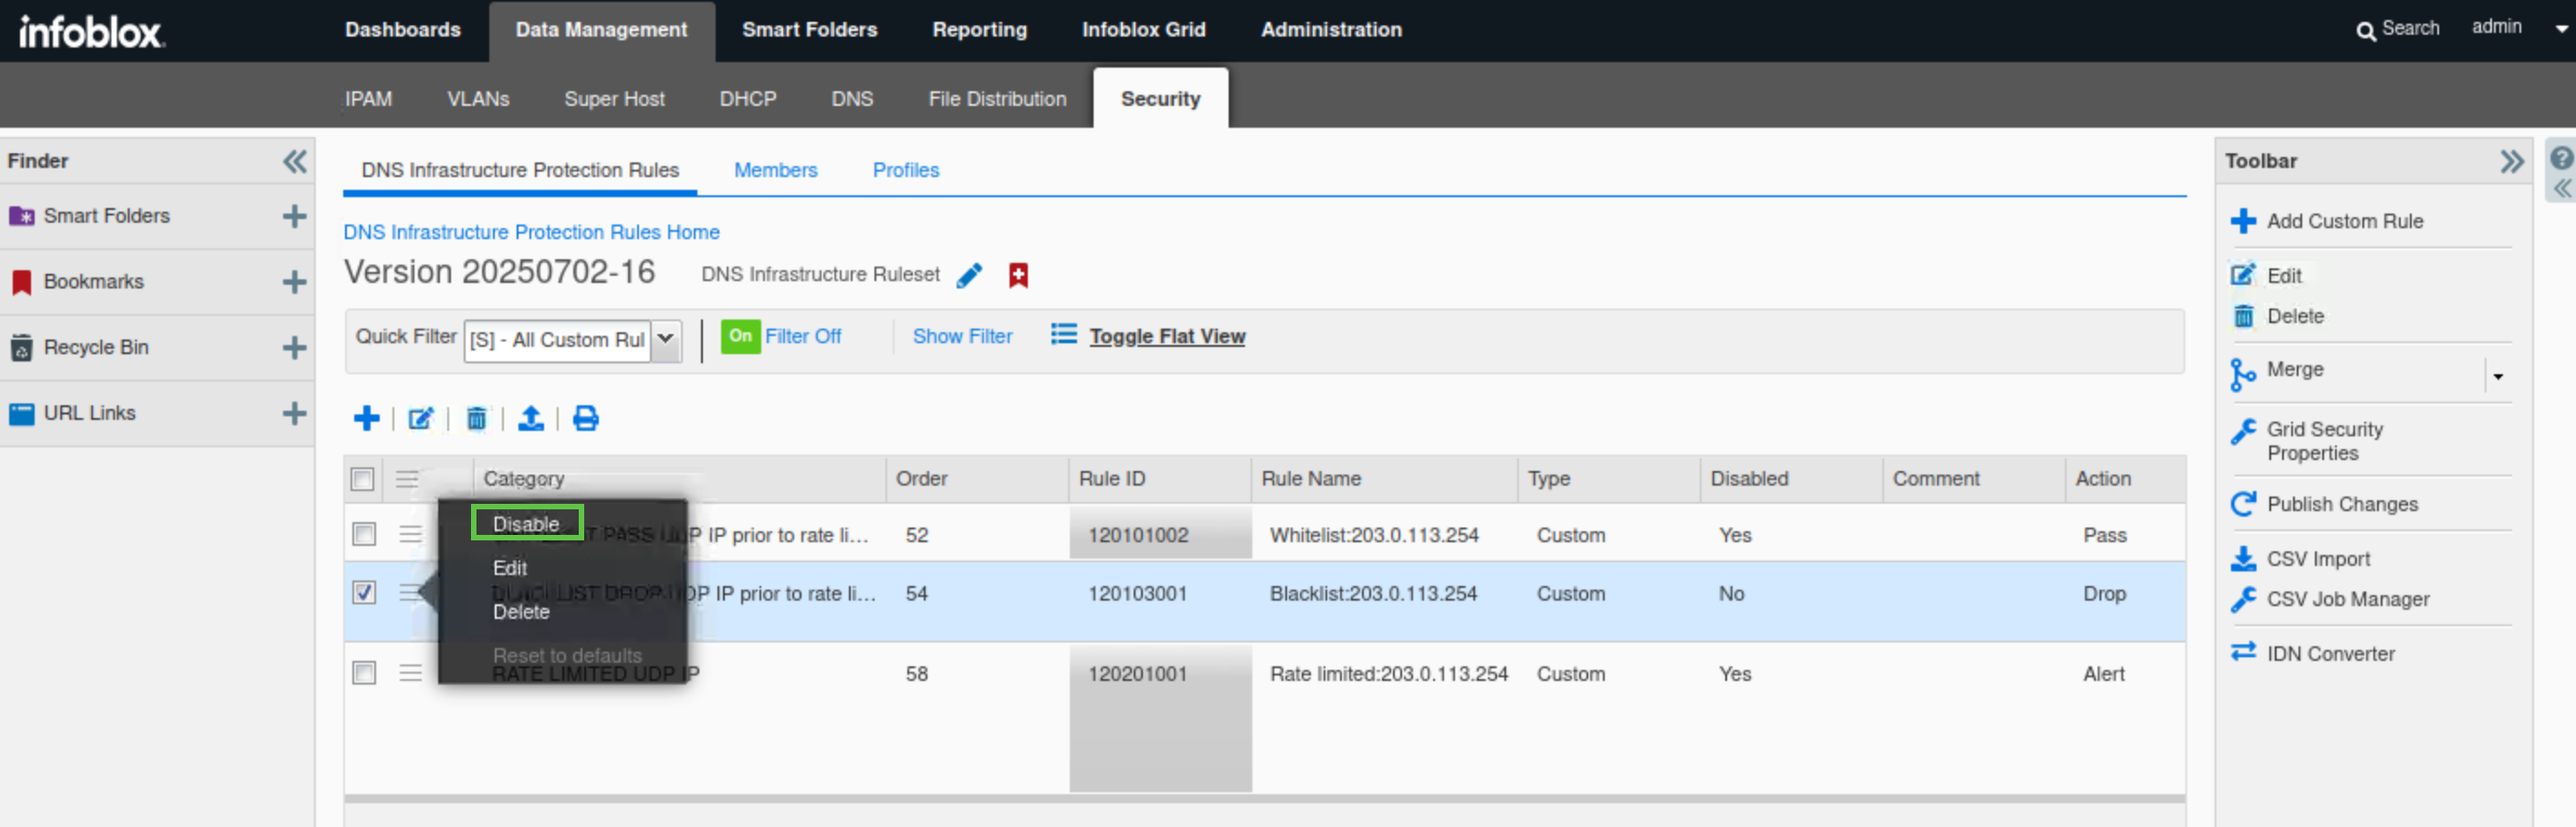
Click the hamburger icon next to the custom BLACKLIST DROP UDP IP prior to rate limiting rule for 203.0.113.254.
-
Click Disable.
-
We will disable the rule and publish the changes. This is to not affect any other labs that might be using the same IP address.
-
-
Publish the changes when prompted.