Analyzing DHCP Options with Wireshark (3537)
Scenario
In this lab, you will learn how to use Wireshark to filter and analyze DHCP traffic. This includes observing the DHCP DORA (Discover, Offer, Request, Acknowledge) process, locating DHCP options requested by the client, and analyzing the options returned by the server.
Estimate Completion Time
10 to 15 minutes
Requirements
Wireshark installed on your machine
Learning Content
Task 1: Filtering DHCP Traffic
Download the packet capture file DORA-capture.pcap to your computer and open it in Wireshark.
Apply a filter to show only DHCP traffic.
Task 2: Viewing the DORA Process
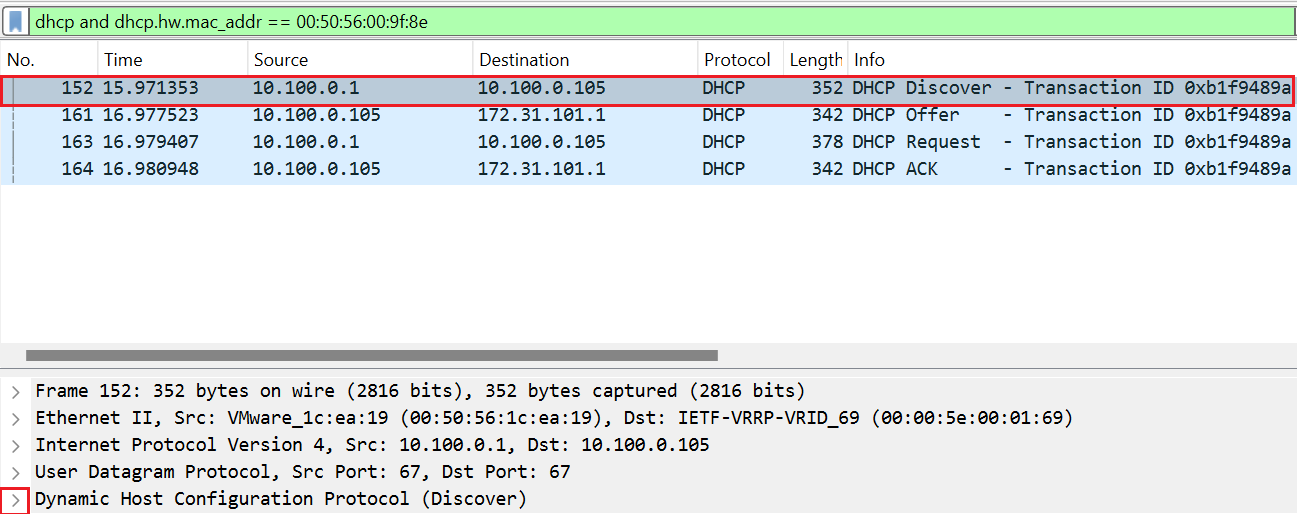
Locate the DORA transactions for the client with the MAC address 00:50:56:00:9f:8e. Identify the DHCPDISCOVER, DHCPOFFER, DHCPREQUEST, and DHCPACK packets to understand the flow.
Task 3: What Options Are Requested by the Client?
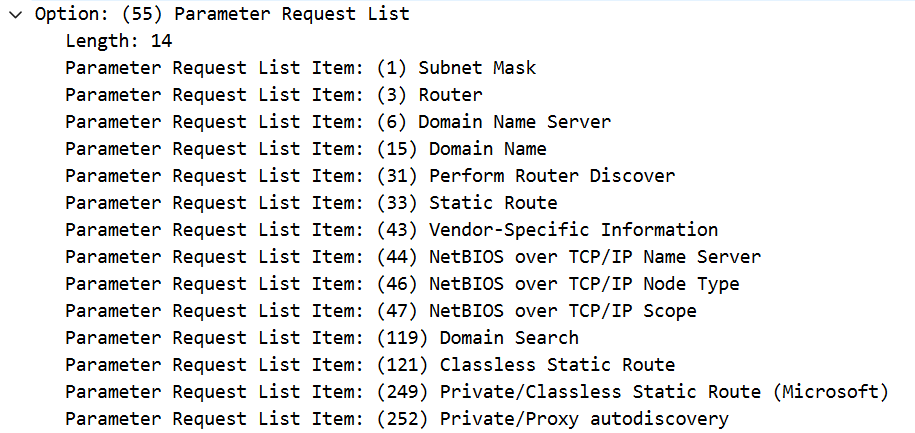
Locate the DHCPDISCOVER packet from the client with MAC address 00:50:56:00:9f:8e. Drill down to Option 55 to see which options are requested in the Parameter Request List (PRL).
Task 4: What Options Are Offered by the DHCP Server to the Client?
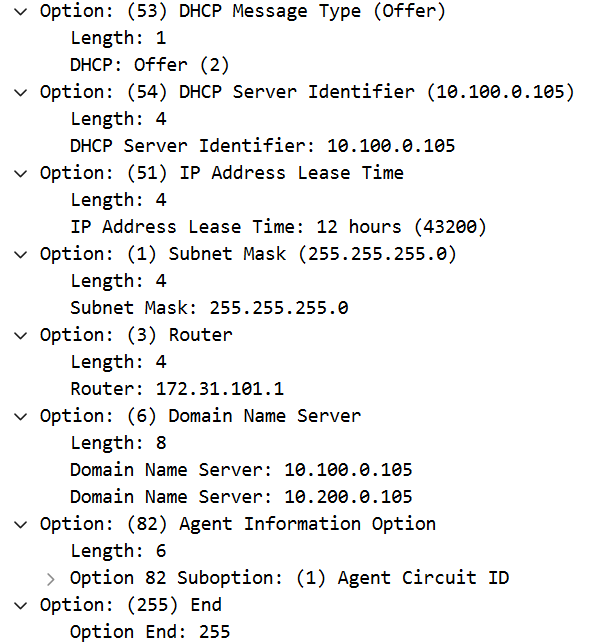
Locate the DHCPOFFER packet from the DHCP server, sent to the client with MAC address 00:50:56:00:9f:8e. Drill down to reveal the options offered by the server.
Task 5: Determine the IP Address Assigned to the Client
Locate the DHCPREQUEST and DHCPACK packets for the client with MAC address 00:50:56:00:9f:8e to verify which IP address the client requests and confirm that the DHCP server acknowledges it.
Solutions
Task 1 Solution: Filtering DHCP Traffic
To open Wireshark and filter only DHCP packets, follow these steps:
Download the DORA-capture.pcap file and save it to a location on your computer.
Launch Wireshark on your machine.
Windows: Open the Start menu, scroll down to Wireshark, and click on it to launch the application.
macOS: Open Finder, go to the Applications folder, and double-click Wireshark.
Linux: Depending on your distribution, find Wireshark in the applications menu or open a terminal and type
wireshark, then press Enter.
In Wireshark, go to File → Open and navigate to the location where you saved the
DORA-capture.pcapfile.Select the
DORA-capture.pcapfile and click Open.In the filter bar at the top, type
dhcporbootpand press Enter.
This filter will display only DHCP packets.

Task 2 Solution: Viewing the DORA Process
To filter DHCP packets for a specific client using the MAC address 00:50:56:00:9f:8e, follow these steps:
Ensure you have the DHCP filter applied.
In the filter bar, modify the filter to
dhcp and dhcp.hw.mac_addr == 00:50:56:00:9f:8eand press Enter.
This filter will display DHCP packets for the specified MAC address, allowing you to view the entire DORA process.

Task 3 Solution: What Options Are Requested by the Client?
To locate the requested options in the DHCPDISCOVER message, follow these steps:
With the filter applied from Task 2, find the DHCPDISCOVER packet in the packet list.
Click on the DHCPDISCOVER packet to highlight it.
In the Packet Details pane, expand the Dynamic Host Configuration Protocol section.
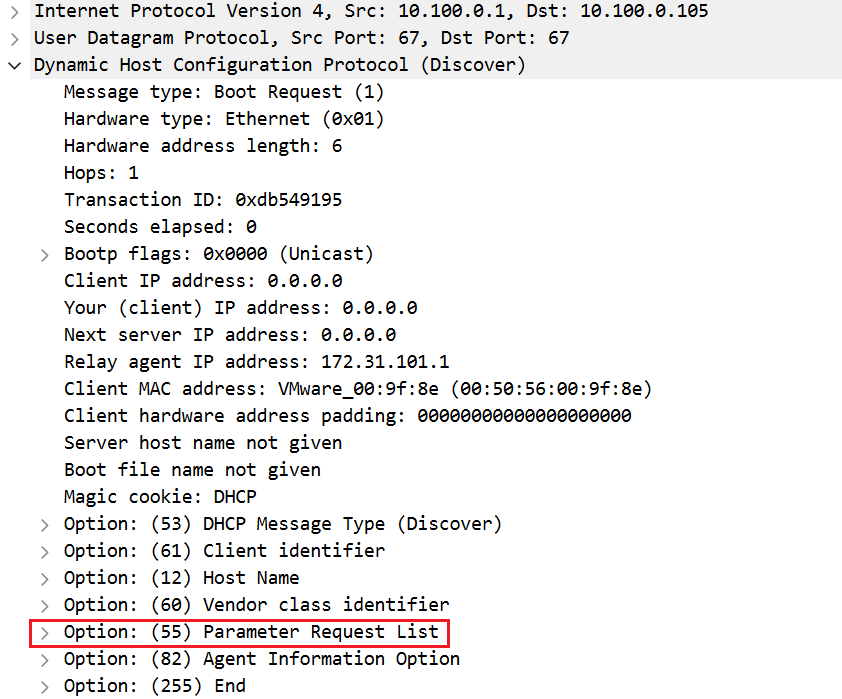
Scroll down to Option 55 (Parameter Request List) and expand it by clicking the arrow to view the list of options requested by the client.
This will reveal the specific DHCP options requested by the client in the DHCPDISCOVER message.
Task 4 Solution: What Options Are Offered by the DHCP Server to the Client?
To analyze the options offered by the server in the DHCPOFFER packet, follow these steps:
Find the DHCPOFFER packet in the packet list.
Click on the DHCPOFFER packet to highlight it.
In the Packet Details pane, expand the Dynamic Host Configuration Protocol section.

Scroll down to the options section to view the specific options returned by the DHCP server.
This will display the options provided by the DHCP server in the DHCPOFFER packet.
Task 5 Solution: Determine the IP Address Assigned to the Client
To verify the IP address assigned to the client:
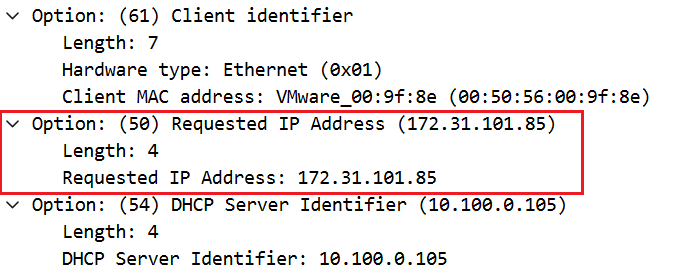
Scroll through the filtered packets to find the DHCPREQUEST packet from the client. In this packet, the client requests the IP address offered by the server.
Click on the DHCPREQUEST packet to expand its details.
In the Packet Details pane, expand the Dynamic Host Configuration Protocol section.
Look for Option 50 - Requested IP Address to see which IP address the client is requesting.
Scroll through the filtered packets to find the DHCPACK packet from the server.
Click on the DHCPACK packet to expand its details.
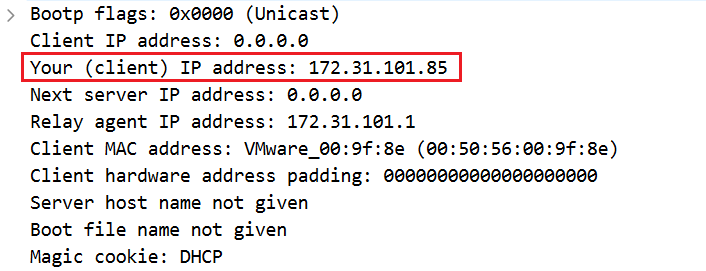
Look for the Your (client) IP address field in the expanded DHCP section. This field is in the packet and shows the IP address that the server officially acknowledges for the client.
