This lab requires a NIOS 9.0 Lab Environment
This lab guide has been developed using the new NIOS 9.0 Lab Environment. Please ensure that you deploy a NIOS 9.0 lab environment to complete these lab tasks. If you use a different lab environment, this is untested, and the lab likely will not work.
Scenario
Your organization is deploying a new Infoblox NIOS appliance for the first time. As part of the initial setup, you need to configure an IP address for the appliance to enable network connectivity. Once connectivity is established, you will test the appliance by applying temporary licenses and then replace it with subscription licenses.
Estimate Completion Time
-
10 to 15 minutes
Credentials
|
Description |
Username |
Password |
URL or IP |
|---|---|---|---|
|
Grid Manager UI |
admin |
infoblox |
Requirement
-
Administrative access to the Grid
Learning Content
Lab Initiation
Failing to complete the tasks in this lab after initiation will render the lab environment unusable for subsequent labs, requiring the deployment of a new lab environment to proceed.
Access jump-desktop
Once the lab is deployed, you can access the virtual machines required for this activity. To begin, select VM List from the navigation bar at the top, locate jump-desktop, and click the green play icon to open its console. Log in to the Linux UI.

Username: training
Password: infoblox
Initiate lab
To initiate the lab, double-click the Launch Lab icon on the Desktop.

Choose the lab number from the list and click OK.

After clicking OK, you will see a pop-up message with a brief description of the lab task. If the description looks correct, click Yes to continue lab initiation.

Lab initiation will take a couple of minutes to finish.
Once complete, you will see another pop-up message with the login credentials and the URL for the Grid Manager’s User Interface. Note that the credentials may differ from those from prior labs.

Tasks
Task 1: Configure an IP Address from the Console
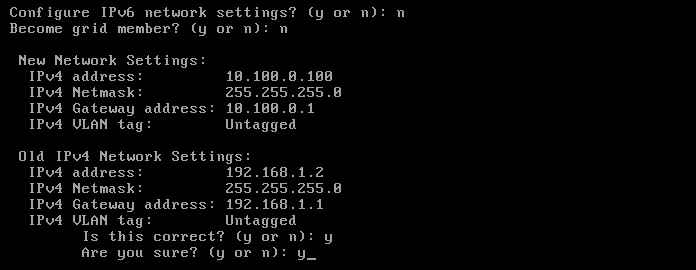
Use the set network command to configure the IP address for the nios-1 appliance. Use the following network details:
-
IP Address: 10.100.0.100
-
Netmask: 255.255.255.0
-
Gateway: 10.100.0.1
Task 2: Apply Temporary Licenses
Access the console of the nios-1 VM and use the set temp_license command to install the NIOS license and DNSone with Grid license, which enables DNS, DHCP, and Grid functionality.
Task 3: Enabling Remote Console Access
Login to the Grid Manager web interface and make the necessary changes to enable remote console access (SSH access).
Task 4: Apply Subscription Licenses
Replace the temporary licenses on nios-1 with a subscription license using either the Grid Manager UI or via SSH.
-
If using the Grid Manager UI, upload the license file
nios-1.licfrom the folder/mnt/shared/licenses/9.0/ -
If using SSH, Issue
set licensecommand and provide the following license string when prompted:
GQAAAFY2J9QNCVSzmW9d5Rc5ROu8puqMZhh9JEk= GAAAAF0xPMIDSlrpljgR5Fx2Cf29oe/GIxh5LQ== EQAAAFwxO9tCRhv8121f4FwnQaq9 EgAAAFw3K9cNCVSzmW9d5Rc5Eam48Q==
Solutions
Task 1 Solution: Configure an IP Address from the Console
To configure the IP address, use the console of the nios-1 VM:
-
Switch to nios-1 VM to access its console
-
Log in to the nios-1 VM using the default credentials:
-
Username:
admin -
Password:
infoblox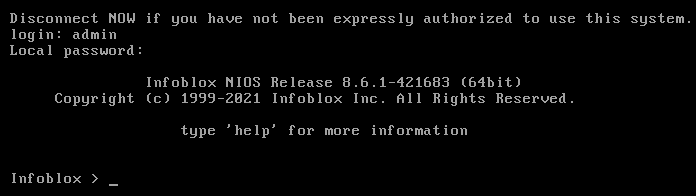
-
-
At the device CLI prompt, use the command
set networkto change the default network information:-
IP Address: 10.100.0.100
-
Netmask: 255.255.255.0
-
Gateway address: 10.100.0.1
-
VLAN tag: Untagged
-
Configure IPv6 network settings? n
-
Become grid member? n
-
-
Review settings and apply changes. The device will restart.
-
Wait for the device to finish restarting.
-
Log back into the nios-1 command prompt console. Use the command
show networkto verify the settings. -
Use the command
pingto verify basic network connectivity. You may ping the jump-desktop from nios-1 with the following command:
ping 10.35.22.10
Task 2 Solution: Apply Temporary Licenses
After configuring the IP address, apply the temporary licenses:
-
Install temporary NIOS License:
-
Access the console of the nios-1 appliance and enter the command:
set temp_license -
From the displayed menu, select option 4 to install the NIOS license. Type 4 and press Enter.
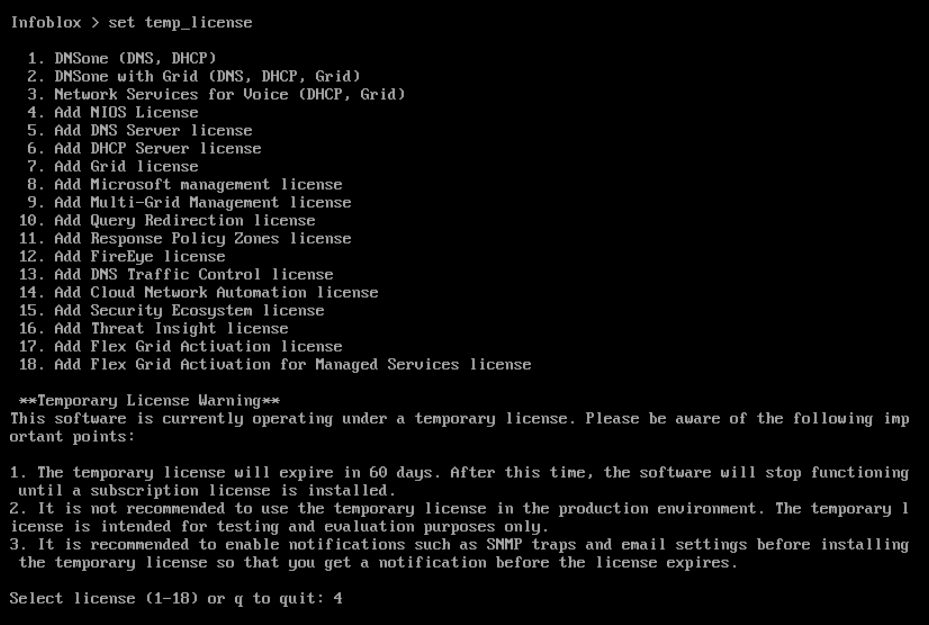
-
A list of NIOS models will appear. For the IB-V1526 model, select option 14. Type 14 and press Enter.
-
When prompted, type y and press Enter to confirm the license installation.
-
Wait for the system to restart (this may take 2–3 minutes).
-
-
Install the DNSone with Grid License:
-
From the console of the nios-1 VM, use the command
set temp_licenseagain. -
From the list of options displayed, select option 2 to install the DNSone with Grid license. Type
2and press Enter.
-
For all the prompts that follow, type y and press Enter to confirm each action, including:
-
Confirming the license installation.
-
Restarting the UI to reflect license changes.
-
Confirming the UI restart.
-
-
-
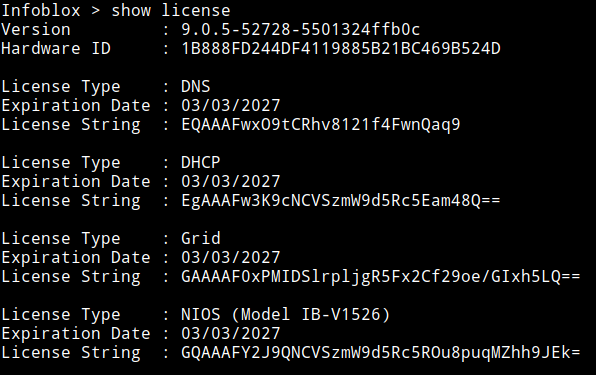
After the license is applied, verify the installation by using the
show licensecommand.
Note: The temporary license will expire in 60 days. After this time, the software will stop functioning until a subscription license is installed. The temporary license is intended for testing and evaluation purposes only and should not be used in a production environment.
Task 3 Solution: Enabling Remote Console Access
To enable remote console access, perform the following steps.
-
Log in to the Grid Manager UI:
-
Username:
admin -
Password:
infoblox -
URL:
https://10.100.0.100/
-
-
Click Cancel to exit the Grid Setup Wizard (if it appears).
-
Navigate to Grid → Grid Manager.
-
Select Grid Properties from the Toolbar on the right side of the window.
-
Click on the Toggle Advanced Mode link in the top left corner of the window.
-
Switch to the Security tab, and while still in the Security tab, click the Advanced tab.
-
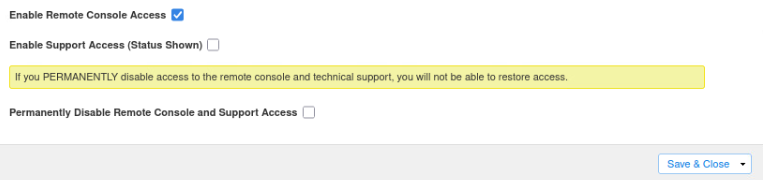
Scroll down and check the box labeled Enable Remote Console Access.
-
Click Save & Close to save changes.
In a typical deployment, the Grid Setup Wizard must be completed as part of the initial configuration to ensure the Grid is properly set up. However, for the purposes of this lab, we are skipping the Grid Setup Wizard since it is covered in a separate lab. If you need to re-run the Grid Setup Wizard later, navigate to Grid → Toolbar → Grid Properties → Setup Wizard.
Task 4 Solution: Apply Subscription Licenses
Replace temporary licenses with subscription licenses using either the Grid Manager UI or SSH.
Option 1: Using the Grid Manager UI
-
Access the Grid Manager web interface.
-
Navigate to Grid → Licenses.
-
Click the + symbol to add a new license.
-
Select the Upload License File option and click Select File.
-
Navigate to
/mnt/shared/licenses/9.0/and select the file nios-1.lic. -
Click Open to upload the license file.
-
On the Verify License(s) window, click Verify License(s) to validate the uploaded license.
-
Once the validation completes, click Save All Valid License(s) to save the license.
-
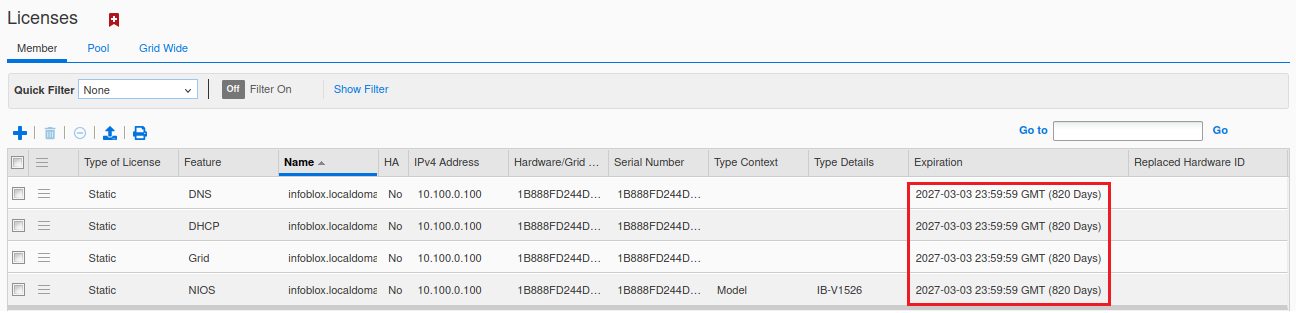
Confirm that the new licenses appear in the License List under Grid → Licenses.
-
Verify that the Expiration column displays the year 2027 for the added licenses.
Option 2: Using CLI via SSH
-
From the Jump-Desktop VM open a terminal window.
-
From the terminal, SSH into the nios-1 VM using the command
ssh admin@10.100.0.100and enter the passwordinfobloxwhen prompted. -
Add the subscription license using the command
set license -
Enter the following license strings when prompted, separated by a space as the delimiter.
-
GQAAAFY2J9QNCVSzmW9d5Rc5ROu8puqMZhh9JEk= GAAAAF0xPMIDSlrpljgR5Fx2Cf29oe/GIxh5LQ== EQAAAFwxO9tCRhv8121f4FwnQaq9 EgAAAFw3K9cNCVSzmW9d5Rc5Eam48Q==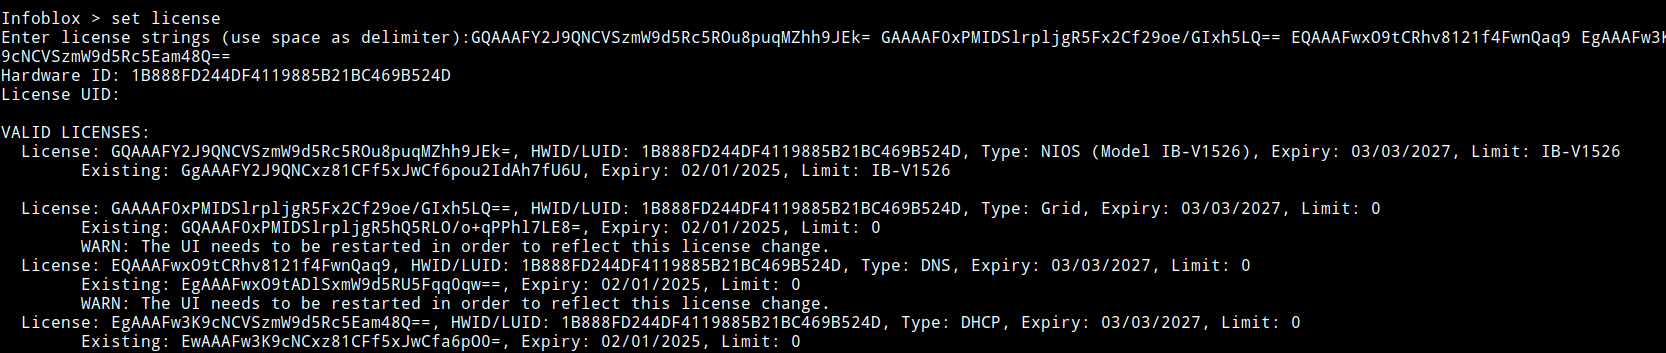
-
-
For all the prompts that follow, type y and press Enter to confirm each action, including:
-
Confirming the license installation.
-
Restarting the UI to reflect license changes.
-
Confirming the UI restart.
-
-
The temporary licenses are removed and appended with the new licenses. After the licenses are applied, verify the installation by using the
show licensecommand. -
The updated licenses should reflect the year 2027 in the expiration date.