Scenario
As part of a security initiative, your organization has purchased subscriptions to Infoblox Threat Defense. You are tasked with adding and testing Threat Defense feeds to your current RPZ configuration in a simulated lab environment before deploying them in production.
Estimate Completion Time
-
30 to 45 minutes
Credentials
|
Description |
Username |
Password |
URL or IP |
|---|---|---|---|
|
Grid Manager UI |
admin |
infoblox |
Requirements
-
Administrative access to the Grid
-
Administrative access to the Infoblox Portal
Lab Initiation
Access jump-desktop
Once the lab is deployed, you can access the virtual machines required for this activity. To begin, select VM List from the navigation bar at the top, locate jump-desktop, and click the green play icon to open its console. Log in to the Linux UI.

Username: training
Password: infoblox
Initiate lab
To initiate the lab, double-click the Launch Lab icon on the Desktop.

Choose the lab number from the list and click OK.

After clicking OK, you will see a pop-up message with a brief description of the lab task. If the description looks correct, click Yes to continue lab initiation.

Lab initiation will take a couple of minutes to finish.
Once complete, you will see another pop-up message with the login credentials and the URL for the Grid Manager’s User Interface. Note that the credentials may differ from those from prior labs.

Tasks
-
Obtain Threat Defense RPZ feed names and feed server details from the Infoblox Portal (IP)
-
Create a new name server group named RPZ DNSFW NSG to use feed servers from Threat Defense
-
Add Threat Defense RPZ feeds into the NIOS Grid
-
Reorder all the RPZs to follow Infoblox guidelines
-
Verify that the newly added Threat Defense RPZ feeds are detecting malicious domains to be blocked
-
Change the Override Policy for infoblox-base.rpz.infoblox.local to None (Given)
-
Test if the Threat Defense RPZ feeds are blocking malicious domains
Task 1: Obtain Threat Defense RPZ feed names and feed server details from the Infoblox Portal (IP)
Use Geany (text editor) to save RPZ names, server IP, and TSIG credentials for later use.
These specific RPZs have been chosen to ensure they don’t exceed the capacity of the NIOS appliances in your lab environment.
-
Use your Education Infoblox Portal Credentials to log into the Infoblox Portal. Obtain feed names for Infoblox-Base and Infoblox-Base-IP, IP addresses of the authoritative Threat Defense feed servers, and the feed authentication credentials (TSIG Credentials).
Task 2: Create a new name server group to use the authoritative feed servers from Threat Defense
-
Create a name server group named RPZ DNSFW NSG to use the Threat Defense authoritative feed servers. Use the server information you obtained from the Infoblox Portal to add an external primary server with ibns1.techblue.net as a lead secondary and ibns2.techblue.net as a secondary.
Task 3: Add Threat Defense RPZ feeds into the NIOS Grid
-
Configure an RPZ for each feed separately. Set the Policy Override mode to Passthru. Once they have been successfully tested and we confirm that they don’t cause issues with legitimate traffic, we will switch them to None (Given) in a later task.
Task 4: Reorder all the RPZs to follow Infoblox guidelines
RPZs should be ordered based on a combination of Confidence and Threat Levels; the Higher the Confidence and Threat levels, the higher the order of the RPZ should be.
In this example, we have three local RPZs (allowlist.rpz, walledgarden.rpz, and denylist.rpz). These are local RPZs, which means that their entries are manually created, and we are very confident in their work. This is why they are at the top of the list in the order our organization sees fit, followed by RPZ feeds we download from Threat Defense.
To order Threat Defense Feed RPZs amongst each other, we can use Infoblox’s documentation to get each feed’s Confidence and Threat levels to order them correctly.
-
Re-order the RPZs if required so that they are ordered as follows:
-
allowlist.rpz
-
walledgarden.rpz
-
denylist.rpz
-
infoblox-base.rpz.infoblox.local
-
infoblox-base-ip.rpz.infoblox.local
-
Task 5: Verify that the newly added Threat Defense RPZ feeds are detecting malicious domains to be blocked
-
Switch over to the testing-linux machine with the credentials (training/infoblox) and set the machine up for testing.
-
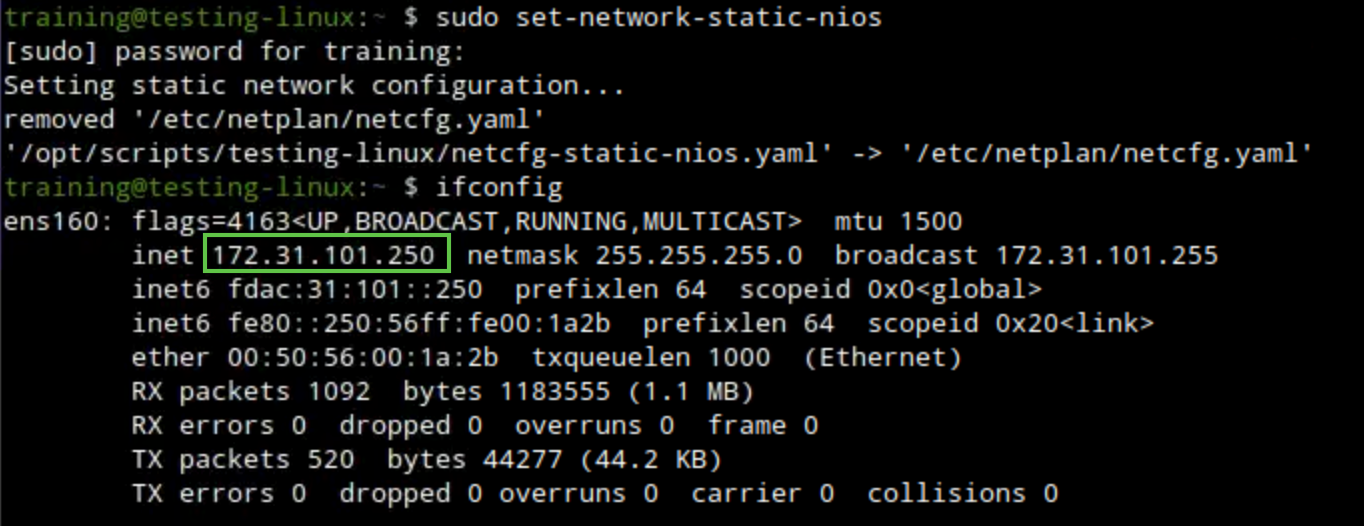
Open a terminal window, issue the command sudo set-network-static-nios, and verify that the machine now has the IP address 172.31.101.250 using the command ifconfig.
-
-
Use dig and syslog entries to verify that the infoblox-base.rpz.infoblox.local RPZ is detecting domain names that should be blocked.
-
Use one or more from the following domains:
-
apt.eicar.network
-
base.eicar.network
-
compromiseddomain.eicar.network
-
compromisedhost.eicar.network
-
exploitkit.eicar.network
-
maliciousnameserver.eicar.network
-
sinkhole.eicar.network
-
-
Task 6: Change the Override Policy for infoblox-base.rpz.infoblox.local to None (Given)
-
Switch over to jump-desktop and change the Override Policy for infoblox-base.rpz.infoblox.local and infoblox-base-ip.rpz.infoblox.com from Passthru to None (Given).
Task 7: Test if the Threat Defense RPZ feeds are blocking malicious domains
-
Switch over to the testing-linux machine, use dig and syslog entries to verify that the infoblox-base.rpz.infoblox.local RPZ is blocking malicious domains.
-
Use one or more from the following domains:
-
apt.eicar.network
-
base.eicar.network
-
compromiseddomain.eicar.network
-
compromisedhost.eicar.network
-
exploitkit.eicar.network
-
maliciousnameserver.eicar.network
-
sinkhole.eicar.network
-
-
Solutions
Task 1 Solution: Log into the Infoblox portal and copy the RPZ feed names and credentials
In this task, our goal is to obtain the names of the RPZ feeds we will use in our environment. In this lab, we will use infoblox-base and infoblox-base-ip. We also need the name server details for the authoritative servers for these RPZ feeds. We will use the Infoblox Portal to obtain this information.
Use Geany (a text editor) to save RPZ names, server IPs, and TSIG credentials for later use.
These specific RPZs have been chosen to ensure they don’t exceed the capacity of the NIOS appliances in your lab environment.
-
On the jump-desktop machine, open a browser window.
-
Use your Education Infoblox Portal Credentials to log into the Infoblox Portal.
-
Enter your username and password from the Learning Portal.
-
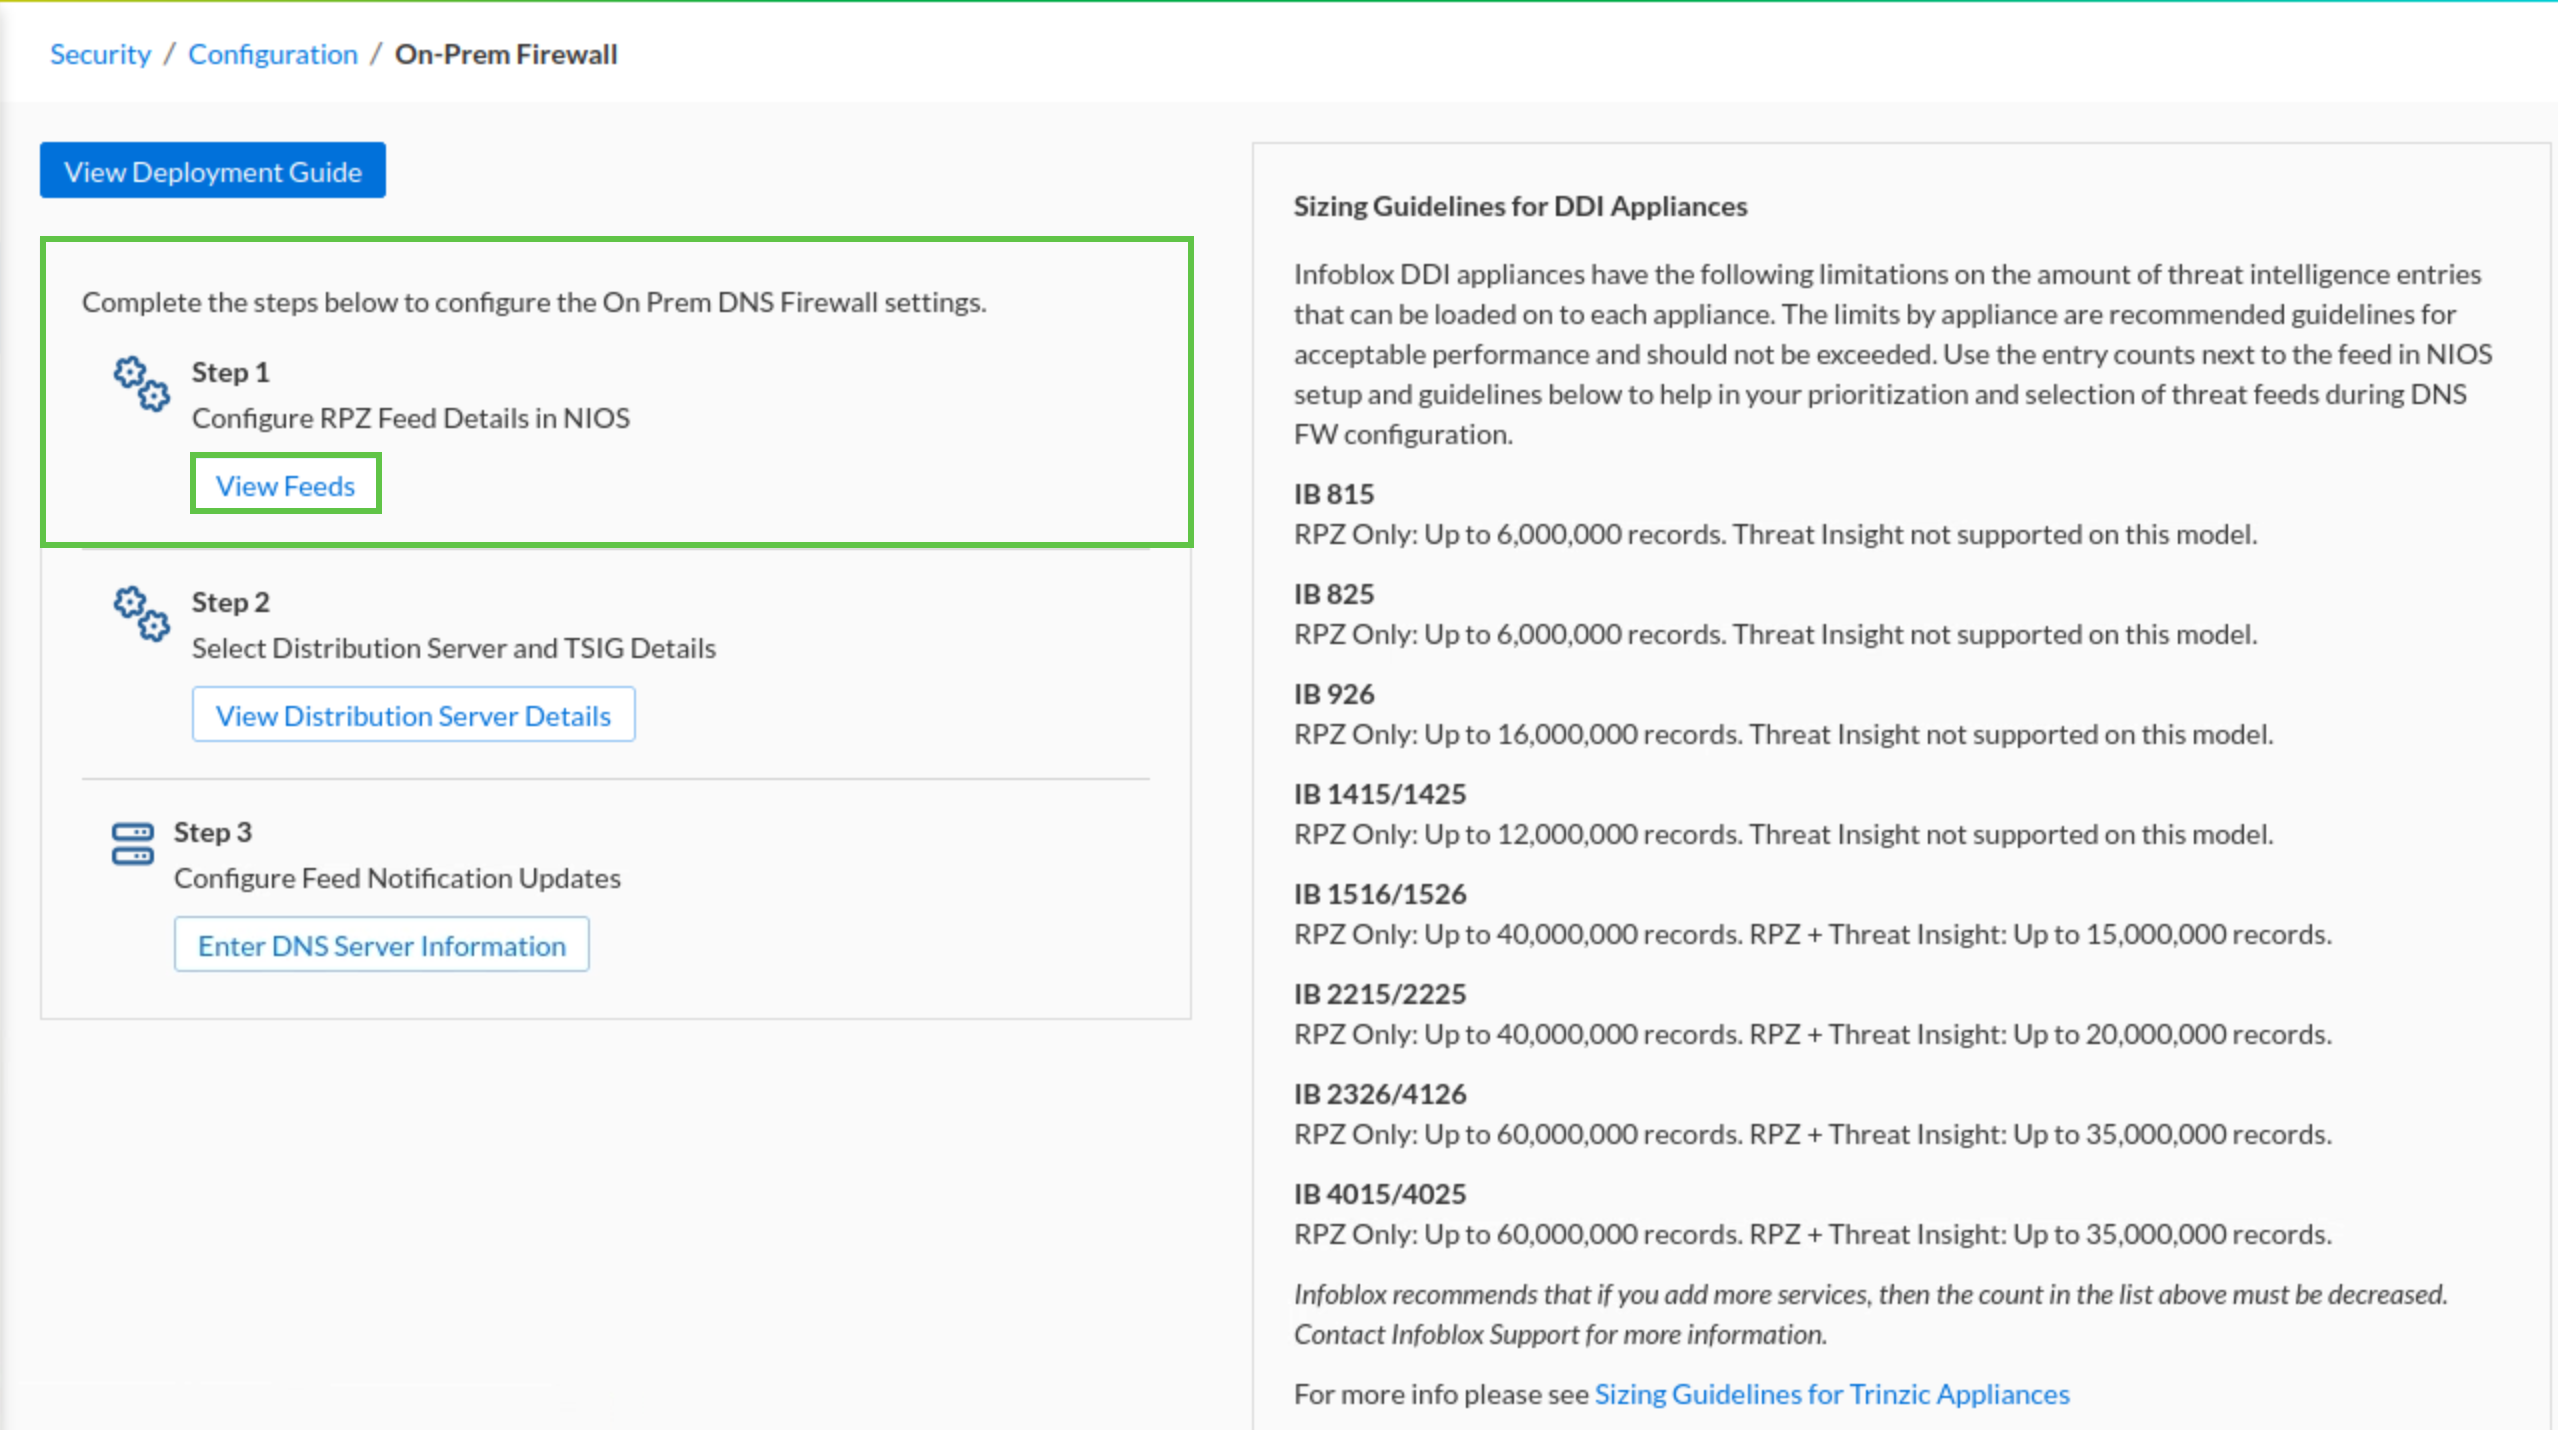
Navigate to Secuirty → Configuration → On-prem DNS Firewall.
-
Click the Step 1 View Feeds link.
-
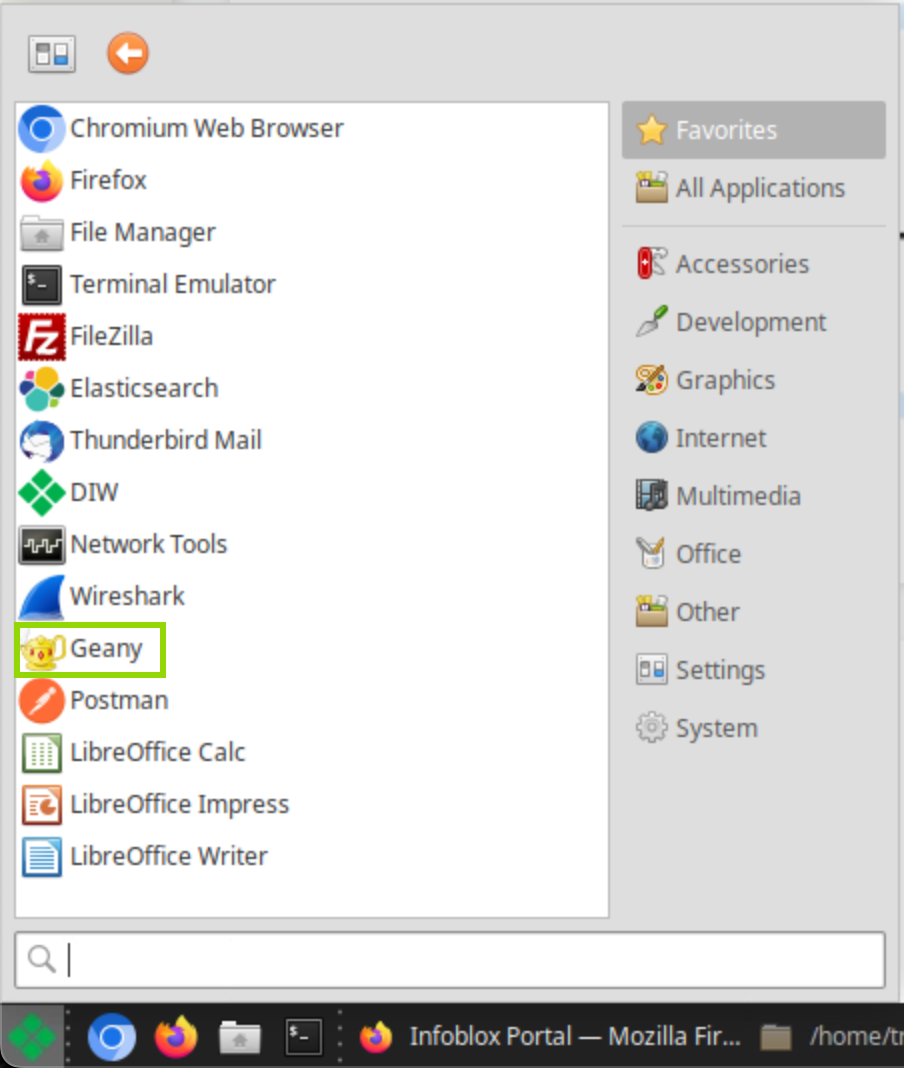
Click the Infoblox logo on the bottom left of the Desktop in jump-desktop.
-
Click the Geany icon.
-
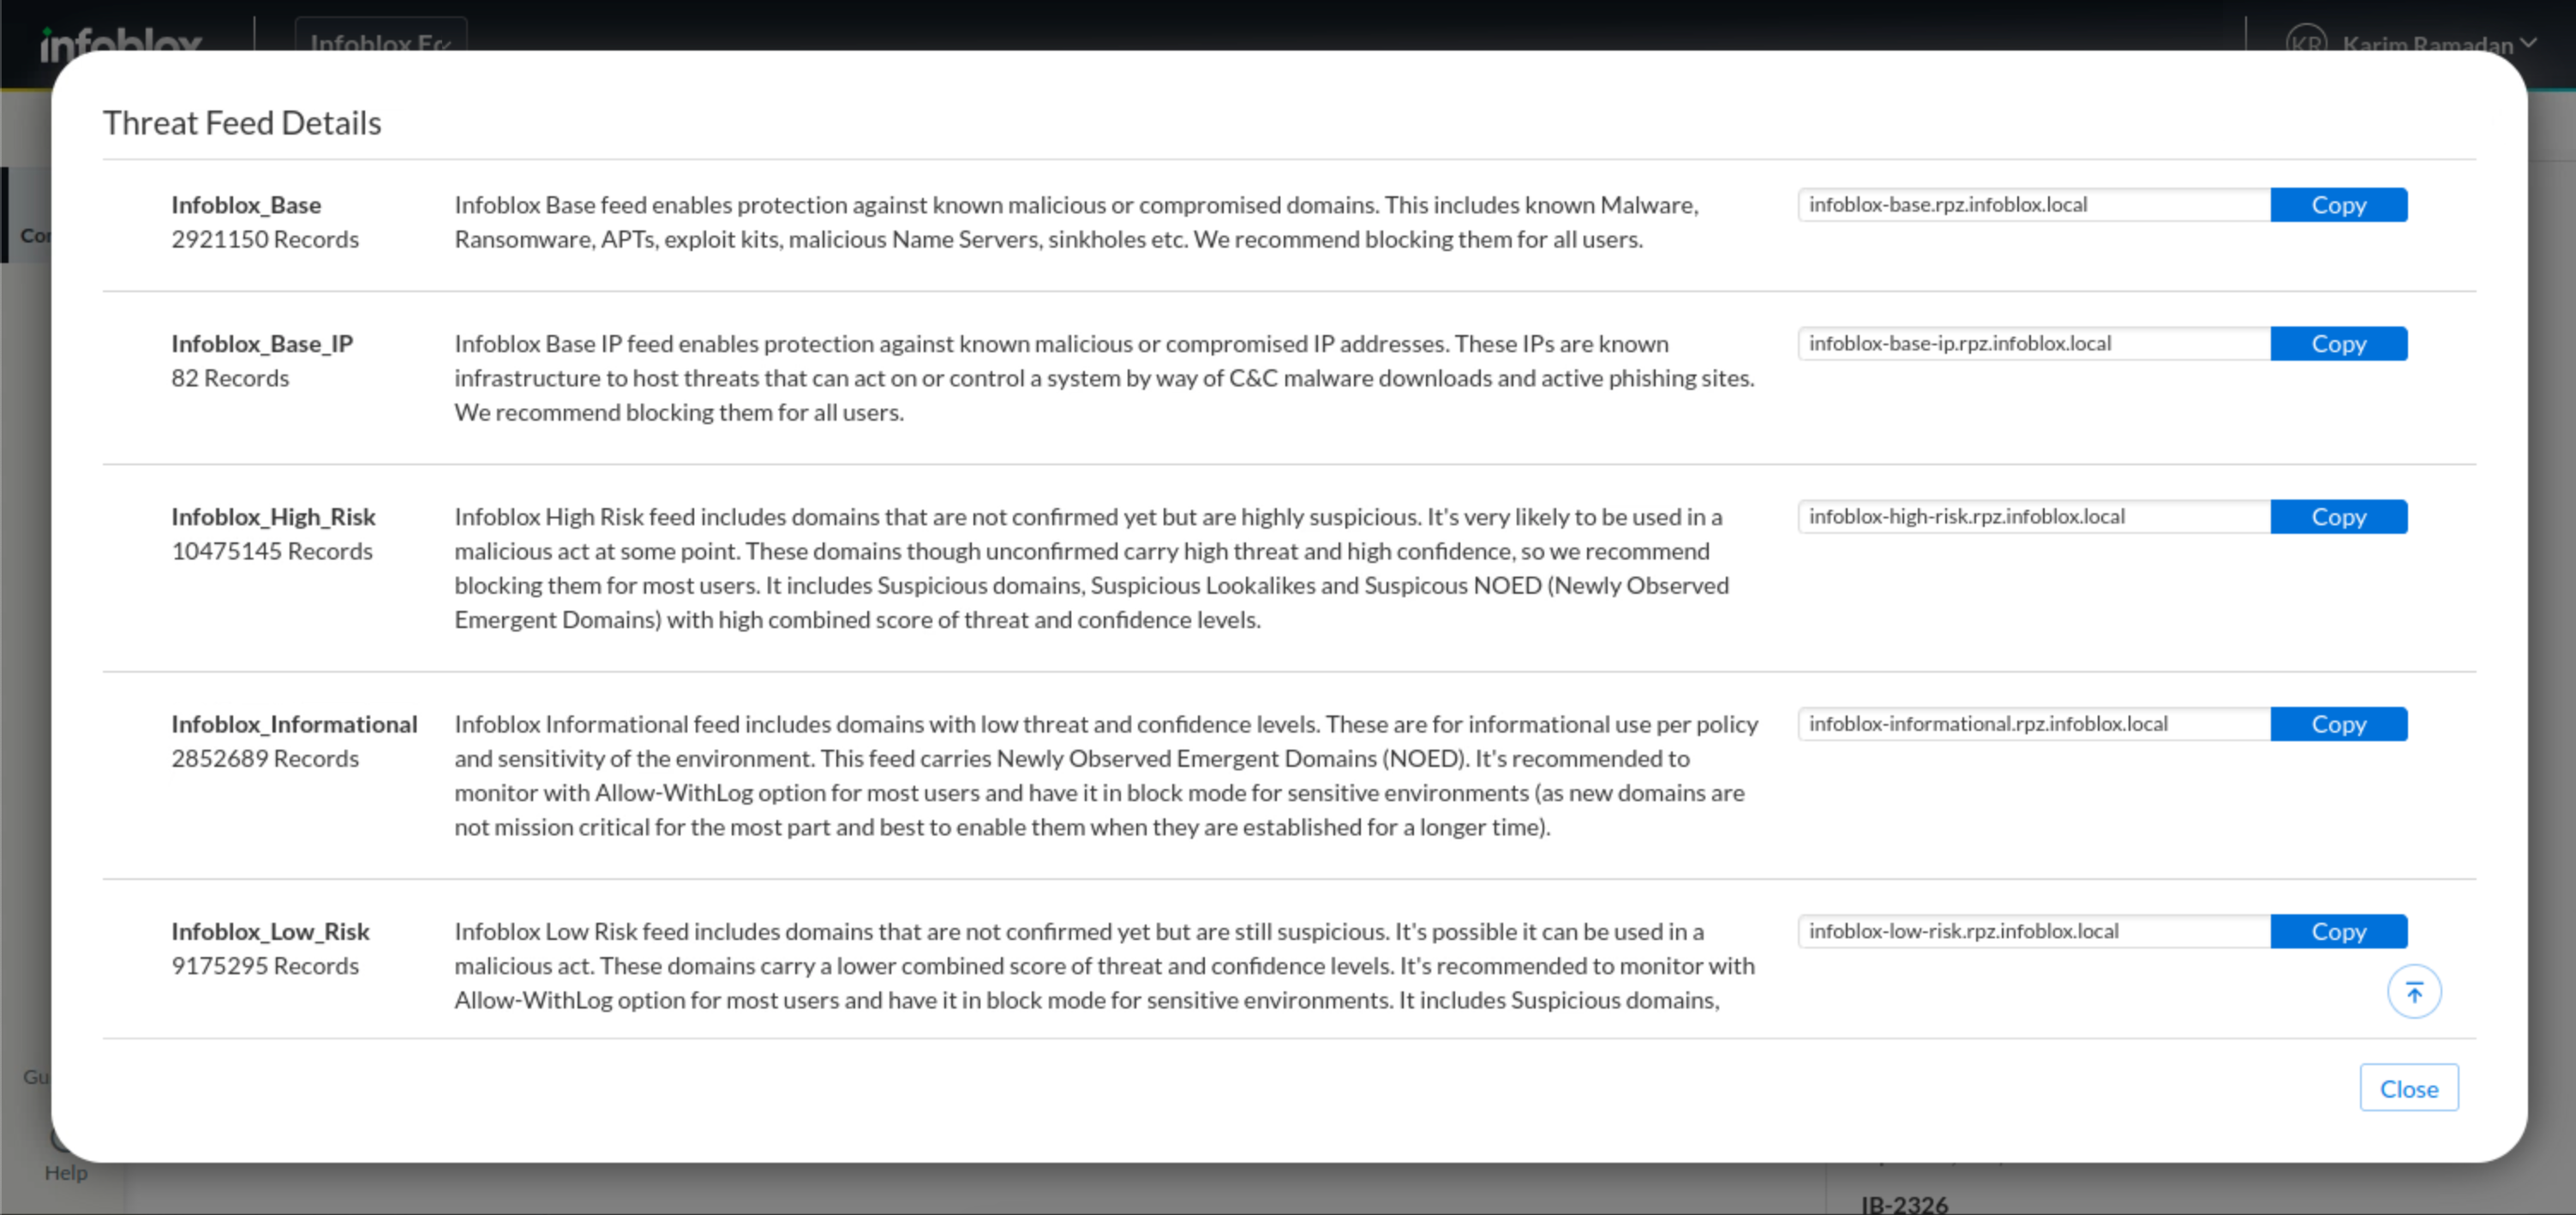
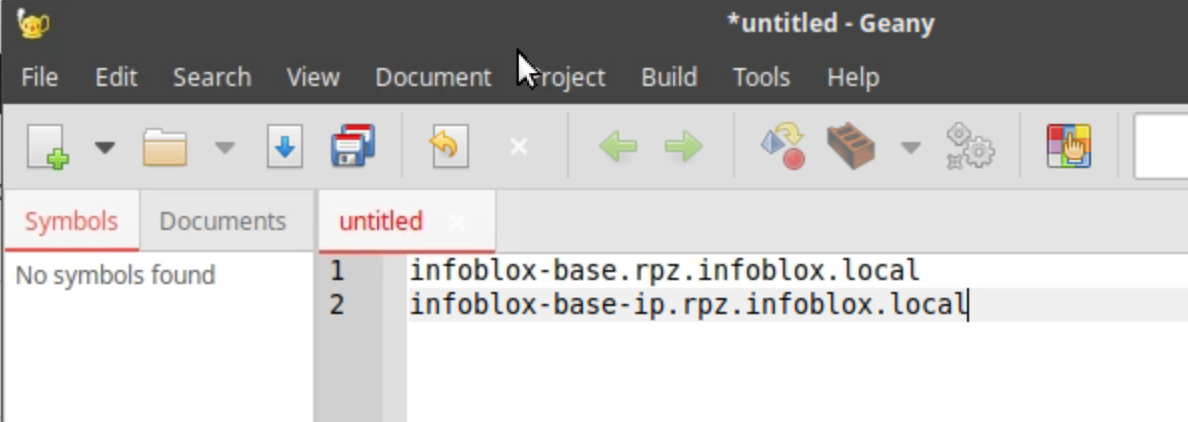
Click the Copy button to copy the RPZ name for the infoblox-base feed.
-
Paste the name of the infoblox-base RPZ into the editor.
-
Repeat the process for the Infoblox-based-ip RPZ.
-
Close the Threat Feed Details page.
-
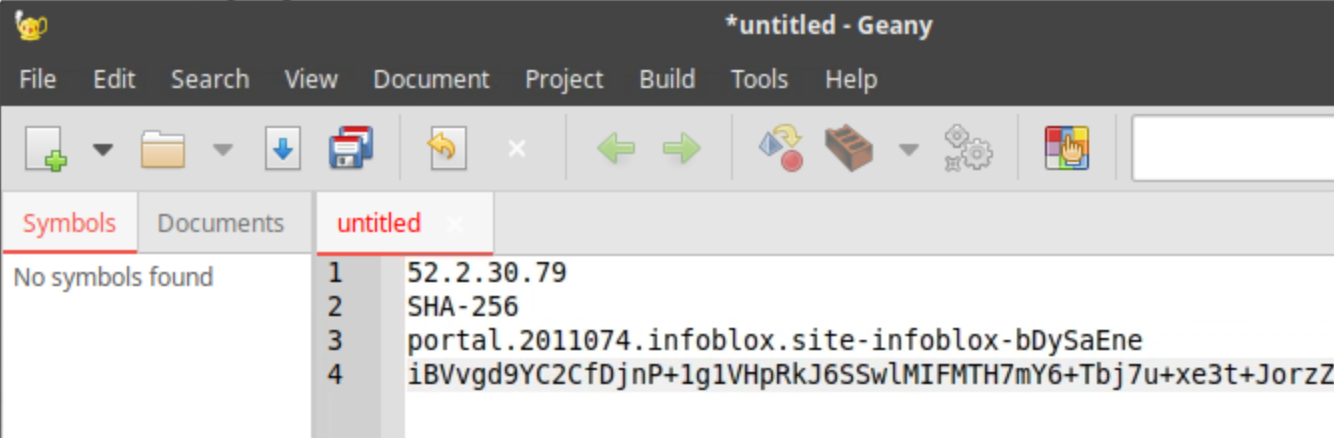
Click the Step 3 Distribution Server Configuration Values link.
-
Copy the values for Distribution Server, Key Name, TSIG Key, and Key Algorithm to your text editor.
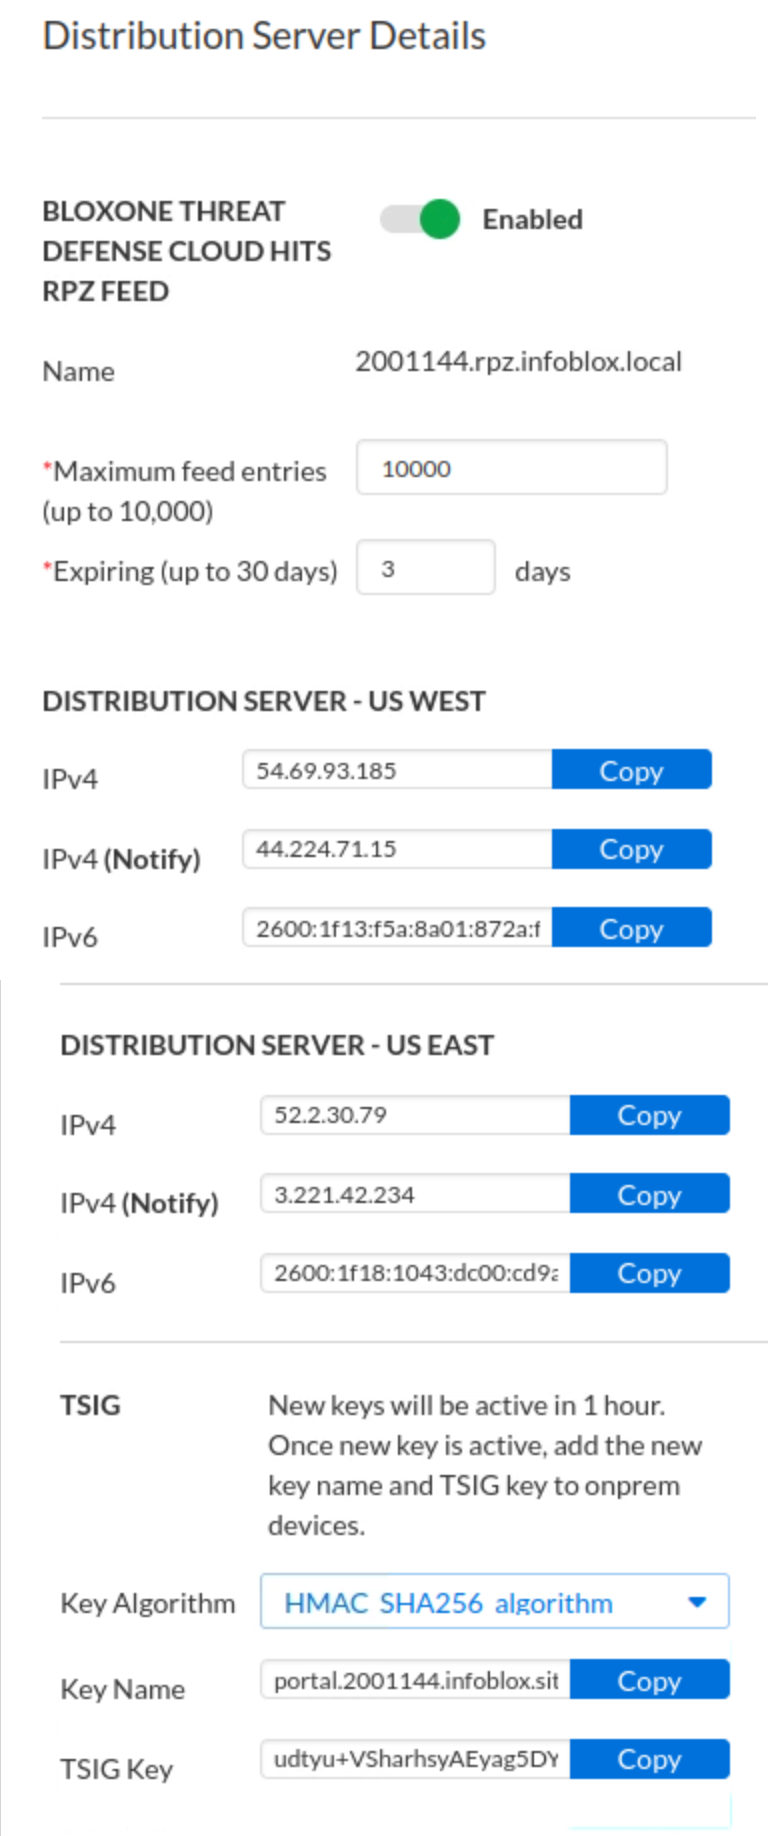
-
Make sure you use the copy button rather than highlight, select, and paste. You might not get the whole key if you don’t use the copy button.
Task 2 Solution: Create a new name server group to use the authoritative feed servers from Threat Defense
In this task, we create a name server group called RPZ DNSFW NSG. In a later step, Threat Defense RPZ feeds will use this name server group.
-
On the jump-desktop machine, open a browser window and access https://10.100.0.100
-
Navigate to Data Management → DNS → Name Server Groups
-
Click the drop-down arrow next to the plus (+) symbol to add a new Authoritative Name Server Group.
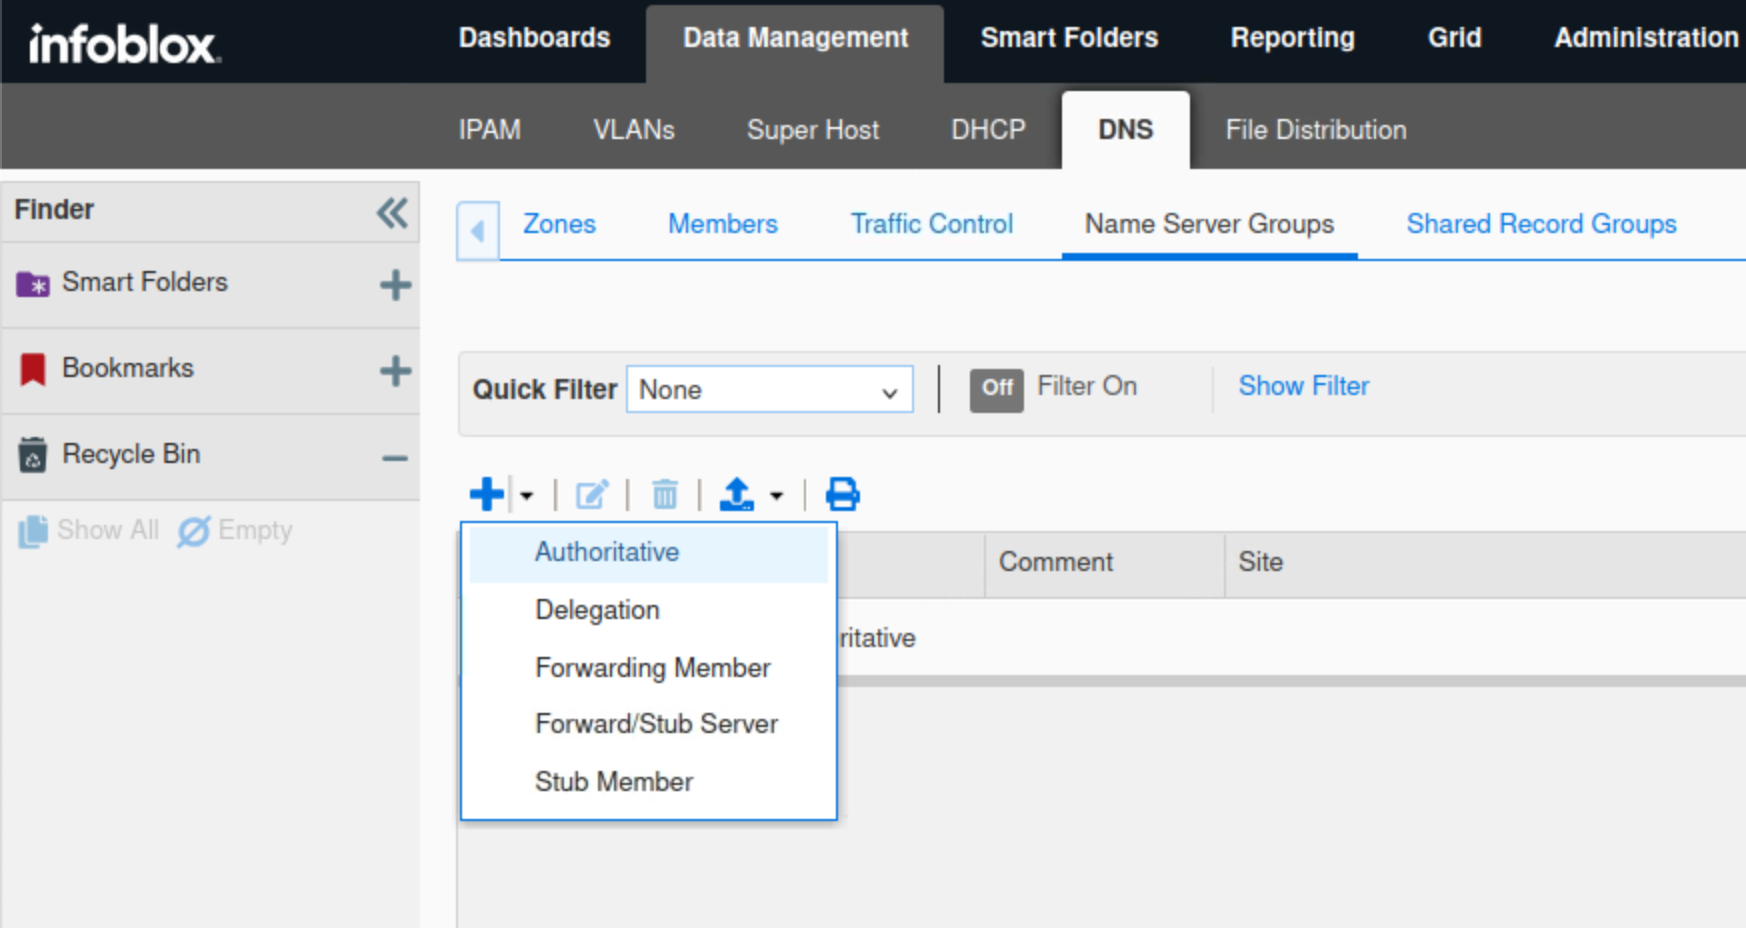
-
Type RPZ DNSFW NSG in the Name field.
-
Click the drop-down arrow next to the plus (+) symbol and select External Primary.

-
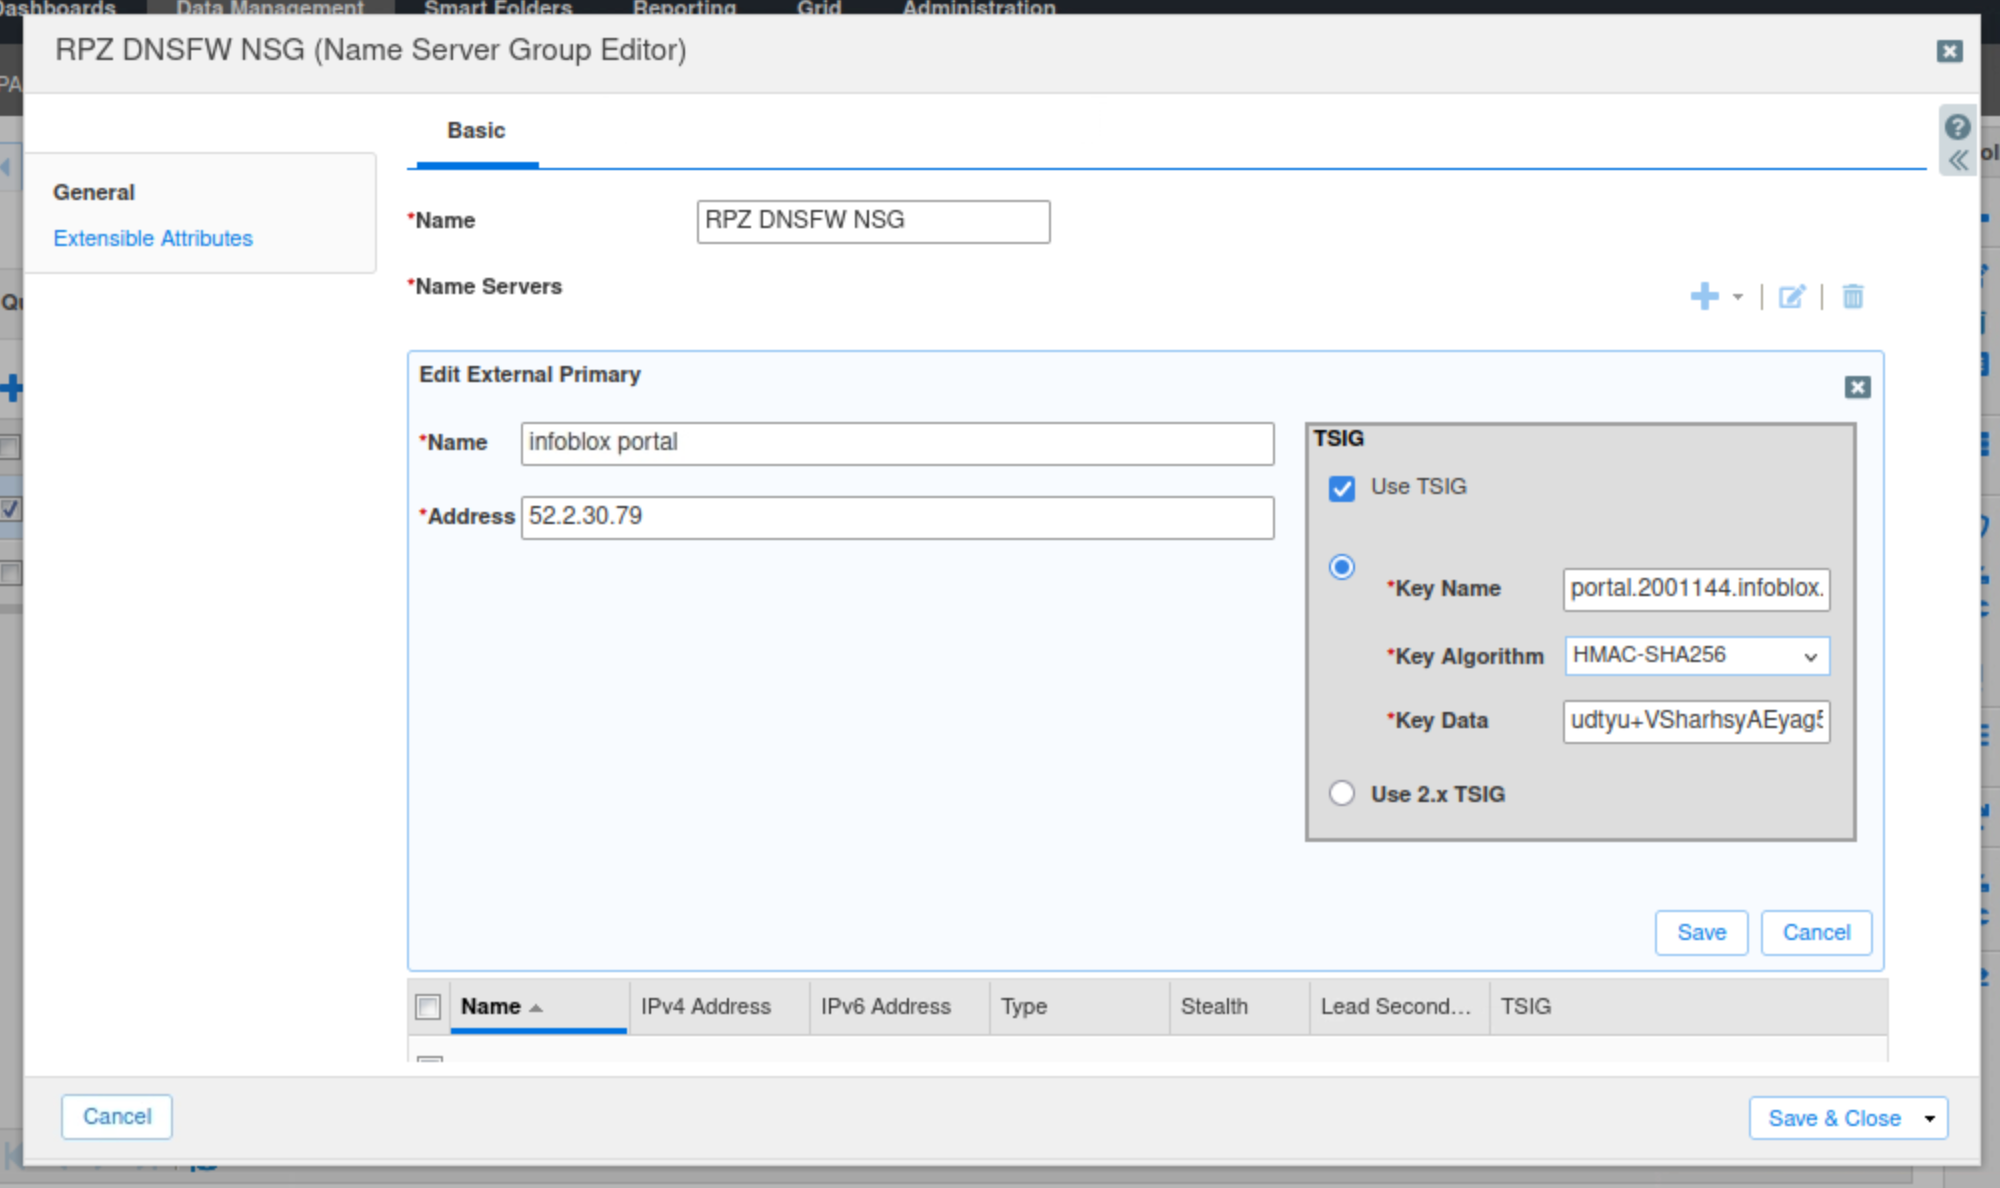
Enter a name for the Infoblox Portal Server.
-
Enter the IPv4 address of the server you saved earlier for the Infoblox Portal.
-
Click the Use TSIG button.
-
Copy your Key Name and Key Data from the Infoblox portal.
-
Click the Add button.
-
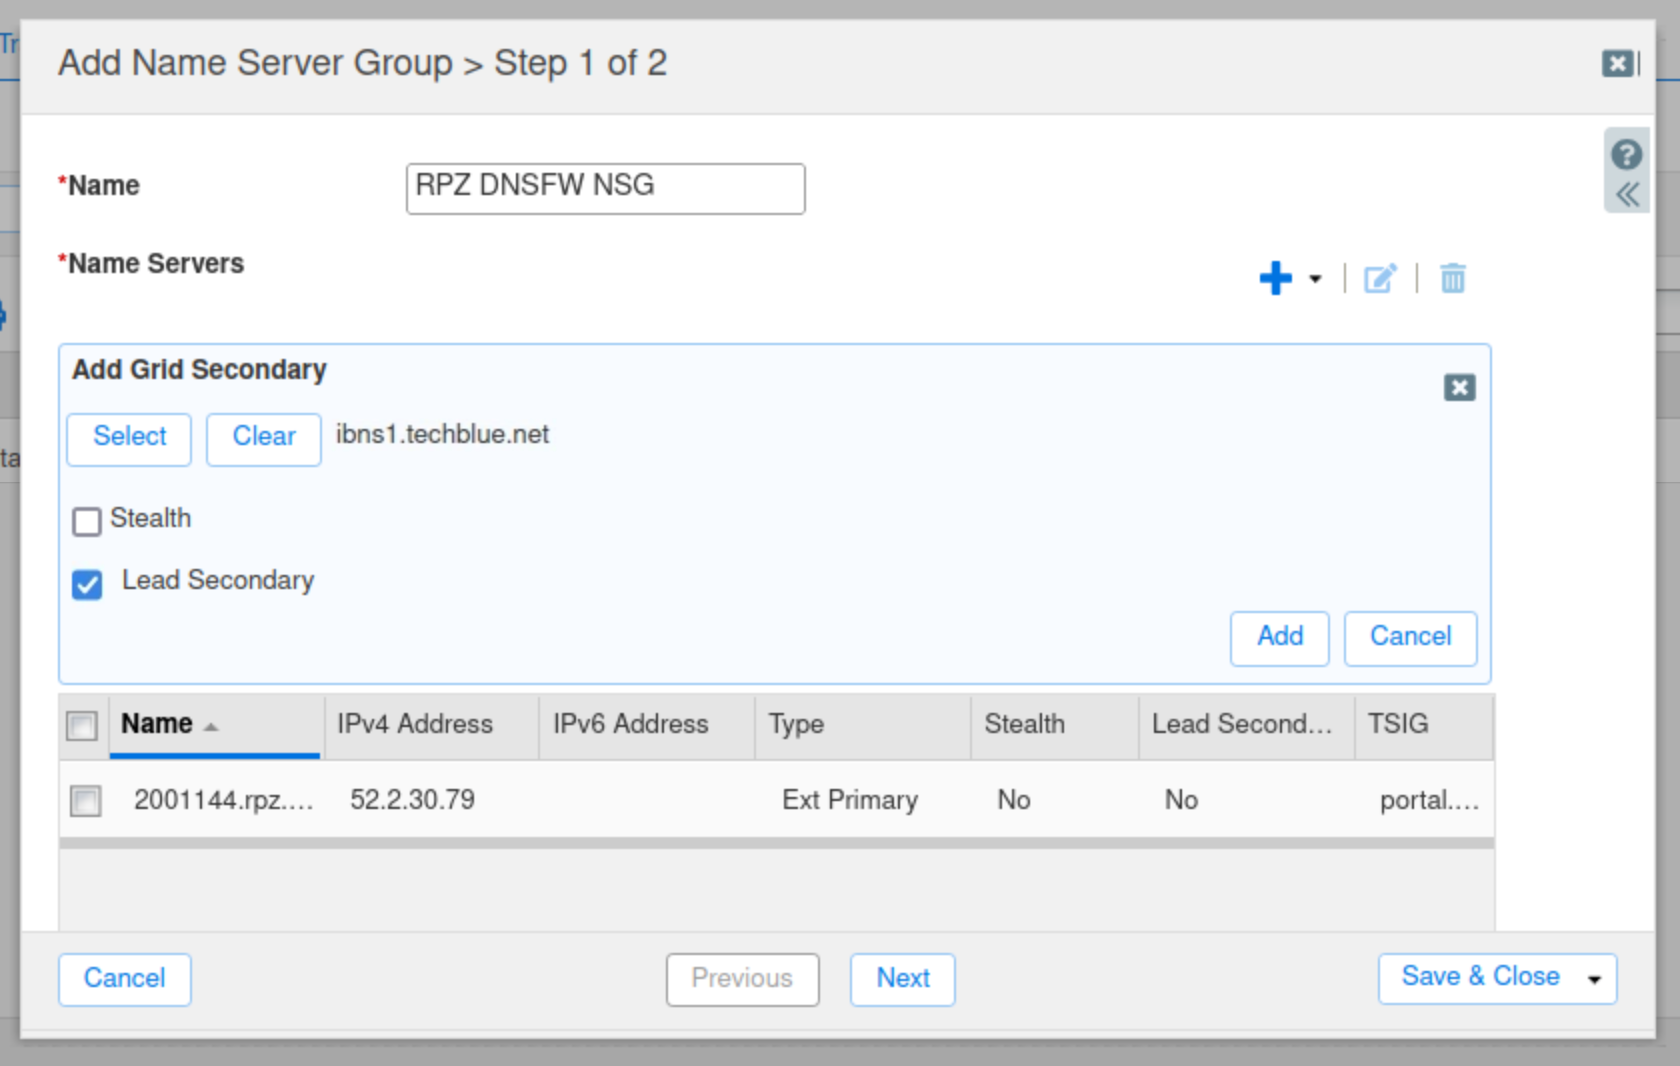
Click the drop-down arrow next to the plus (+) symbol and select Grid Secondary.
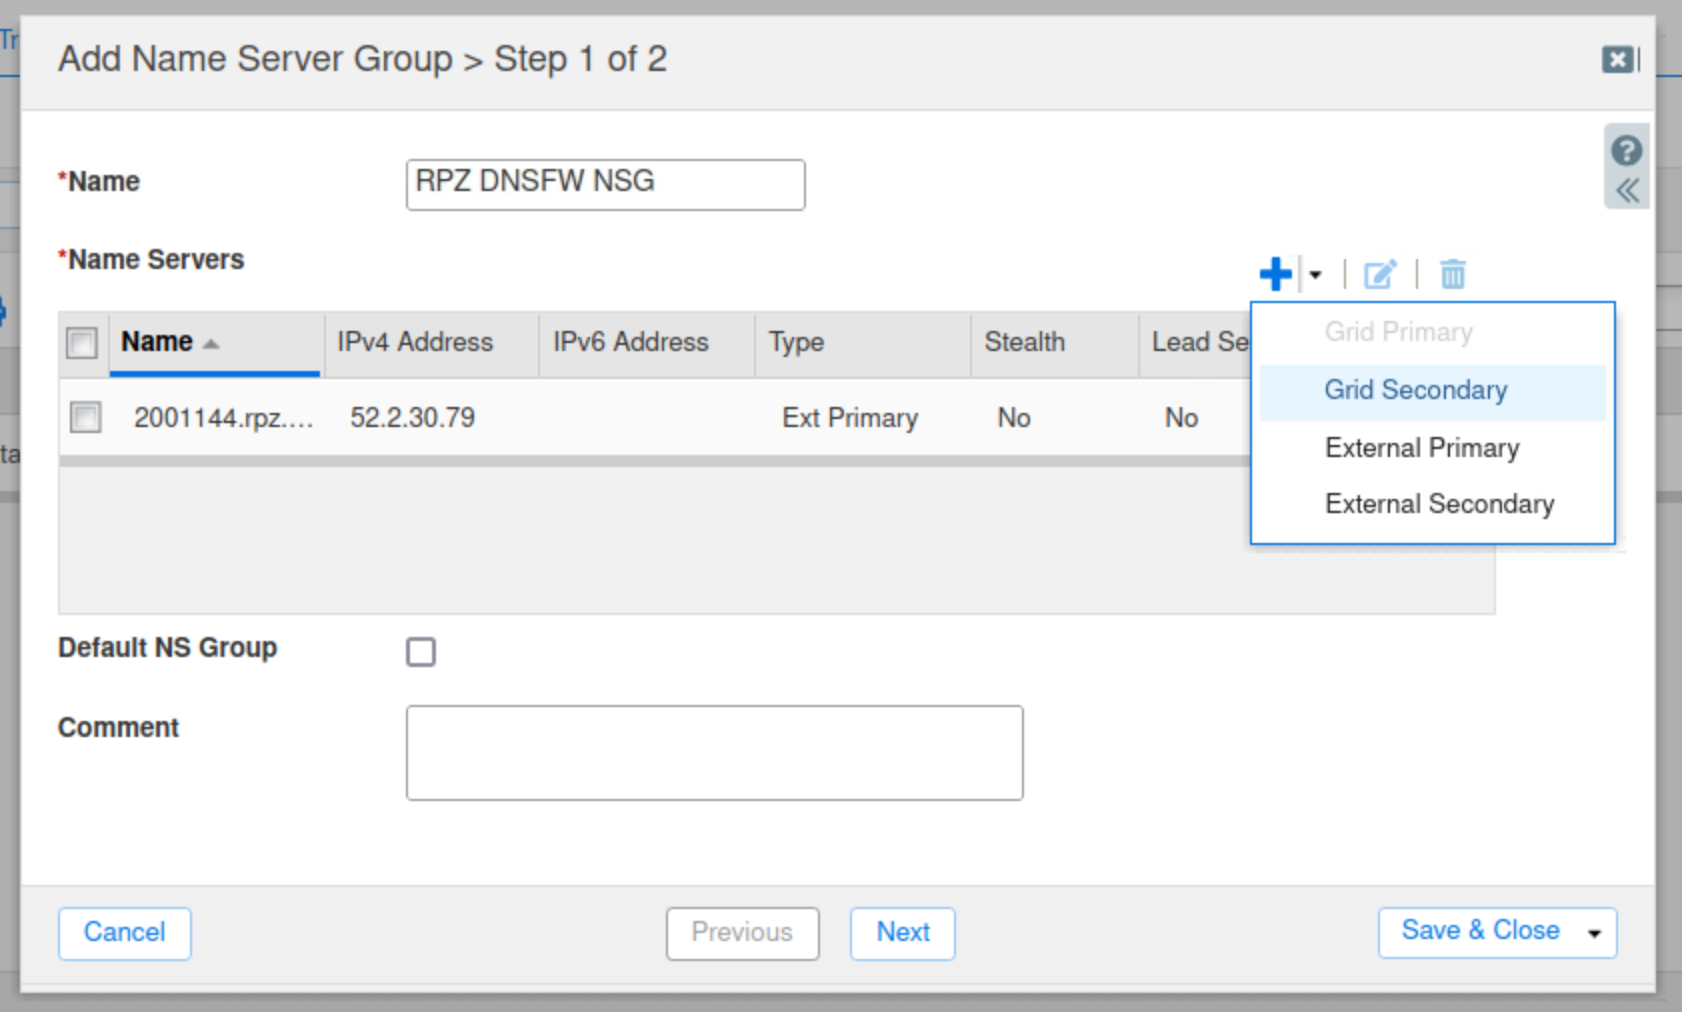
-
Click Select, Select ibns1.techblue.net from the Member Selector.
-
Check the Lead Secondary box.
-
Click Add.
-
Click the drop-down arrow next to the plus (+) symbol. Click Grid Secondary.
-
Click Select, Select ibns2.techblue.net from the Member Selector.
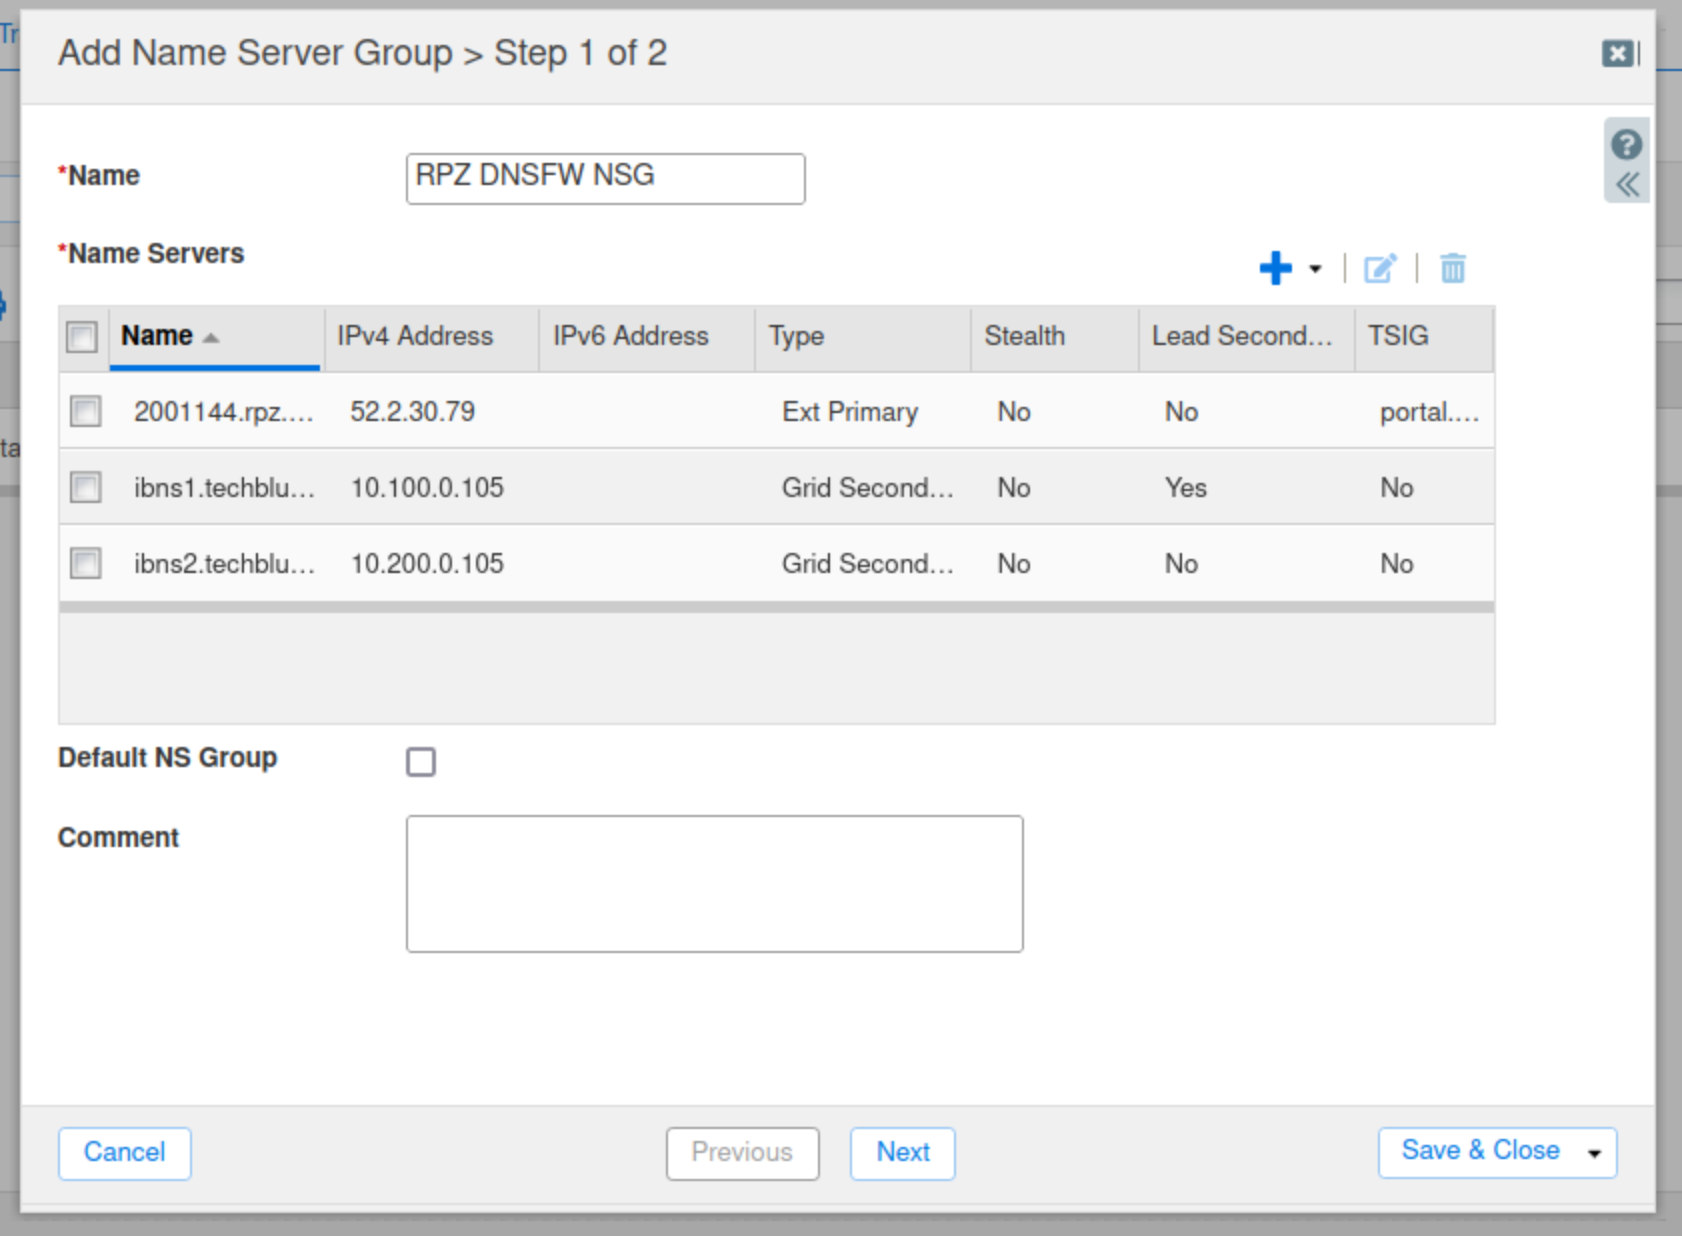
-
Click Add, then Save & Close.
Task 3 Solution: Add Threat Defense RPZ feeds into the NIOS Grid
In this task, we will add an RPZ for each feed we copied separately and set the Policy Override mode to Passthru. This is to test how the feeds will affect our current DNS behaviour. If the feeds match any traffic we don't want blocked, we will change the Policy Override mode to block traffic in a later step.
-
Navigate to Data Management → DNS → Response Policy Zones.
-
Click the check button for Add Response Policy Zone Feed.
-
Click Next.

-
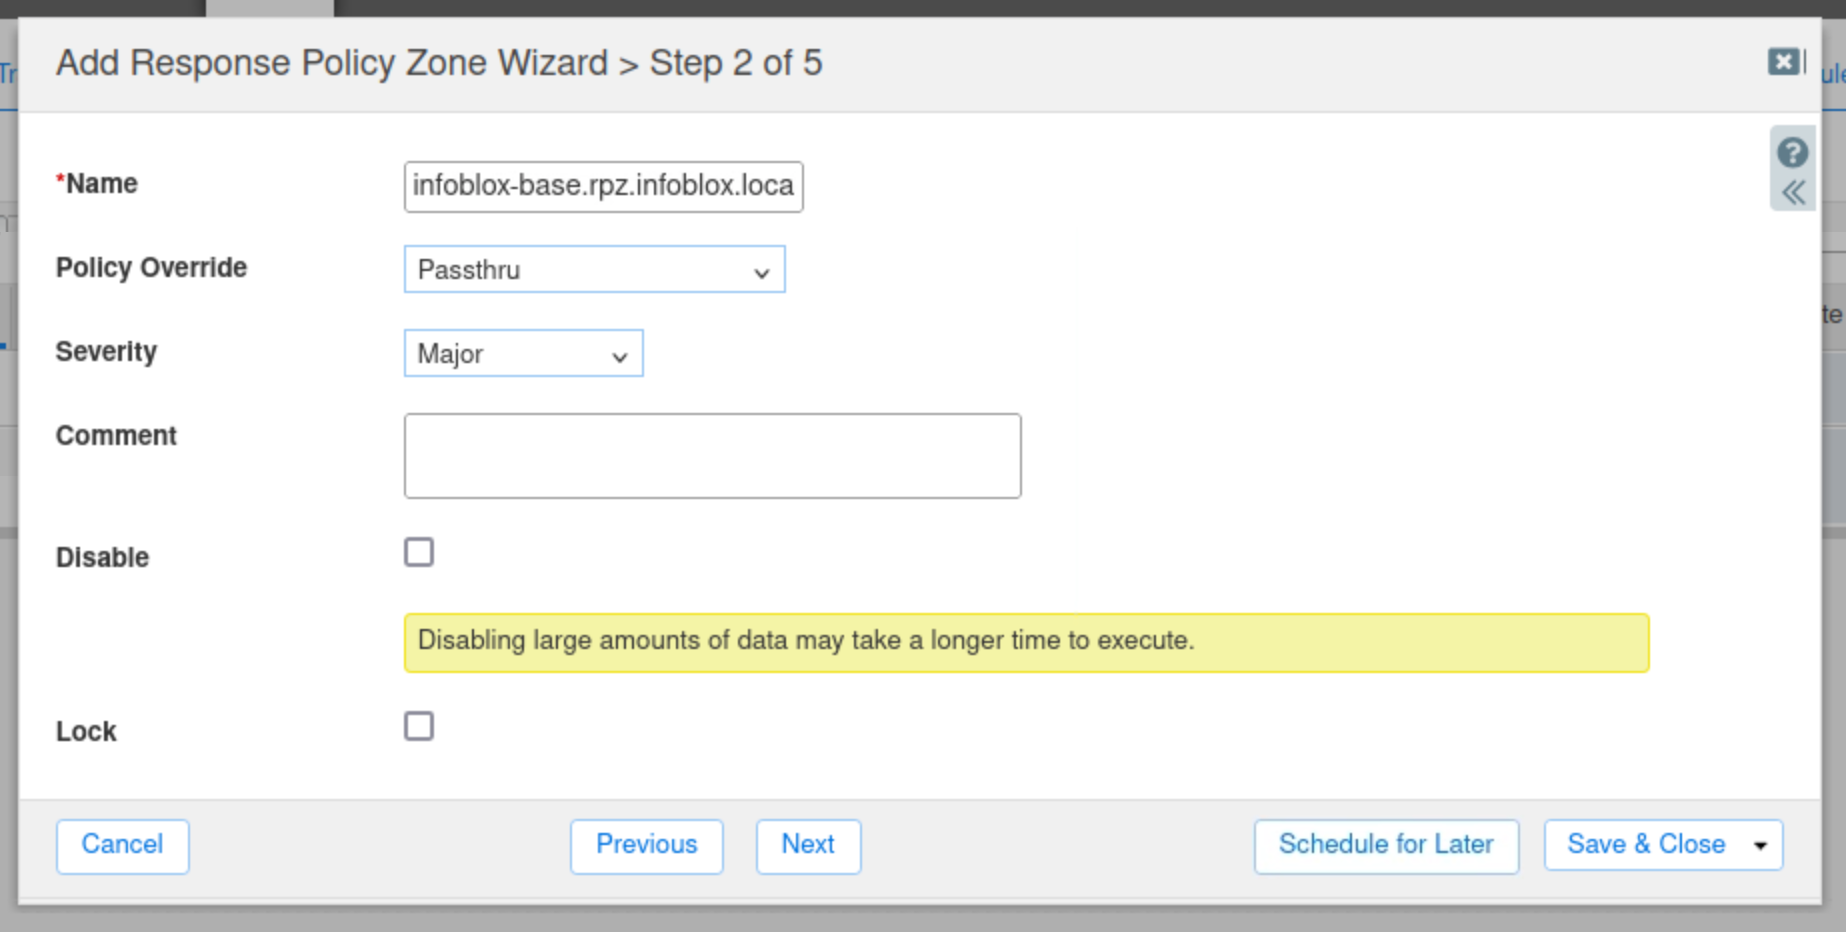
Copy the name from your text file, or type, infoblox-base.rpz.infoblox.local into the name field.
-
Select Passthru as the Policy Override value.
-
Add a description for the zone.
-
Click Next.
-
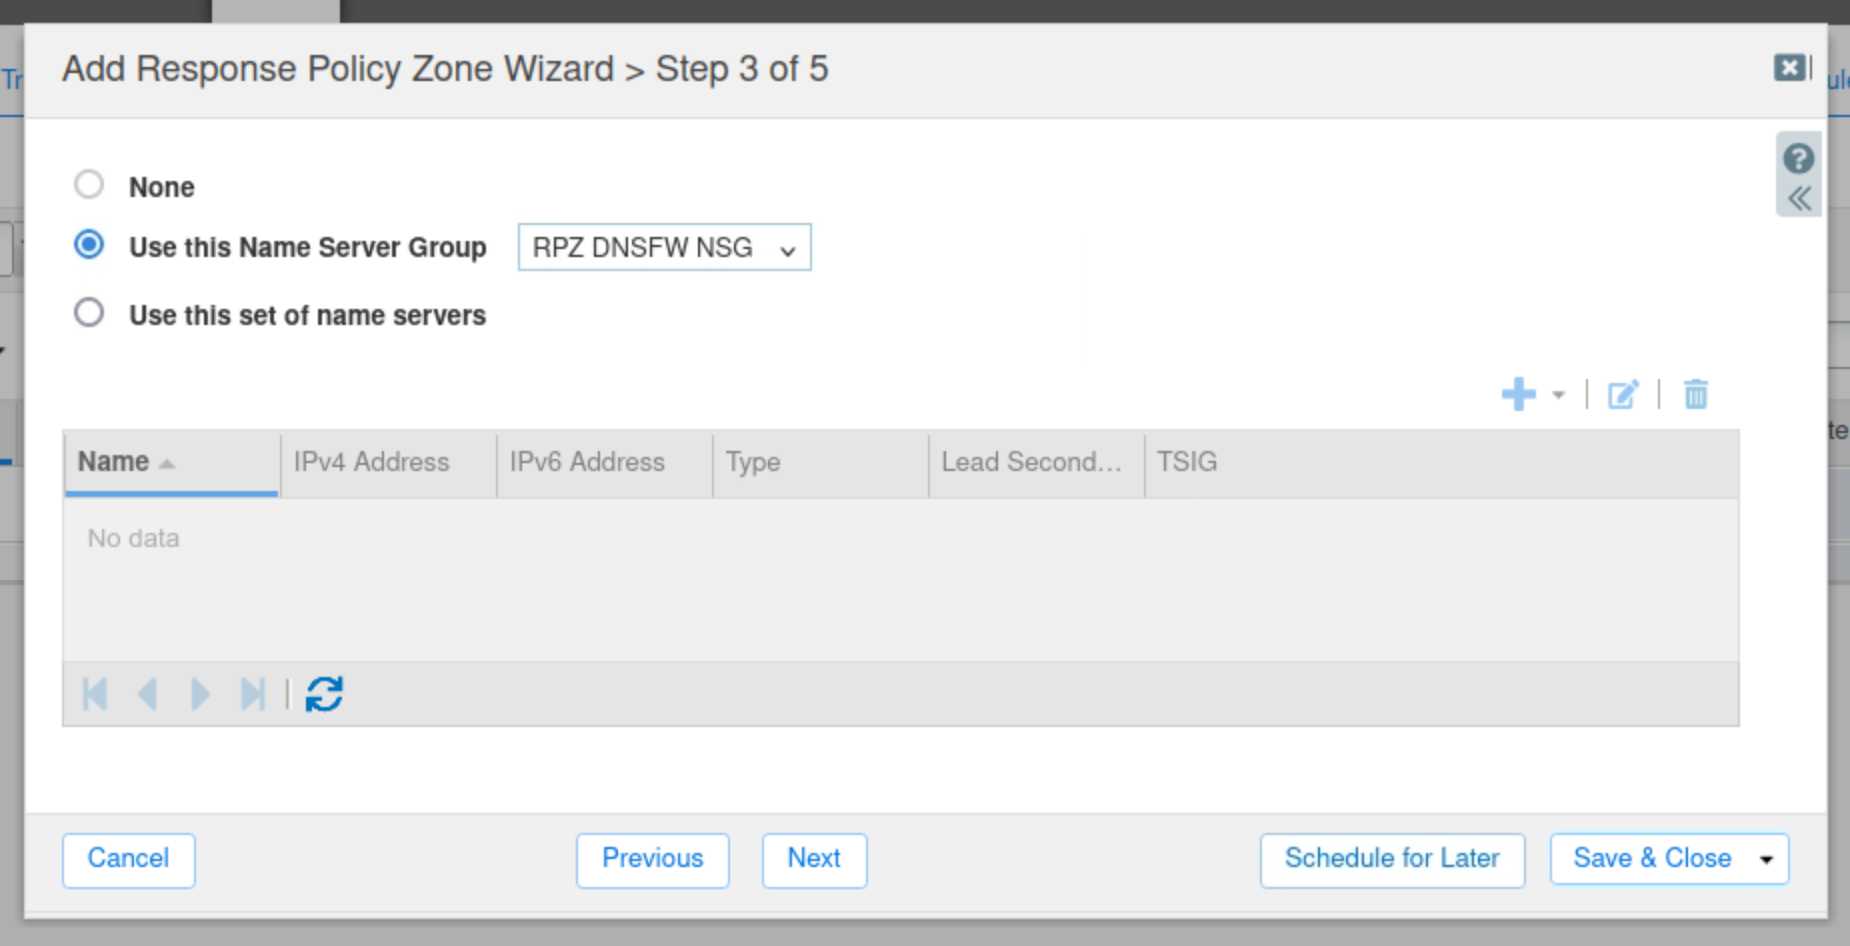
Choose to Use this Name Server Group.
-
Select RPZ DNSFW NSG
-
Click Save & Close.
-
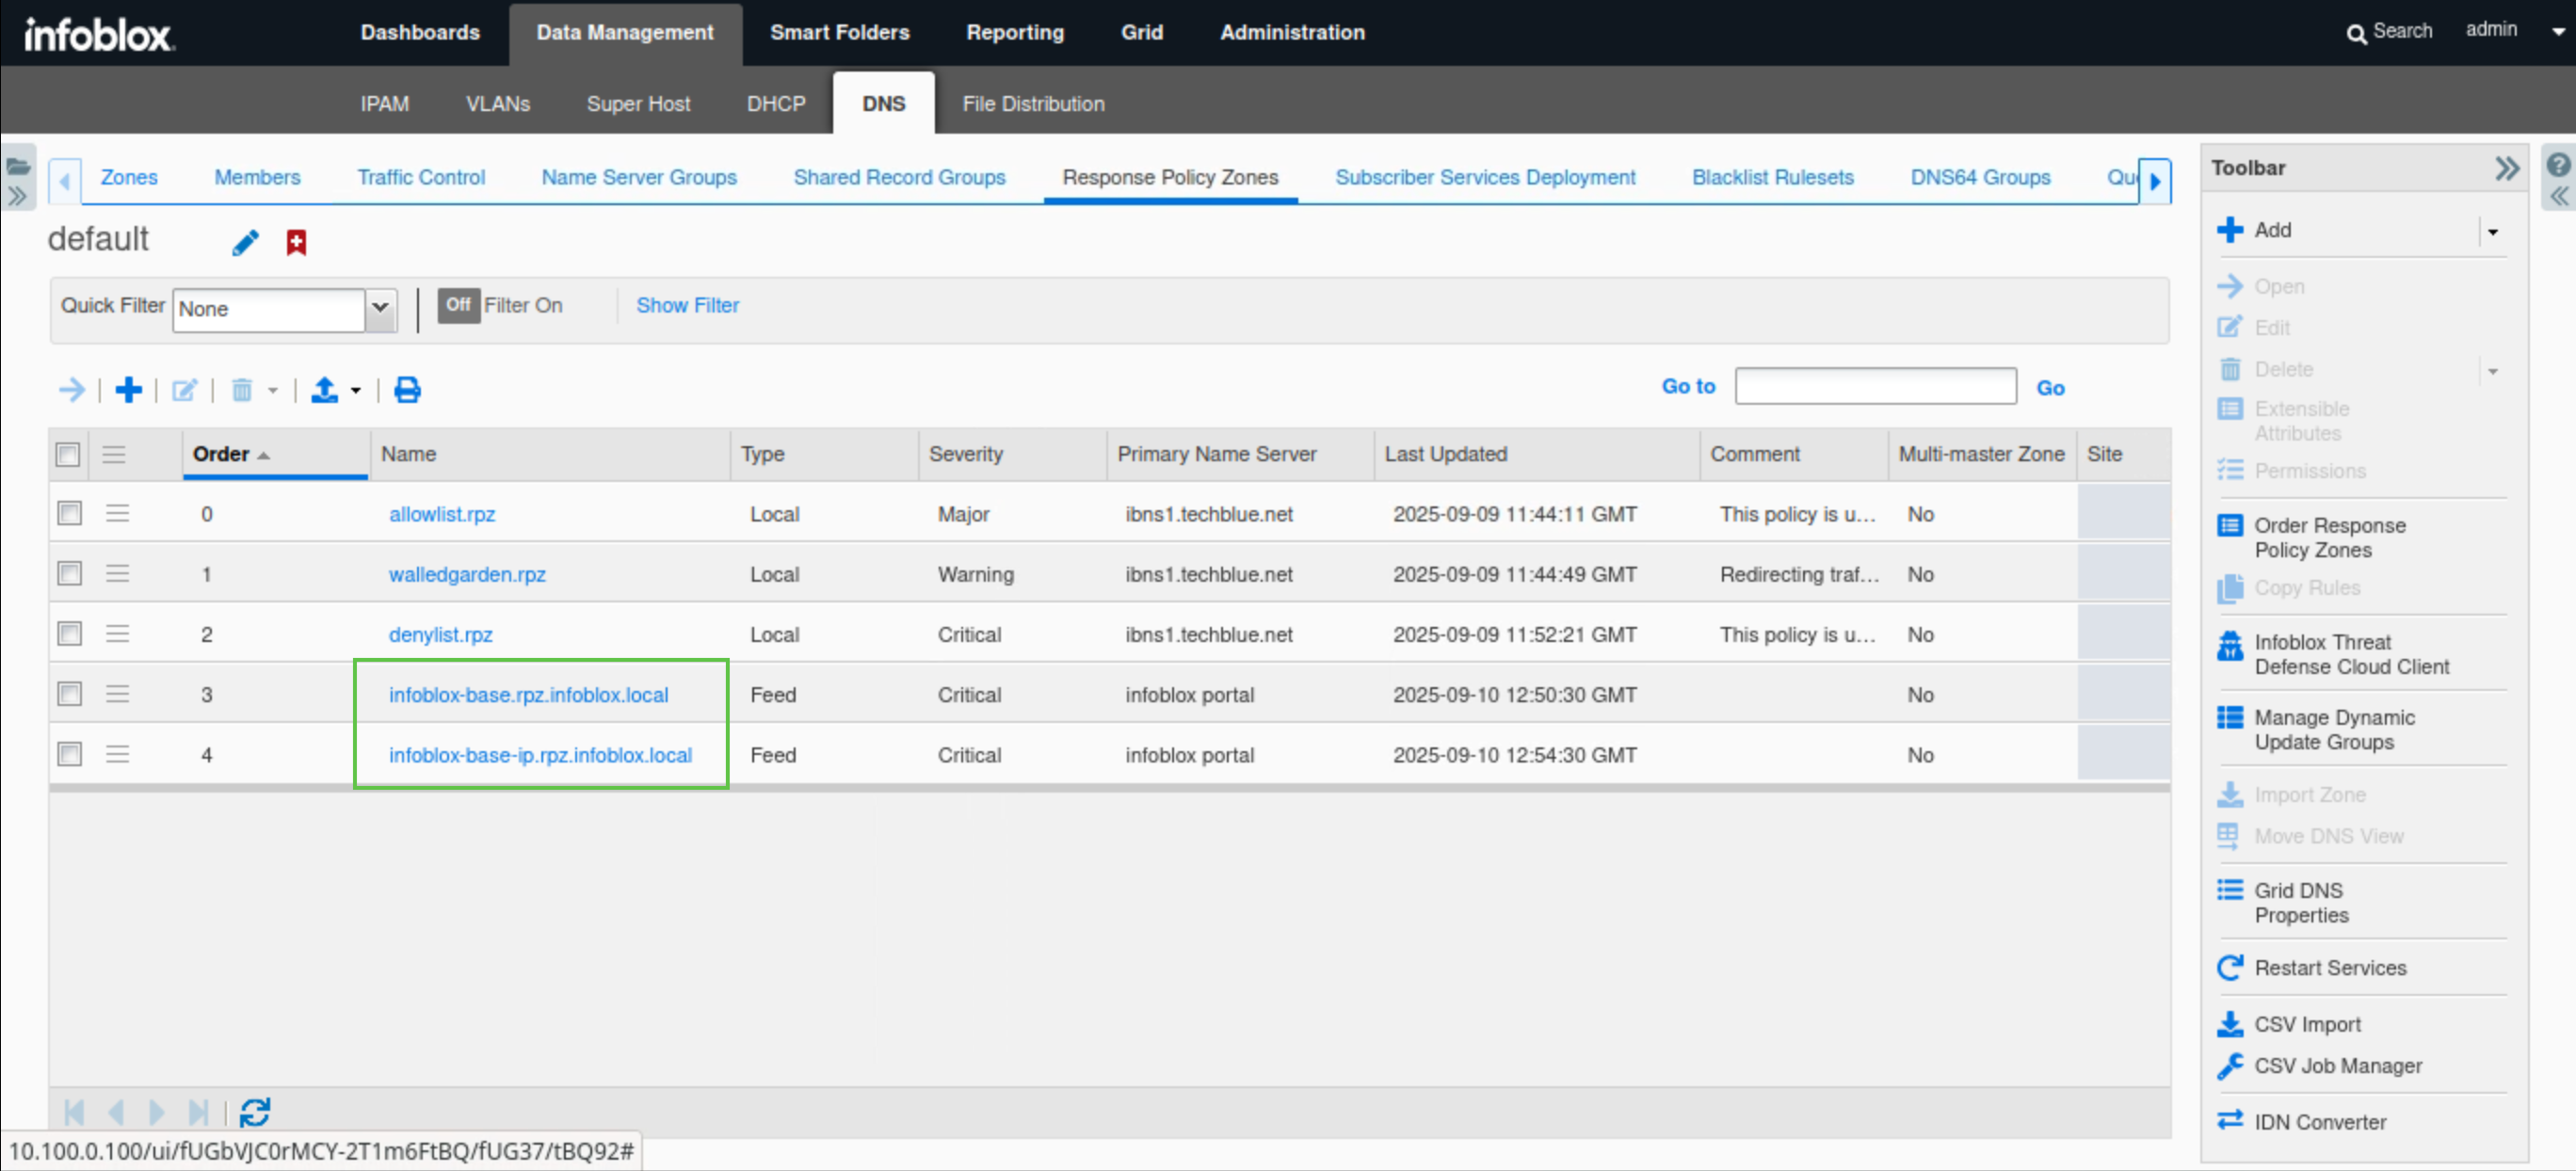
Repeat Steps 4 to 10 to add the infoblox-base-ip RPZ Feeds.
-
Use Passthru as the Policy Override value for all feeds.
-
Restart Services when prompted.
Task 4 Solution: Reorder all the RPZs to follow Infoblox guidelines
In this task, we will reorder the RPZs according to Infoblox guidelines while waiting for the Threat Defense feeds to be downloaded to our NIOS Grid.
RPZs (Response Policy Zones) should be prioritized based on a combination of Confidence and Threat Levels; the higher the Confidence and Threat Levels, the higher the RPZ's priority. In this example, we have three local RPZs: allowlist.rpz, walledgarden.rpz, and denylist.rpz. These are classified as local RPZs because their entries are manually created, and we have a high level of confidence in their effectiveness. Therefore, they are positioned at the top of our organization's priority list, followed by RPZ feeds downloaded from Threat Defense. To prioritize Threat Defense Feed RPZs against one another, we can refer to Infoblox’s documentation to obtain the Confidence and Threat Levels for each feed, allowing us to order them correctly.
-
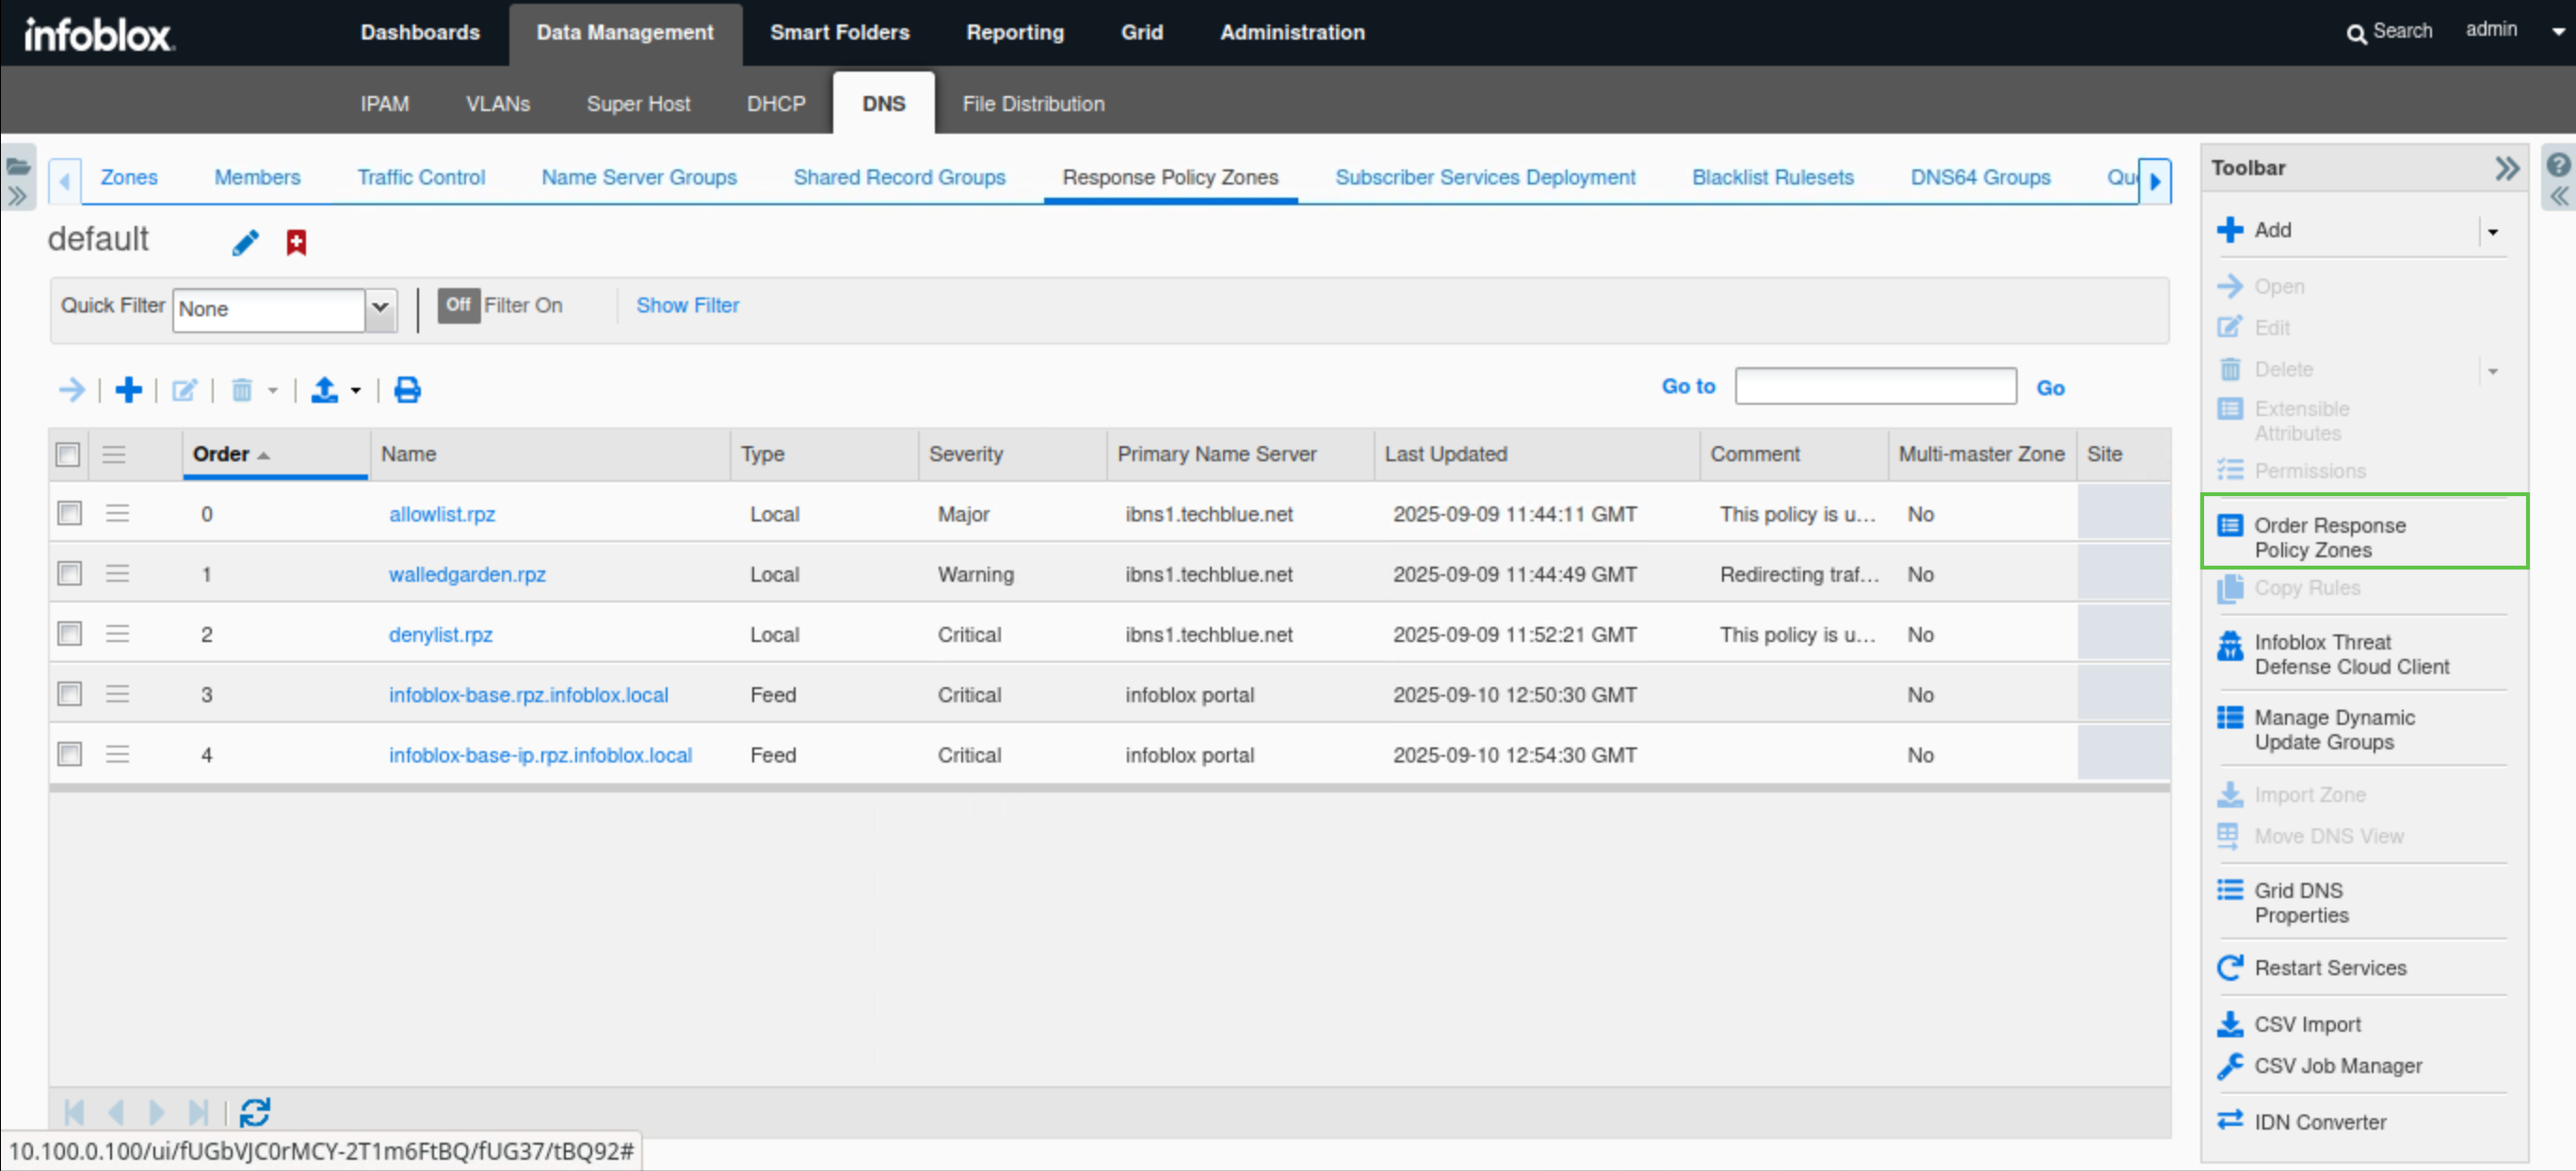
Navigate to Data Management → DNS → Response Policy Zones.
-
Click Order Response Policy Zones on the toolbar.
-
Re-order the RPZs if required so that they are ordered as follows:
-
allowlist.rpz
-
walledgarden.rpz
-
denylist.rpz
-
infoblox-base.rpz.infoblox.local
-
infoblox-base-ip.rpz.infoblox.local
-
-
Click OK.
-
Restart services when prompted.
-
Use the refresh icon to update the Last Updated field, which shows the date and time of the last feed update.
Task 5 Solution: Verify that the newly added Threat Defense RPZ feeds are detecting malicious domains to be blocked
The feeds may take some time to download into the Grid. Before proceeding with this task, make sure the Last Updated column is populated for the feeds. This process can take approximately 15–20 minutes.
In this task, we will use dig and syslog entries to validate that infoblox-base.rpz.infoblox.local is catching malicious DNS domains. They won't be blocked yet, but we should be able to see logs verifying that the feed matches the traffic.
-
Switch over to the testing-linux virtual machine with the credentials (training/infoblox) and set the machine up for testing.
-
Open a terminal window, issue the command sudo set-network-static-nios, and verify that the machine now has the IP address 172.31.101.250 using the command ifconfig.
-
-
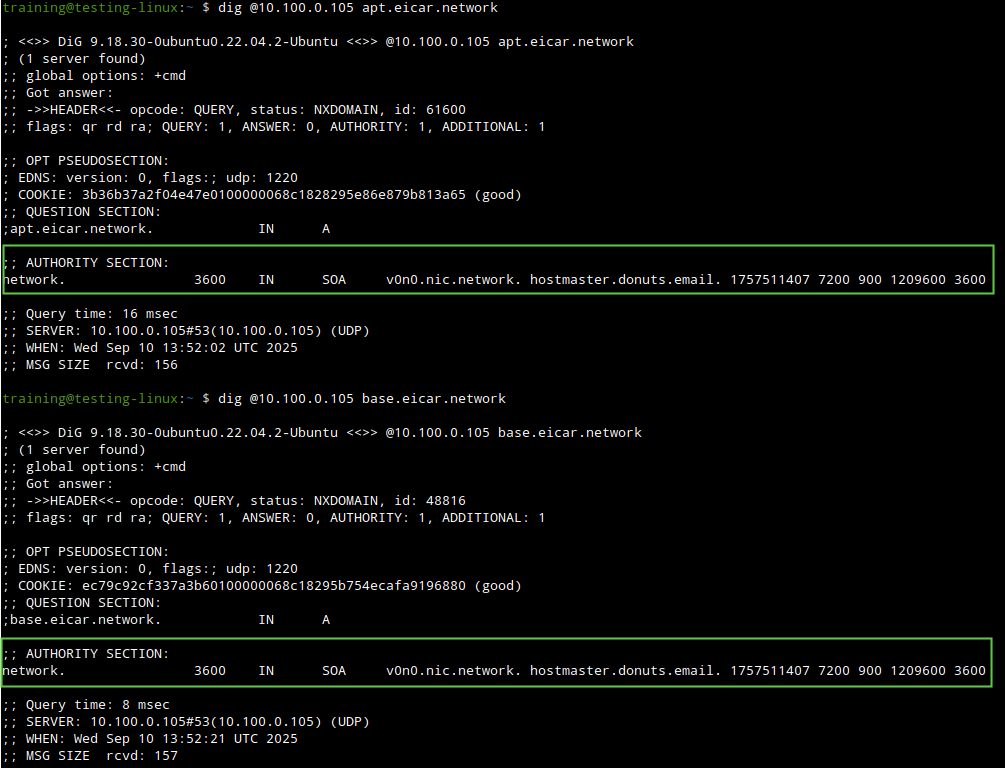
Use this dig command dig @10.100.0.105 <DOMAIN NAME> against one or more of the following domains: apt.eicar.network, base.eicar.network, compromiseddomain.eicar.network, compromisedhost.eicar.network, exploitkit.eicar.network, maliciousnameserver.eicar.network, or sinkhole.eicar.network.
-
The NXDOMAIN response here is from public DNS resolvers, not from our DNS Server. The output here is not that important; we know our servers didn’t block it. Since the SOA record is for a public DNS server and not one of our servers, we need to verify that further.
-
-
Switch back to jump-desktop.
-
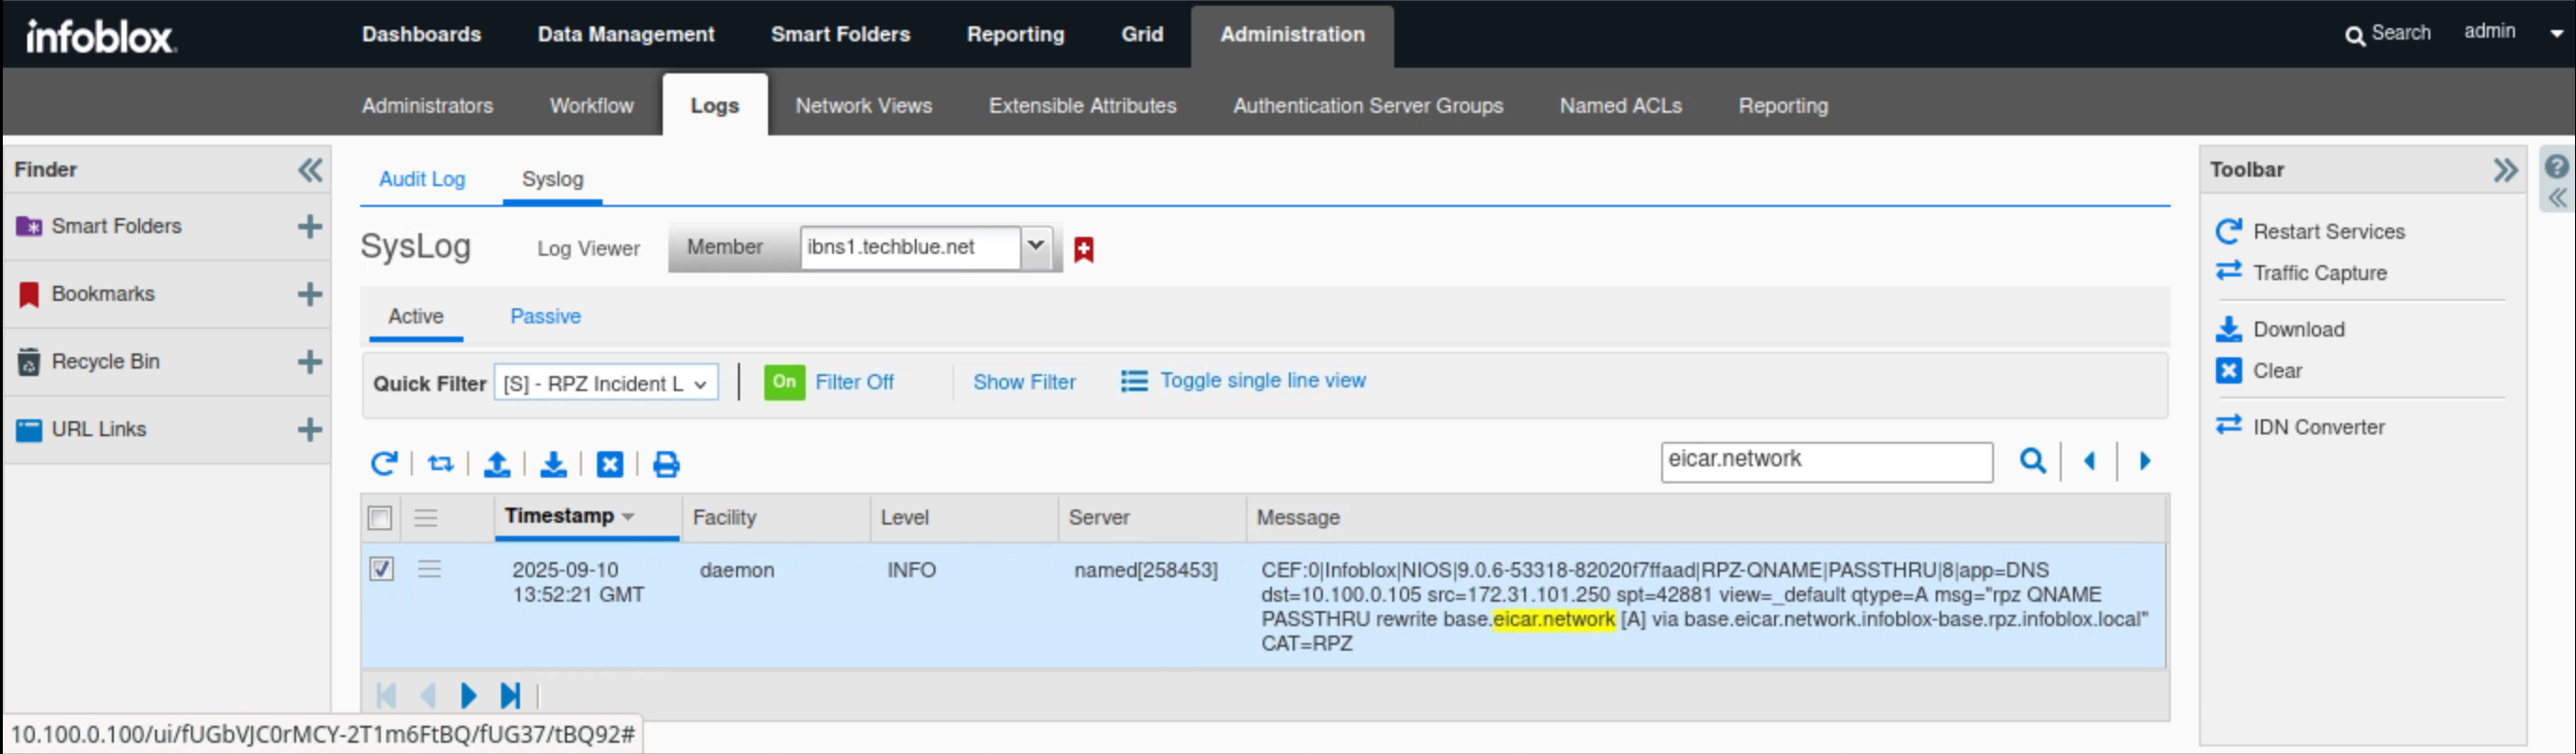
Navigate to Administration → Logs → Syslog.
-
Select Member ibns1.techblue.net from the drop-down list.
-
Choose RPZ Incidents from the Quick Filter drop-down list.
-
Click the Toggle Multi line view link.
-
Type eicar.network in the search box.
-
In this example, the DNS Query for base.eicar.network is listed in the messages section in CEF format. The query matches a PASSTHRU rule in base.rpz.infoblox.local.
-
Task 6 Solution: Change the Override Policy for infoblox-base.rpz.infoblox.local to None (Given)
In this task, we will set the Policy Override mode to None (Given) so that the downloaded RPZ can enforce its default action on matching traffic. For the feeds we’ve selected and the test domains in use, this default action is to block traffic.
-
Navigate to Data Management → DNS → Response Policy Zones.
-
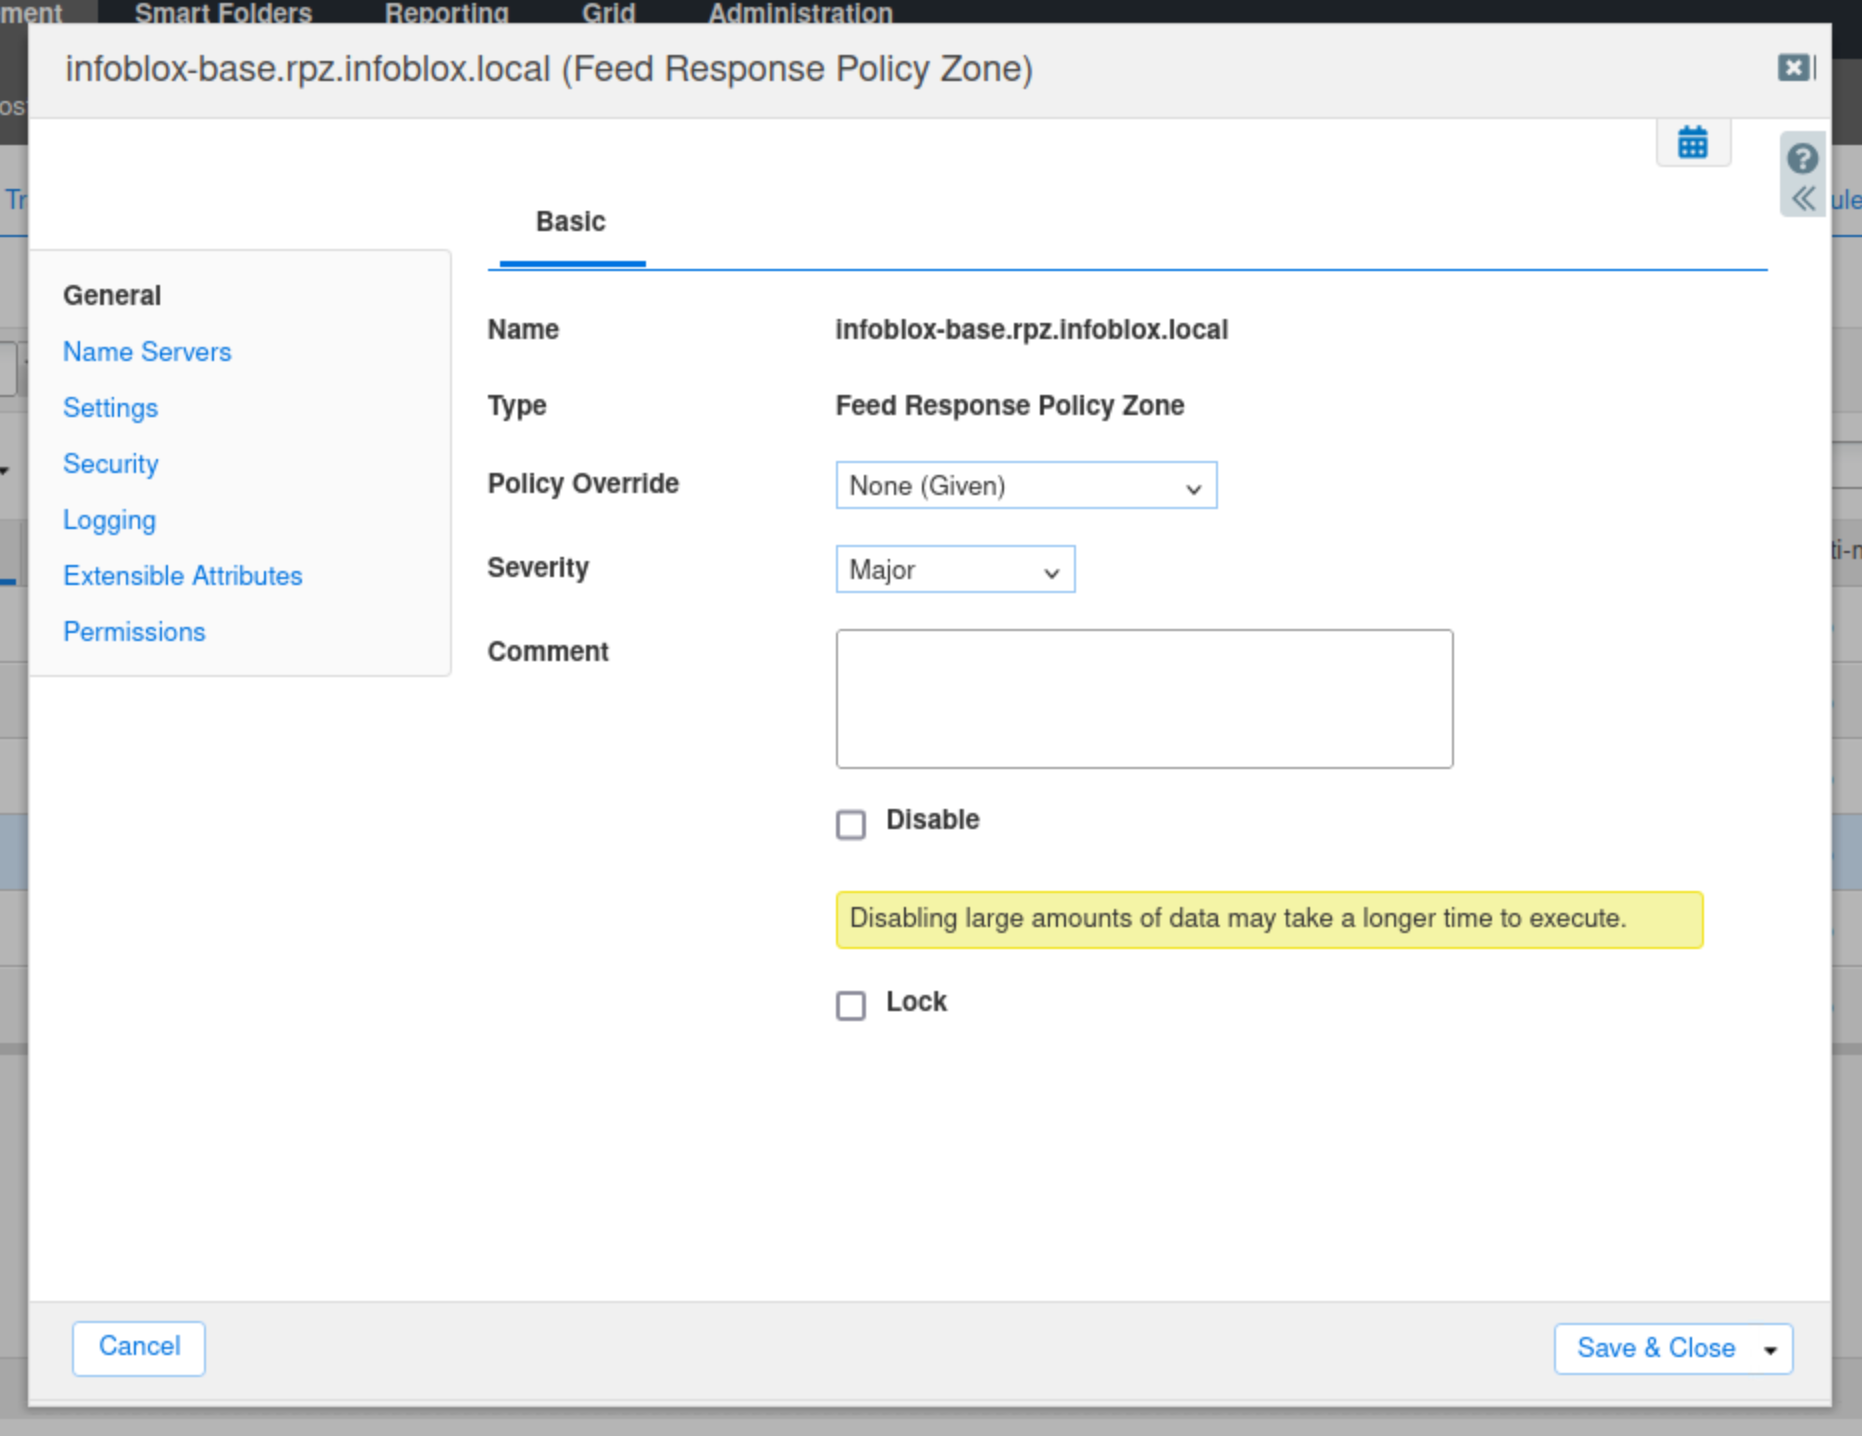
Select the infoblox-base.rpz.infoblox.local feed and click the hamburger icon.
-
Select Edit.
-
Change the Policy Override value to None(Given).
-
Click Save & Close.
-
Restart services when prompted.
Task 7 Solution: Test if the Threat Defense RPZ feeds are blocking malicious domains
-
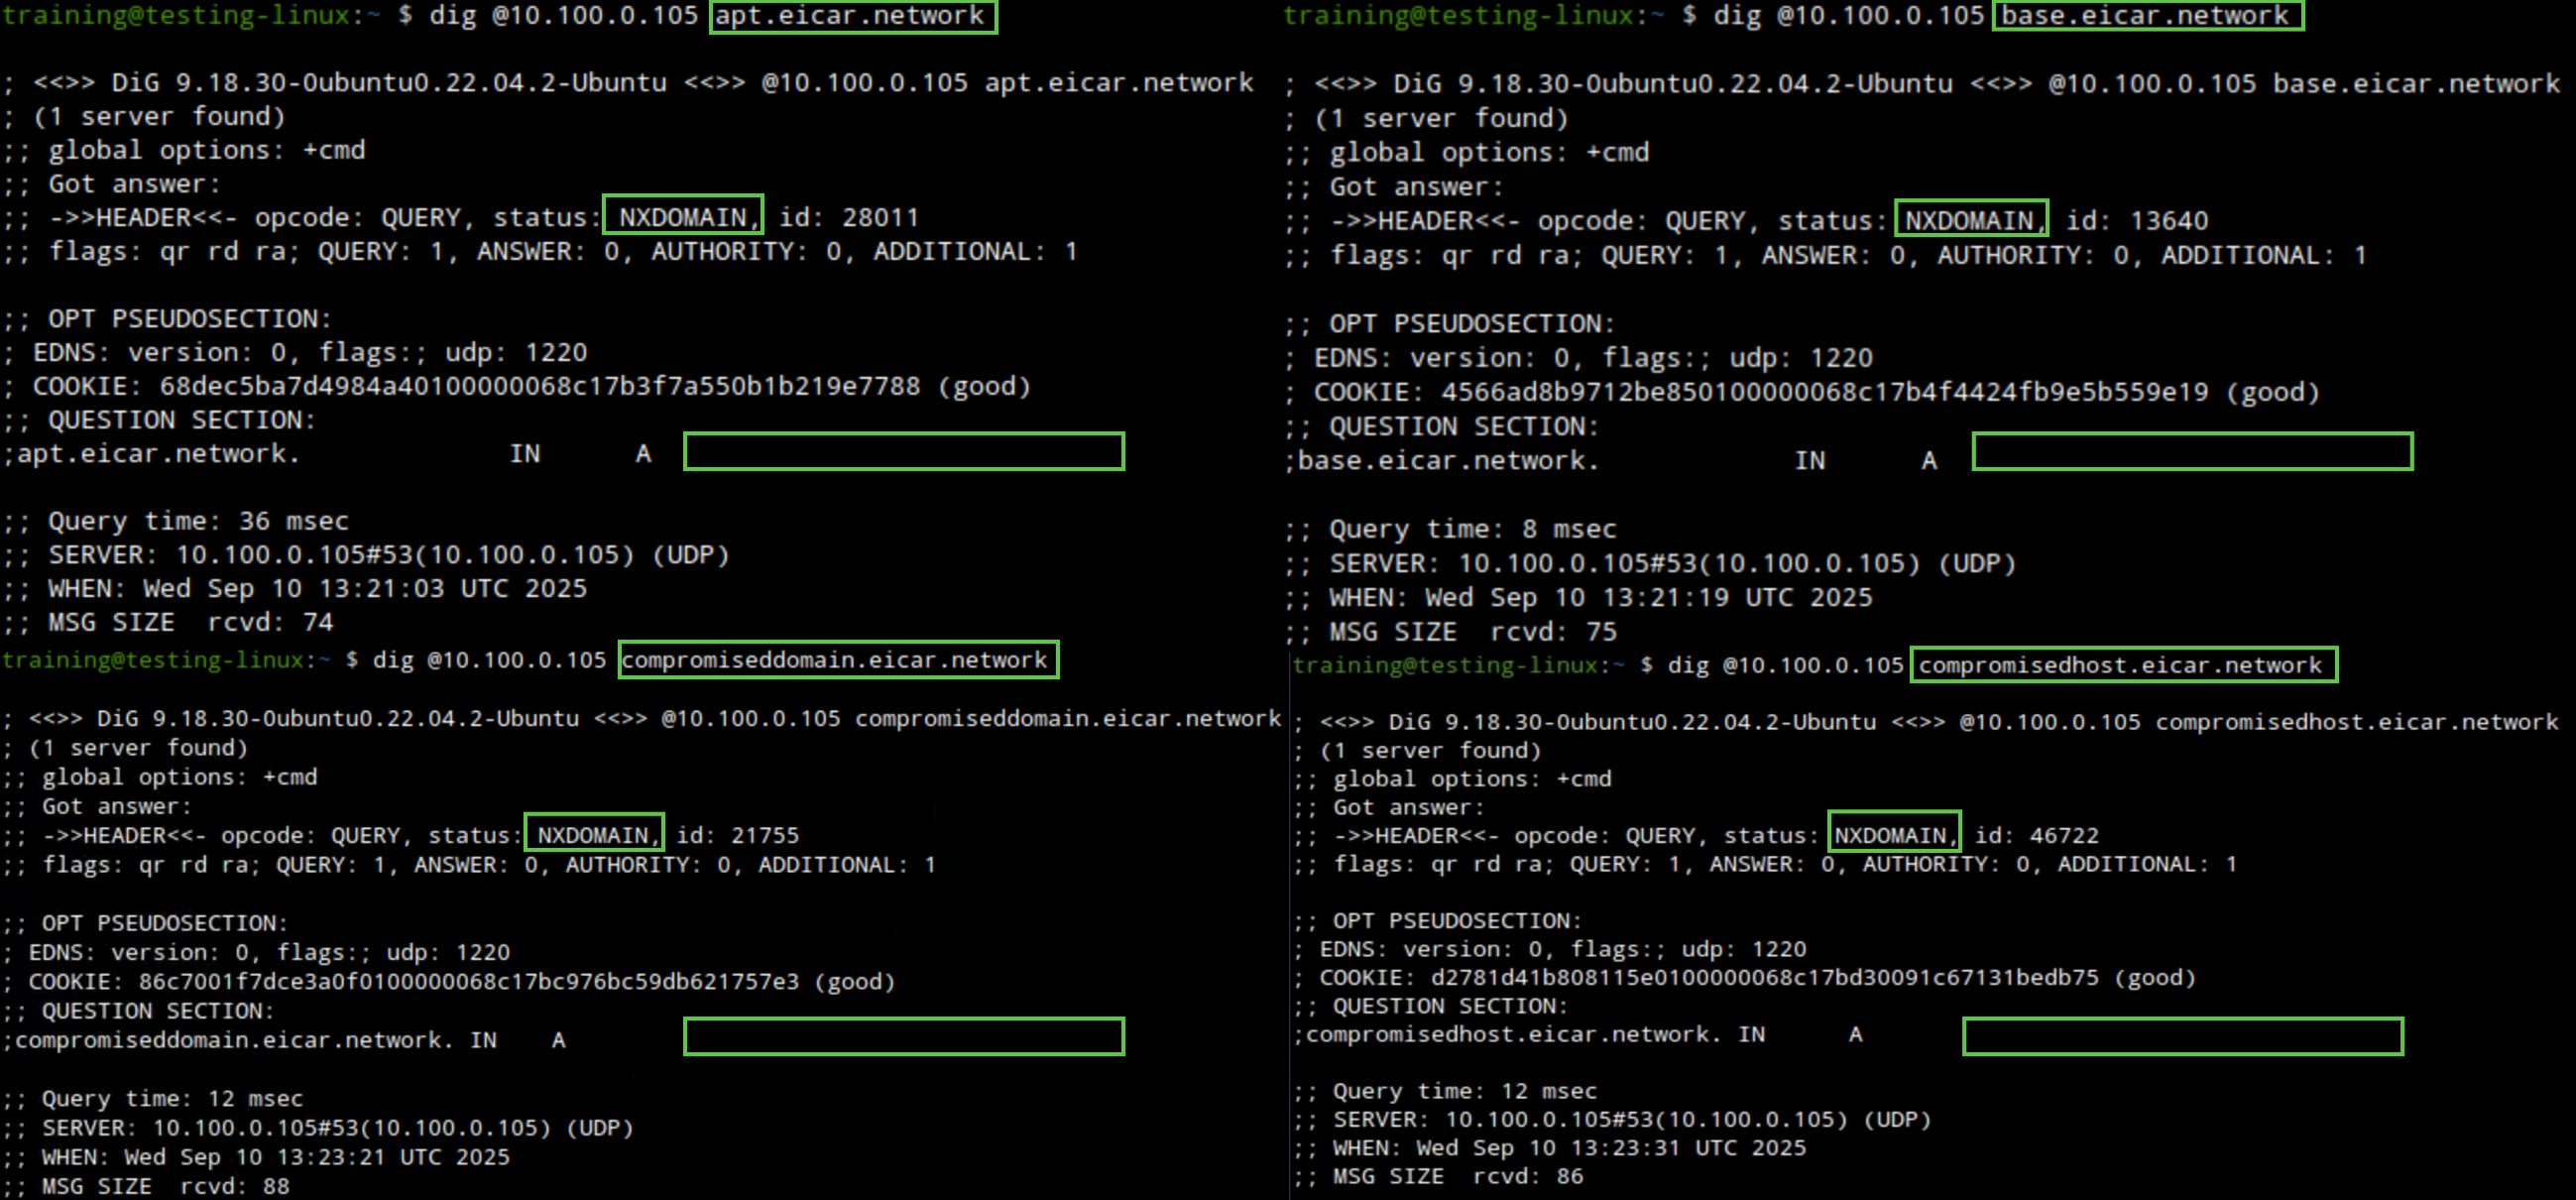
We will use the same dig command dig @10.100.0.105 <DOMAIN NAME> against one or more of the following domains: apt.eicar.network, base.eicar.network, compromiseddomain.eicar.network, compromisedhost.eicar.network, exploitkit.eicar.network, maliciousnameserver.eicar.network, or sinkhole.eicar.network.
-
We receive an NXDOMAIN response message for each query we send, this time with an. empty A record, indicating that our RPZ feed is blocking malicious traffic.
-
Switch back to jump-desktop.
-
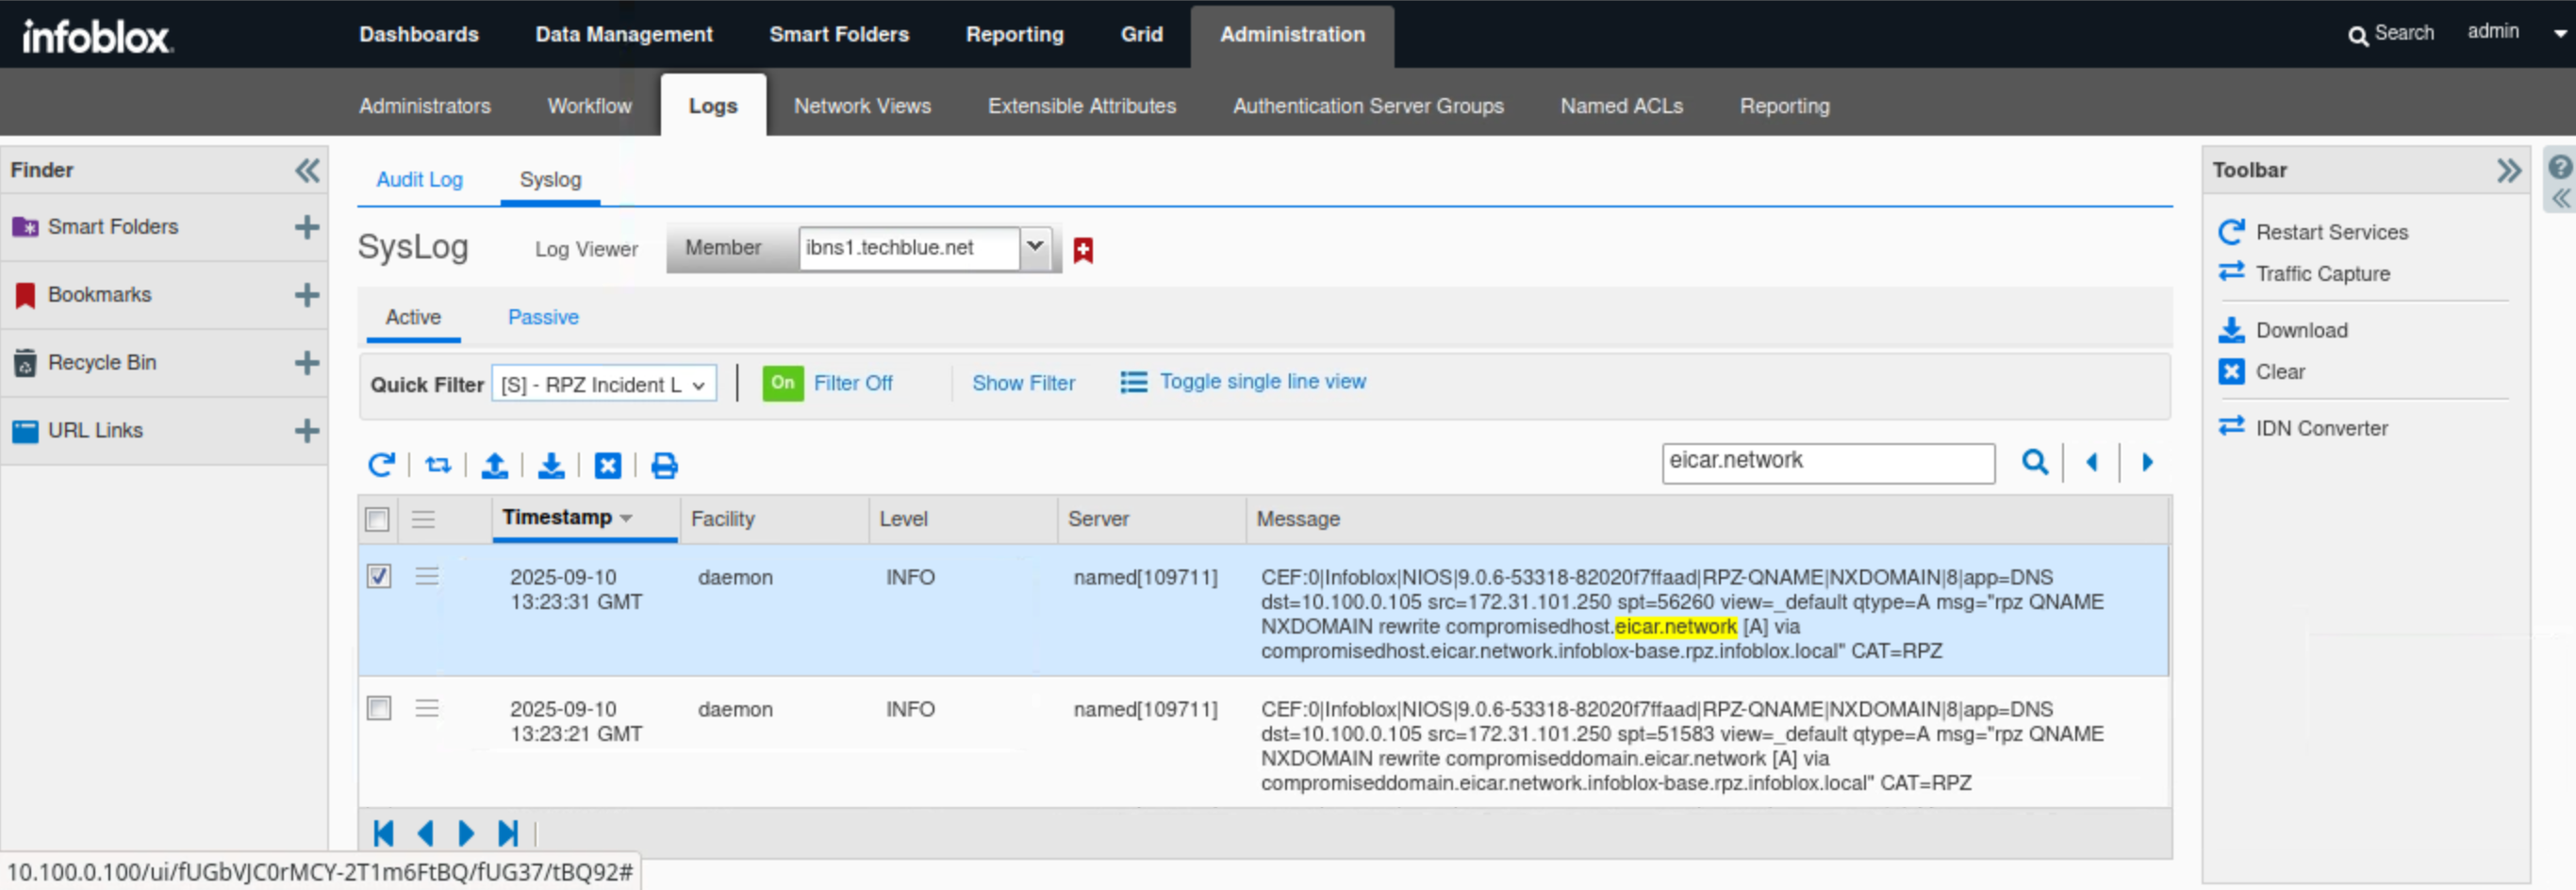
Navigate to Administration → Logs → Syslog.
-
Select Member ibns1.techblue.net from the drop-down list.
-
Choose RPZ Incidents from the Quick Filter drop-down list.
-
Click the Toggle Multi line view link.
-
Type eicar.network in the search box.
-
In this example, the DNS Query for compromisedhost.eicar.network is listed in the messages section in CEF format. The query matches an NXDOMAIN rule in base.rpz.infoblox.local.
-