Scenario
Your organization is strengthening its DNS security posture by enabling the DNS Forwarding Proxy (DFP) service on its NIOS-X servers. You will create DFP service instances in the Infoblox Portal, connect them to the appropriate servers, configure interface bindings, set up internal and fallback DNS resolvers, and verify that the DFP services are functioning correctly by performing DNS lookups from a test machine.
Estimated Completion Time
-
20 to 30 minutes
Prerequisites
-
Administrative access to the Infoblox Portal
Tasks
-
Enabling DNS Forwarding Proxies (DFP) on both NIOS-X Servers
-
Verifying DFP services are working
Task 1: Enabling DNS Forwarding Proxies (DFP) on both NIOS-X Servers
In the Infoblox Portal, create two DFP instances named DFP-OPH1 and DFP-OPH2 and connect them to the NIOS-X servers oph1.techblue.net and oph2.techblue.net. Verify that DFP services are enabled on all NIOS-X server interfaces. Add the IP address 10.100.0.100 as an internal and fallback DNS resolver without encryption; 10.100.0.100 is the IP address of a local NIOS grid. Enable POP auto selection.
Task 2: Verifying DNS Forwarding Proxies (DFP) Services Are Working
In the lab, provision the VM testing-linux with a static IP address using the command sudo set-network-static-bloxone to access the NIOS-X servers. From the VM testing-linux, perform DNS lookups using the NIOS-X servers (10.100.0.110 and 10.200.0.110) to verify the DNS Forwarding Proxy services.
Solutions
Task 1 Solution: Enabling DNS Forwarding Proxies (DFP) on both NIOS-X Servers
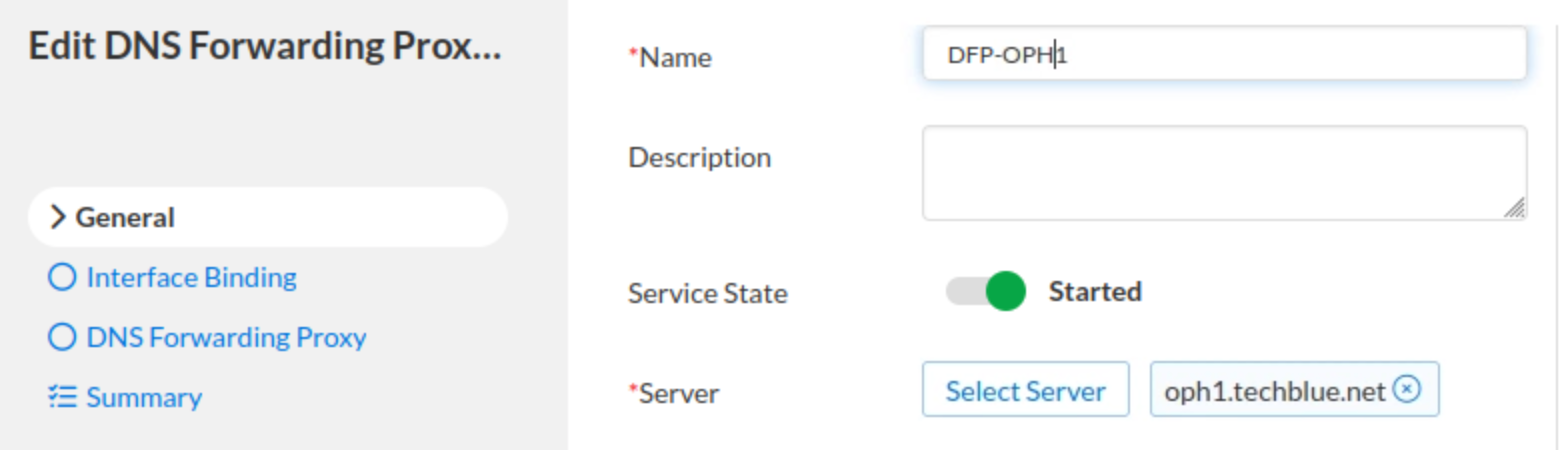
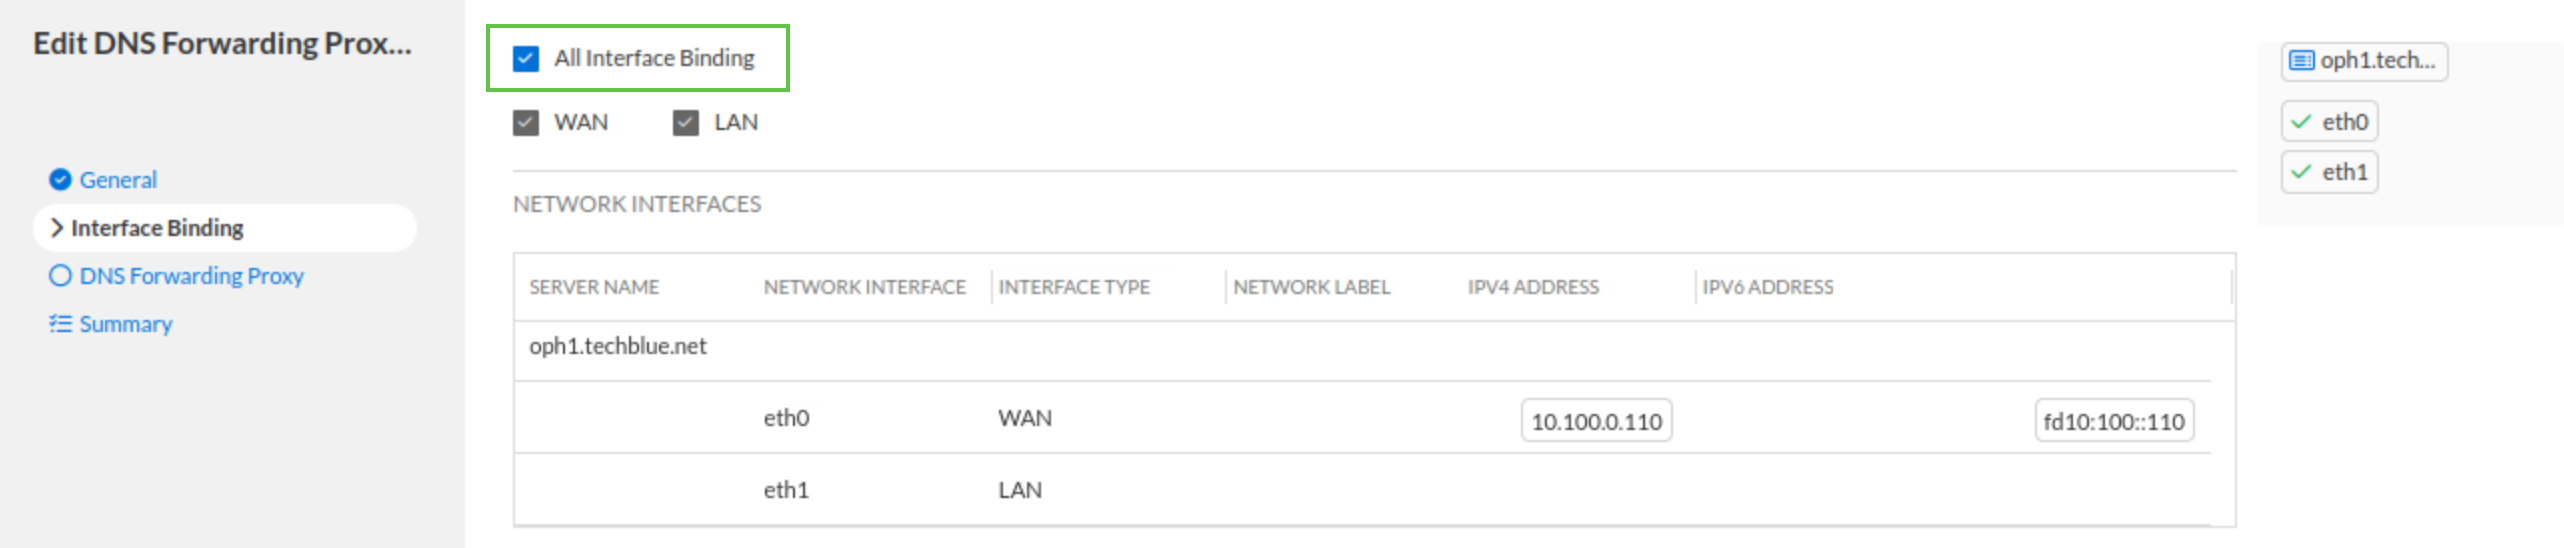
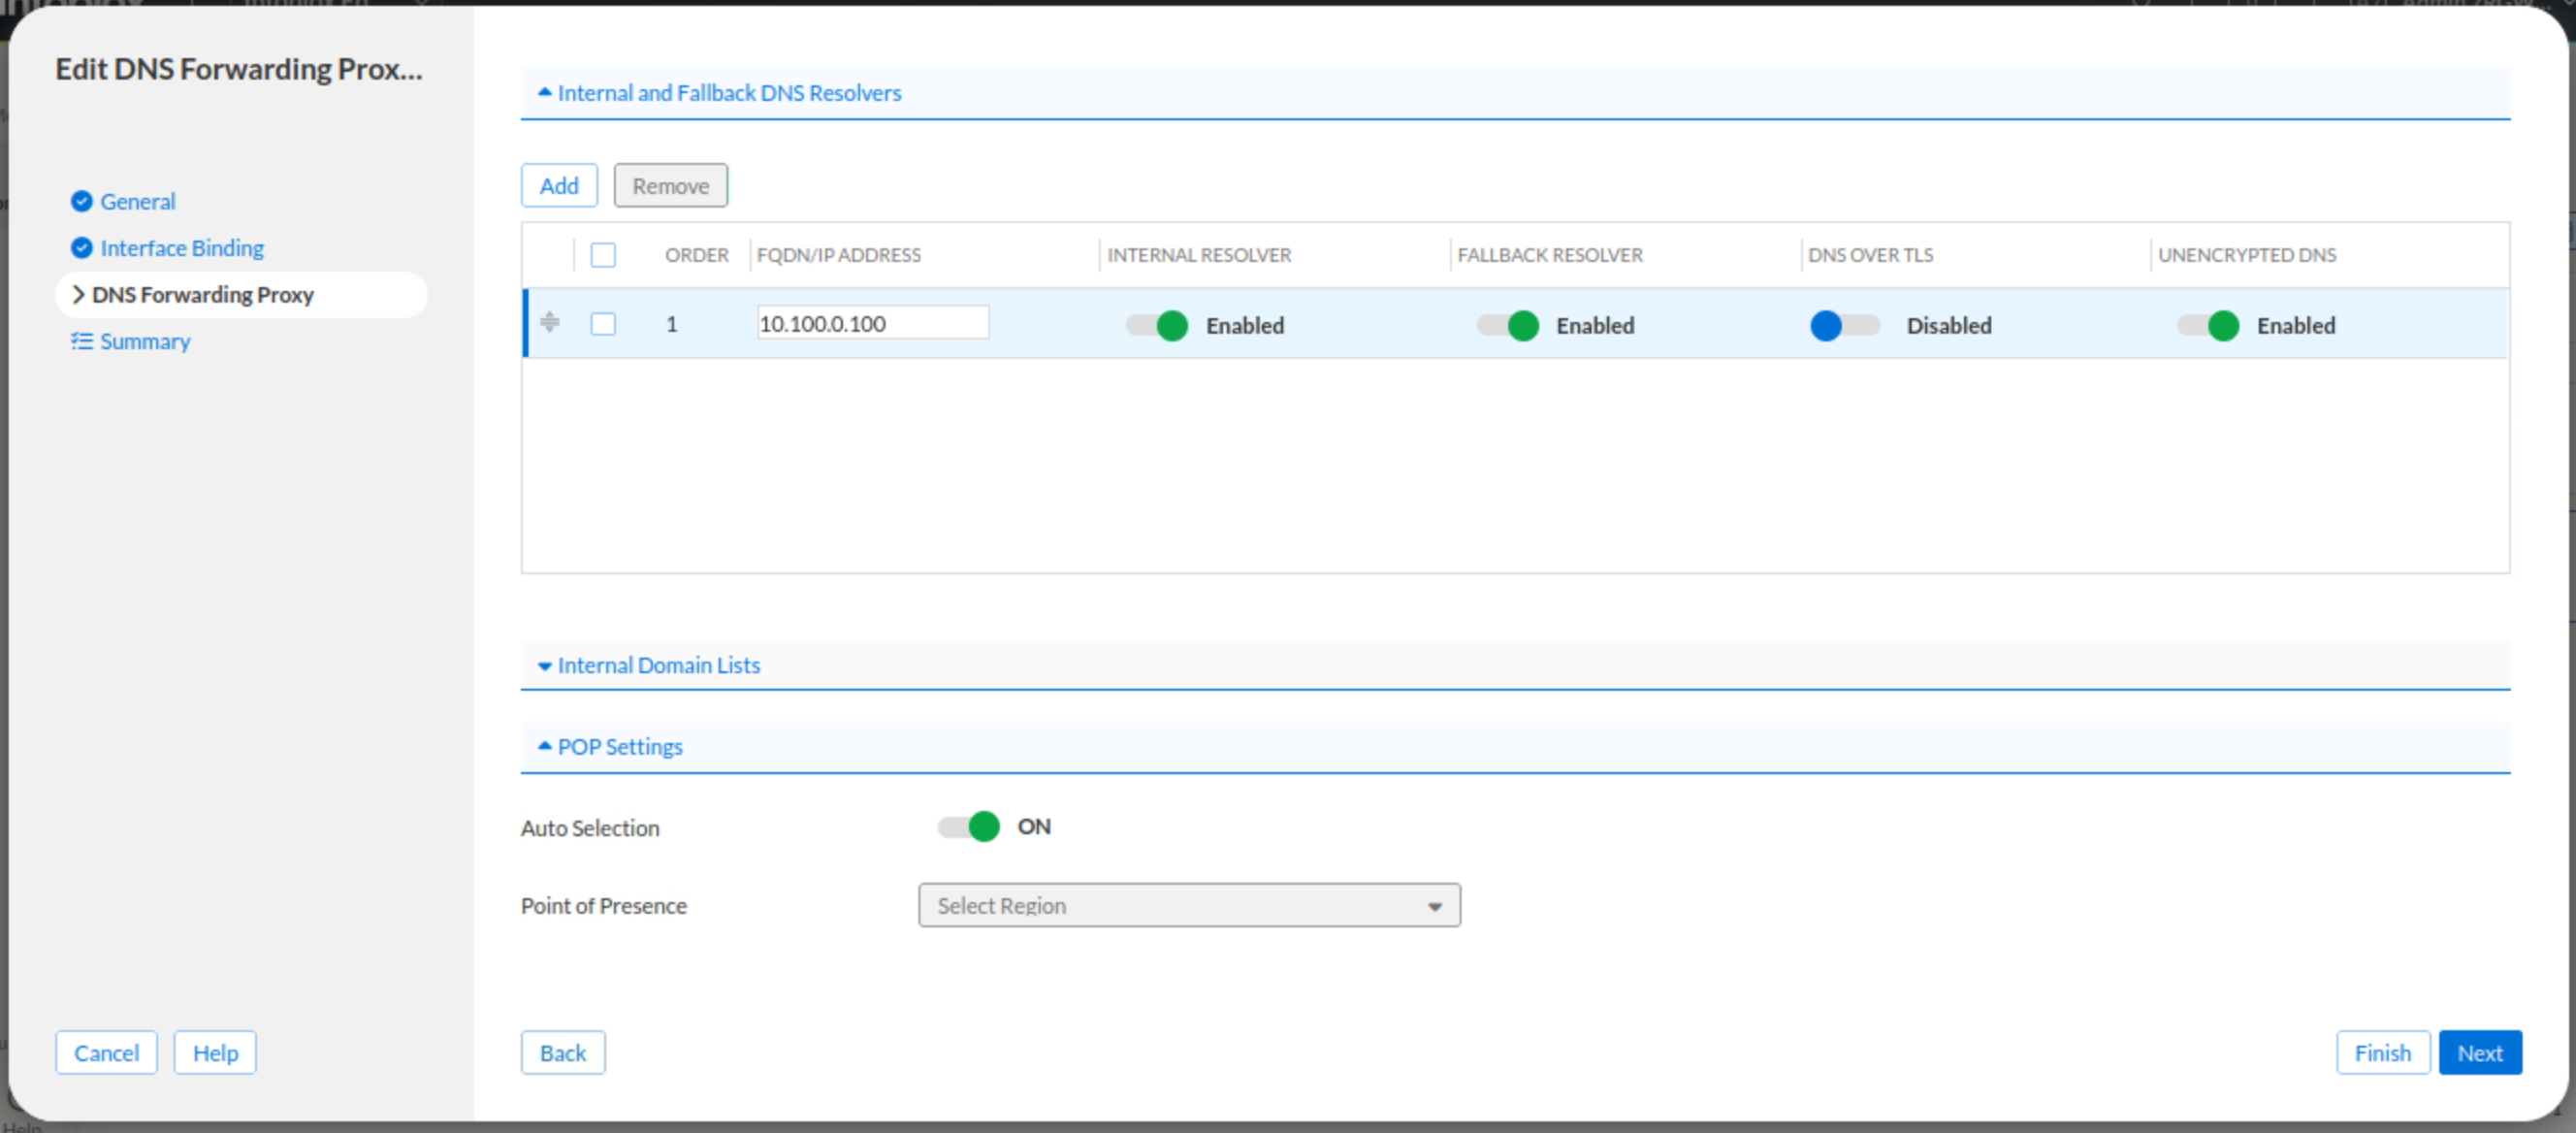
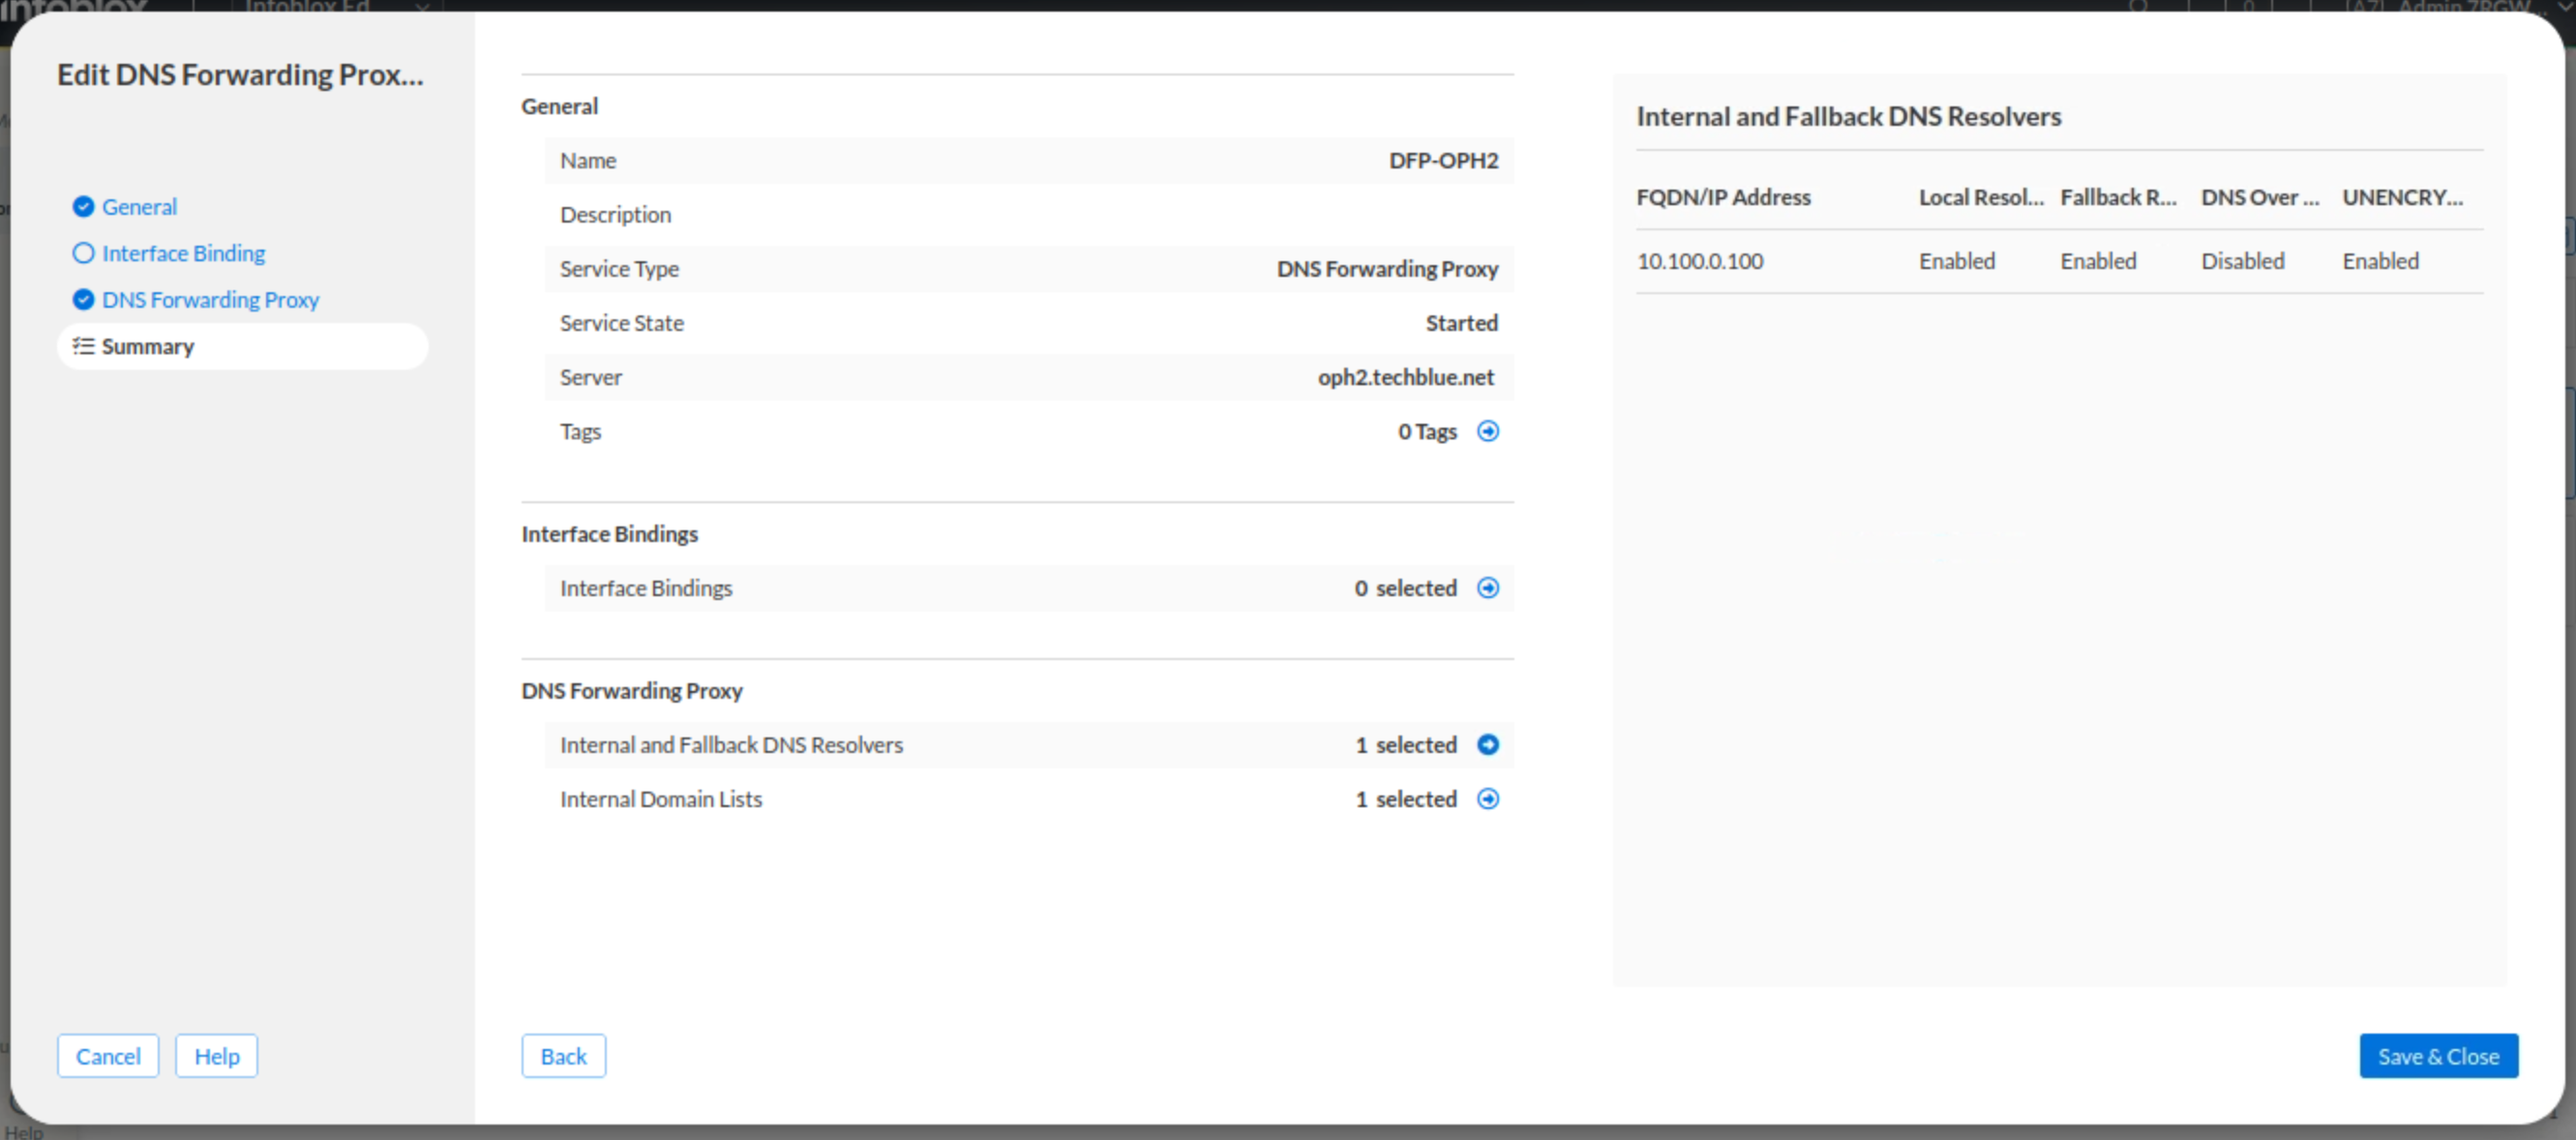
In this task, we will create two new protocol service instances of the DNS Forwarding Proxy type: DFP-OPH1 and DFP-OPH2. During the creation process, we will choose which NIOS-X server each service will be attached to: for DFP-OPH1, we will select oph1.techblue.net, and for DFP-OPH2, we will choose oph2.techblue.net. We will also verify that the “All Interface Binding“ checkbox is selected for both NIOS-X servers to ensure that DFP services will be enabled on all interfaces. Finally, under the DNS Forwarding Proxy tab, we will add the IP address 10.100.0.100 as an internal and fallback DNS resolver. 10.100.0.100 is the IP address for a NIOS grid that will be used as a backup for when the connection between NIOS-X servers and Threat Defense gets interrupted.
-
Log in to your lab’s VM jump-desktop.
-
While logged in to jump-desktop, use your Education Infoblox Portal Credentials to log into the Infoblox Portal.
-
Navigate to Network → Services & Servers → Protocol Services.
-
Click Create Service and choose DNS Forwarding Proxy from the list.
-
Enter DFP-OPH1 for the name.
-
Click Select Server.
-
Choose oph1.techblue.net from the list.
-
-
Click the Interface Binding tab.
-
Verify that the All Interface Binding checkbox is selected.
-
-
Click the DNS Forwarding Proxy tab
-
Under the Internal and Fallback DNS Resolvers section.
-
Click Add.
-
Use the IP address 10.100.0.100 as the DNS Resolver
-
Enable the INTERNAL RESOLVER, FALLBACK RESOLVER, and UNENCRYPTED DNS toggles.
-
-
Under the POP Settings section.
-
Verify that the Auto selection toggle is enabled.
-
-
Click Finish and then Save & Close.
-
-
Repeat steps 4, 5, and 6 to create the second DFP service.
-
Enter DFP-OPH2 for the name.
-
Select oph2.techblue.net as the server.
-
Task 2 Solution: Verifying DNS Forwarding Proxies (DFP) Services Are Working
In this task, we will jump to the new virtual machine testing-linux to simulate a user utilizing the DFP services we enabled on both NIOS-X servers. We will use the command dig to look up several popular domains while specifying the IP addresses of oph1.techblue.net and oph2.techblue.net as the servers.
-
Log in to the VM testing-linux in your lab environment with the credentials (training / infoblox).
-
Open a terminal window and enter the command sudo set-network-static-bloxone.
-
If prompted for a password, enter infoblox; This command sets a static IP address for the testing-linux VM to reach the NIOS-X servers.

-
-
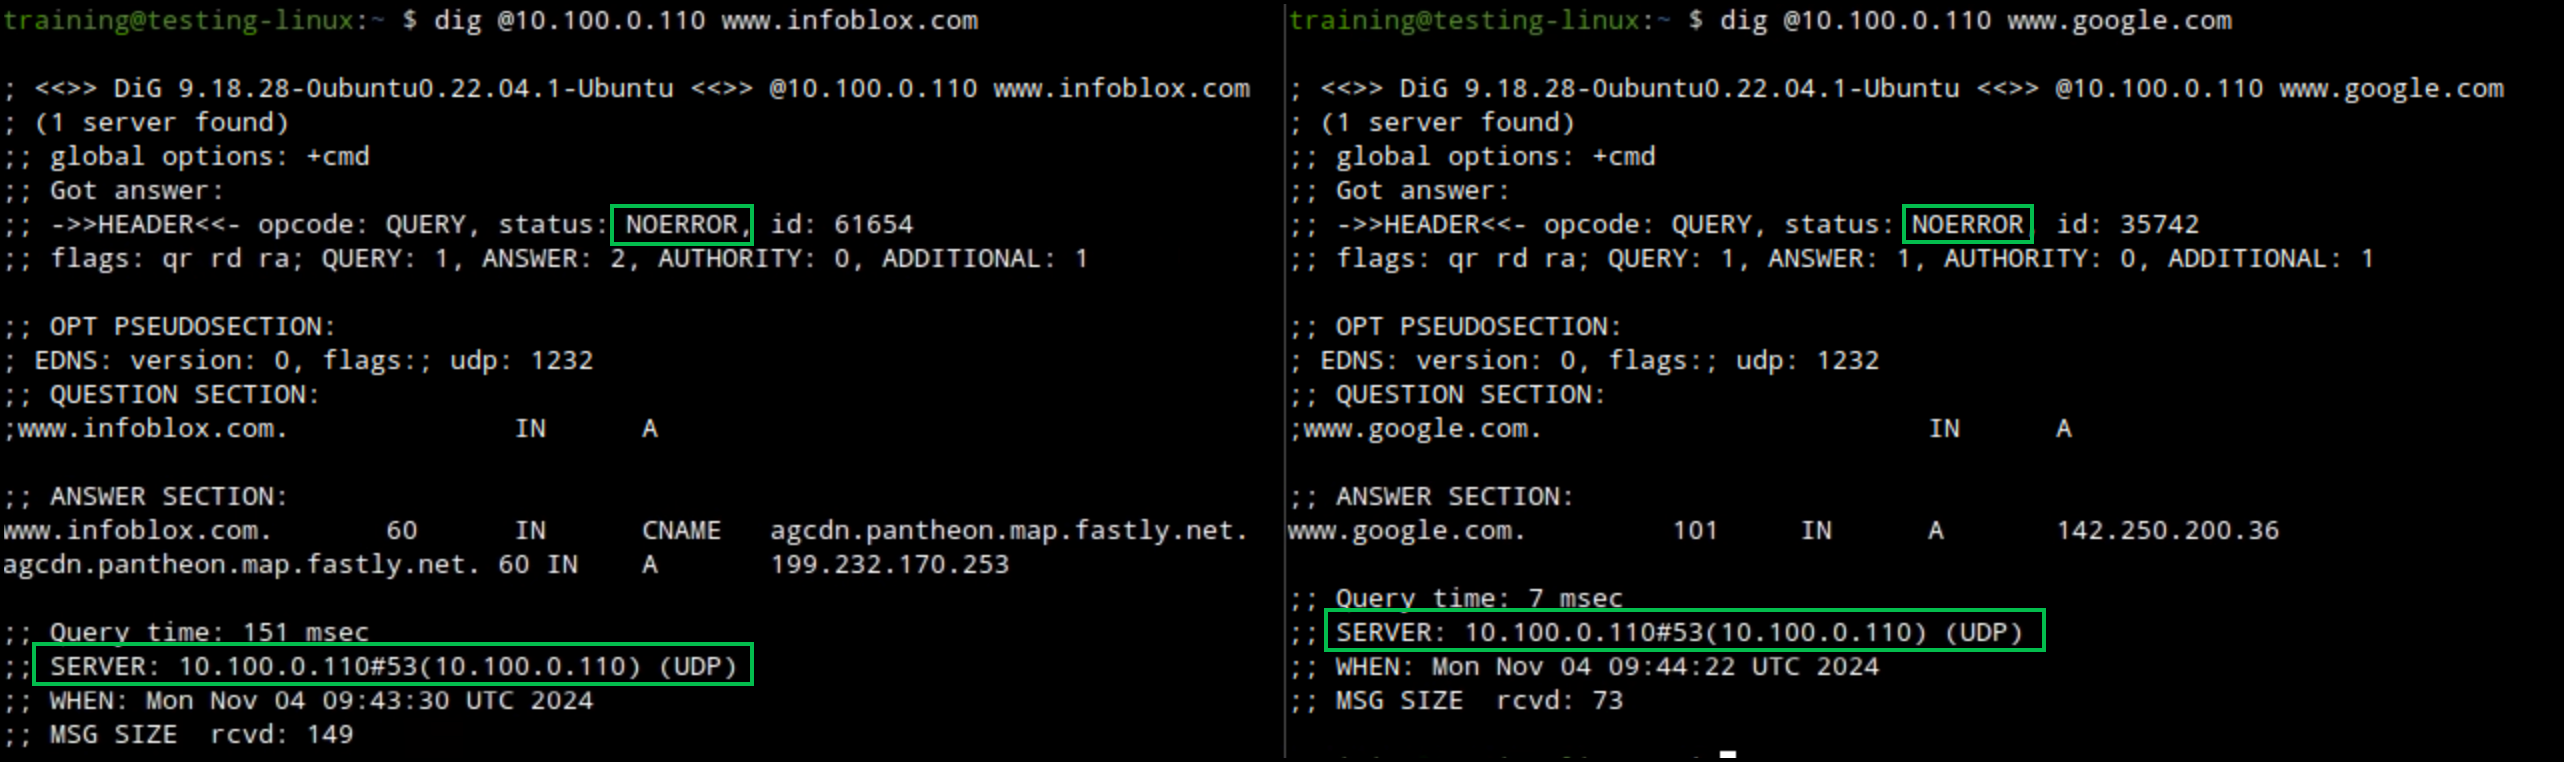
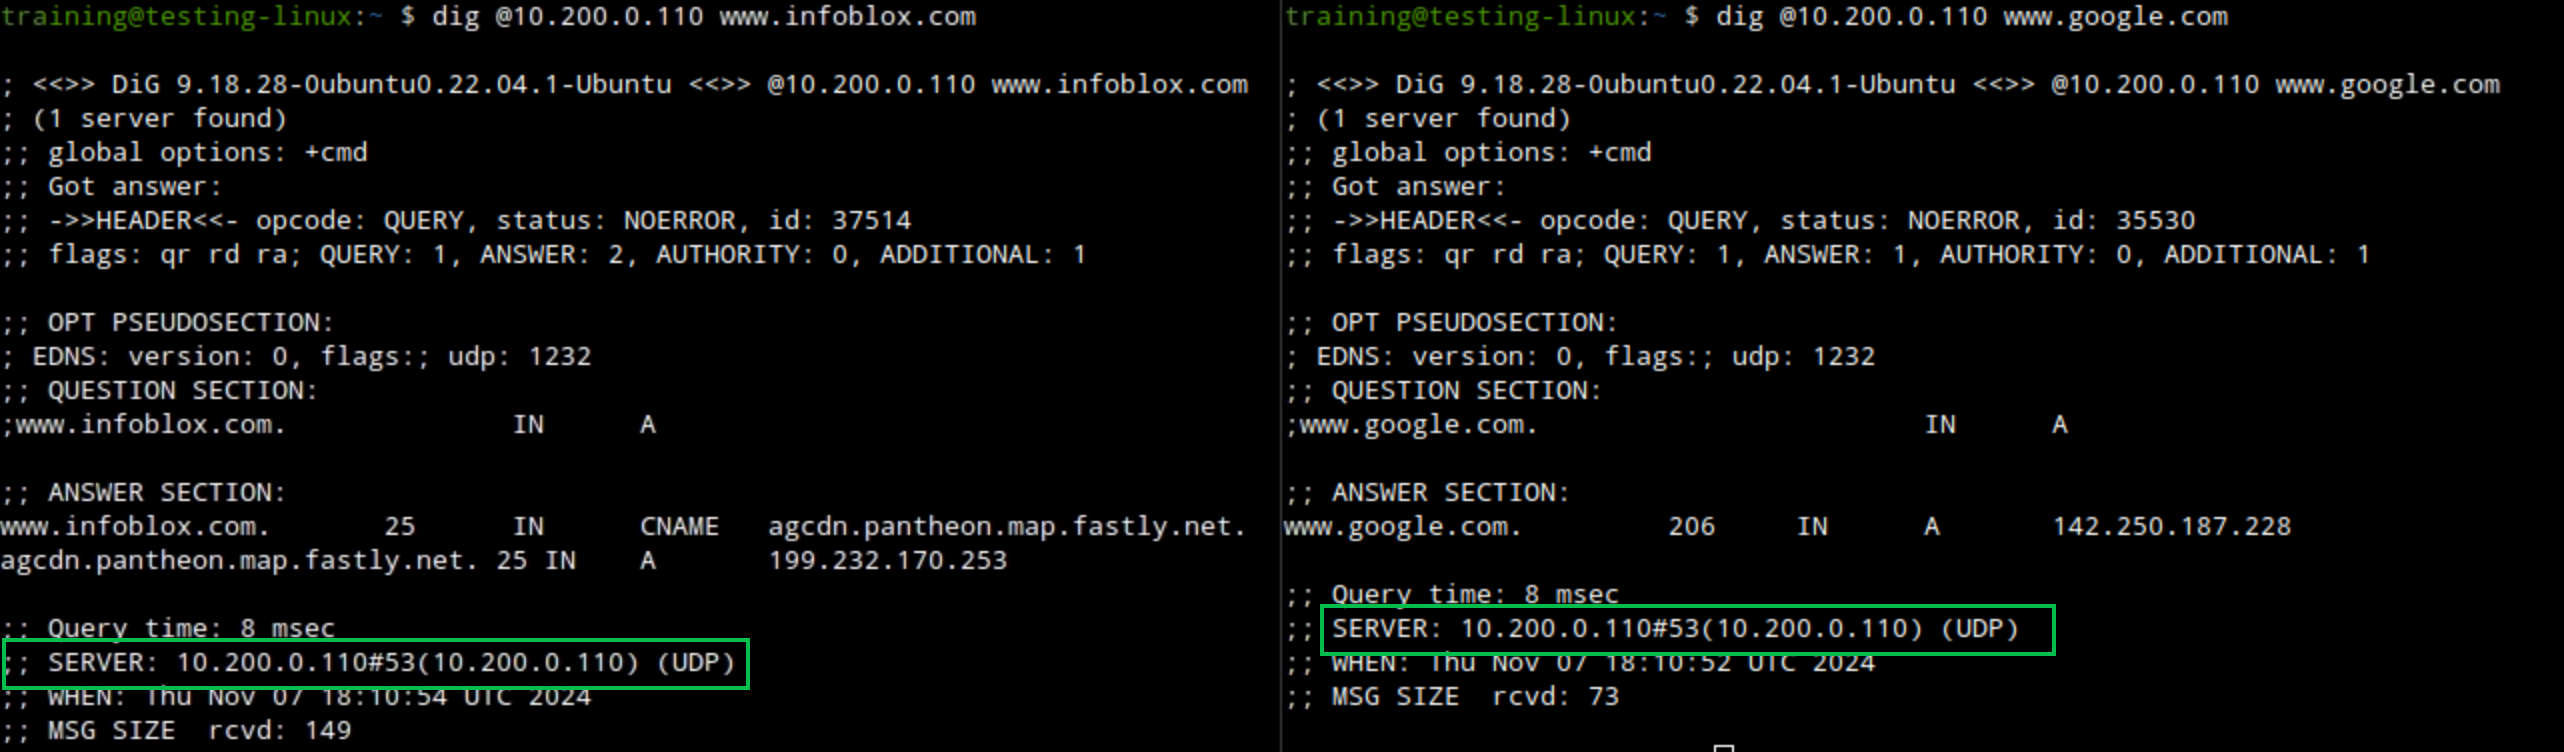
Using the command dig against oph1.techblue.net (10.100.0.110) and. oph2.techblue.net (10.200.0.110), resolve the domains www.infoblox.com and www.google.com. Both domains should be resolved with a NOERROR response code. The commands are:
-
dig @10.100.0.110 www.infoblox.com.
-
dig @10.100.0.110 www.google.com.
-
dig @10.200.0.110 www.infoblox.com.
-
dig @10.200.0.110 www.google.com.
-