Scenario
An Infoblox Education Universal DDI lab environment has expired, but the Infoblox Portal tenant to which its servers were joined is still active. To continue learning with a new Universal DDI lab, you need to start servers in the new lab environment and join them to your existing Infoblox Portal tenant to replace the old servers.
You're tasked with replacing two offline NIOS-X Servers from the previous lab. You have remote access to the replacement virtual machines, which are pre-installed with Docker. This allows you to install the NIOS-X Server image and connect it to the Infoblox Portal.
Estimate Completion Time
-
60 to 70 Minutes
Prerequisites
-
Administrative access to the Infoblox Portal
-
Prior Completion of Deploying NIOS-X Servers (2801)
Tasks
-
Renaming the offline NIOS-X Servers.
-
Creating a new join token.
-
Deploying Docker Instance on oph1.
-
Deploying Docker Instance on oph2.
-
Validating NIOS-X Servers are connected to the Infoblox Portal.
-
Swapping offline NIOS-X instances with new servers on the Infoblox Portal.
Task 1: Renaming the offline NIOS-X Servers
-
Using your lab’s Jump-Desktop, log into the Infoblox Portal. Rename the current Offline NIOS-X Servers, and add a prefix of offline to their names for later identification.
Task 2: Creating a new join token
-
From Infoblox Portal, create a join token and save the join token as a text file using the text editor Geany for later use.
Task 3: Deploying NIOS-X Server oph1
-
SSH into oph1 virtual machine using the IP address 10.100.0.110 on port 65522, and the credentials of [training/infoblox].
-
Once logged in, download and initiate the NIOS-X installer script using the Join Token you saved in Task 2.
-
Task 4: Deploying NIOS-X Server oph2
-
SSH into oph2 virtual machine using the IP address 10.200.0.110 on port 65522, and the credentials of [training/infoblox].
-
Once logged in, download and initiate the NIOS-X installer script using the Join Token you saved in Task 2.
-
Task 5: Validating that the new NIOS-X Servers are connected to the Infoblox Portal
-
Verify both Instances are visible on Infoblox Portal, and that both are online.
-
Locate the Online Server with the IP address 10.100.0.110 and change its name to oph1.techblue.net.
-
Similarly, locate the second Online Server with the address 10.200.0.110 and change its name to oph2.techblue.net.
-
It may take up to 30 mins for the two instances to be online.
Task 6: Swapping offline NIOS-X instances with new servers on Infoblox Portal
-
Locate the offline Server with the IP address 10.100.0.110 (offlineoph1.techblue.net) and replace it with the online instance, oph1.techblue.net.
-
Similarly, locate the second offline Server with the address 10.200.0.110 (offlineoph2.techblue.net) and replace it with the online instance, oph2.techblue.net.
Solutions
Task 1 Solution: Renaming the offline NIOS-X Servers
-
On the Jump-Desktop, use a browser to access Infoblox Portal UI. Once logged into the Infoblox Portal, navigate to Network → Services & Servers → Servers.
-
Locate the Offline Server with the IP address 10.100.0.110 by expanding the server's entry in the list (the toggle is on the right-hand side). It should currently display the status as ‘Error’ or ‘Offline’.
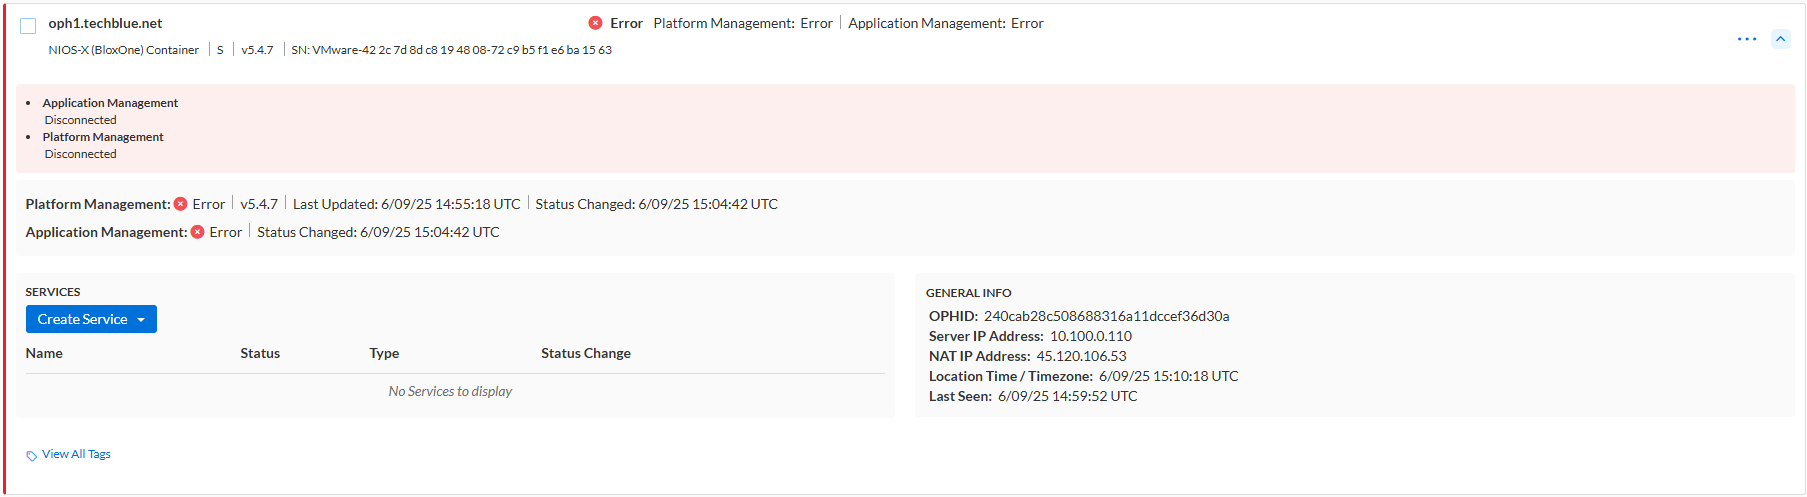
-
Place a check in the box next to the server and click the Edit button.
-
Change the name to offlineoph1.techblue.net, then click Finish and Save & Close.
-
Repeat the same steps for the offline Server with the IP address 10.200.0.110, rename it to offlineoph2.techblue.net, and then click Finish and Save & Close.
Task 2 Solution: Creating a join token.
-
On the Jump-Desktop, click on the start menu and run the application Geany, which we will use to save our join tokens for use in a later step.
-
Switch to your Infoblox Portal browser window, navigate to System → Administration, select the Join Tokens tab, and click on Create.
-
Enter a name for this join token, give the token a description, and click Save & Close.
-
The join token will be displayed on a pop-up window. Click Copy to copy the join token to the clipboard and paste it into Geany.
-
Save this document to the Desktop as join-token.txt.
Make sure you have saved the text of the join token, as the token will not be visible again. If we don't save it, we will need to revoke the token and create a new one.
Task 3 Solution: Deploying NIOS-X Server oph1
-
On the Jump-Desktop, open the terminal application on your application taskbar.
-
Start a secure shell connection to the oph1 virtual machine on IP address 10.100.0.110 on port 65522 using the command
ssh -p 65522 training@10.100.0.110. When prompted, enter the passwordinfoblox. -
Once successfully logged in, download NIOS-X install script using this command.
wget -O niosx_installer.sh https://s3.amazonaws.com/ib-noa-prod.csp.infoblox.com/niosx_installer_v2.2.2.sh -
Use
chmod +x niosx_installer.shcommand to change the script's permission to make it executable. -
Now execute the script with the Join Token you received in Task 1:
sudo ./niosx_installer.sh -j paste-your-join-token-here
-
Enter the password
infobloxif prompted
Task 4 Solution: Deploying NIOS-X Server oph2
-
On the Jump-Desktop, open the terminal application on your application taskbar, if it is not already open.
-
Start a secure shell connection to the oph2 virtual machine on IP address 10.200.0.110 on port 65522 using the command
ssh -p 65522 training@10.200.0.110. When prompted, enter the passwordinfoblox. -
Once successfully logged in, download NIOS-X install script using this command.
wget -O niosx_installer.sh https://s3.amazonaws.com/ib-noa-prod.csp.infoblox.com/niosx_installer_v2.2.2.sh -
Use
chmod +x niosx_installer.shcommand to change the script's permission to make it executable. -
Now execute the script with the Join Token you received in Task 1:
sudo ./niosx_installer.sh -j paste-your-join-token-here
-
Enter the password
infobloxif prompted
Task 5 Solution: Validating that the new NIOS-X Servers are connected to the Infoblox Portal
It may take up to 30 minutes for the two NIOS-X Server containers to be online.
-
Switch to your Infoblox Portal browser window, and navigate to Network → Services & Servers → Servers..
-
Your new NIOS-X Server should appear in the list of servers. If they are not visible, wait 10 seconds and refresh the browser.
-
NIOS-X Server status may initially indicate Offline or Degraded. This is normal. You should also see Platform Management in an Upgrading state. All NIOS-X Servers are automatically upgraded to the latest version to work with the Infoblox Portal. Refreshing the page periodically may show a change.
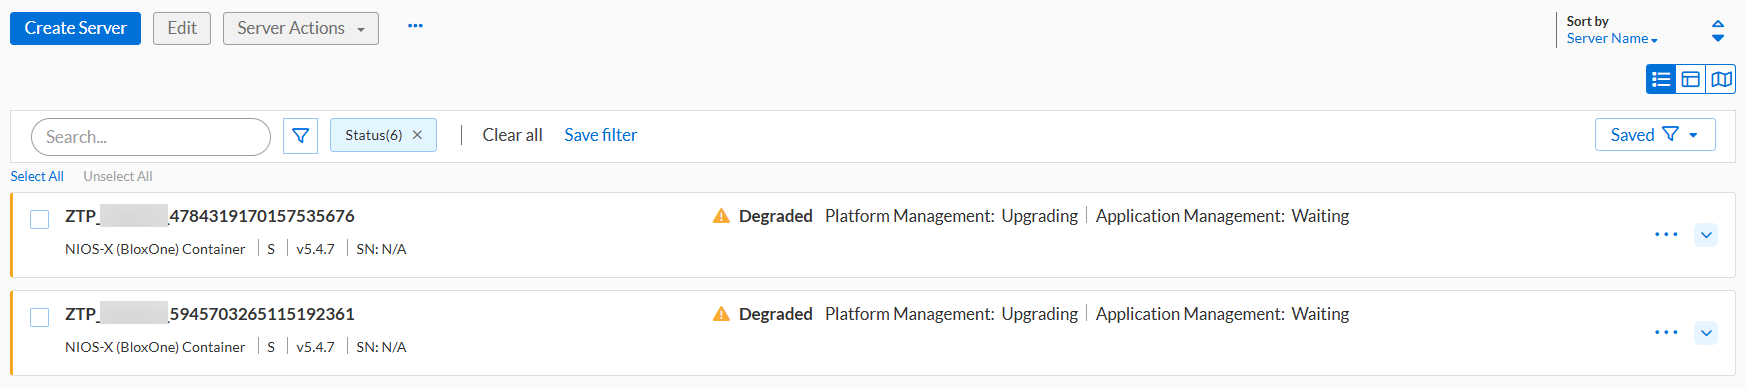
-
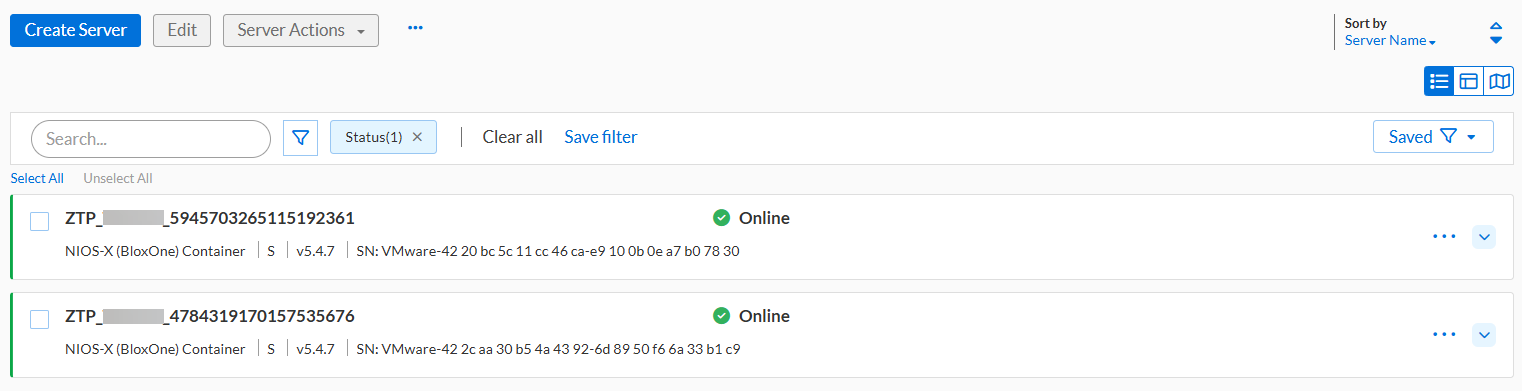
NIOS-X Server will change from Pending to Review Details to Online. Once both of your Server statuses are Online, they are ready for configuration. Refreshing the page may show a change.
-
Expand the server entry in the list (the toggle is on the right-hand side) to locate the online server with the IP address 10.100.0.110.
-
Place a check in the box next to the server and click on the Edit button.
-
Change the name to oph1.techblue.net, and then click Finish and Save & Close.
-
Locate the Online Server with the server IP address 10.200.0.110 by expanding the Server entry in the list (the toggle is on the right-hand side).
-
Place a check in the box next to the Server and click on the Edit button.
-
Change the name to oph2.techblue.net, and then click Finish and Save & Close.
Task 6 Solution: Swapping offline NIOS-X instances with new servers on Infoblox Portal
-
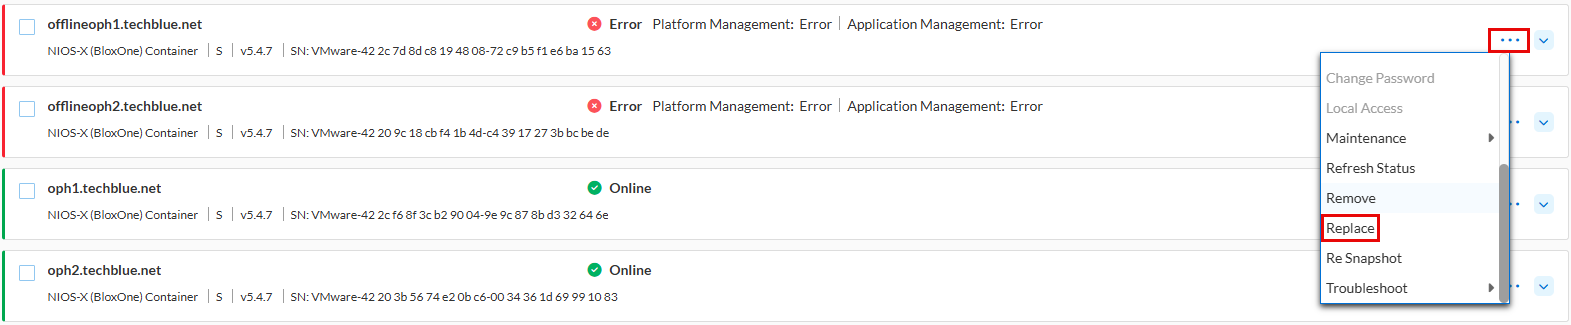
From the Infoblox Portal browser window, navigate to Network → Services & Servers → Servers.
-
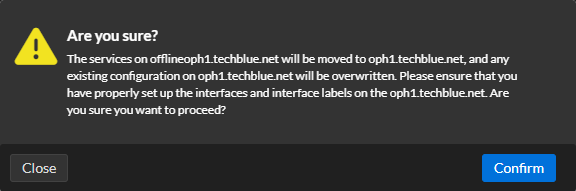
Click on the ‘ellipsis’ icon for the offline Server offlineoph1.techblue.net. Use the Replace option. From the 'Replacement Server' list, select oph1.techblue.net. Then, click on Save & Close.
-
A confirmation message is displayed. Click Confirm to replace the existing server with the new server.
-
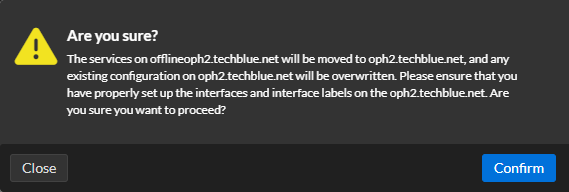
Repeat the same steps for offlineoph2.techblue.net by clicking on the ellipsis icon for the offline server offlineoph2.techblue.net. Select the Replace option. From the 'Replacement Server' list, select oph2.techblue.net. Then click Save & Close.
-
A confirmation message is displayed. Click Confirm to replace the existing server with the new server.
-
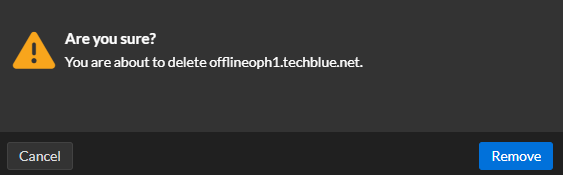
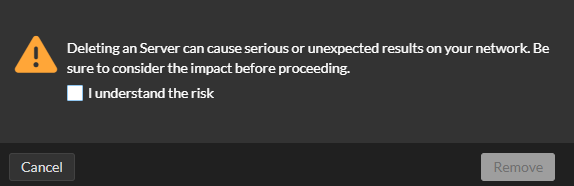
After 2-3 minutes, the offline server will now appear in Pending status. Click on the ellipses icon for the offline server offlineoph1.techblue.net. Select the Remove option. For the first confirmation message, click Remove. For the 2nd confirmation message, check the box beside ‘I understand the risk’ and click Remove. This would remove the offline server from the Infoblox Portal.
-
Repeat the last step for the offline server offlineoph2.techblue.net as well.
-
The statuses of your new NIOS-X Servers may now indicate 'Offline' or 'Degraded'. This is normal, as the configurations are being transferred. Periodically refreshing the page may show changes.
It may take up to 30 minutes for the two new NIOS-X Servers to be online after the last step.