Scenario
Your organization is preparing to move a dual‑DNS‑view deployment into production. To improve clarity, the default DNS view will be renamed to External, while the Internal view will remain unchanged.
Because the DNS members are deployed behind Network Address Translation (NAT), external clients must receive public IP addresses of the glue records rather than the internal addresses. In this lab, you will configure the NIOS Grid so that glue records published in the External view reflect the correct NAT’ed public IP addresses, ensuring proper resolution for Internet-based clients.
Estimate Completion Time
-
20 minutes
Credentials
|
Description |
Username |
Password |
URL or IP |
|---|---|---|---|
|
Grid Manager UI |
admin |
infoblox |
Requirements
-
Administrative access to the Grid
Learning Content
-
NIOS DDI DNS Service Administration Lab Activities 3006: Configuring NAT'ed Glue Records in NIOS
Lab Initiation
Access jump-desktop
Once the lab is deployed, you can access the virtual machines required for this activity. To begin, select VM List from the navigation bar at the top, locate jump-desktop, and click the green play icon to open its console. Log in to the Linux UI.

Username: training
Password: infoblox
Initiate lab
To initiate the lab, double-click the Launch Lab icon on the Desktop.

Choose the lab number from the list and click OK.

After clicking OK, you will see a pop-up message with a brief description of the lab task. If the description looks correct, click Yes to continue lab initiation.

Lab initiation will take a couple of minutes to finish.
Once complete, you will see another pop-up message with the login credentials and the URL for the Grid Manager’s User Interface. Note that the credentials may differ from those from prior labs.

Tasks
Task 1: Renaming the DNS View
Rename DNS View from default to External.
Task 2: Configuring NAT'ed IP Addresses for Glue records
Configure glue records in the new view to reflect the NAT'ed public IP addresses of DNS servers, instead of the private IP addresses assigned to their interfaces. Please refer to Table 3524-1 for details.
Table 3524-1
|
Name Server |
Internal/Private IP Address |
External/Public IP Address |
|---|---|---|
|
ibns1.techblue.net |
10.100.0.105 |
203.0.113.50 |
|
ibns2.techblue.net |
10.200.0.105 |
203.0.113.51 |
Glue records are A or AAAA records that belong to NS records.
Task 3: Verifying resolution
Test and confirm that the external clients are now getting the NAT'ed IP addresses when querying the glue records for both ibns1.techblue.net and ibns2.techblue.net.
Solutions
Task 1 Solution: Renaming the DNS View
-
In Data Management → DNS → Zones, you should see both views (Internal and default).
-
Select the view default and click Edit.
-
In the DNS View field, change the name to External. Click Save & Close.
If you do not see multiple DNS views under Data Management → DNS → Zones, you might be inside of a zone. Look for the DNS Home link on the upper left corner, it should be located between the name of the view and the sub menus. This link will display all of the DNS views configured for the Grid.
Task 2 Solution: Configuring NAT'ed IP Addresses for Glue records
The DNS member configuration needs to be updated. After the update, the Infoblox Grid will automatically reconfigure the zone records in the external DNS view.
Perform the following steps on the members ibns1 and ibns2:
-
Navigate to Data Management → DNS → Members, edit the Member DNS Properties.
-
Toggle into Advanced Mode and select DNS Views from the side menu.
-
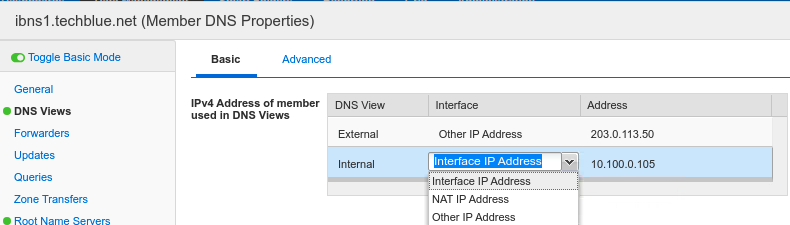
In the section IPv4 Address of Member Used in DNS Views, look for External. It defaults to Interface IP address. Change it from Interface IP Address to Other IP Address, and enter the public or external IP address for this member. The example screenshot shows the completed configuration for the member ibns1.techblue.net.
-
Click Save & Close. You will be prompted to restart the service. Wait until you have configured both members, then restart the service.
Task 3 Solution: Verifying resolution
Testing is tricky, since all internal clients (including the jump-desktop) are receiving only Internal view answers. If you were to look up the glue records for ibns1.techblue.net from the jump-desktop, it looks like this:
$ dig @10.100.0.105 ibns1.techblue.net. A
; <<>> DiG 9.11.12 <<>> @10.100.0.105 ibns1.techblue.net. A
; (1 server found)
;; ->>HEADER<<- opcode: QUERY, status: NXDOMAIN, id: 52746
;; flags: qr rd ra; QUERY: 1, ANSWER: 0, AUTHORITY: 1, ADDITIONAL: 1

;; AUTHORITY SECTION:
techblue.net.      900   IN    SOA   polaris.techblue.io. training-tech.infoblox.com. 26 10800 3600 2419200 900

;; Query time: 29 msec
;; SERVER: 10.100.0.105#53(10.100.0.105)
;; WHEN: Thu Aug 19 20:45:07 UTC 2021
;; MSG SIZE  rcvd: 156
This is because there is no techblue.net zone configured in the Internal view. Because recursion is enabled, the DNS server 10.100.0.105 went to the Internet, found the authoritative servers for the Internet-available techblue.net, and received the answer NXDOMAIN. We can see the name of the primary name server is polaris.techblue.io. in the output above.
We want the jump-desktop to temporarily receive the External view answer. This can be accomplished by modify the match clients value on the Internal view, to deny jump-desktop access to the Internal view. In other words, this will force the jump-desktop to receive data from the External view, so we may test and verify the name resolution. To do this, we will need to: 1) get the IP address of jump-desktop, and 2) make an exception for that IP address so it temporarily receives answers from the External view.
Modifying DNS View’s Match Clients List
Edit the DNS Internal view, modifying its match clients rule to deny access to jump-desktop’s IPv4 address, 10.35.22.10.
-
From Data Management→DNS→Zones, place a check in the box beside the Internal view.
-
Click Edit.
-
Select the left tab for Match Clients.
-
The current configuration is to serve this view (Internal) to internal/private networks only. We need to add a new entry for our jump-desktop.
-
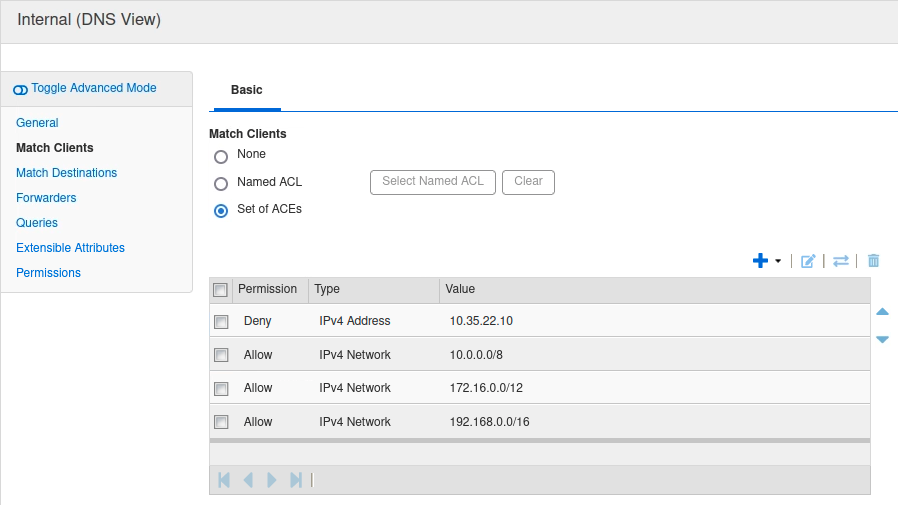
In the section for Match Clients → Set of ACE’s, click the Add dropdown and choose IPv4 Address.
-
For the Address, enter 10.35.22.10.
-
For the Permission, set it to Deny.
-
-
Click the checkbox next to the entry you just created, and use the arrows to move it to the top of the list.
-
Click Save & Close.
-
Restart service when prompted.
Remember that match clients list works exactly the same as ACL and other ordered lists: Ordering matters. If you left the IPv4 10.35.22.10 at the bottom of the list, it will never be reached. When the DNS server is processing this request, it will see 10.0.0.0/8 → Allow, and stop processing after that statement. In other words, you would have added an entry that doesn’t do anything, because of its placement on the list.
Now, when we re-run the same query, the answer comes from the External view, and we can verify that it is correct. Notice the presence of the AA flag, which confirms that we are receiving this authoritative answer from member 10.100.0.105.
$ dig @10.100.0.105 ibns1.techblue.net. A
; <<>> DiG 9.11.12 <<>> @10.100.0.105 ibns1.techblue.net. A
; (1 server found)
;; global options: +cmd
;; Got answer:
;; ->>HEADER<<- opcode: QUERY, status: NOERROR, id: 59671
;; flags: qr aa rd ra; QUERY: 1, ANSWER: 1, AUTHORITY: 0, ADDITIONAL: 1

;; OPT PSEUDOSECTION:
;; QUESTION SECTION:
;ibns1.techblue.net.            IN    A

;; ANSWER SECTION:
ibns1.techblue.net. 28800 IN    A     203.0.113.50

;; Query time: 5 msec
;; SERVER: 10.100.0.105#53(10.100.0.105)
;; WHEN: Thu Aug 19 20:50:16 UTC 2021
;; MSG SIZE  rcvd: 91