Scenario
Your organization is implementing Infoblox Threat Defense to enhance its DNS security. In this lab, you will configure a security policy, using custom lists to always allow trusted corporate domains and block unwanted ones. The policy will leverage Infoblox threat feeds and Threat Insight to block malicious indicators, apply category filters to restrict adult and gambling content, and use application filters to block specific social media apps while allowing approved applications. This phase/lab focuses on creating and configuring the policy rules; associating network scopes with the policy will be covered in later labs.
Estimated Completion Time
-
20 to 30 minutes
Prerequisites
-
Administrative access to the Infoblox Portal
Tasks
-
Create Custom lists.
-
Create Filters.
-
Add a Security Policy.
Task 1: Creating Custom Lists
Use the Education Infoblox Portal credentials to log in to the Infoblox Portal. Create two custom lists: an allowlist that only lists the domain www.infoblox.com and a blocklist containing entries eicar.co, eicar.stream, and eicar.pw.
Task 2: Creating Filters
In this task, you will create a Category Filter for adult-themed content and an Application Filter for the social media apps Instagram and TikTok.
Task 3: Adding a Security Policy
In the Infoblox Portal, create a new security policy named Techblue Sec Policy.
-
Don't add any network scopes.
-
Change the default general tab settings as follows:
-
Change the Precedence Value to 1.
-
Toggle Geolocation ON.
-
Toggle Safe Search ON.
-
Toggle Block DNS Rebinding Attacks ON.
-
-
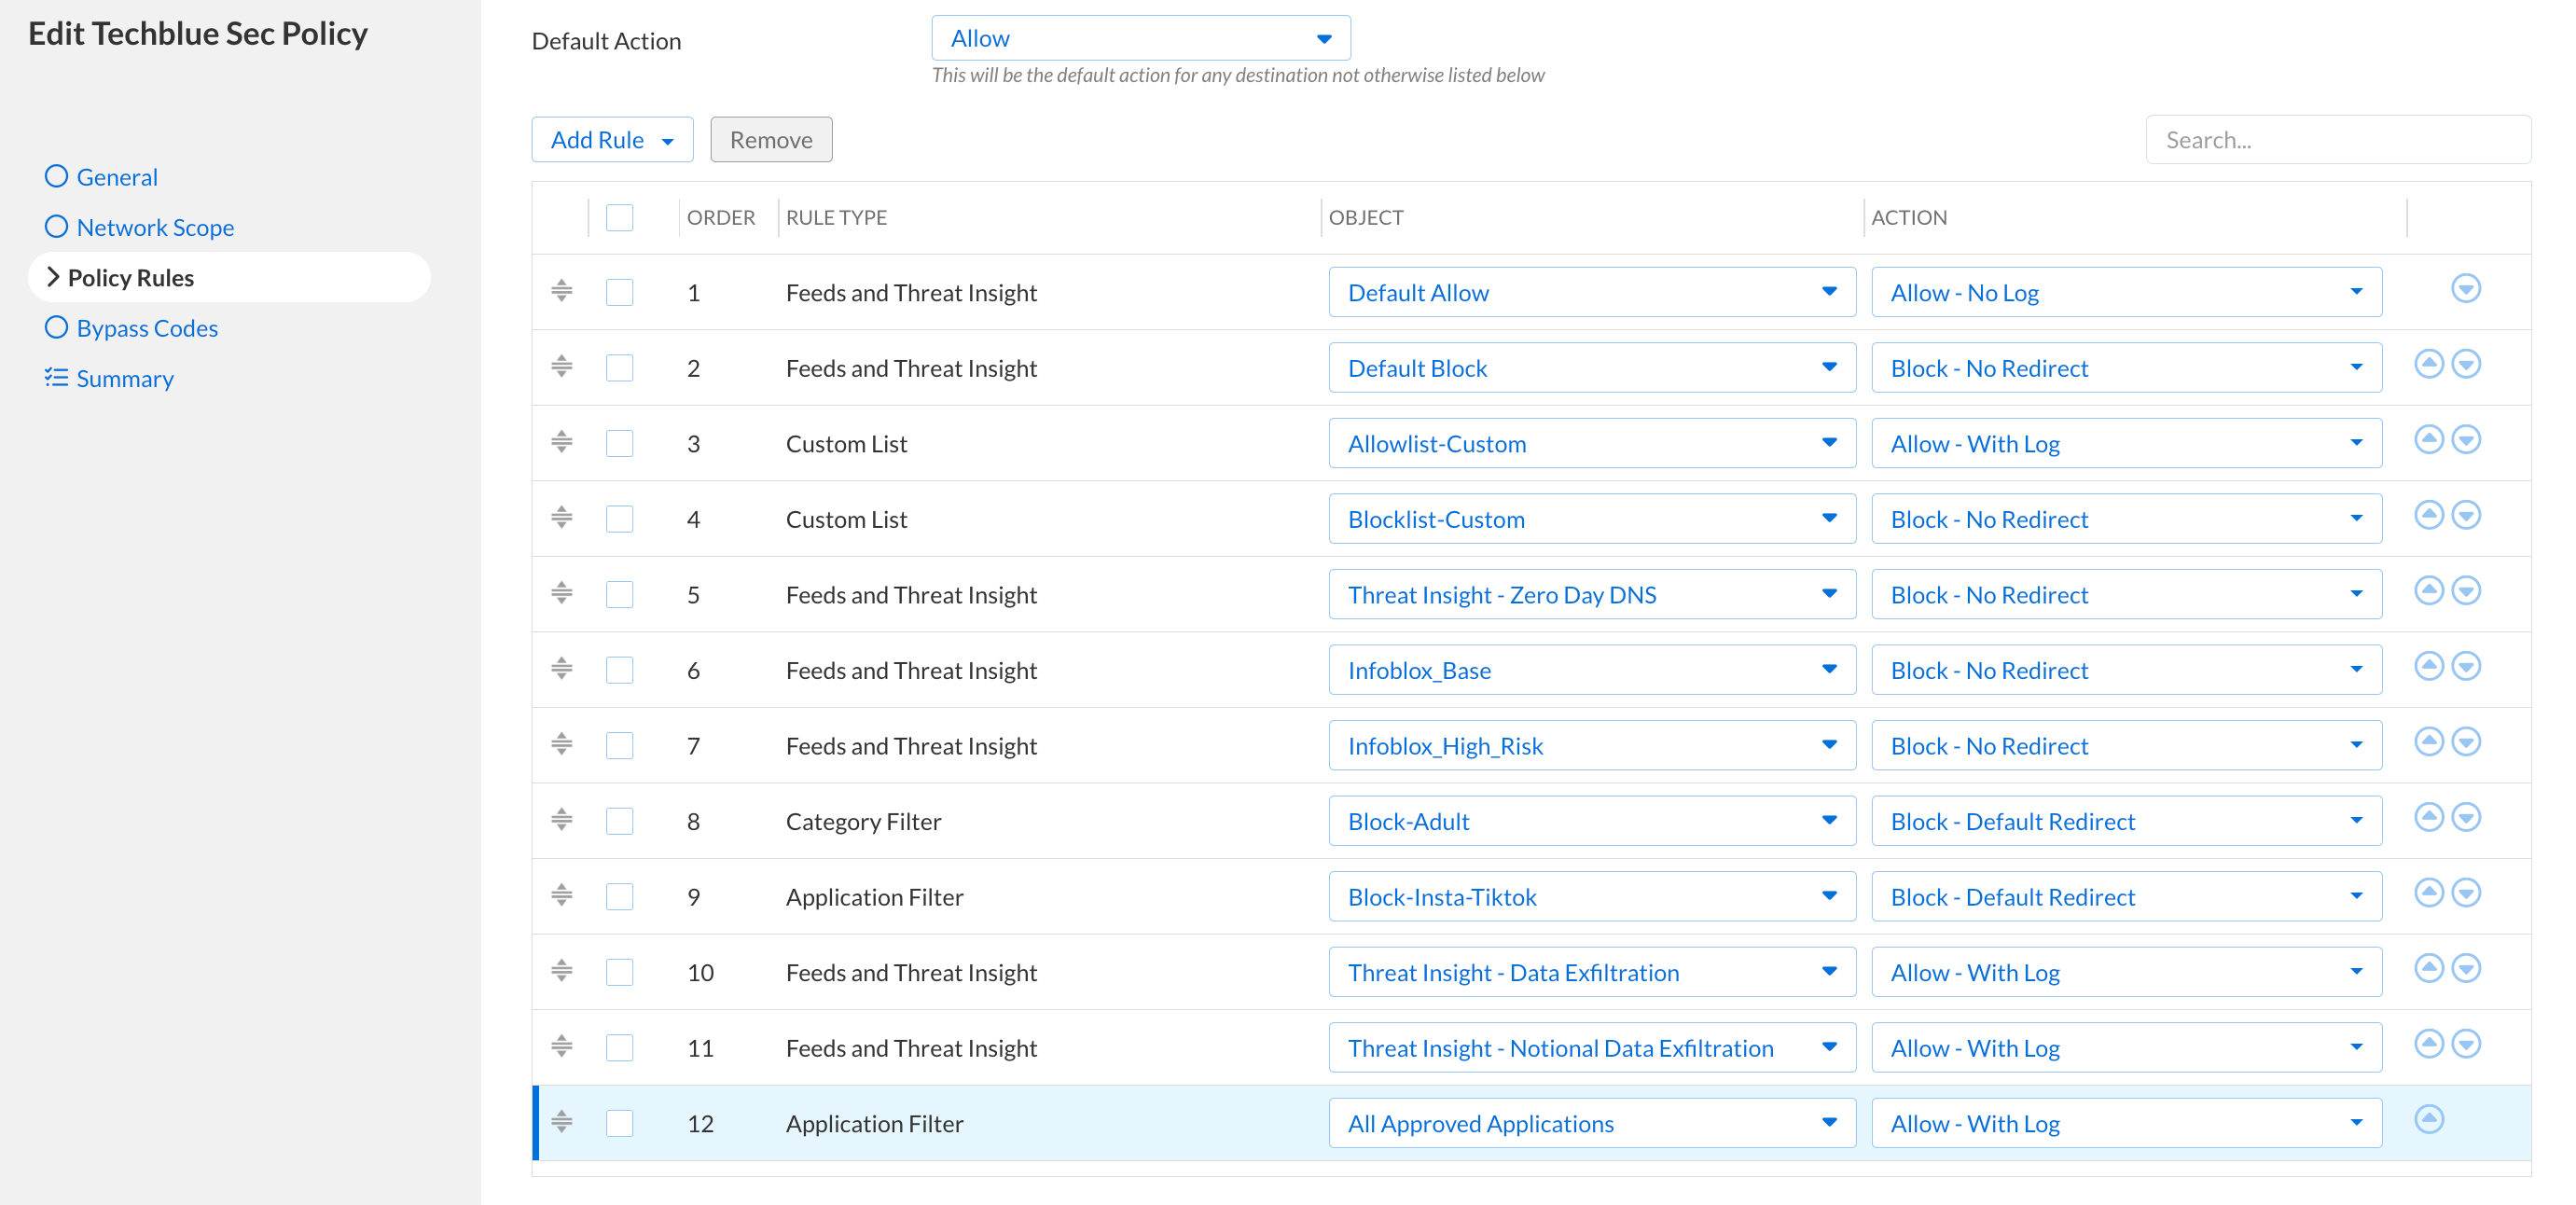
The policy contains the following rules in order:
-
Default Allow → Allow (No log)
-
Default Allow will be listed under Feeds and Threat Insight
-
-
Default Block → Block (No Redirect)
-
Default Block will be listed under Feeds and Threat Insight
-
-
Allowlist-Custom → Allow (with log)
-
Blocklist-Custom → Block (No Redirect)
-
Threat Insight - Zero Day DNS → Block (No Redirect)
-
Infoblox_Base (feed) → Block (No Redirect)
-
Infoblox_High_Risk (feed) → Block (No Redirect)
-
Block-Adult → Block (Default Redirect)
-
Block-Insta-Tiktok → Block (Default Redirect)
-
Threat Insight - Data Exfiltration → Allow (with log)
-
Threat Insight - Notional Data Exfiltration → Allow (with log)
-
All Approved Applications → Allow (with log)
-
Solutions
Task 1 Solution: Creating Custom Lists
In this task, we will create two custom lists, “Allowlist-Custom“ and “Blocklist-Custom“. We will add our partner domain www.infoblox.com to “Allowlist-Custom“ and the three unwanted domains eicar.co, eicar.stream and eicar.pw to “Blocklist-Custom“.
Note: The three unwanted domains are added to the list to simulate an unwanted domain for lab purposes. All three domains are already part of the Infoblox_Base feed and need not be blocked manually.
-
Log in to your lab’s jump-desktop.
-
Use your Education Infoblox Portal Credentials to log into the Infoblox Portal.
-
Navigate to Security → Configure → Security Policies → Custom Lists.
-
Click Create Custom List
-
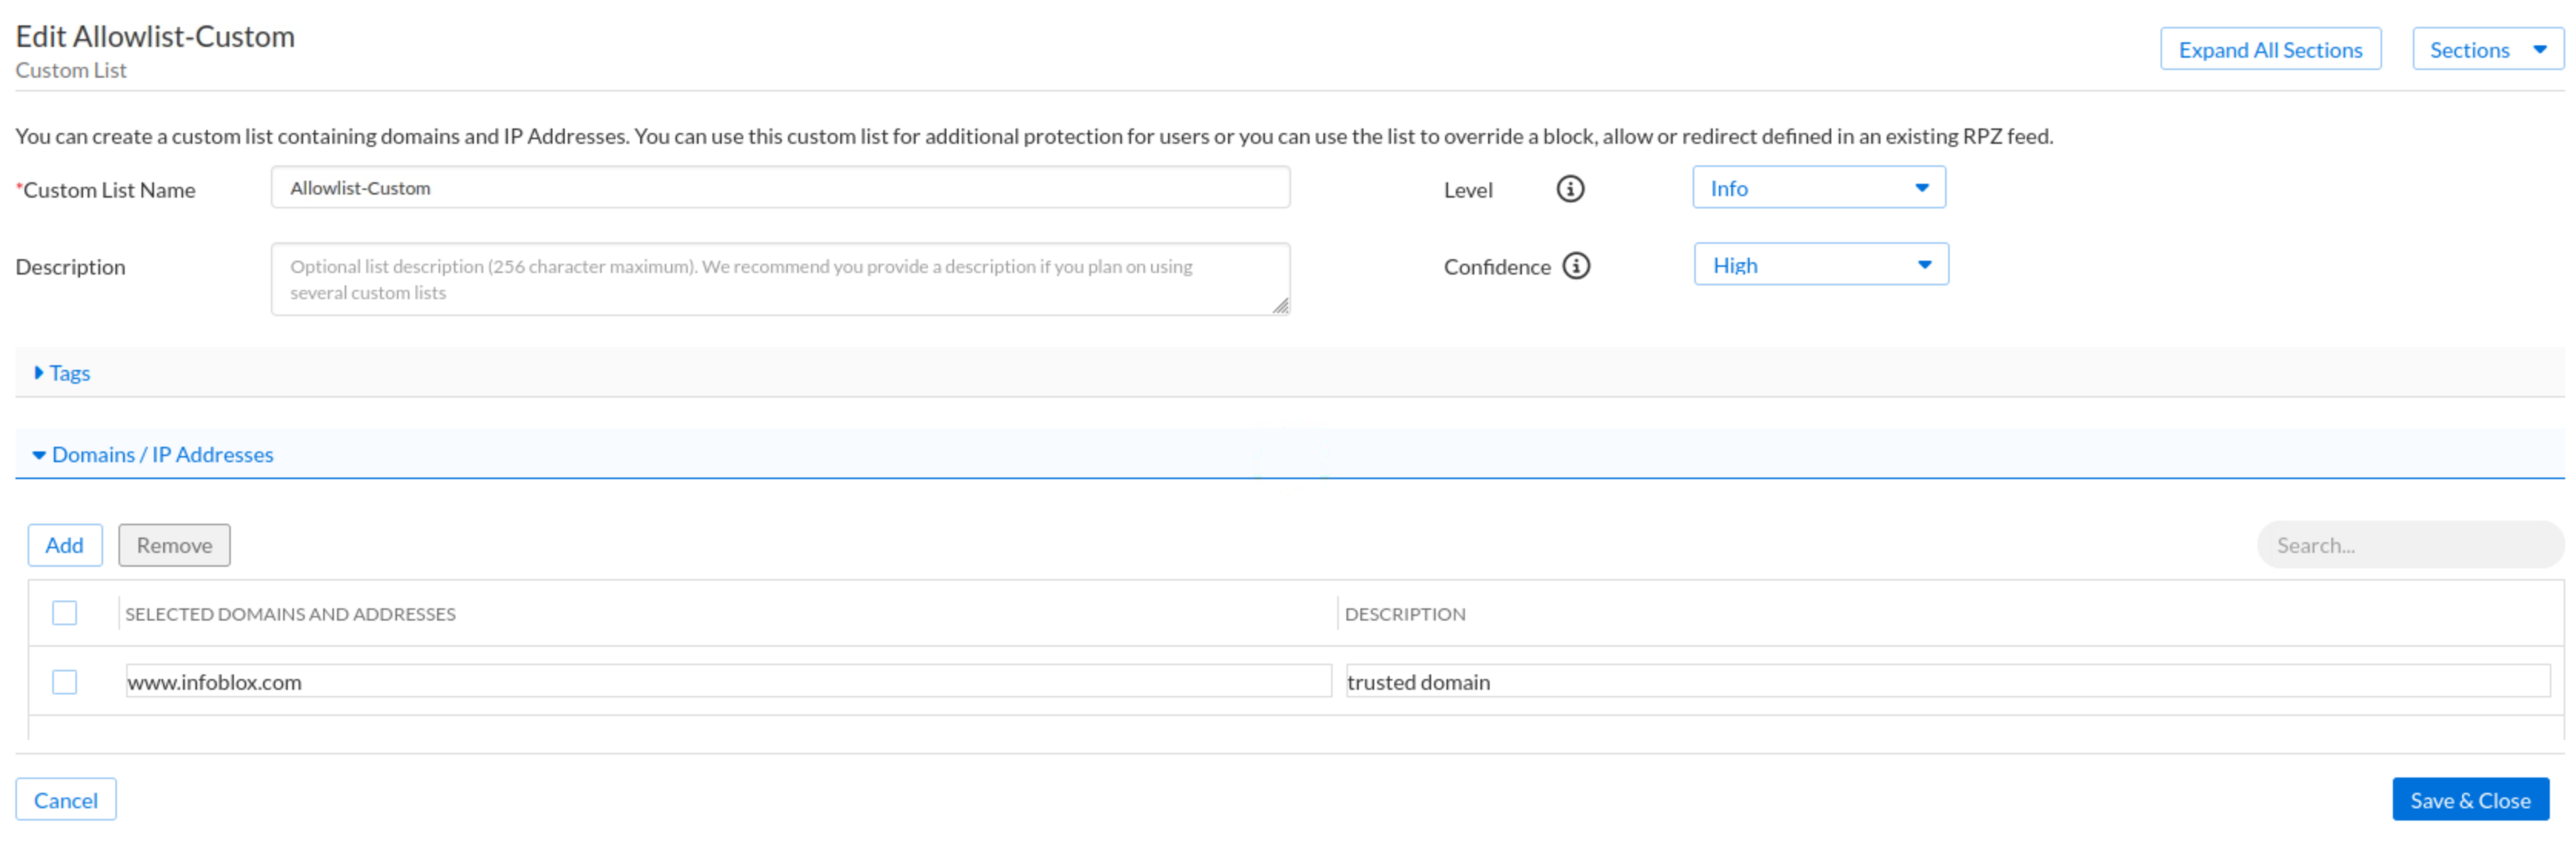
Use the name Allowlist-Custom.
-
Change the default severity level to Info and leave the Confidence level High.
-
Under the Domains and IP Addresses section:
-
Click Add
-
Enter the domain www.infoblox.com.
-
Click Save & Close.
-
-
Create another Custom List
-
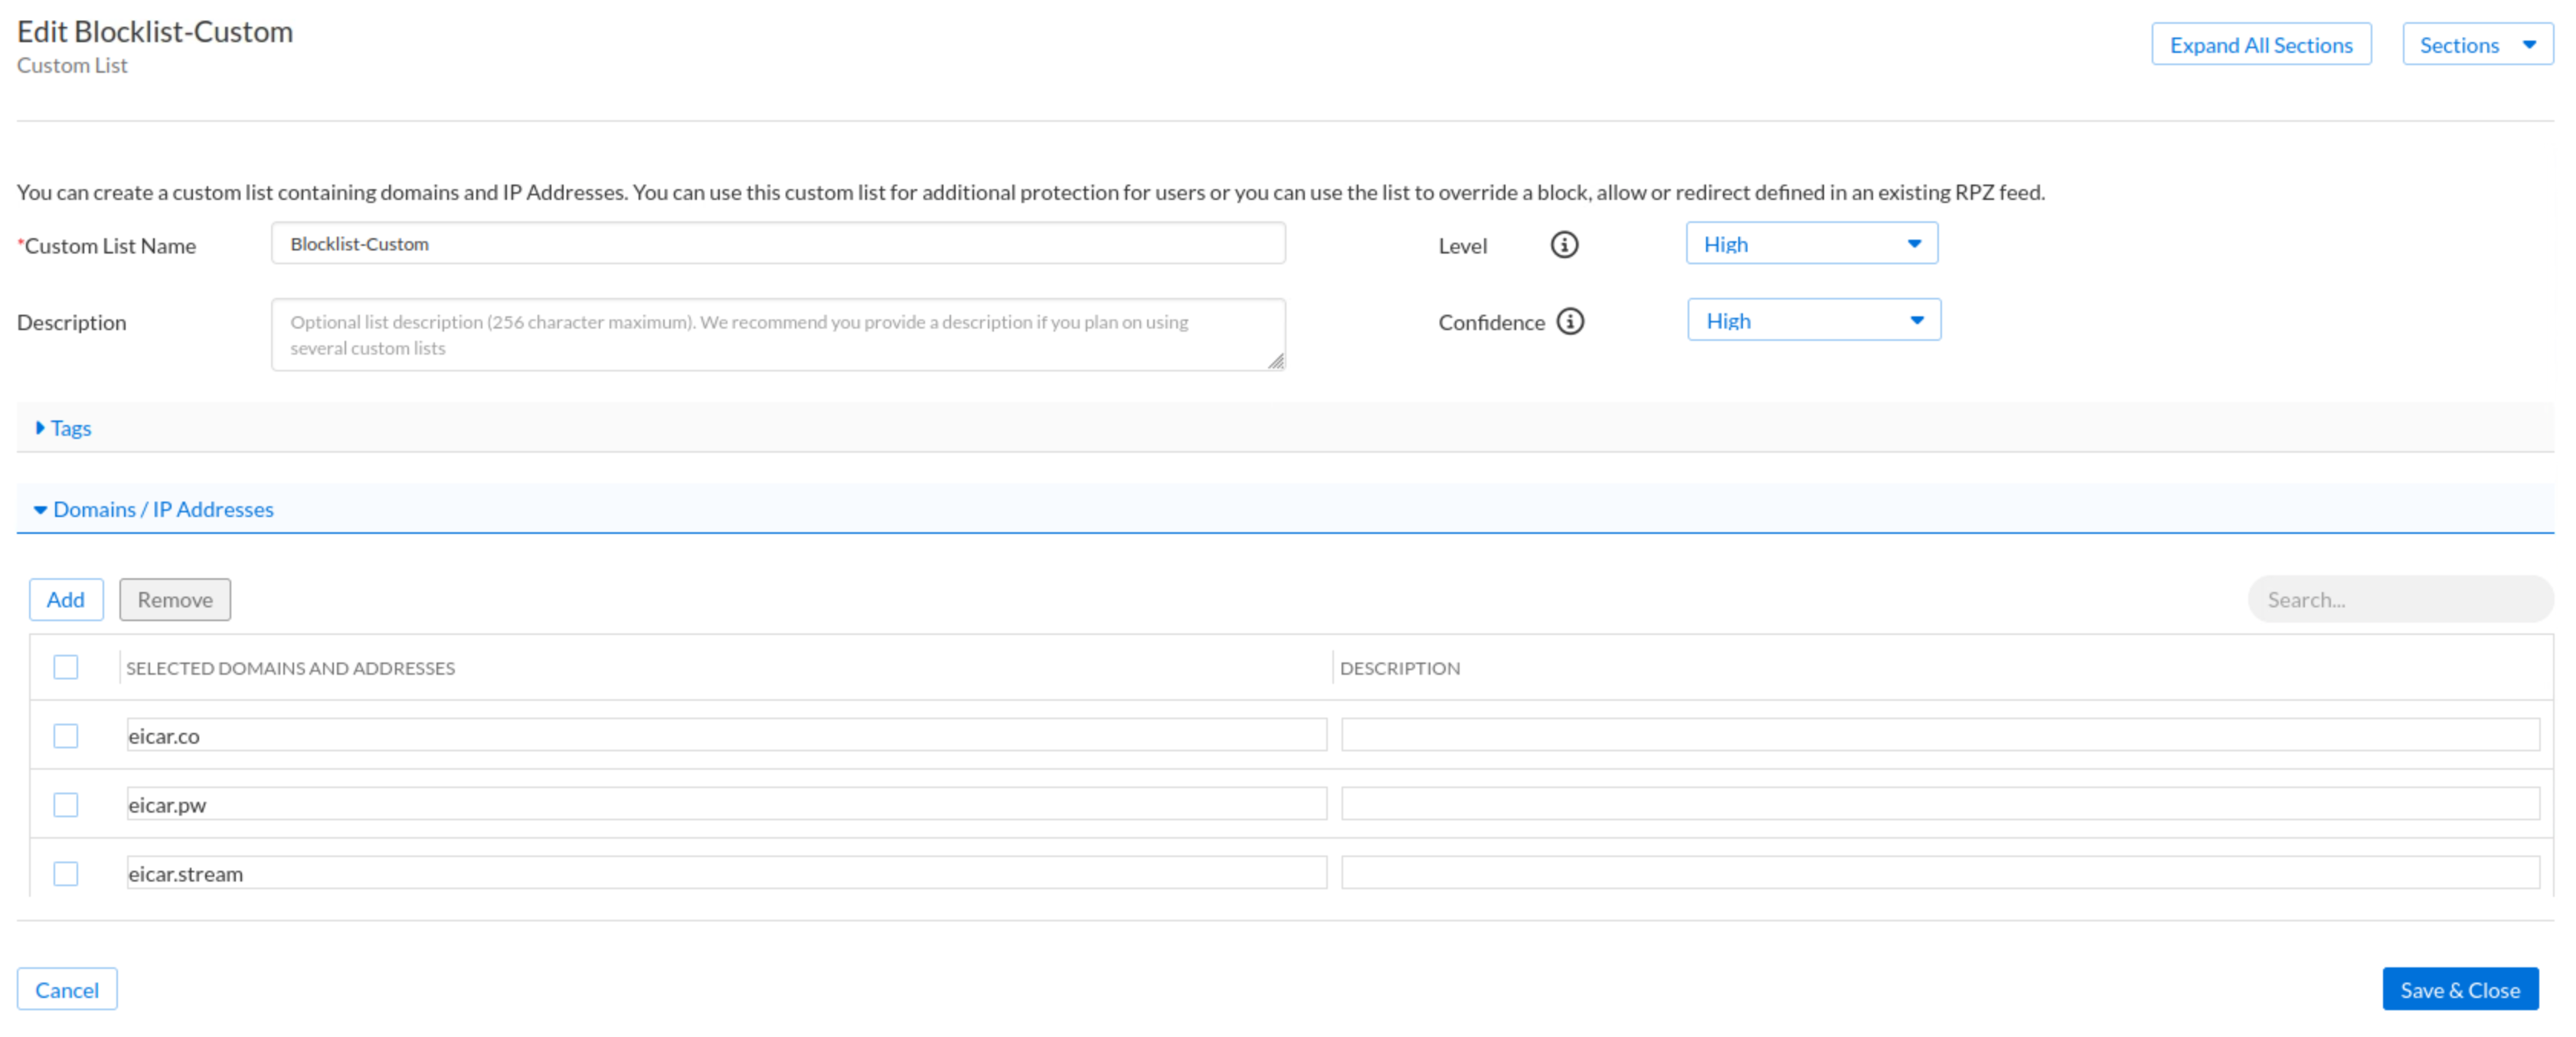
Use the name Blocklist-Custom.
-
Change the default severity and Confidence levels to High.
-
Under the Domains and IP Addresses section:
-
Enter the domain eicar.co, eicar.stream and eicar.pw.
-
Click Save & Close.
-
Task 2 Solution: Creating Filters
In this step, we will create two filters. The first is a category filter, “Block-Adult“, which will match the adult category. The second is an Application filter, “Block-Insta-Tiktok“, which will match two specific applications, Instagram and TikTok.
-
Navigate to Security → Configure → Security Policies → Filters.
-
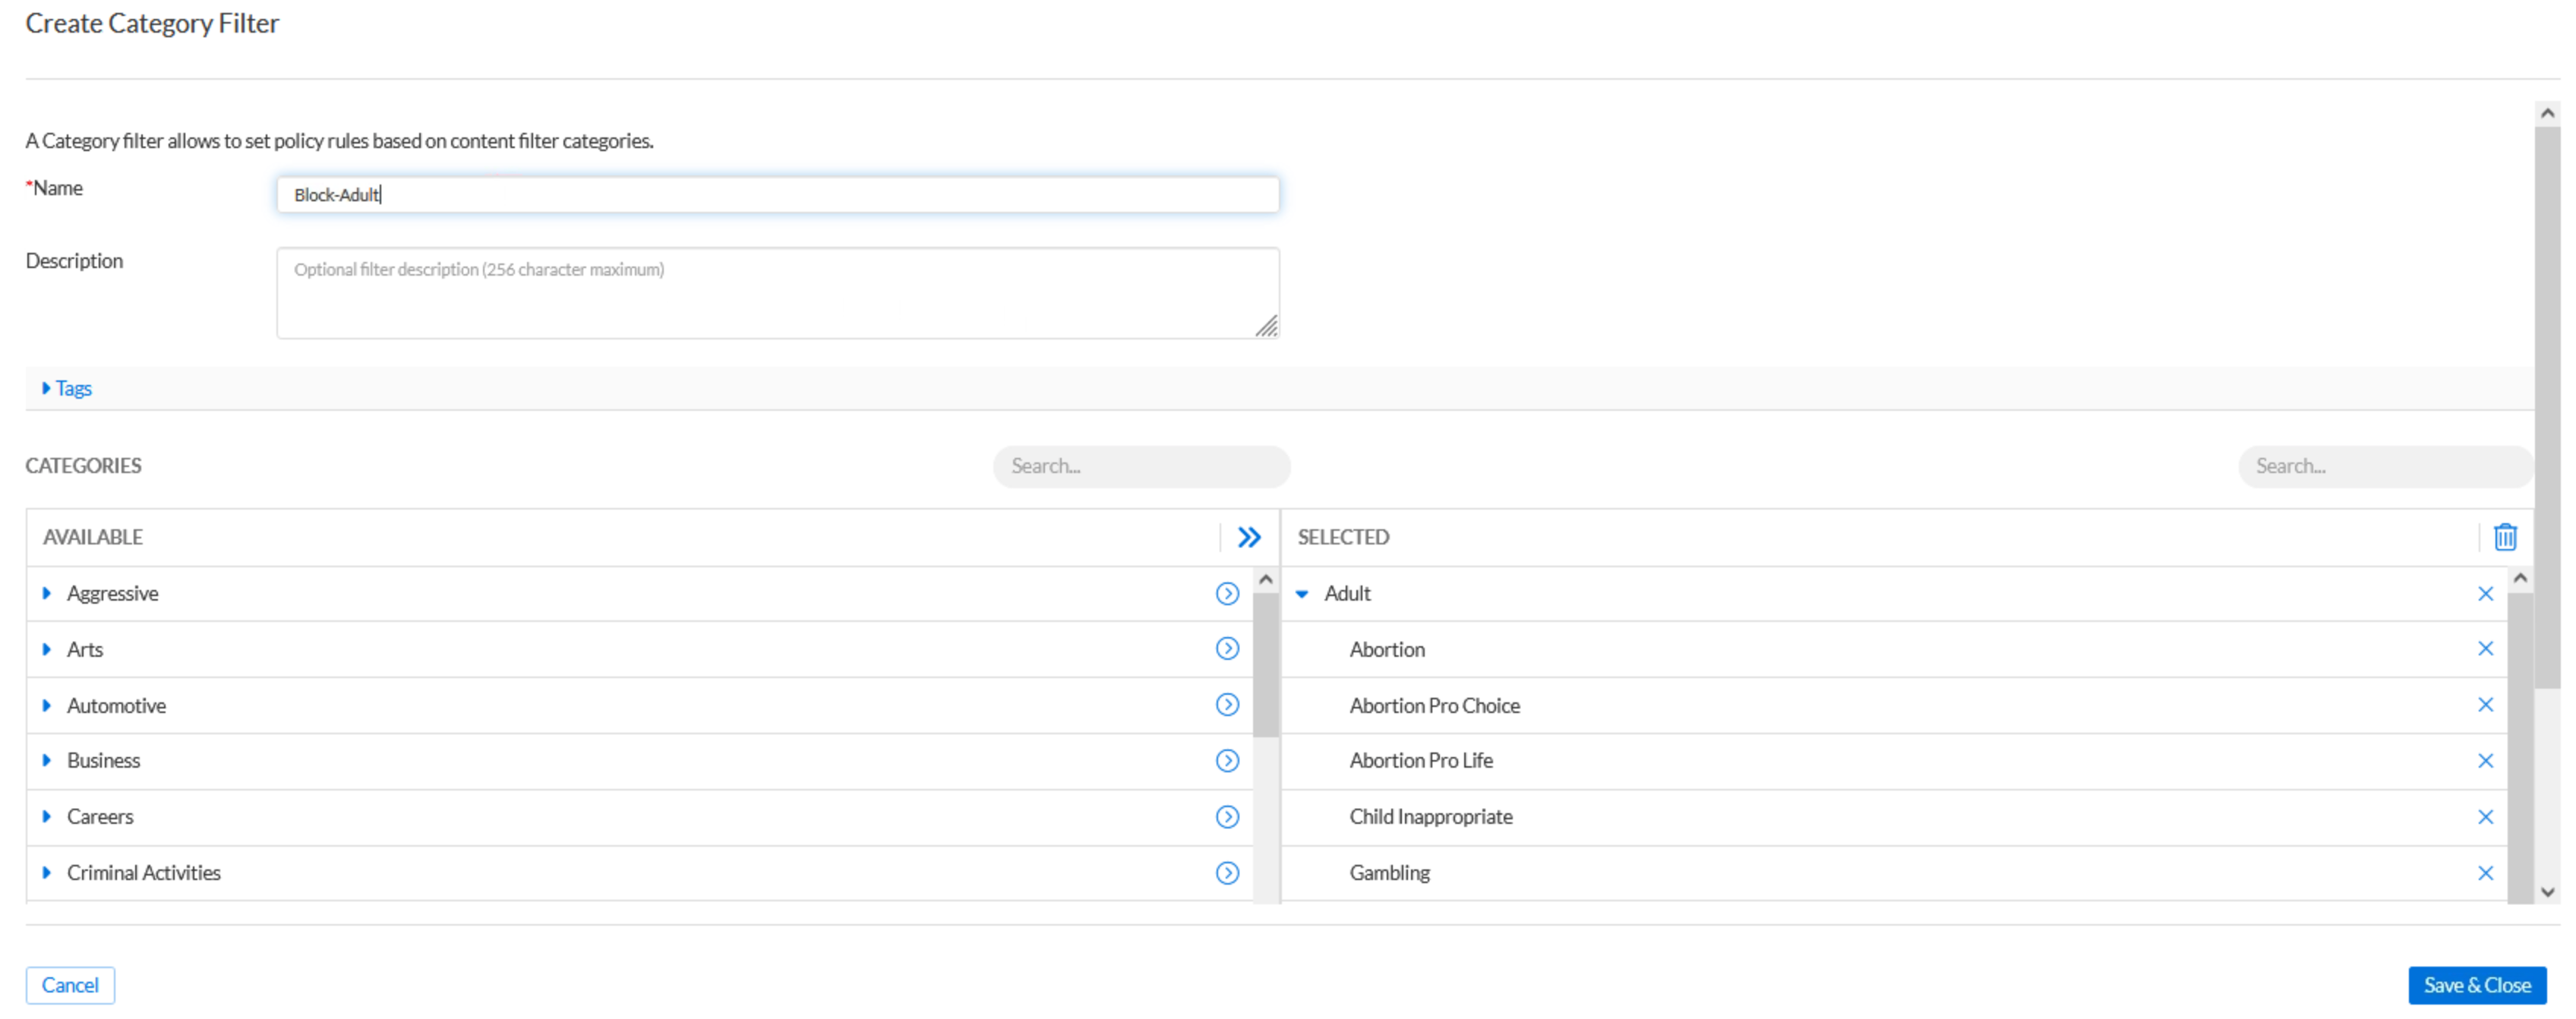
Click the Arrow next to Create Filter and choose Create Category Filters
-
Use the name Block-Adult.
-
Click the arrow next to the Adult section to add it to the selected column.
-
If you don’t see the Adult category immediately, use the search bar above the Available categories list to locate it quickly.
-
Click Save & Close.
-
-
-
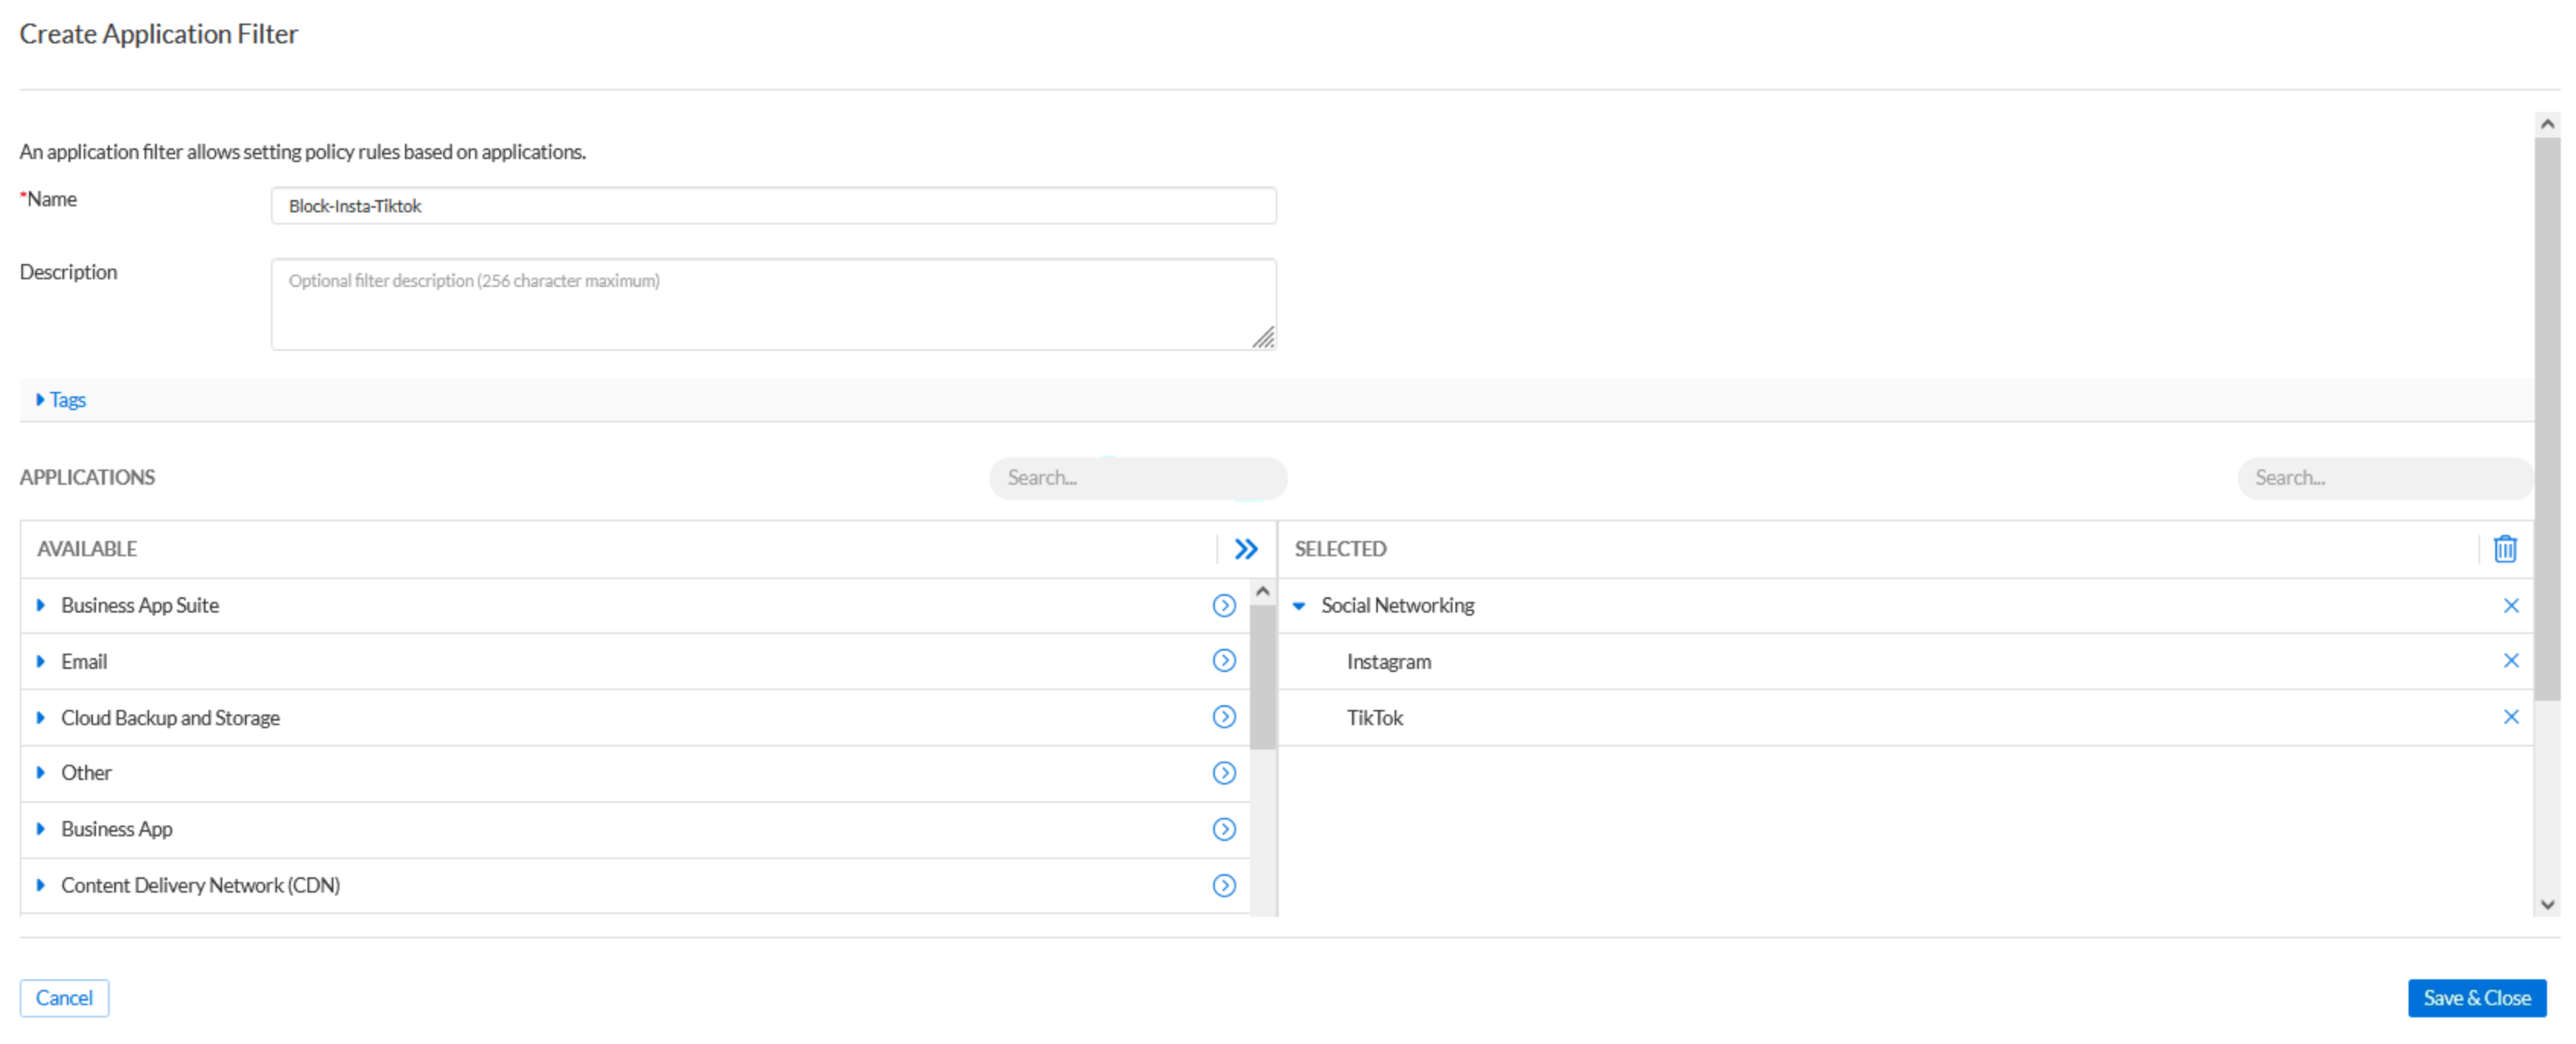
Click the Arrow next to Create Filter and choose Create App Filter
-
Use the name Block-Insta-Tiktok.
-
Use the search bar at the top of the Applications available section to quickly locate Instagram and TikTok.
-
Select both Instagram and TikTok from the application list.
-
Click Save & Close.
-
Task 3 Solution: Adding a Security Policy
In this task, we will create a new security policy, Techblue Sec Policy. The security policy will enable geolocation, safe search, and blocking DNS rebinding attacks. Network scopes will not be configured in this lab. The security policy will follow rule precedence recommendations for a security-biased organization:
-
Default Section: This section includes rules we are very certain about. It's a short list of rules whose entries have been manually added, ensuring high confidence.
-
Default Allow → Allow (No log): This list is empty in this scenario, but it should contain trusted domains that do not need to be logged.
-
Default Block → Block (No Redirect): In this scenario, this list is empty, but it should contain either unwanted domains or the very rare feed false-negatives.
-
Allowlist-Custom → Allow (with log): This is a custom list created to allow partner domains, so it needs to be high on the list.
-
-
High Confidence Block Section: This section contains rules that we are highly confident should be blocked. Since Techblue is a security-biased organization, we will add the high-confidence, low-risk feeds and medium-confidence custom lists to the bottom of the section.
-
Blocklist-Custom → Block (No Redirect): A custom list created to block some unwanted domains
-
Threat Insight - Zero Day DNS → Block (No Redirect): This is a Threat Insight Custom List
-
Infoblox_Base (feed) → Block (No Redirect): A high confidence, high risk Infoblox feed.
-
Infoblox_High_Risk (feed) → Block (No Redirect): A high confidence, high risk Infoblox feed.
-
Block-Adult → Block (Default Redirect): A Category filter blocking adult content.
-
Block-Insta-Tiktok → Block (Default Redirect): An application filter blocking Instagram and TikTok.
-
-
Allow Section: This section includes application filters for allowed applications that need to be monitored but not blocked. Usually, medium—and low-confidence rules that should initially be allowed with monitoring logs are added to this section.
-
Threat Insight—Data Exfiltration → Allow (with log): This is a Threat Insight Custom List that detects Data exfiltration attempts. It is a medium-confidence list. In this scenario, we chose to allow its entries and monitor its behaviour before deciding on its final action.
-
Threat Insight—Notional Data Exfiltration → Allow (with log): This Threat Insight Custom List detects and stops Data exfiltration attempts. It is a low-confidence list. In this scenario, we chose to allow its entries and monitor its behaviour before deciding on its final action.
-
All Approved Applications → Allow (with log): This list will be populated by Application Discovery.
-
-
Navigate to Security → Configure → Security Policies → Security Policies
-
Click Create Security Policy
-
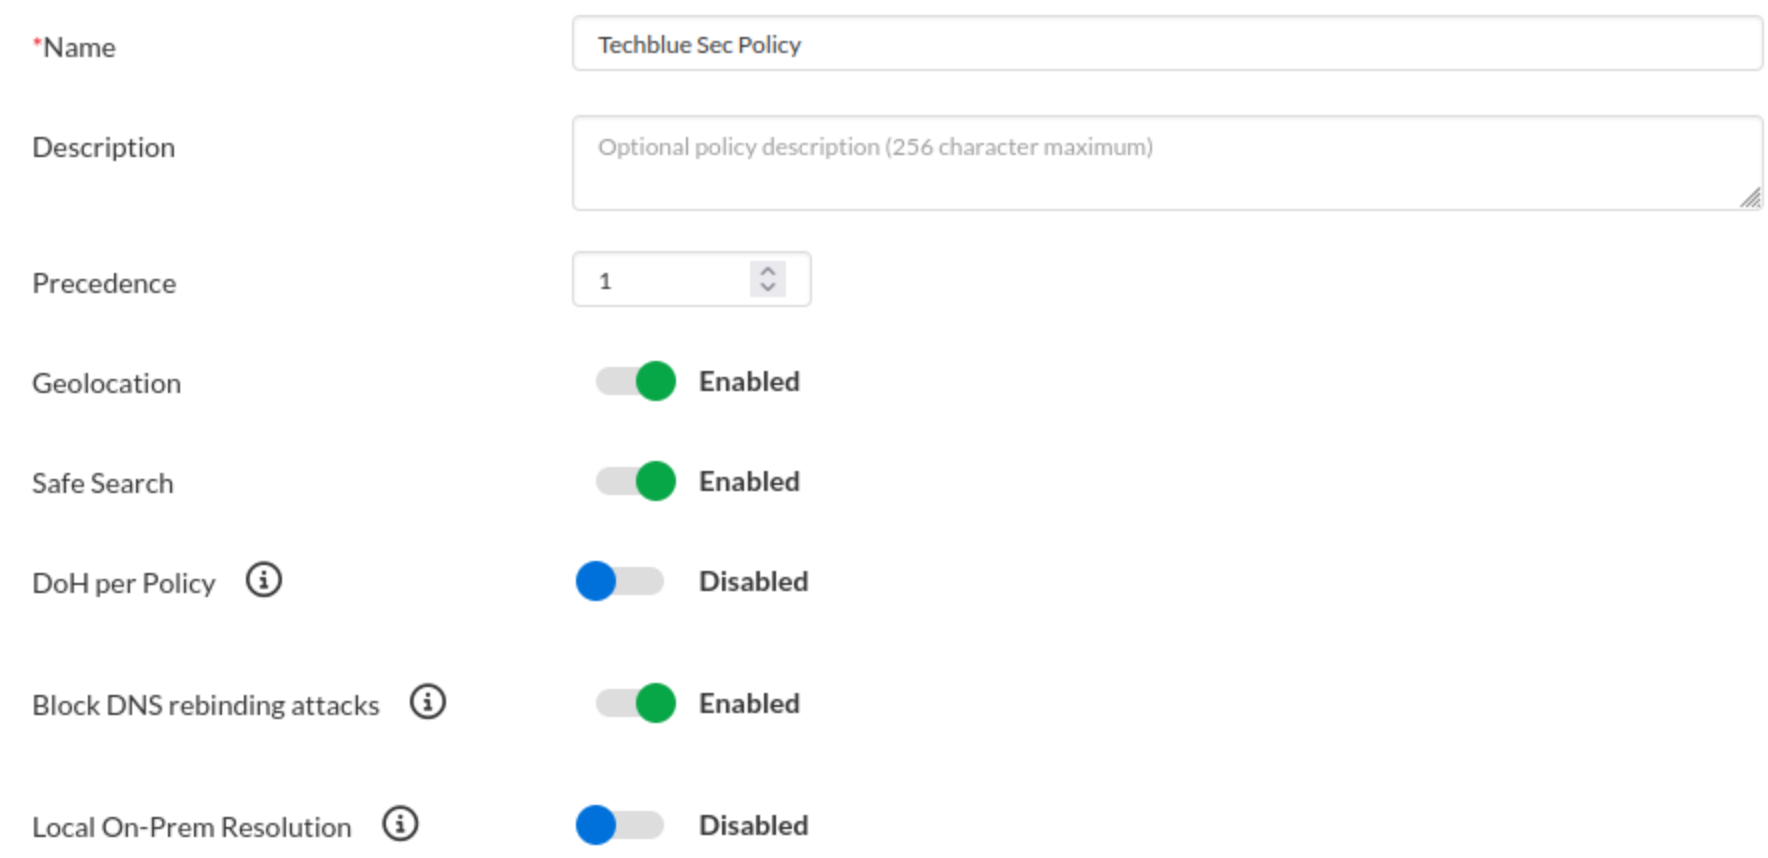
Use the name Techblue Sec Policy.
-
Change the general settings as follows:
-
Set the Precedence Value to 1.
-
Toggle Geolocation ON.
-
Toggle Safe Search ON.
-
Toggle Block DNS Rebinding Attacks ON.
-
-
Click the Policy Rules tab add the following rules:
-
Default Allow → Allow (No log)
-
Default Allow will be listed under Feeds and Threat Insight
-
-
Default Block → Block (No Redirect)
-
Default Block will be listed under Feeds and Threat Insight
-
-
Allowlist-Custom → Allow (with log)
-
Blocklist-Custom → Block (No Redirect)
-
Threat Insight - Zero Day DNS → Block (No Redirect)
-
Infoblox_Base (feed) → Block (No Redirect)
-
Infoblox_High_Risk (feed) → Block (No Redirect)
-
Block-Adult → Block (Default Redirect)
-
Block-Insta-Tiktok → Block (Default Redirect)
-
Threat Insight - Data Exfiltration → Allow (with log)
-
Threat Insight - Notional Data Exfiltration → Allow (with log)
-
All Approved Applications → Allow (with log)
-
-
Click Finish, then Save & Close.