Scenario
You have already configured DHCP for the Techblue NYC Branch on a single NIOS-X server, but the branch now needs DHCP service redundancy so clients can still obtain leases if one service host becomes unavailable. Your goal is to create an Advanced Active/Passive HA pair by using the existing DHCP service instances, update the DHCP Config Profile to use both service instances, reassign the subnet and range to the HA Group, and then verify that the testing-linux client can still obtain a lease during a simulated host outage.
Estimated Completion Time
-
25 to 35 minutes
Prerequisites
-
Administrative access to the Infoblox Portal
Learning Content
Tasks
-
Create HA Group
-
Update DHCP Config profile
-
Reassociate subnet
-
Reassociate range
-
Validate client lease
-
Test DHCP High Availability
Task 1: Create HA Group
Create an HA Group named Techblue NYC Branch DHCP HA by using Techblue DHCP Service 1 as the active service instance and Techblue DHCP Service 2 as the passive service instance. The HA Group will provide the redundancy used in the remaining tasks.
Task 2: Update DHCP Config Profile
Update the Techblue NYC Branch DHCP Config Profile so it applies to both DHCP service instances in the HA pair rather than only one service instance.
Task 3: Reassociate subnet
Reassociate the branch subnet 172.31.101.0/24 with the HA Group so the DHCP service for that subnet is no longer tied to a single service instance.
Task 4: Reassociate range
Reassociate the DHCP range 172.31.101.100-172.31.101.199 with the HA Group so the lease pool uses the redundant DHCP service design you created earlier.
Task 5: Validate client lease
Use testing-linux to confirm that a DHCP client can still obtain a lease from the updated configuration and identify which DHCP service instance offered the lease.
Task 6: Test DHCP High Availability
Simulate a failure of the DHCP service that provided the lease and verify that the client can still receive a lease from the remaining online NIOS-X server.
Solutions
Task 1 Solution: Create HA Group
Start by creating the HA Group that will hold the two existing DHCP service instances. This gives you the redundancy object you need before you can update the profile, subnet, and range. After you create the HA Group, expect it to show a Degraded status at first. That is normal, and it remains in that state until you complete the remaining HA configuration steps.
-
Log in to your lab’s jump-desktop.
-
Use the Education Infoblox Portal credentials to sign in to the Infoblox Portal.
-
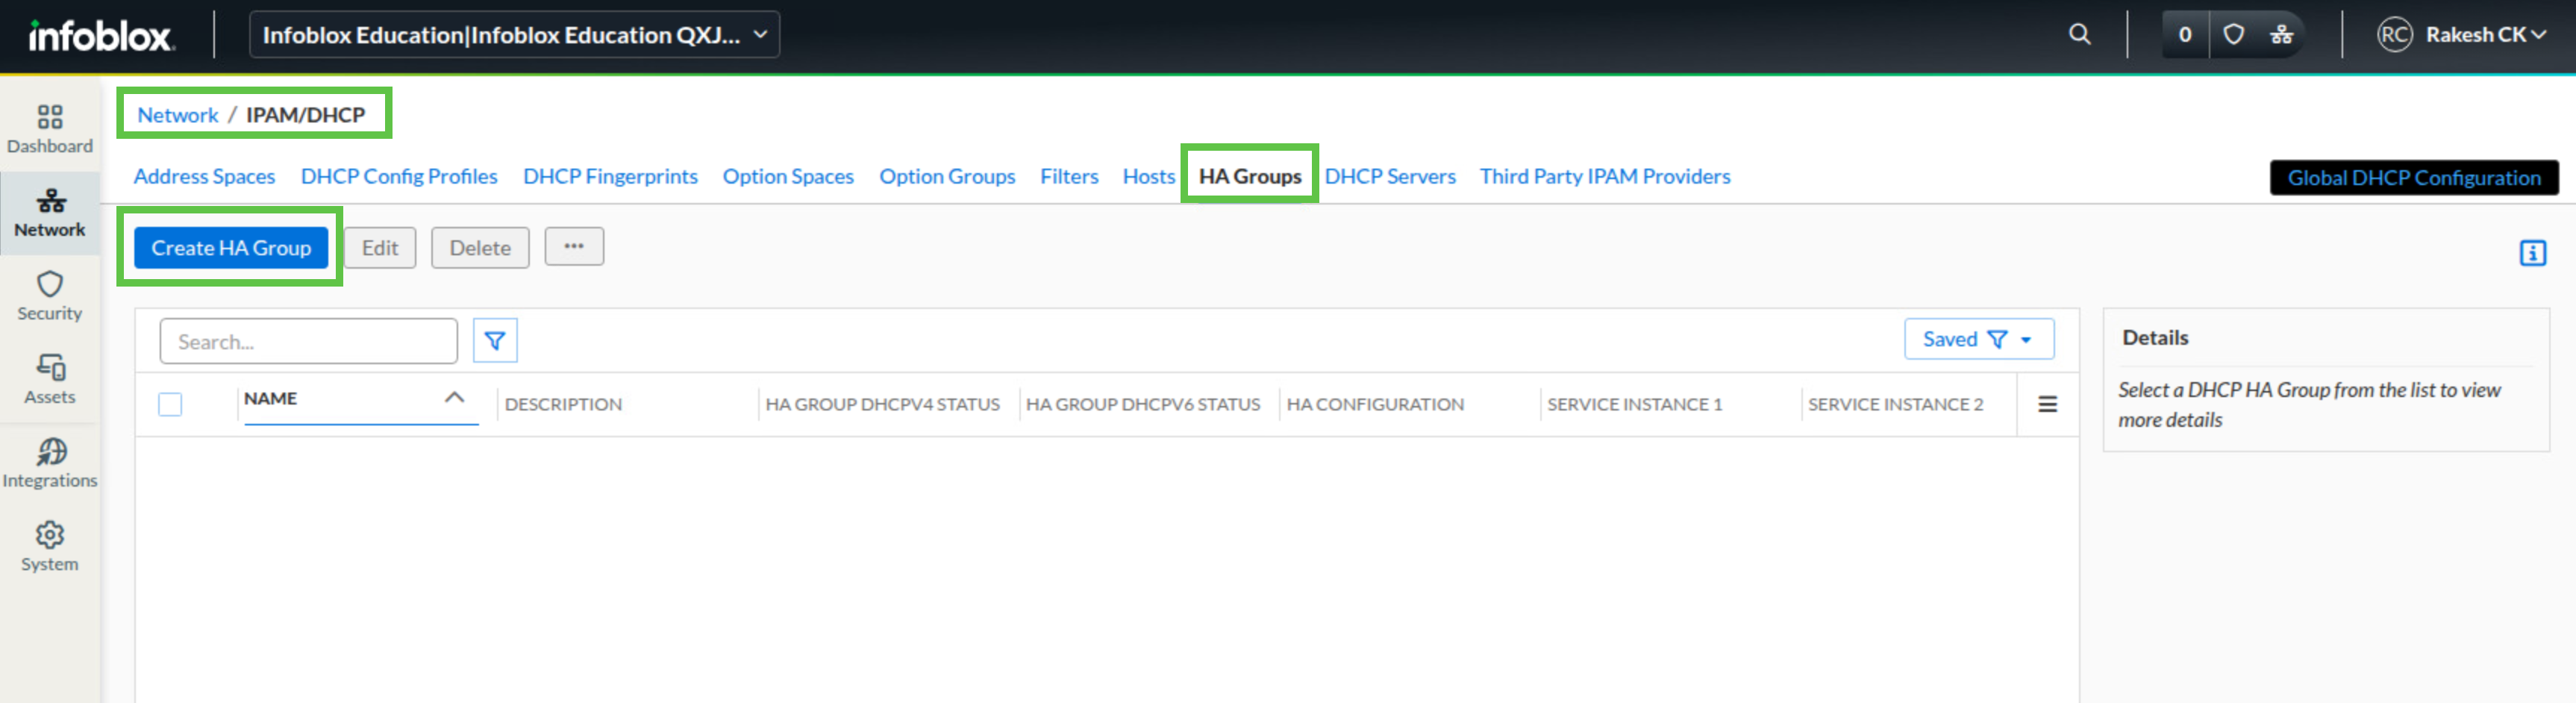
Navigate to Network → IPAM/DHCP.
-
Select the HA Groups tab.
-
Click Create HA Group.
-
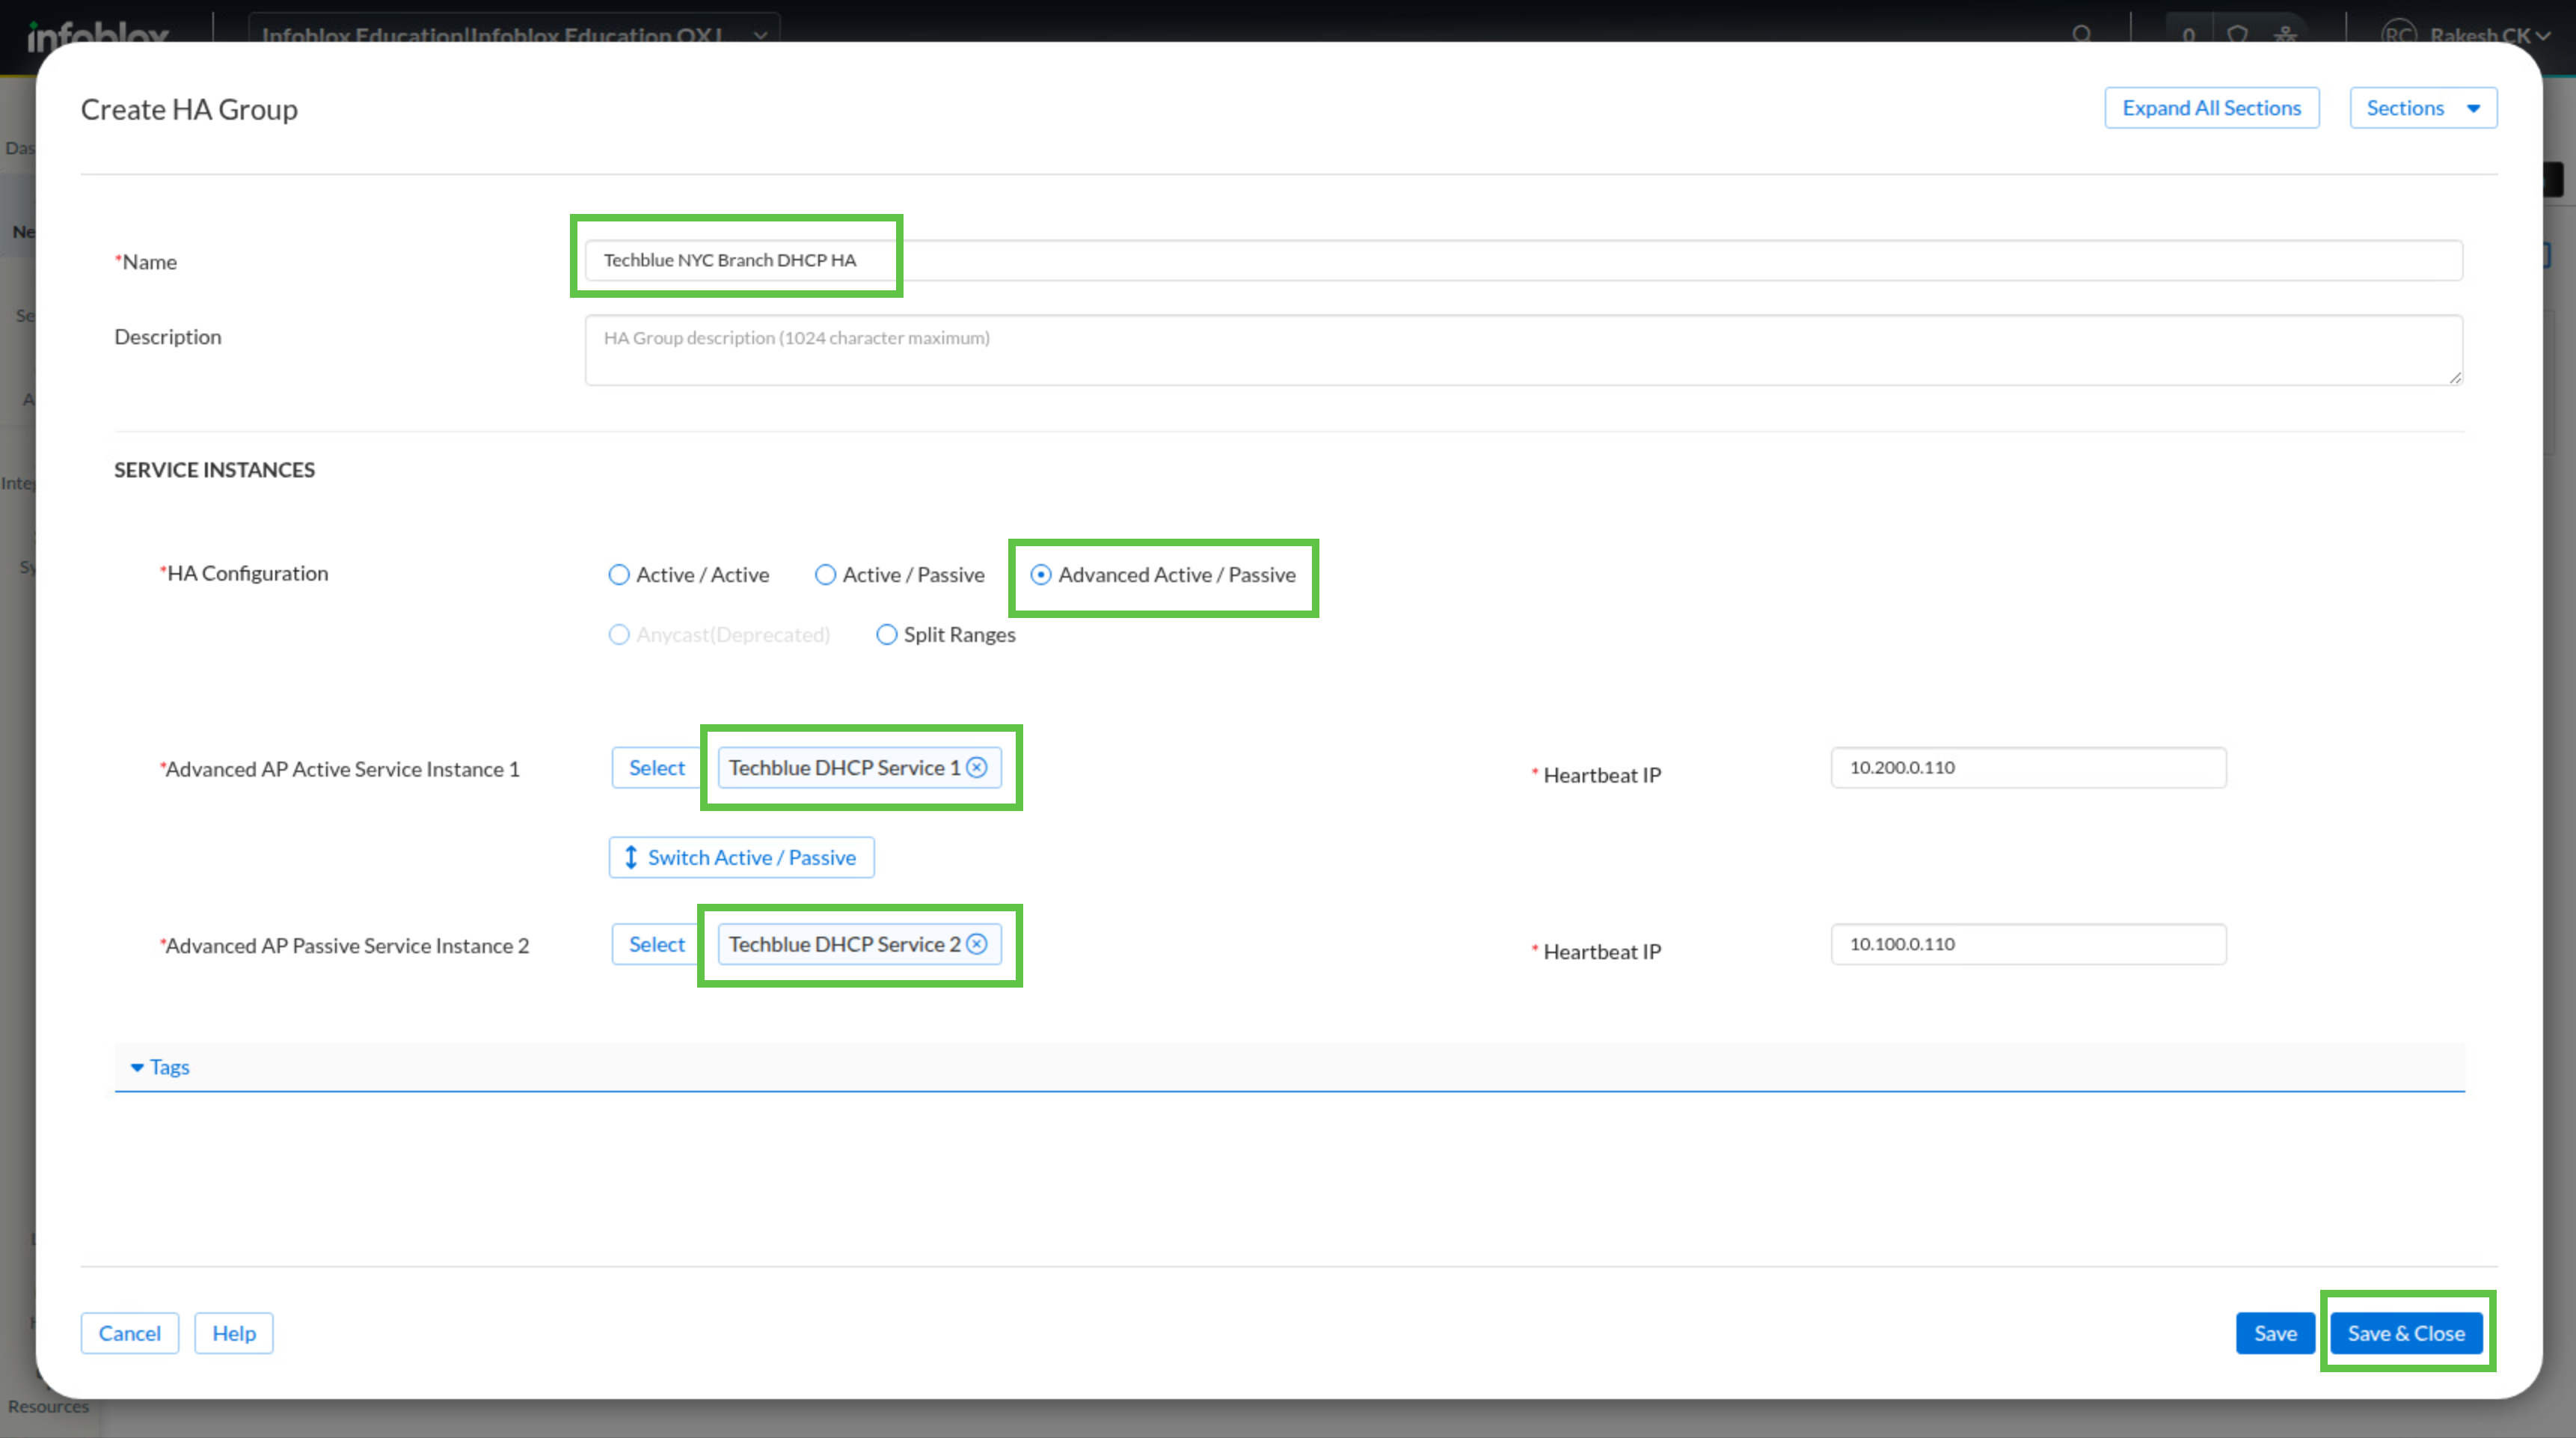
In the name field, enter Techblue NYC Branch DHCP HA.
-
Set HA Configuration Type to Advanced Active/Passive.
-
Next to Advanced Active Service Instance 1, click Select Active Service Instance, choose Techblue DHCP Service 1, and click Select.
-
Next to Advanced Passive Service Instance 2, click Select Passive Service Instance, choose Techblue DHCP Service 2, and click Select.
-
Review the HA Group settings.
-
Click Save & Close.
The HA Group will be in the Degraded state after its initial creation. It will remain Degraded until you have completed all configuration steps.
Task 2 Solution: Update DHCP Config Profile
The Techblue NYC Branch DHCP Config Profile already supplies branch-specific DHCP options, but an HA design requires the profile to apply to both DHCP service instances. Update the profile now so both members of the HA pair can serve the same client settings.
-
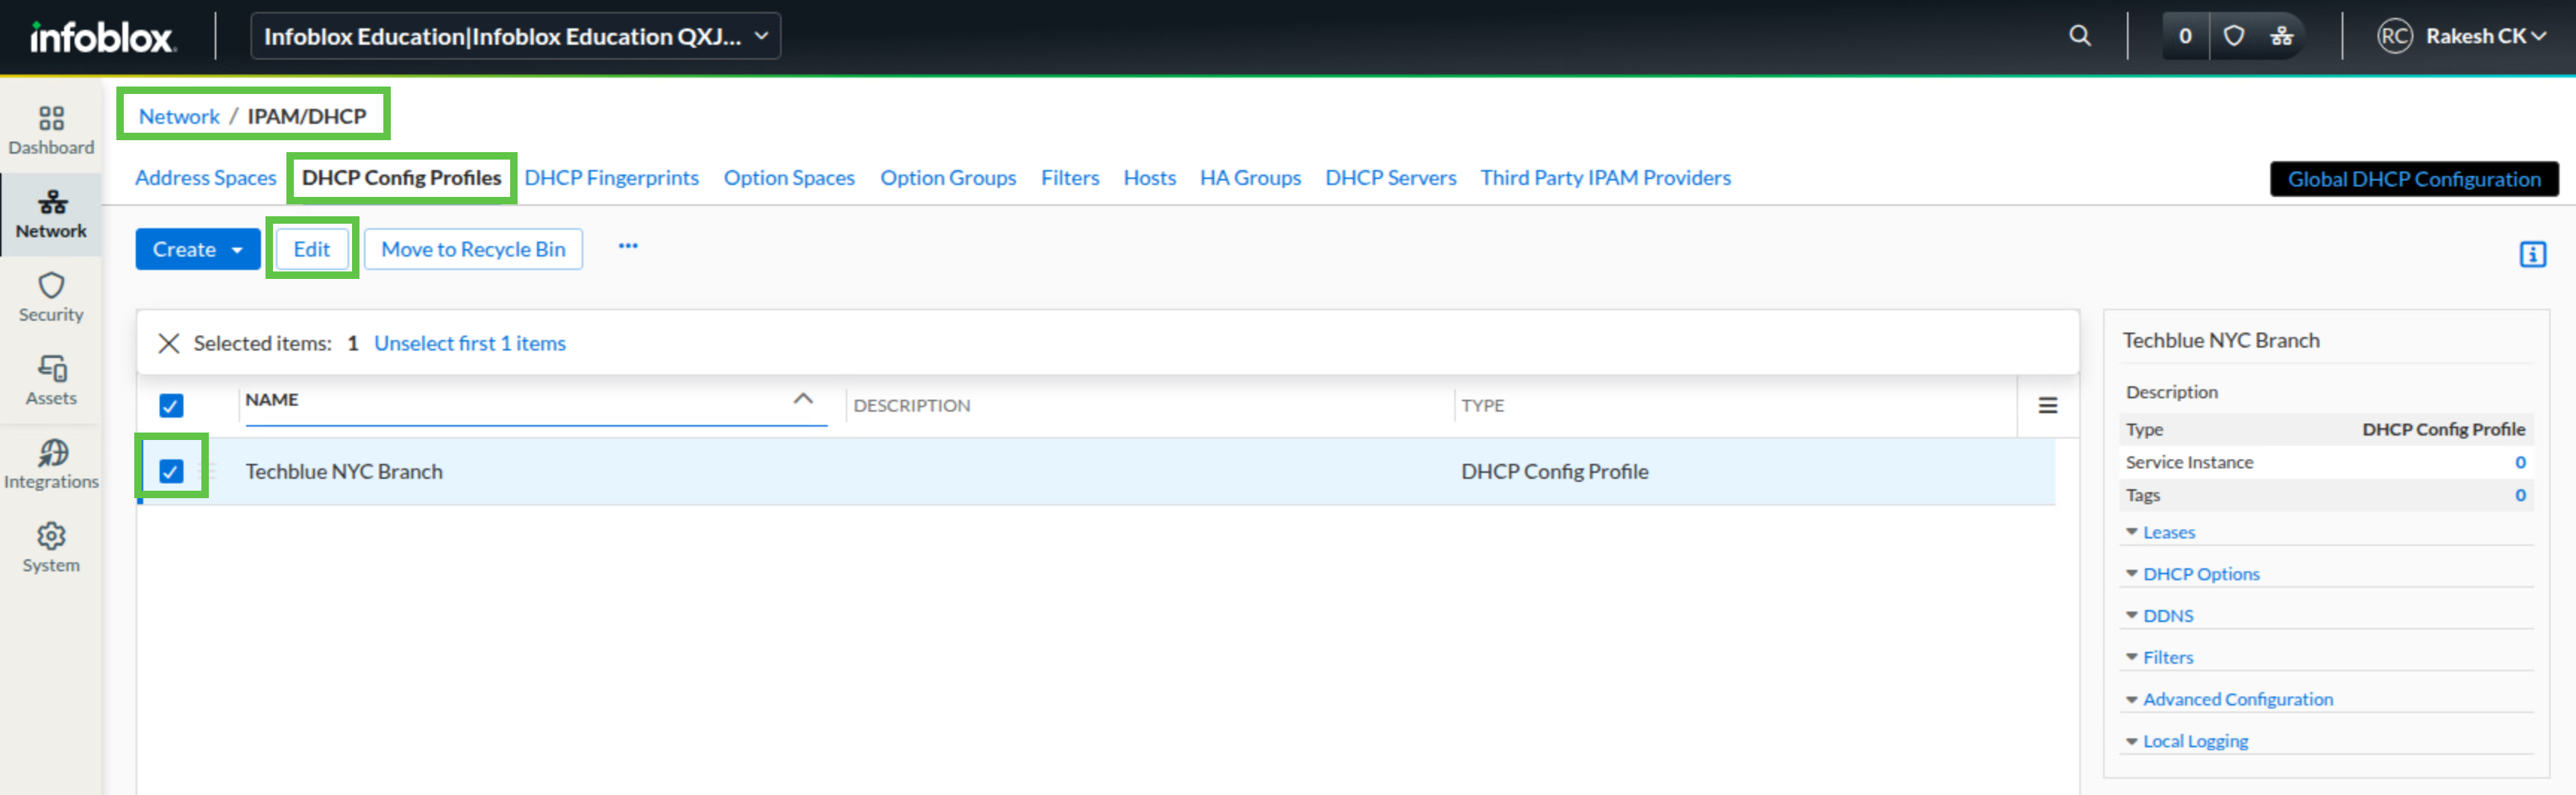
Navigate to Network → IPAM/DHCP.
-
Select the DHCP Config Profiles tab.
-
Open the menu next to Techblue NYC Branch and click Edit.
-
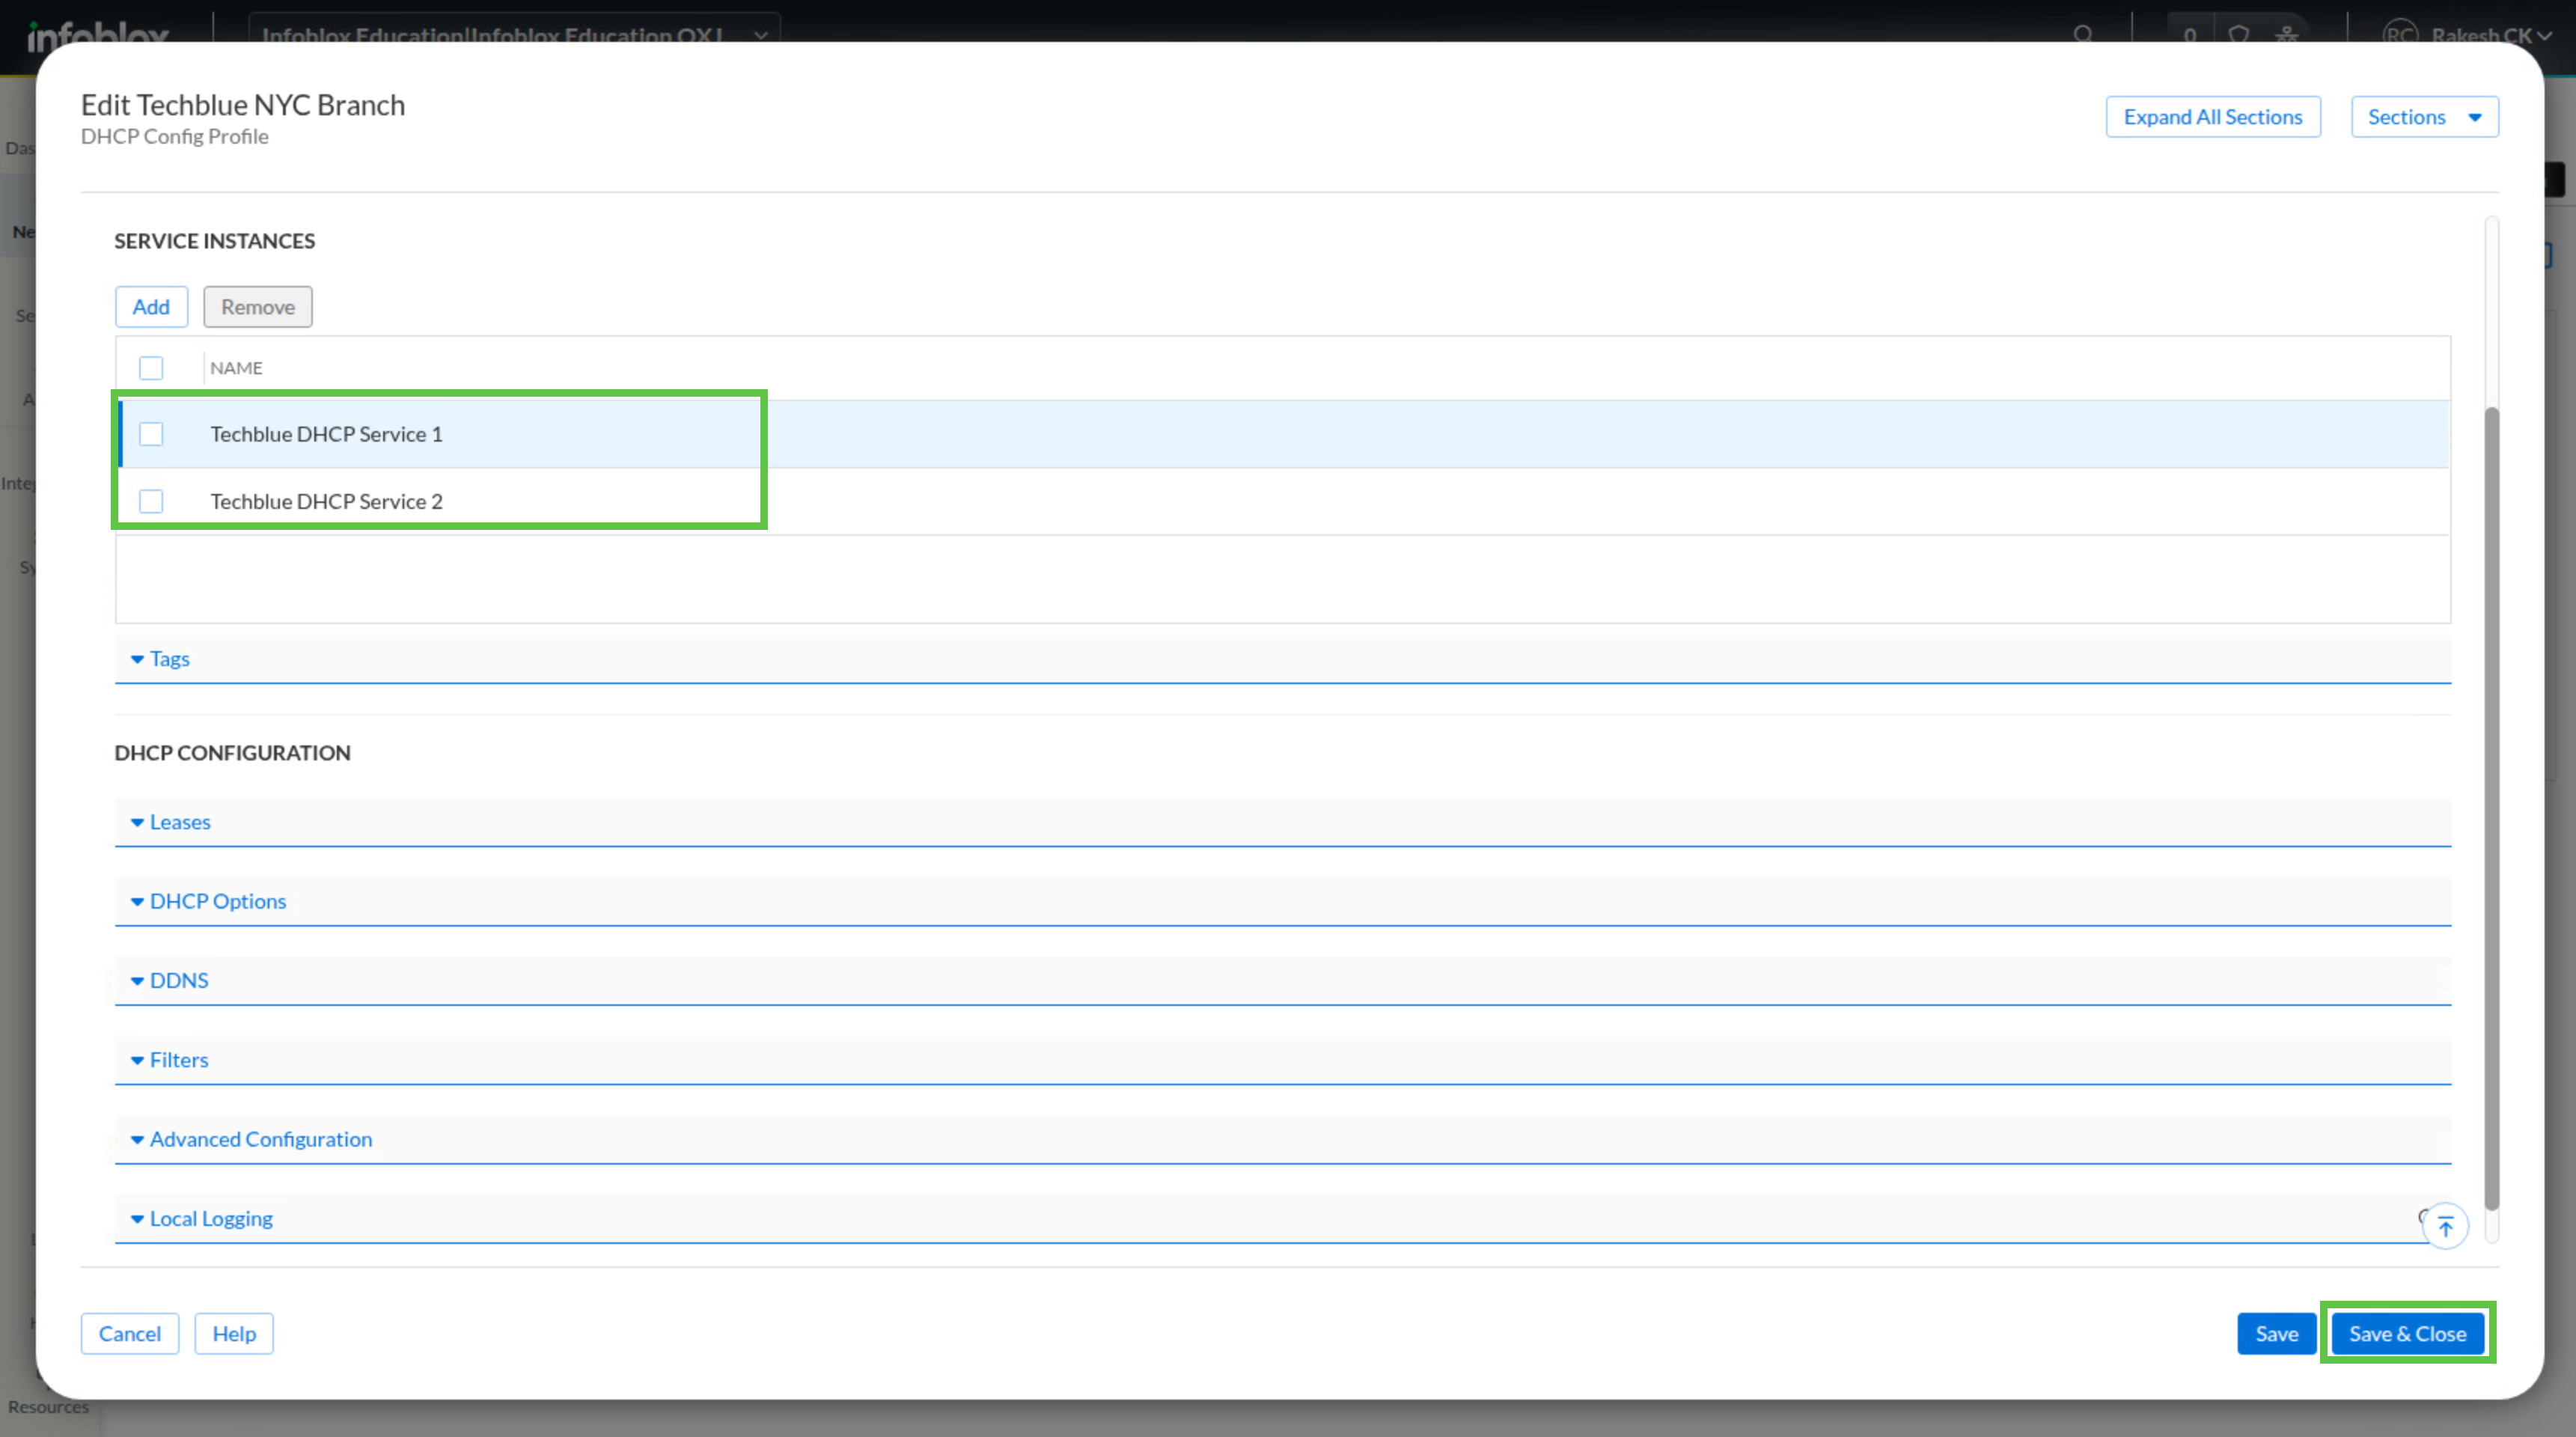
Under Select Service Instance, click Add.
-
Select Techblue DHCP Service 1 and click Select. If you completed the earlier DHCP Services lab, this service instance may already be selected.
-
Select Techblue DHCP Service 2 and click Select.
-
Review the profile settings.
-
Click Save & Close.
Task 3 Solution: Reassociate subnet
The subnet is still associated with a single DHCP service instance from the earlier DHCP network configuration. Reassociate it with the HA Group now so the subnet uses the redundant DHCP service design instead of relying on only one service instance.
-
Navigate to Network → IPAM/DHCP.
-
Select the Address Spaces tab.
-
Open Techblue Networks, then 172.31.0.0/16, then 172.31.101.0/24.
-
Alternatively, you can use Global Search to jump directly to 172.31.101.0/24.
-
Click the drop-down next to 172.31.101.0/24 and choose Edit.
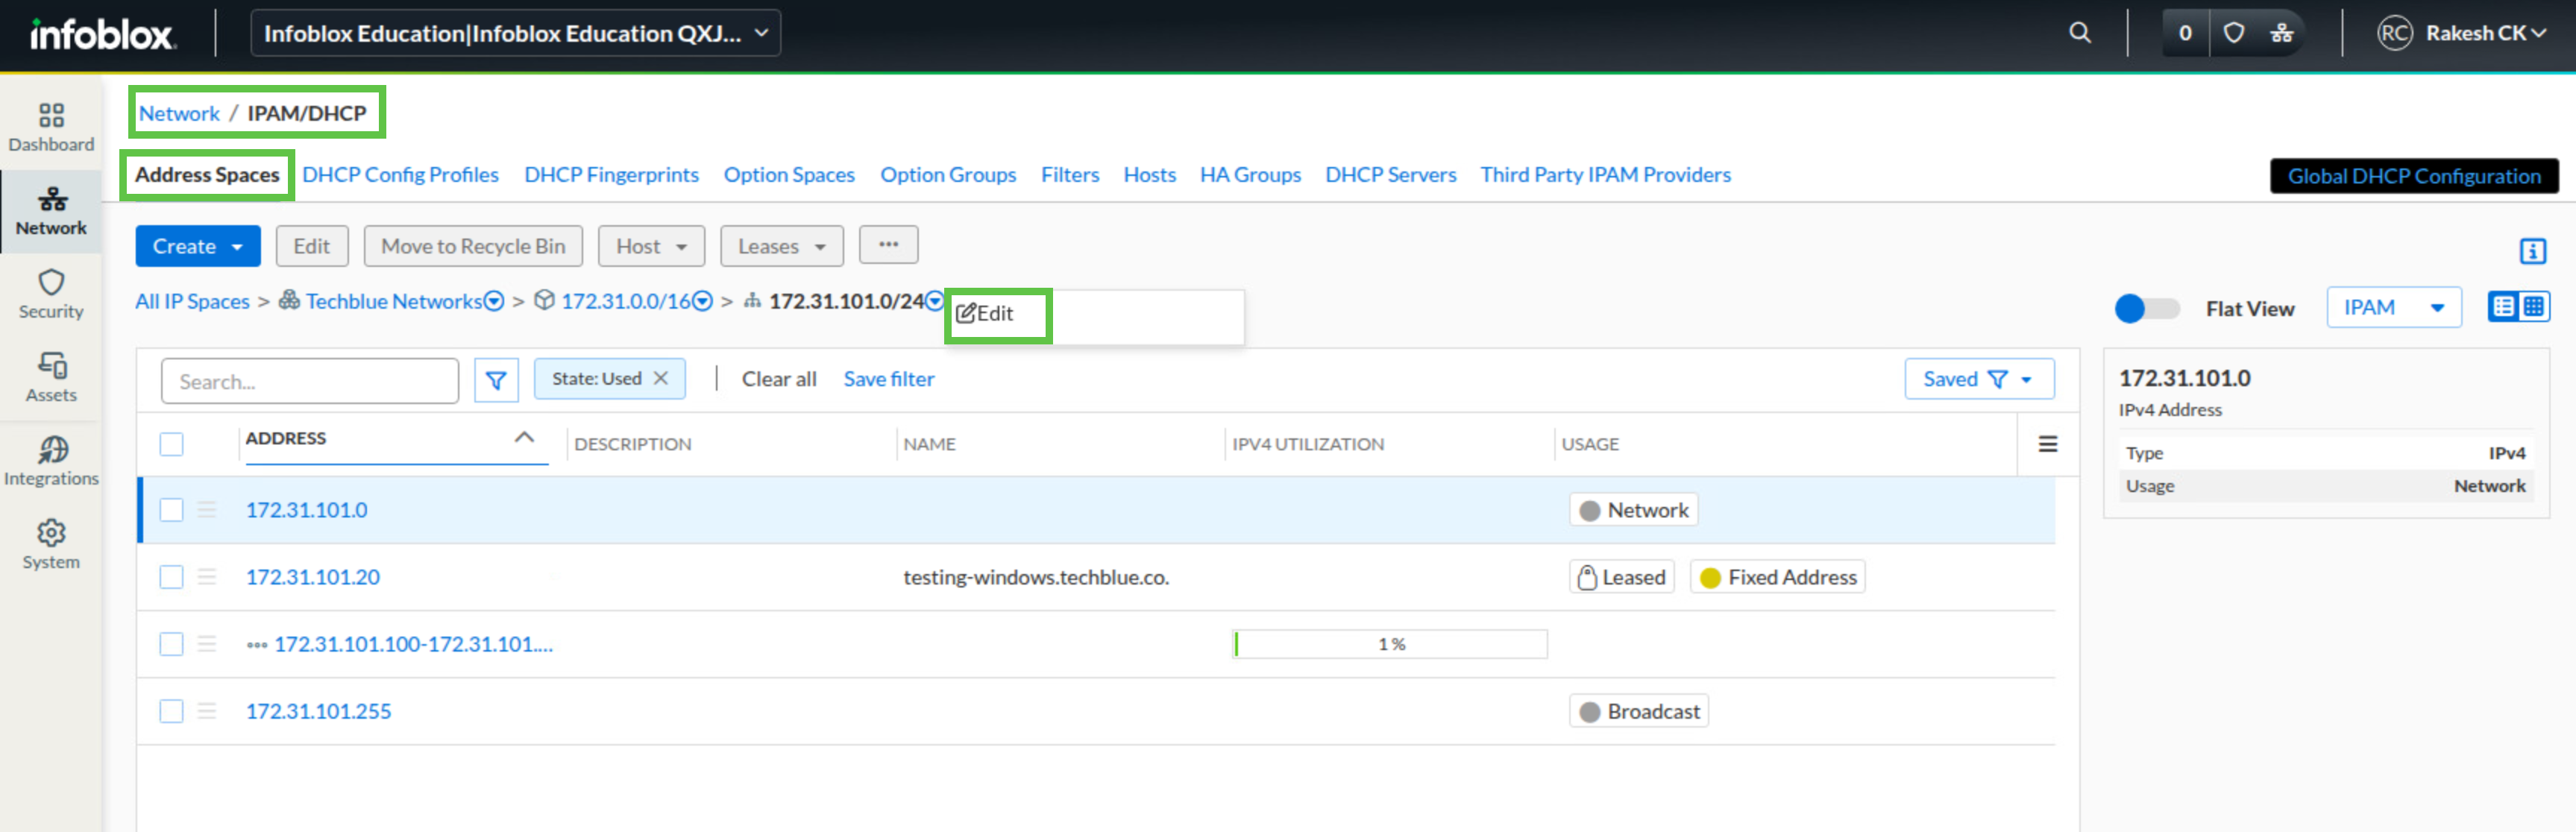
-
Click Select Service Instance.
-
Click HA Groups and choose Techblue NYC Branch DHCP HA.
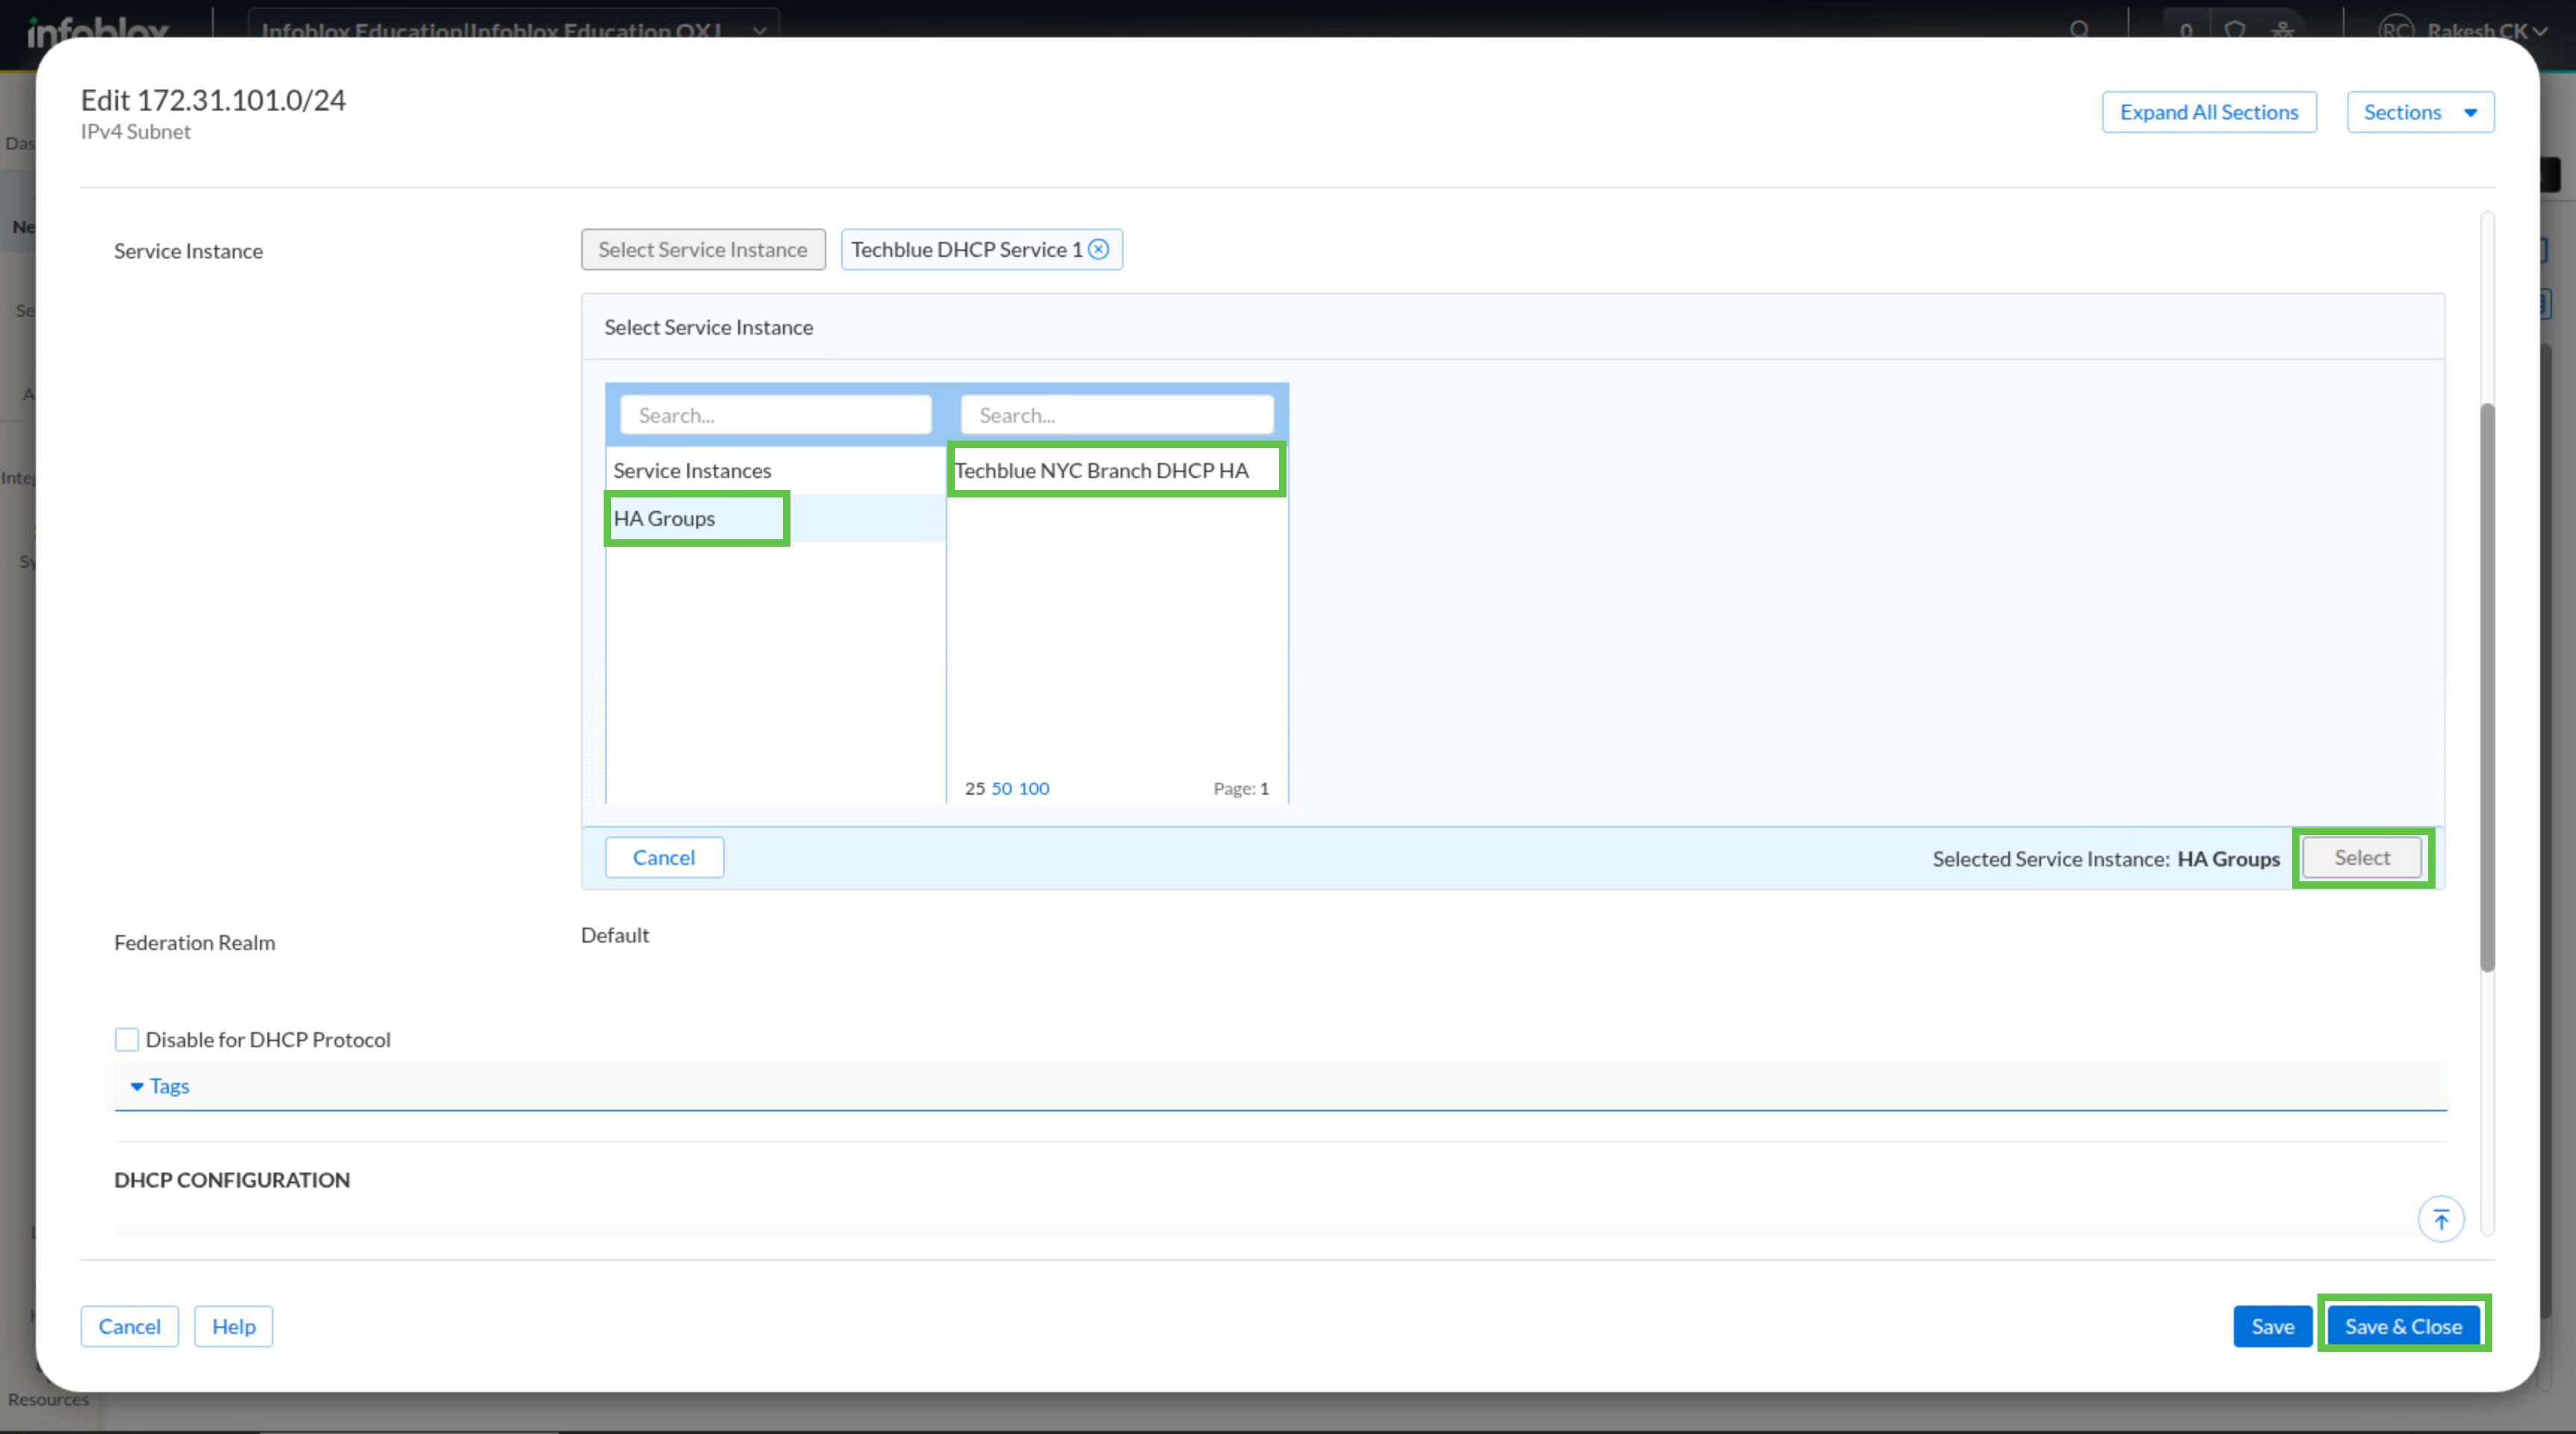
-
Click Save & Close.
Task 4 Solution: Reassociate range
The DHCP range must also use the HA Group. Updating only the subnet is not enough for this lab, because the lease pool itself is still tied to a single DHCP service instance until you reassign the range.
-
In the Infoblox Portal, navigate to range 172.31.101.100-172.31.101.199. If you are continuing from the previous task, it may already be on screen.
-
Otherwise, navigate to Network → IPAM Network → DHCP, select the Address Spaces tab, and open Techblue Networks → 172.31.0.0/16 → 172.31.101.0/24.
-
Alternatively, you can use Global Search to jump directly to 172.31.101.0/24.
-
Open the menu next to the range and choose Edit.
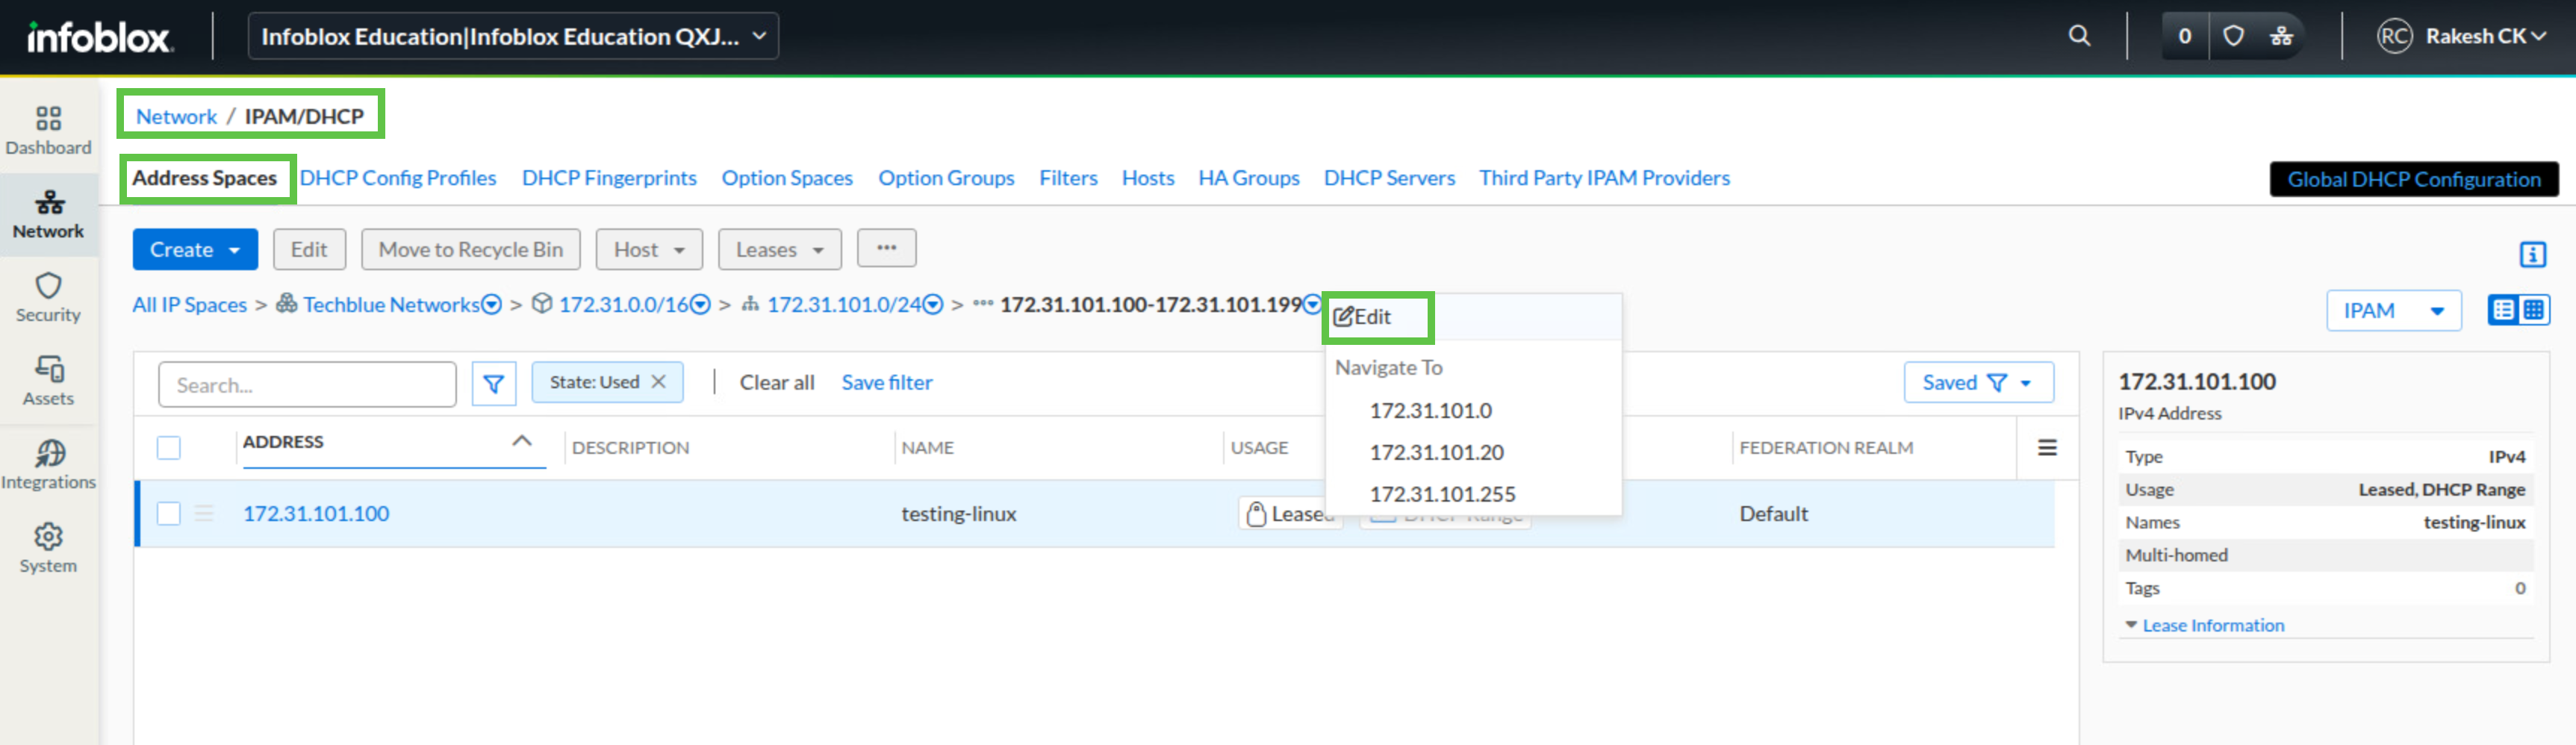
-
Click Select Service Instance.
-
Click HA Groups and choose Techblue NYC Branch DHCP HA.
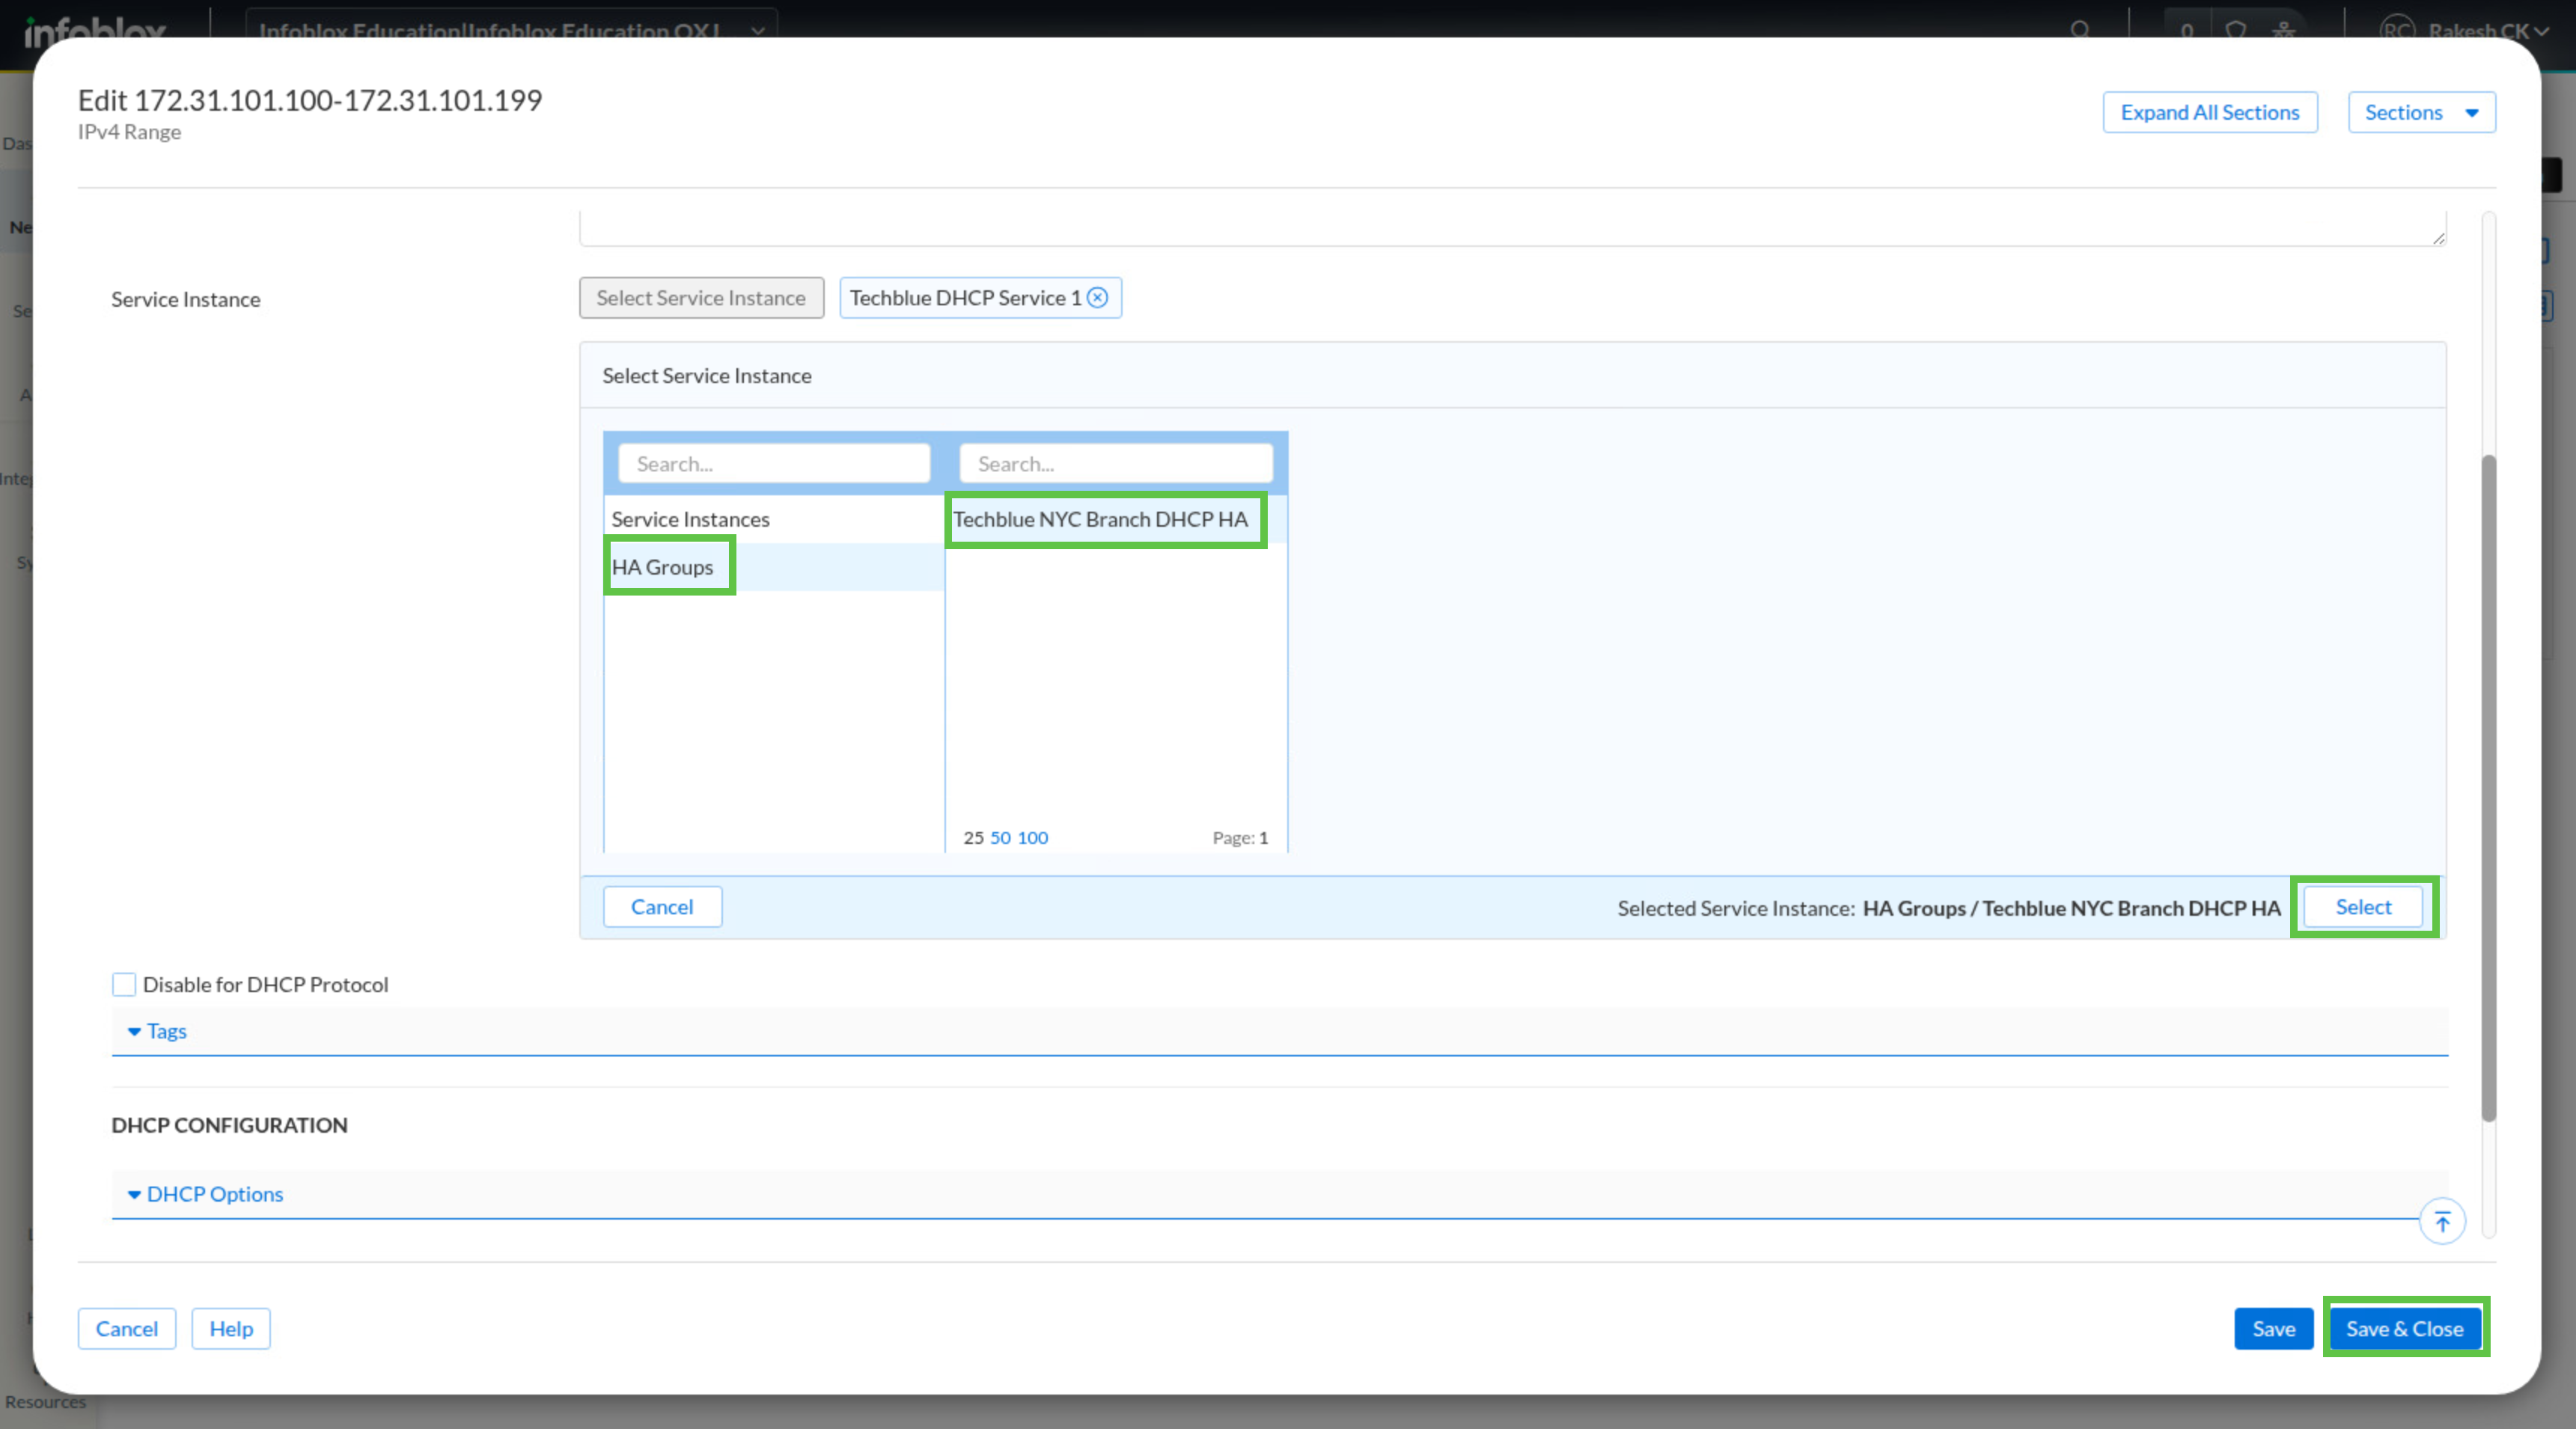
-
Click Save & Close.
Task 5 Solution: Validate client lease
Before you test failover, confirm that the updated HA configuration can still serve a DHCP client normally. The lease details also tell you which DHCP service instance responded, which you need for the failover test in the next task.
-
On testing-linux, open a terminal window.
-
Run sudo set-network-dhcp. If prompted for a password, use infoblox.
-
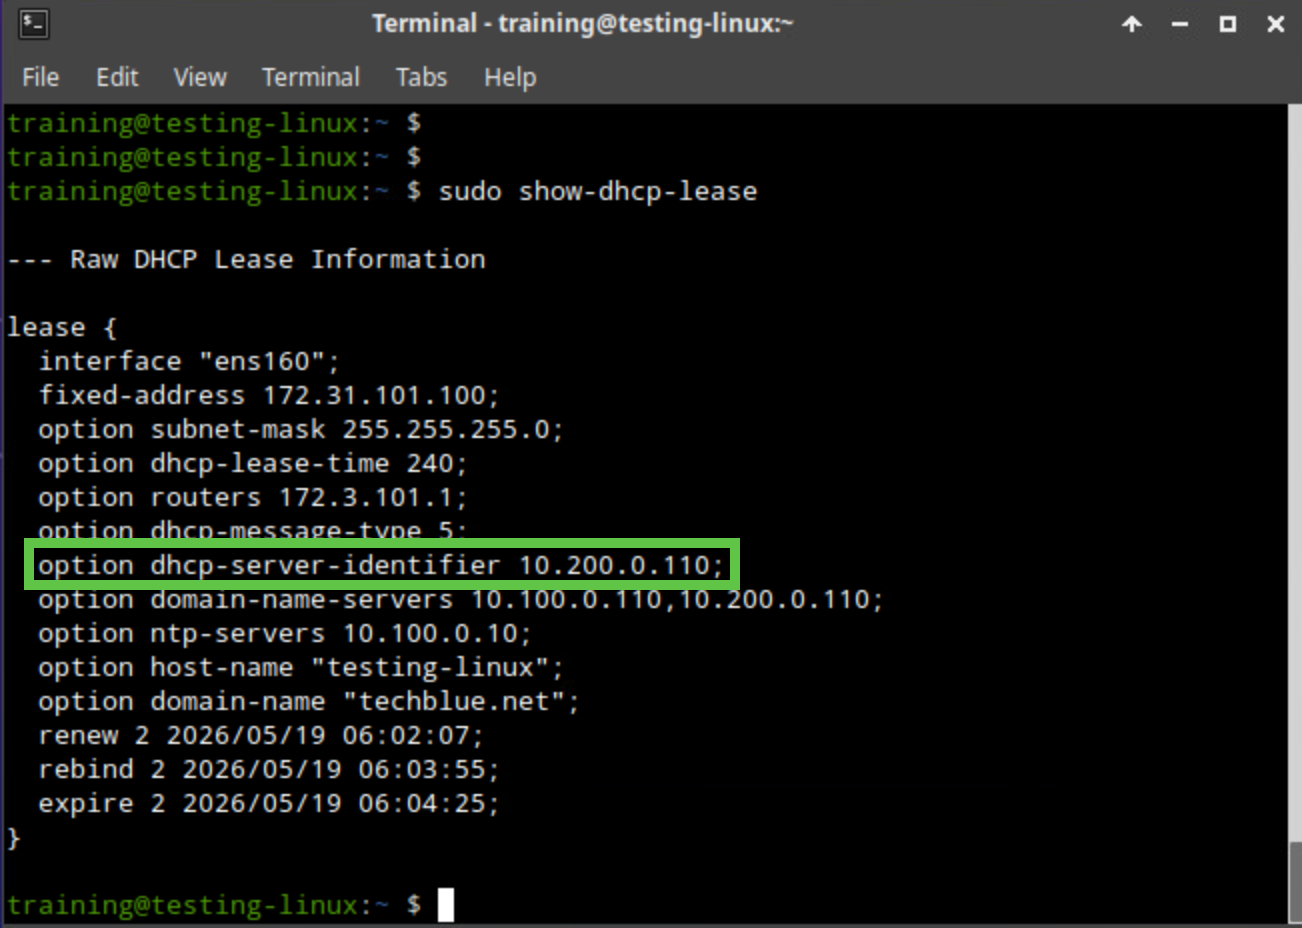
Run sudo show-dhcp-lease to display the lease information for interface ens160.
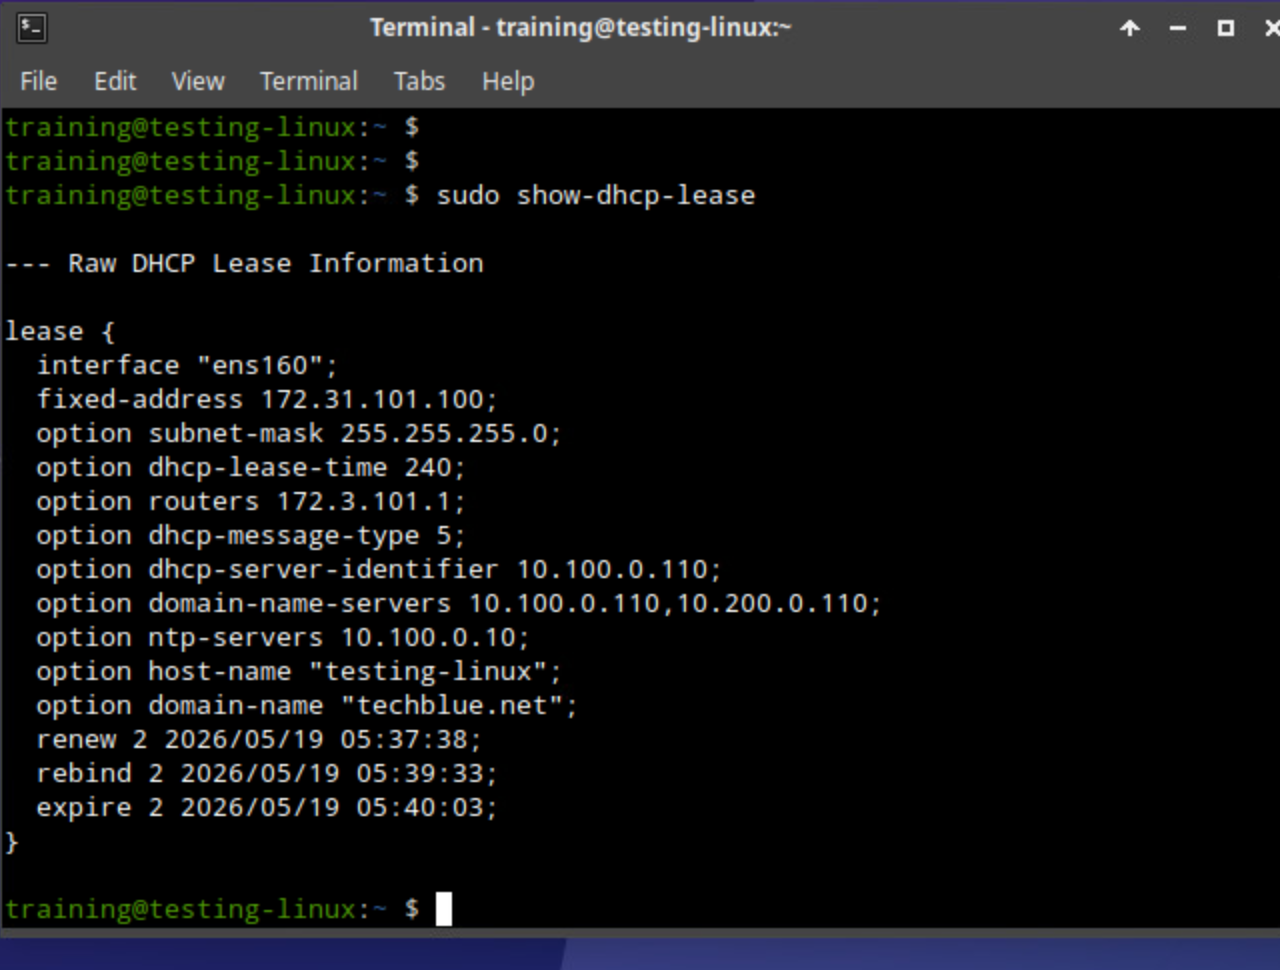
-
Review the lease details and confirm that testing-linux received DHCP lease information.
-
In the lease output, note the value of option dhcp-server-identifier. This shows which DHCP service instance handed the client the lease.
-
Switch to your lab’s jump-desktop.
-
Log in to Infoblox Portal.
-
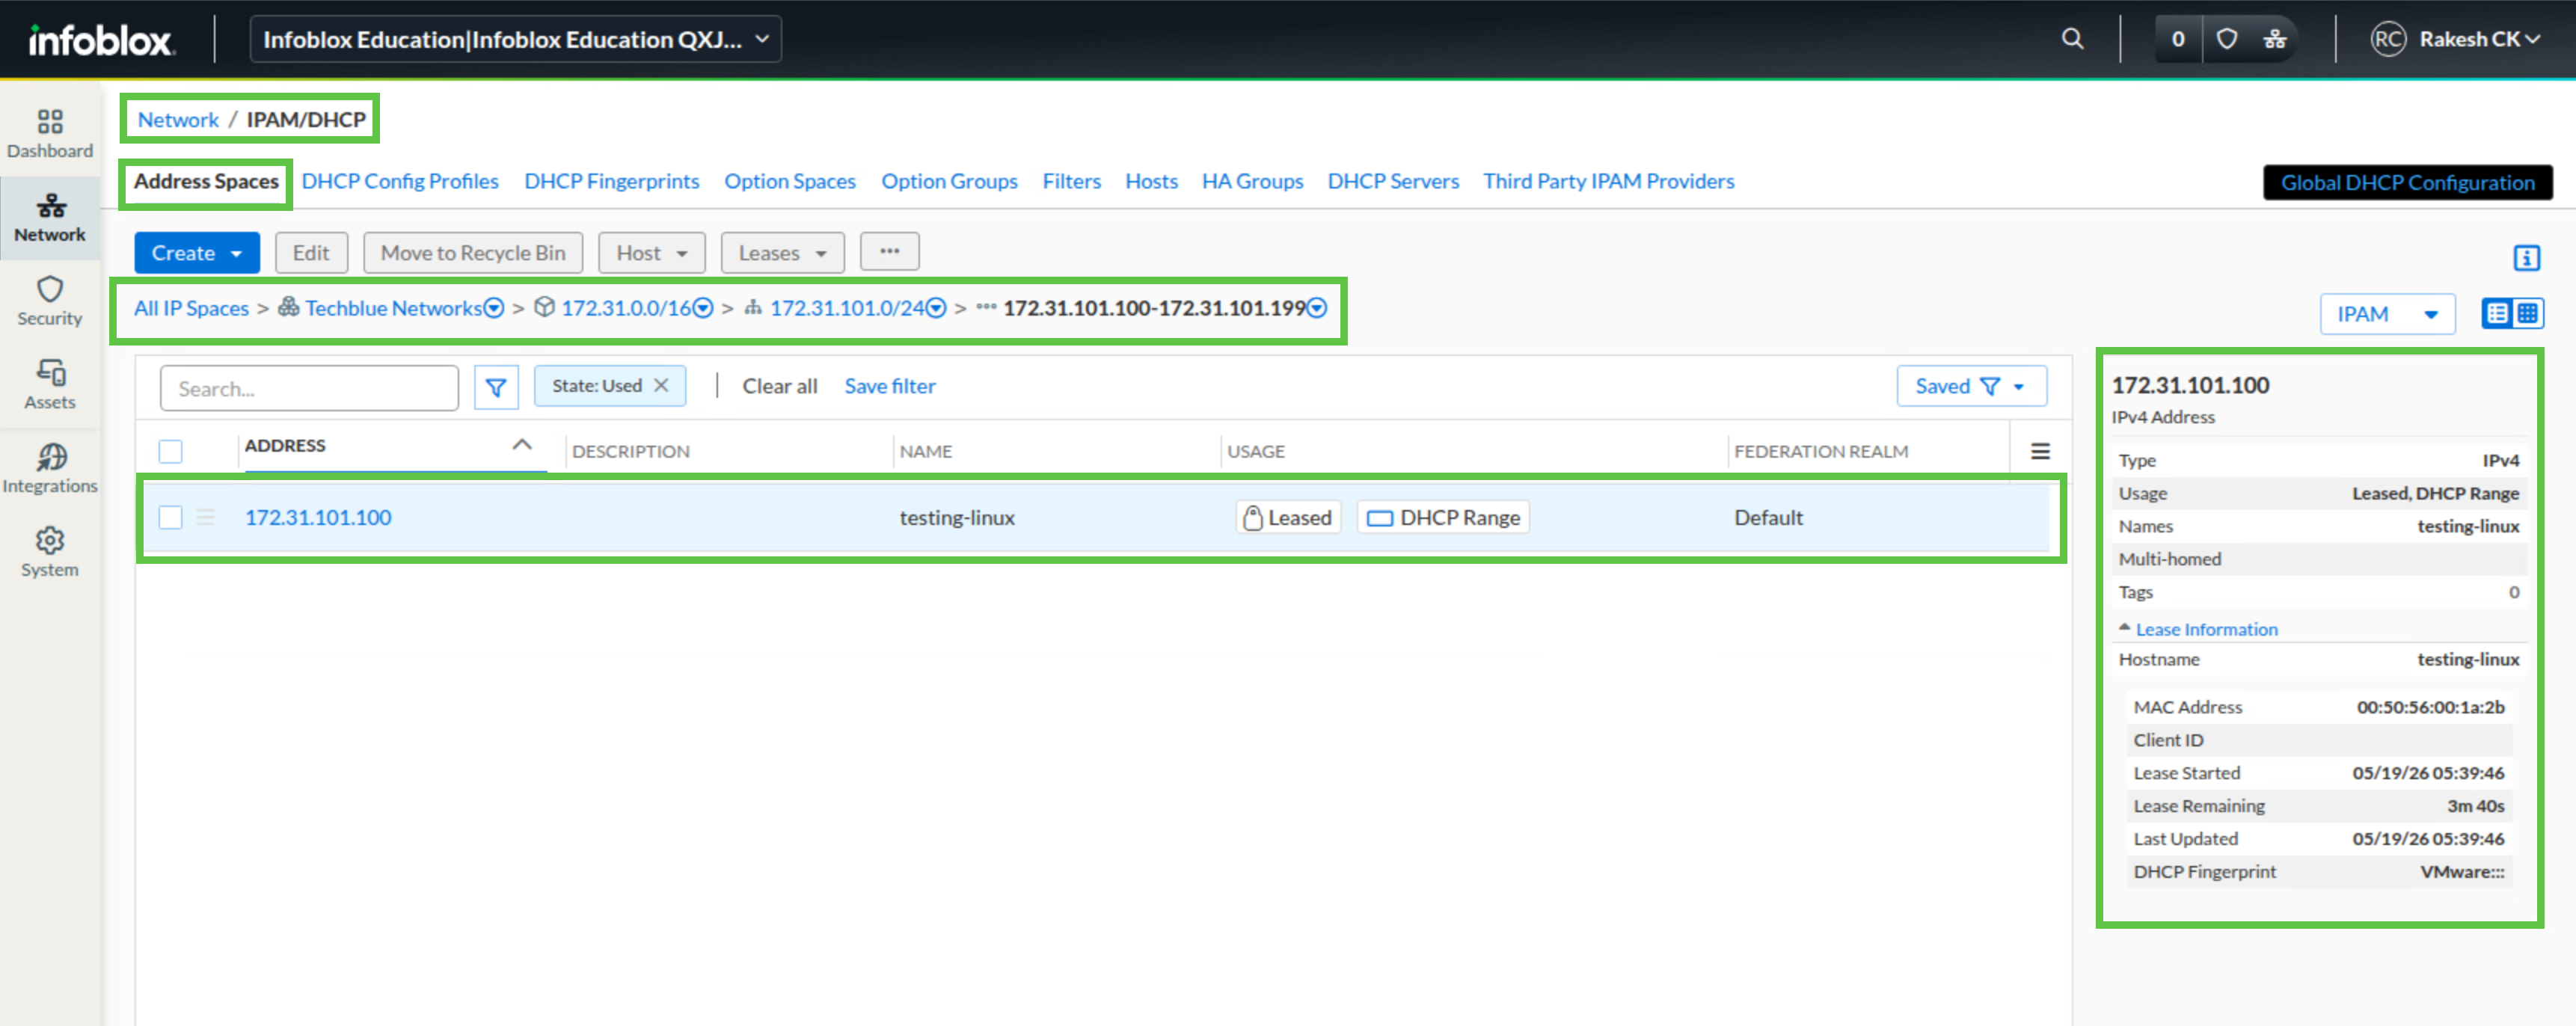
In Network → IPAM/DHCP, access range 172.31.101.100-172.31.101.199 and verify that the lease for testing-linux appears in the range view.
Task 6 Solution: Test DHCP High Availability
Now simulate the loss of the DHCP service host that offered the lease. Because you set the lease time to 4 minutes in the earlier DHCP Config Profile lab, you can watch the current lease expire and confirm that the remaining online NIOS-X server takes over. This verifies that the HA design is working as intended.
-
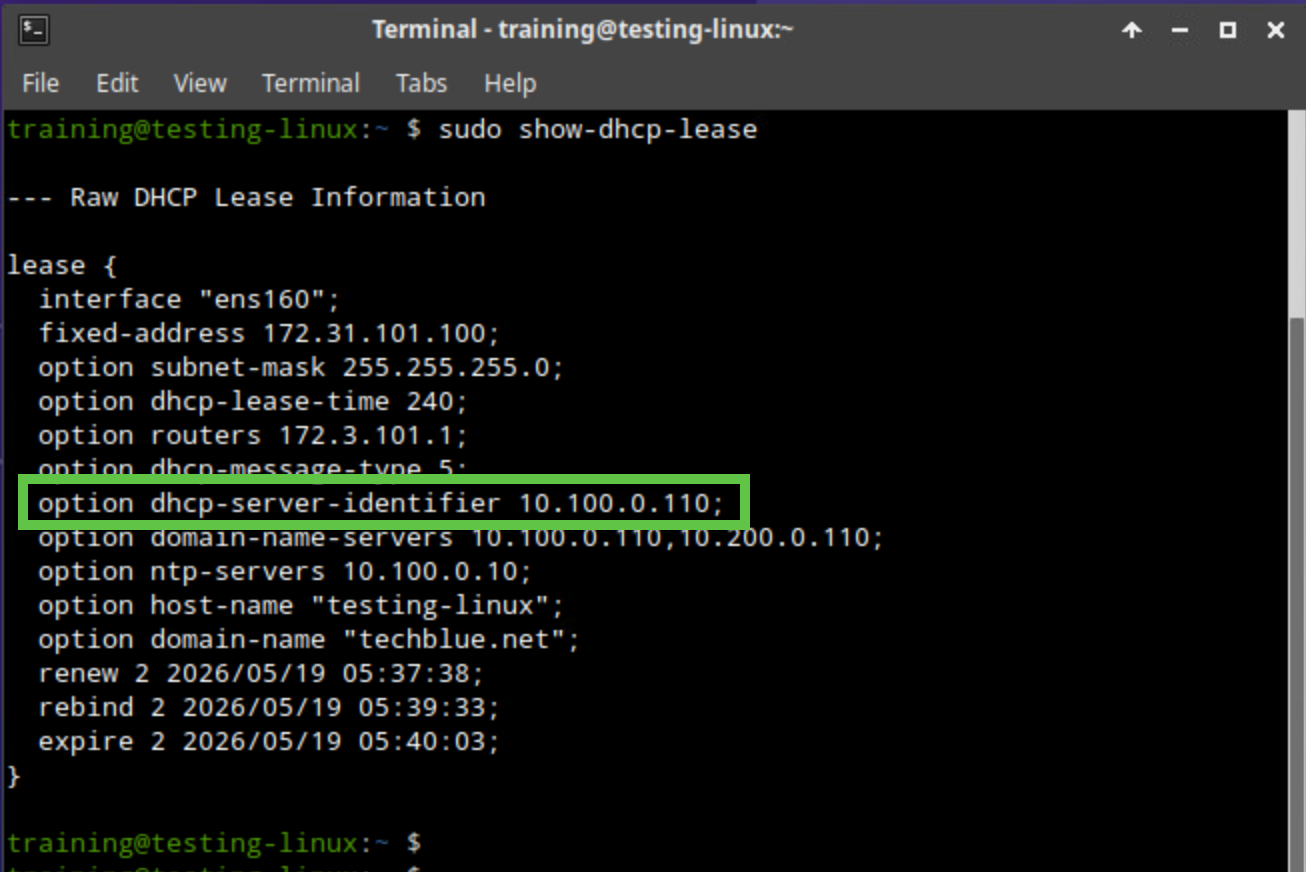
On testing-linux, open a terminal window and run sudo show-dhcp-lease again.
-
Note the IP address shown in option dhcp-server-identifier. This is the NIOS-X server that provided the current lease.
-
Switch to jump-desktop and open the Infoblox Portal from the browser.
-
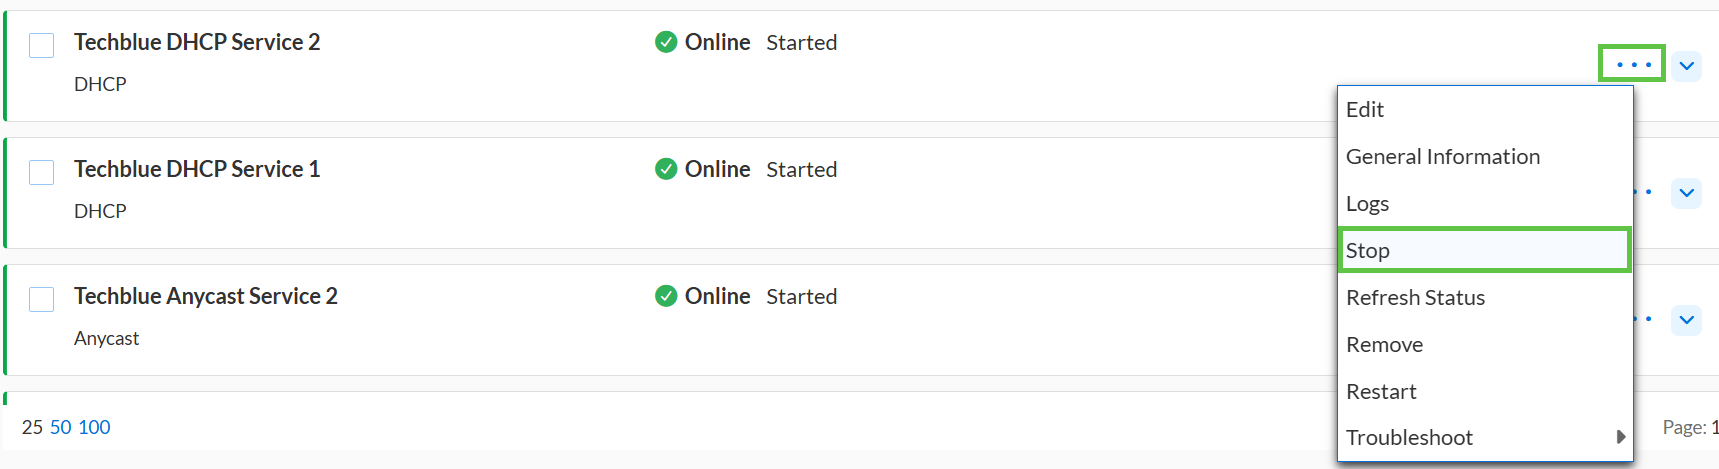
Navigate to Network → Services and Servers → Protocol Services.
-
Identify the DHCP service associated with the NIOS-X server that provided the lease (Techblue DHCP Service or Techblue DHCP Service 2)
-
Click the ellipsis icon next to the appropriate DHCP service and select Stop.
-
Allow the service time to stop completely before continuing.
-
On testing-linux, open a terminal window again.
-
Run sudo show-dhcp-lease several times while the 4-minute lease expires.
-
Confirm that the lease information is still assigned to testing-linux and that the value of option dhcp-server-identifier changes to the remaining online NIOS-X server.
-
Switch to jump-desktop and open the Infoblox Portal.
-
Navigate to Network → Services and Servers → Protocol Services.
-
Locate the DHCP service that you stopped earlier .Click the ellipsis icon next to the service and select Start.