

Scenario
As part of a corporate DNS security and compliance initiative, you have been assigned to implement and validate the Infoblox DNS Firewall feature on the Grid.
First, configure the Grid to support DNS Firewall and establish the required logging and reporting settings so your team can verify the configuration, monitor any anomalous activity and troubleshoot future issues.
Next, implement the corporate compliance policy by creating a Pass-thru policy that allows trusted internal domains to be resolved unmodified, a blocking policy that prevents access to known malicious domains, and a substitute policy that redirects users who access unwanted domains. As part of the security initiative, you will also add and test Infoblox Threat Defense feeds as Response Policy Zones (RPZ).
Finally, use the Security Dashboard and Reporting Server to review recent DNS security events, analyze RPZ hits, verify the status of name servers and RPZ feeds, and identify potentially compromised clients. Create a search for hits on the infoblox-base.rpz.infoblox.local feed, add it to a custom dashboard, generate a report, and configure an alert that sends an email to noc@techblue.net whenever new hits are detected.
Learning Content
Estimate Completion Time
-
90 to 120 minutes
Credentials
|
Description |
Username |
Password |
URL |
|---|---|---|---|
|
Grid Manager UI |
admin |
infoblox |
https://10.100.0.100/ |
Requirements
-
Administrative access to the Grid
-
Administrative access to the Infoblox Portal
Lab Initiation
Use Lab 2541 - Setting up NIOS DNS Firewall as your starting point
Access jump-desktop
Once the lab is deployed, you can access the virtual machines required for this activity. To begin, select VM List from the navigation bar at the top, locate jump-desktop, and click the green play icon to open its console. Log in to the Linux UI.

Username: training
Password: infoblox
Initiate lab
To initiate the lab, double-click the Launch Lab icon on the Desktop.

Choose the lab number from the list and click OK.
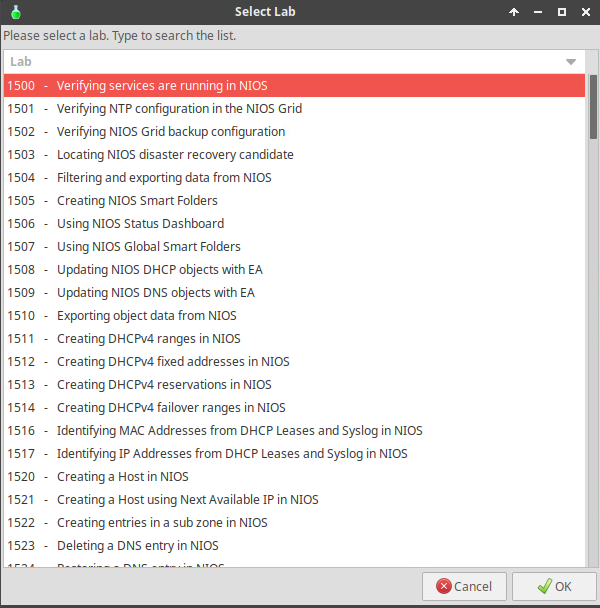
After clicking OK, you will see a pop-up message with a brief description of the lab task. If the description looks correct, click Yes to continue lab initiation.
Lab initiation will take a couple of minutes to finish.
Once complete, you will see another pop-up message with the login credentials and the URL for the Grid Manager’s User Interface. Note that the credentials may differ from those from prior labs.
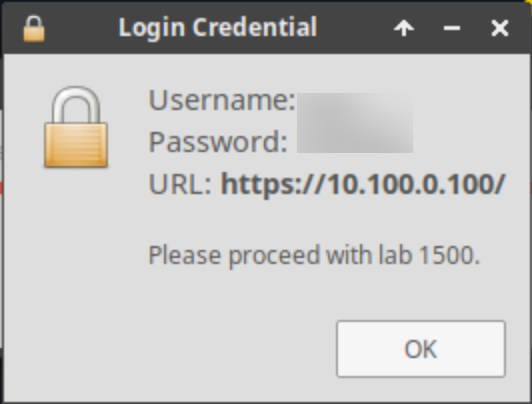
Tasks
-
Create a name server group using grid members ibns1.techblue.net and ibns2.techblue.net as members.
-
Verify RPZ logging is enabled on the Grid.
-
Ensure that the Reporting Server has security reporting enabled.
-
Create a local RPZ named allowlist.rpz
-
Create a rule in the allowlist.rpz to ensure DNS requests for techblue.net and all of its sub-domains get passed through unmodified
-
Create a local RPZ named walledgarden.rpz
-
Add a Substitute (Domain Name) Policy Rules to walledgarden.rpz
-
Create a local RPZ named denylist.rpz with an initial action of pass-thru
-
Re-arrange Response Policy Zones in the correct order
-
Add Block Domain Name Policy Rules to denylist.rpz
-
Add Block IP Address Rule to denylist.rpz
-
Add a Block Client IP Address Rule to denylist.rpz
-
Test Pass-thru Local RPZ Rules
-
Test Substitute Local RPZ Rules
-
Test denylist.rpz to verify it is detecting the traffic and passing it through
-
Modify denylist.rpz to Block traffic instead of passing it through
-
Verify that traffic matching rules in denylist.rpz is now blocked
-
Obtain Threat Defense RPZ feed names and feed server details from the Infoblox Portal (IP)
-
Create a new name server group named RPZ DNSFW NSG to use feed servers from Threat Defense
-
Add Threat Defense RPZ feeds into the NIOS Grid
-
Reorder all the RPZs to follow Infoblox guidelines
-
Verify that the newly added Threat Defense RPZ feeds are detecting malicious domains to be blocked
-
Change the Override Policy for infoblox-base.rpz.infoblox.local to None (Given)
-
Test if the Threat Defense RPZ feeds are Blocking malicious domains
Use Lab 2541 - Setting up NIOS DNS Firewall as your starting point
Task 1: Create RPZ Local NSG Name Server Group
Create a name server group named RPZ Local NSG. This name server group will be used by the local RPZs. The members of the group are ibns1.techblue.net as the primary and ibns2.techblue.net as the secondary.
Task 2: Verify RPZ logging is enabled
Verify RPZ logging is enabled on the Grid.
Task 3: Enable Security Reporting for the Grid
Ensure that the Reporting Server has security reporting enabled.
Task 4: Create local RPZ - allowlist.rpz
Create a local RPZ named allowlist.rpz to ensure DNS traffic from the techblue.net domain is allowed to pass through using a previously configured server group called RPZ Local NSG.
Task 5: Add Passthru Domain Policy Rules to allowlist.rpz
Create a rule in the allowlist.rpz to ensure DNS requests for techblue.net and all of its sub-domains get passed through unmodified.
Task 6: Create local RPZ - walledgarden.rpz
Create a local RPZ named walledgarden.rpz, use a previously configured server group called RPZ Local NSG.
Task 7: Add Substitute (Domain Name) Policy Rules to walledgarden.rpz
Add a Substitute (Domain Name) rule to the walledgarden.rpz. Queries for the malware.signalorange.net domain should be redirected to walledgarden.techblue.net.
Task 8: Create local RPZ - denylist.rpz
Create a local RPZ named denylist.rpz to ensure DNS traffic from unwanted domains is allowed to pass through for now as a test, using a previously configured server group called RPZ Local NSG.
Task 9: Rearrange Response Policy Zones in the correct order
Place the RPZ’s into the correct order, ensuring that traffic that should pass through is not blocked, and vice versa:
-
Allowlist.rpz
-
Walledgarden.rpz
-
Denylist.rpz
Task 10: Add Block Domain Name Policy Rules to denylist.rpz
Add a rule to the denylist.rpz to block the eicar.net domain and all its sub-domains.
Task 11: Add Block IP Address Rule to denylist.rpz
Add a rule to block a destination IP Address 224.224.224.224 in the denylist.rpz.
-
This IP Address 224.224.224.224 is an Infoblox-owned IP we will use it to simulate a known bogon domain bogon.singalorange.net.
Task 12: Add Block Client IP Address Rule to denylist.rpz
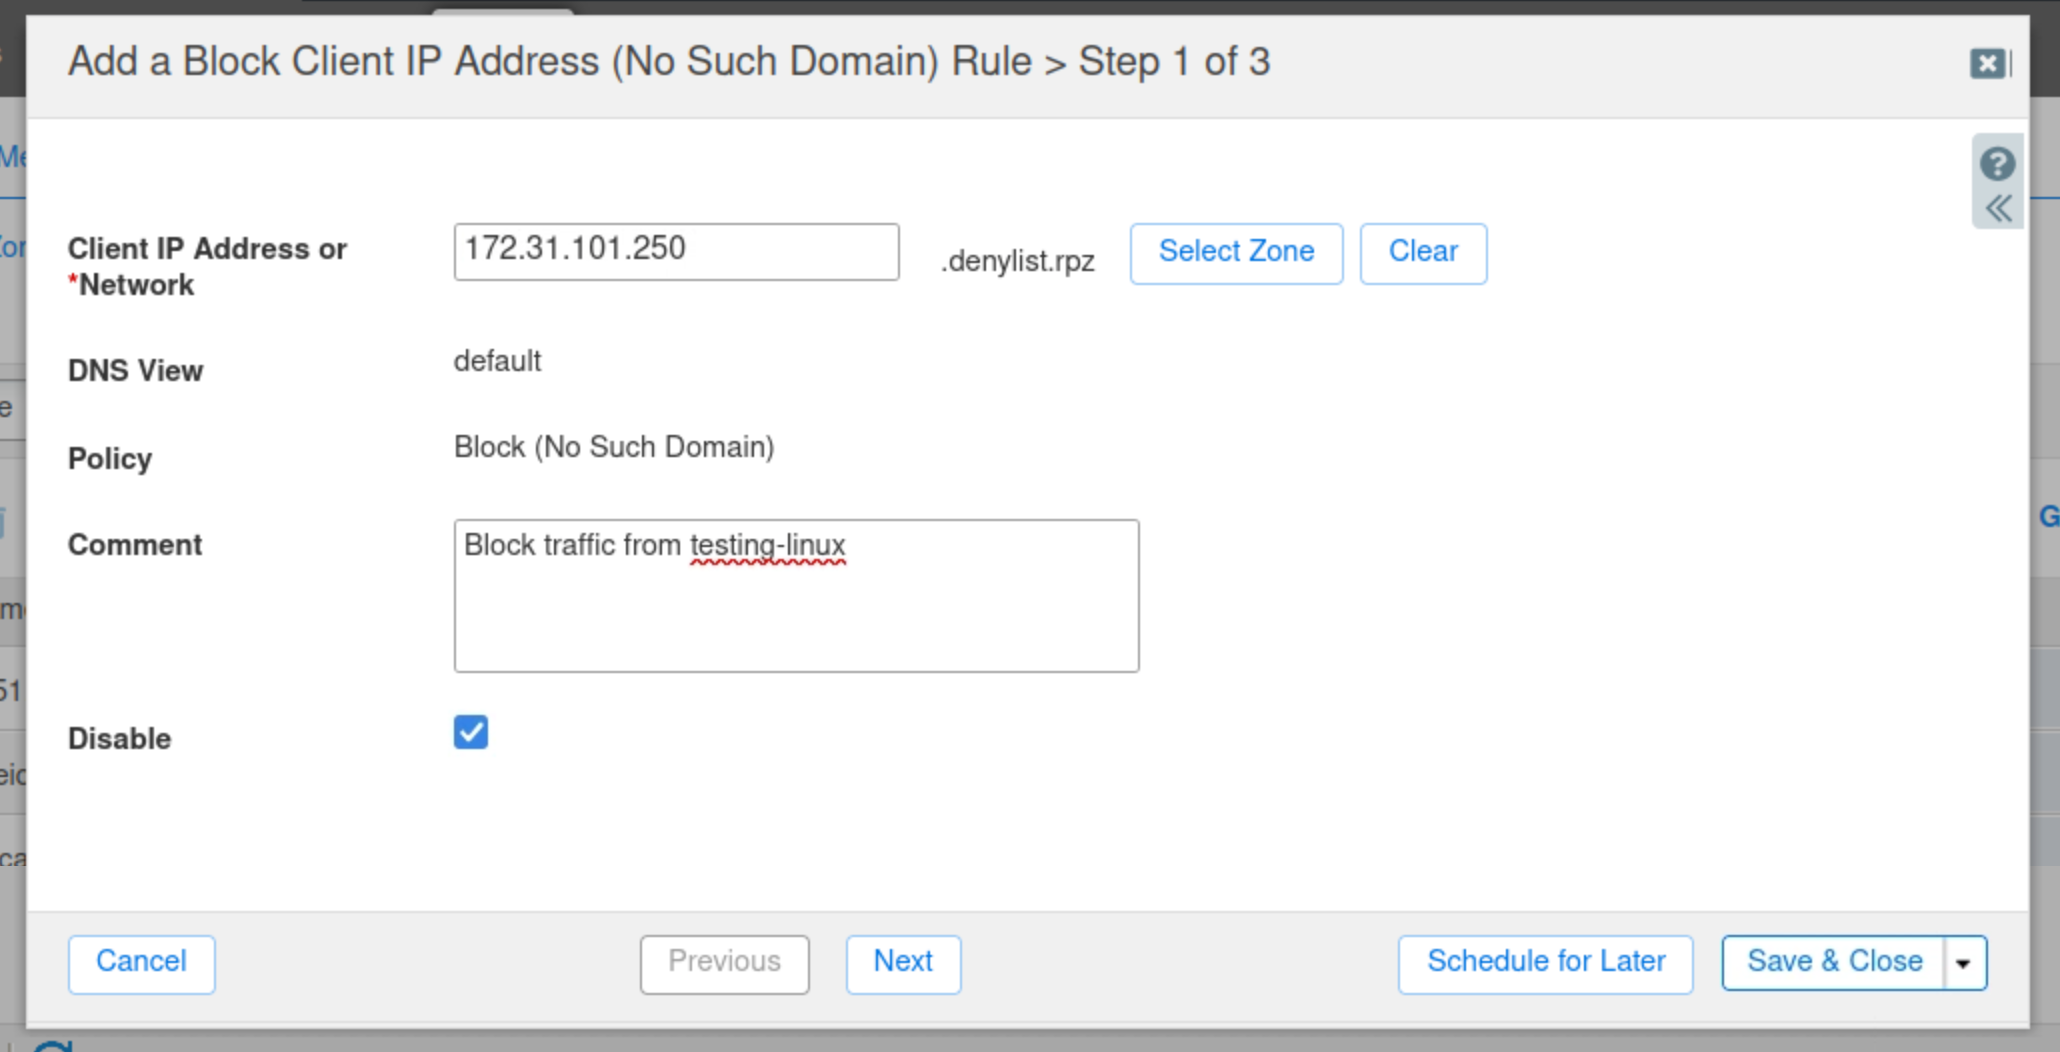
Add a rule to block DNS queries from a specific client IP address. The address used in the lab is 172.31.101.250.
-
This is the IP address of the Testing-Linux machine, for this reason, the rule is left disabled until we test it.
Task 13: Test Pass-thru Local RPZ Rules
-
Switch over to the testing-linux machine with the credentials (training/infoblox) and set the machine up for testing.
-
open a terminal window and issue the command sudo set-network-static-nios and verify that the machine now has the IP address 172.31.101.250 using the command ifconfig.
-
-
Use dig and syslog entries to validate the local RPZ configurations.
Task 14: Test Substitute Local RPZ Rules
Use dig and syslog entries to validate the local RPZ configurations.
Task 15: Test denylist.rpz Local RPZ Rules
Use dig and syslog entries to validate the local RPZ configurations.
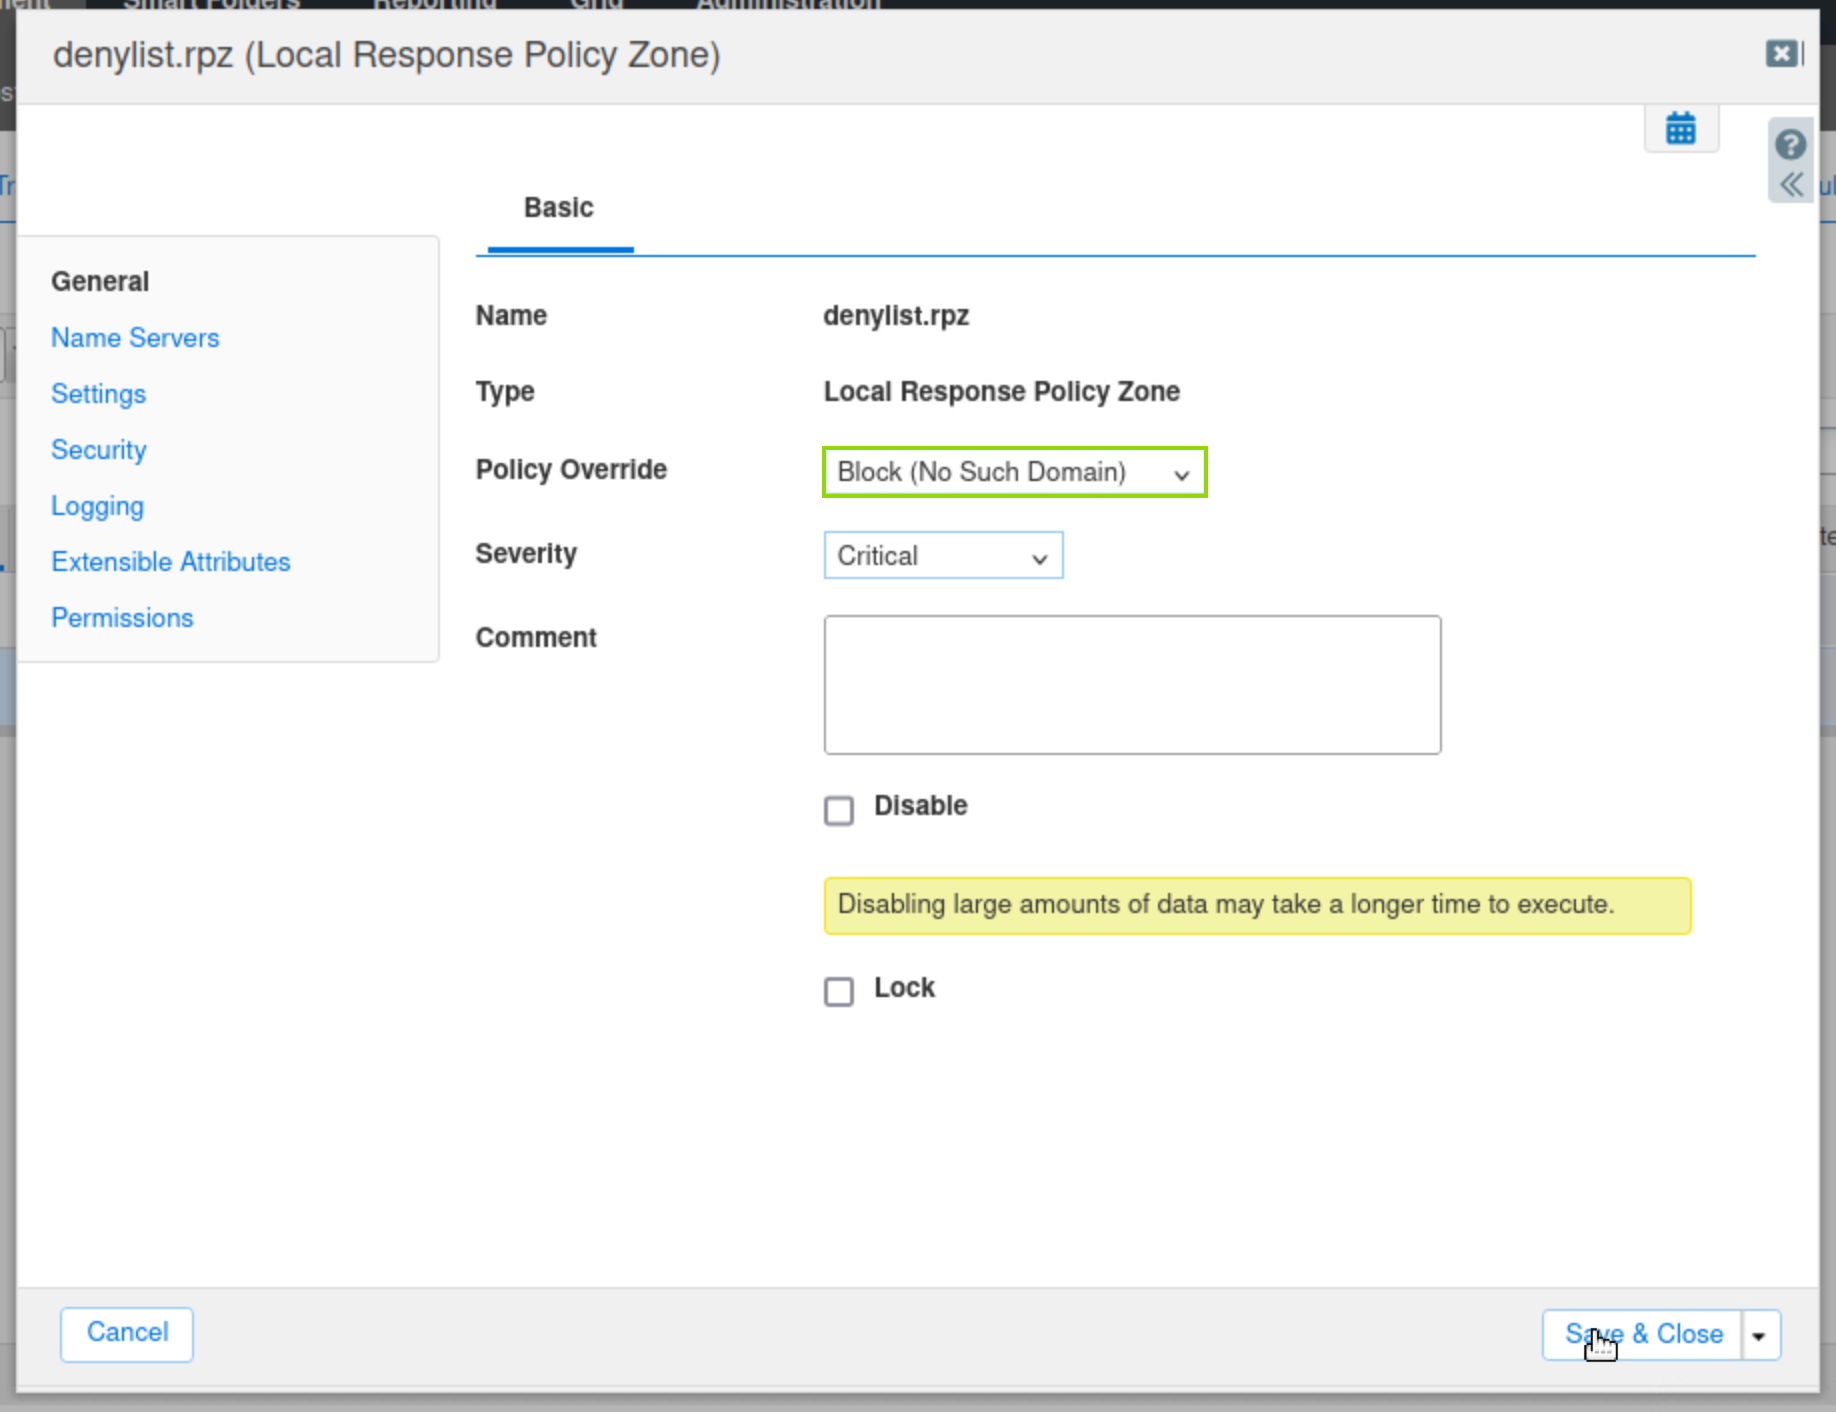
Task 16: Modify denylist.rpz to Block traffic
Change the Policy Override value for denylist.rpz to Block (No Such Domain).
Task 17: Verify denylist.rpz is Blocking traffic
-
Switch back to testing-linux with the credentials (training/infoblox).
-
Use dig and syslog entries to verify that queries to infoblox.com and the IP address 224.224.224.224 are blocked.
-
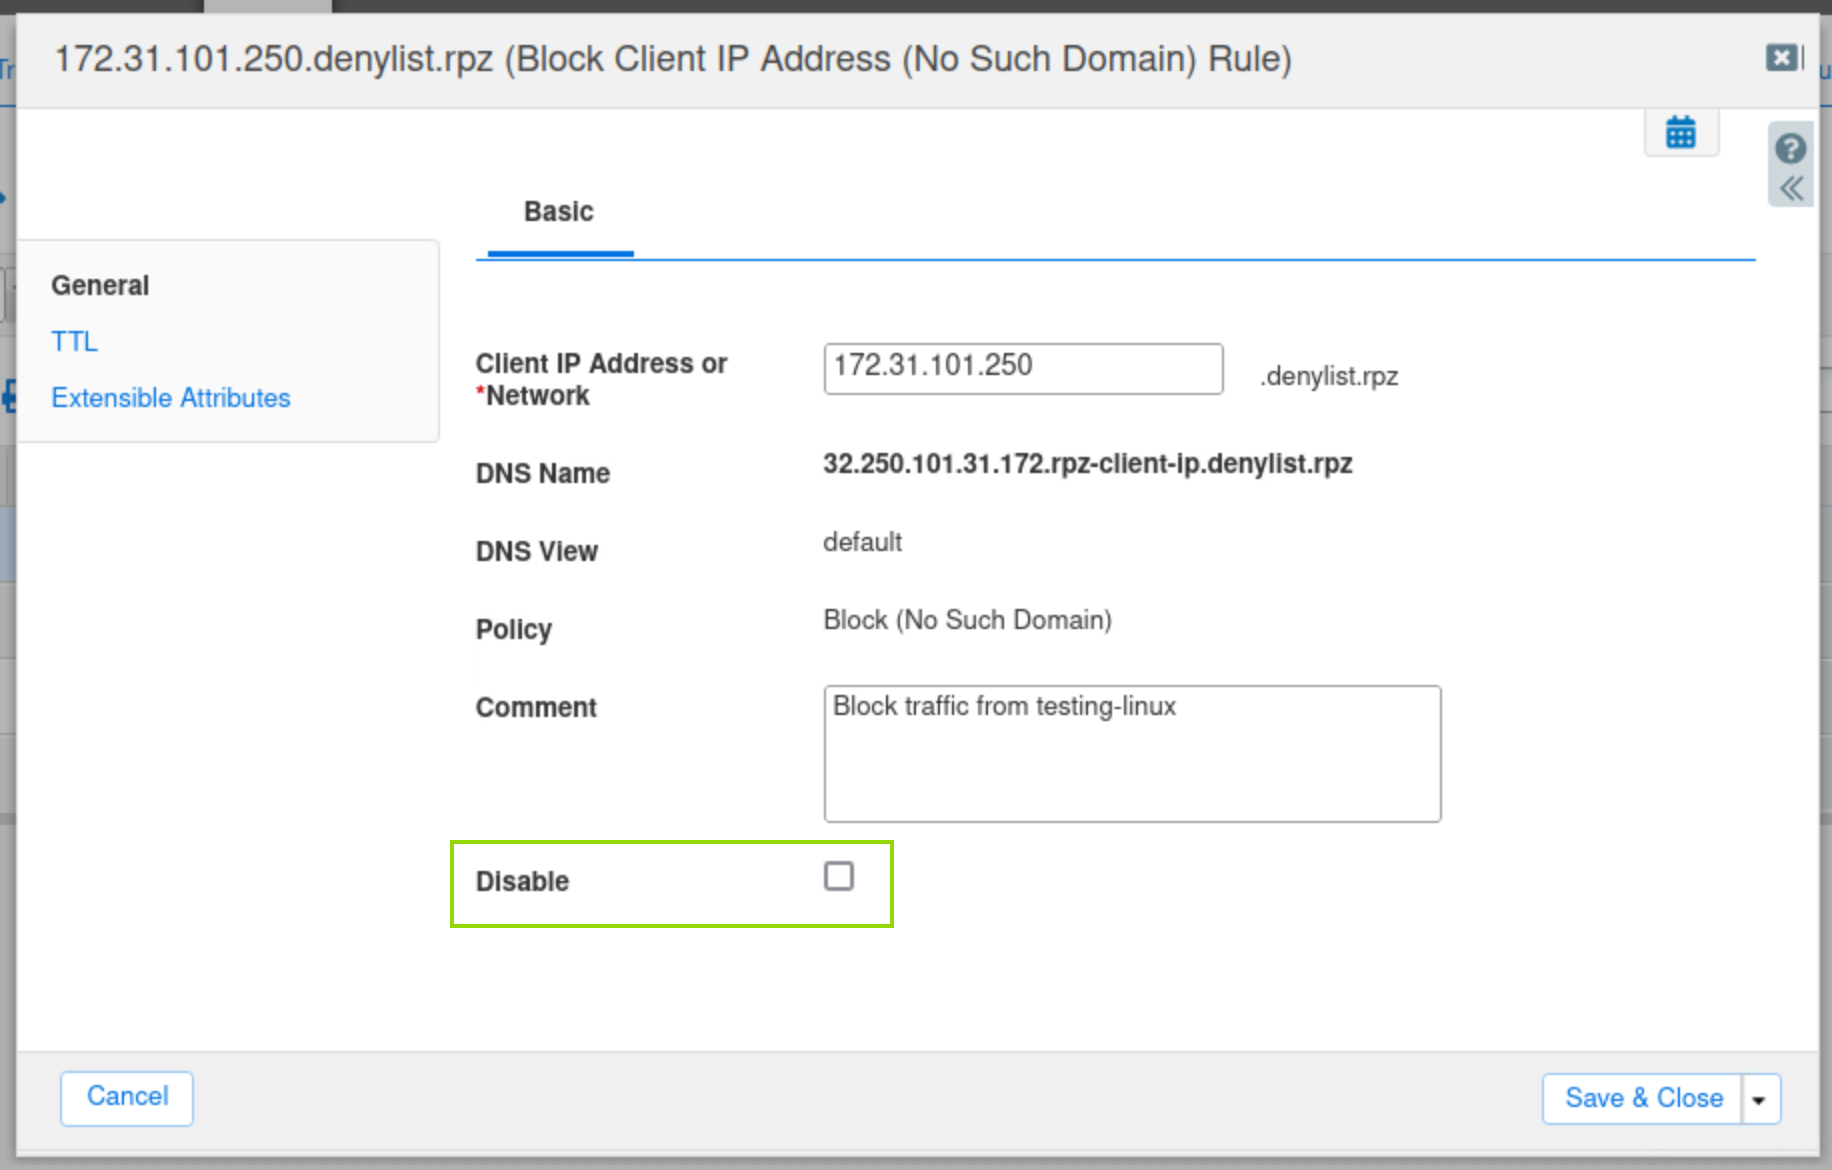
Enable the Block Client IP Address rule created earlier and validate that queries from 172.31.101.250 are blocked.
Task 18: Obtain Threat Defense RPZ feed names and feed server details from the Infoblox Portal (IP)
Use Geany (text editor) to save RPZ names, server IP, and TSIG credentials for later use.
These specific RPZs have been chosen to ensure they don’t exceed the capacity of the NIOS appliances in your lab environment.
Use your Education Infoblox Portal Credentials to log into the Infoblox Portal. Obtain feed names for Infoblox-Base and Infoblox-Base-IP, IP addresses of the authoritative Threat Defense feed servers, and the feed authentication credentials (TSIG Credentials).
Task 19: Create a new name server group to use the authoritative feed servers from Threat Defense
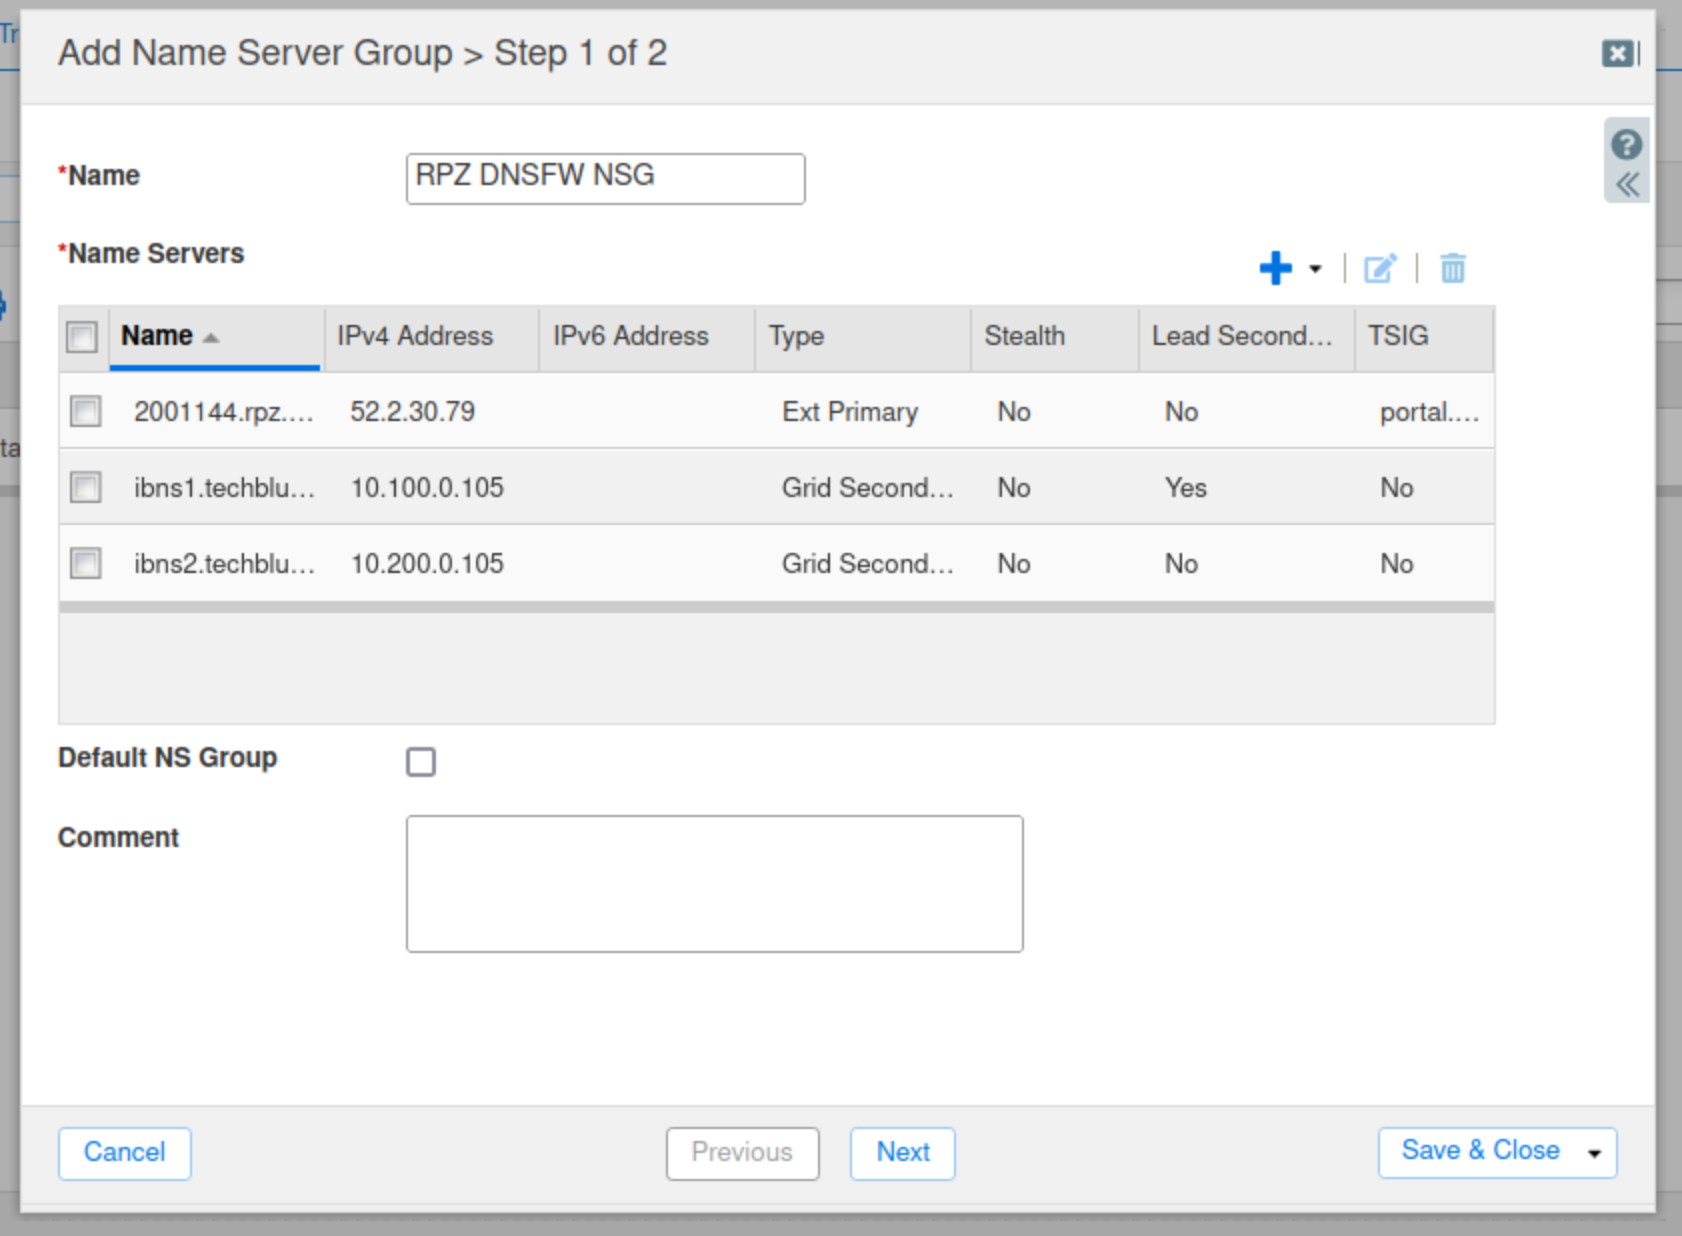
Create a name server group named RPZ DNSFW NSG to use the Threat Defense authoritative feed servers. Use the server information you obtained from the Infoblox Portal to add an external primary server with ibns1.techblue.net as a lead secondary and ibns2.techblue.net as a secondary.
Task 20: Add Threat Defense RPZ feeds into the NIOS Grid
Configure an RPZ for each feed separately. Set the Policy Override mode to Passthru. Once they have been successfully tested and we confirm that they don’t cause issues with legitimate traffic, we will switch them to None (Given) in a later task.
Task 21: Reorder all the RPZs to follow Infoblox guidelines
RPZs should be ordered based on a combination of Confidence and Threat Levels; the Higher the Confidence and Threat levels, the higher the order of the RPZ should be.
In this example, we have three local RPZs (allowlist.rpz, walledgarden.rpz, and denylist.rpz). These are local RPZs, which means that their entries are manually created, and we are very confident in their work. This is why they are at the top of the list in the order our organization sees fit, followed by RPZ feeds we download from Threat Defense.
To order Threat Defense Feed RPZs amongst each other, we can use Infoblox’s documentation to get each feed’s Confidence and Threat levels to order them correctly.
Re-order the RPZs if required so that they are ordered as follows:
-
allowlist.rpz
-
walledgarden.rpz
-
denylist.rpz
-
infoblox-base.rpz.infoblox.local
-
infoblox-base-ip.rpz.infoblox.local
Task 22: Verify that the newly added Threat Defense RPZ feeds are detecting malicious domains to be blocked
-
Switch over to the testing-linux machine with the credentials (training/infoblox) and set the machine up for testing.
-
Open a terminal window, issue the command sudo set-network-static-nios, and verify that the machine now has the IP address 172.31.101.250 using the command ifconfig.
-
-
Use dig and syslog entries to verify that the infoblox-base.rpz.infoblox.local RPZ is detecting domain names that should be blocked. Use one or more from the following domains:
-
apt.eicar.network
-
base.eicar.network
-
compromiseddomain.eicar.network
-
compromisedhost.eicar.network
-
exploitkit.eicar.network
-
maliciousnameserver.eicar.network
-
sinkhole.eicar.network
-
Task 23: Change the Override Policy for infoblox-base.rpz.infoblox.local to None (Given)
Switch over to jump-desktop and change the Override Policy for infoblox-base.rpz.infoblox.local and infoblox-base-ip.rpz.infoblox.com from Passthru to None (Given).
Task 24: Test if the Threat Defense RPZ feeds are blocking malicious domains
Switch over to the testing-linux machine, use dig and syslog entries to verify that the infoblox-base.rpz.infoblox.local RPZ is blocking malicious domains. Use one or more from the following domains:
-
apt.eicar.network
-
base.eicar.network
-
compromiseddomain.eicar.network
-
compromisedhost.eicar.network
-
exploitkit.eicar.network
-
maliciousnameserver.eicar.network
-
sinkhole.eicar.network
Solutions
Task 1 Solution: Create RPZ Local NSG Name Server Group
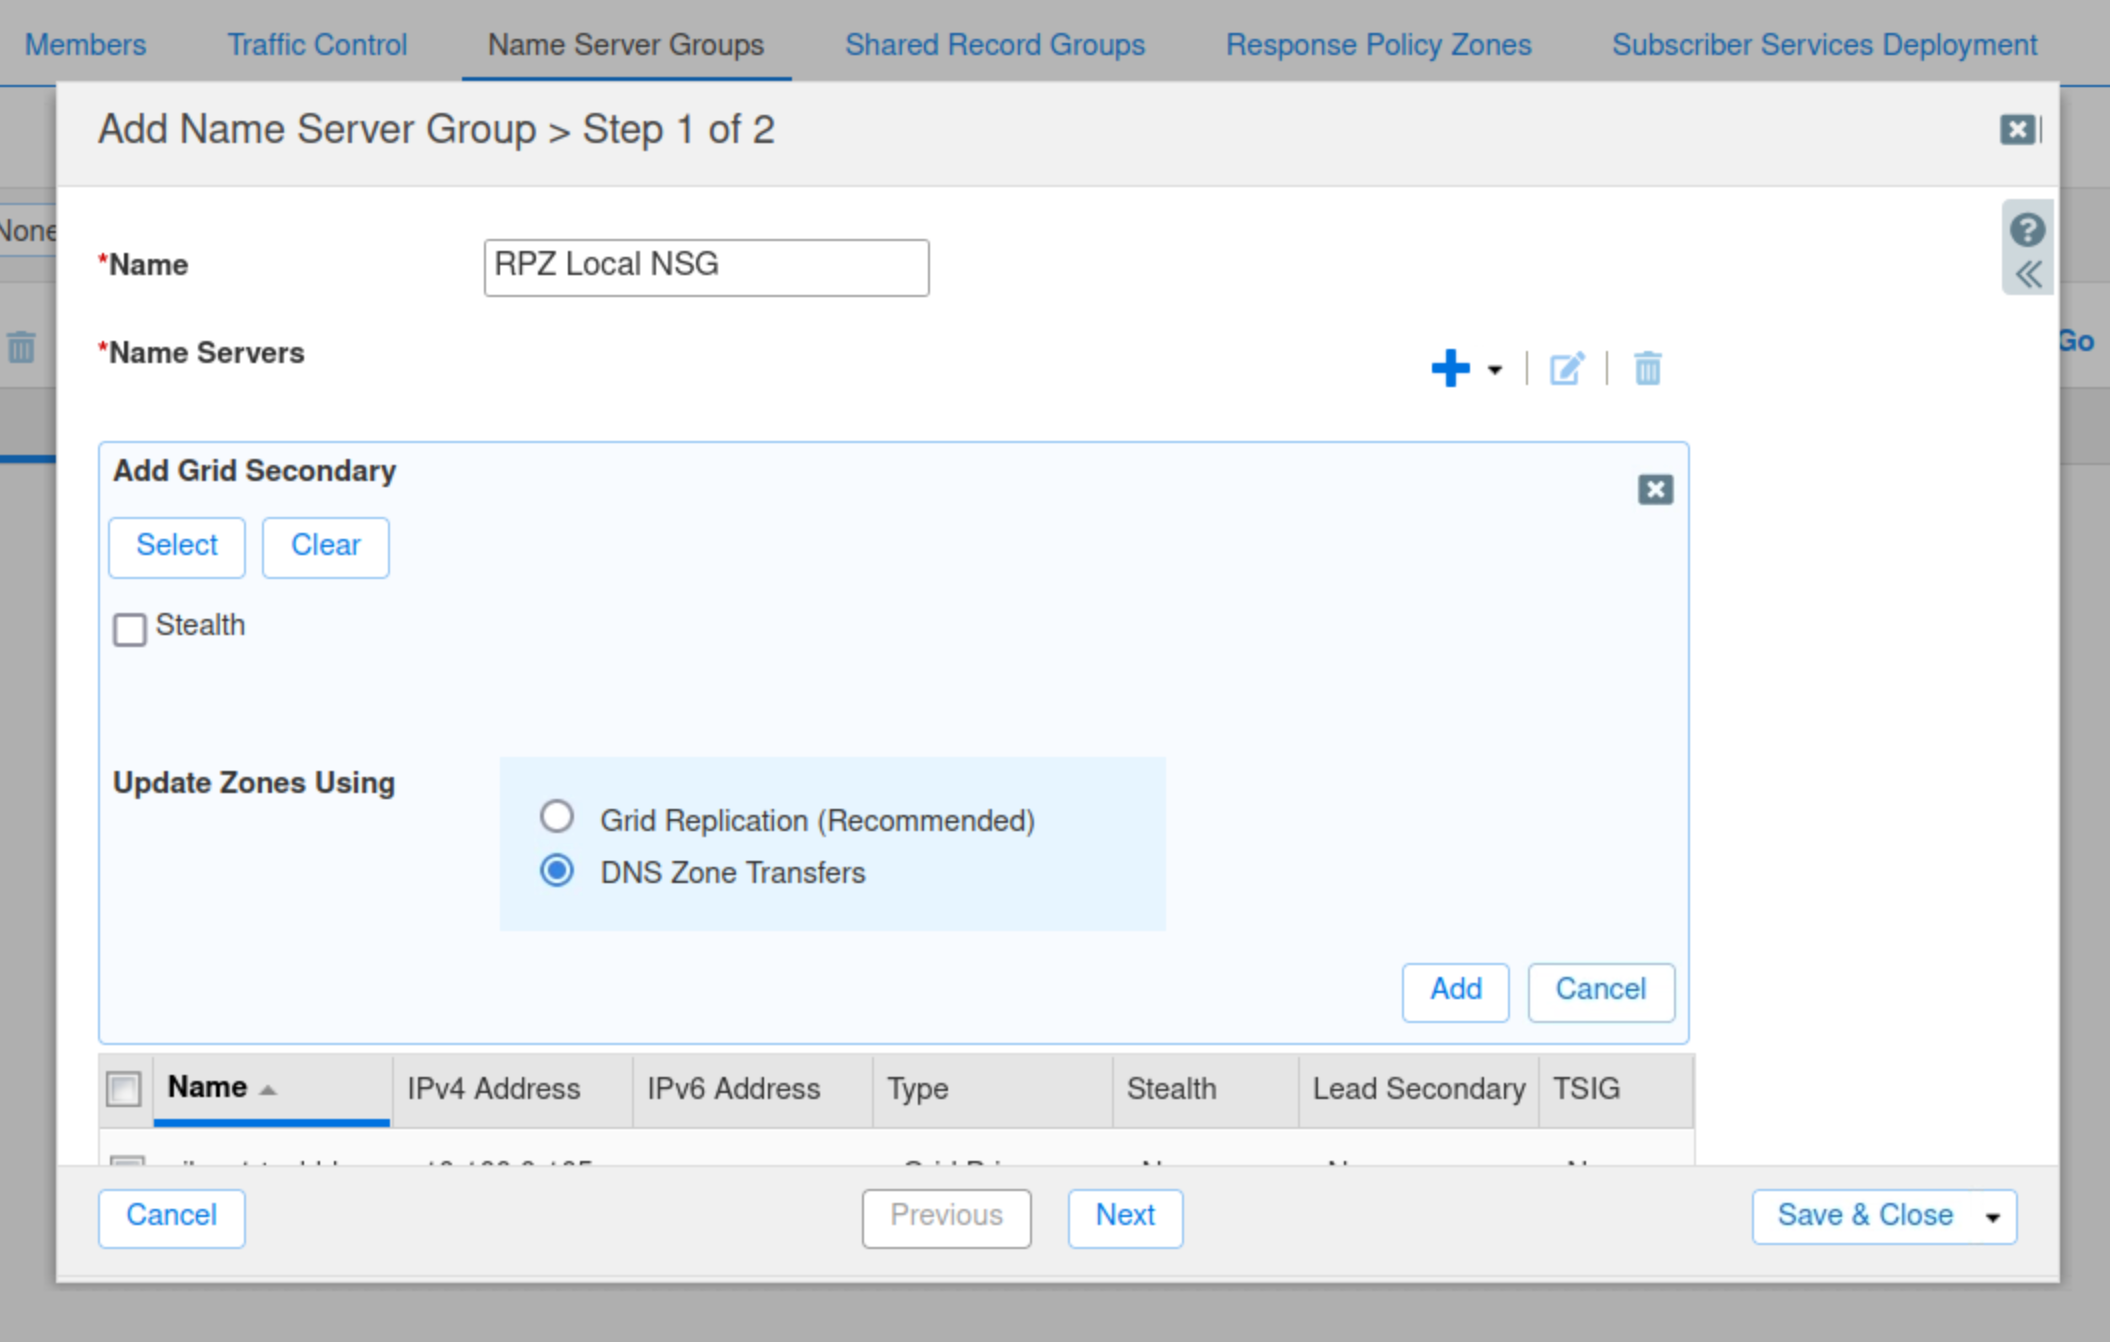
In this task, you create the RPZ Local NSG Name Server Group. This name server group will be used by the local RPZs you create in later labs. The members of RPZ Local NSG are ibns1.techblue.net and ibns2.techblue.net. You must choose DNS Zone Transfers for the Update Zones Using method. You get an error if you try and add a name server group with Grid Replication as the Update Zones Using method to an RPZ.
-
On the jump-desktop machine, open a browser window and surf https://10.100.0.100.
-
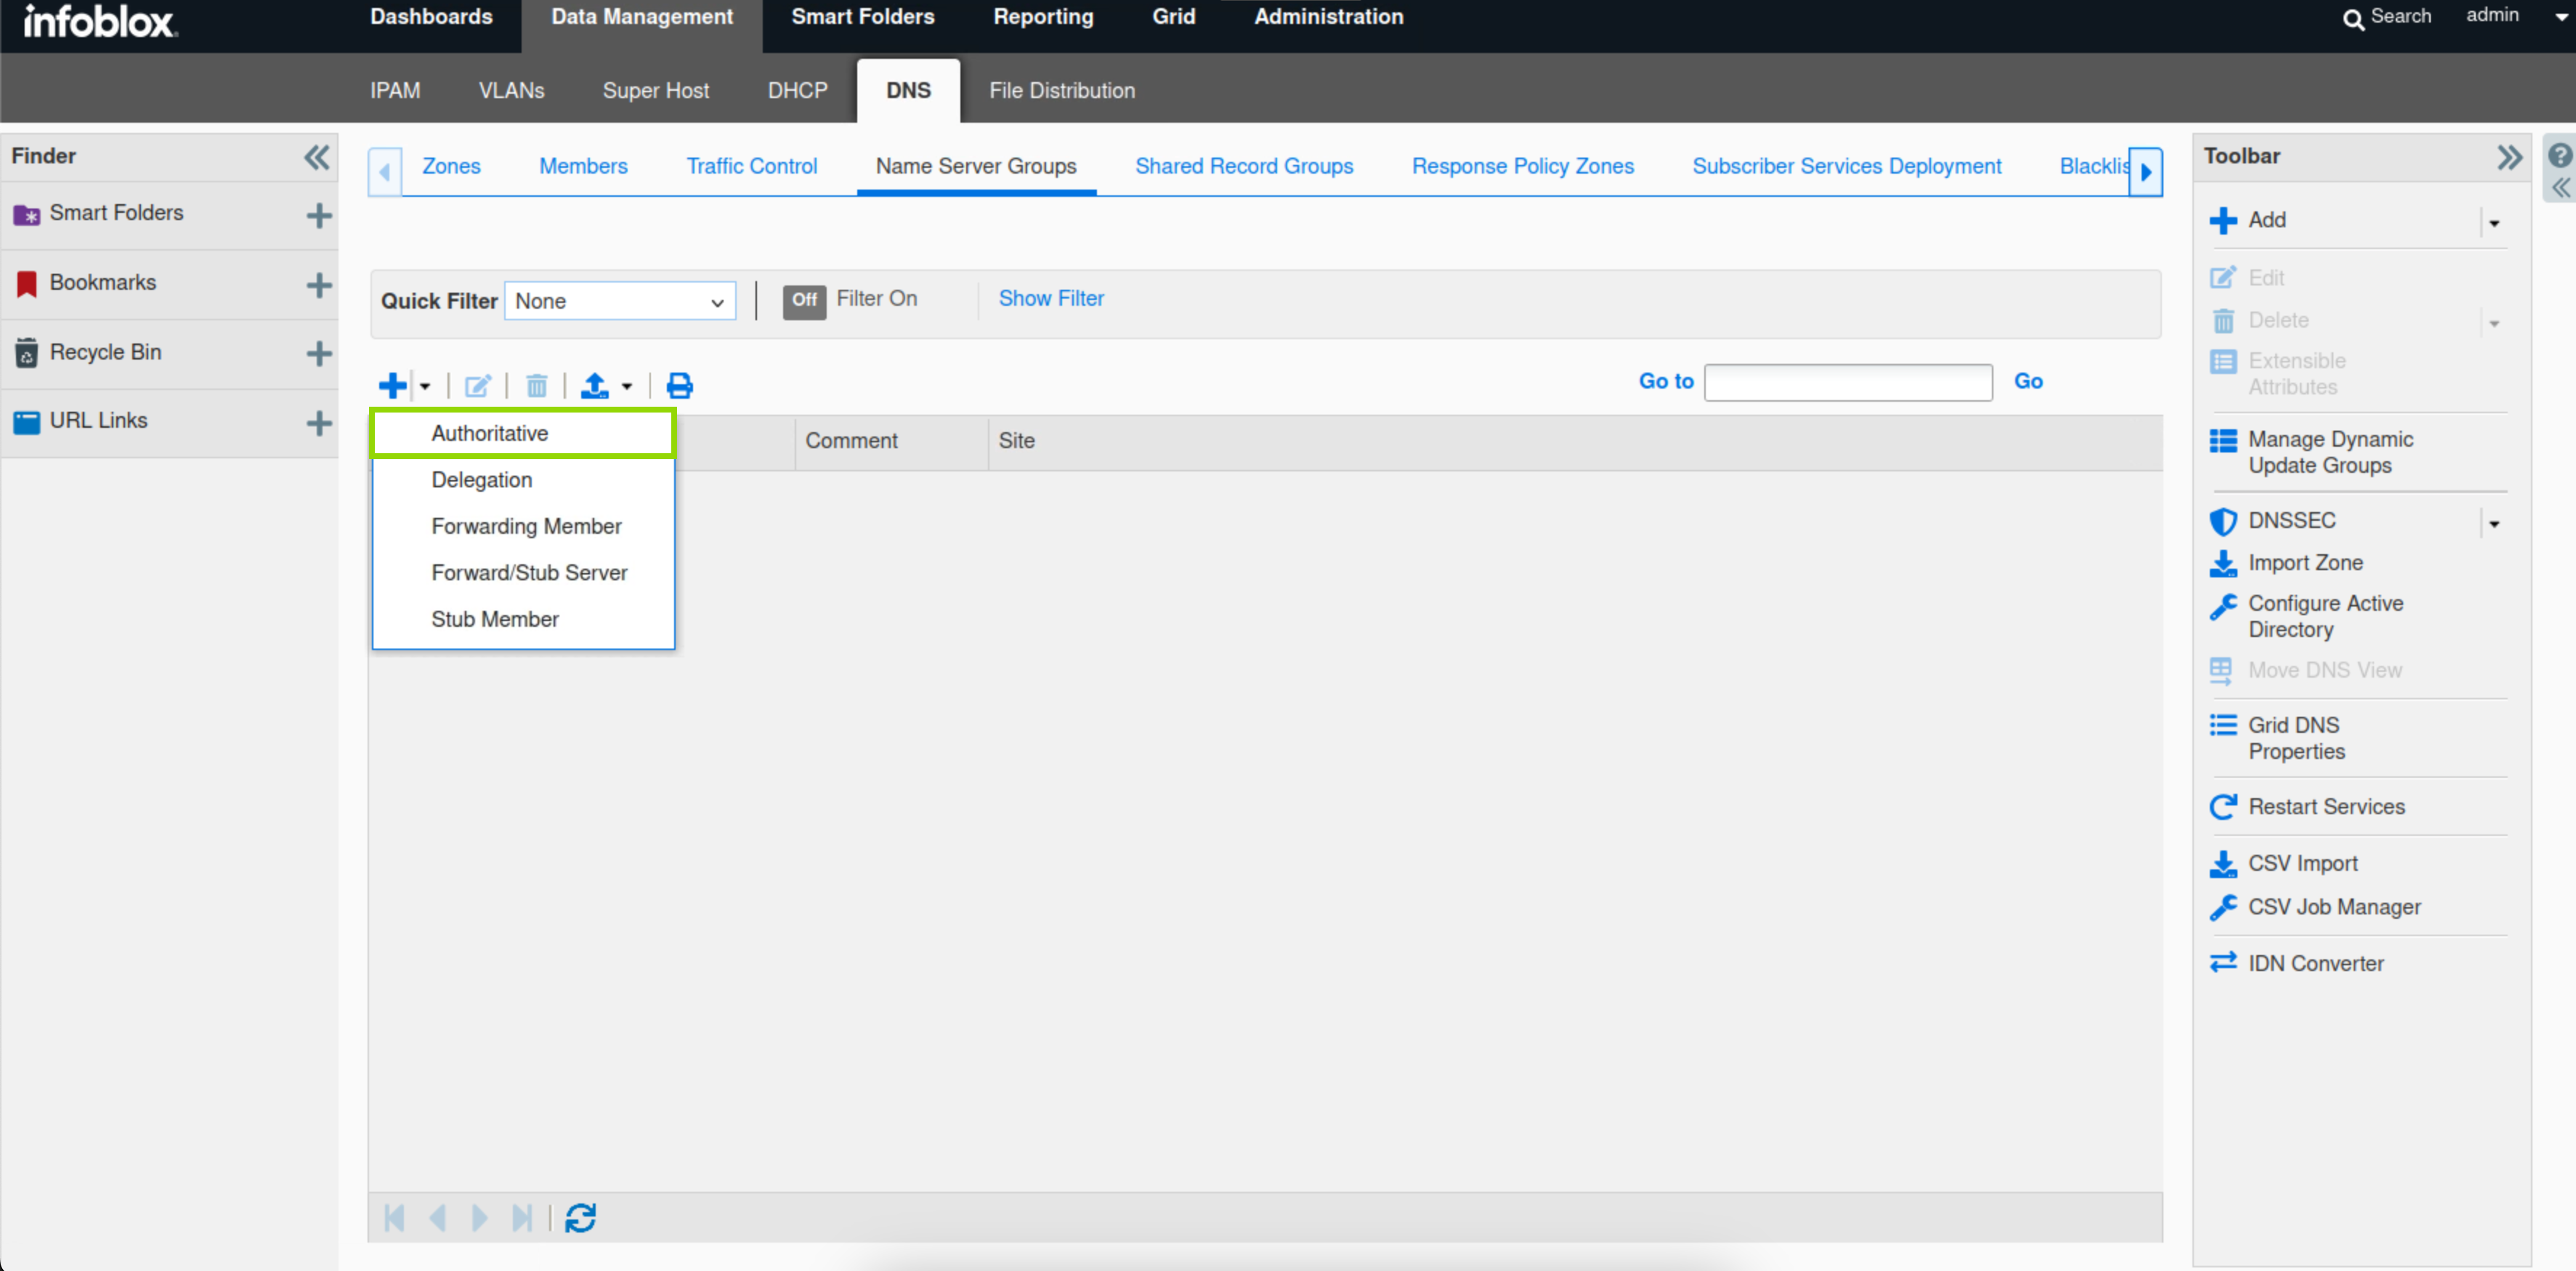
Navigate to Data Management → DNS → Name Server Groups.
-
Click the drop-down arrow next to the plus(+) symbol to add a new Authoritative Name Server Group.
-
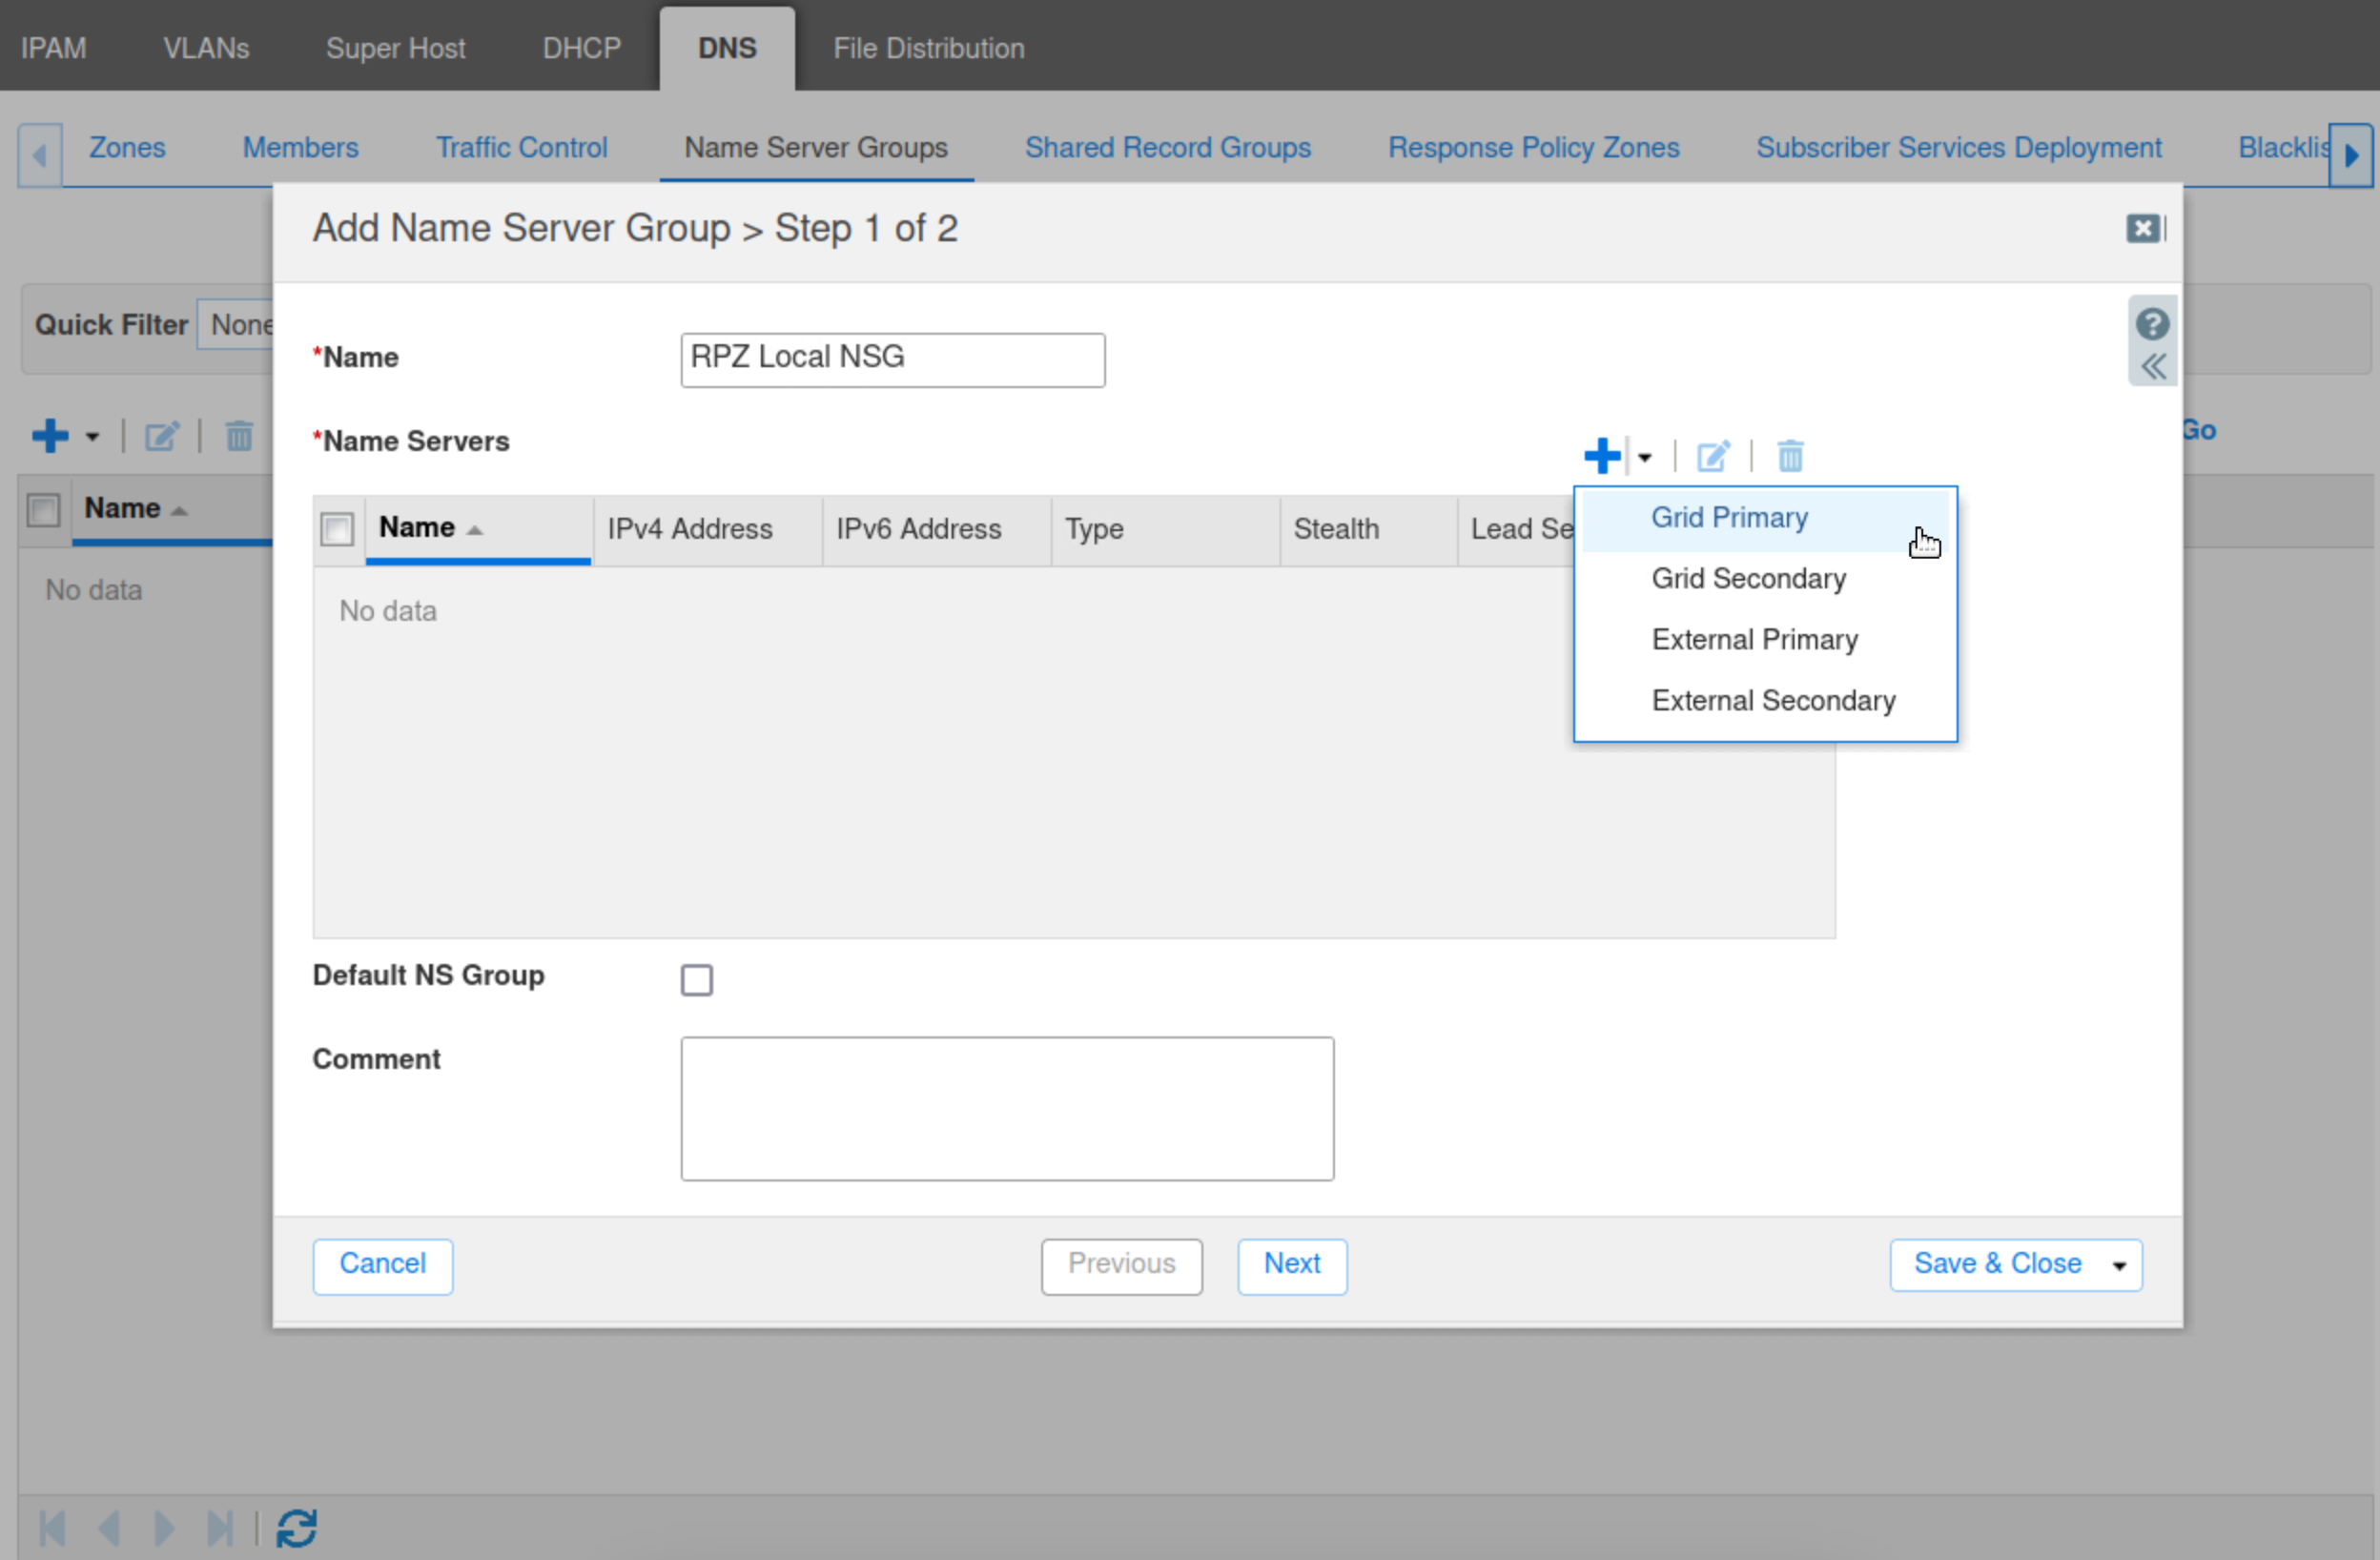
Type RPZ Local NSG in the Name box. Click the drop-down arrow next to the plus (+) symbol and select Grid Primary.
-
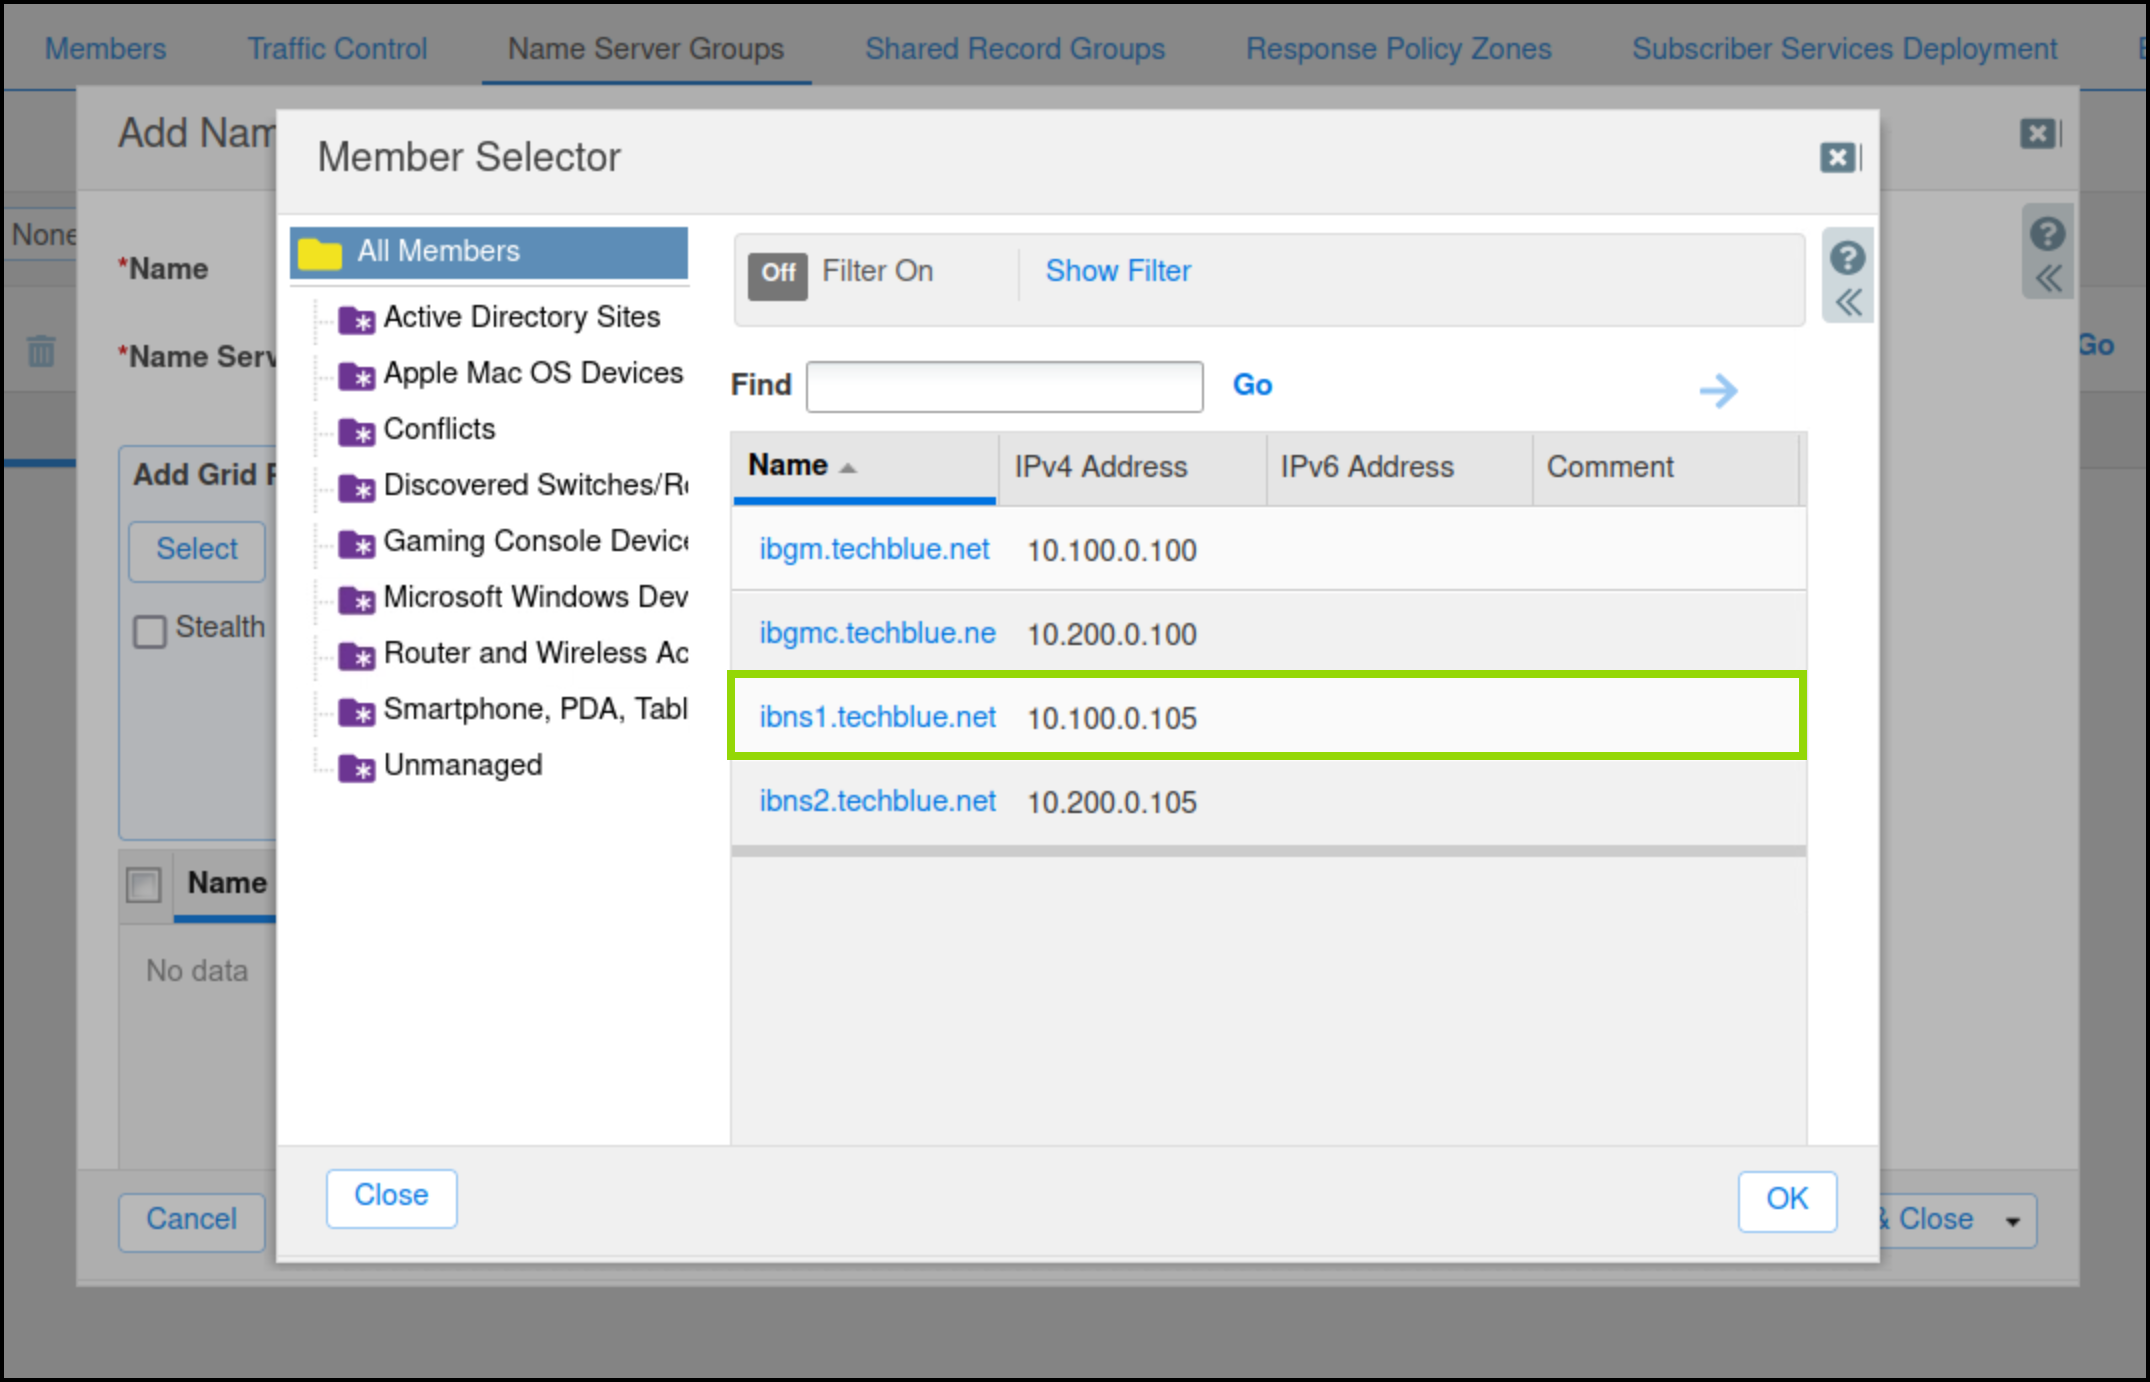
Click Select.
-
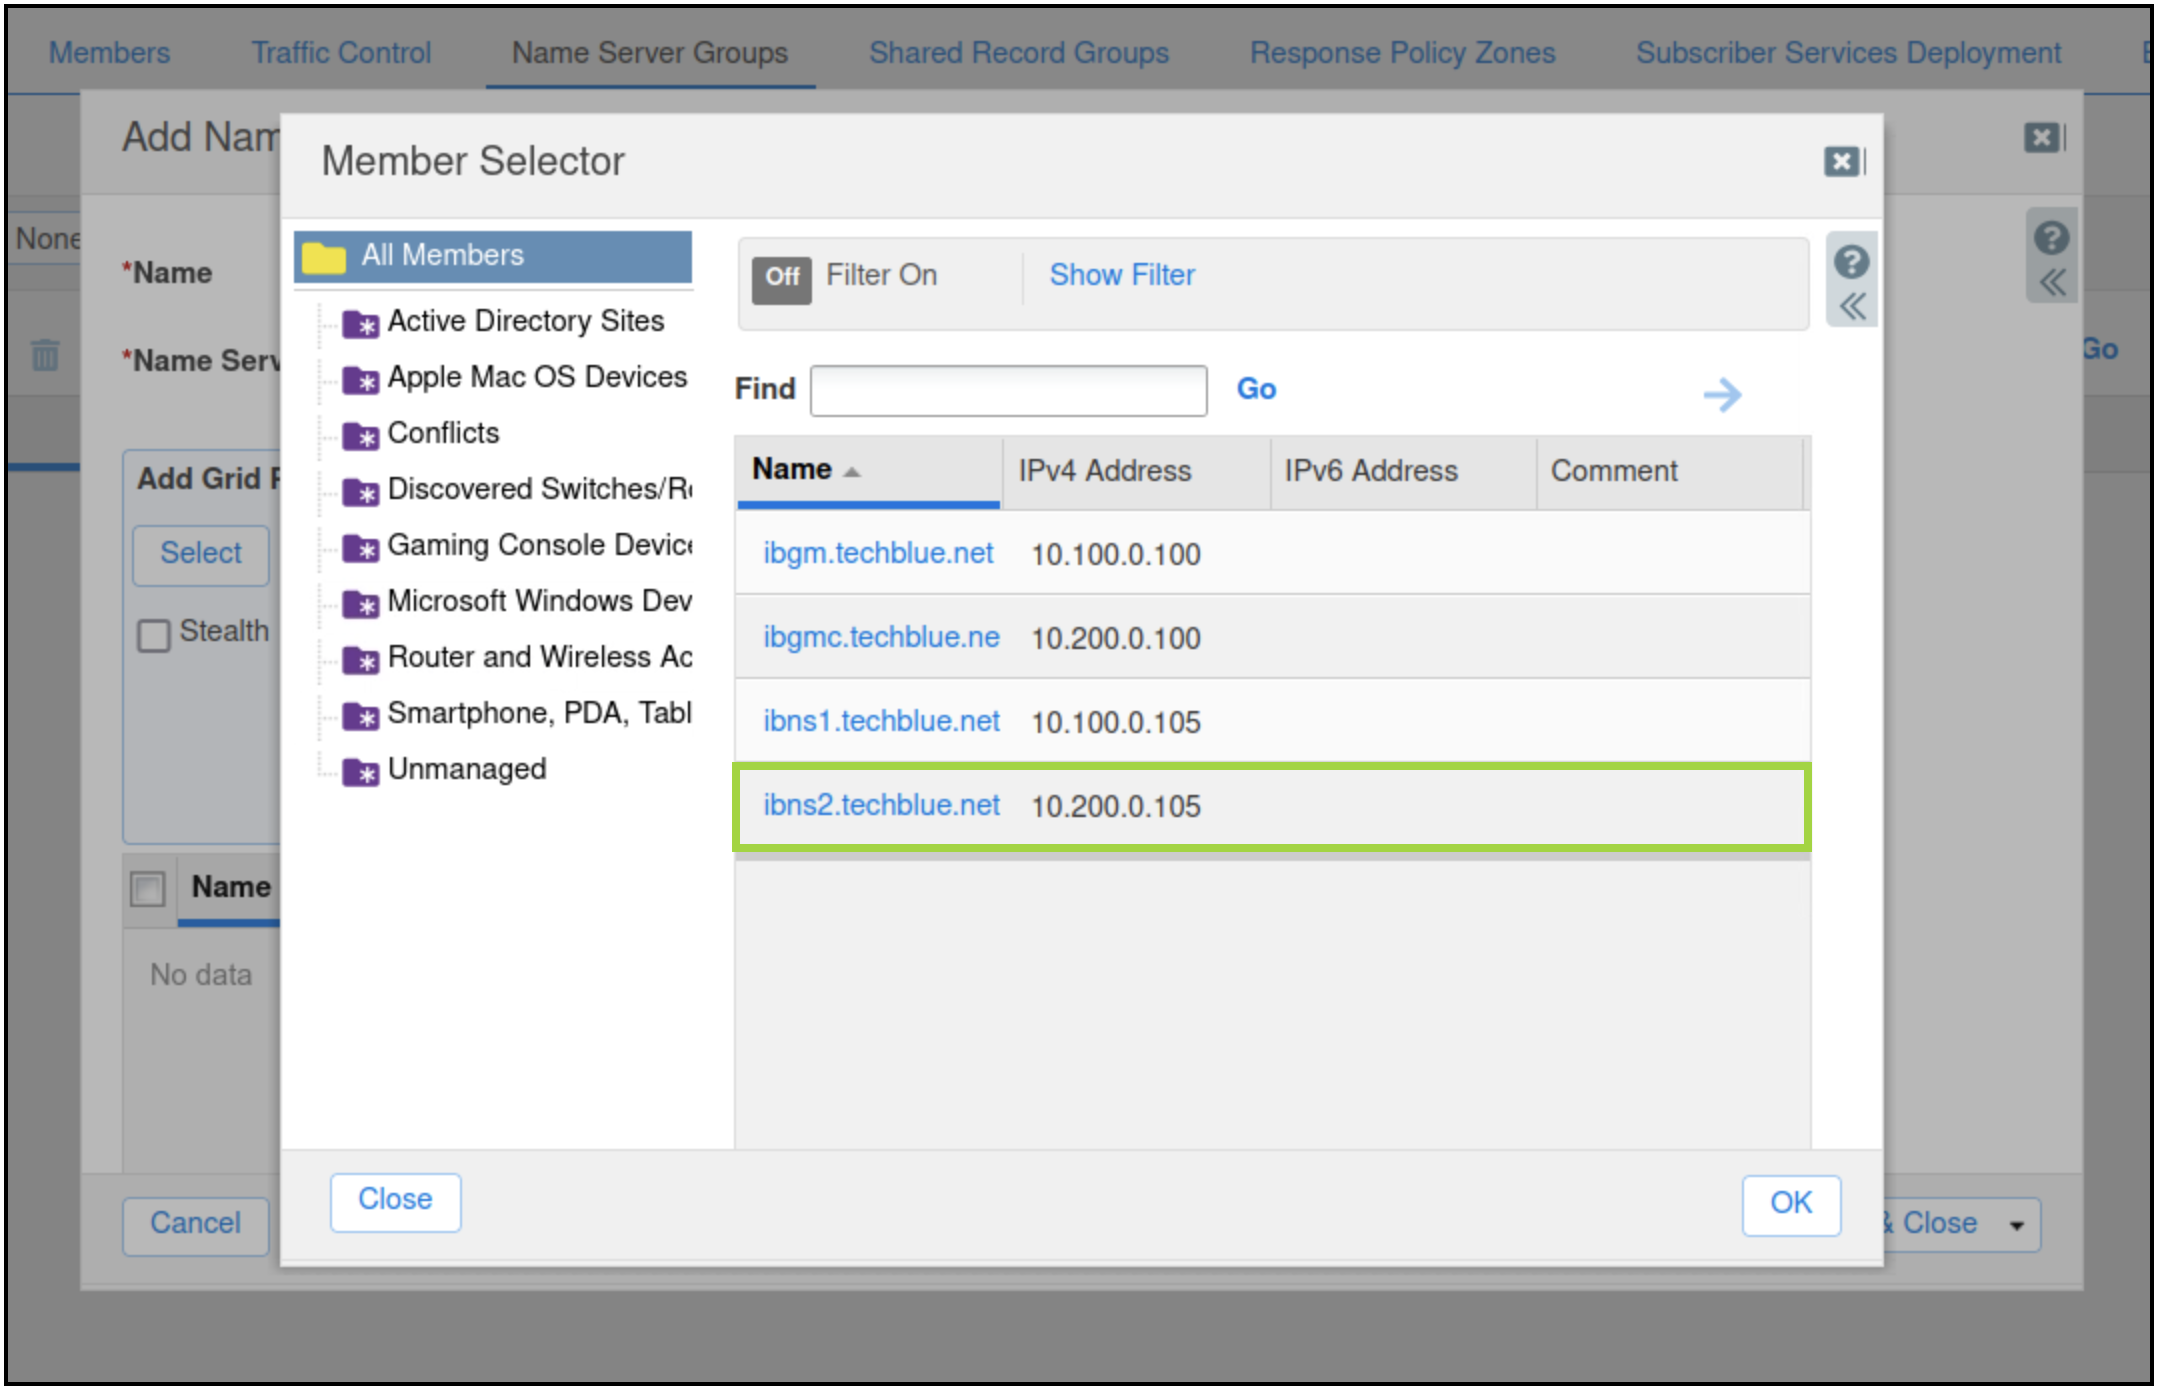
Choose ibns1.techblue.net from the Member Selector. Click OK.
-
Click Add in the Add Name Server Group wizard to add ibns1.techblue.net to the RPZ Local NSG group.
-
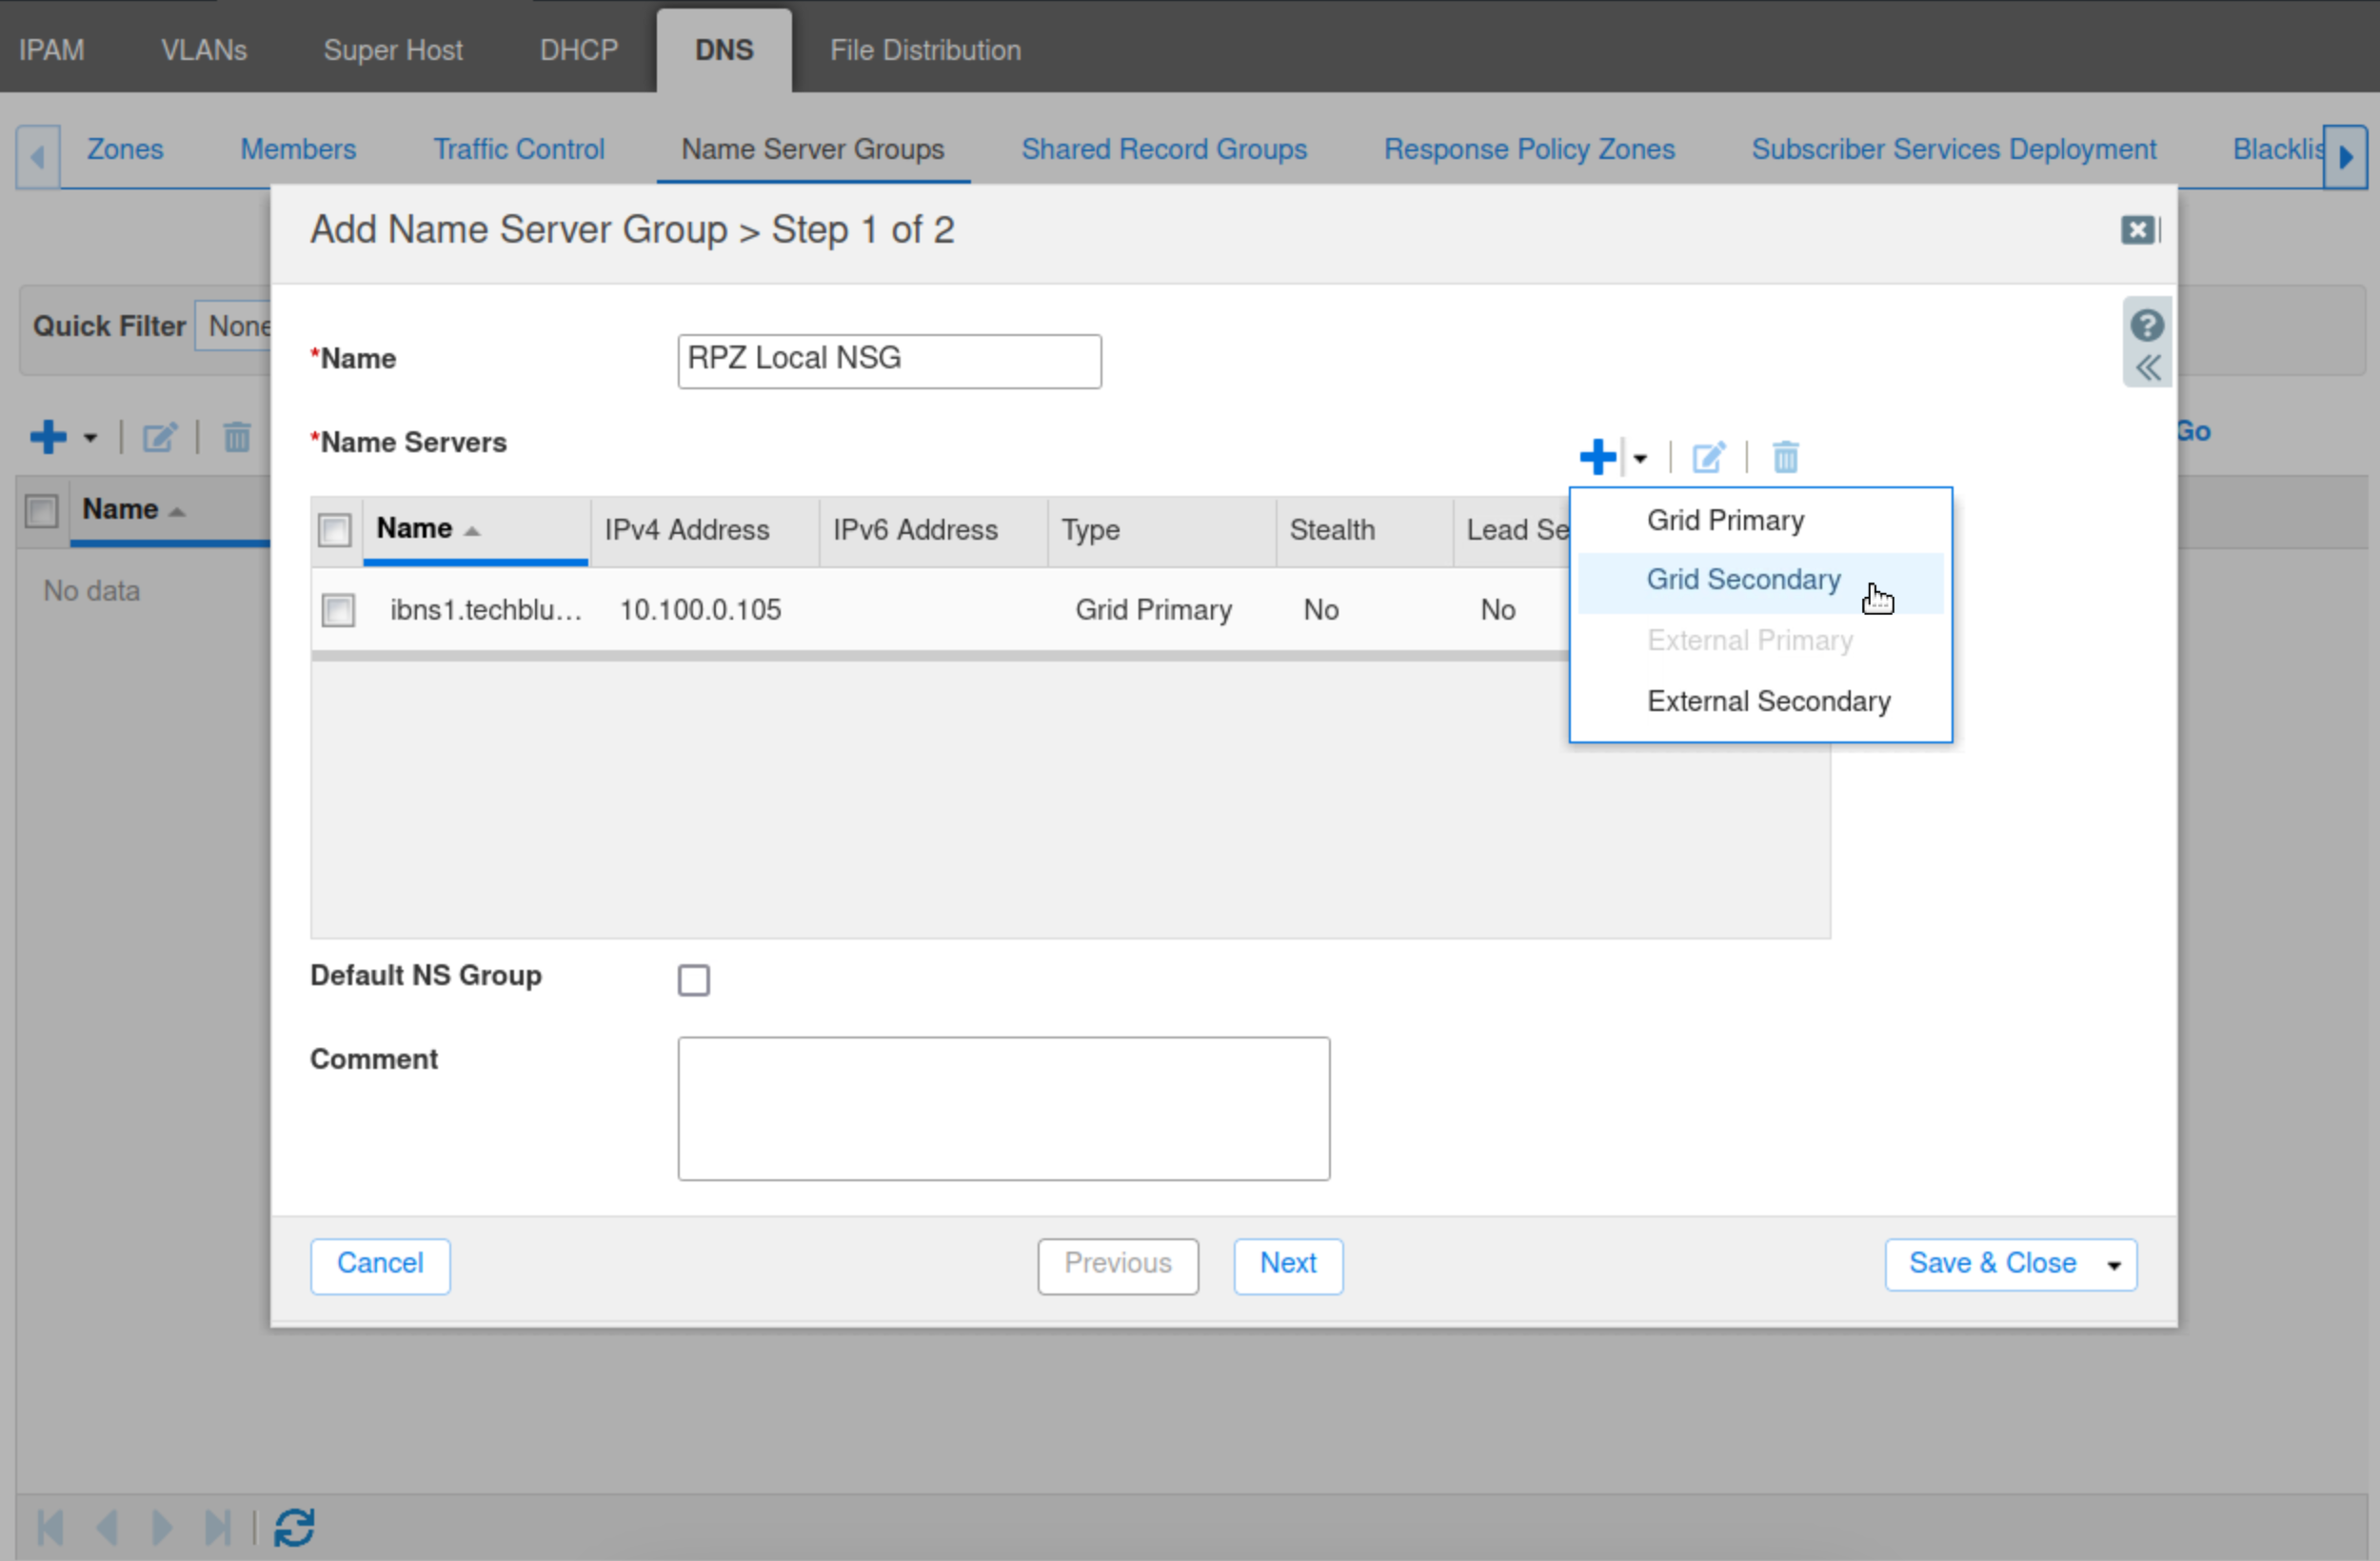
Click the drop-down arrow next to the plus (+) symbol and select Grid Secondary.
-
Ensure Update Zones Using is set to DNS Zone Transfers. Click Select.
-
Choose ibns2.techblue.net from the Member Selector.
-
Click Add to add ibns2.techblue.net to the Name Server Group RPZ Local NSG.
-
Click Save & Close to save the configuration.
Task 2 Solution: Verify RPZ Logging is enabled
In this task, you verify that RPZ logging is enabled. This ensures that RPZ events are logged to syslog allowing us to verify our RPZ configuration and troubleshoot problems that might happen in the future.
-
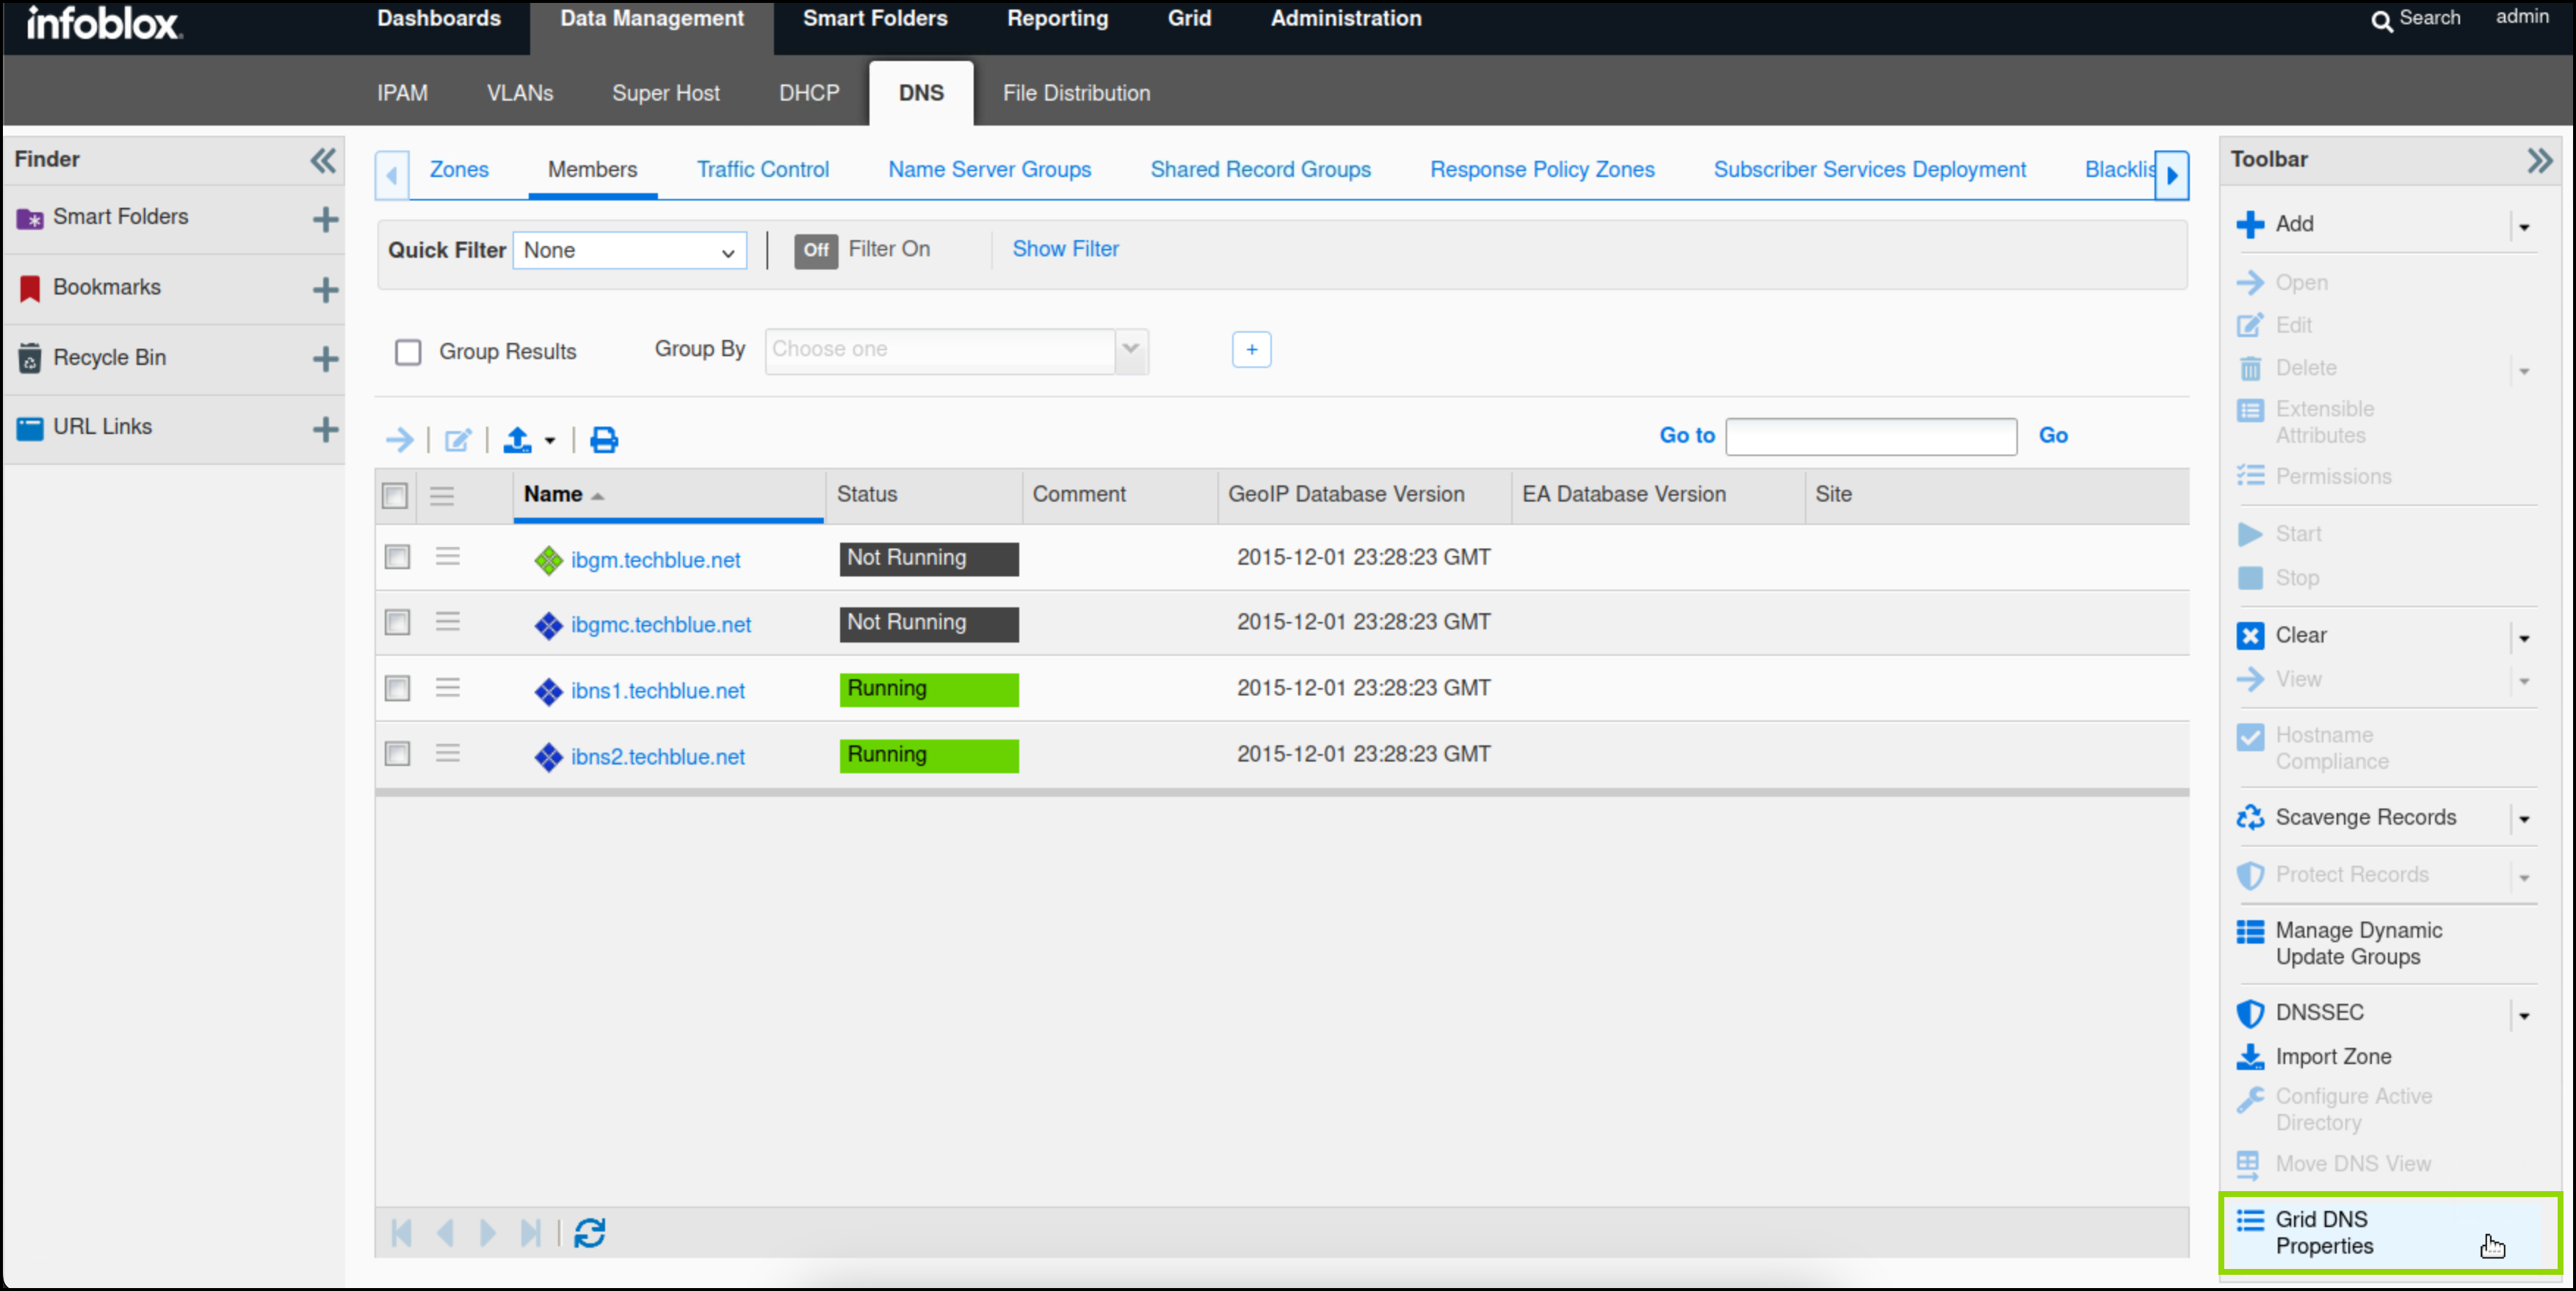
Navigate to Data Management → DNS → Members.
-
Select Grid DNS Properties from the toolbar.
-
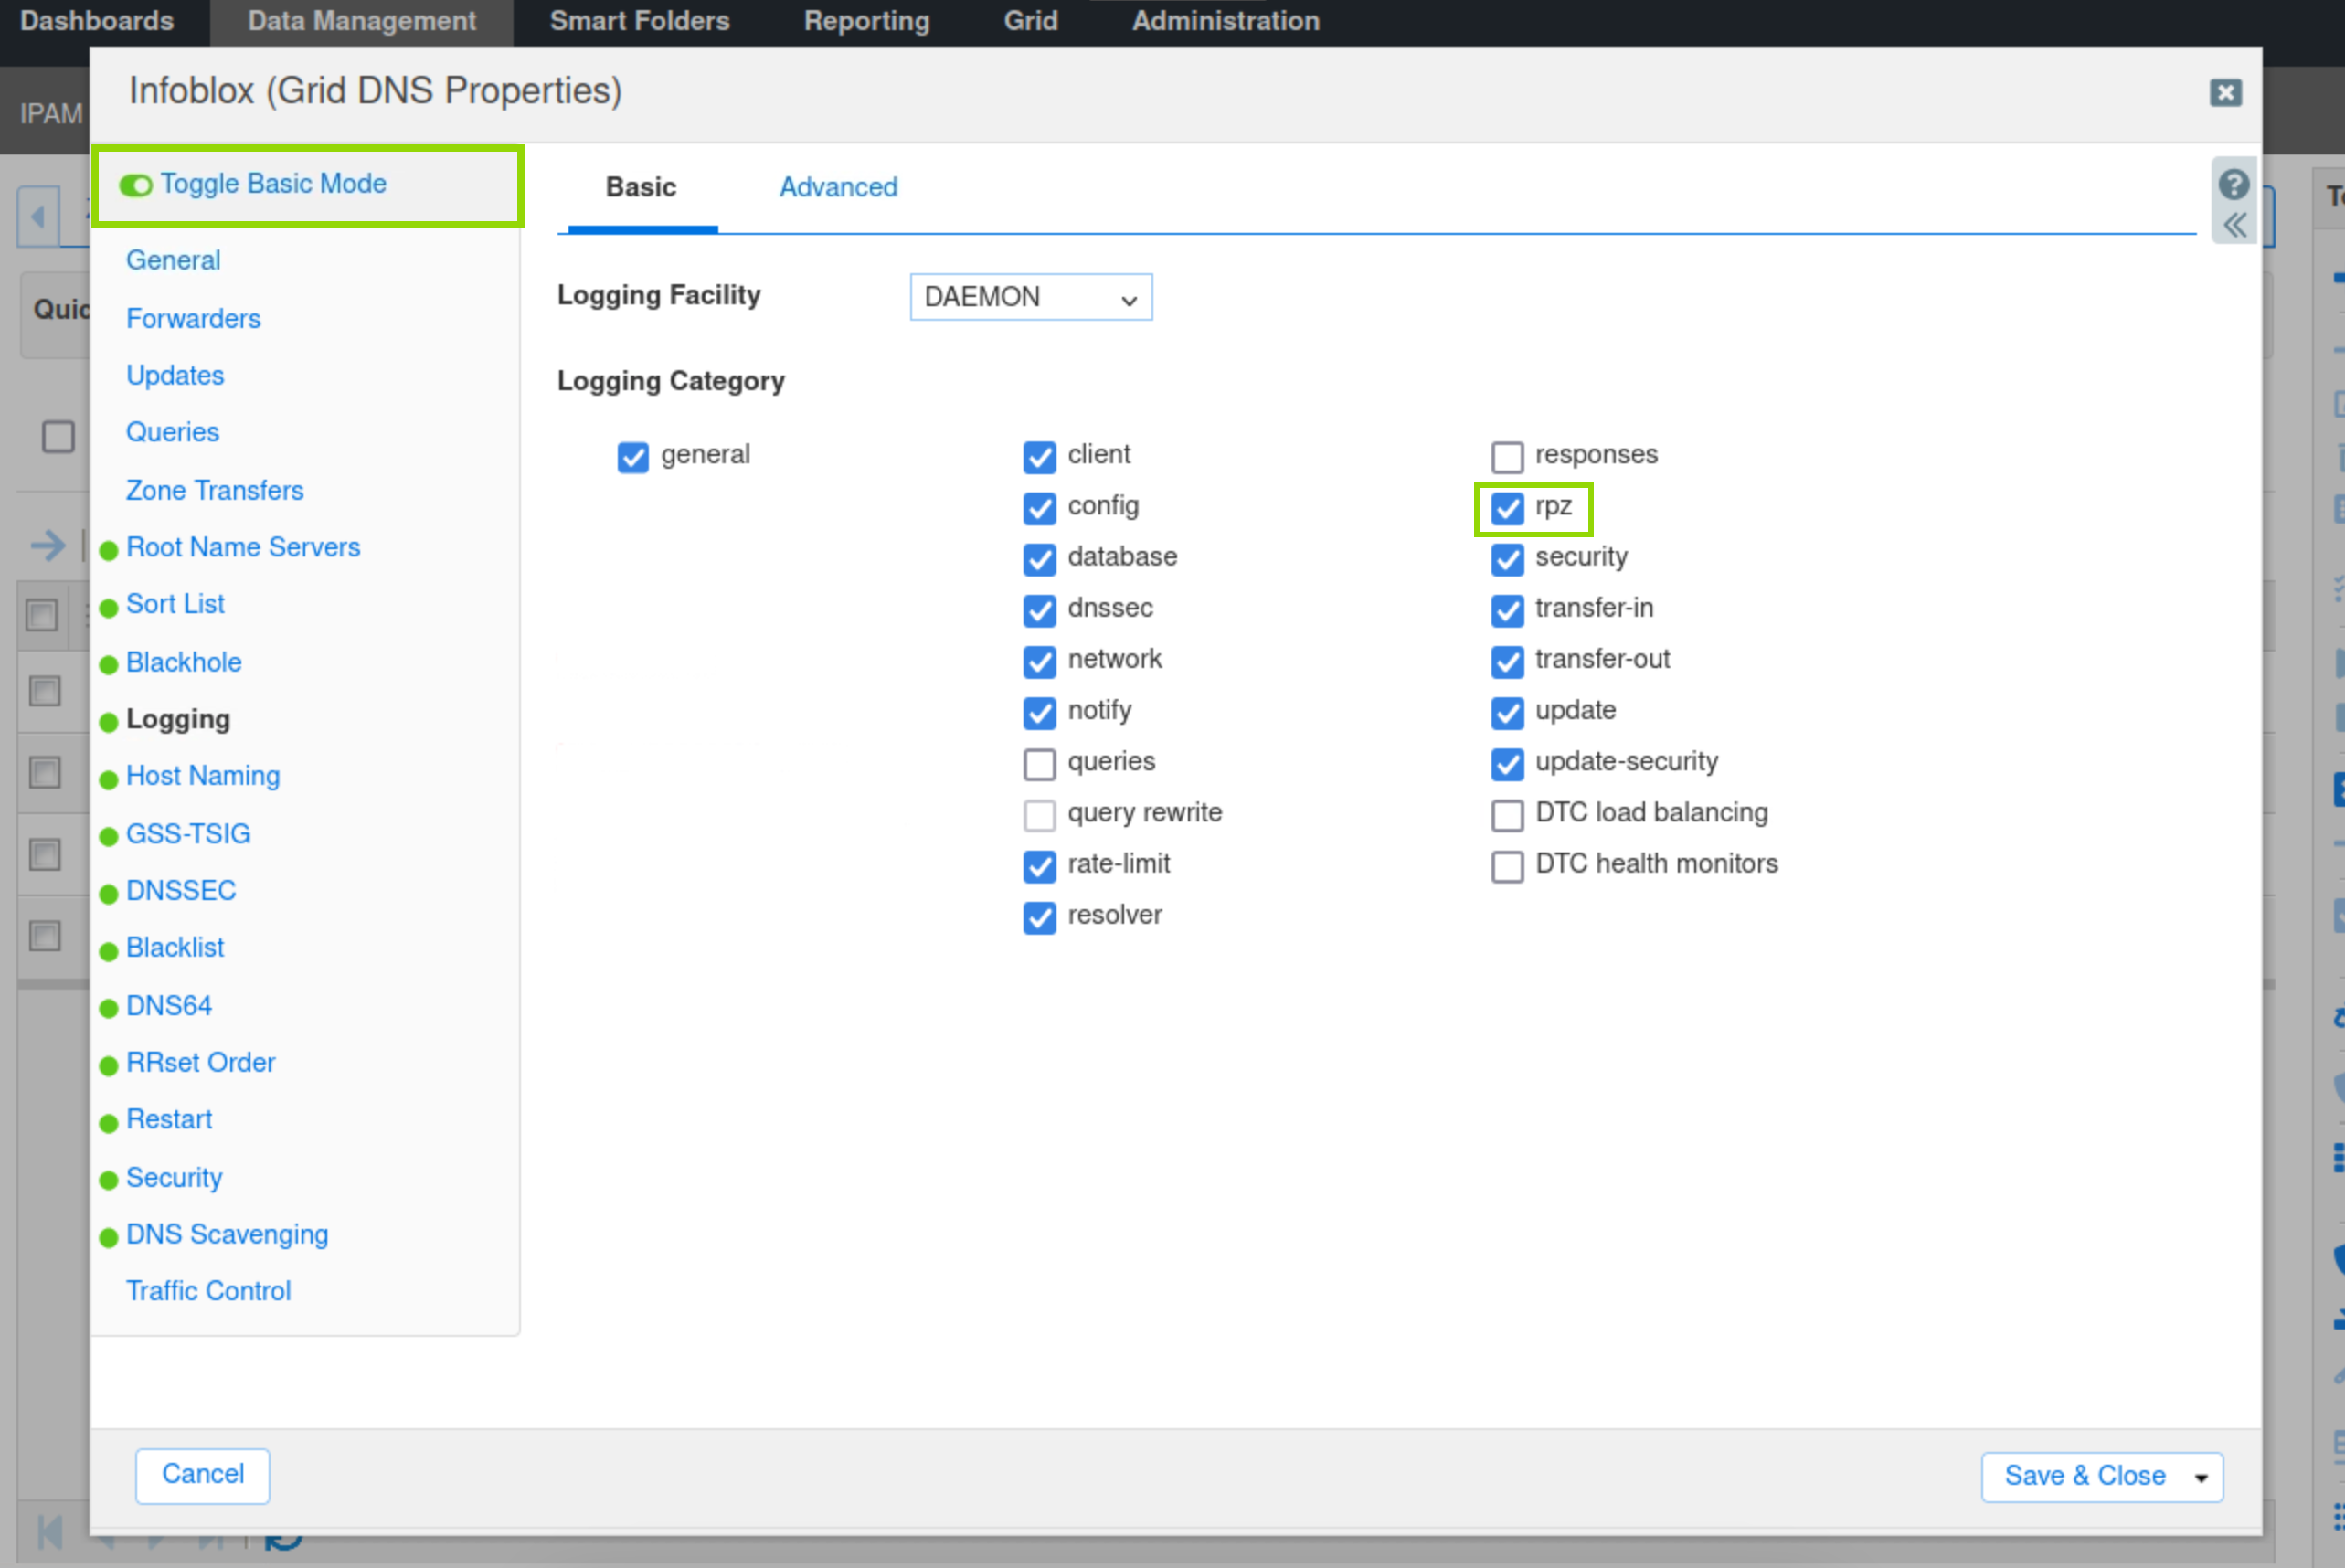
Toggle Advanced Mode. Select Logging.
-
Verify that the check box for RPZ is checked, if not check it.
-
Click Save & Close.
-
Restart Services if prompted.
Task 3 Solution: Enable Security Reporting for the Grid
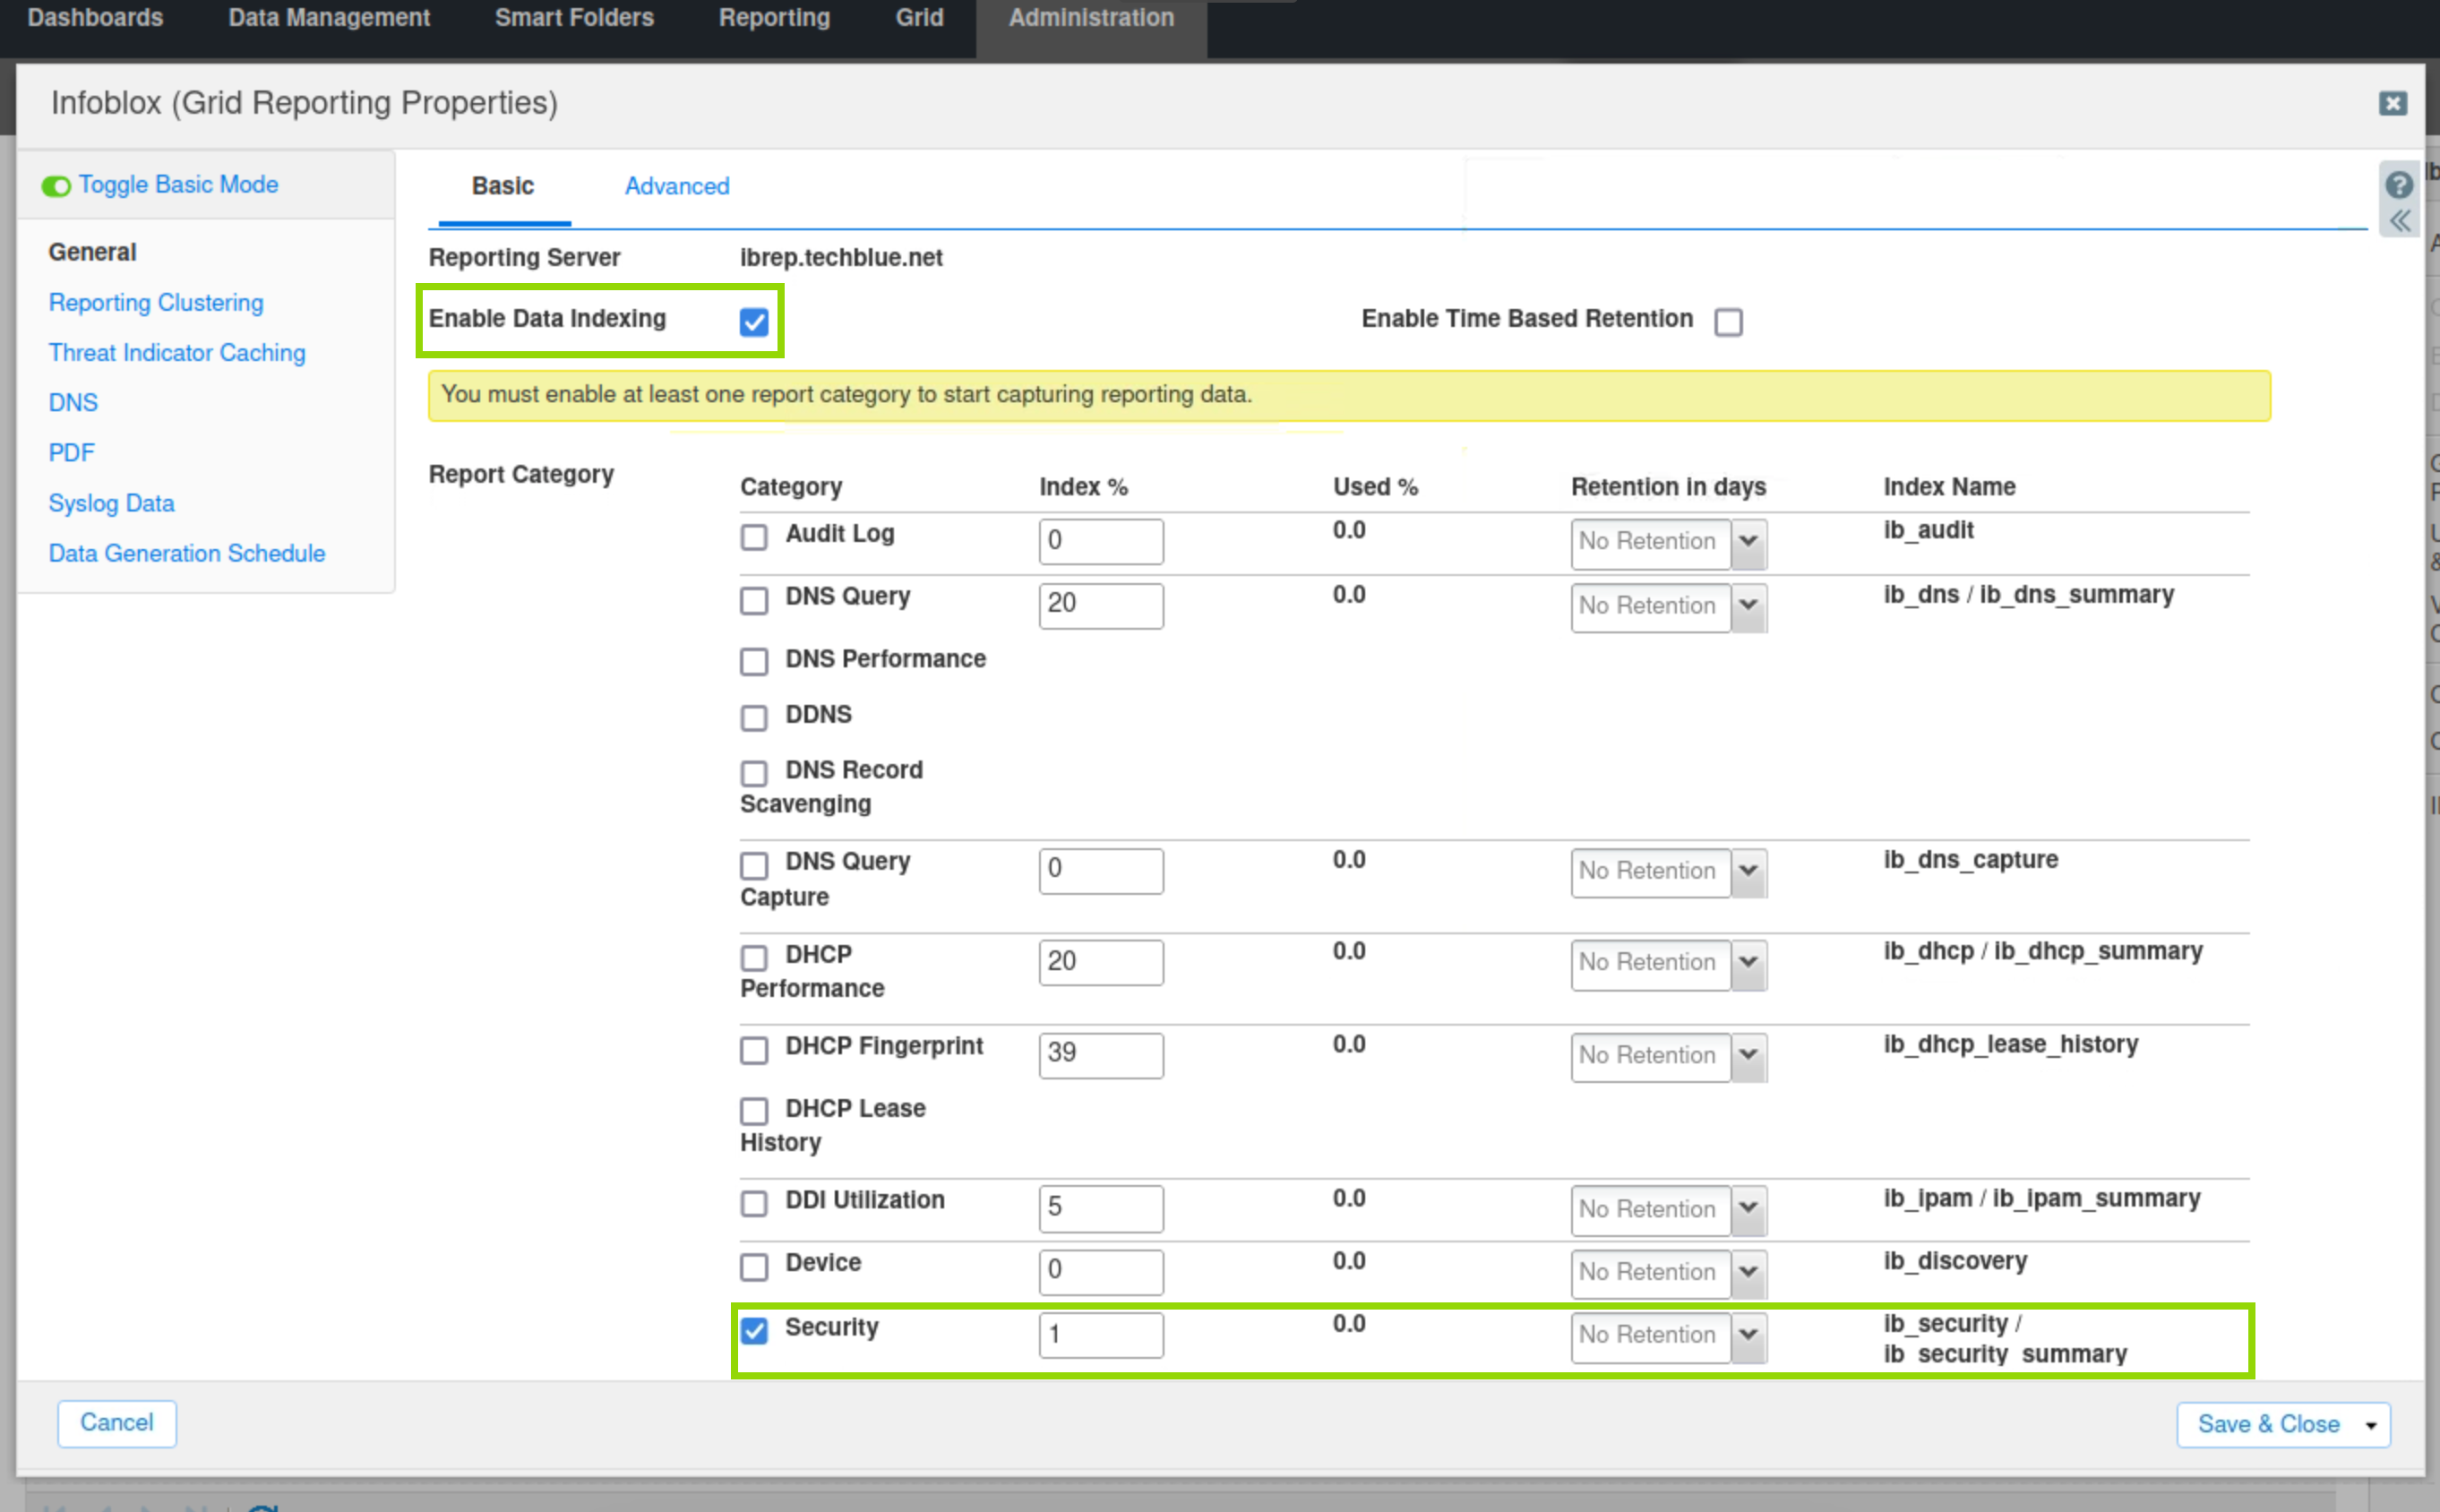
In this task, we enable the Reporting Server Security category and it has an index % value, this is to allow the reporting server to generate reports on security events including RPZ.
NOTE: To allow grid members to send data over to the reporting server we must enable data indexing and if the "Enable Time Based Rentention“ box is enabled data will be retained by the reporting server for a number of days we set for each reporting category.
-
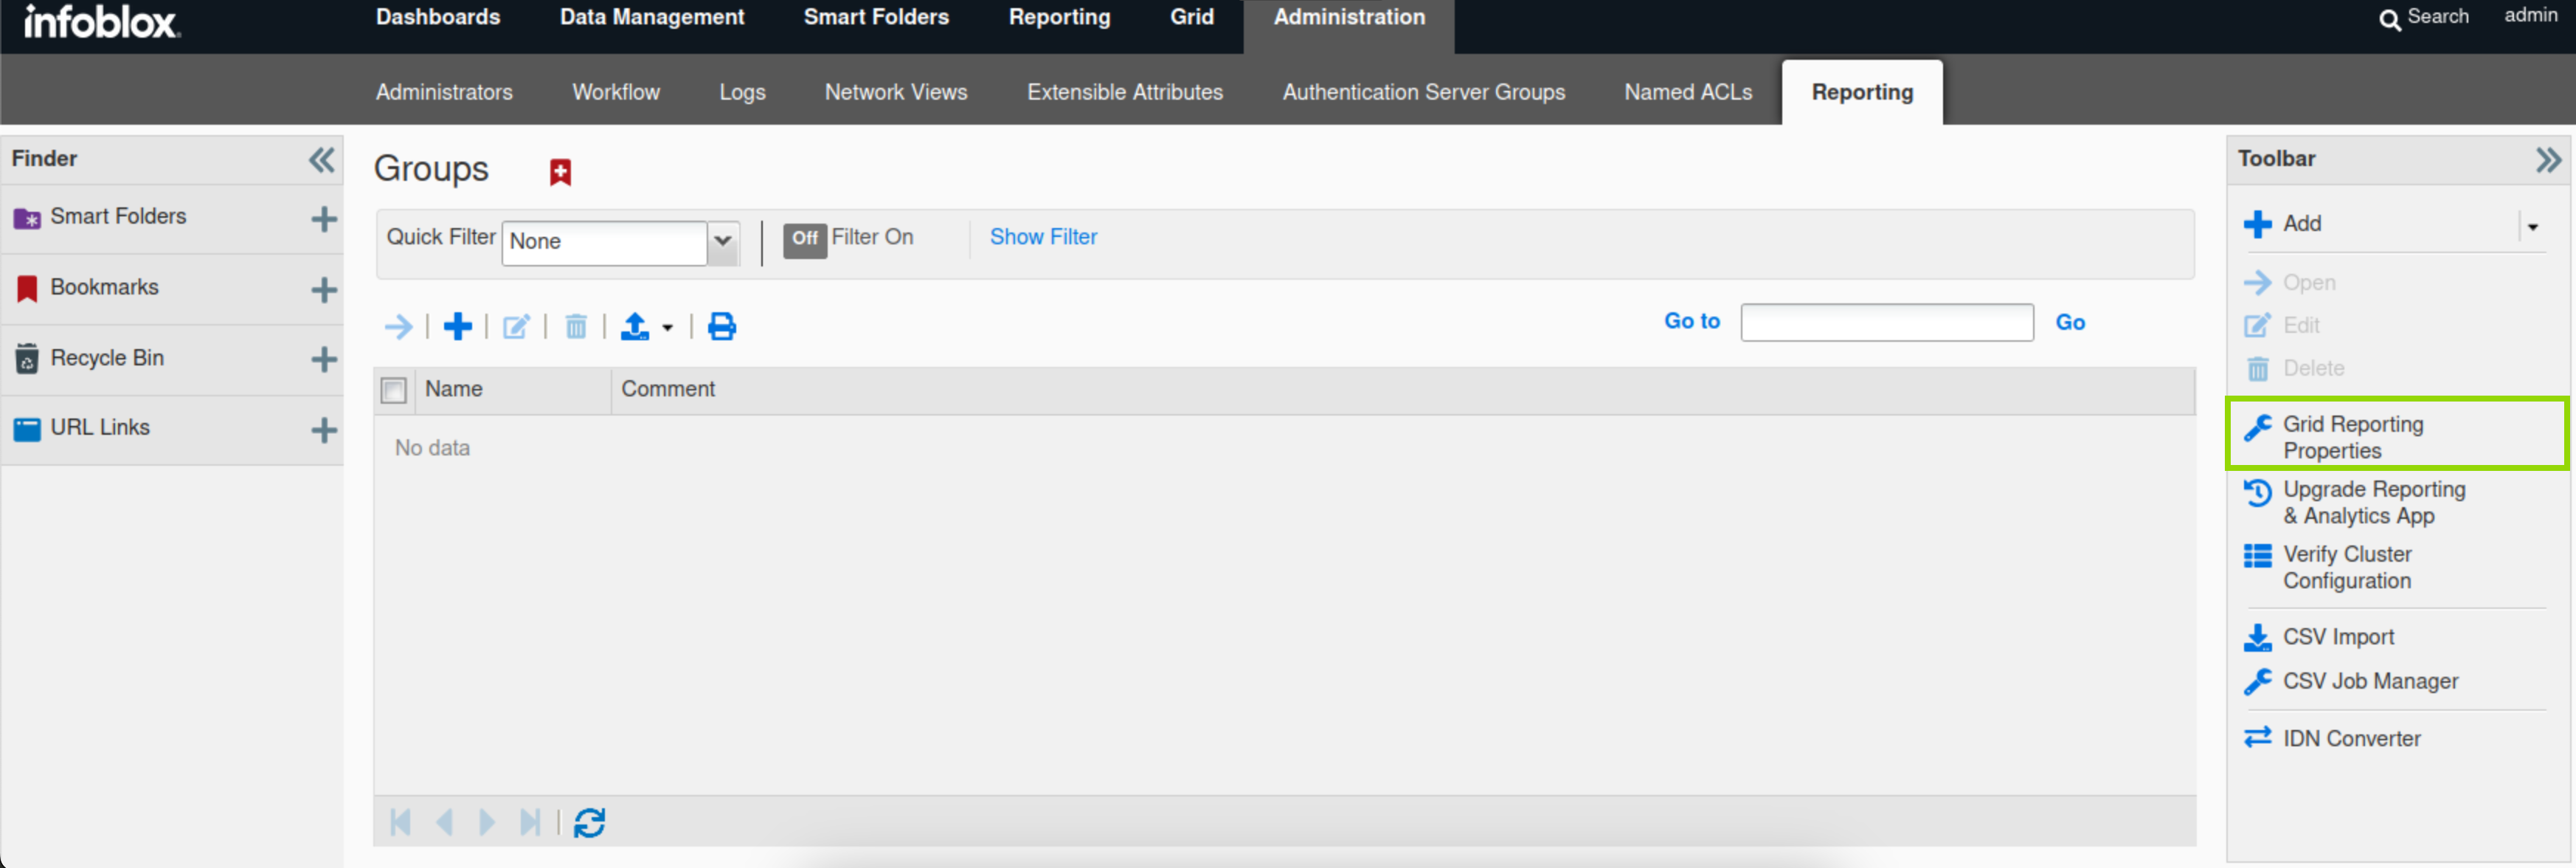
Navigate to Administration → Reporting.
-
Select Grid Reporting Properties from the Toolbar.
-
Check the "Enable Data Indexing“ box, this enables grid members to transfer data to the reporting server.
-
Ensure the Security Category is selected, and the Index% field has a value, you can leave as the default value.
-
Click Save & Close.
-
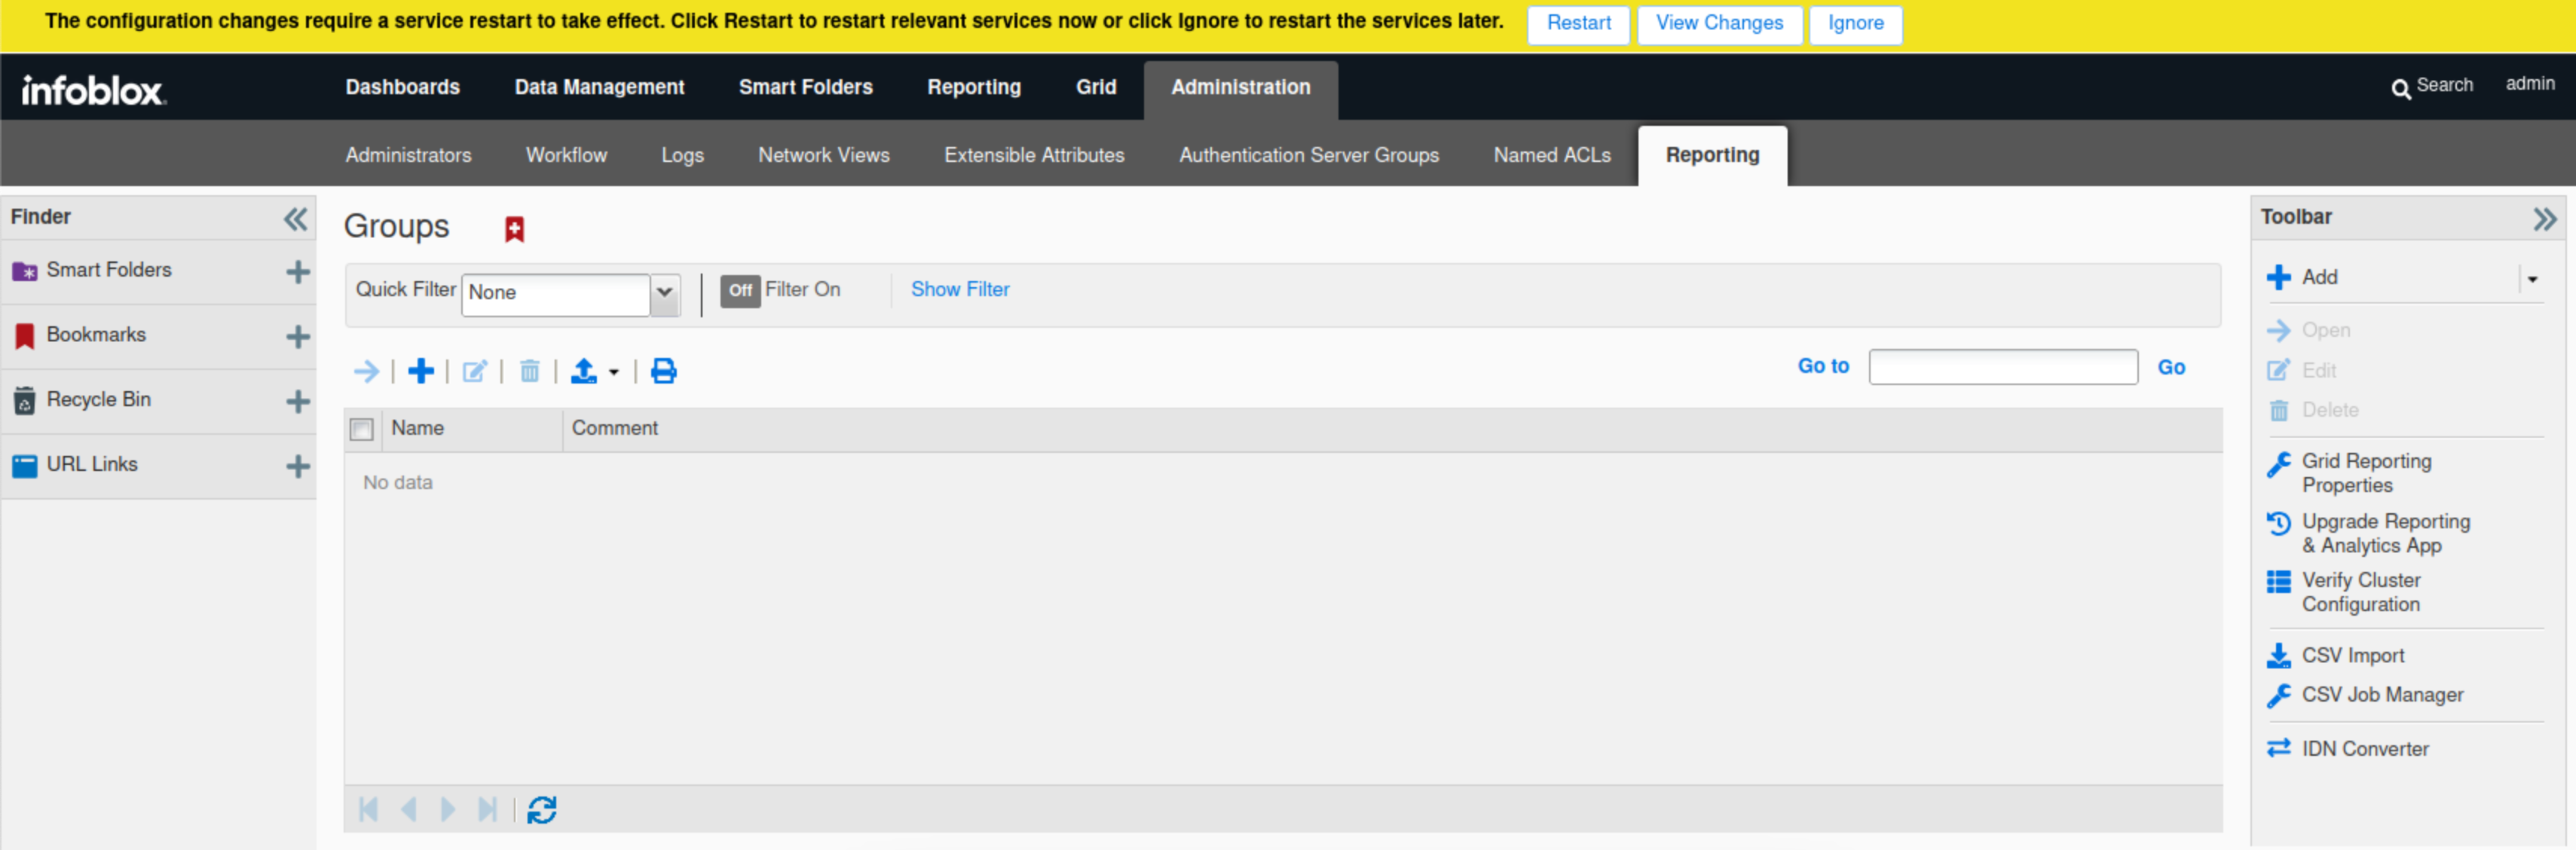
Restart Services if prompted
Task 4 Solution: Create local RPZ - allowlist.rpz
In this task, you create a local RPZ called allowlist.rpz. This will be used to ensure DNS traffic from the techblue.net domain is allowed to pass through.
-
On the jump-desktop machine, open a browser window and surf https://10.100.0.100.
-
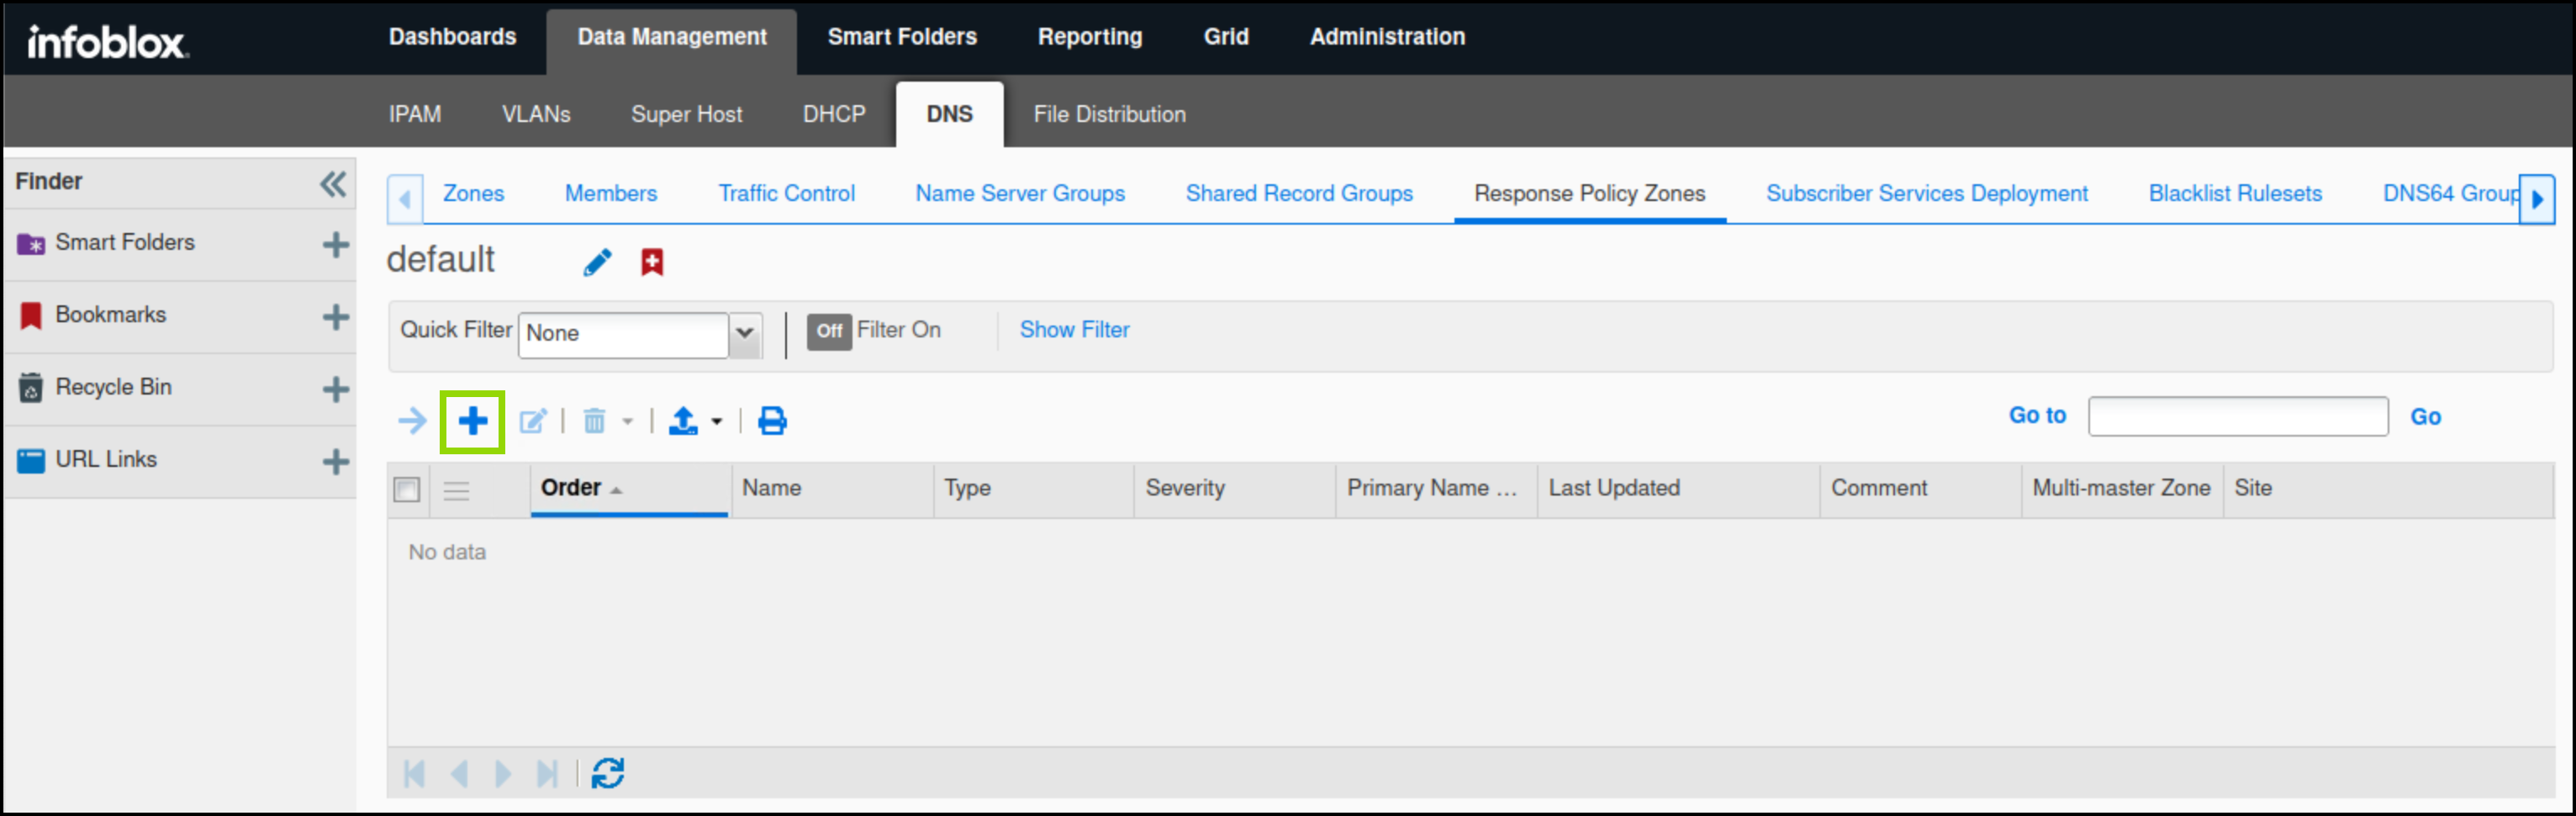
Navigate to Data Management → DNS → Response Policy Zones.
-
Click the plus (+) symbol to add a new RPZ.
-
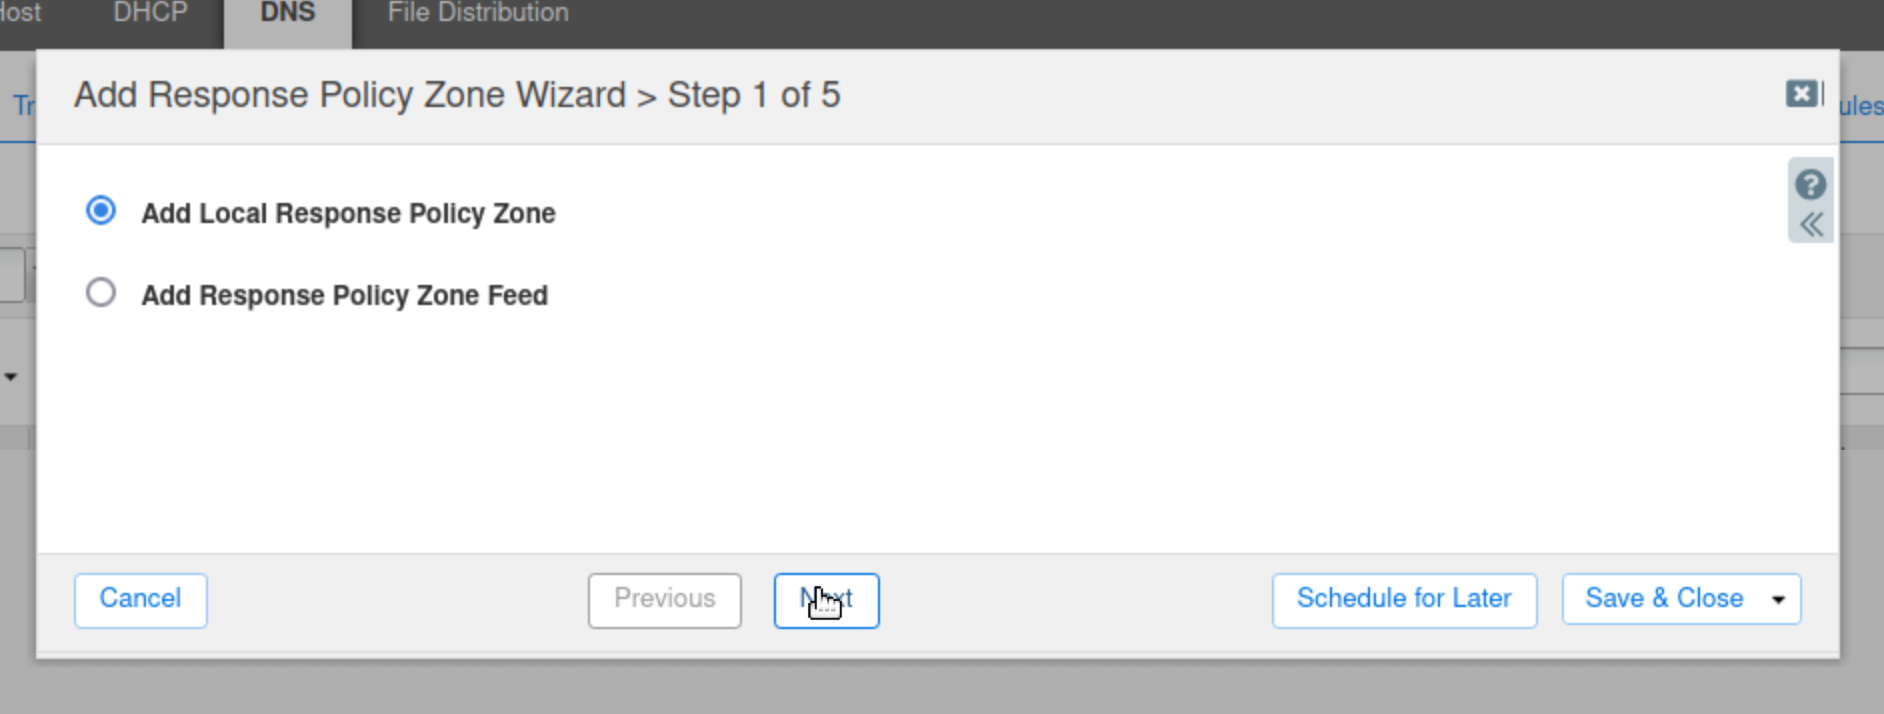
Select Add Local Response Policy Zone and click Next.
-
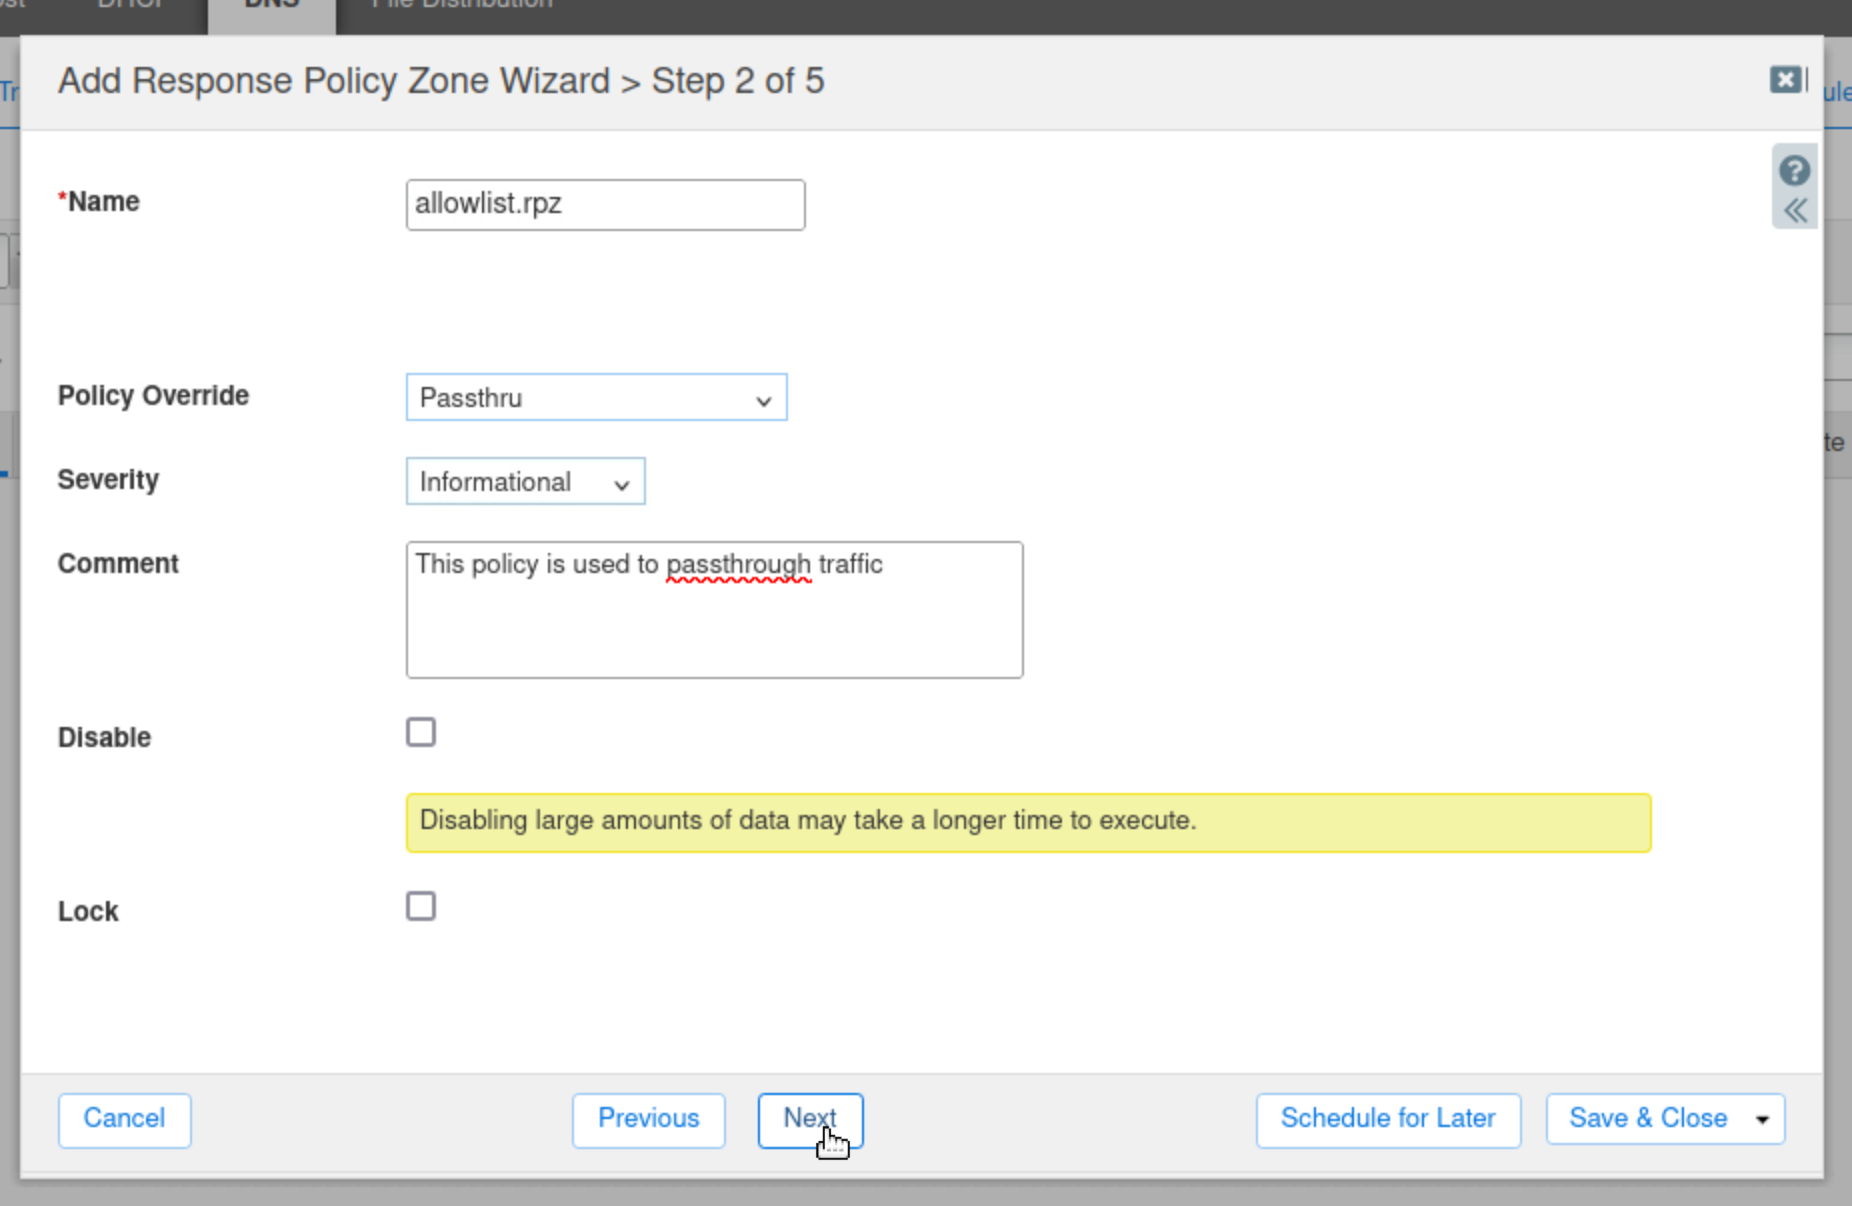
Enter allowlist.rpz for the name of the zone.
-
Set the Policy Override value to Passthru.
-
Change the Severity to Informational.
-
Type in a comment to describe the purpose of the RPZ.
-
Click Next to continue.
-
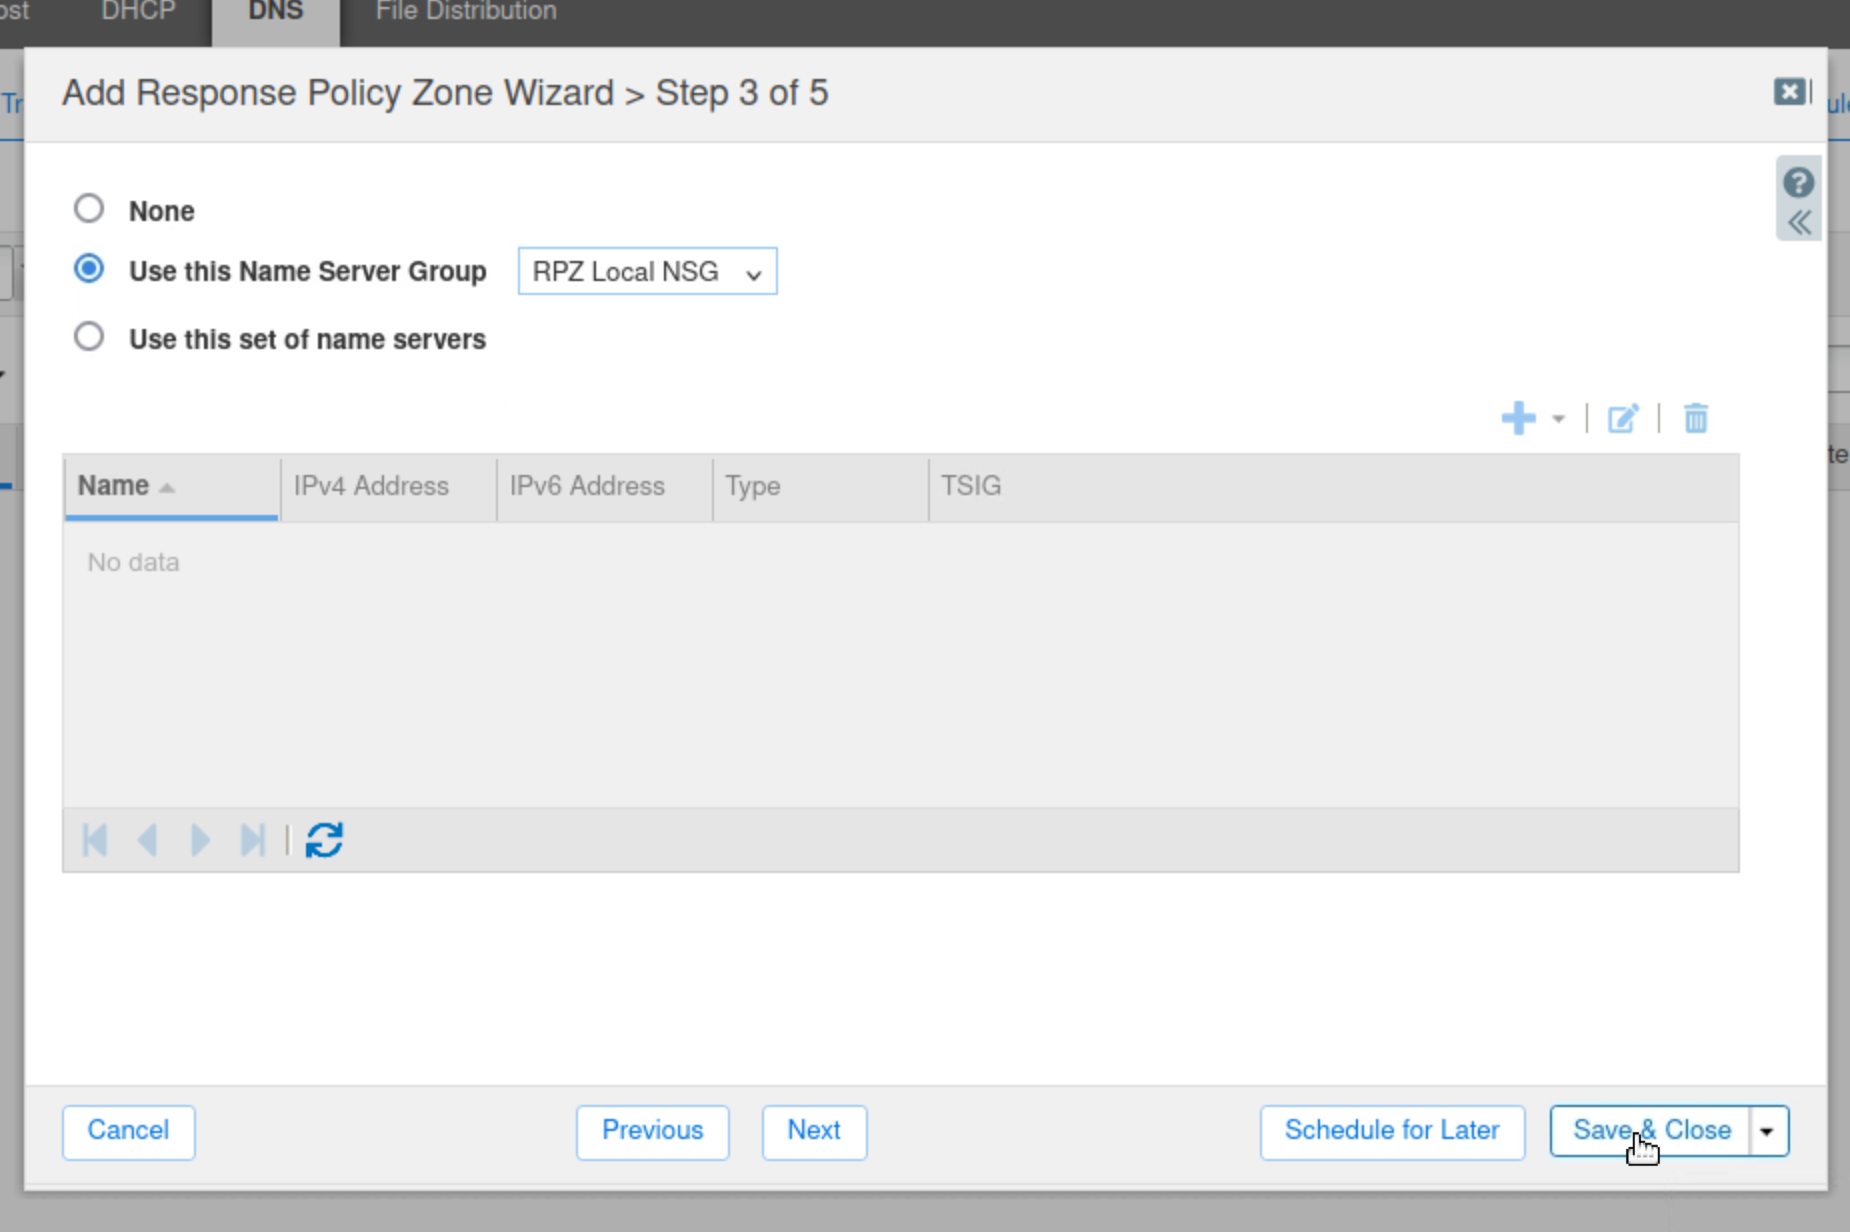
Select the Use this Name Server Group button.
-
Choose RPZ Local NSG from the drop-down list.
-
Click Save & Close.
-
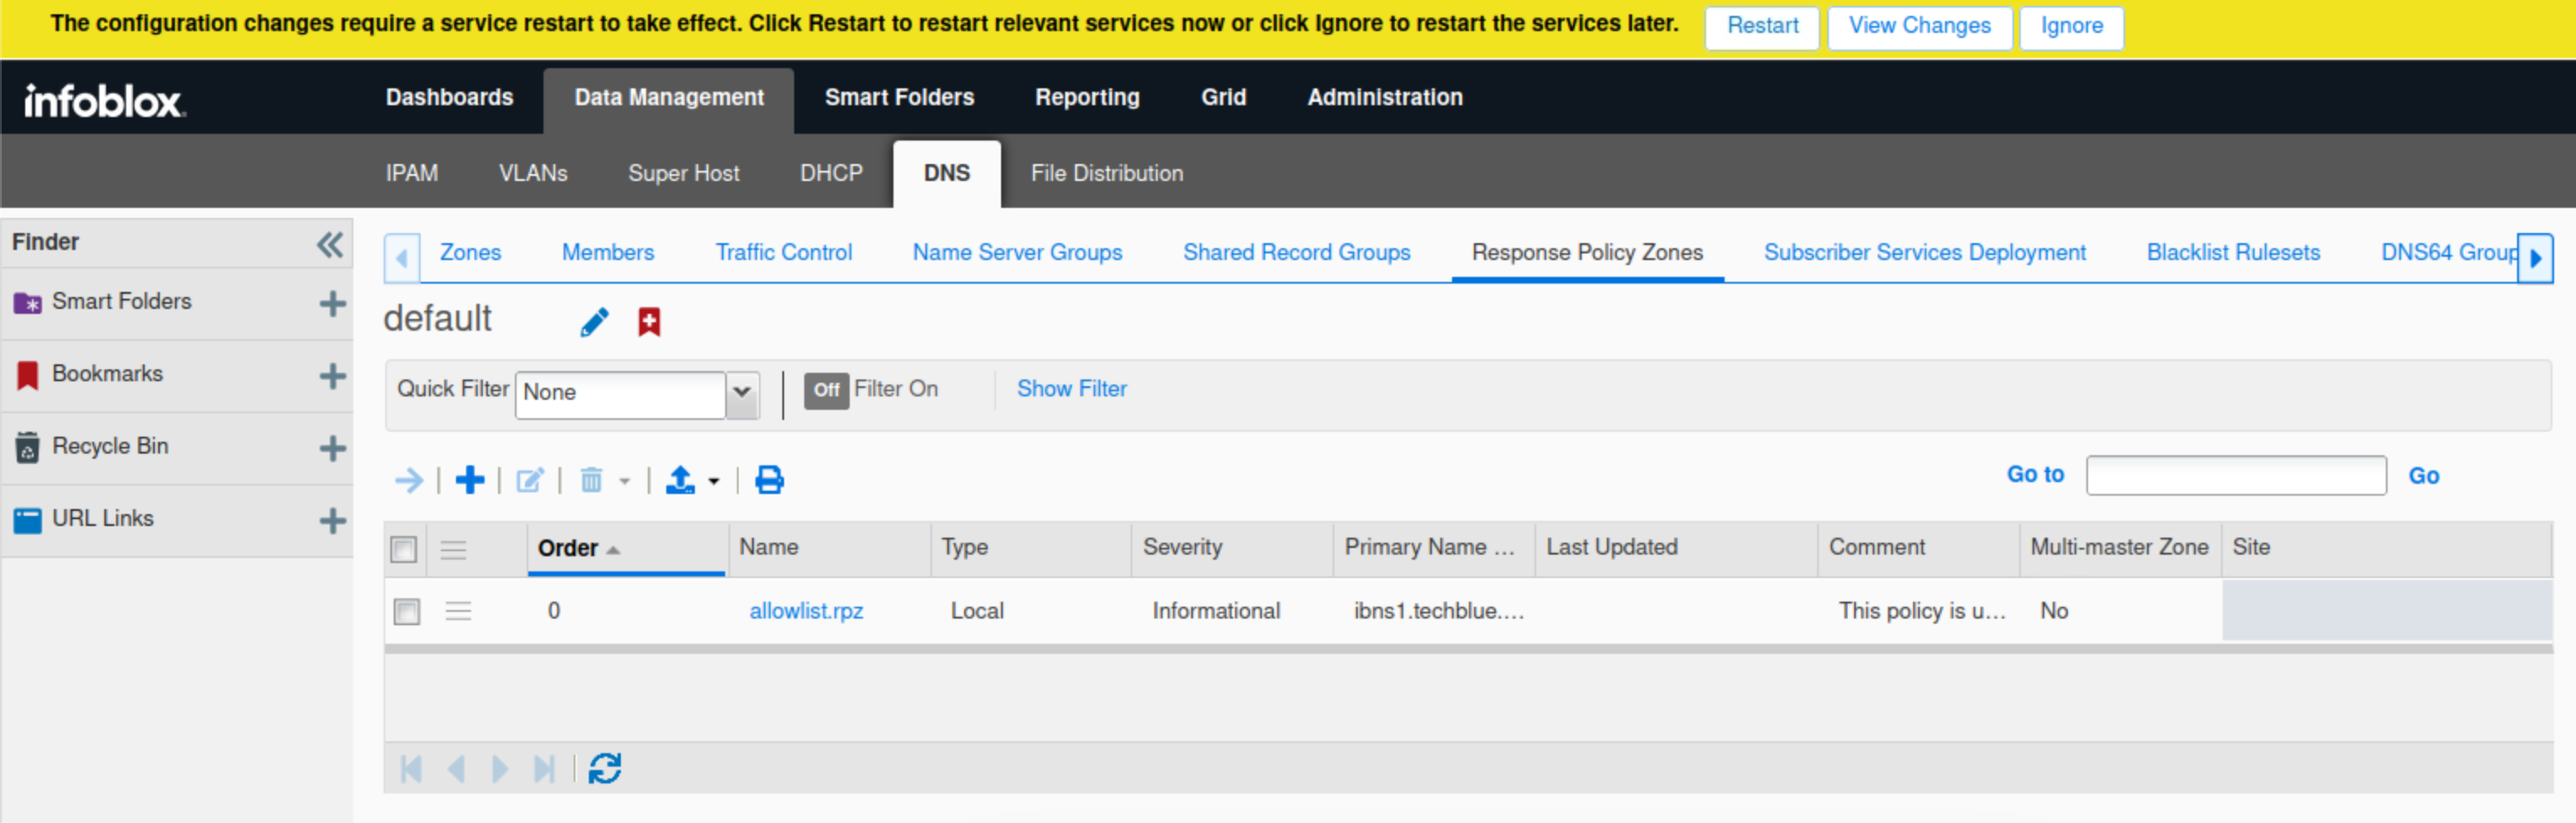
Restart Services when prompted.
Task 5 Solution: Add Passthru Domain Policy Rules to allowlist.rpz
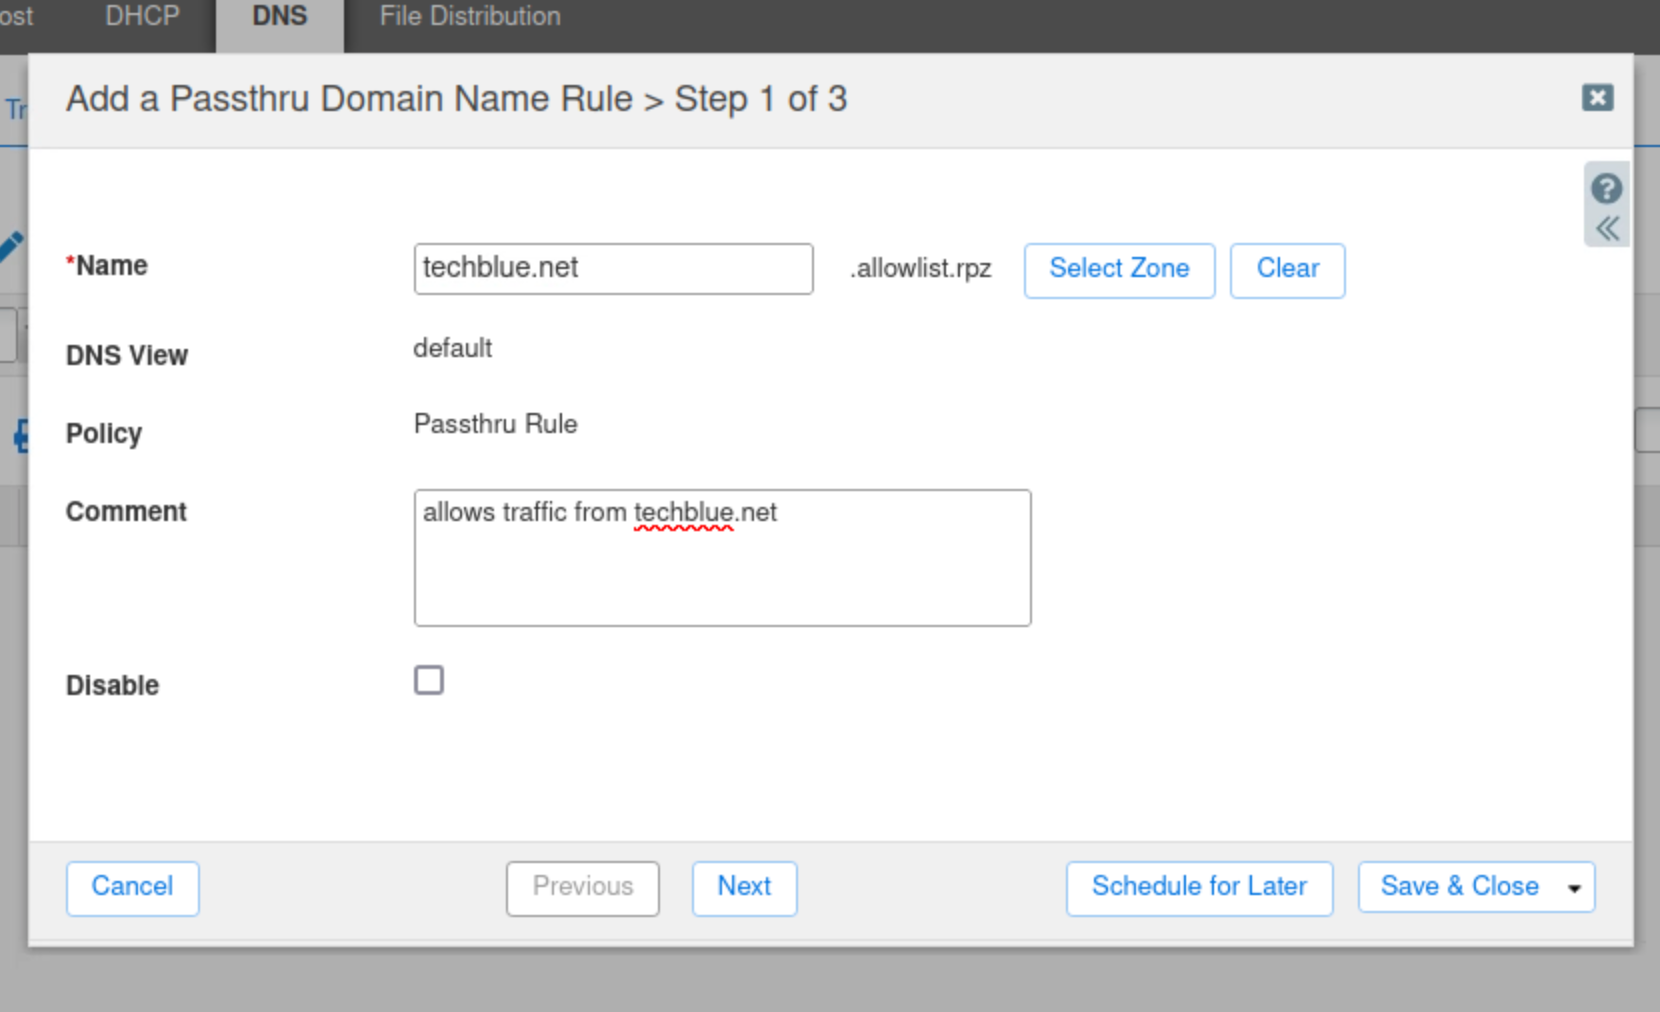
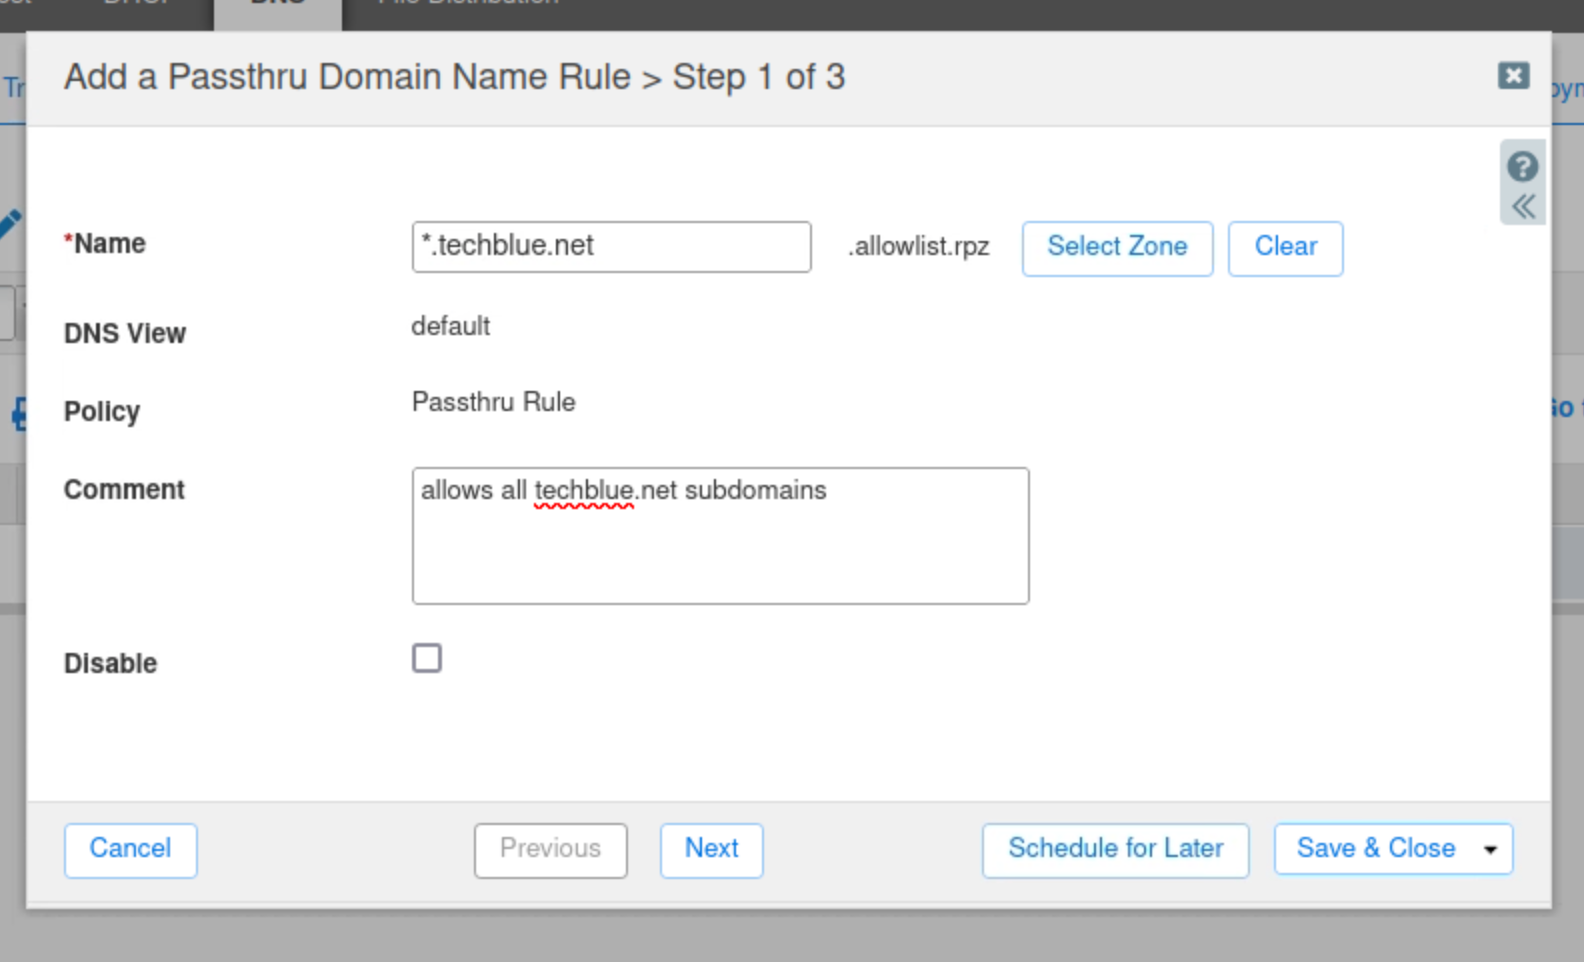
In this task, we create a rule in the allowlist.rpz policy to ensure DNS requests for the techblue.net domain and all of its sub-domains to pass through unmodified. We will achieve that through two rules the first is to allow techblue.net and the second will use the wildcard (*.techblue.net) to allow all sub-domains.
-
Navigate to Data Management → DNS → Response Policy Zones.
-
Click the link to allowlist.rpz.
-
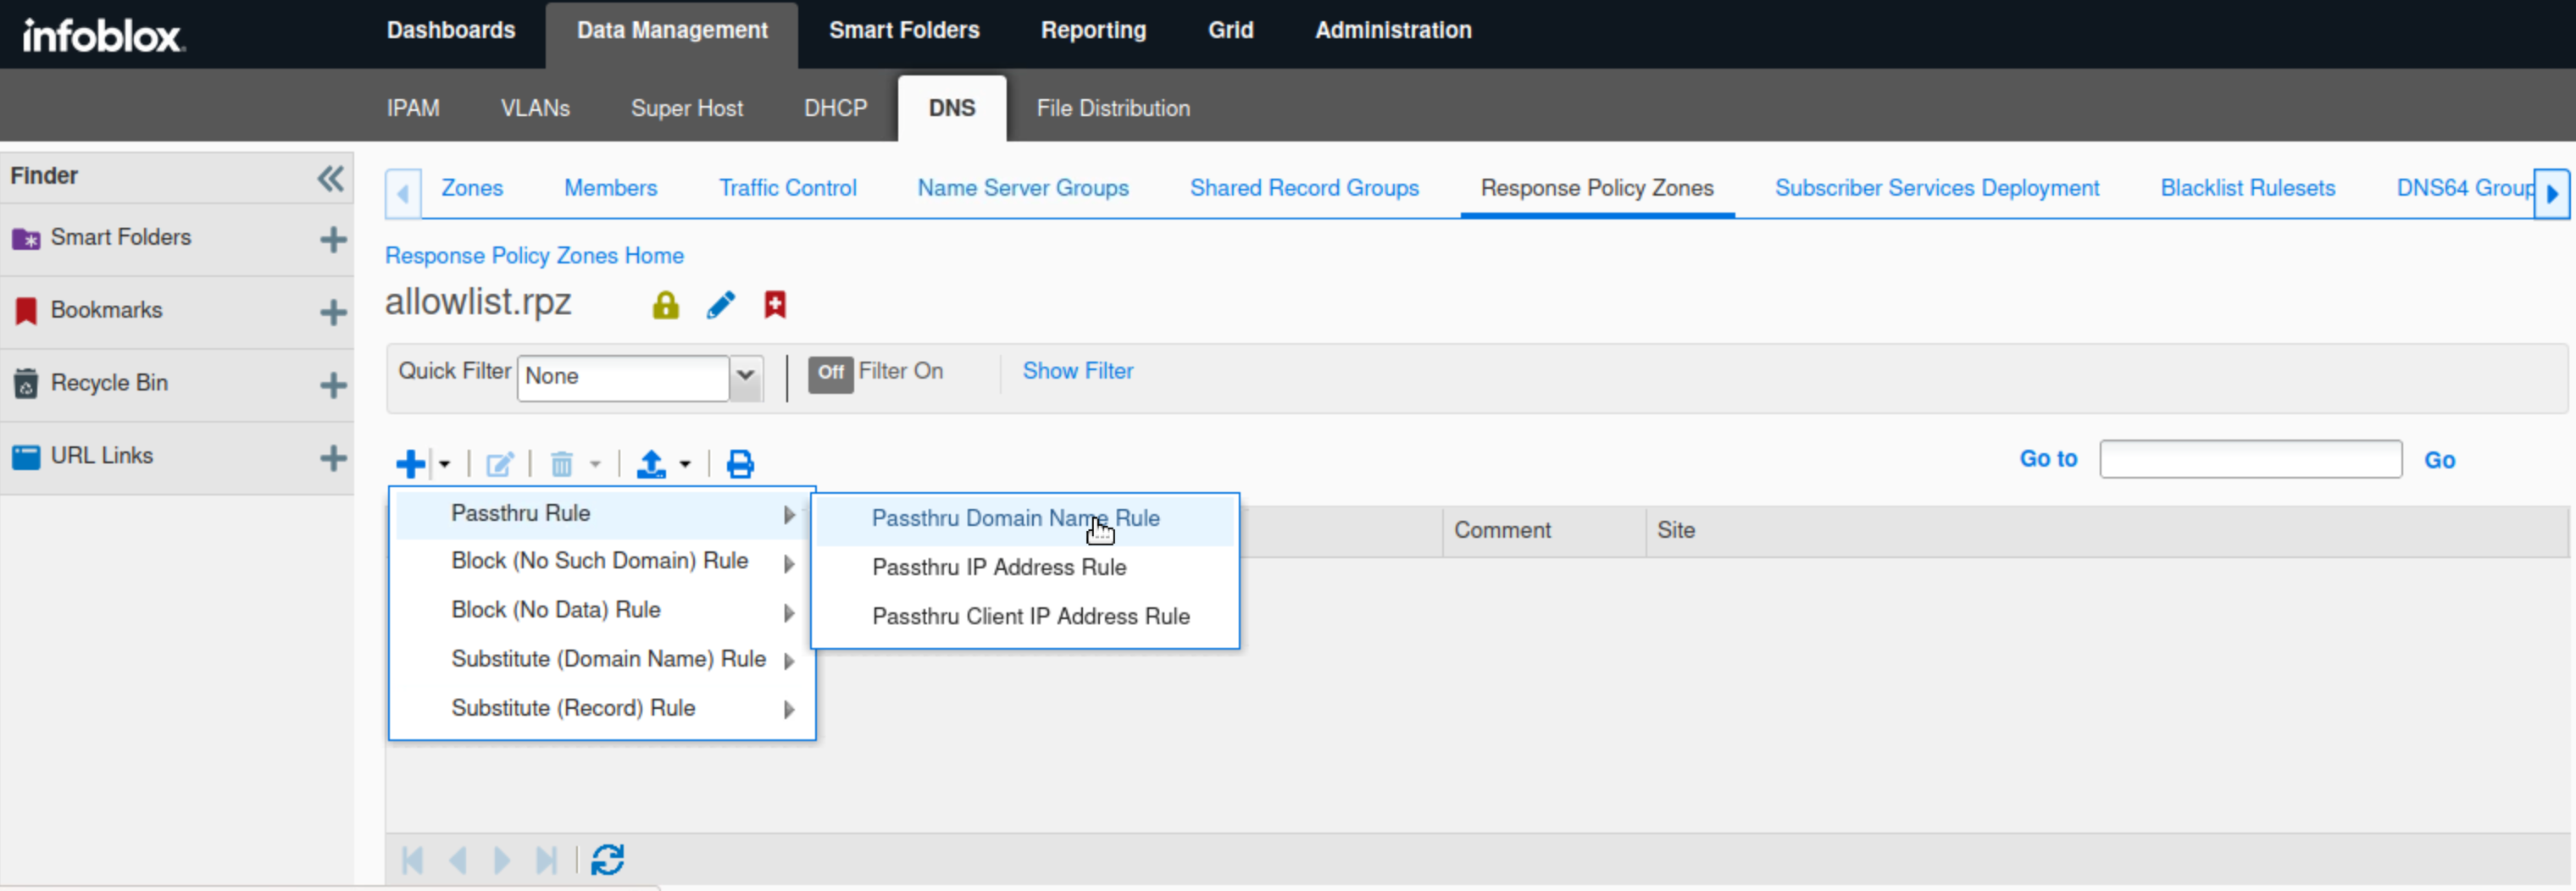
Click the arrow next to the plus (+) symbol and select Passthru Rule from the drop-down list.
-
Select Passthru Domain Name Rule.
-
Enter techblue.net in the Name field.
-
Type a Comment to describe the purpose of the rule.
-
Click Save & Close.
-
Click the arrow next to the plus (+) symbol and select Passthru Rule from the drop-down list.
-
Select Passthru Domain Name Rule.
-
Enter *.techblue.net in the Name field.
-
Type a Comment to describe the purpose of the rule.
-
Click Save & Close.
Task 6 Solution: Create local RPZ - walledgarden.rpz
In this task, you create a local RPZ called walledgarden.rpz. The RPZ is used to redirect queries for malware.signalorange.net to walledgarden.rpz.infoblox.com.
-
On the jump-desktop machine, open a browser window and surf https://10.100.0.100.
-
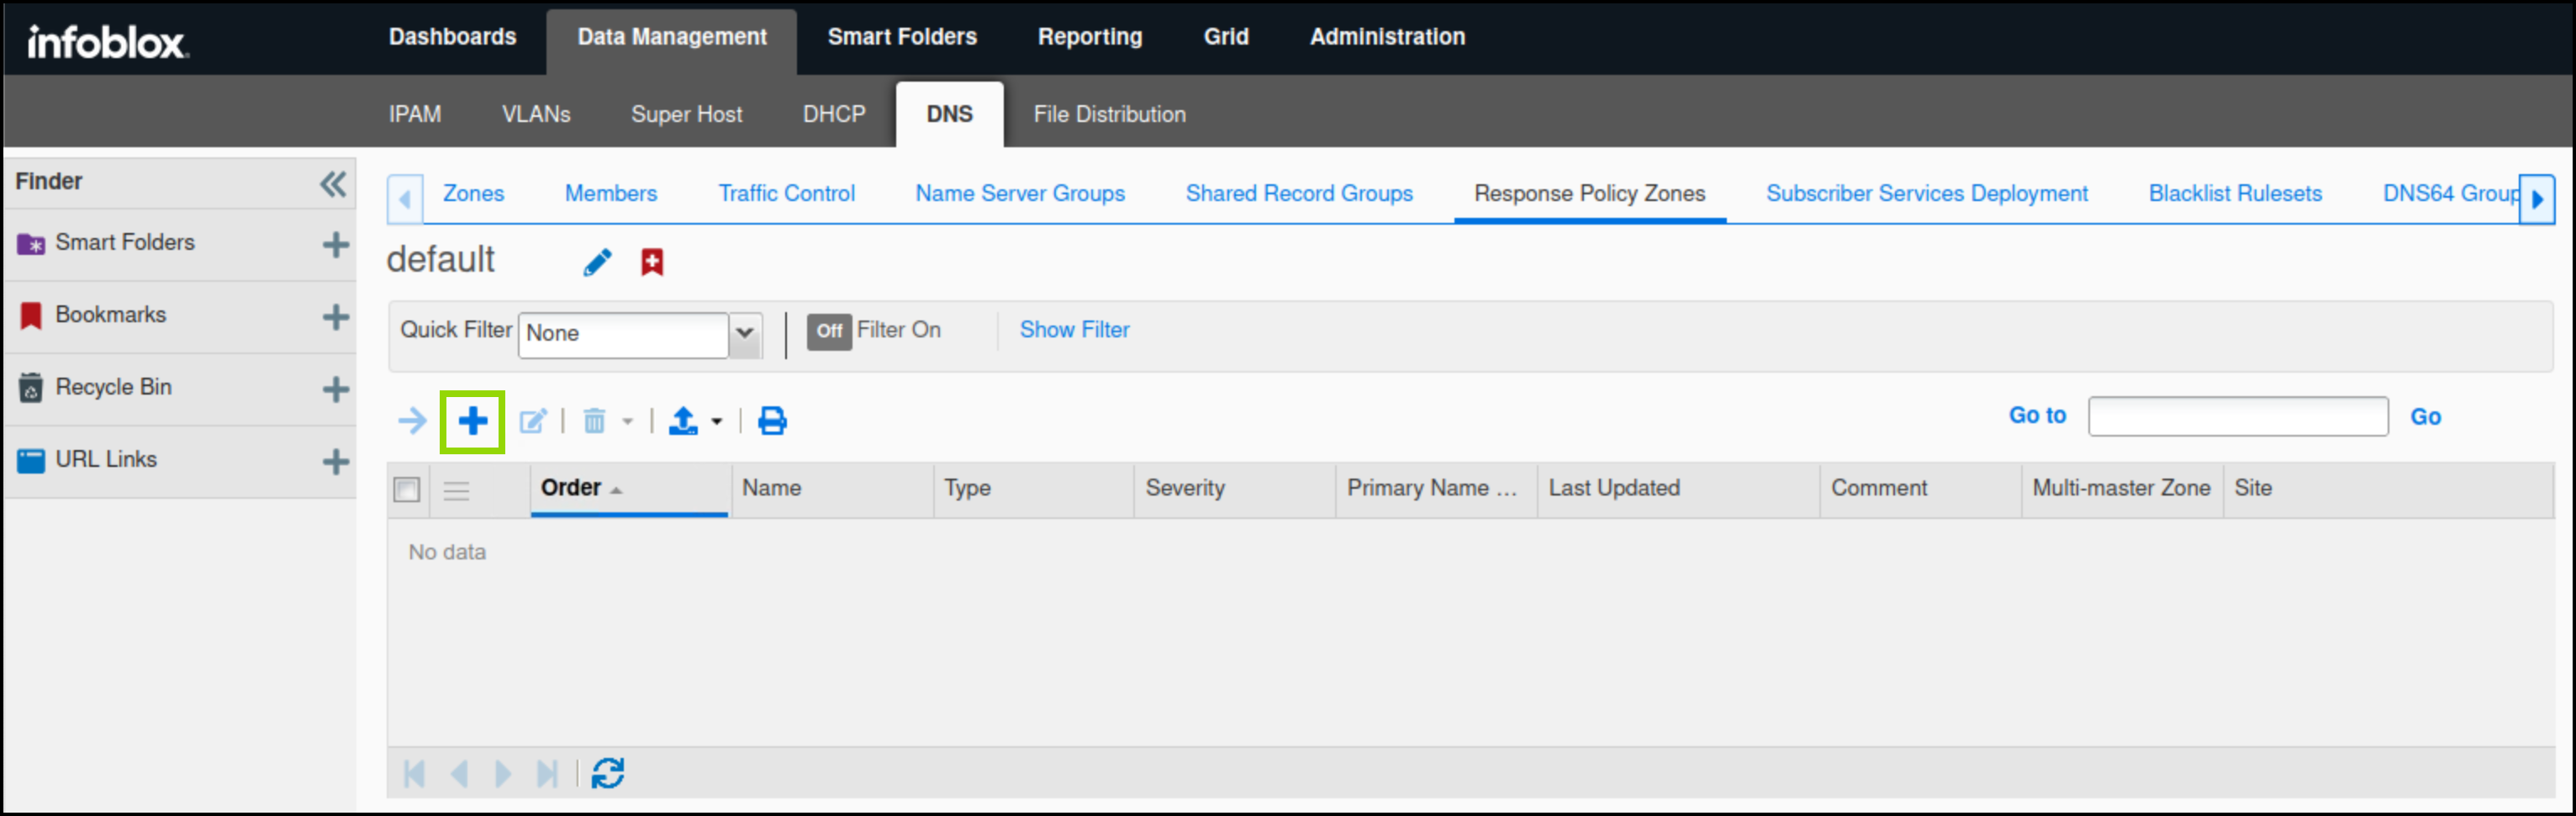
Navigate to Data Management → DNS → Response Policy Zones.
-
Click the plus (+) symbol to add a new RPZ.
-
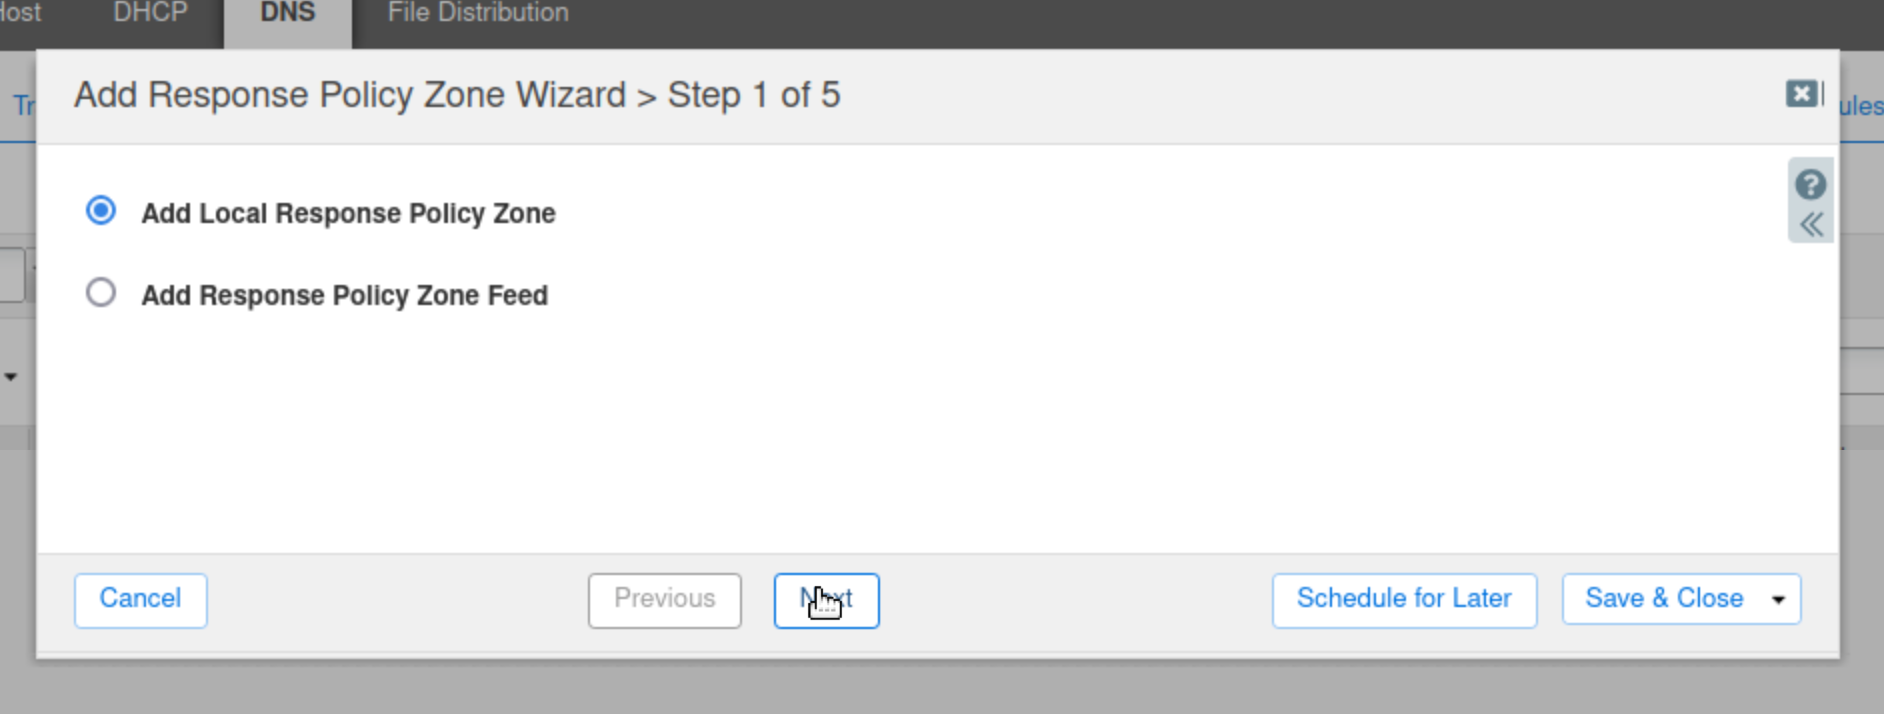
Select Add Local Response Policy Zone and click Next.
-
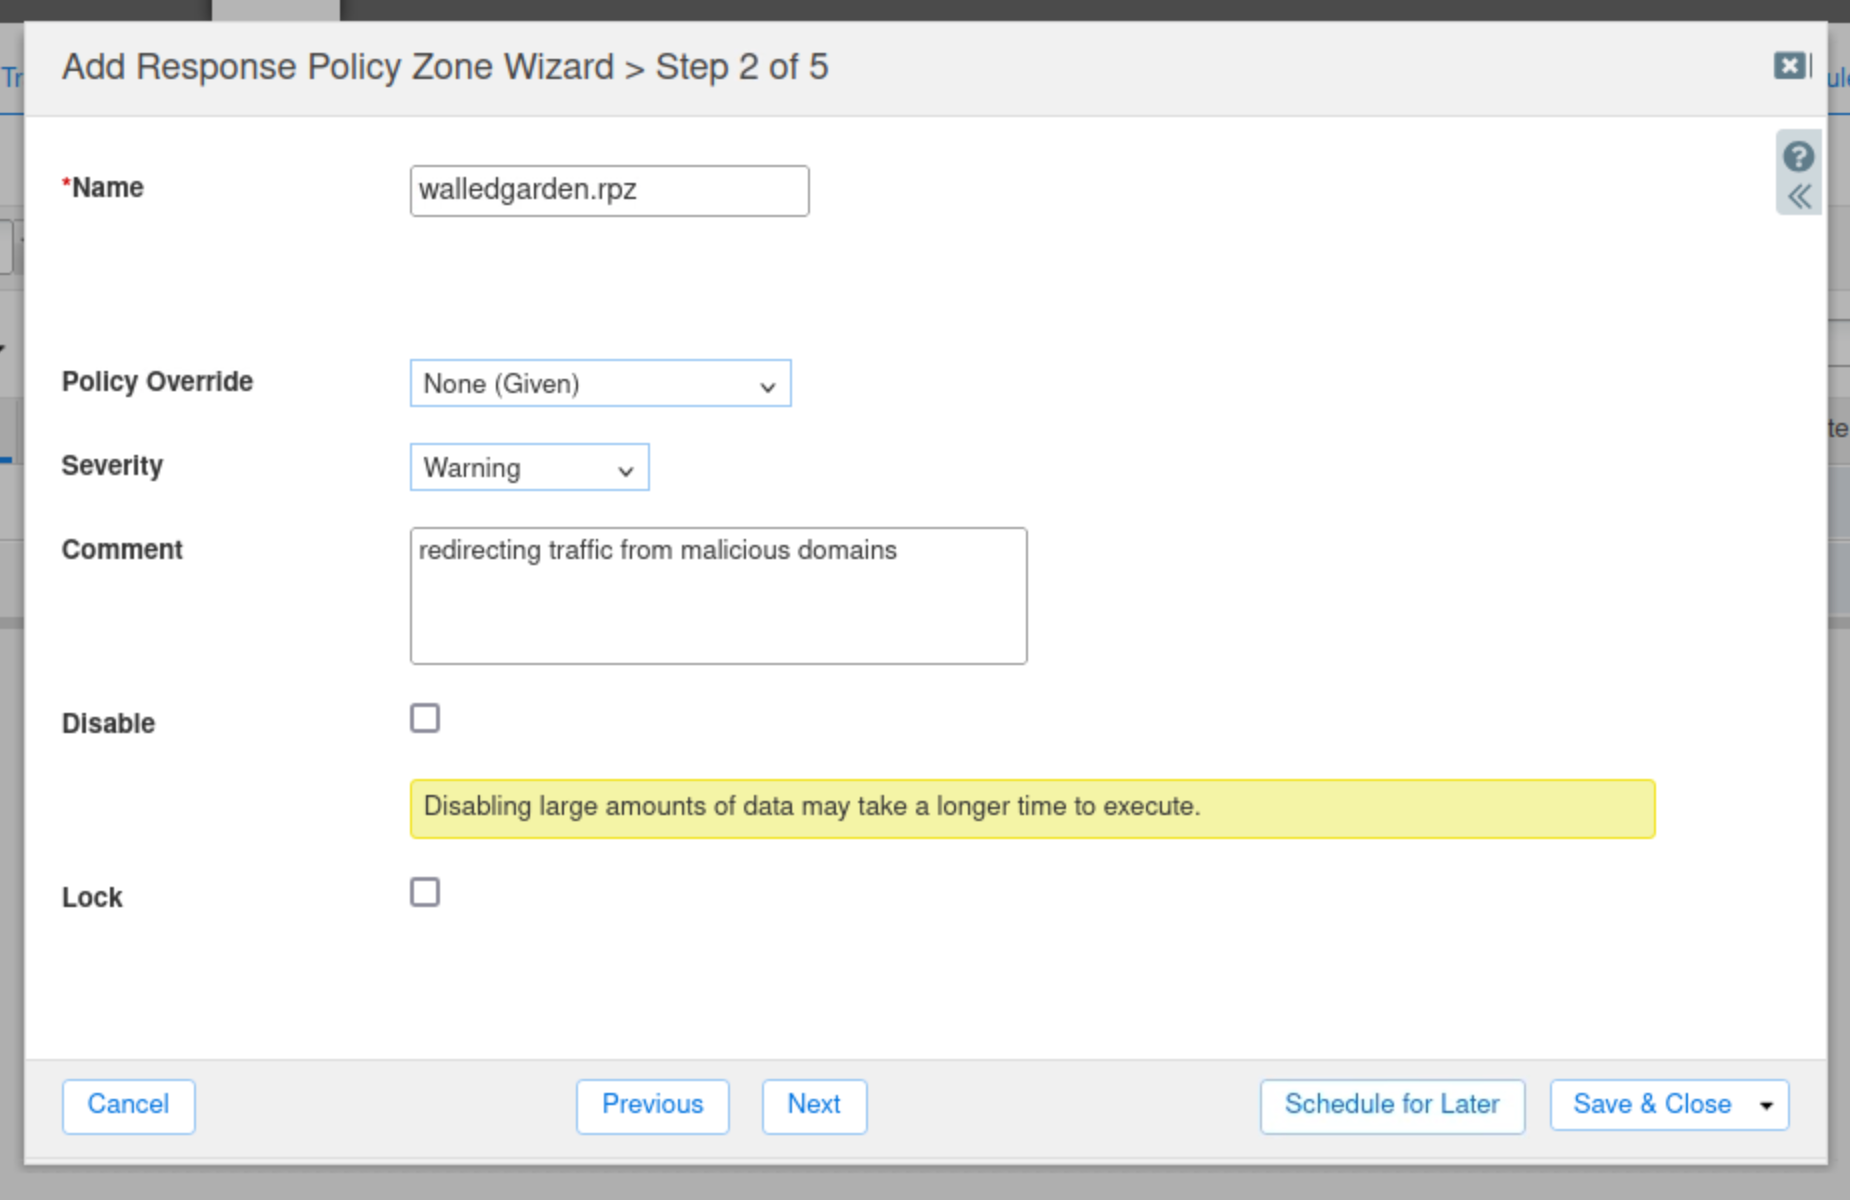
Enter walledgarden.rpz for the name of the zone.
-
Change the Severity to Warning.
-
Select None (Given) for the Policy Override value.
-
The policy will be specified in the rule.
-
-
Type in a comment to describe the purpose of the RPZ.
-
Click Next to continue.
-
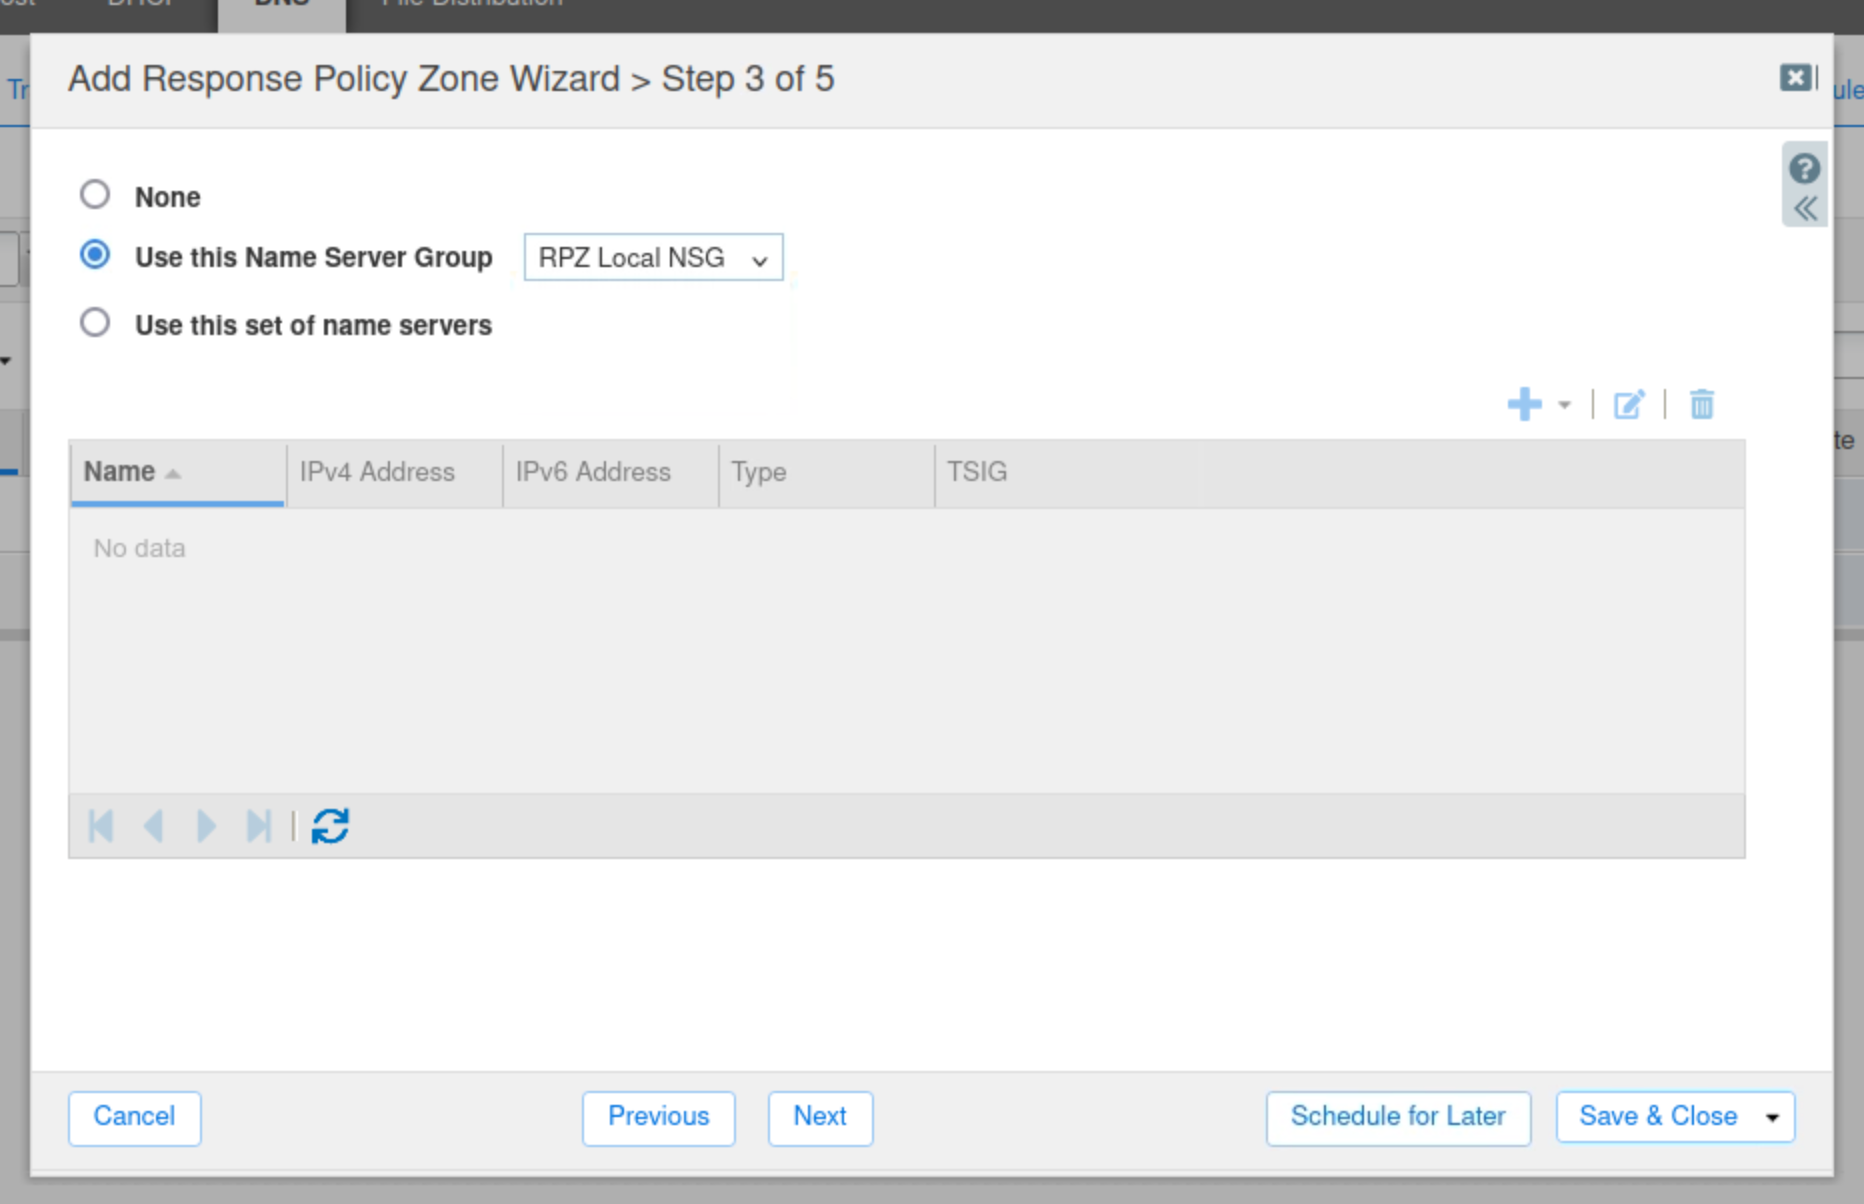
Select the Use this Name Server Group button.
-
Choose RPZ Local NSG from the drop-down list.
-
Click Save & Close.
-
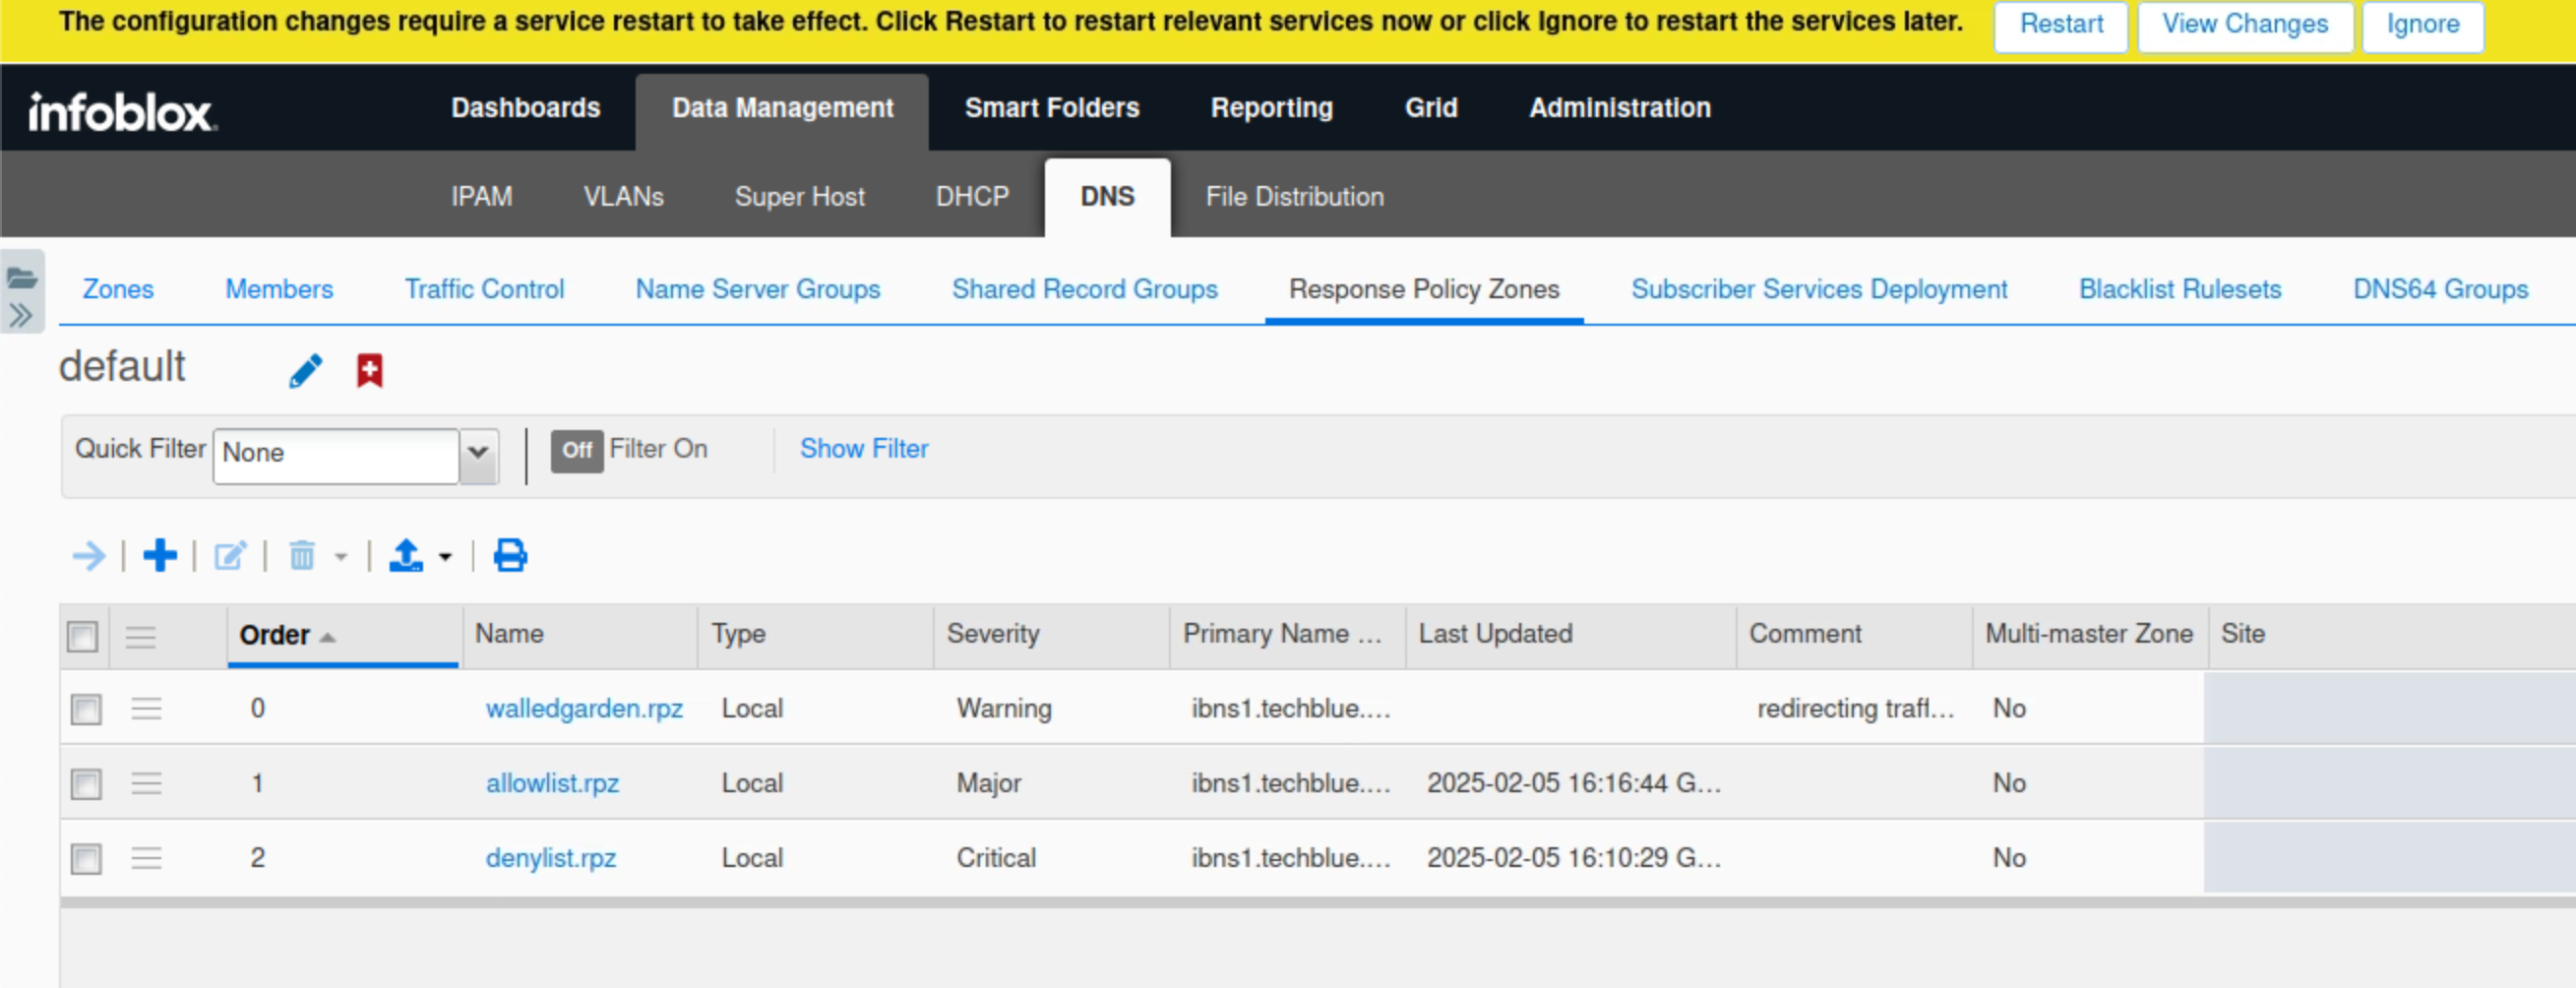
Restart Services when prompted.
Task 7 Solution: Add Substitute (Domain Name) Policy Rules to walledgarden.rpz
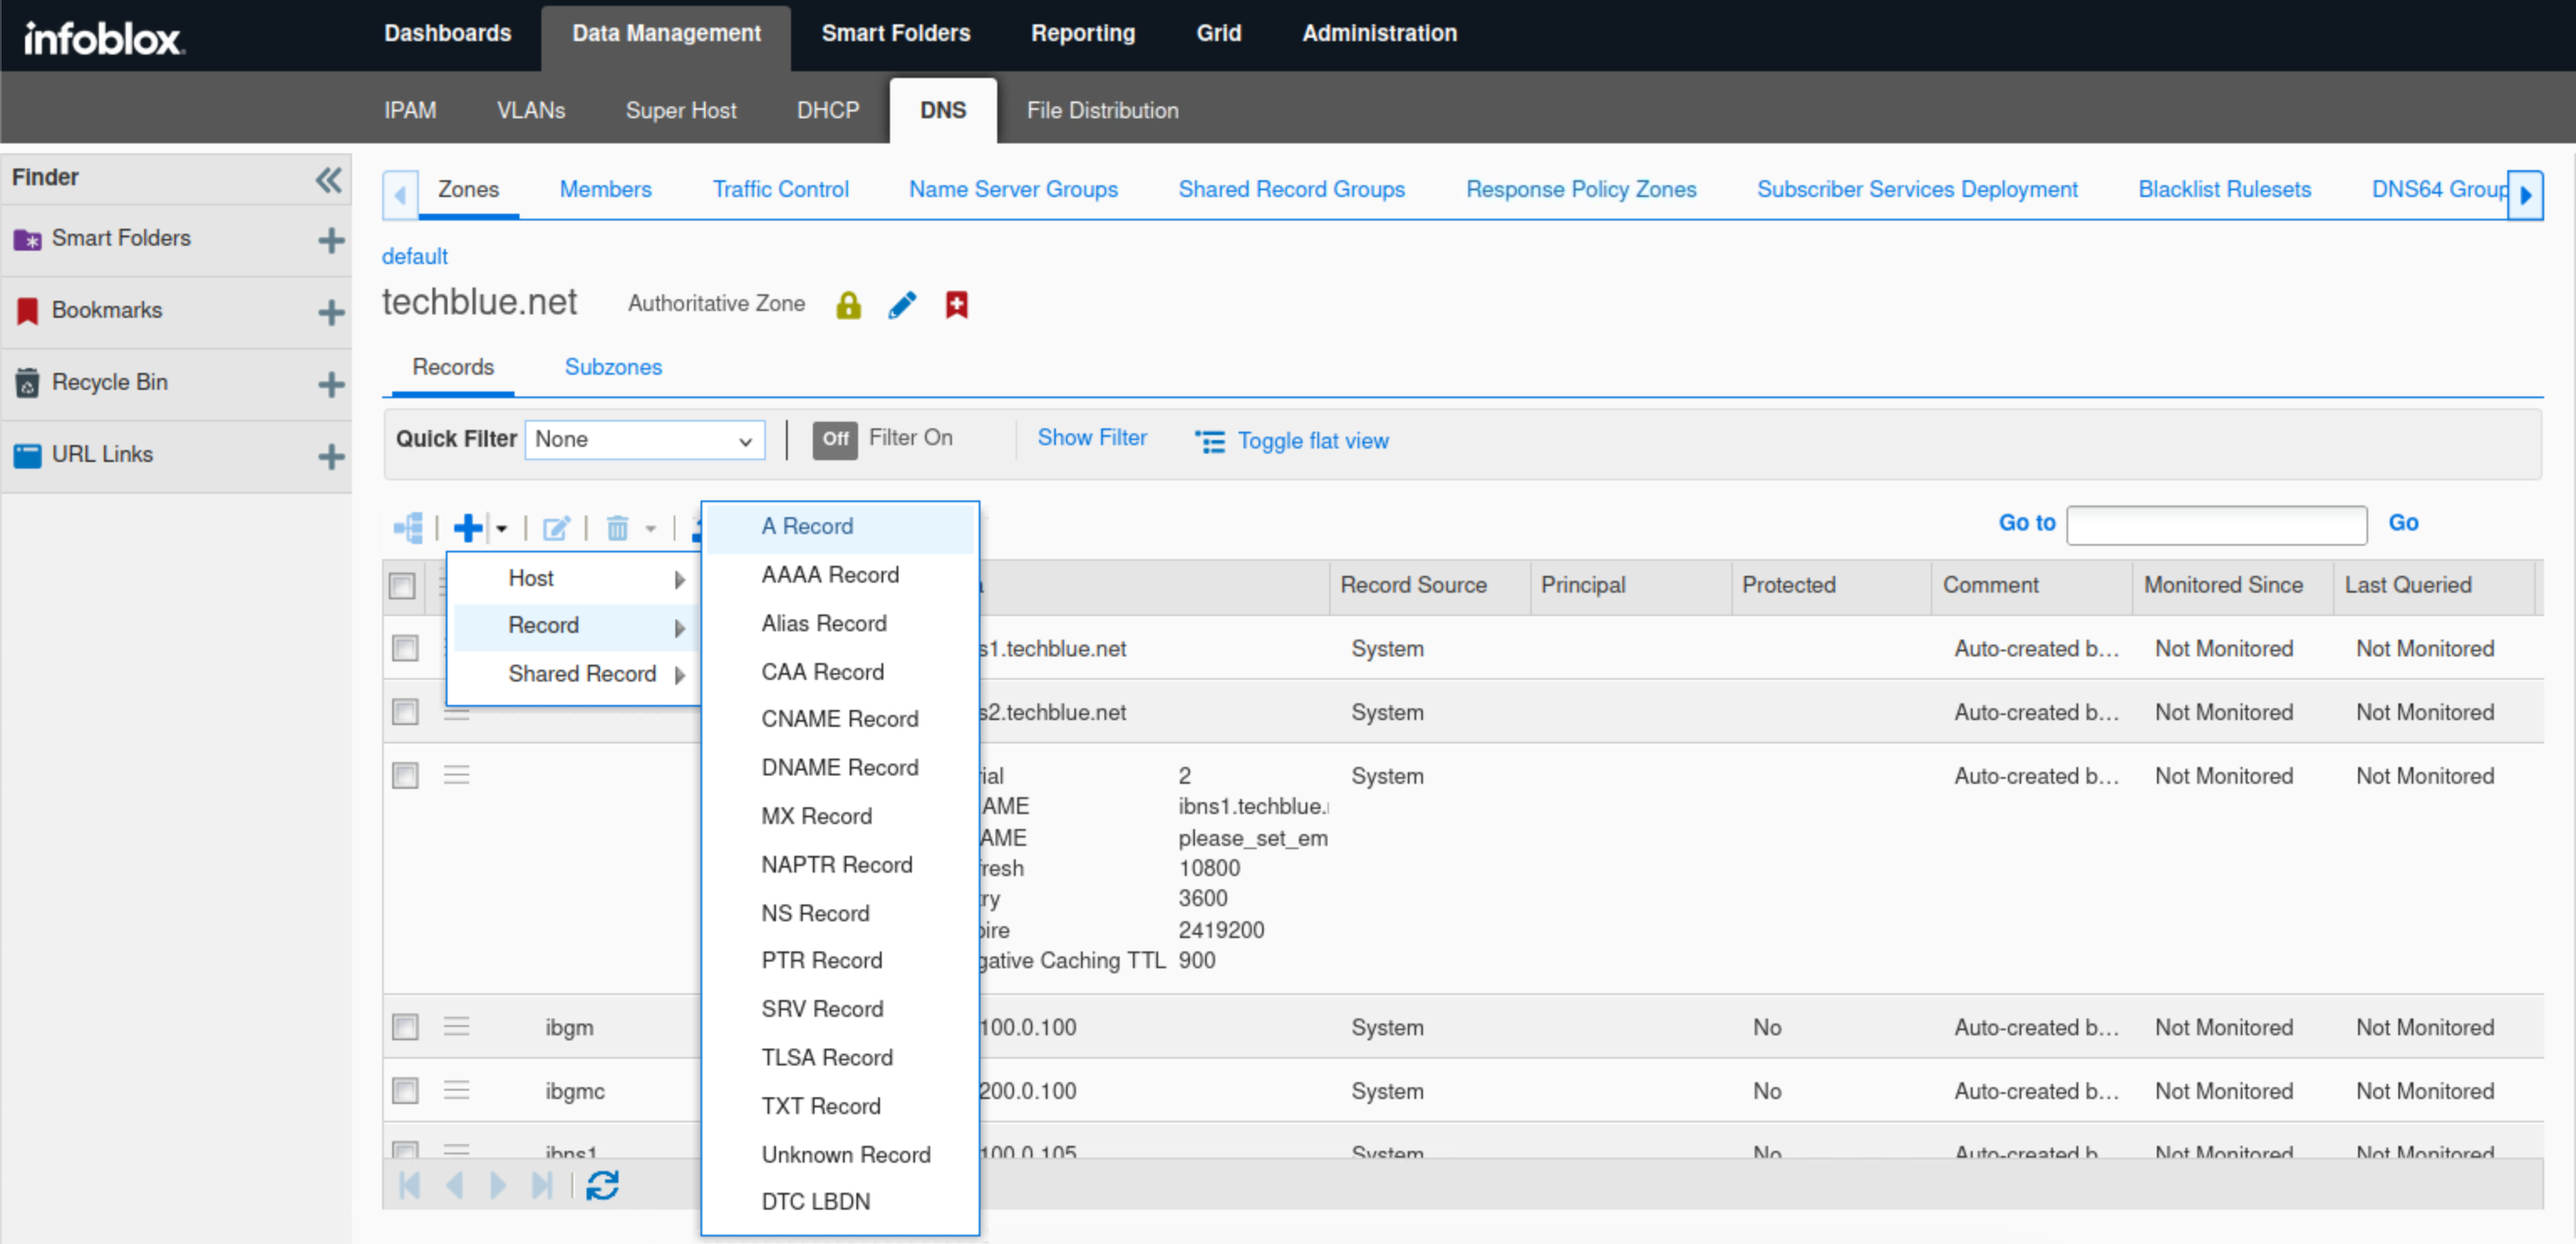
In this task, you add a Substitute (Domain Name) rule to the walledgarden.rpz. Queries for the malware.signalorange.net domain are redirected to walledgarden.techblue.net. We will start by creating an address record for walledgarden.techblue.net for the RPZ to substitute malware.signalorange.net for, then we will create two RPZ rules one to substitute malware.signalorange.net and the second is to substitute all of its subdomains.
-
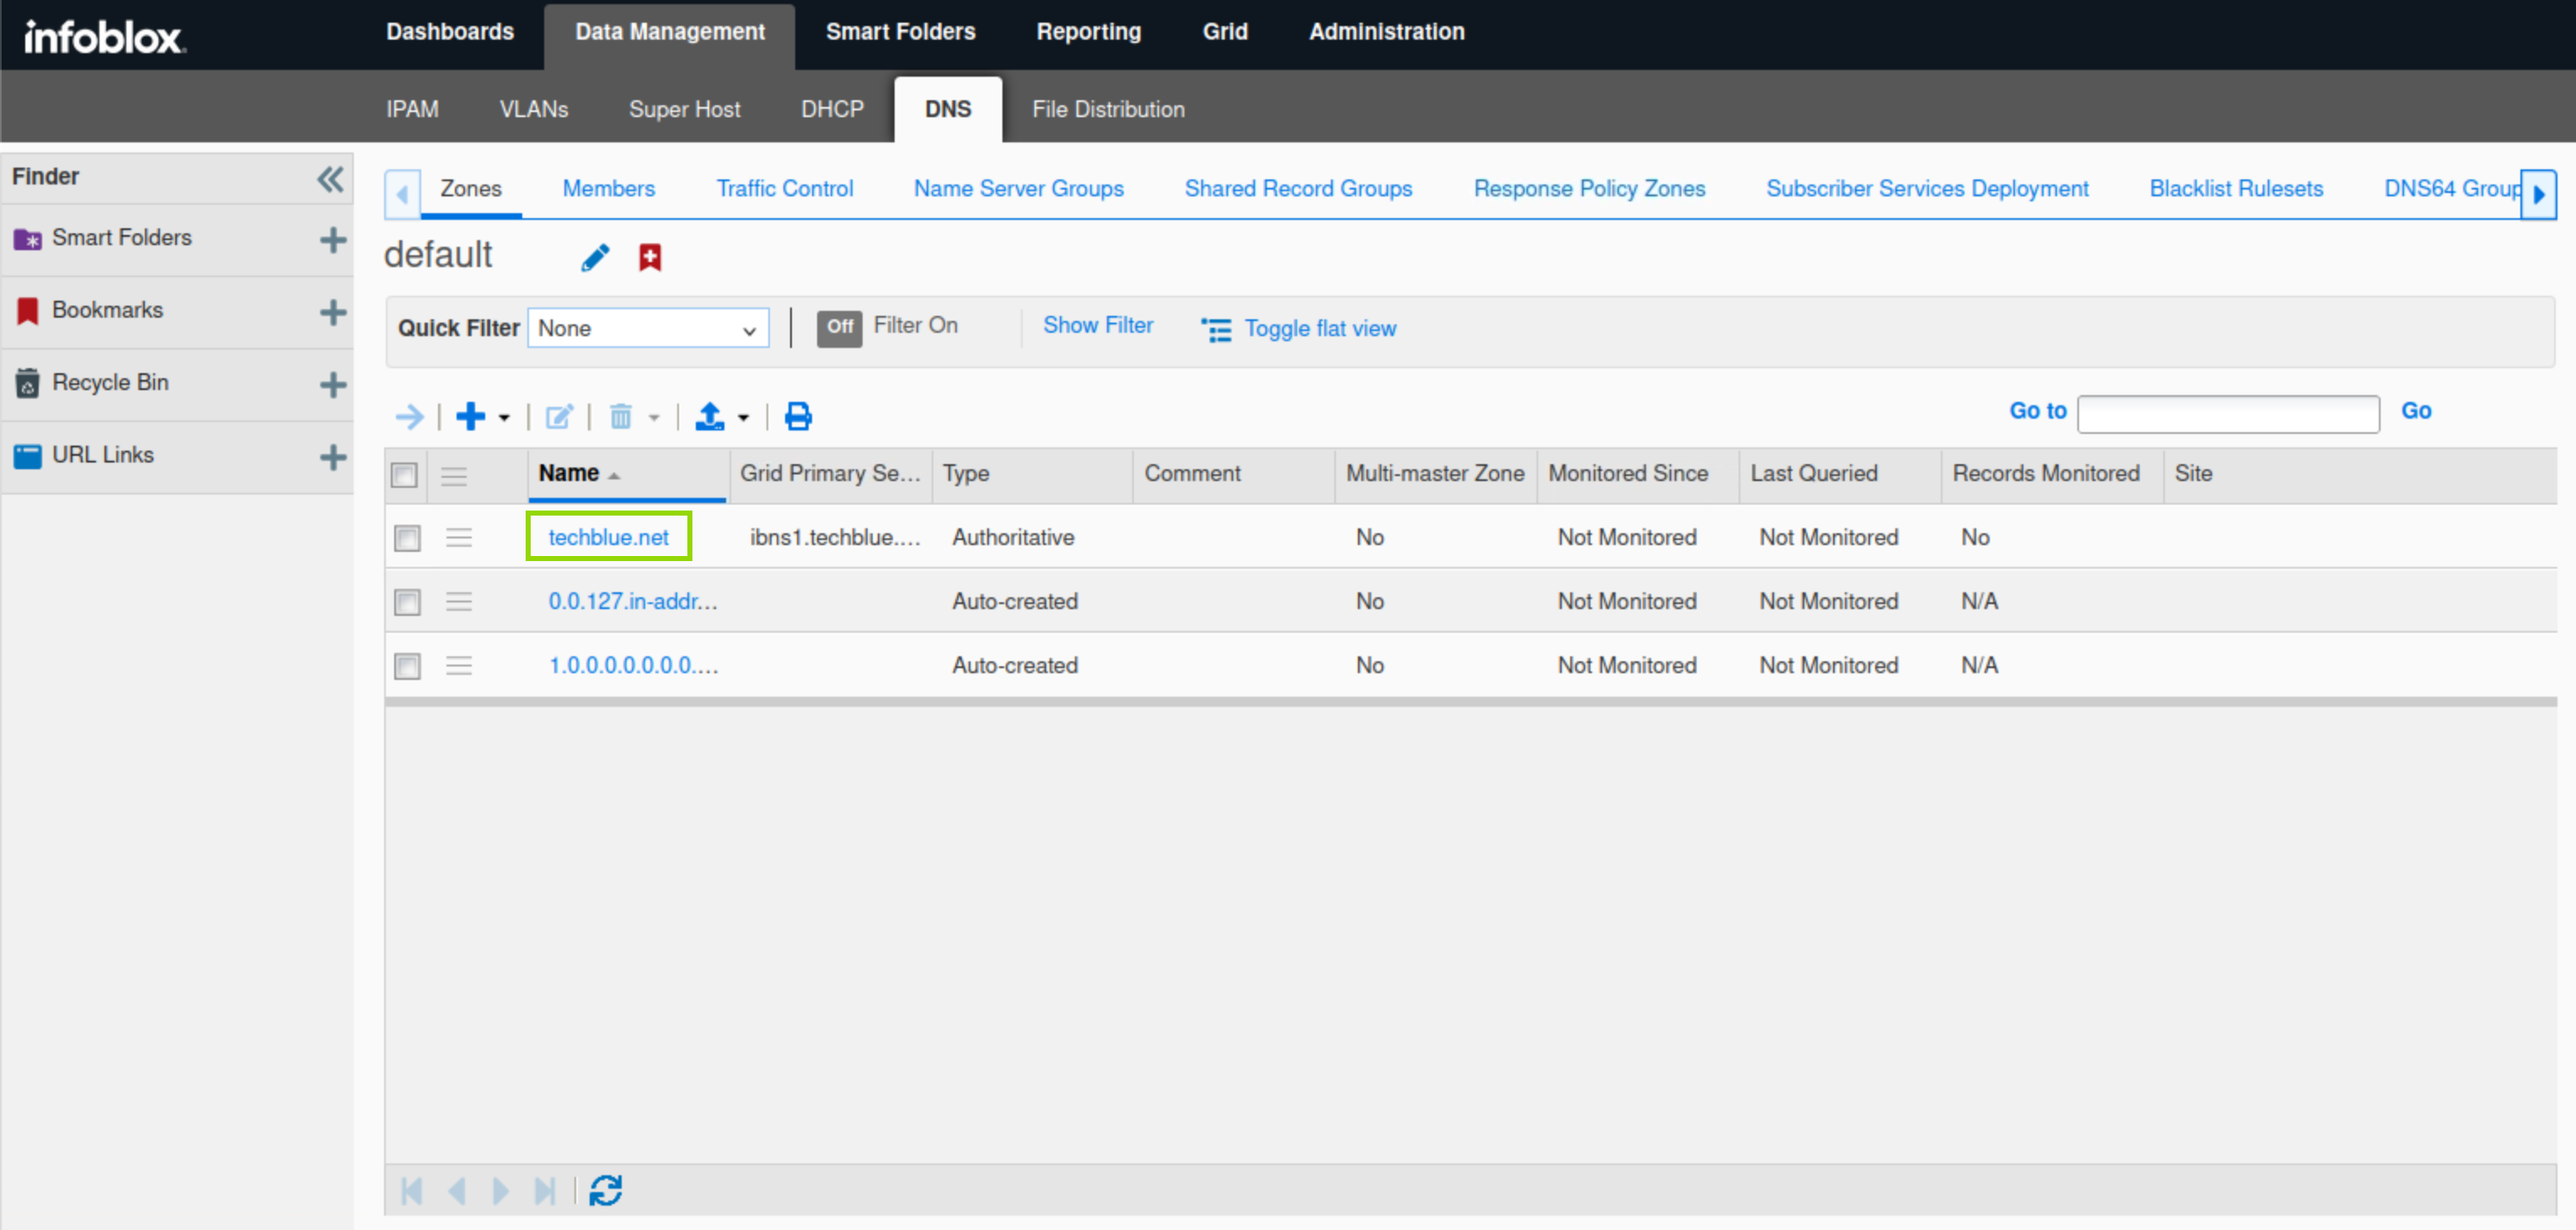
Navigate to Data Management → DNS → Zones.
-
Click the link to techblue.net.
-
Click the drop-down list for Add. Select A record.
-
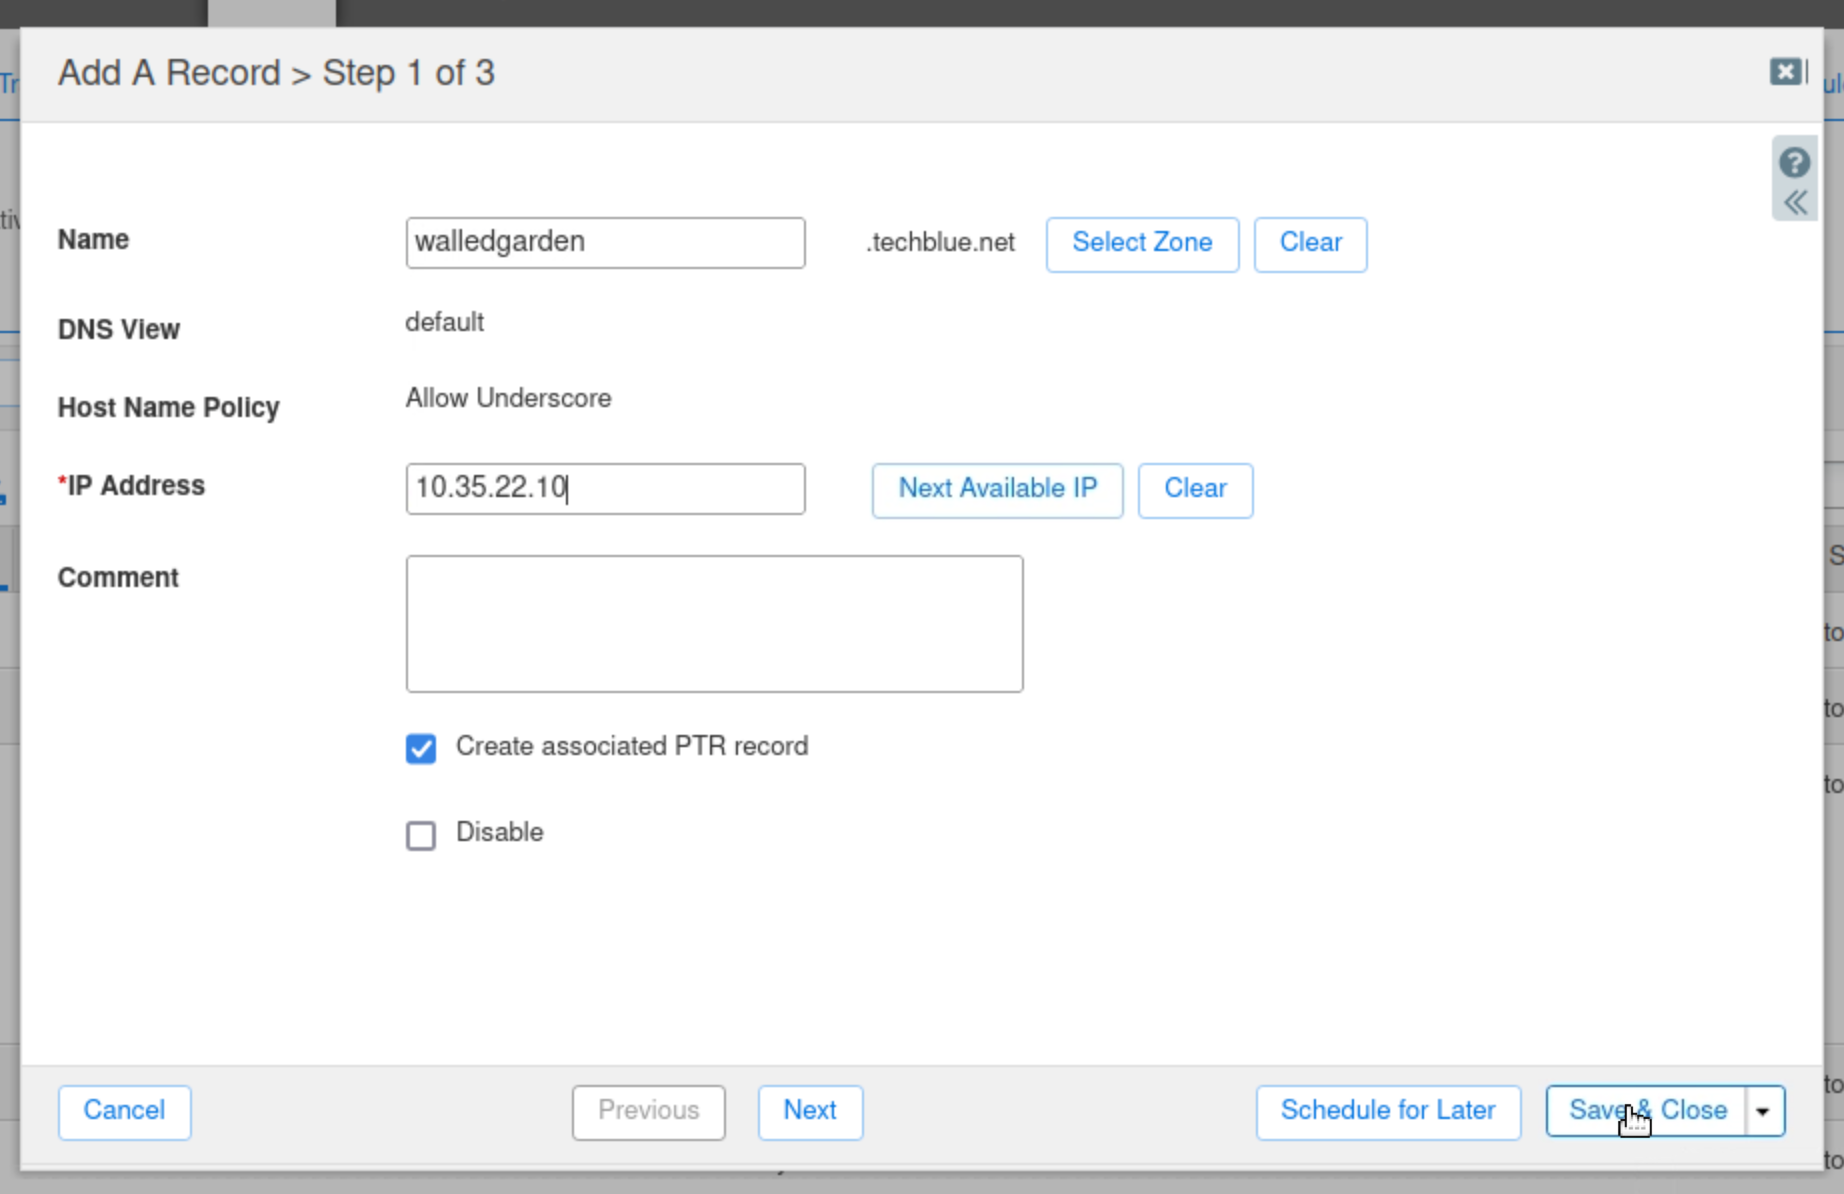
Enter the name walledgarden.
-
Enter the IP Address 10.35.22.10.
-
Click Save & Close and accept the warning prompt.
-
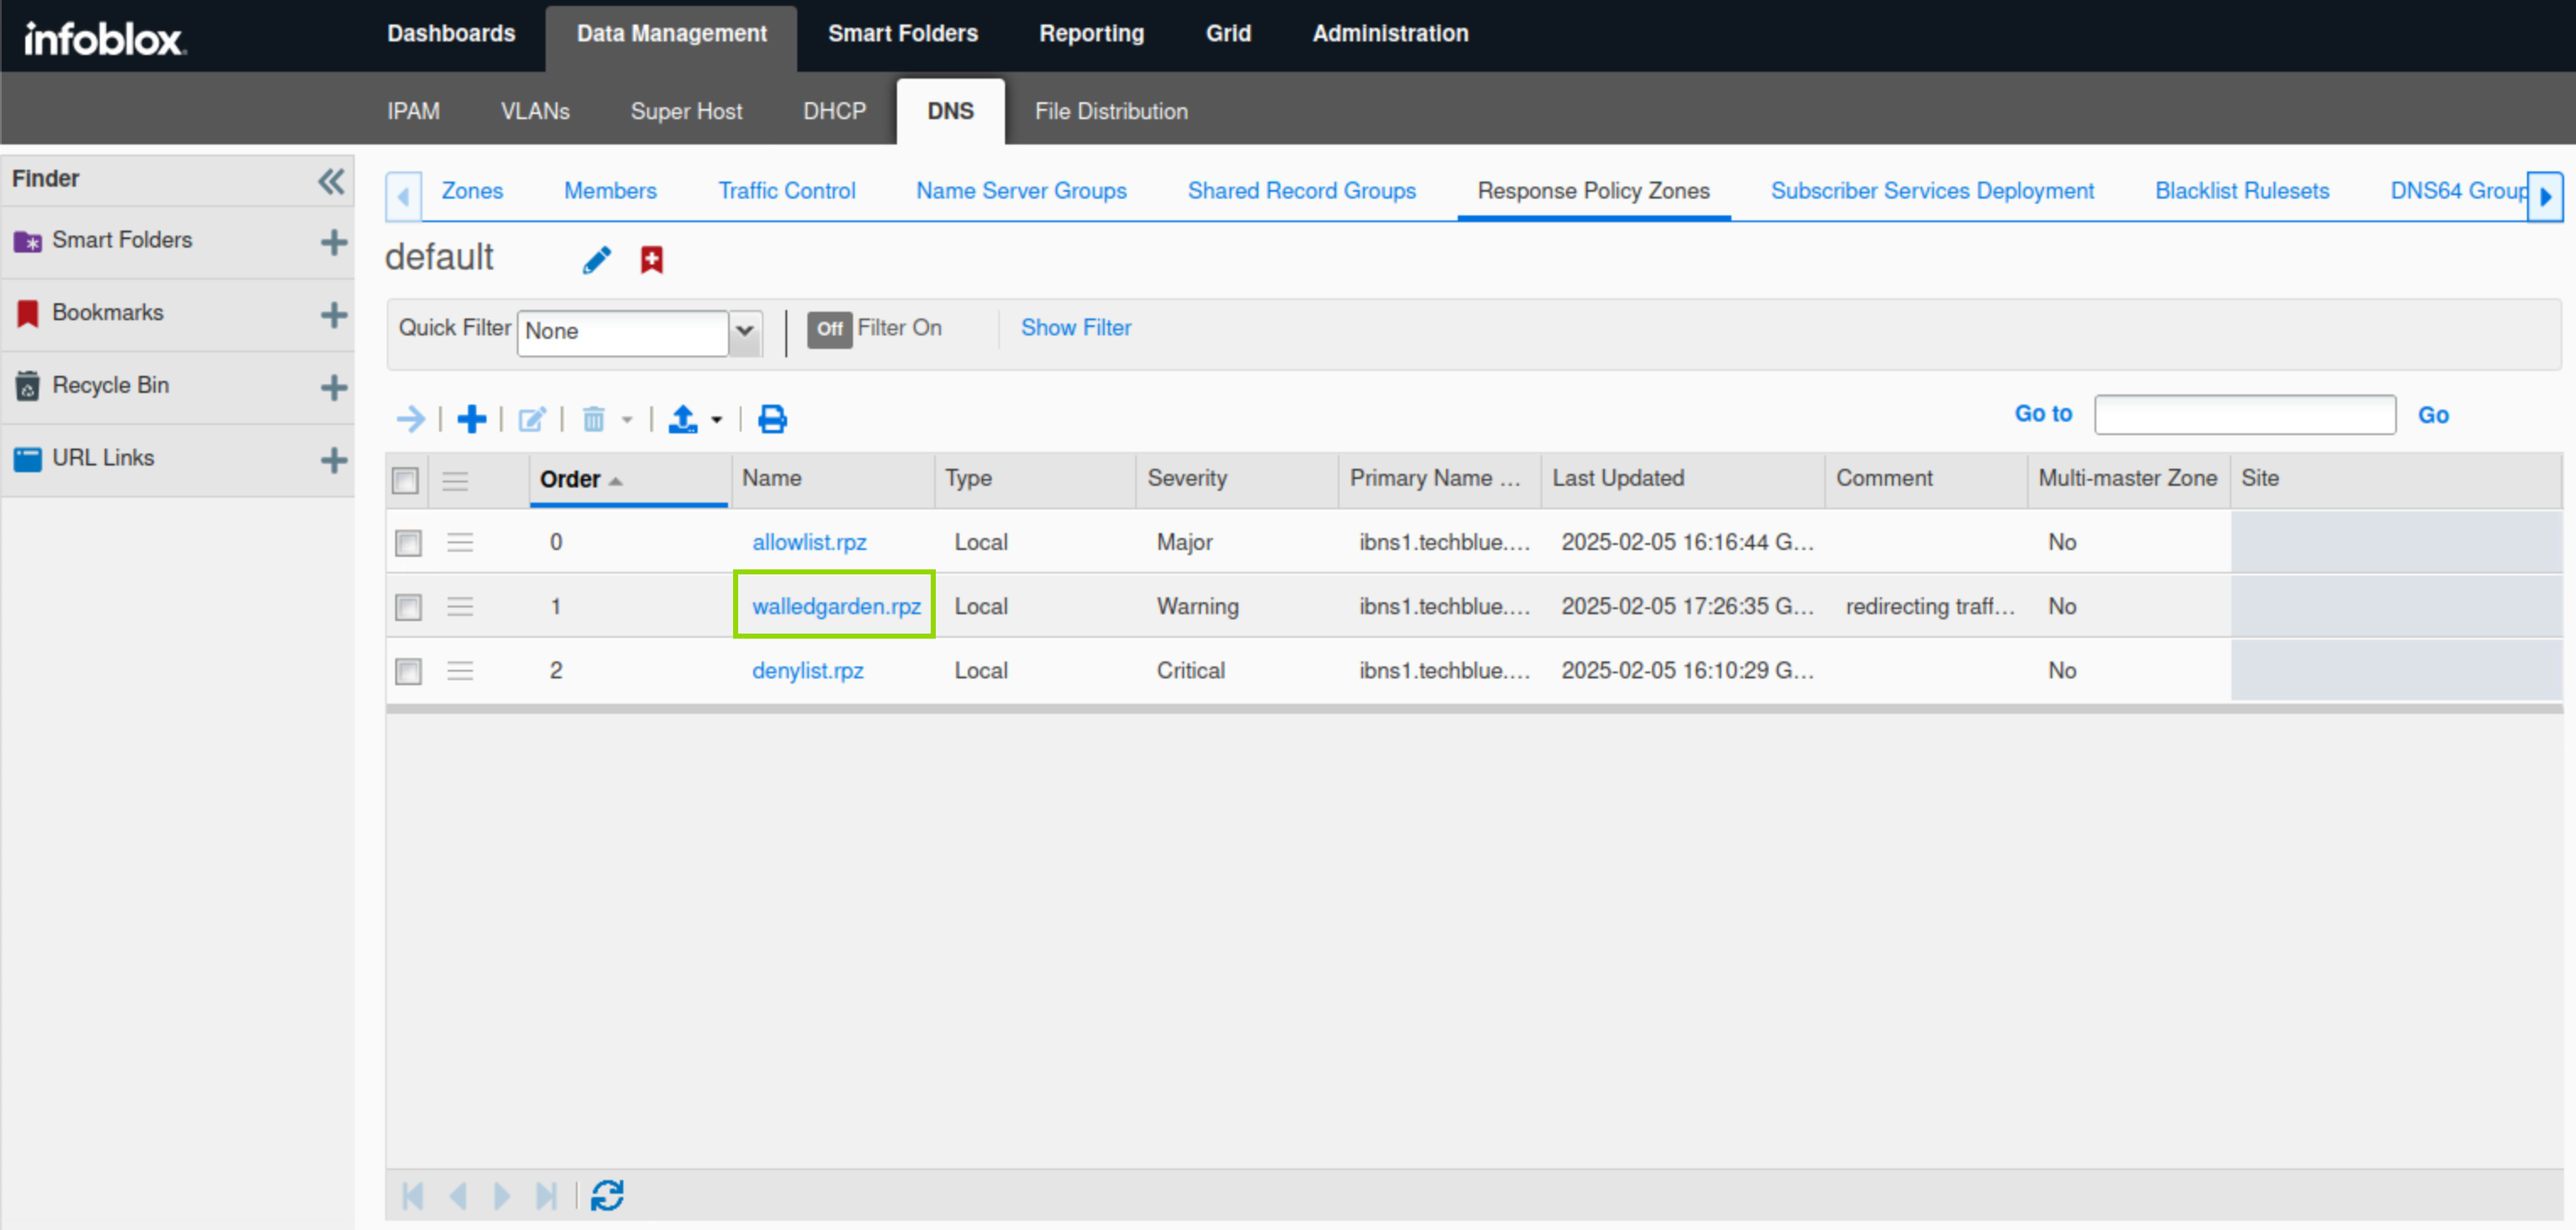
Navigate to Data Management → DNS → Response Policy Zones.
-
Click the link to walledgarden.rpz.
-
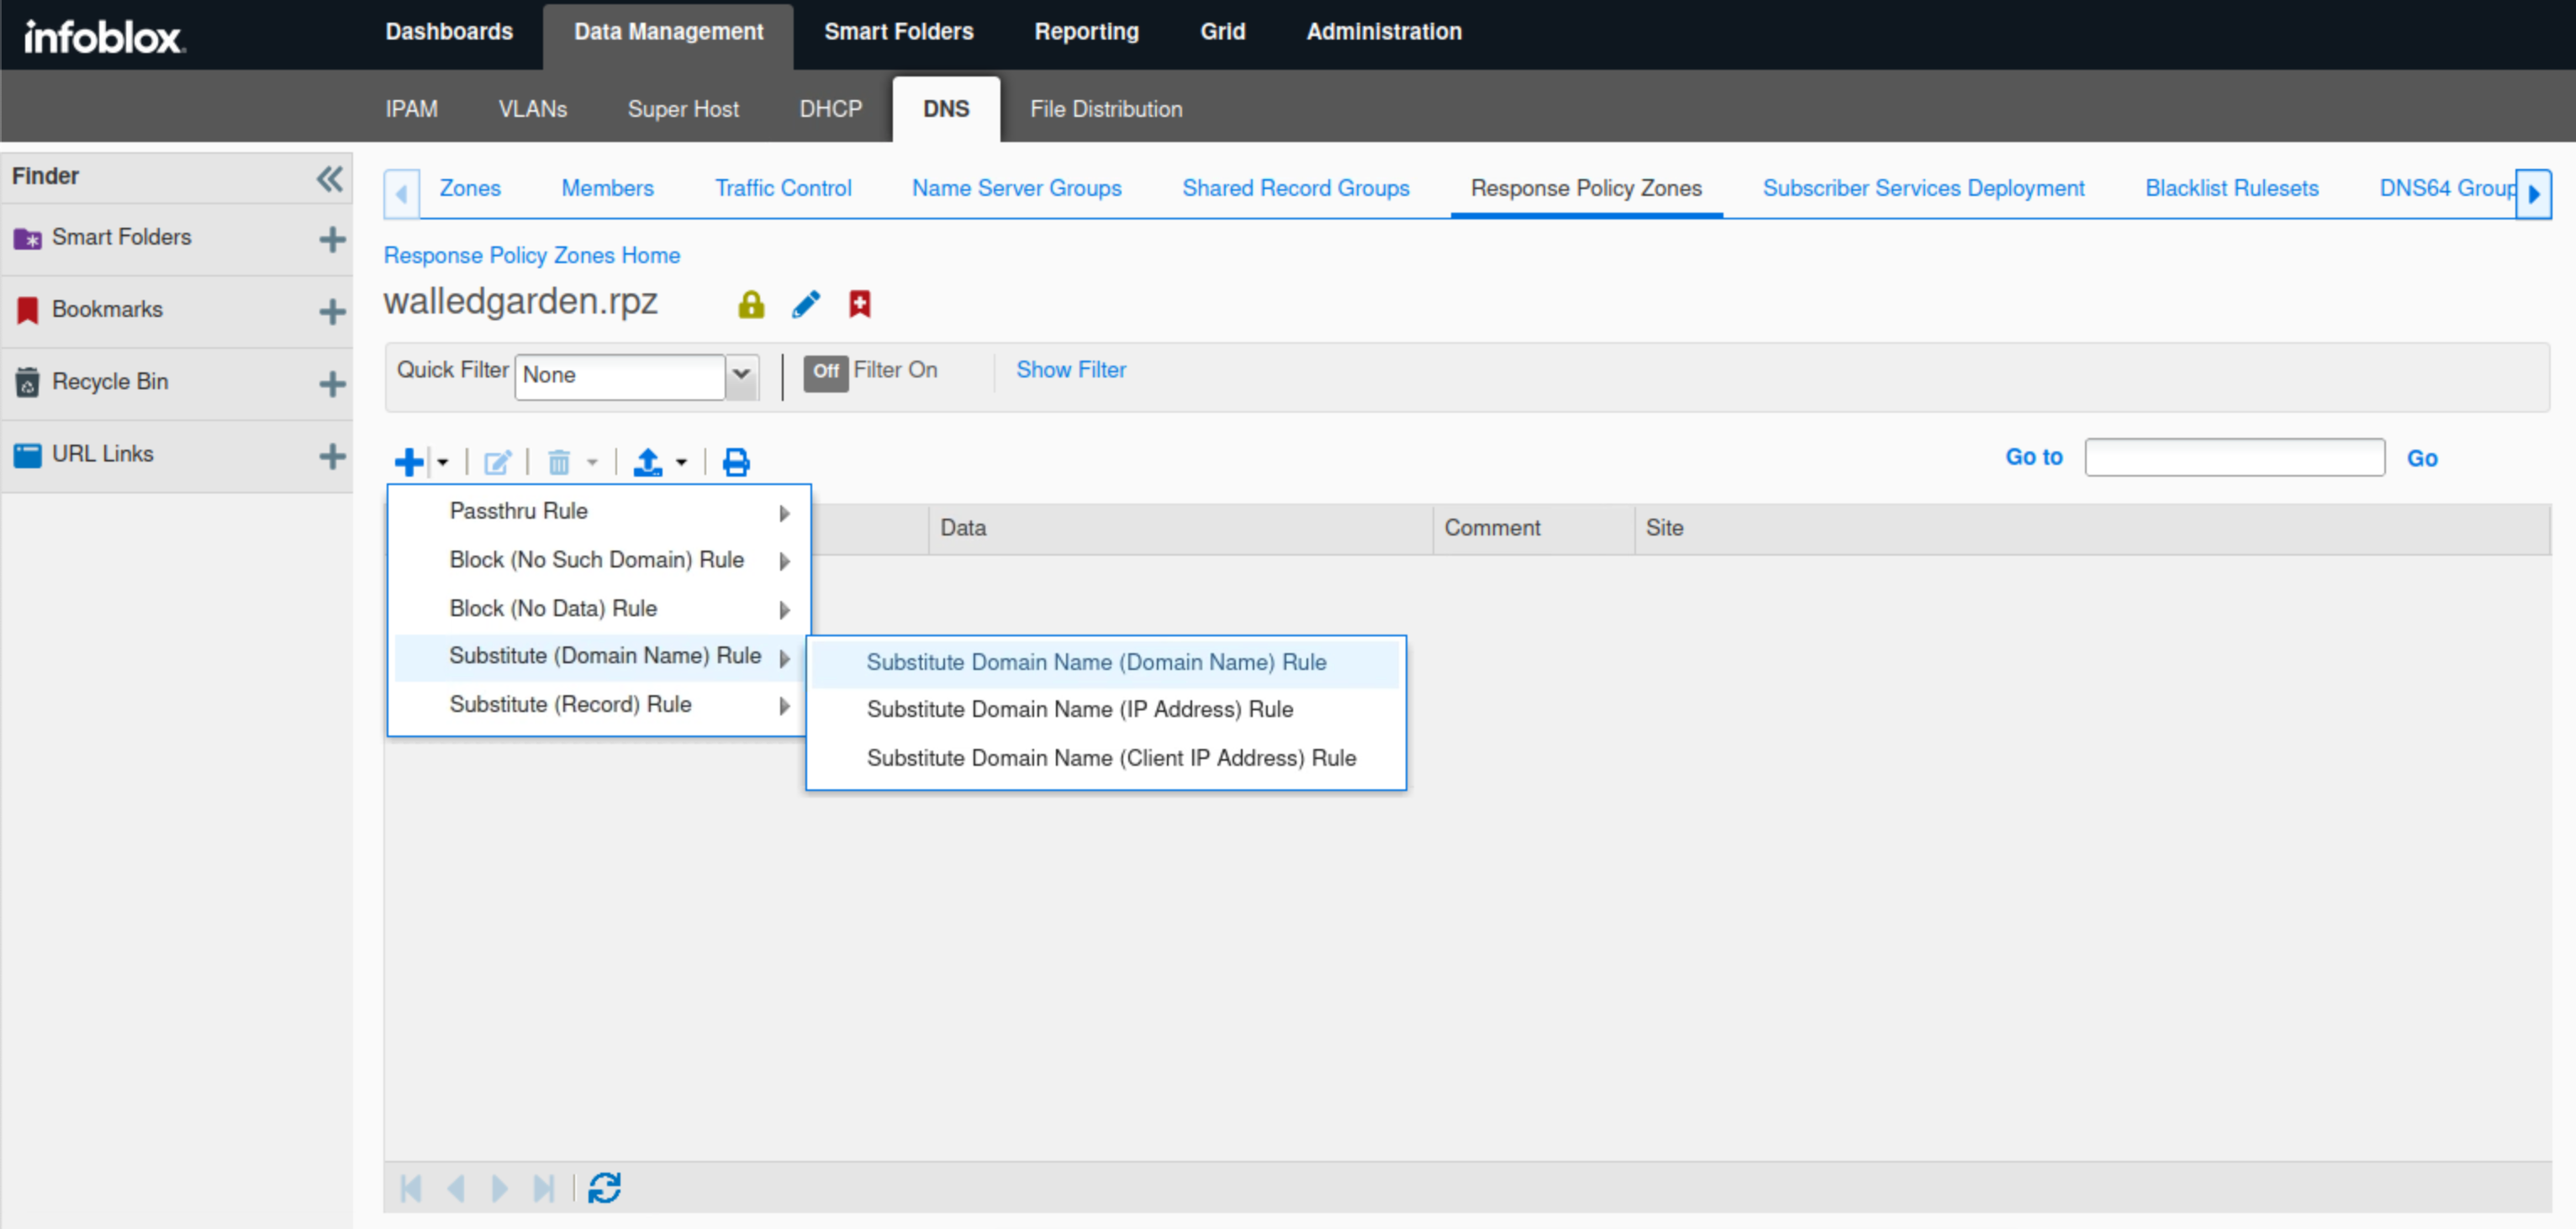
Click the arrow next to the plus (+) symbol and select Substitute (Domain Name) Rule from the drop-down list.
-
Select Substitute Domain Name (Domain Name) Rule.
-
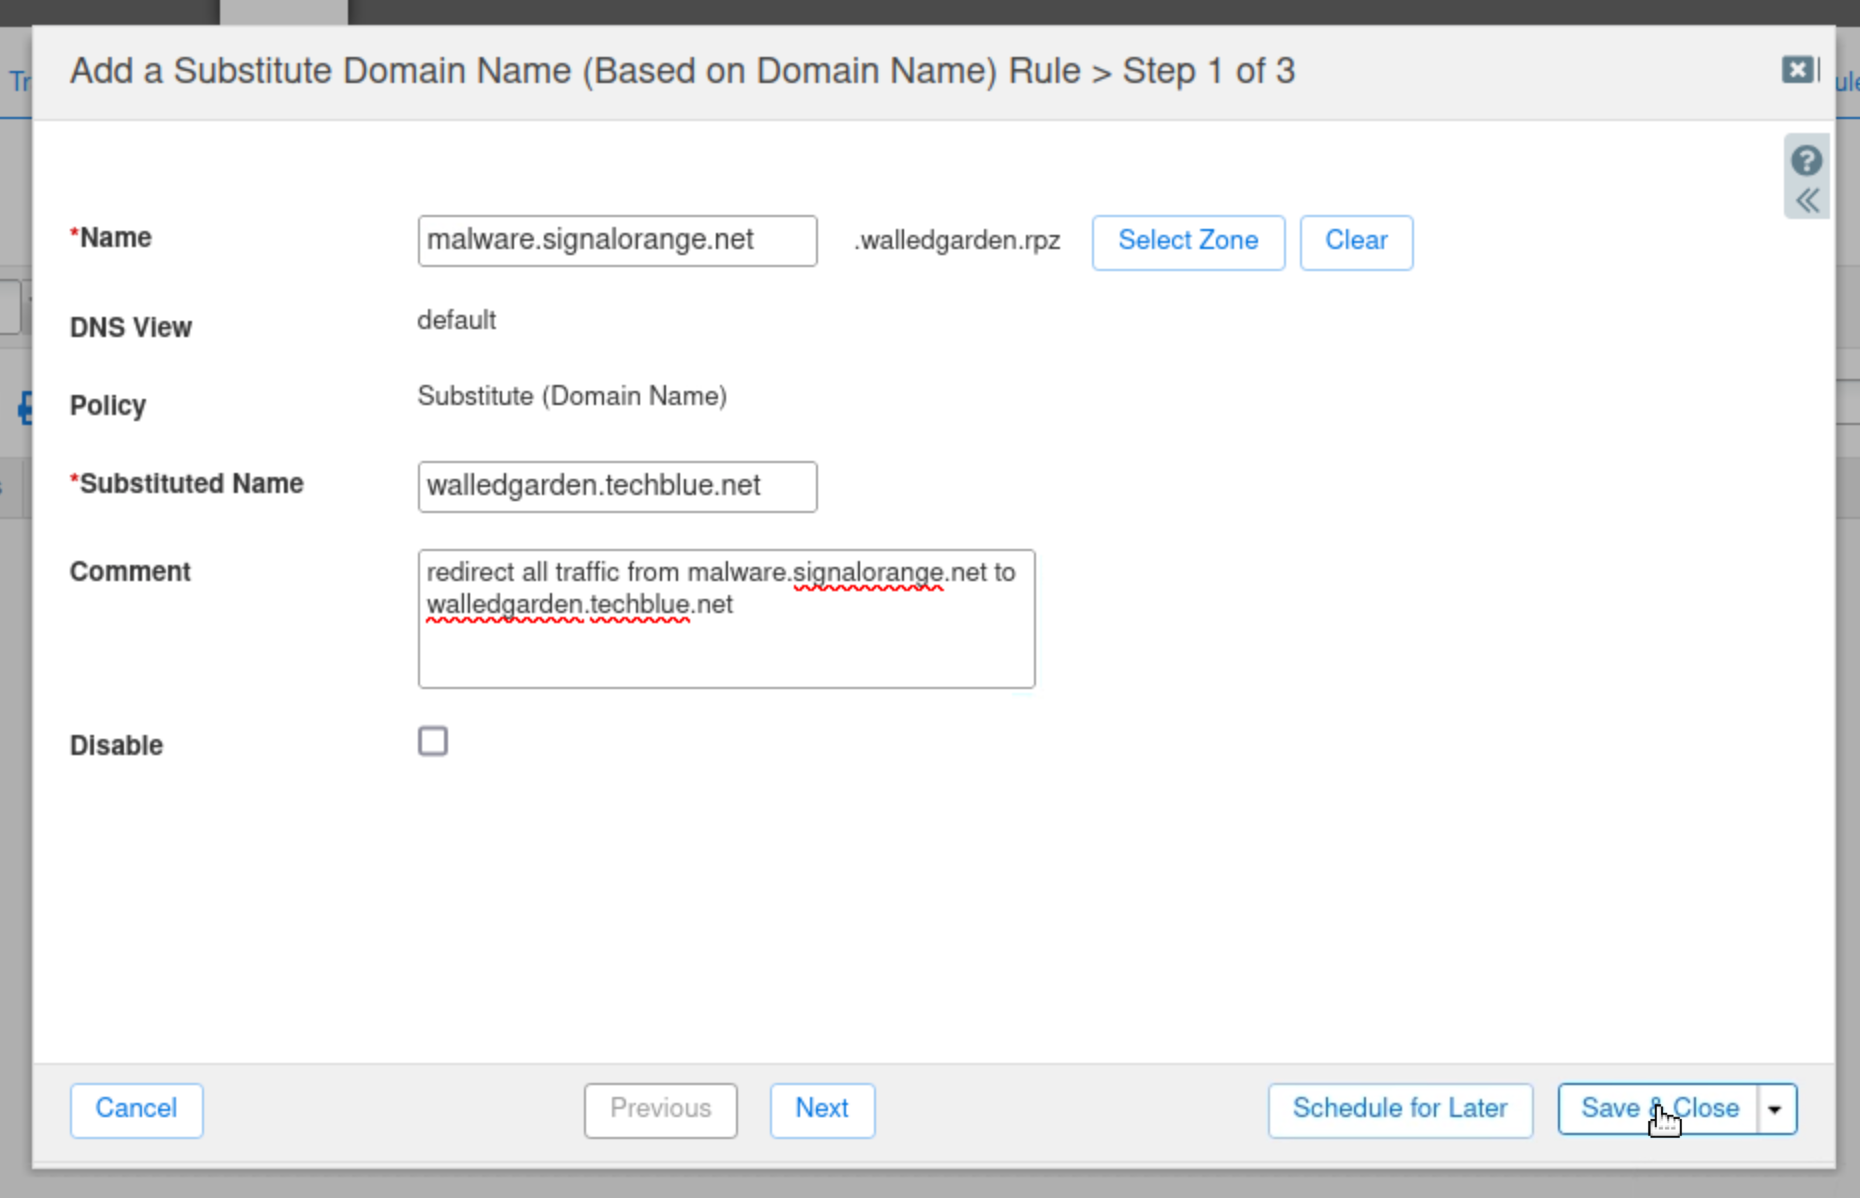
Enter malware.signalorange.net in the Name field.
-
Enter walledgarden.techblue.net in the Substituted Name field.
-
Type a Comment to describe the purpose of the rule.
-
Click Save & Close.
-
Click the arrow next to the plus (+) symbol and select Substitute (Domain Name) Rule from the drop-down list.
-
Select Substitute Domain Name (Domain Name) Rule.
-
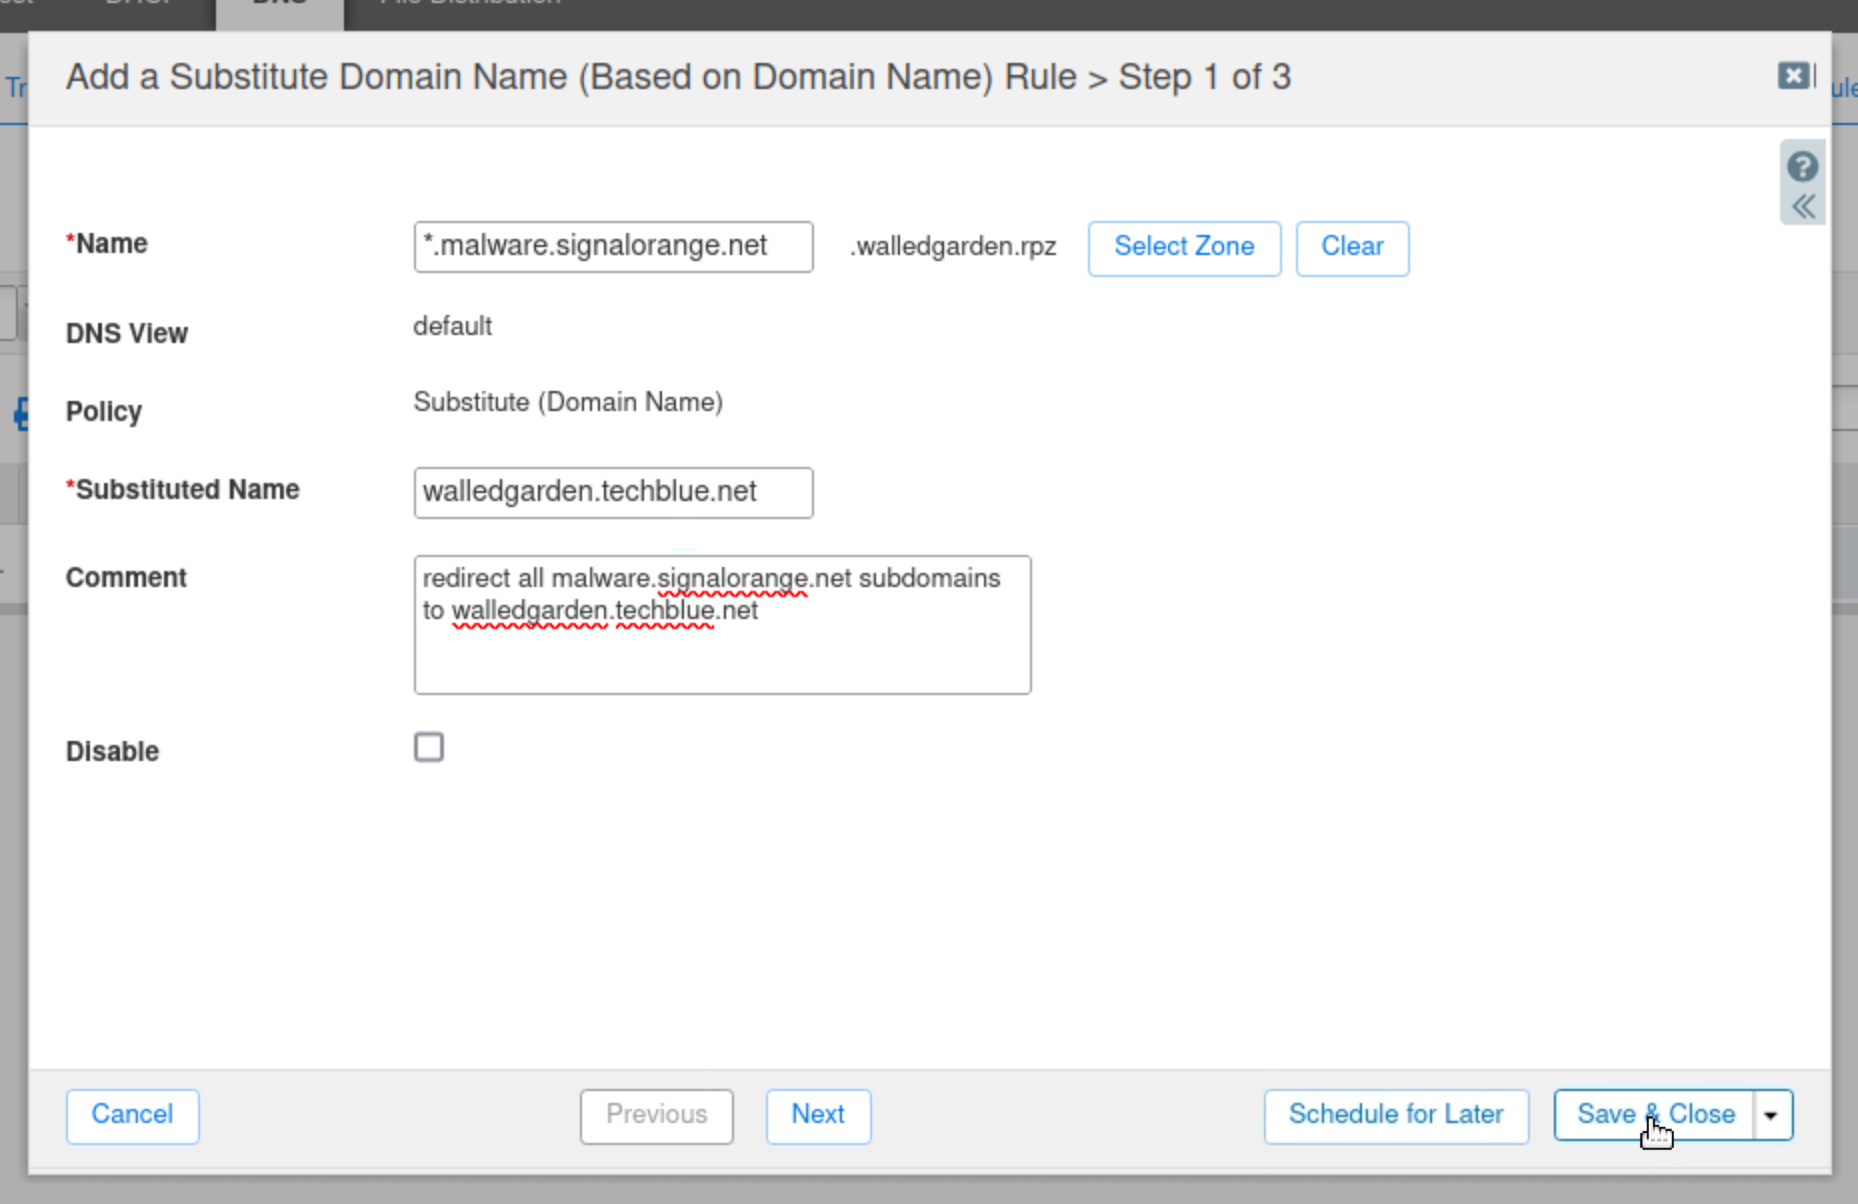
Enter *.malware.signalorange.net in the Name field.
-
Enter walledgarden.techblue.net in the Substituted Name field.
-
Click Save & Close.
Task 8 Solution: Create local RPZ - denylist.rpz
In this task, we create a local RPZ called denylist.rpz. The RPZ is initially created with Passthru mode. This allows you to test the RPZ without unintentionally blocking legitimate traffic.
-
On the jump-desktop machine, open a browser window and surf https://10.100.0.100.
-
Navigate to Data Management → DNS → Response Policy Zones.
-
Click the plus (+) symbol to add a new RPZ.
-
Select Add Local Response Policy Zone and click Next.
-
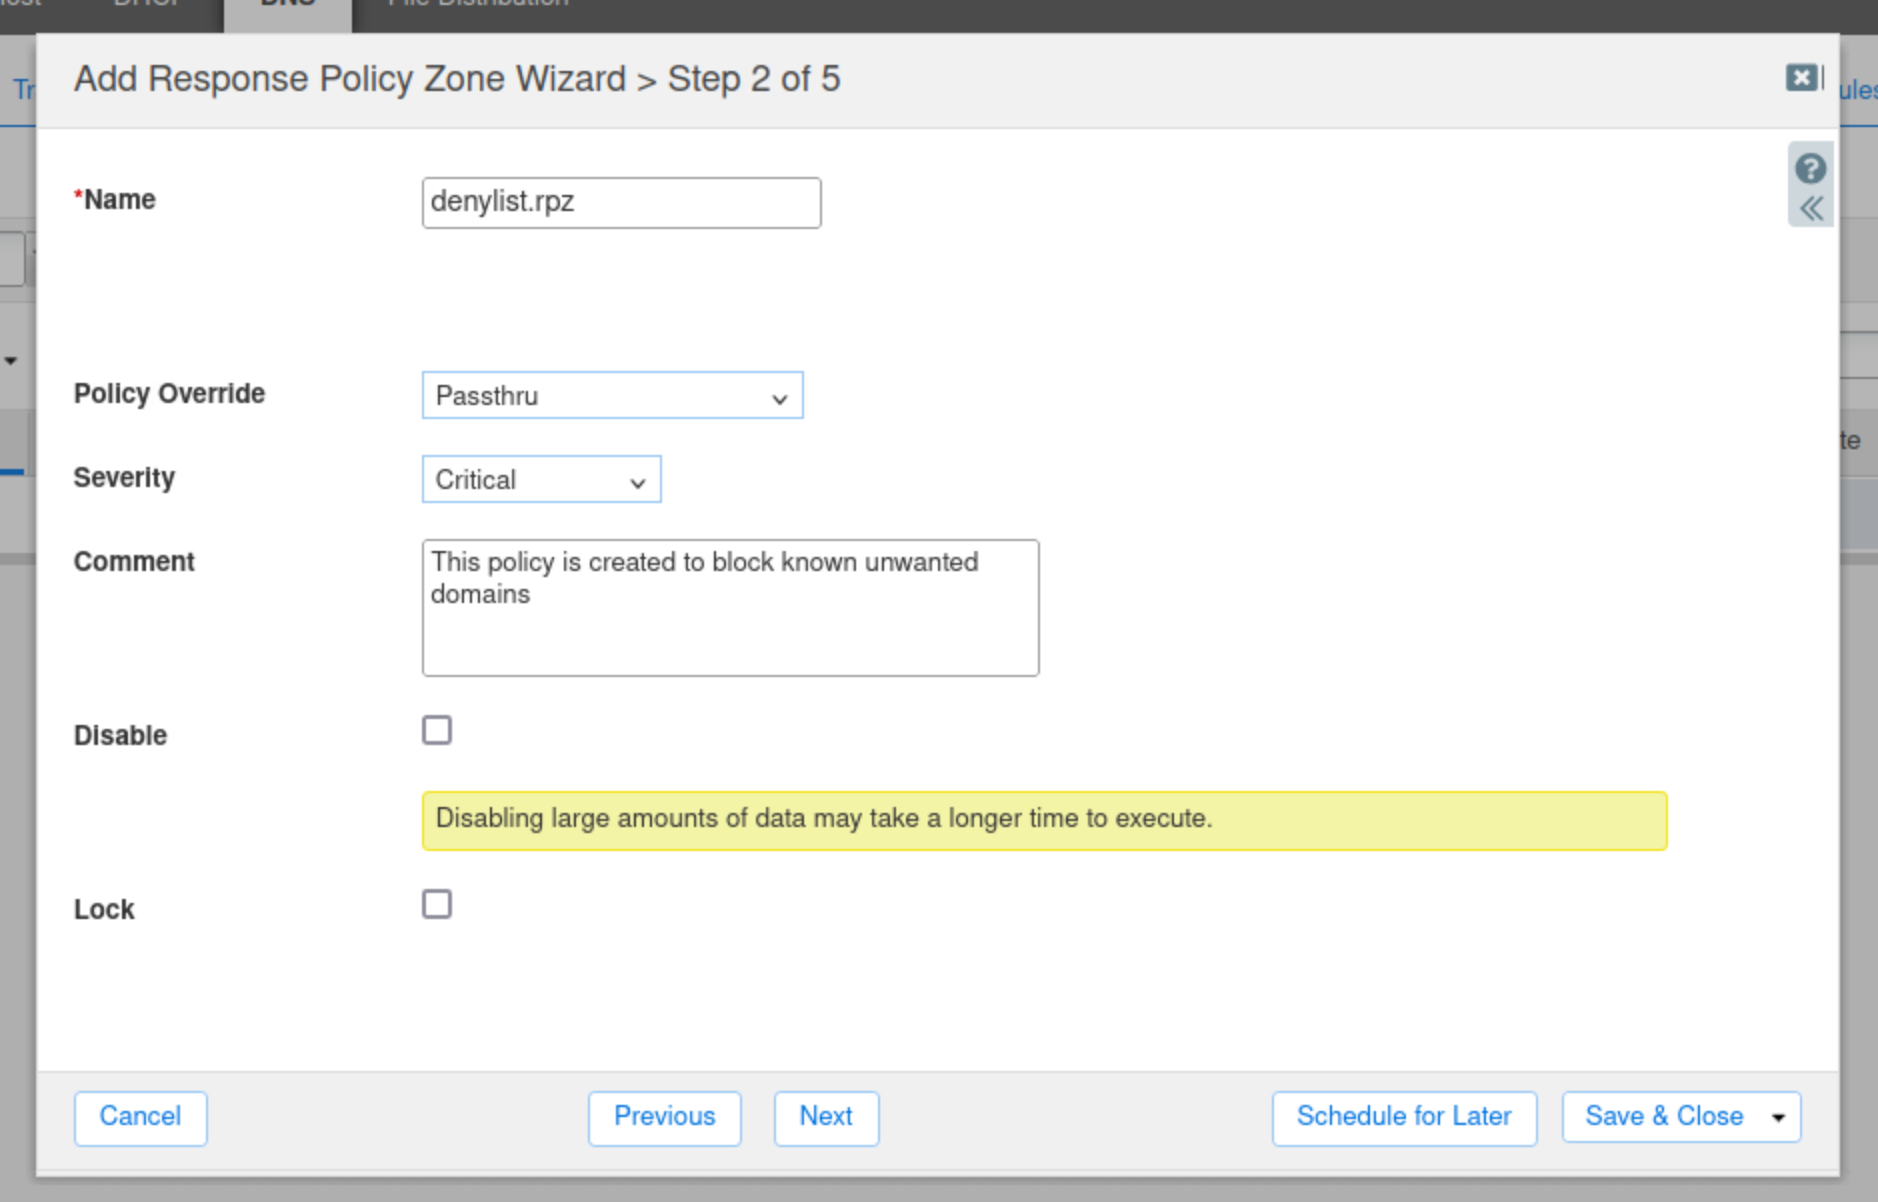
Enter denylist.rpz for the name of the zone.
-
Select Passthru from the drop-down list for the Policy Override value.
-
NOTE: The Policy Override value will be changed once the RPZ policy action is verified.
-
-
Change the Severity to Critical.
-
Type in a comment to describe the purpose of the RPZ.
-
Click Next to continue.
-
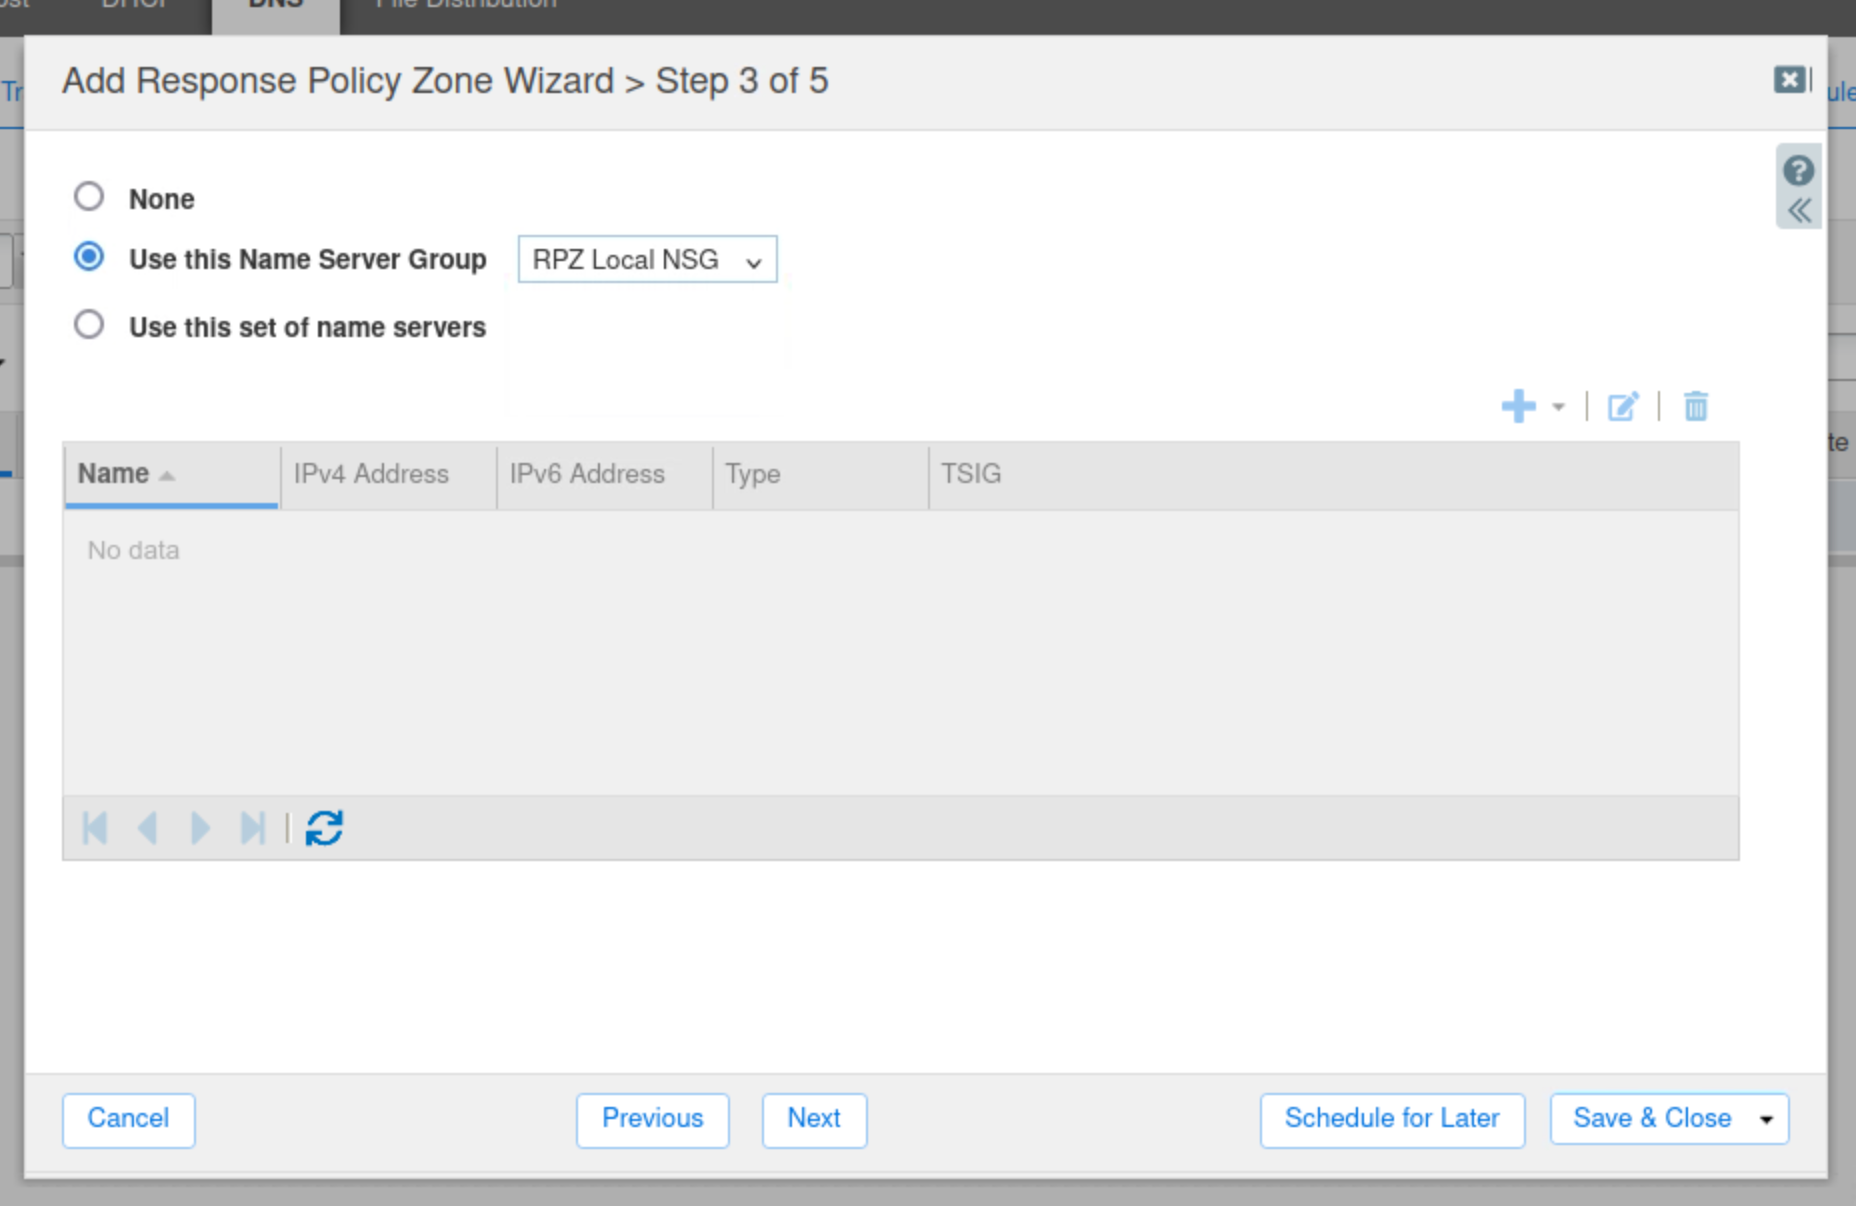
Select the Use this Name Server Group button.
-
Choose RPZ Local NSG from the drop-down list.
-
Click Save & Close.
-
Restart Services when prompted.
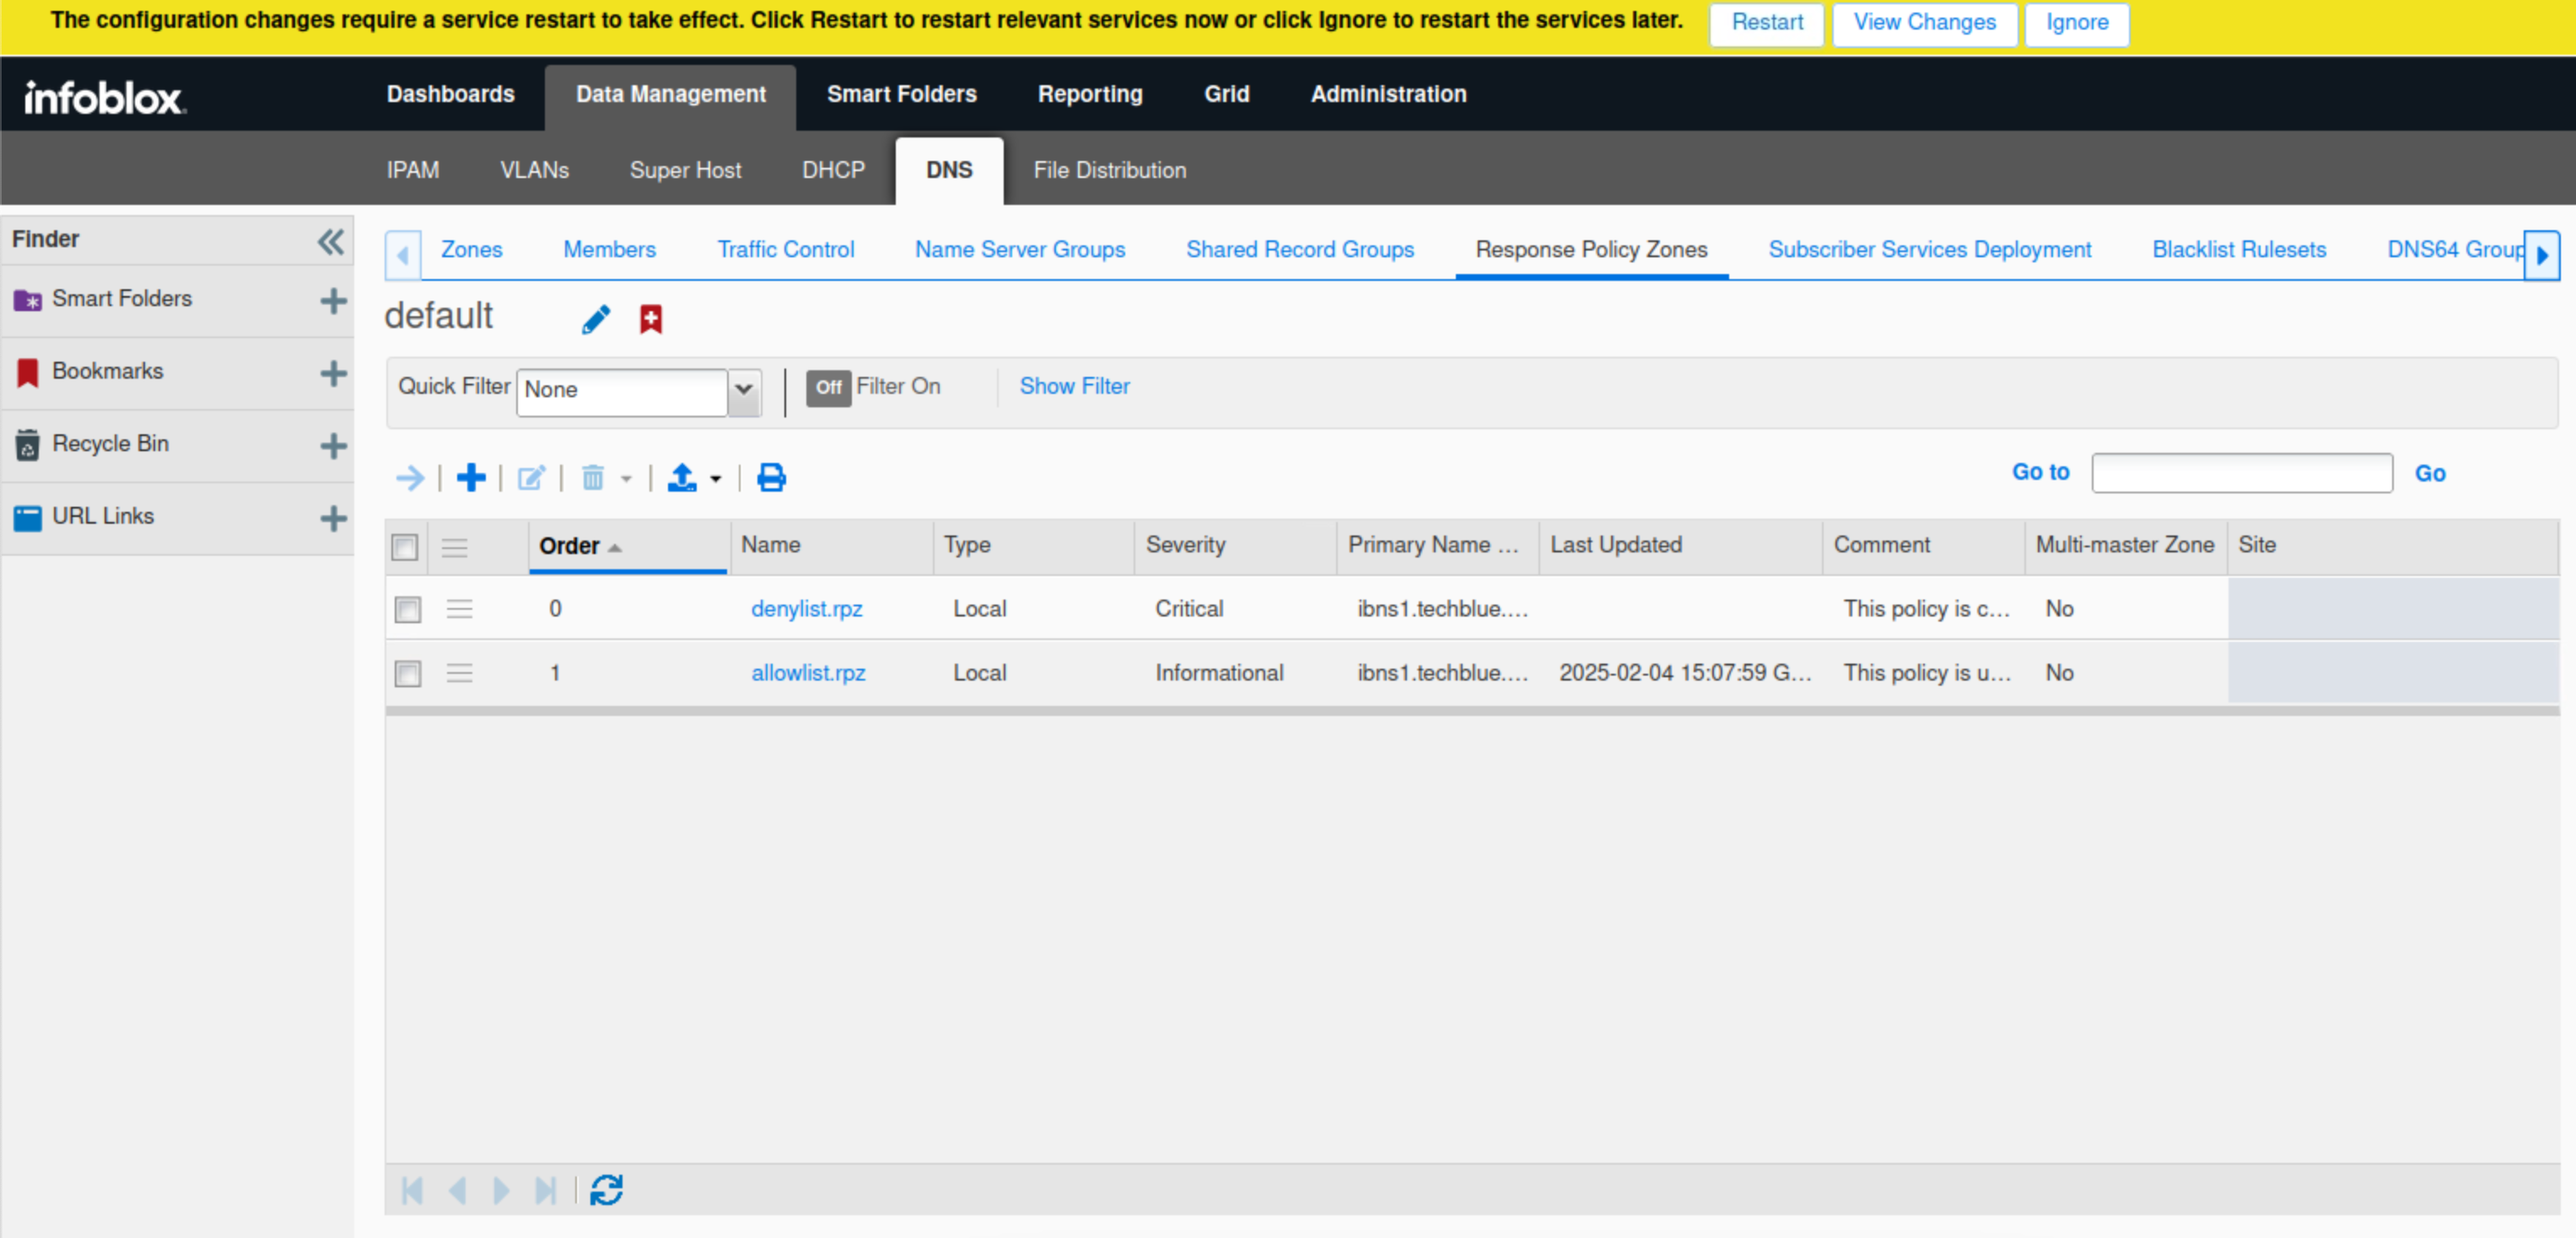
Task 9 Solution: Rearrange Response Policy Zones in the correct order
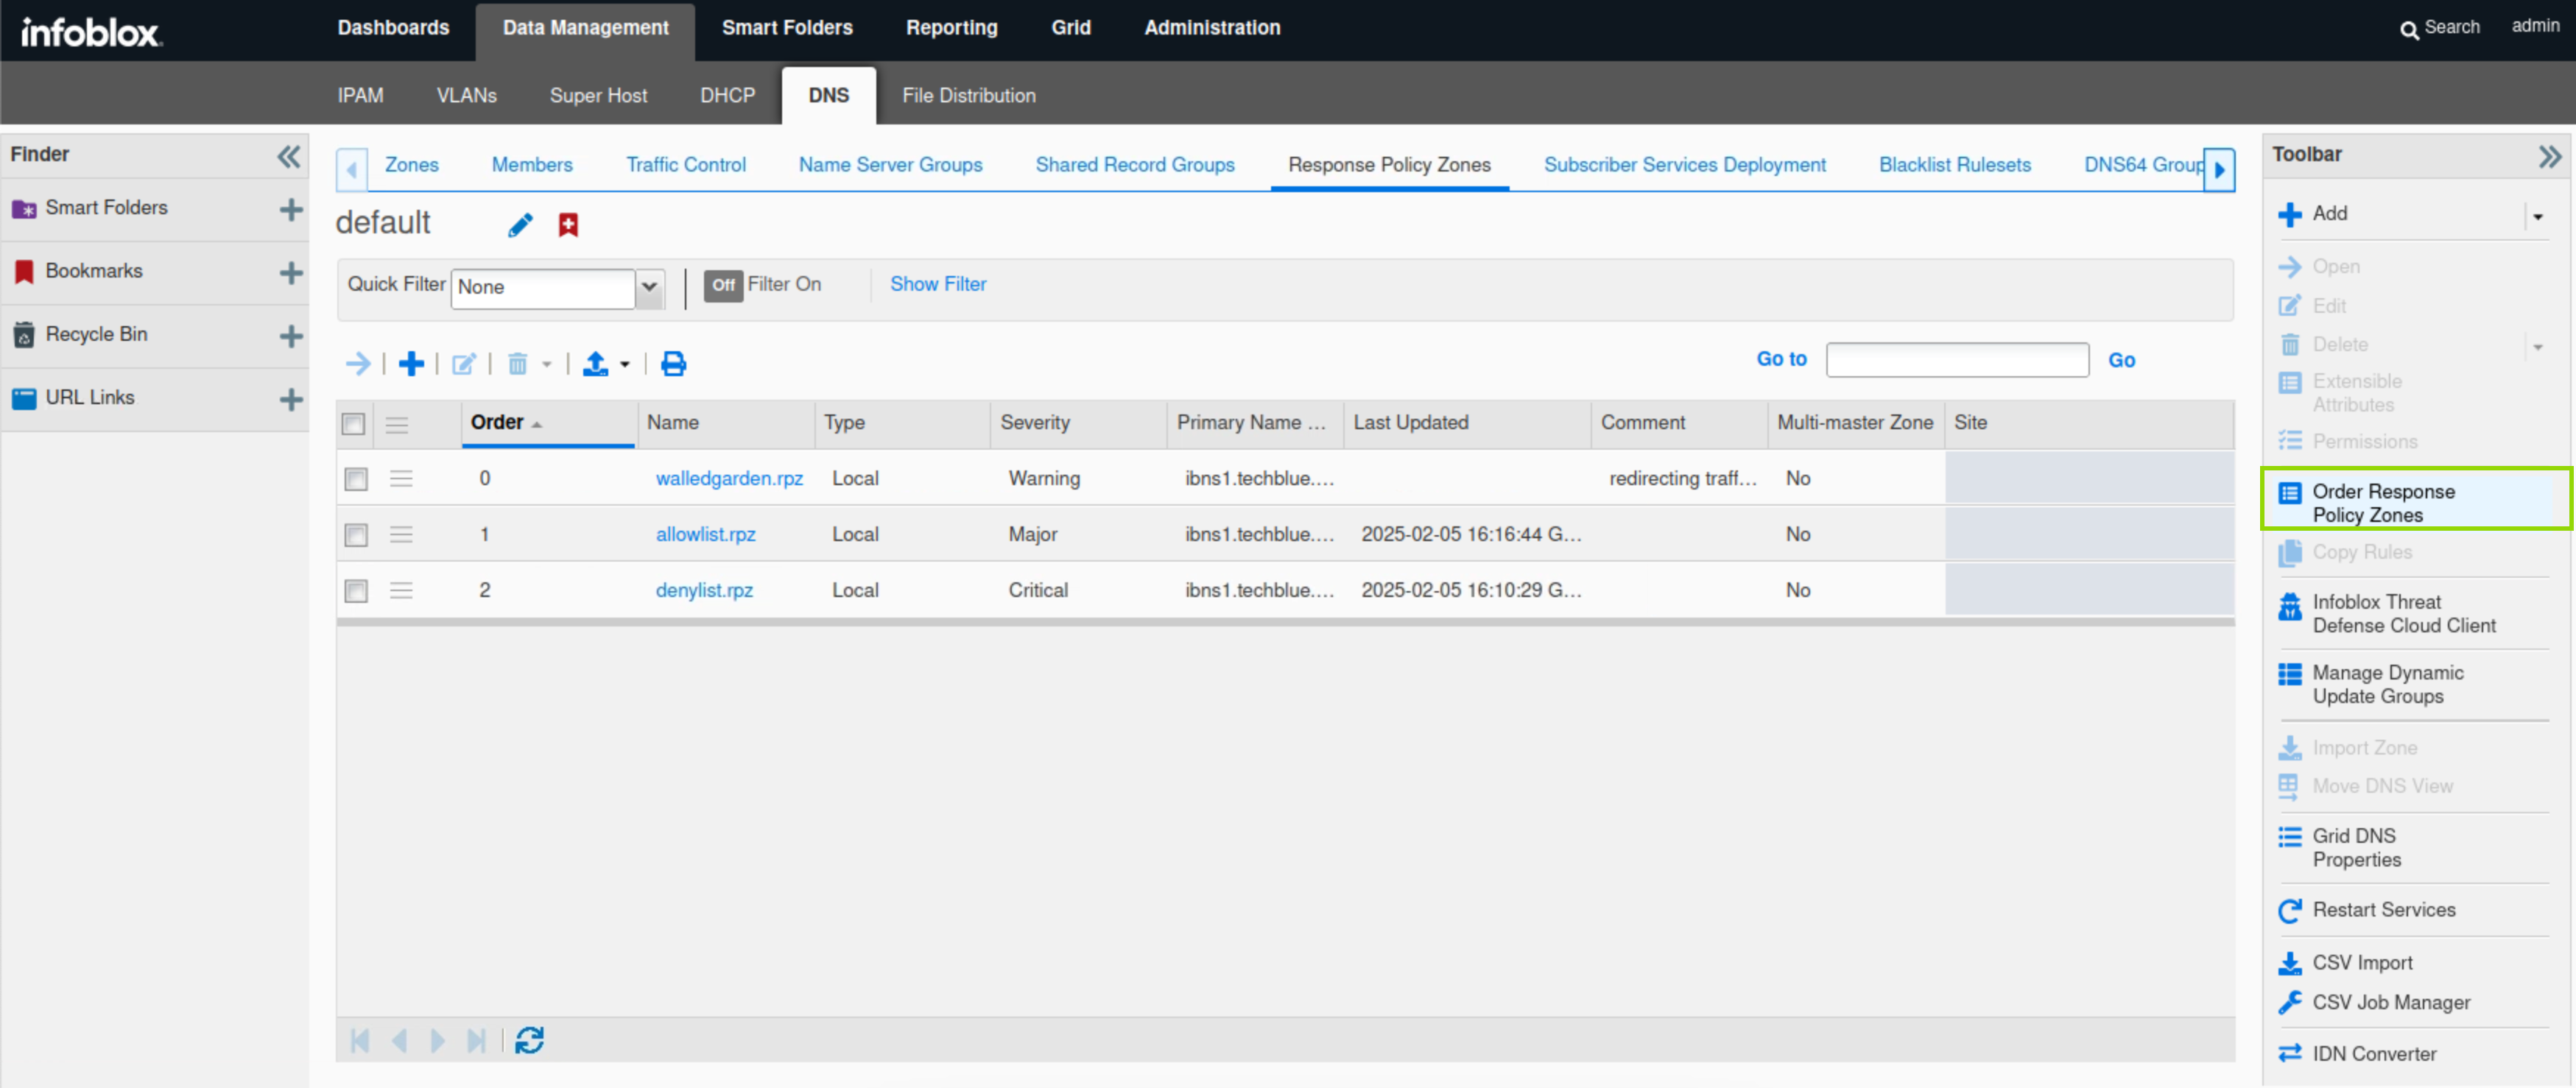
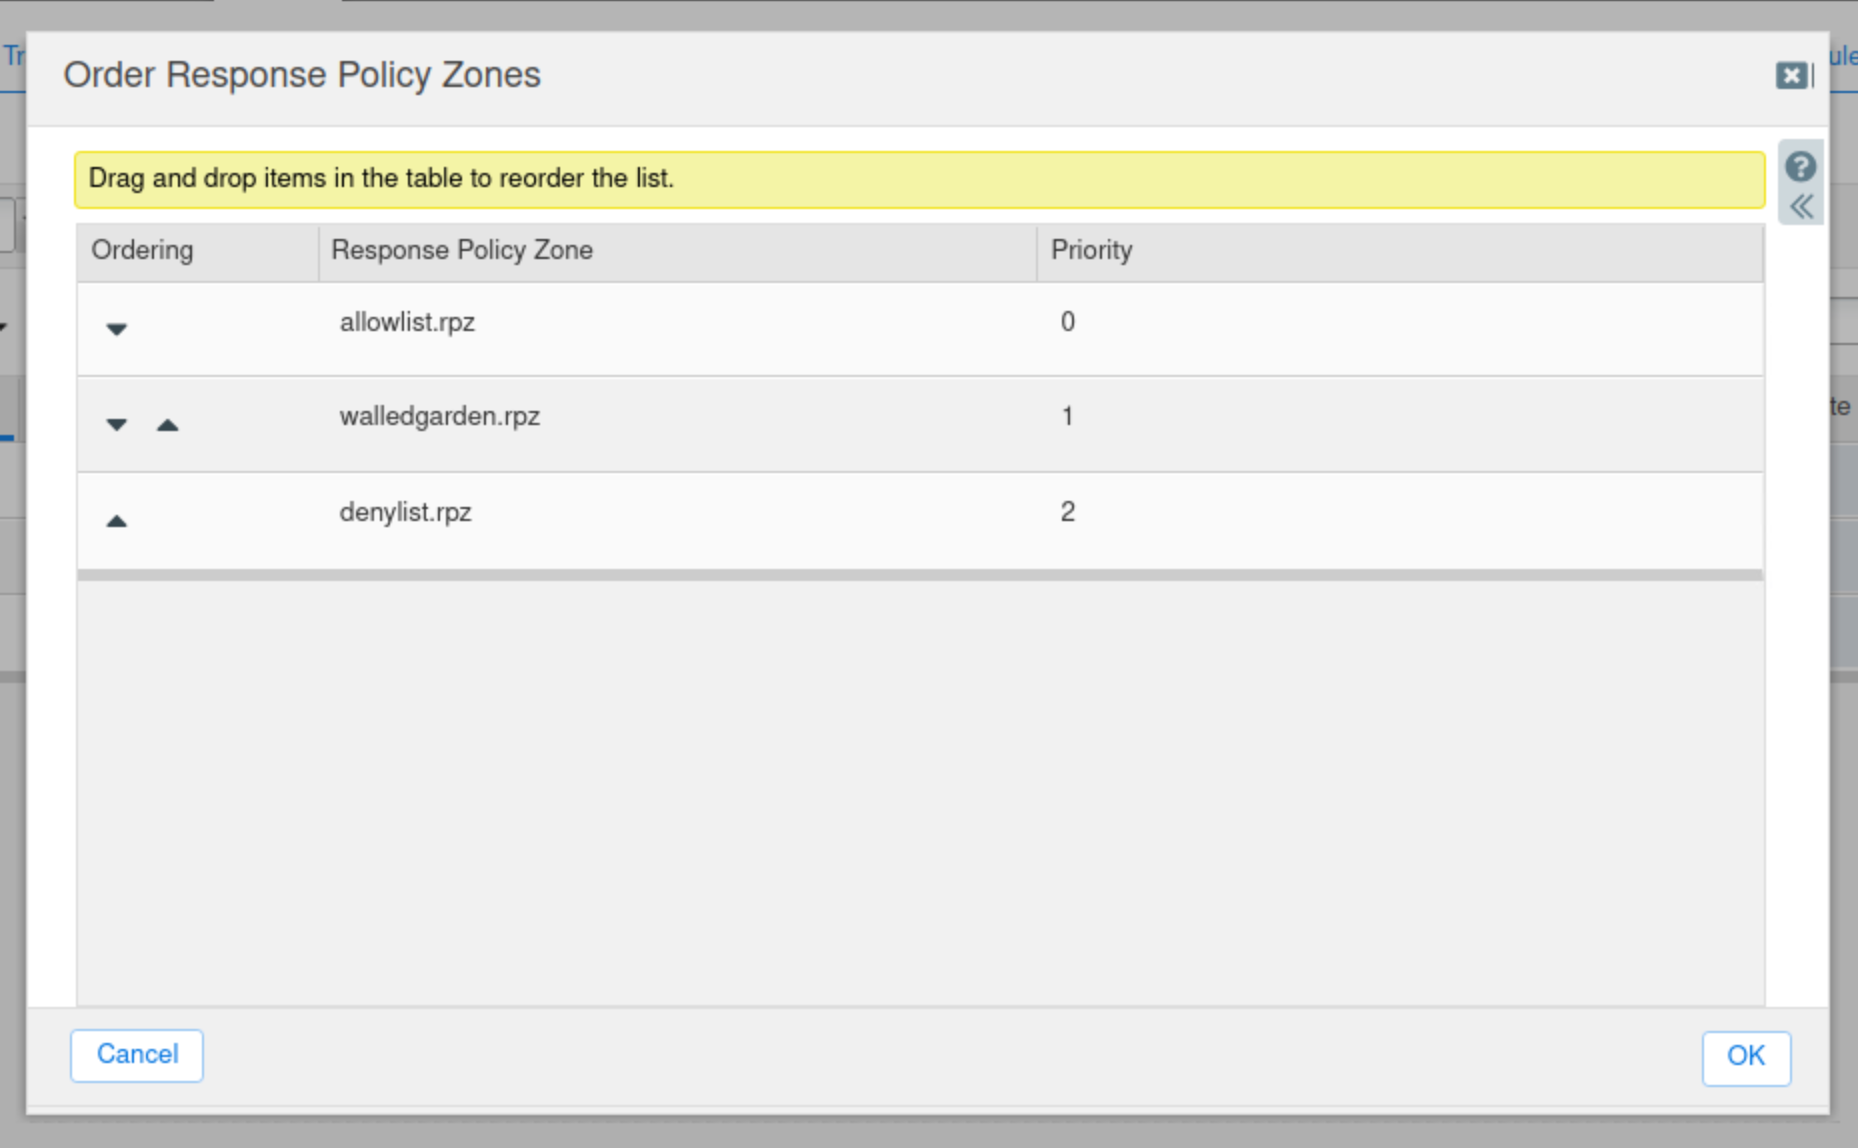
In this task, we place the RPZs into the correct order, ensuring that traffic gets targeted by the correct policy. This will be very important when we eventually switch denylist.rpz to blocking traffic, we don't want it to accidentally block a domain that should be allowed so we are placing it under allowlist.rpz.
-
Navigate to Data Management → DNS → Response Policy Zones.
-
Click Order Response Policy Zones on the toolbar.
-
Arrange the RPZs so that allowlist.rpz is first, walledgarden.rpz is second and denylist.rpz is last.
-
Click OK.
-
Restart services when prompted.
Task 10 Solution: Add Block Domain Name Policy Rules to denylist.rpz
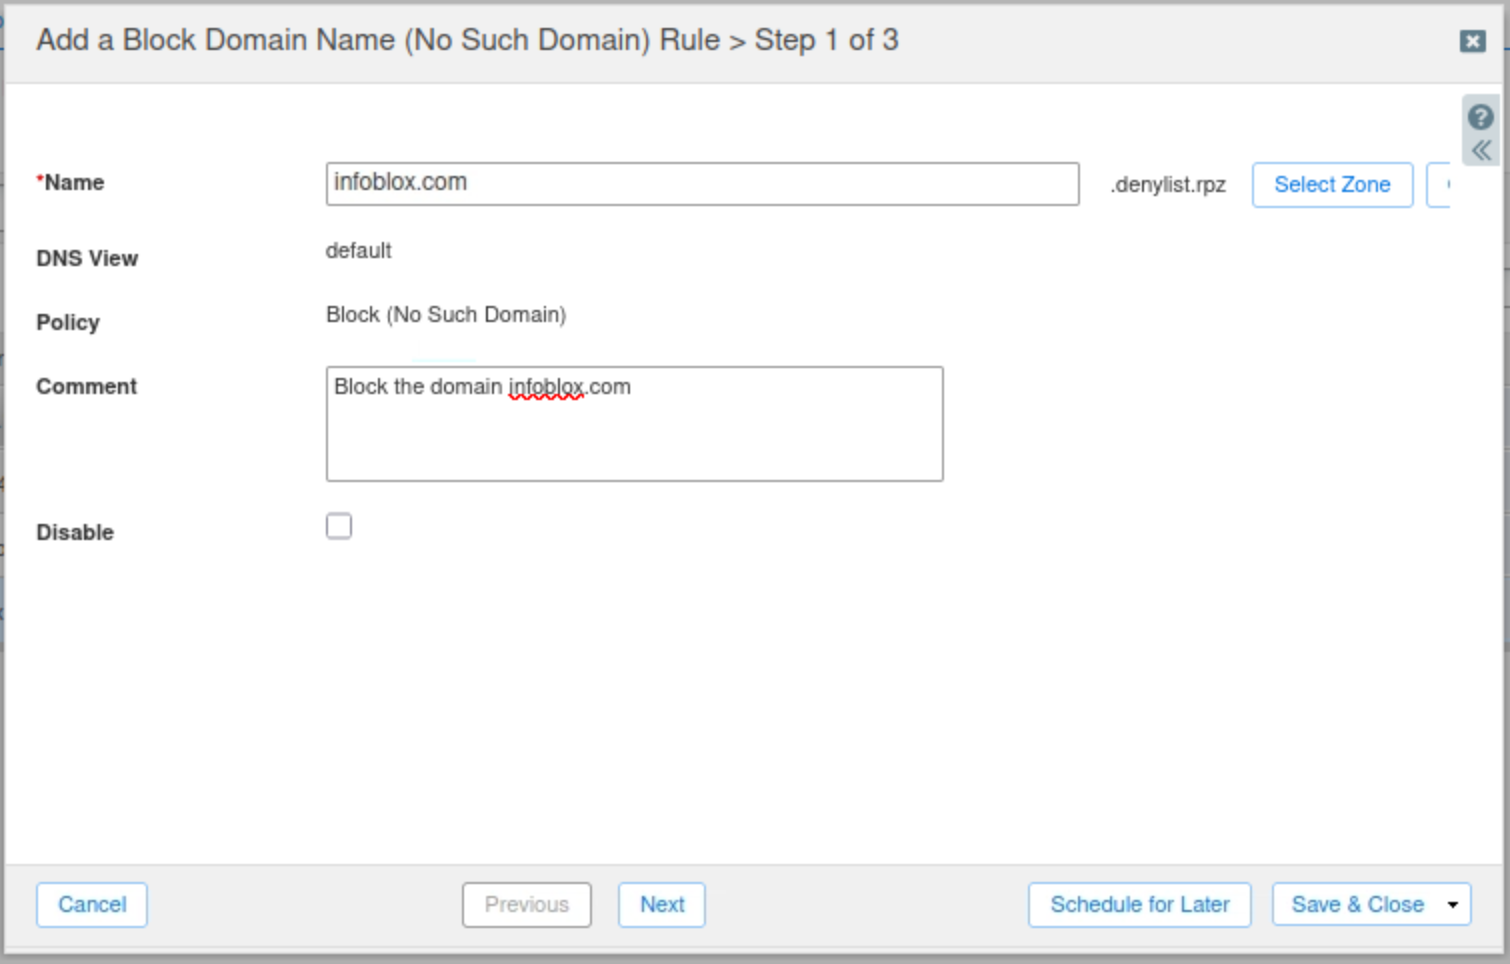
In this task, we will add a first rule to the denylist.rpz to block eicar.net domain. we then add a second rule to the denylist.rpz to block all eicar.net subdomains ensuring that they are blocked.
-
Navigate to Data Management → DNS → Response Policy Zones.
-
Click the link to denylist.rpz.
-
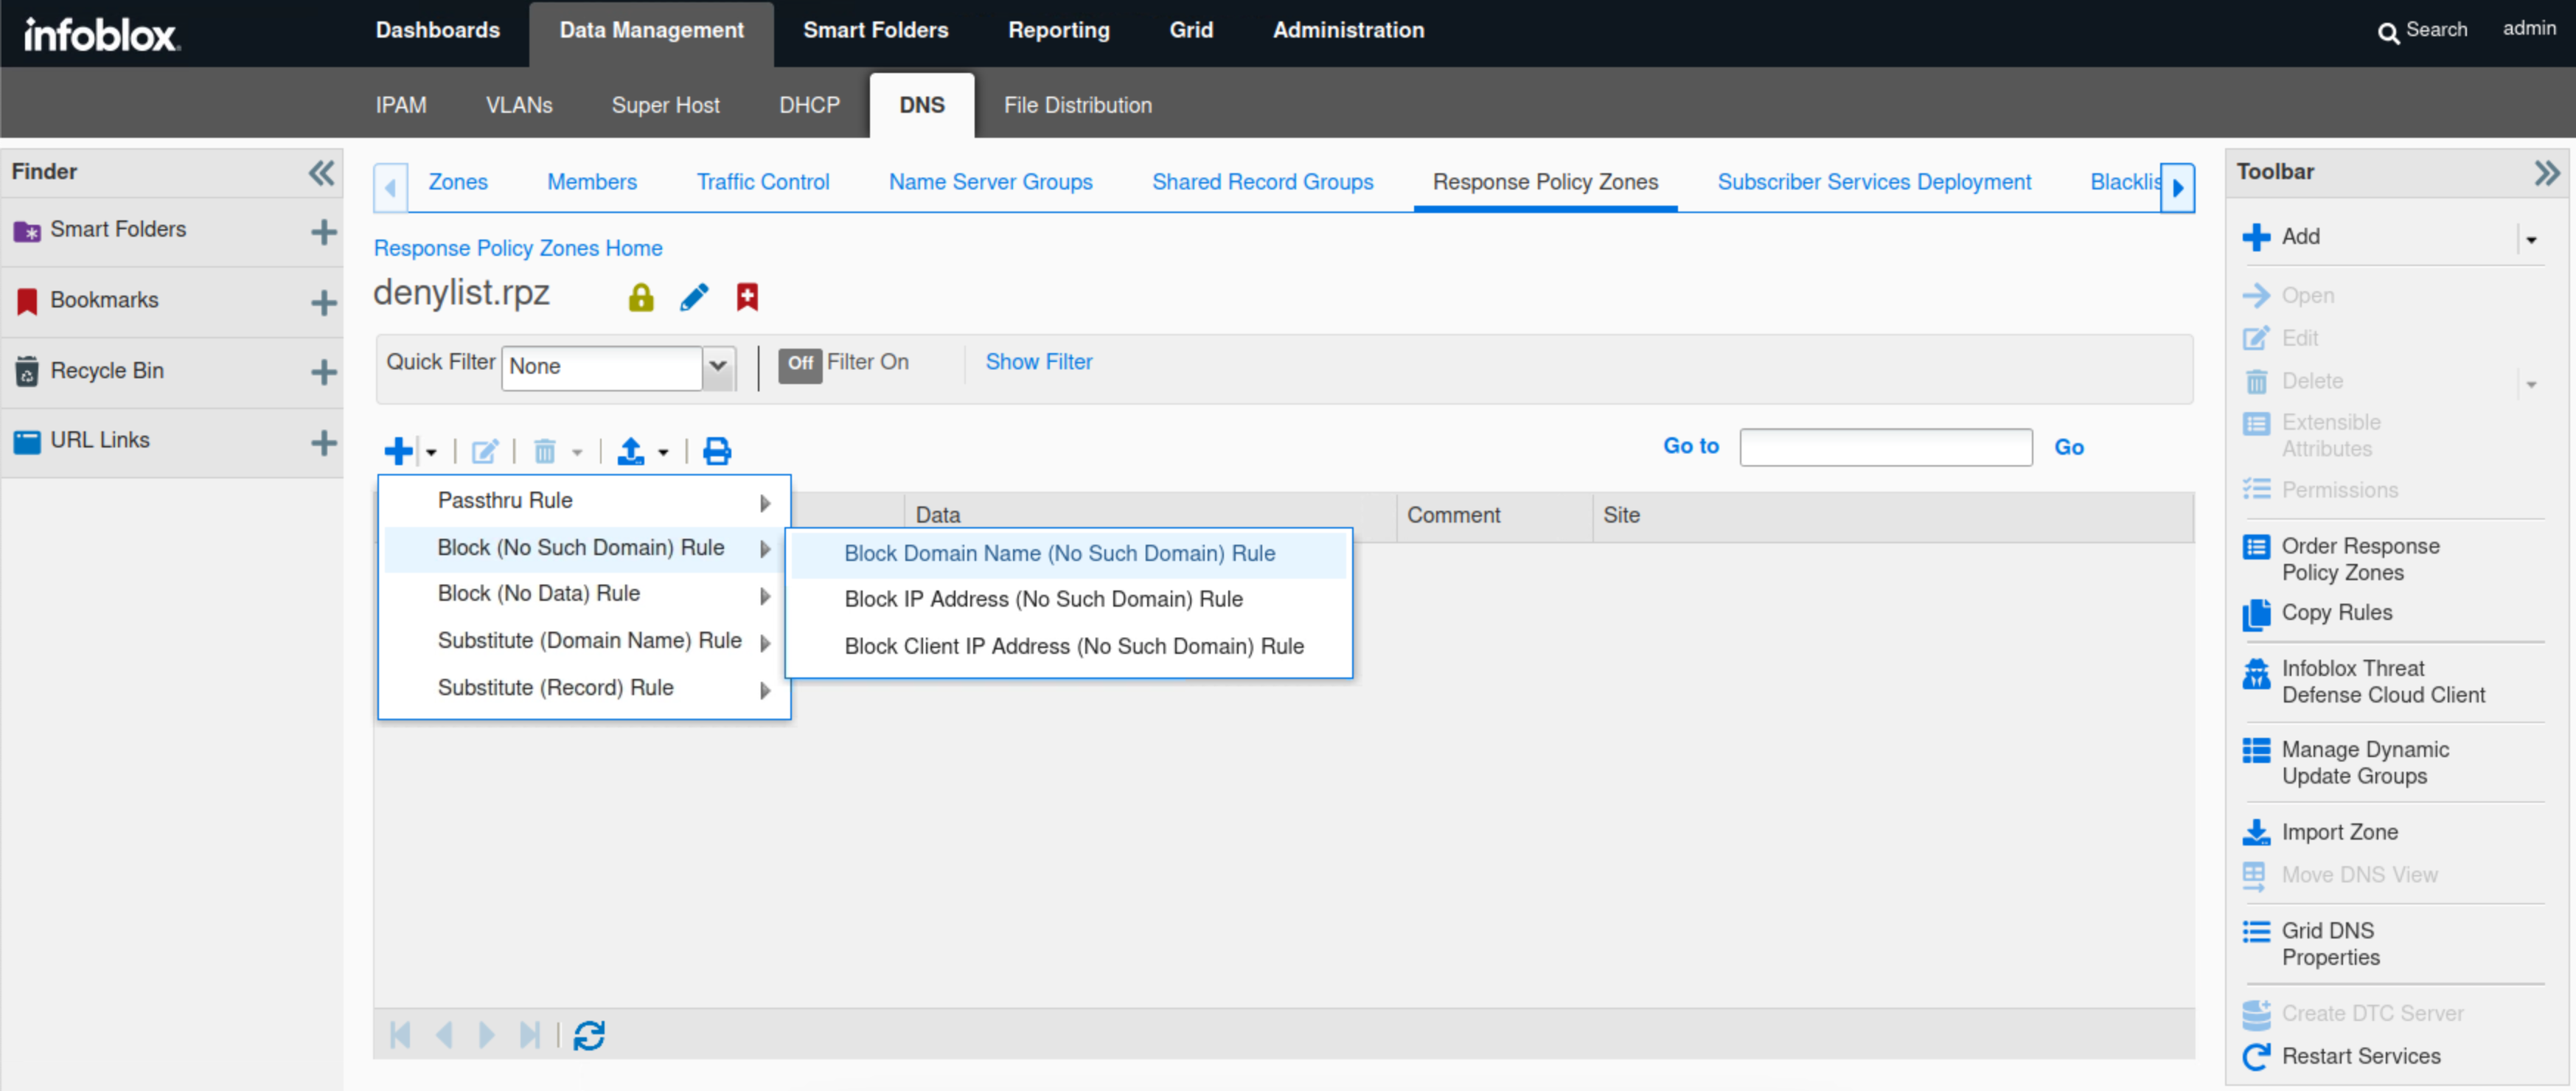
Click the arrow next to the plus (+) symbol and select Block (No Such Domain) Rule from the drop-down list.
-
Select Block Domain Name (No Such Domain) Rule.
-
-
Enter infoblox.com in the Name field.
-
Type a Comment to describe the purpose of the rule.
-
Click Save & Close.
-
Click the arrow next to the plus (+) symbol and select Block (No Such Domain) Rule from the drop-down list.
-
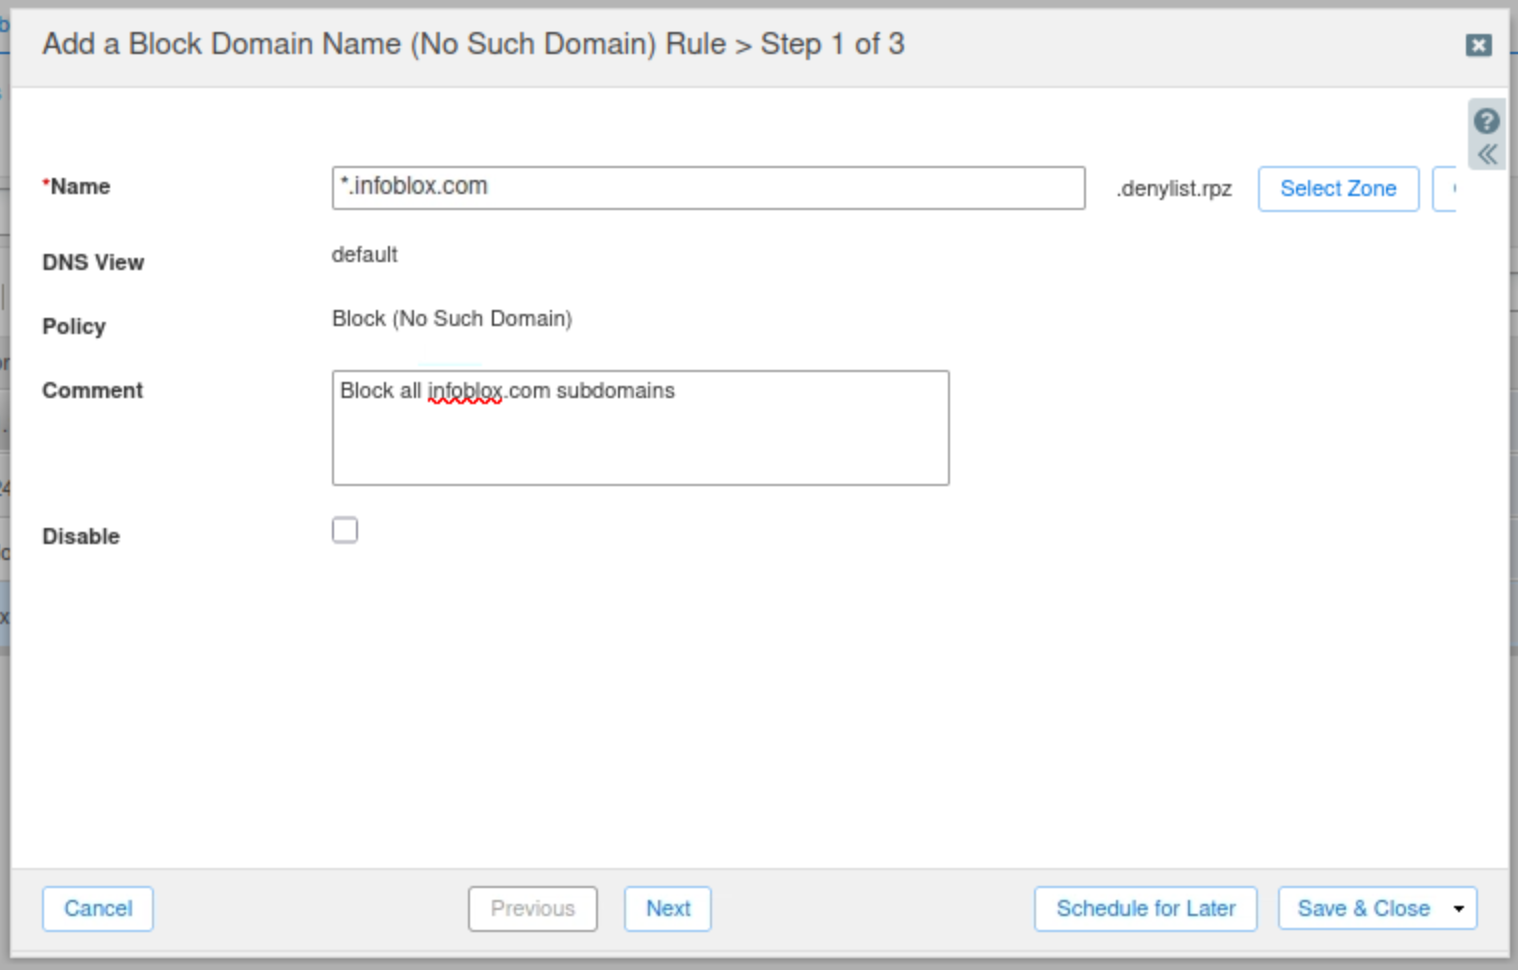
Select Block Domain Name (No Such Domain) Rule, then enter *.infoblox.com in the Name field.
-
Type a Comment to describe the purpose of the rule.
-
Click Save & Close.
-
Task 11 Solution: Add Block IP Address Rule to denylist.rpz
In this task, you add a rule to block a destination IP Address to the denylist.rpz. This IP Address 224.224.224.224 is an Infoblox-owned IP we will use it to simulate a known bogon domain bogon.singalorange.net.
-
Navigate to Data Management → DNS → Response Policy Zones.
-
Click the link to denylist.rpz.
-
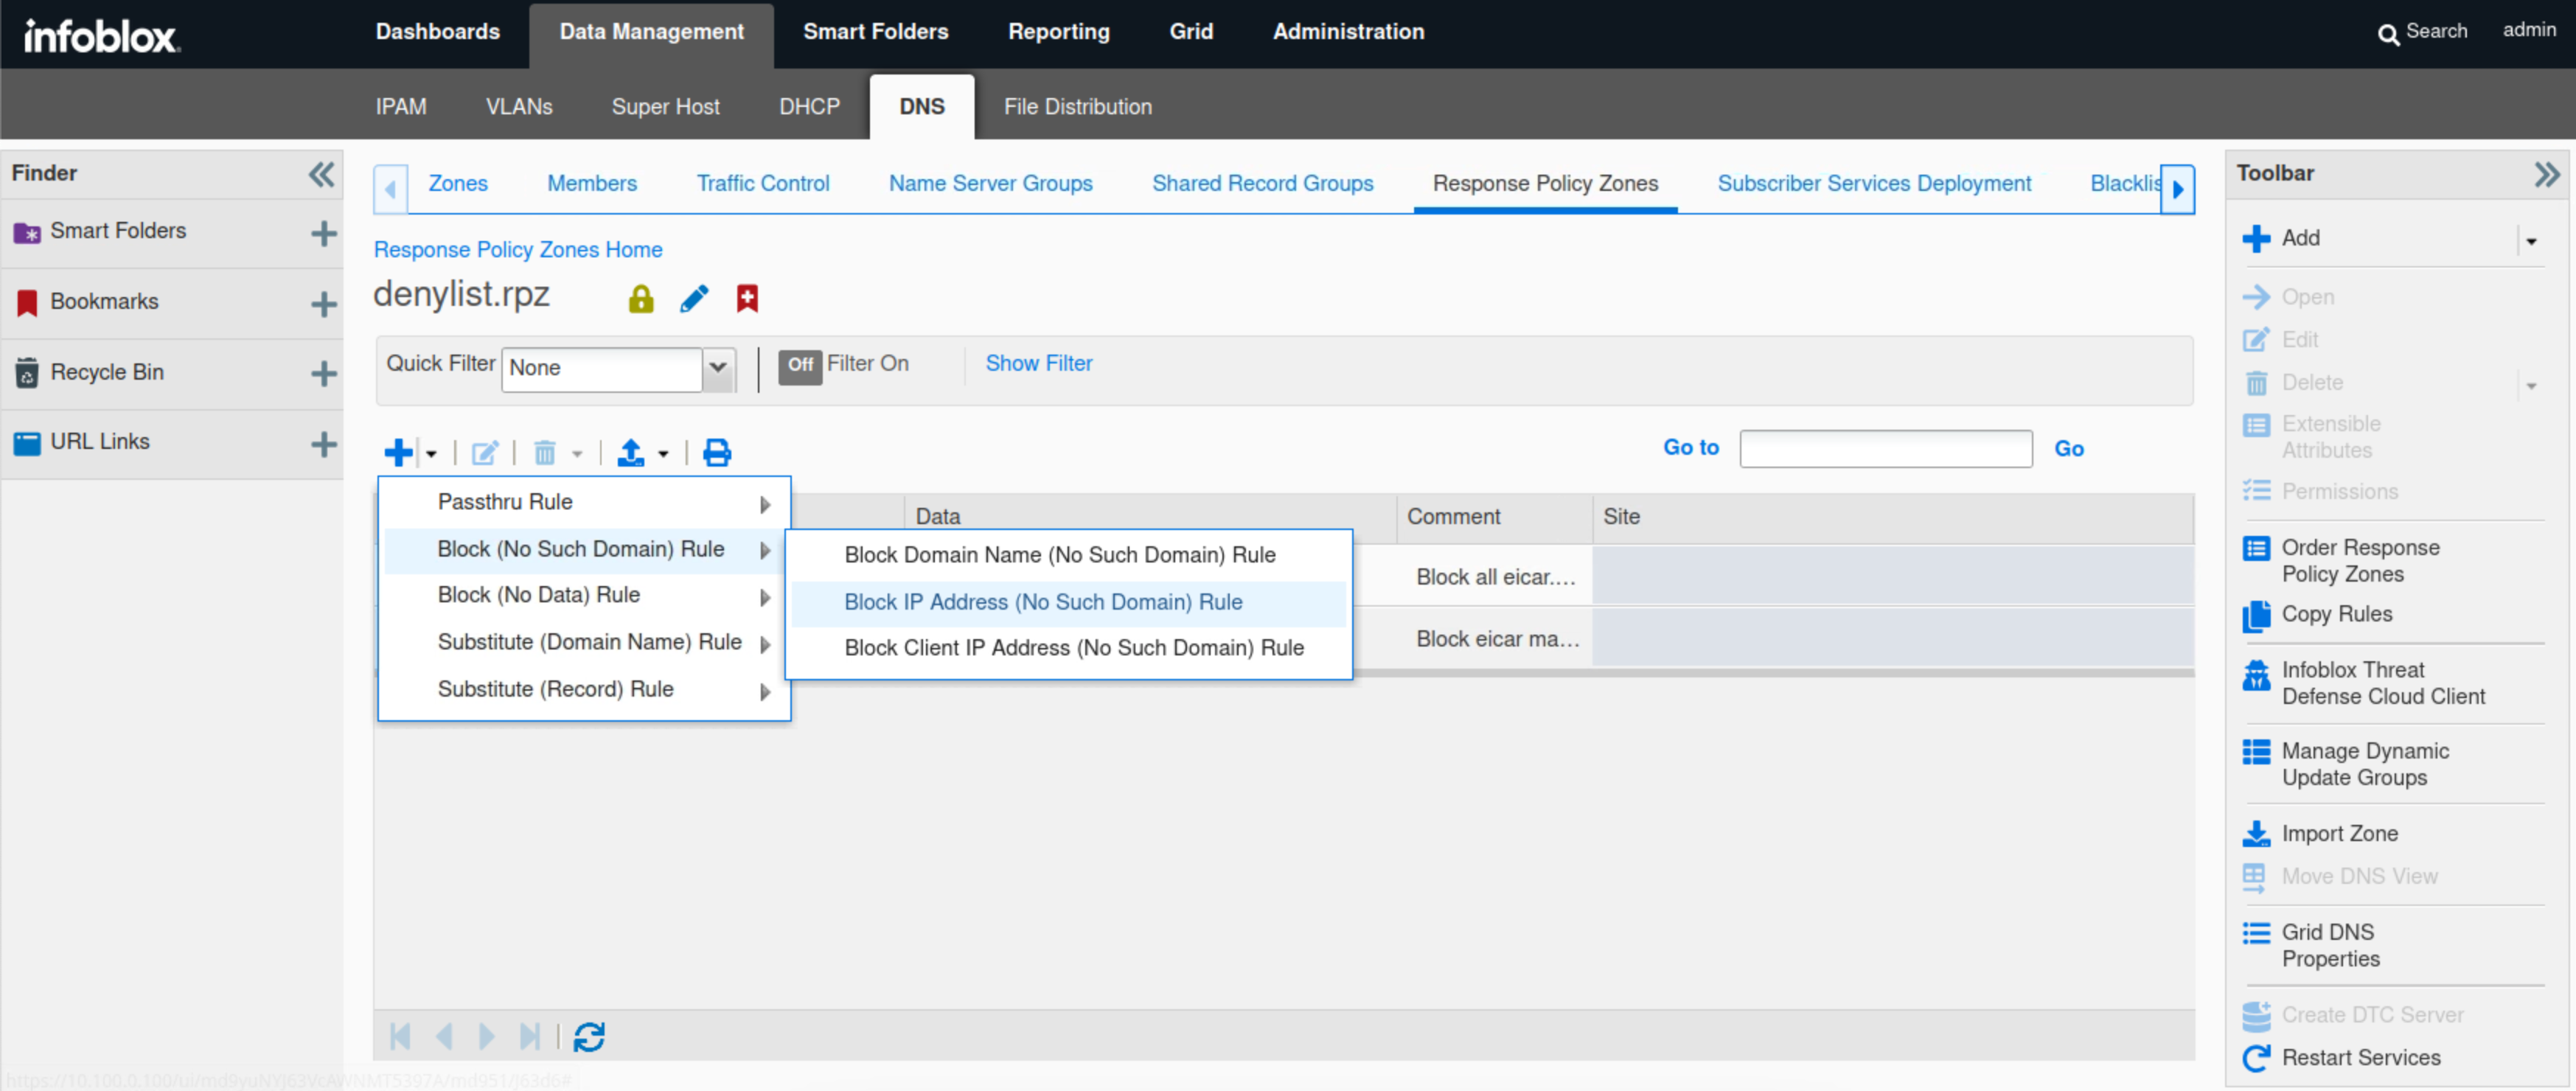
Click the arrow next to the plus (+) symbol and select Block (No Such Domain) Rule from the drop-down list.
-
Select Block IP Address (No Such Domain) Rule.
-
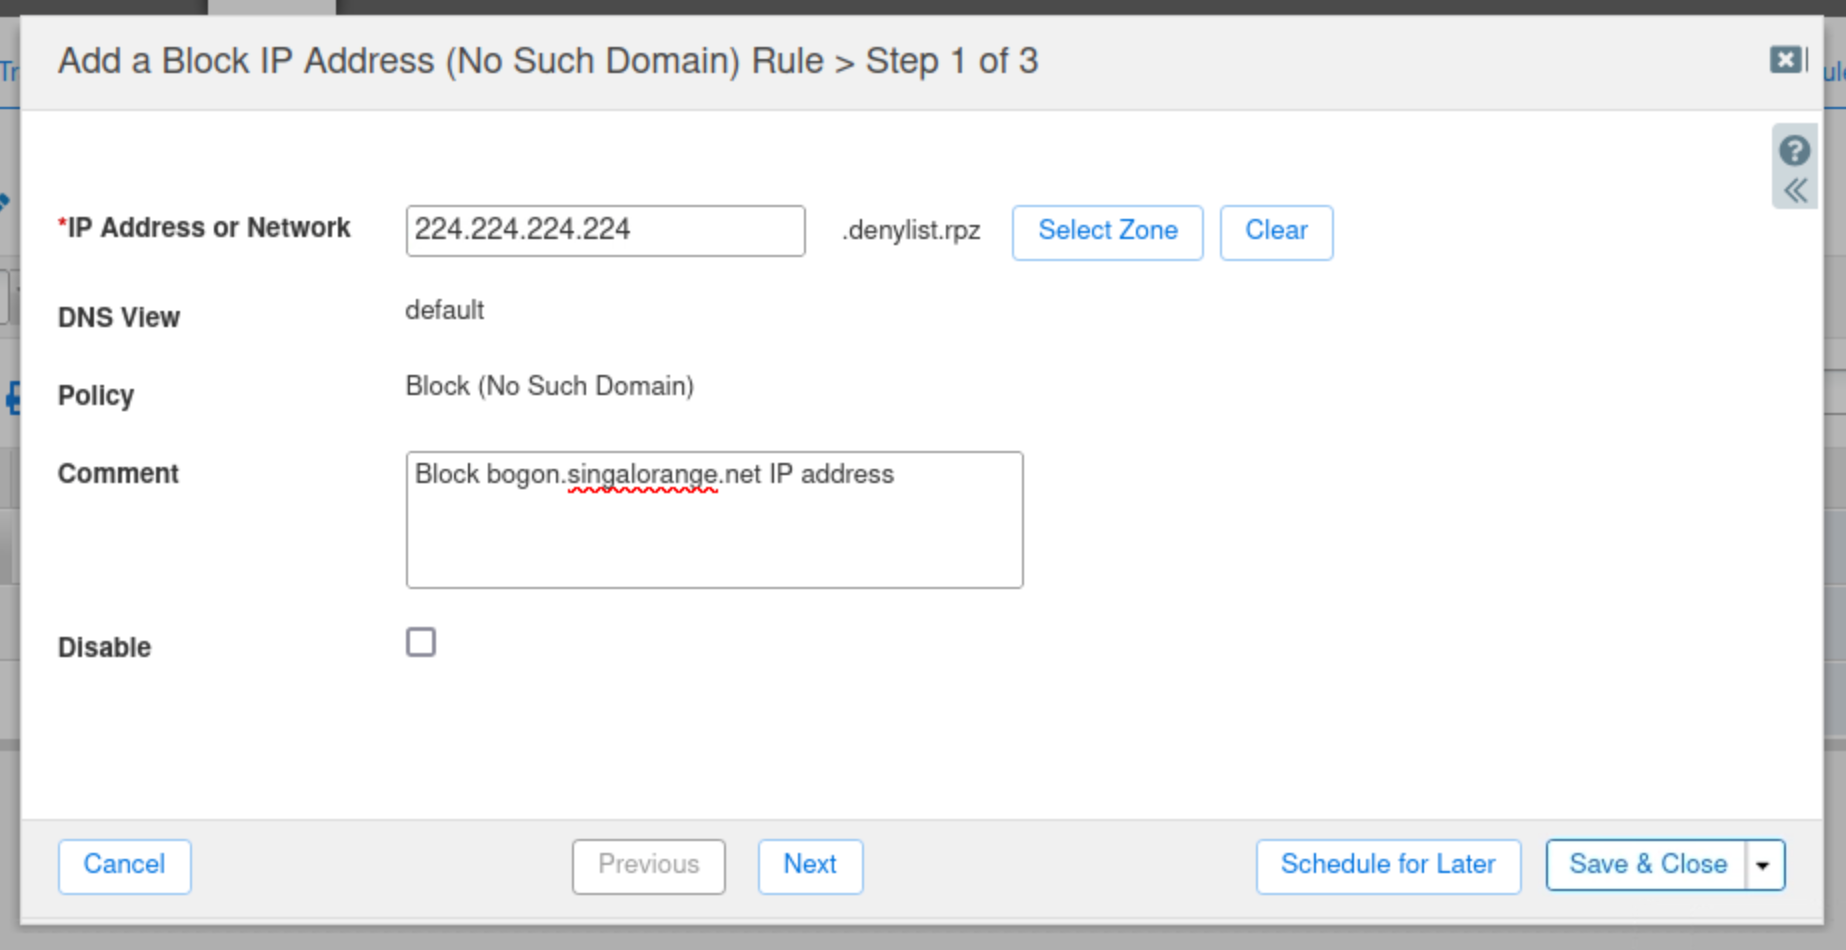
Enter 224.224.224.224 in the IP Address or Network field.
-
Type a Comment to describe the purpose of the rule.
-
Click Save & Close.
Task 12 Solution: Add Block Client IP Address Rule to denylist.rpz
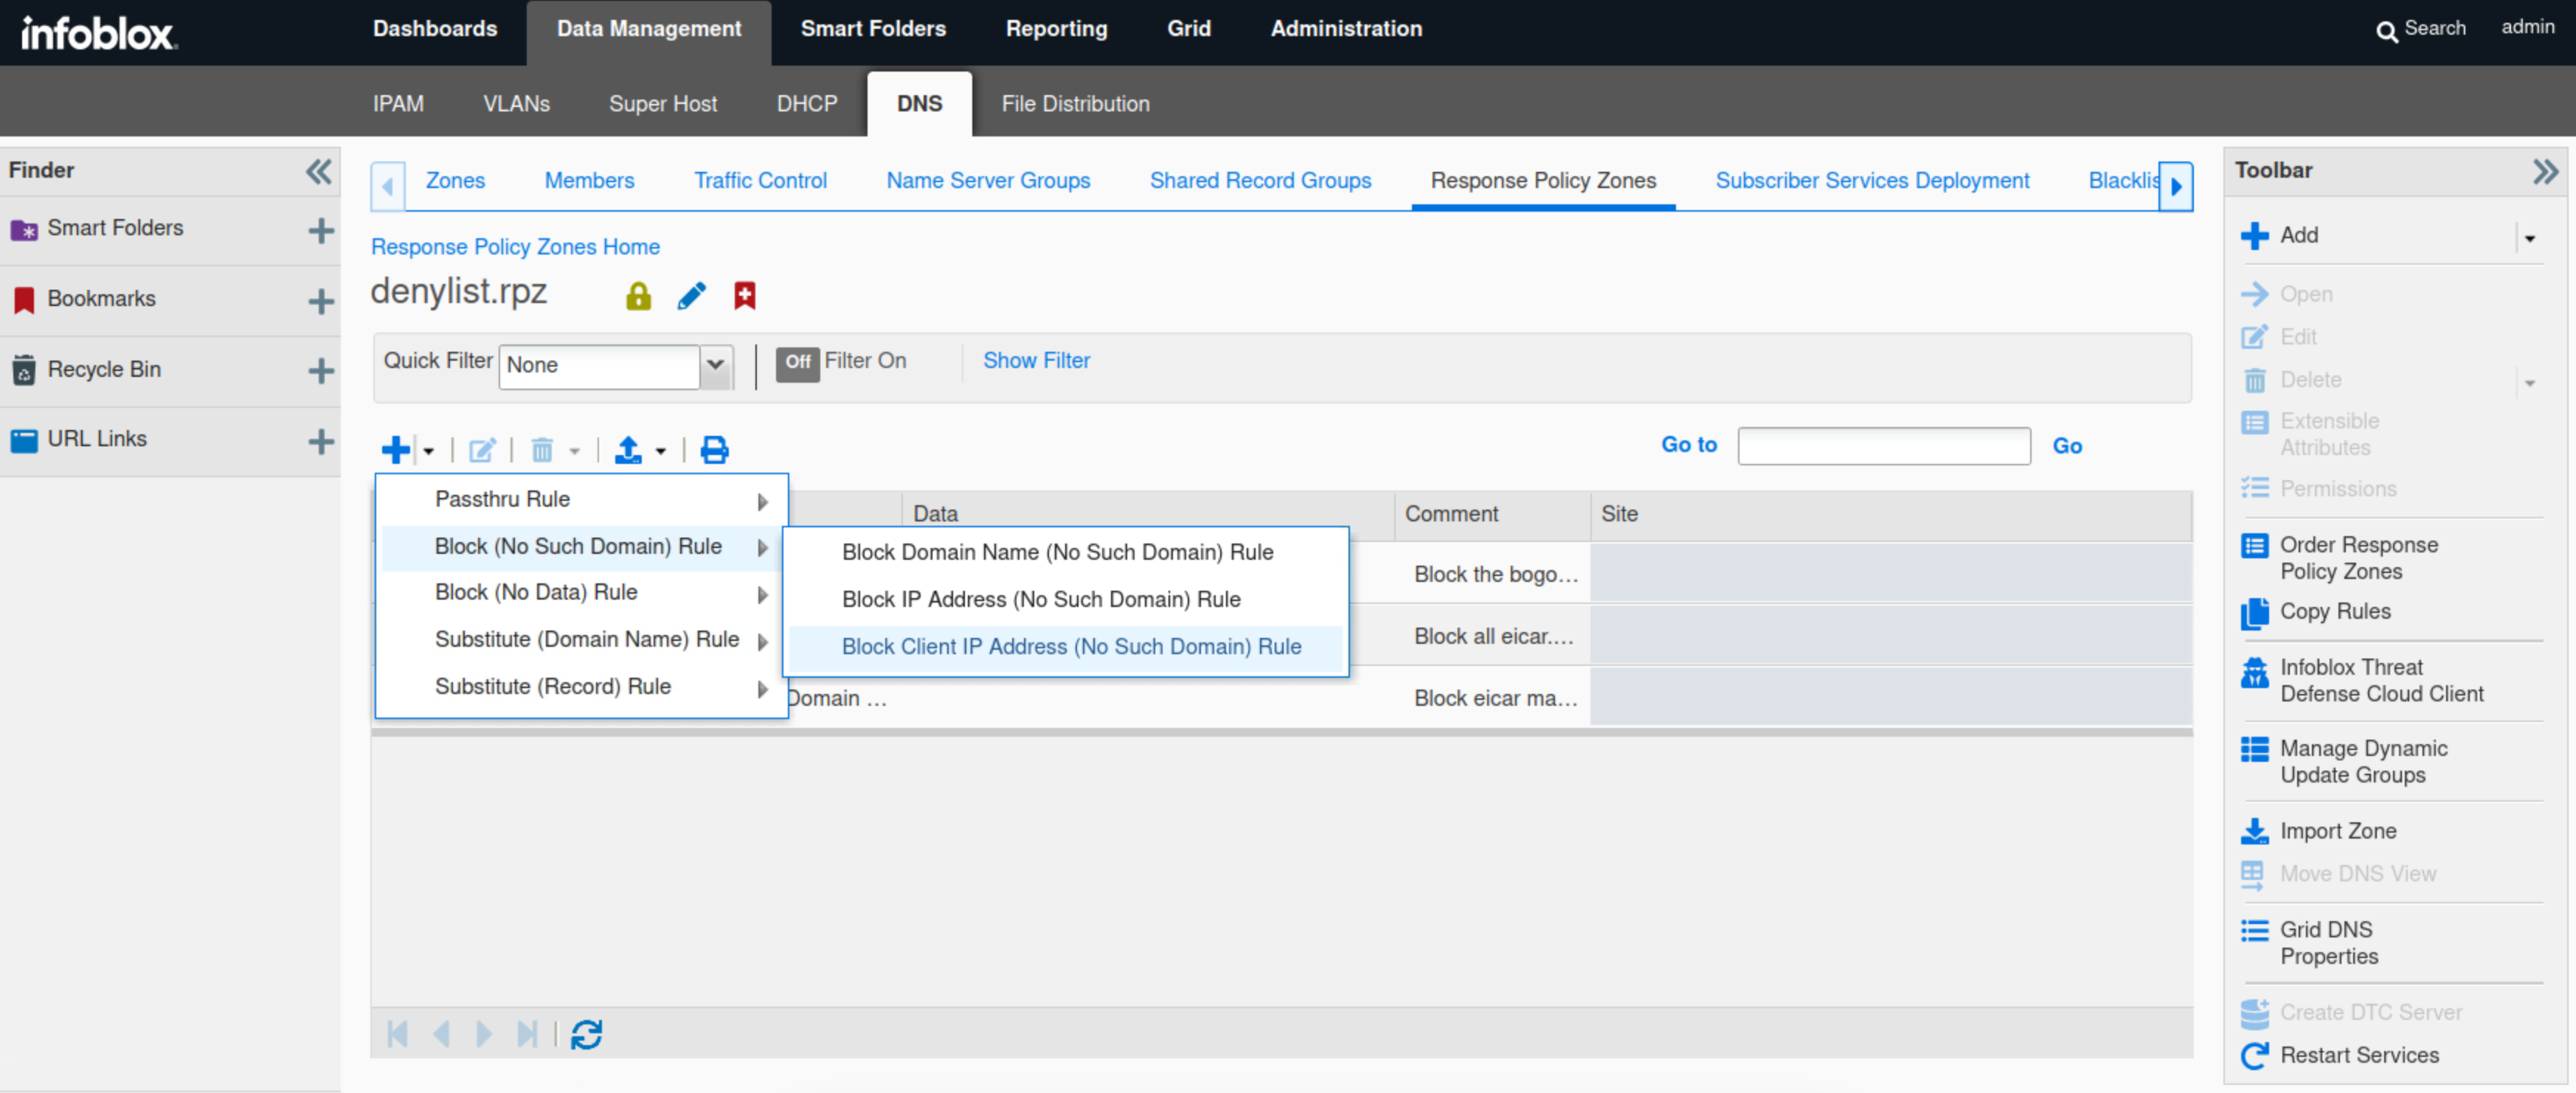
In this task, you add a rule to block DNS queries from a specific client IP address. The address used in the lab is 172.31.101.250. This is the IP address of the testing-linux machine. For this reason, the rule is left disabled until we test it.
-
Navigate to Data Management → DNS → Response Policy Zones.
-
Click the link to denylist.rpz.
-
Click the arrow next to the plus (+) symbol and select Block (No Such Domain) Rule from the drop-down list.
-
Select Block Client IP Address (No Such Domain) Rule.
-
Enter 172.31.101.250 in the Client IP Address or Network field.
-
Type a Comment to describe the purpose of the rule.
-
Check the Disable box.
-
Click Save & Close.
Task 13 Solution: Testing Pass-thru Local RPZ Rules
The newly created RPZ must be tested. In this task, we will use dig and syslog entries to validate the local RPZ configurations.
-
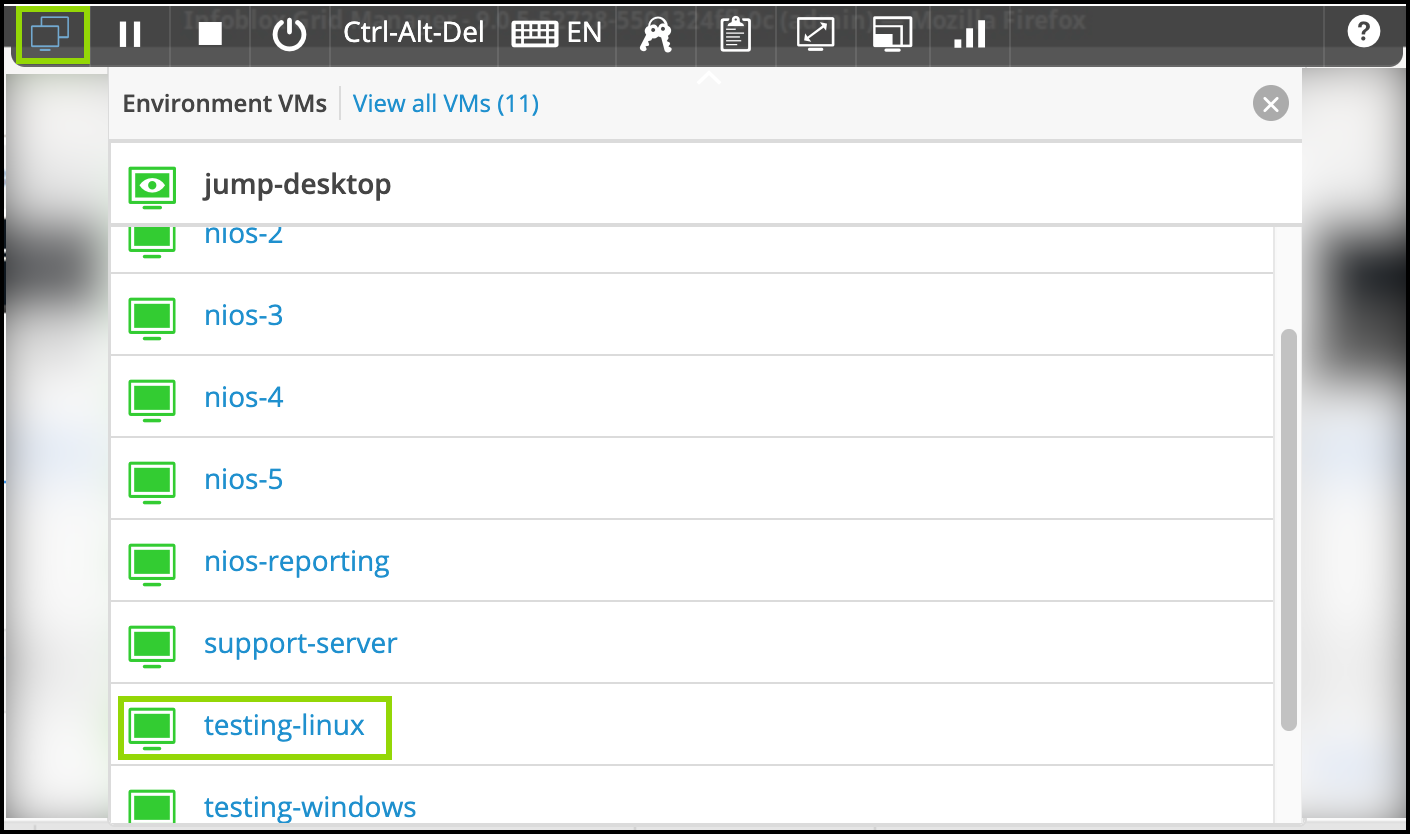
Switch over to the testing-linux machine with the credentials (training/infoblox) and set the machine up for testing.
-
open a terminal window and issue the command
sudo set-network-static-niosand verify that the machine now has the IP address 172.31.101.250 using the commandifconfig.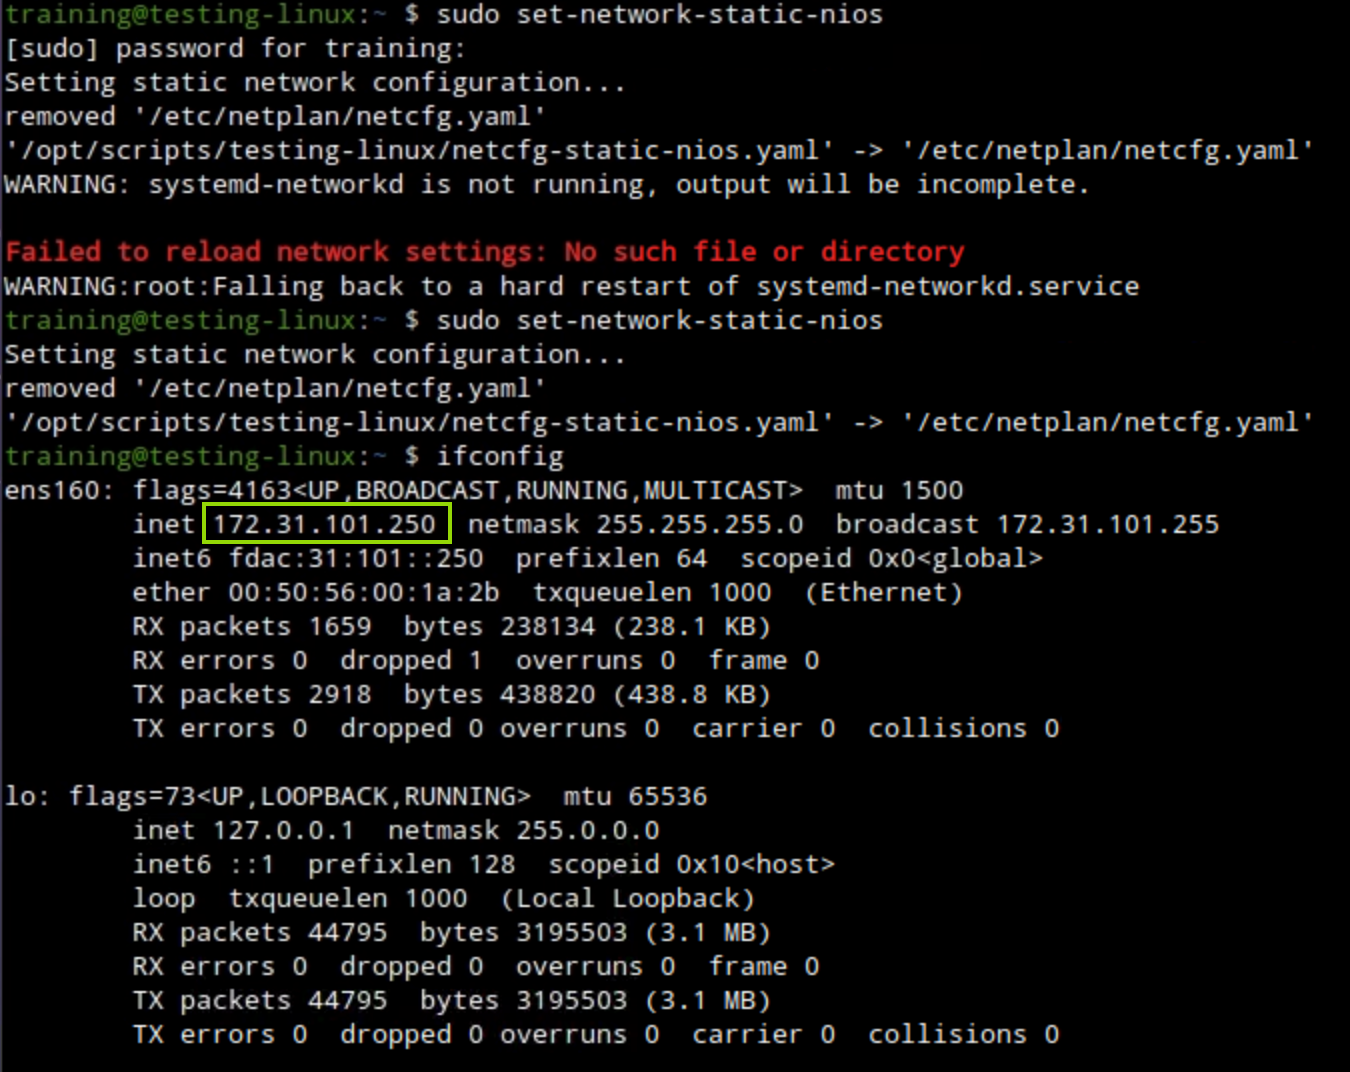
-
-
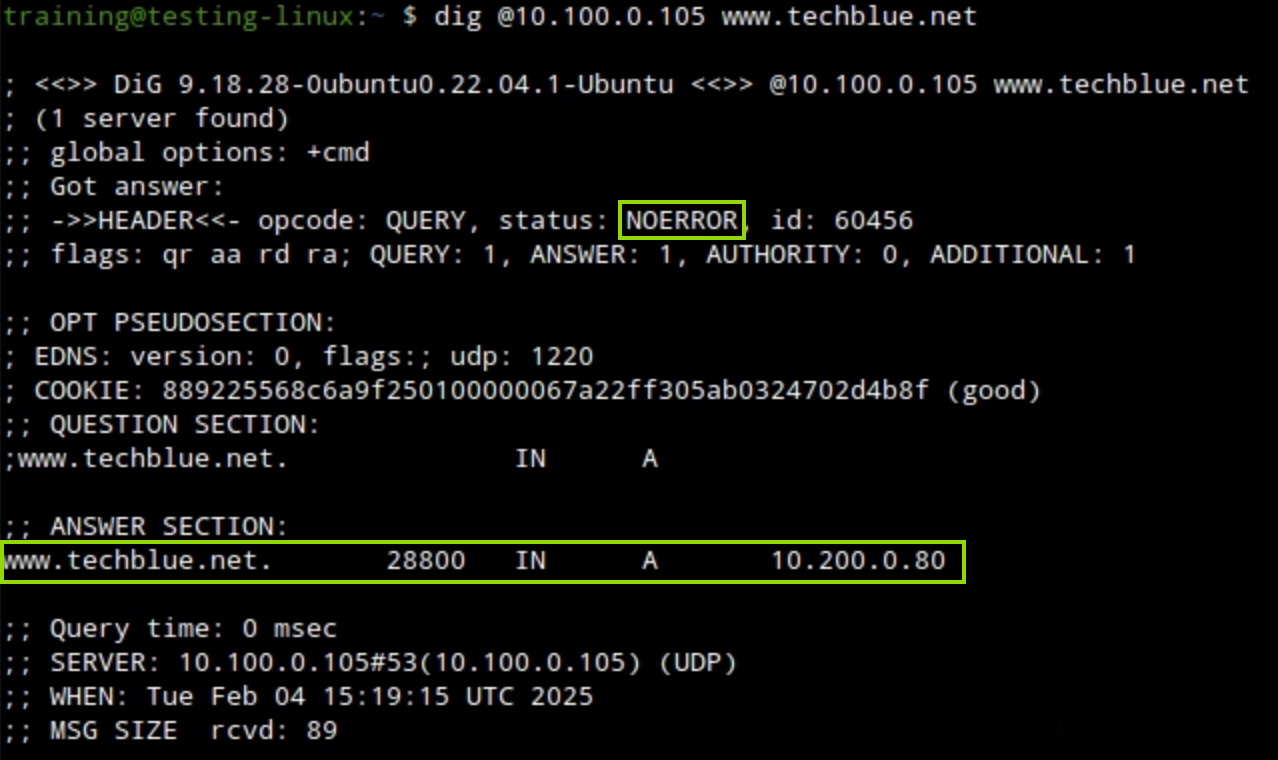
Open a terminal window on testing-linux. Use the dig command
dig @10.100.0.105 www.techblue.netto perform a DNS query for www.techblue.net.-
10.100.0.105 is the IP address of ibns1.techblue.net an HA pair grid member.
-
The results show that the query has been answered. The IP Address of www.techblue.net is 10.200.0.80.
-
-
Switch back the the jump-desktop machine.
-
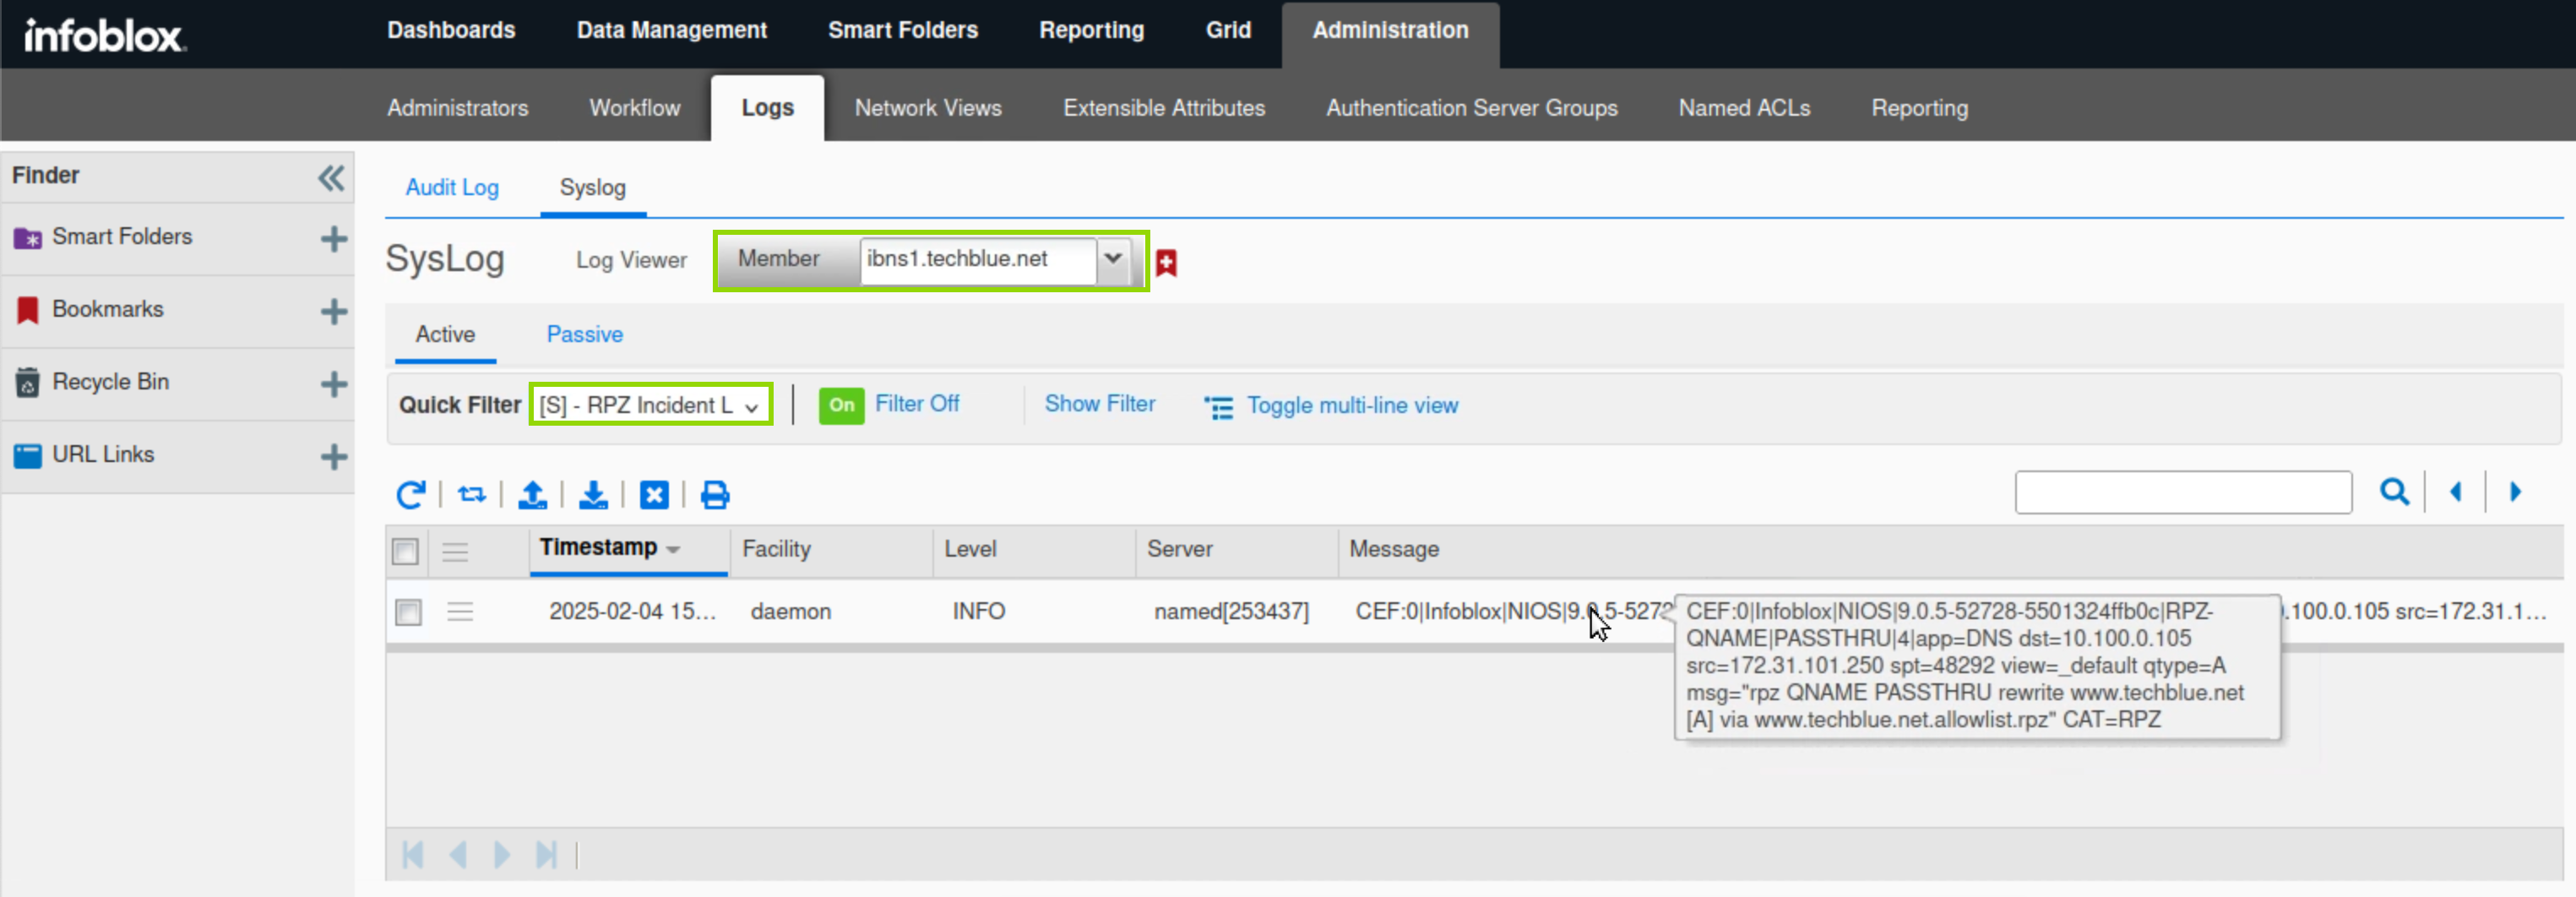
Navigate to Administration → Logs → Syslog.
-
Select the Member ibns1.techblue.net from the drop-down list.
-
Choose RPZ Incidents from the Quick Filter drop-down list.
-
The DNS Query for www.techblue.net is listed in the messages section, in CEF format.
-
The query has matched a PASSTHRU rule in allowlist.rpz.
-
Task 14 Solution: Test Substitute Local RPZ Rules
In this task, we will use dig and syslog entries to validate that the malicious domain is being substituted.
-
Switch over to the testing-linux machine and open a terminal window.
-
Use the dig command
dig @10.100.0.105 eicar.net. The DNS server returns the address record. The name substitution with a CNAME record is visible in the results.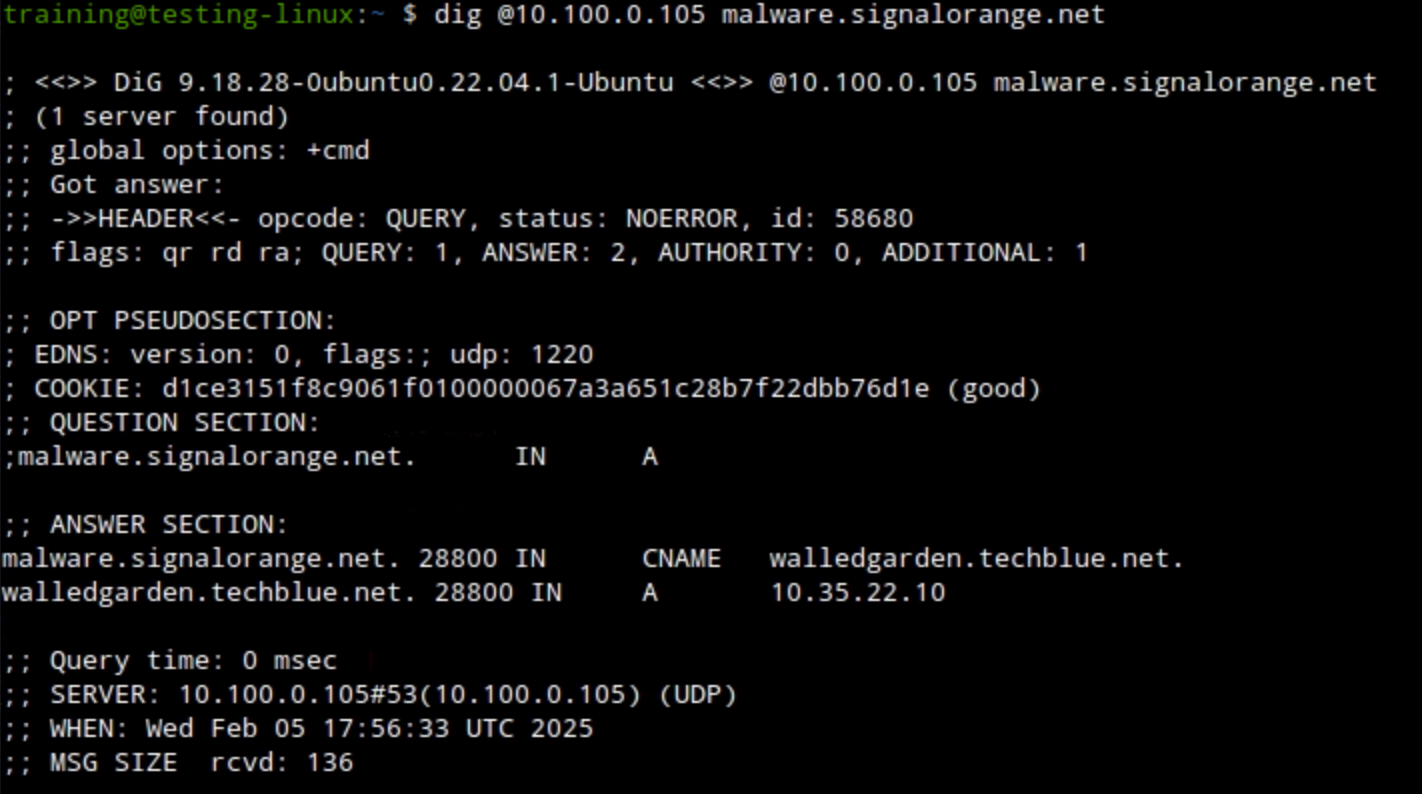
-
Switch back to jump-desktop.
-
Under Administration → Logs → Syslog.
-
Select Member ibns1.techblue.net from the drop-down list.
-
Choose RPZ Incidents from the Quick Filter drop-down list.
-
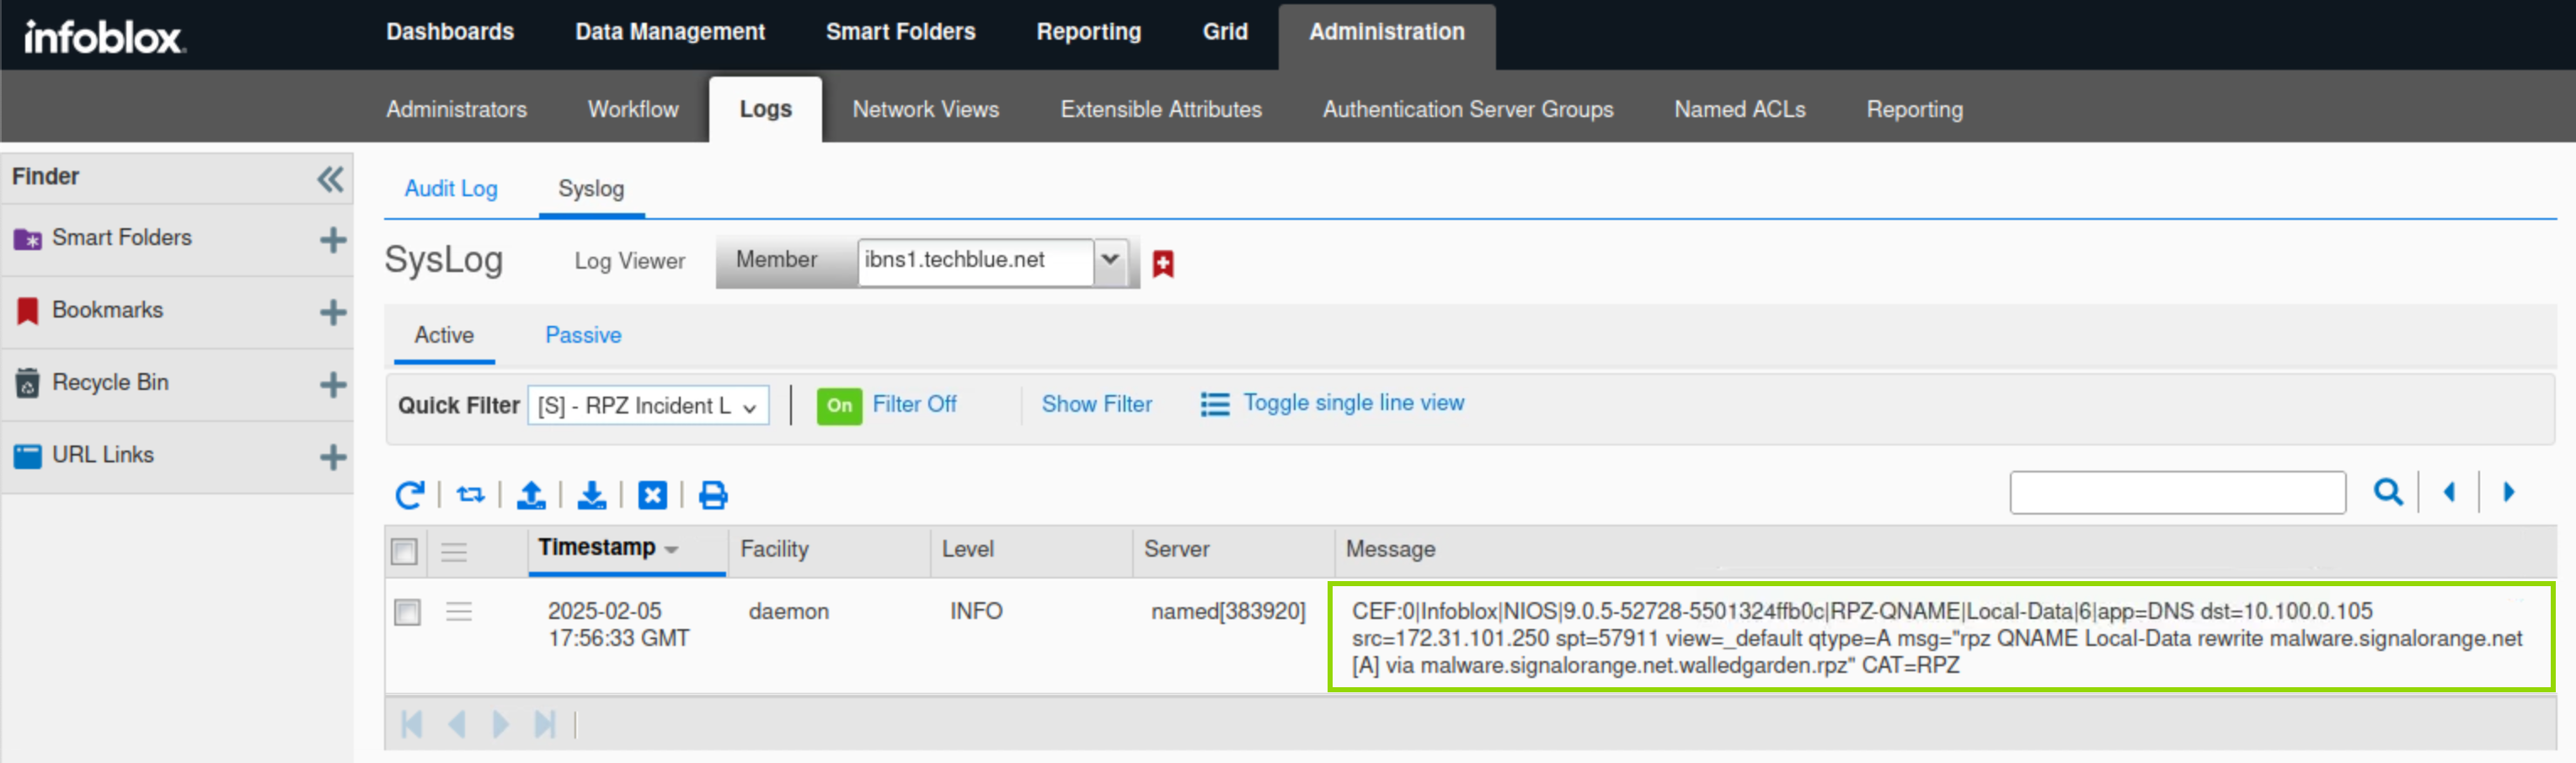
Click the Toggle Multi line view link.
-
The DNS Query for malware.signalorange.net is listed in the messages section, in CEF format.
-
The name malware.signalorange.net is re-written to malware.signalorange.net.walledgarden.rpz.
-
The query has matched a Substitute Domain Name rule in walledgarden.rpz.
-
Task 15 Solution: Test denylist.rpz Local RPZ Rules
In this task, we will use dig and syslog entries to validate the local RPZ configurations for eicar.host and the IP address 151.101.38.253, however, we will not be able to test the rule matching traffic coming from the testing-linux machine yet as it is disabled.
-
Switch over to the testing-linux machine and open a terminal window.
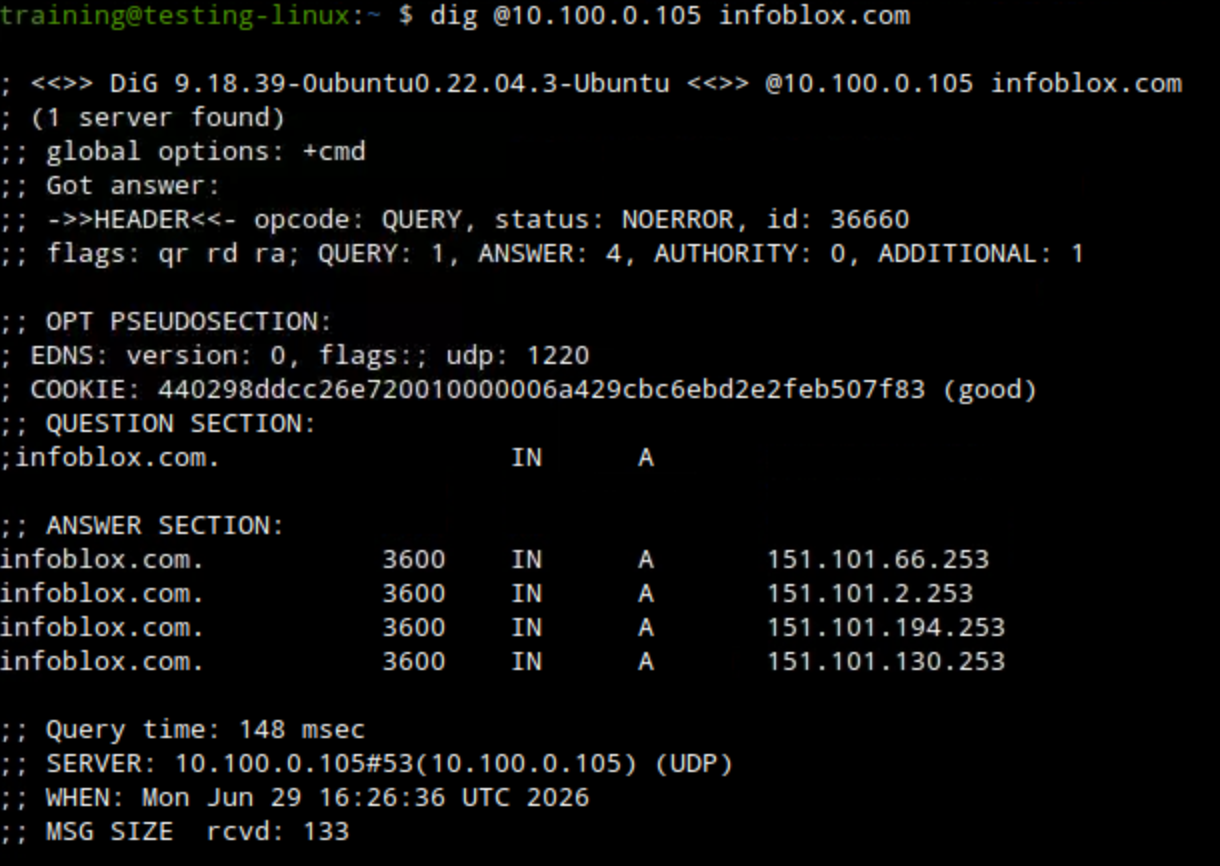
-
Use the dig command dig @10.100.0.105 infoblox.com.
-
The DNS server returns the address record. The DNS query and response have been allowed to pass through.
-
-
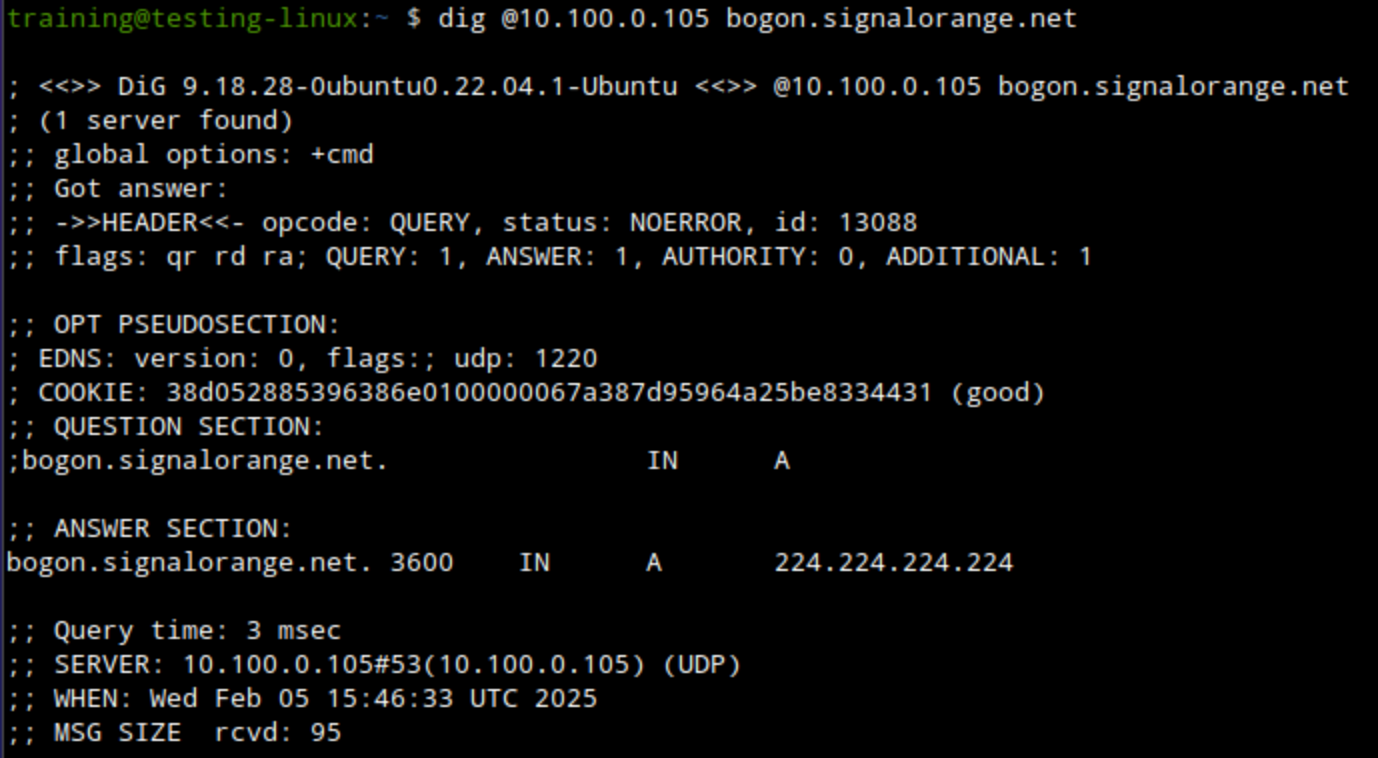
Use the dig command dig @10.100.0.105 bogon.singalorange.net to perform a DNS query for the bogon domain.
-
The DNS server returns the address record. The DNS query and response have been allowed to pass through.
-
-
Switch back the the jump-desktop machine.
-
Navigate to Administration → Logs → Syslog.
-
Select the Member ibns1.techblue.net from the drop-down list.
-
Choose RPZ Incidents from the Quick Filter drop-down list.
-
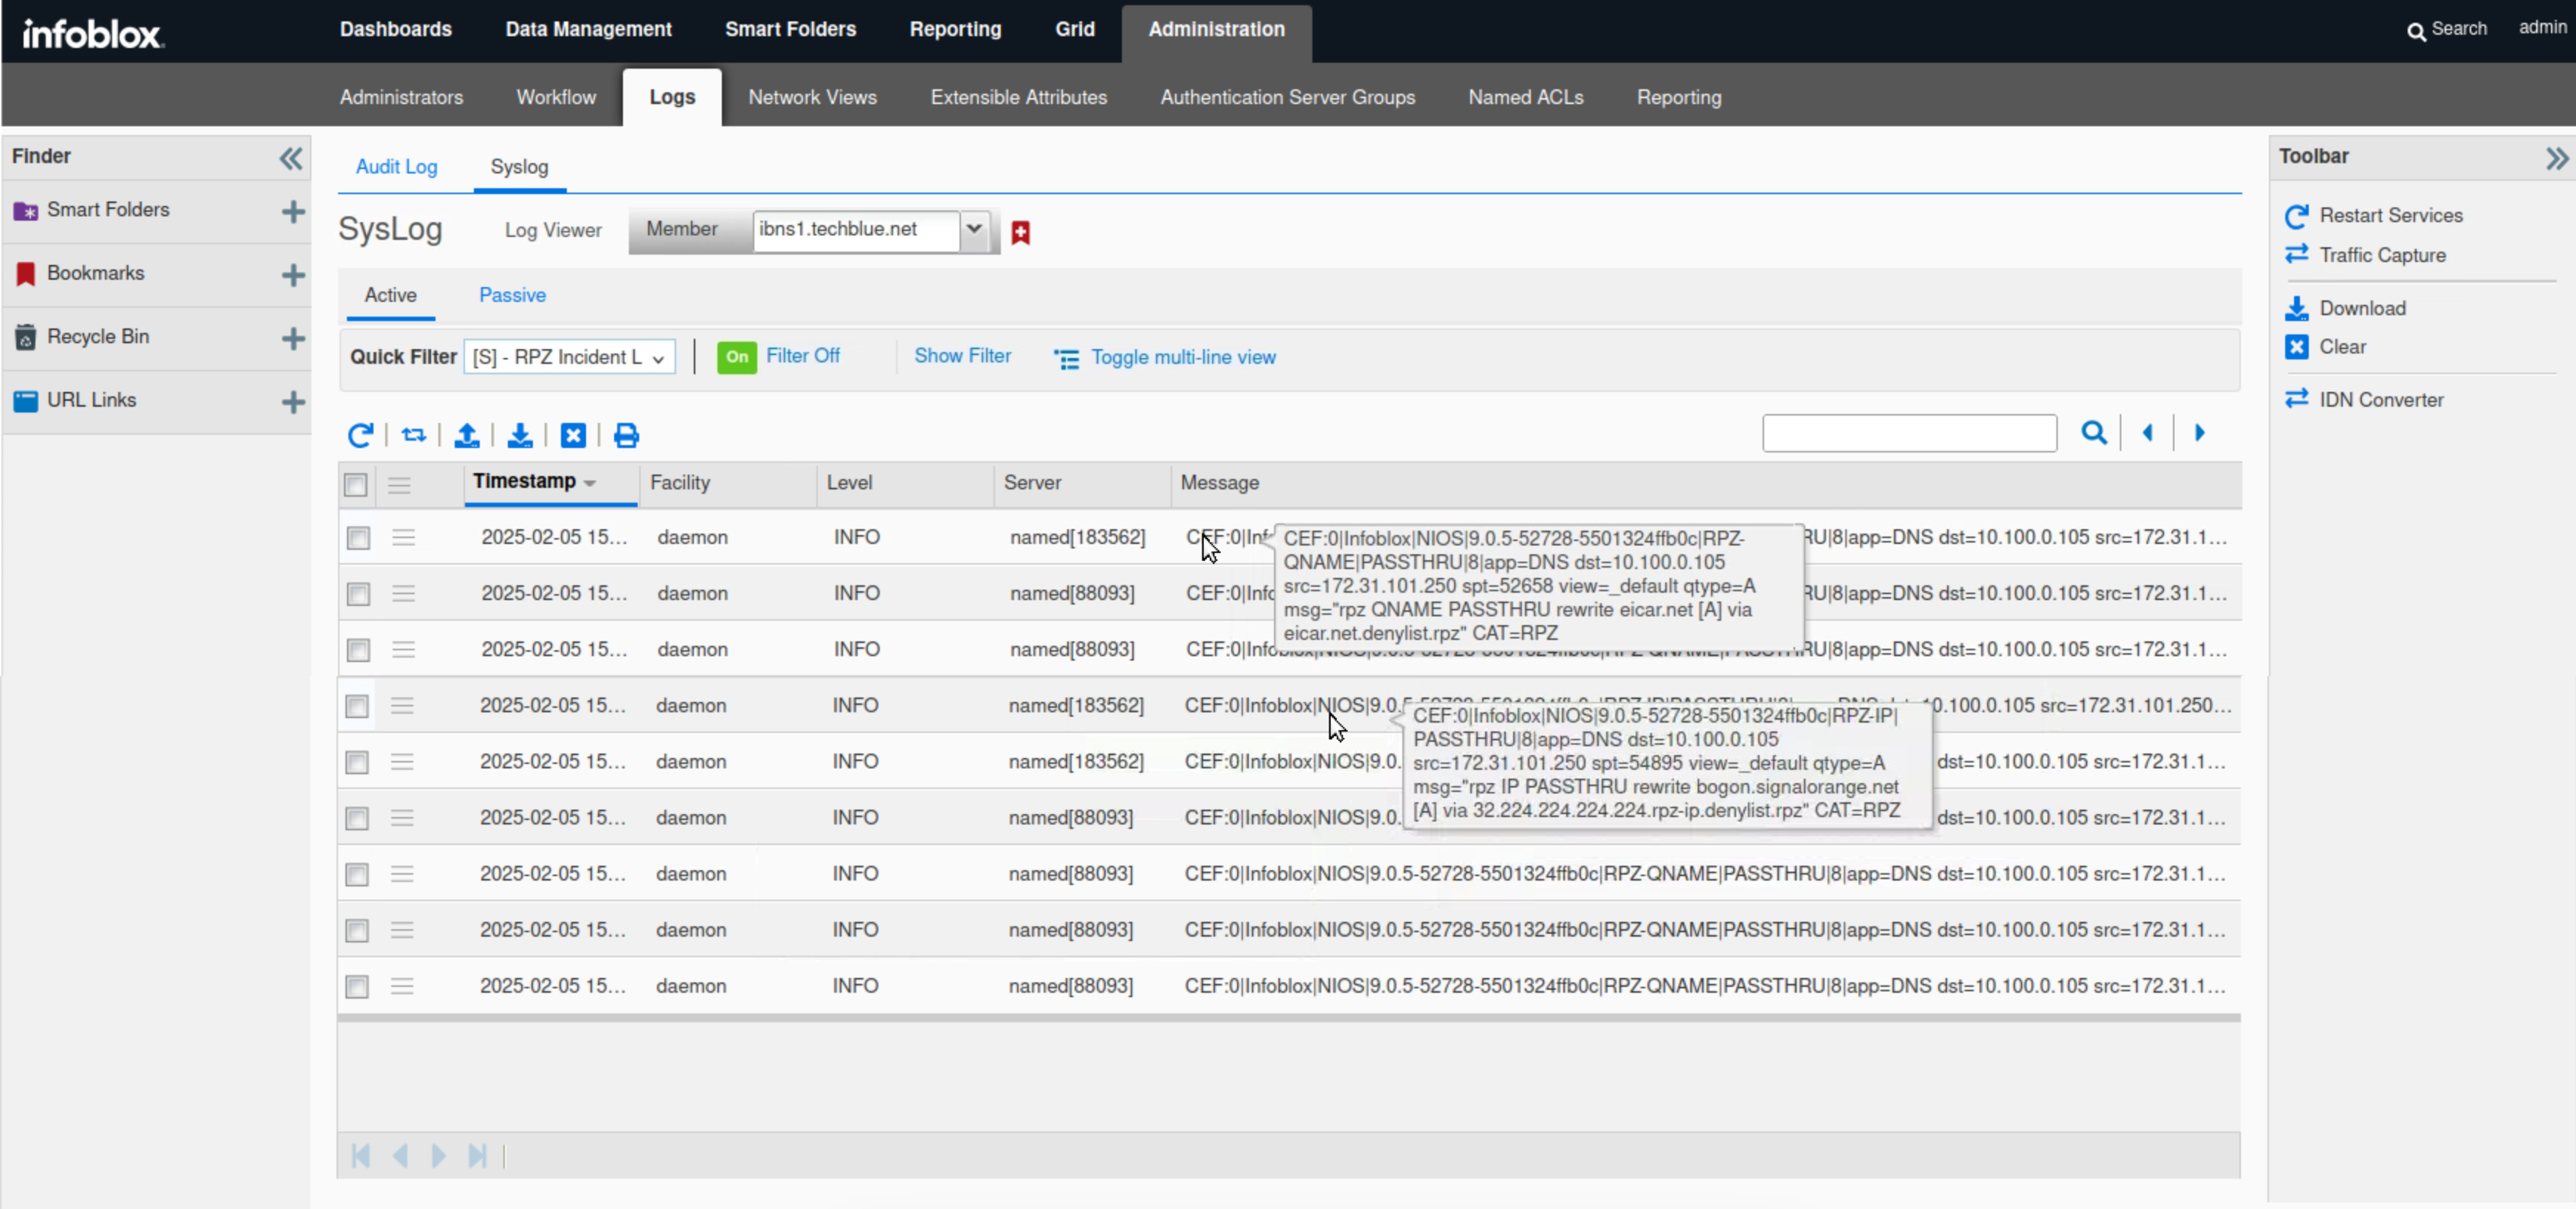
The DNS Query for infoblox.com and 224.224.224.224 are listed in the messages section, in CEF format.
-
The queries has matched a PASSTHRU rule in denylist.rpz.
-
We are confident that the denylist.rpz policy is matching the DNS requests/responses we want it to, now it is tiime to switch the RPZ over to block traffic.
-
Task 16 Solution: Modify denylist.rpz to Block traffic
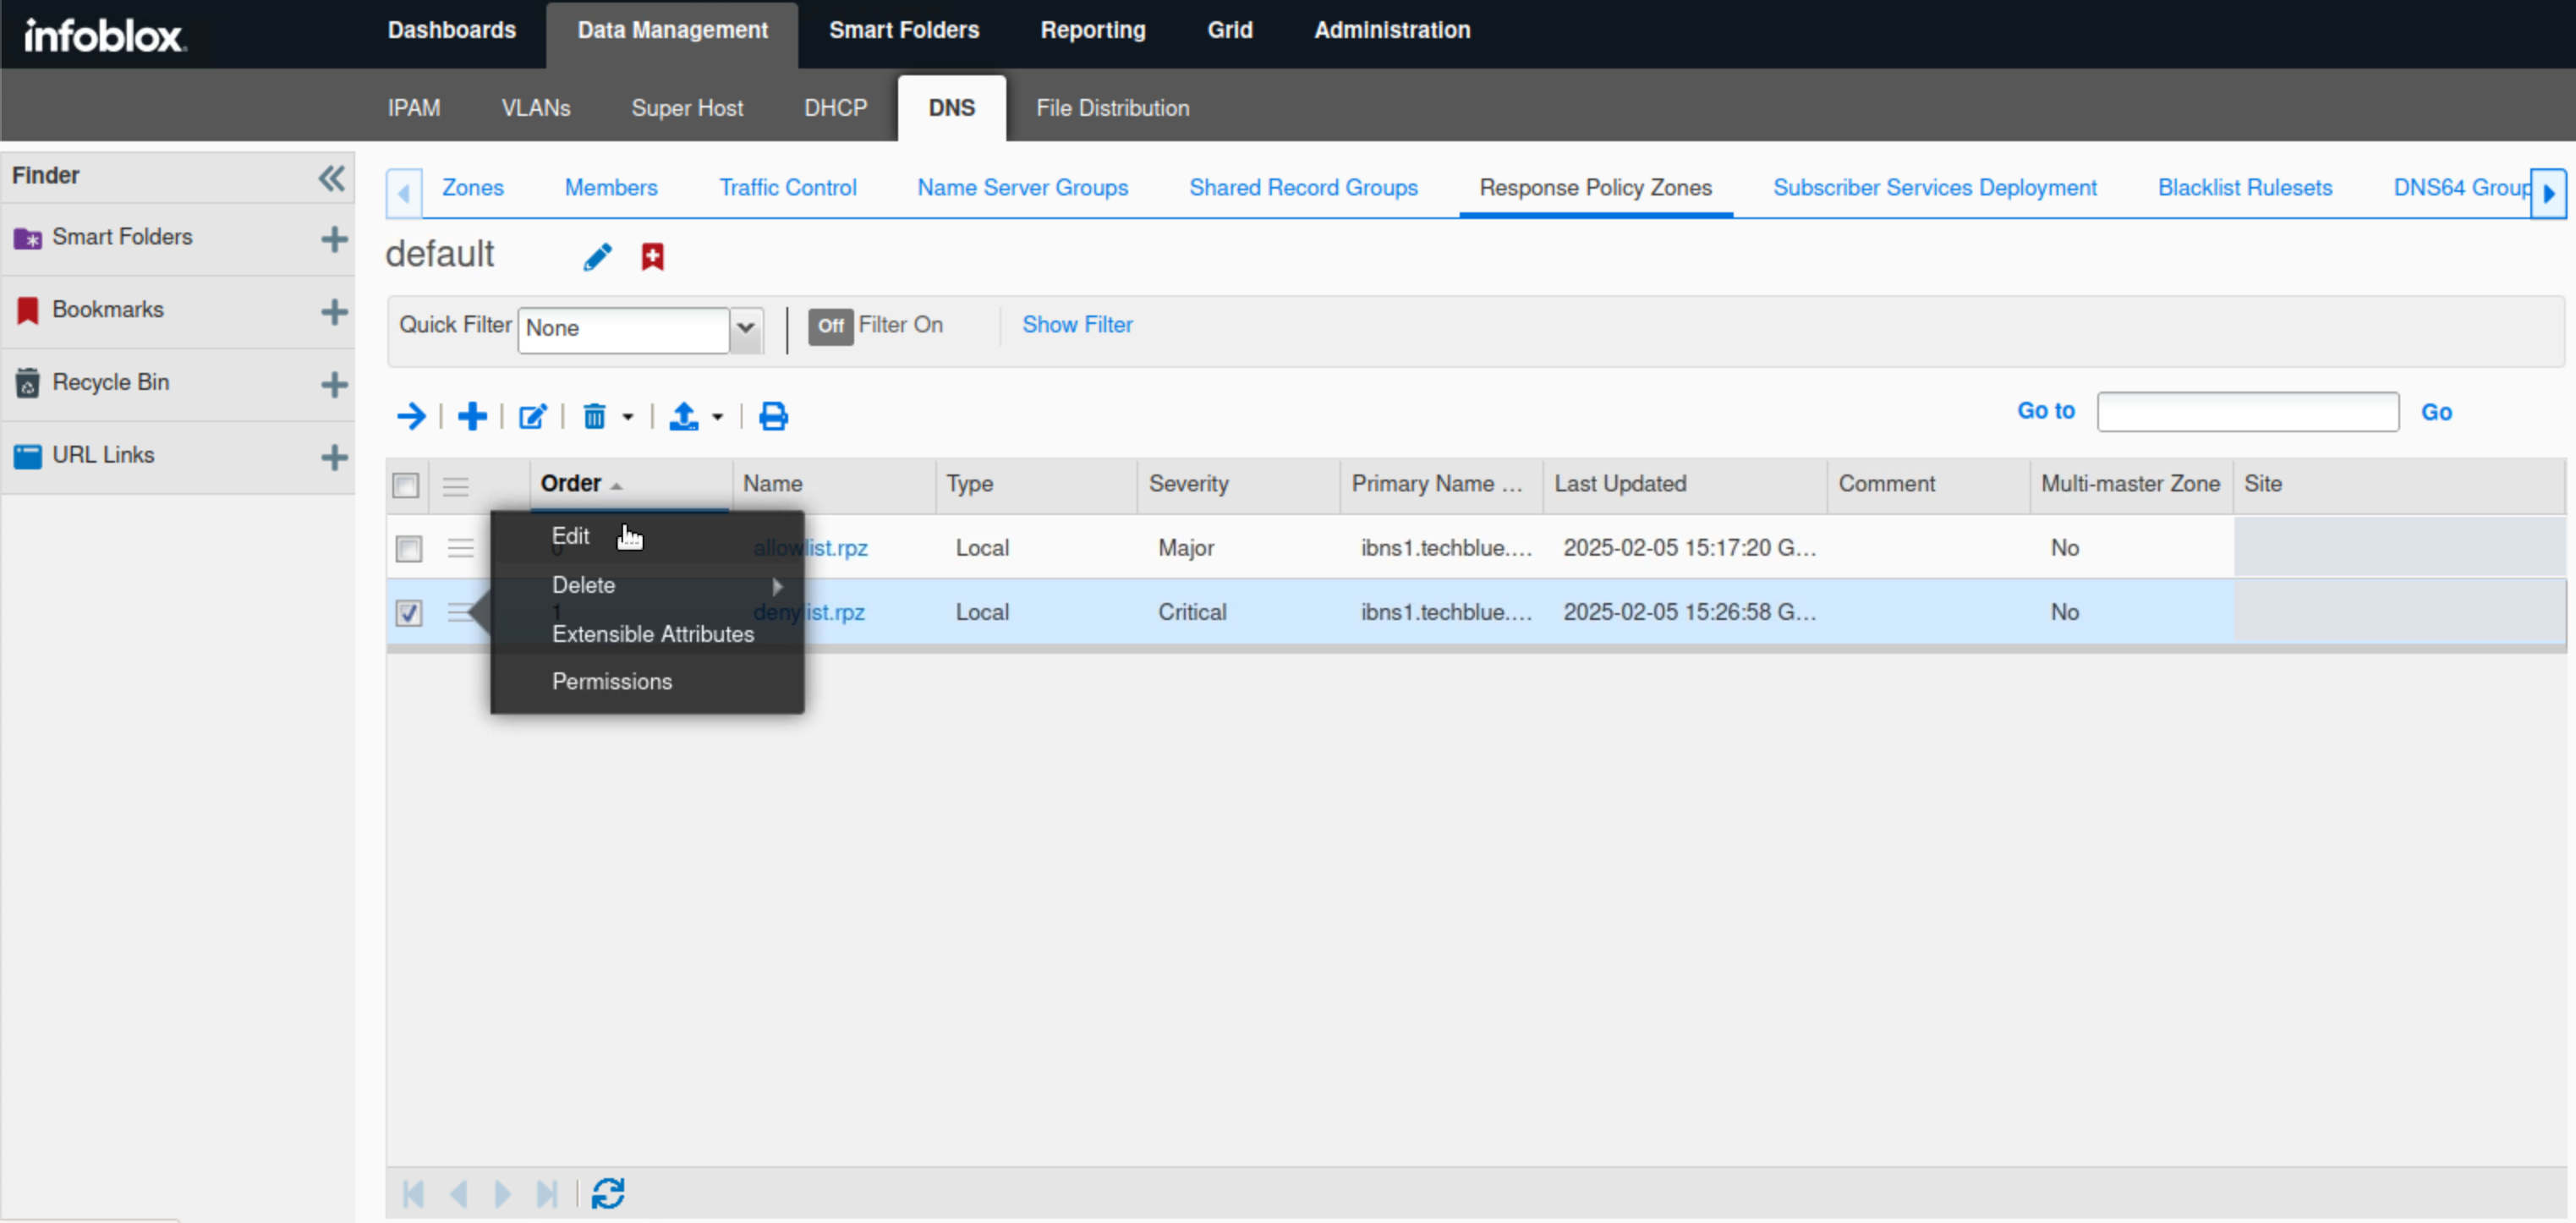
In the previous task, we verified that the denylist.rpz is matching the traffic we plan to block. In this task, we change the Policy Override value for denylist.rpz to Block (No Such Domain) to be able to finally stop the unwanted traffic.
-
Navigate to Data Management → DNS → Response Policy Zones.
-
Click the hamburger icon to edit denylist.rpz.
-
Select Block (No Such Domain) from the drop-down list for Policy Override.
-
Click Save & Close.
-
Restart the services when prompted.
Task 17 Solution: Verify denylist.rpz is Blocking traffic
In this task, we verify that queries to infoblox.com, training.infoblox.com and the IP address 151.101.38.253 and queries from 172.31.101.250 are blocked, we need to enable the source IP based rule before testing it.
-
Switch over to the testing-linux machine and open a terminal window.
-
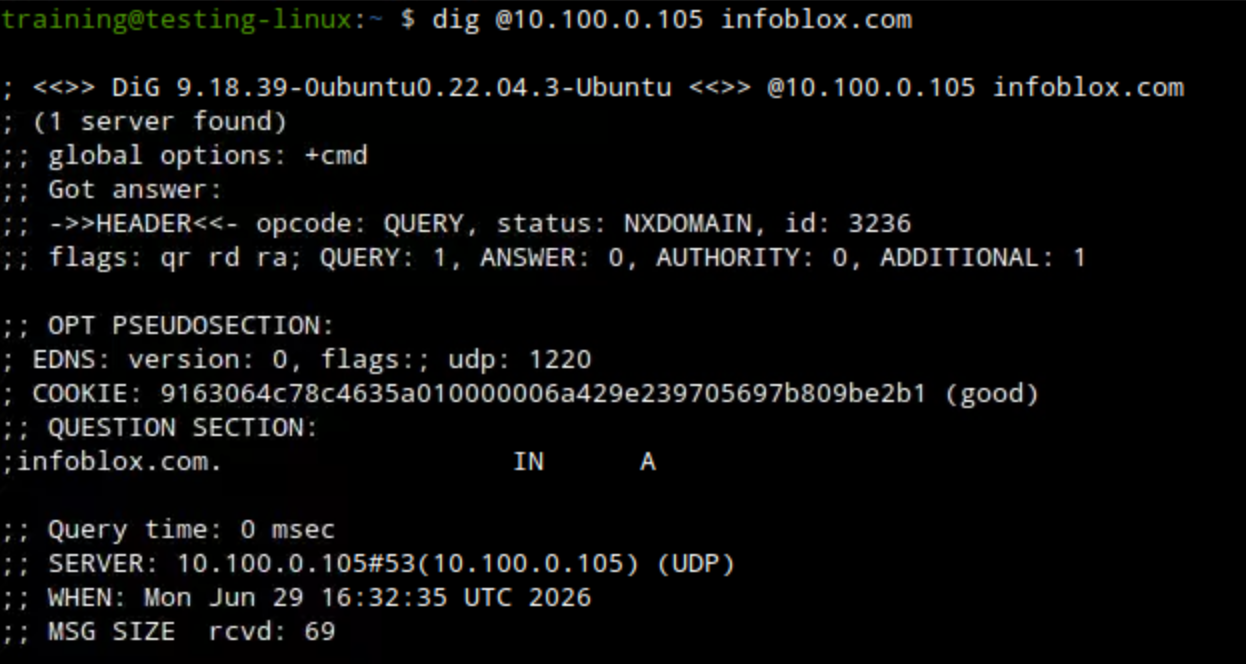
Use the dig command dig @10.100.0.105 infoblox.com. The DNS server should return an NXDOMAIN response.
-
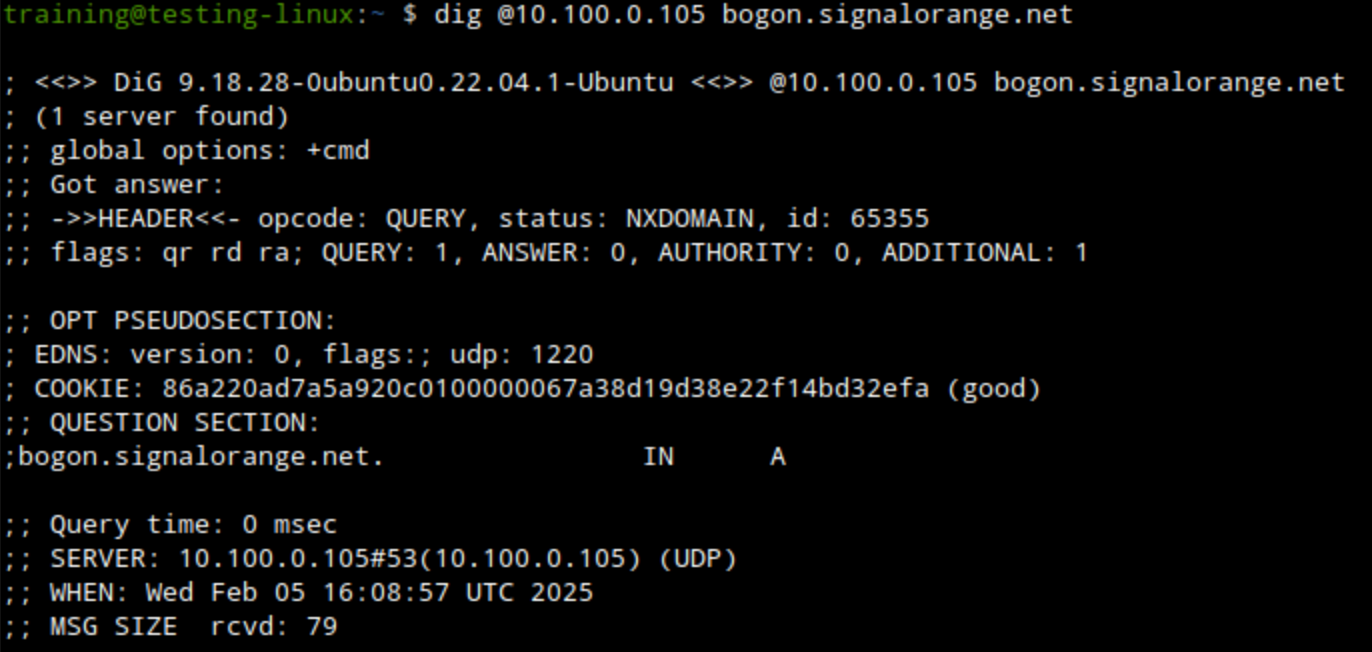
Use the dig command dig @10.100.0.105 bogon.singalorange.net to perform a DNS query for the bogon domain. The DNS server should return an NXDOMAIN response.
-
Navigate back the the jump-desktop machine.
-
Navigate to Data Management → DNS → Response Policy Zones.
-
Click the link to denylist.rpz.
-
Click the check box for the 172.31.101.250 rule.
-
Click the hamburger icon or the edit icon to edit the rule.
-
Remove the check from the Disable box.
-
Click Save & Close.
-
Navigate back the the testing-linux machine.
-
Open a terminal window.
-
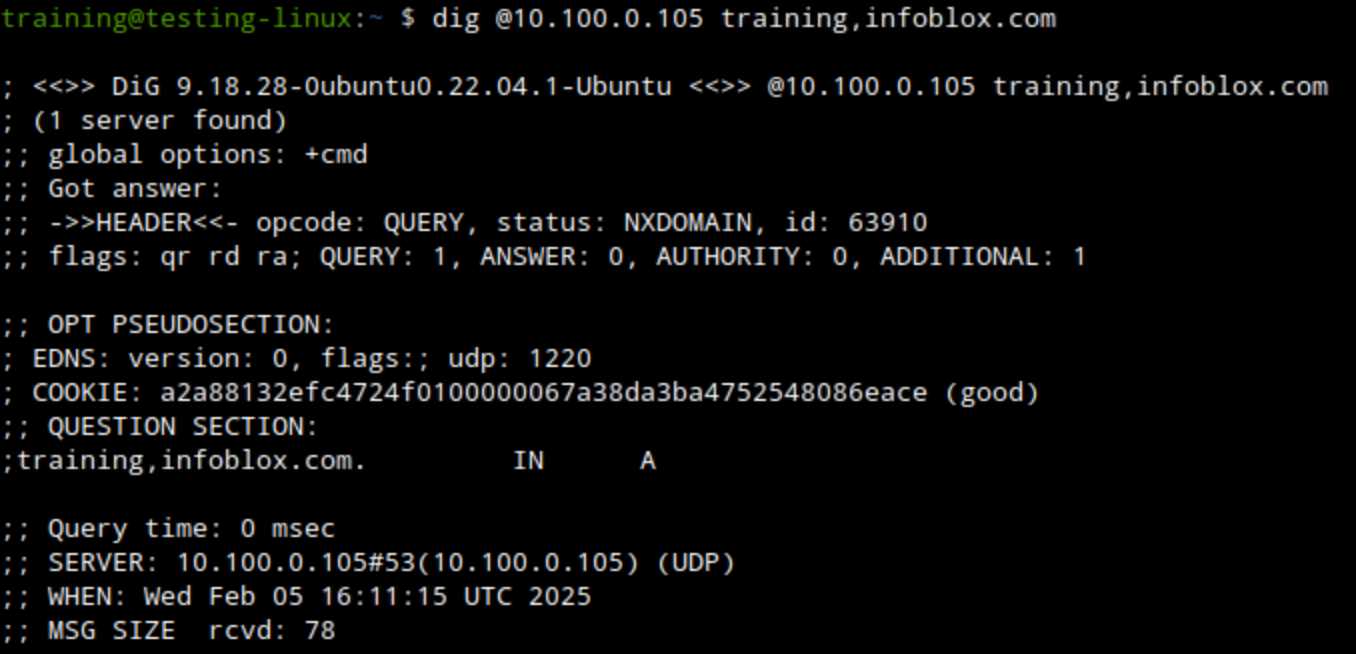
Use the dig command dig @10.100.0.105 training.infoblox.com. The DNS server should return an NXDOMAIN response because the request is coming from testing-linux.
-
Switch back the the jump-desktop machine.
-
Navigate to Administration → Logs → Syslog.
-
Select the Member ibns1.techblue.net from the drop-down list.
-
Choose RPZ Incidents from the Quick Filter drop-down list.
-
Click Toggle Multi line view link.
-
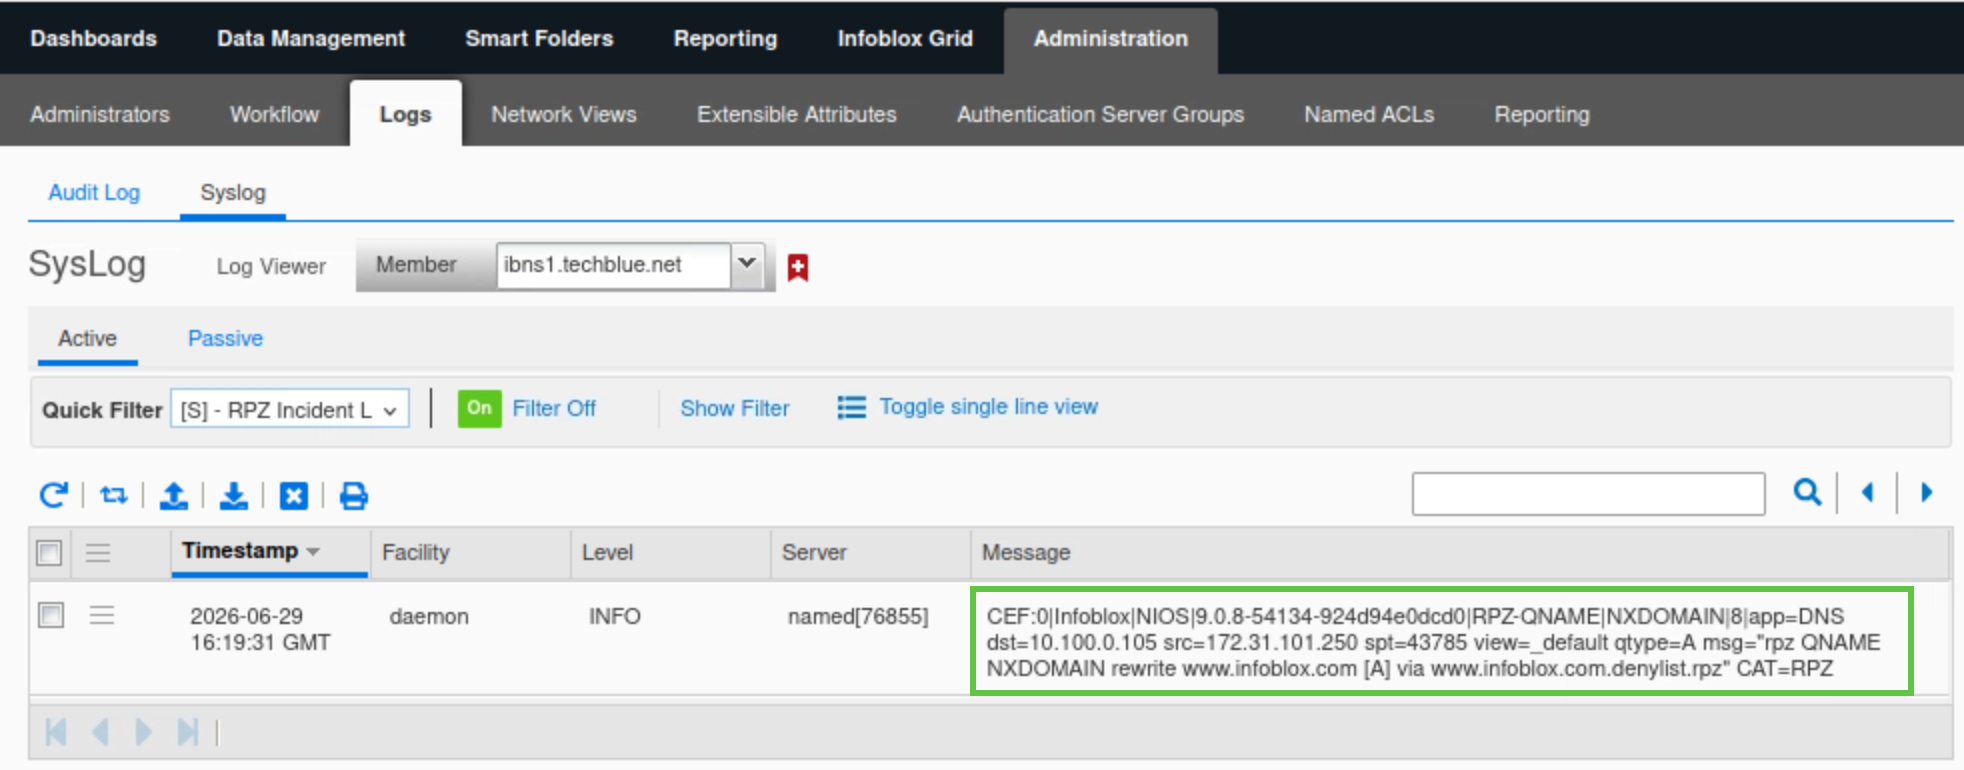
The DNS Query for infoblox.com is listed in the messages section, in CEF format. The query has matched a Block No Such Domain rule in denylist.rpz.
-
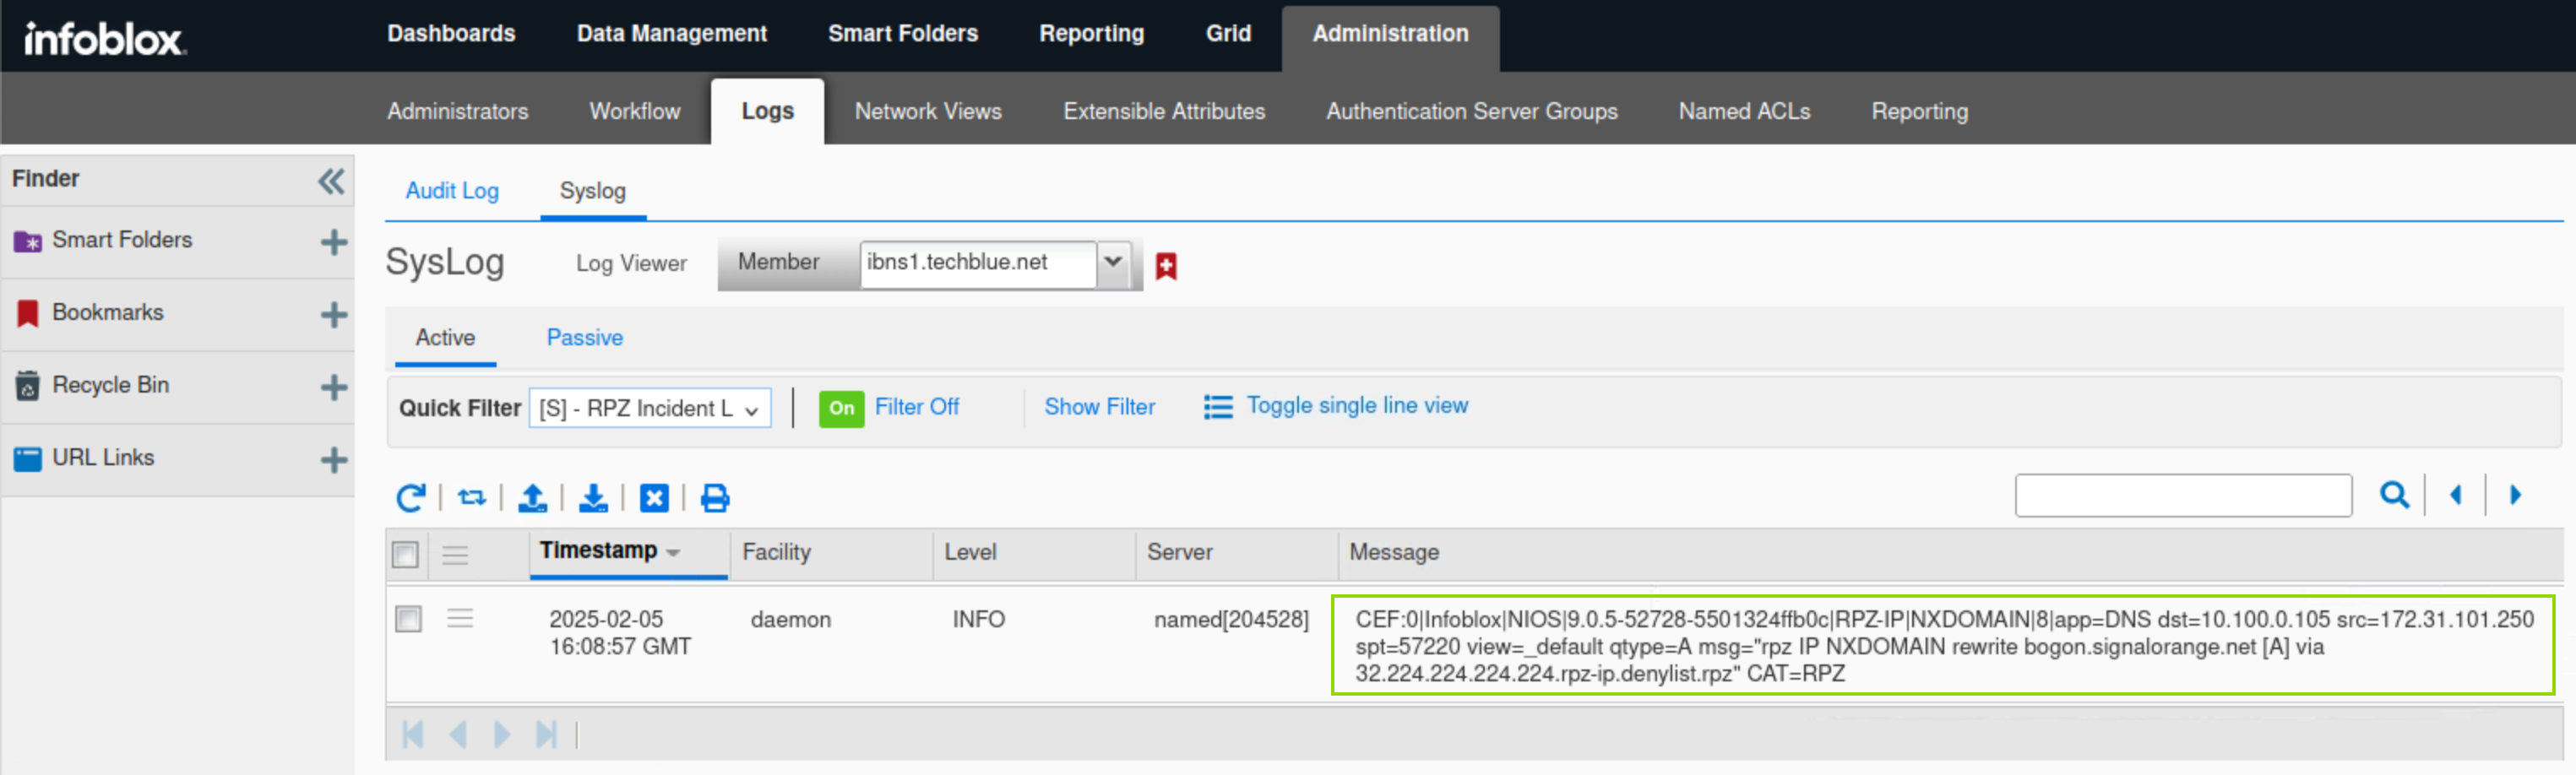
The DNS Query for 224.224.224.224 is listed in the messages section, in CEF format. The query has matched a Block No Such Domain rule in denylist.rpz.
-
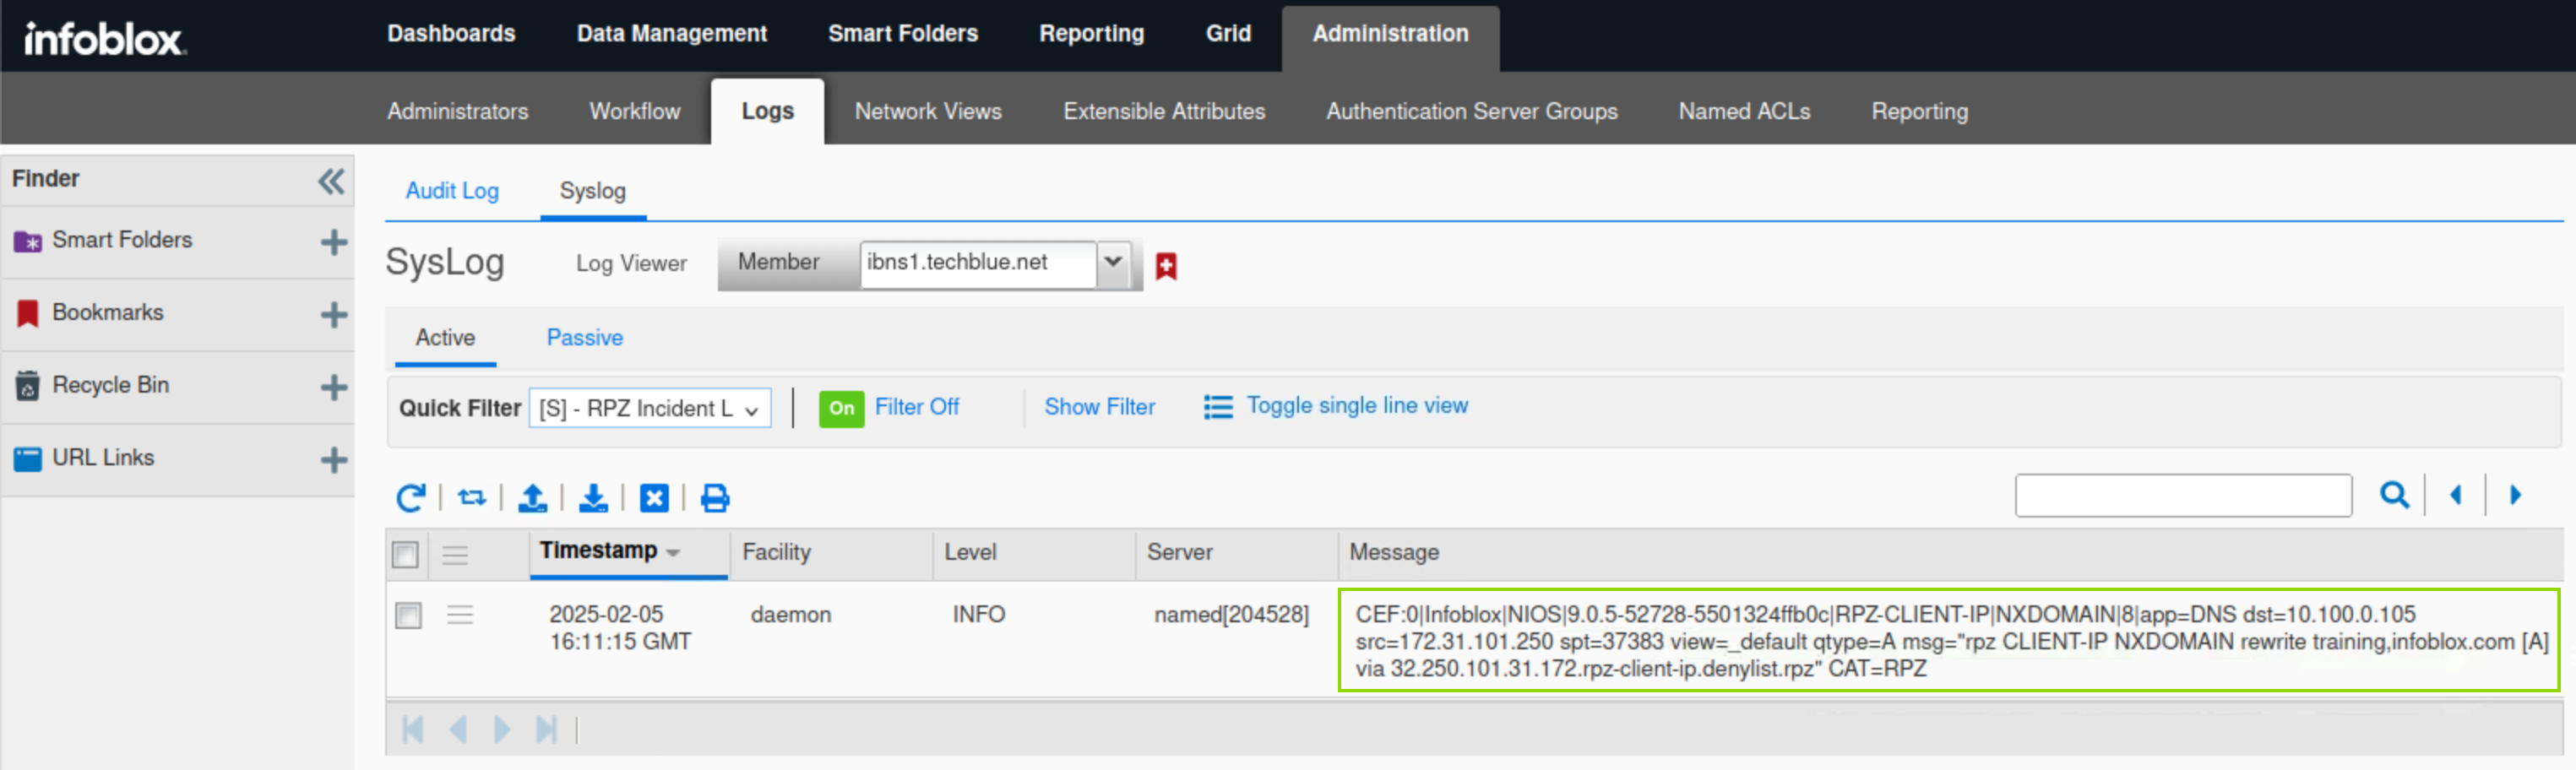
The DNS Query for training.infoblox.com is listed in the messages section, in CEF format. The query has matched a Client IP Block NXDOMAIN rule in denylist.rpz.
-
Task 18 Solution: Log into the Infoblox portal and copy the RPZ feed names and credentials
In this task, our goal is to obtain the names of the RPZ feeds we will use in our environment. In this lab, we will use infoblox-base and infoblox-base-ip. We also need the name server details for the authoritative servers for these RPZ feeds. We will use the Infoblox Portal to obtain this information.
Use Geany (a text editor) to save RPZ names, server IPs, and TSIG credentials for later use.
These specific RPZs have been chosen to ensure they don’t exceed the capacity of the NIOS appliances in your lab environment.
-
On the jump-desktop machine, open a browser window.
-
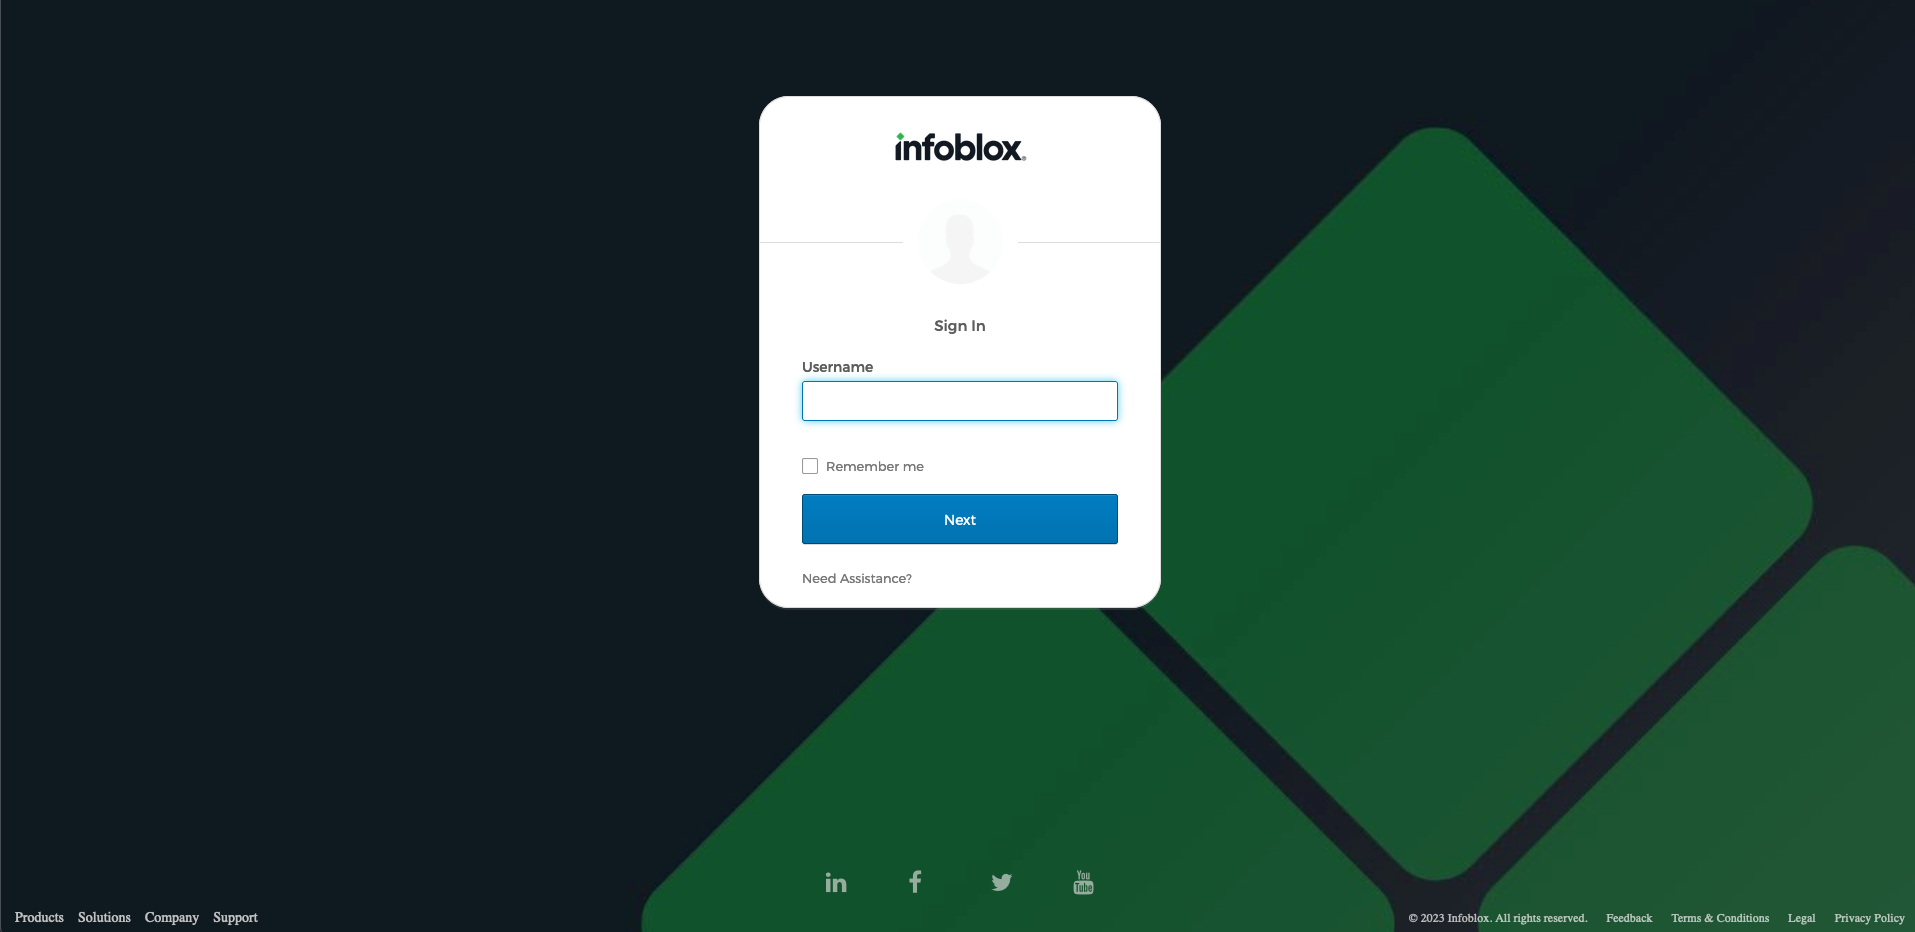
Use your Education Infoblox Portal Credentials to log into the Infoblox Portal.
-
Enter your username and password from the Learning Portal.
-
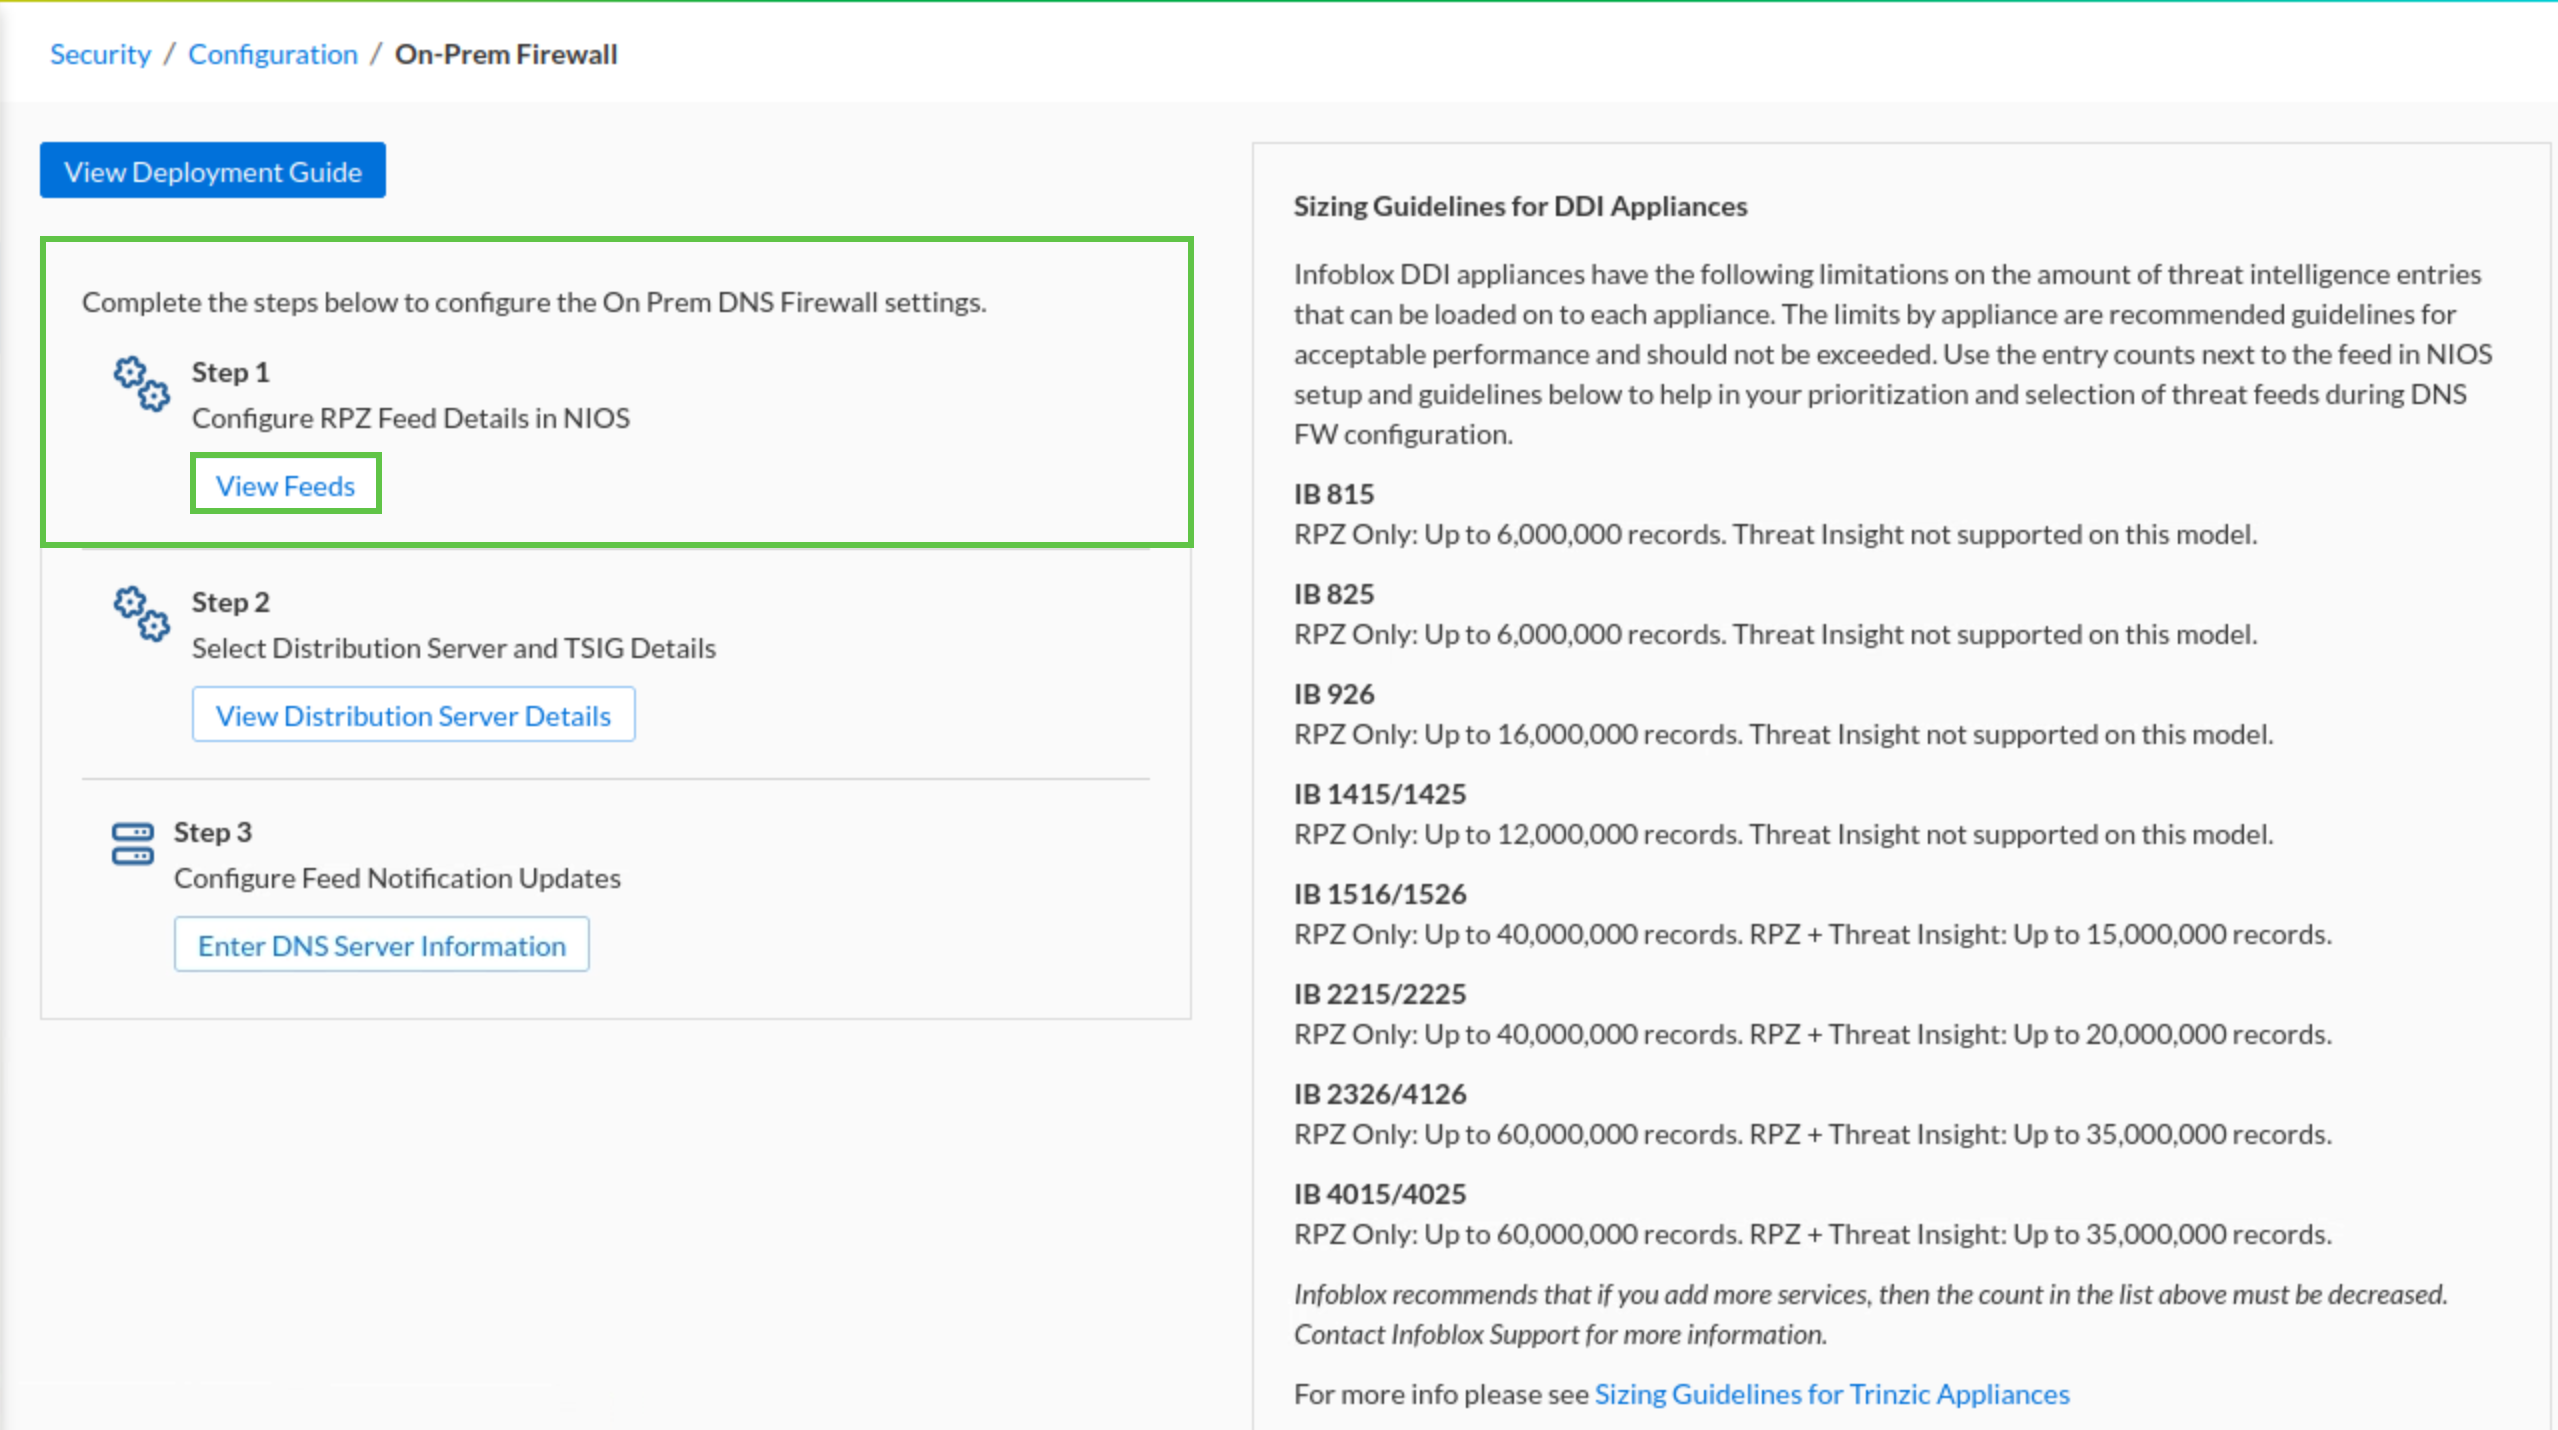
Navigate to Secuirty → Configuration → On-prem DNS Firewall.
-
Click the Step 1 View Feeds link.
-
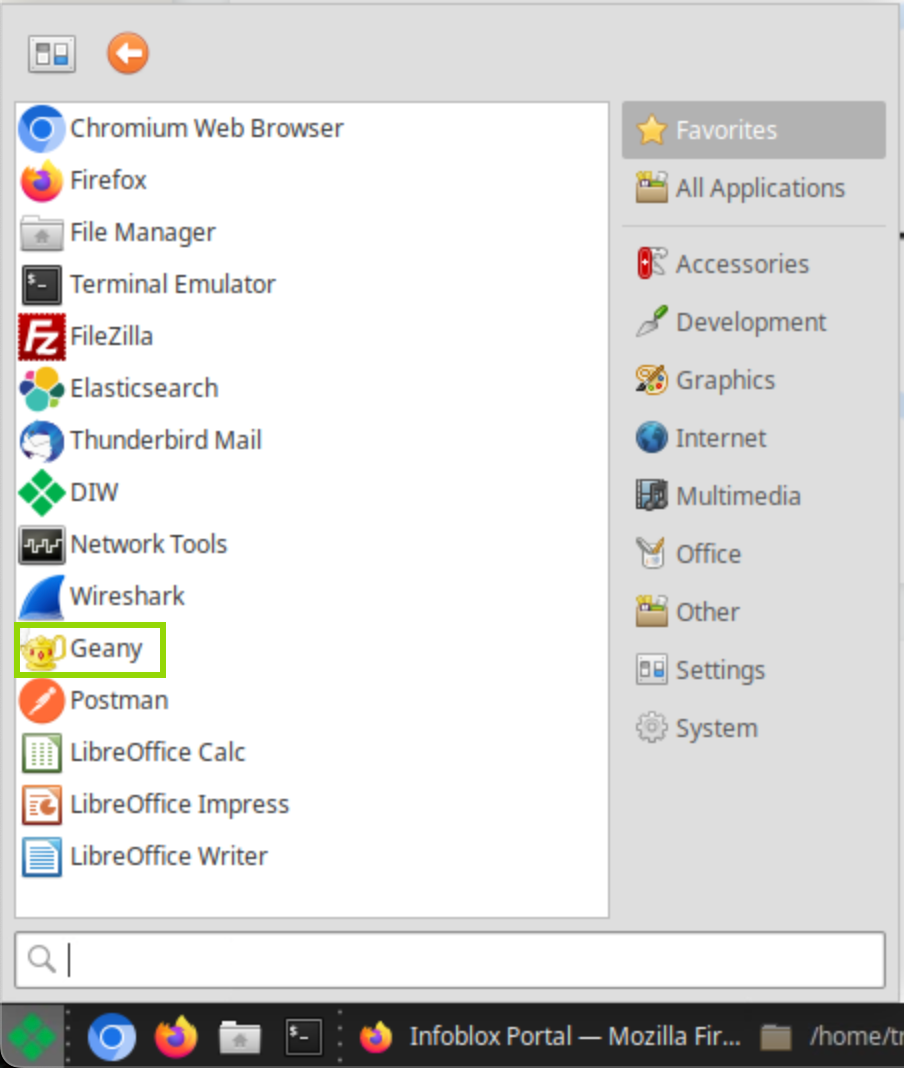
Click the Infoblox logo on the bottom left of the Desktop in jump-desktop.
-
Click the Geany icon.
-
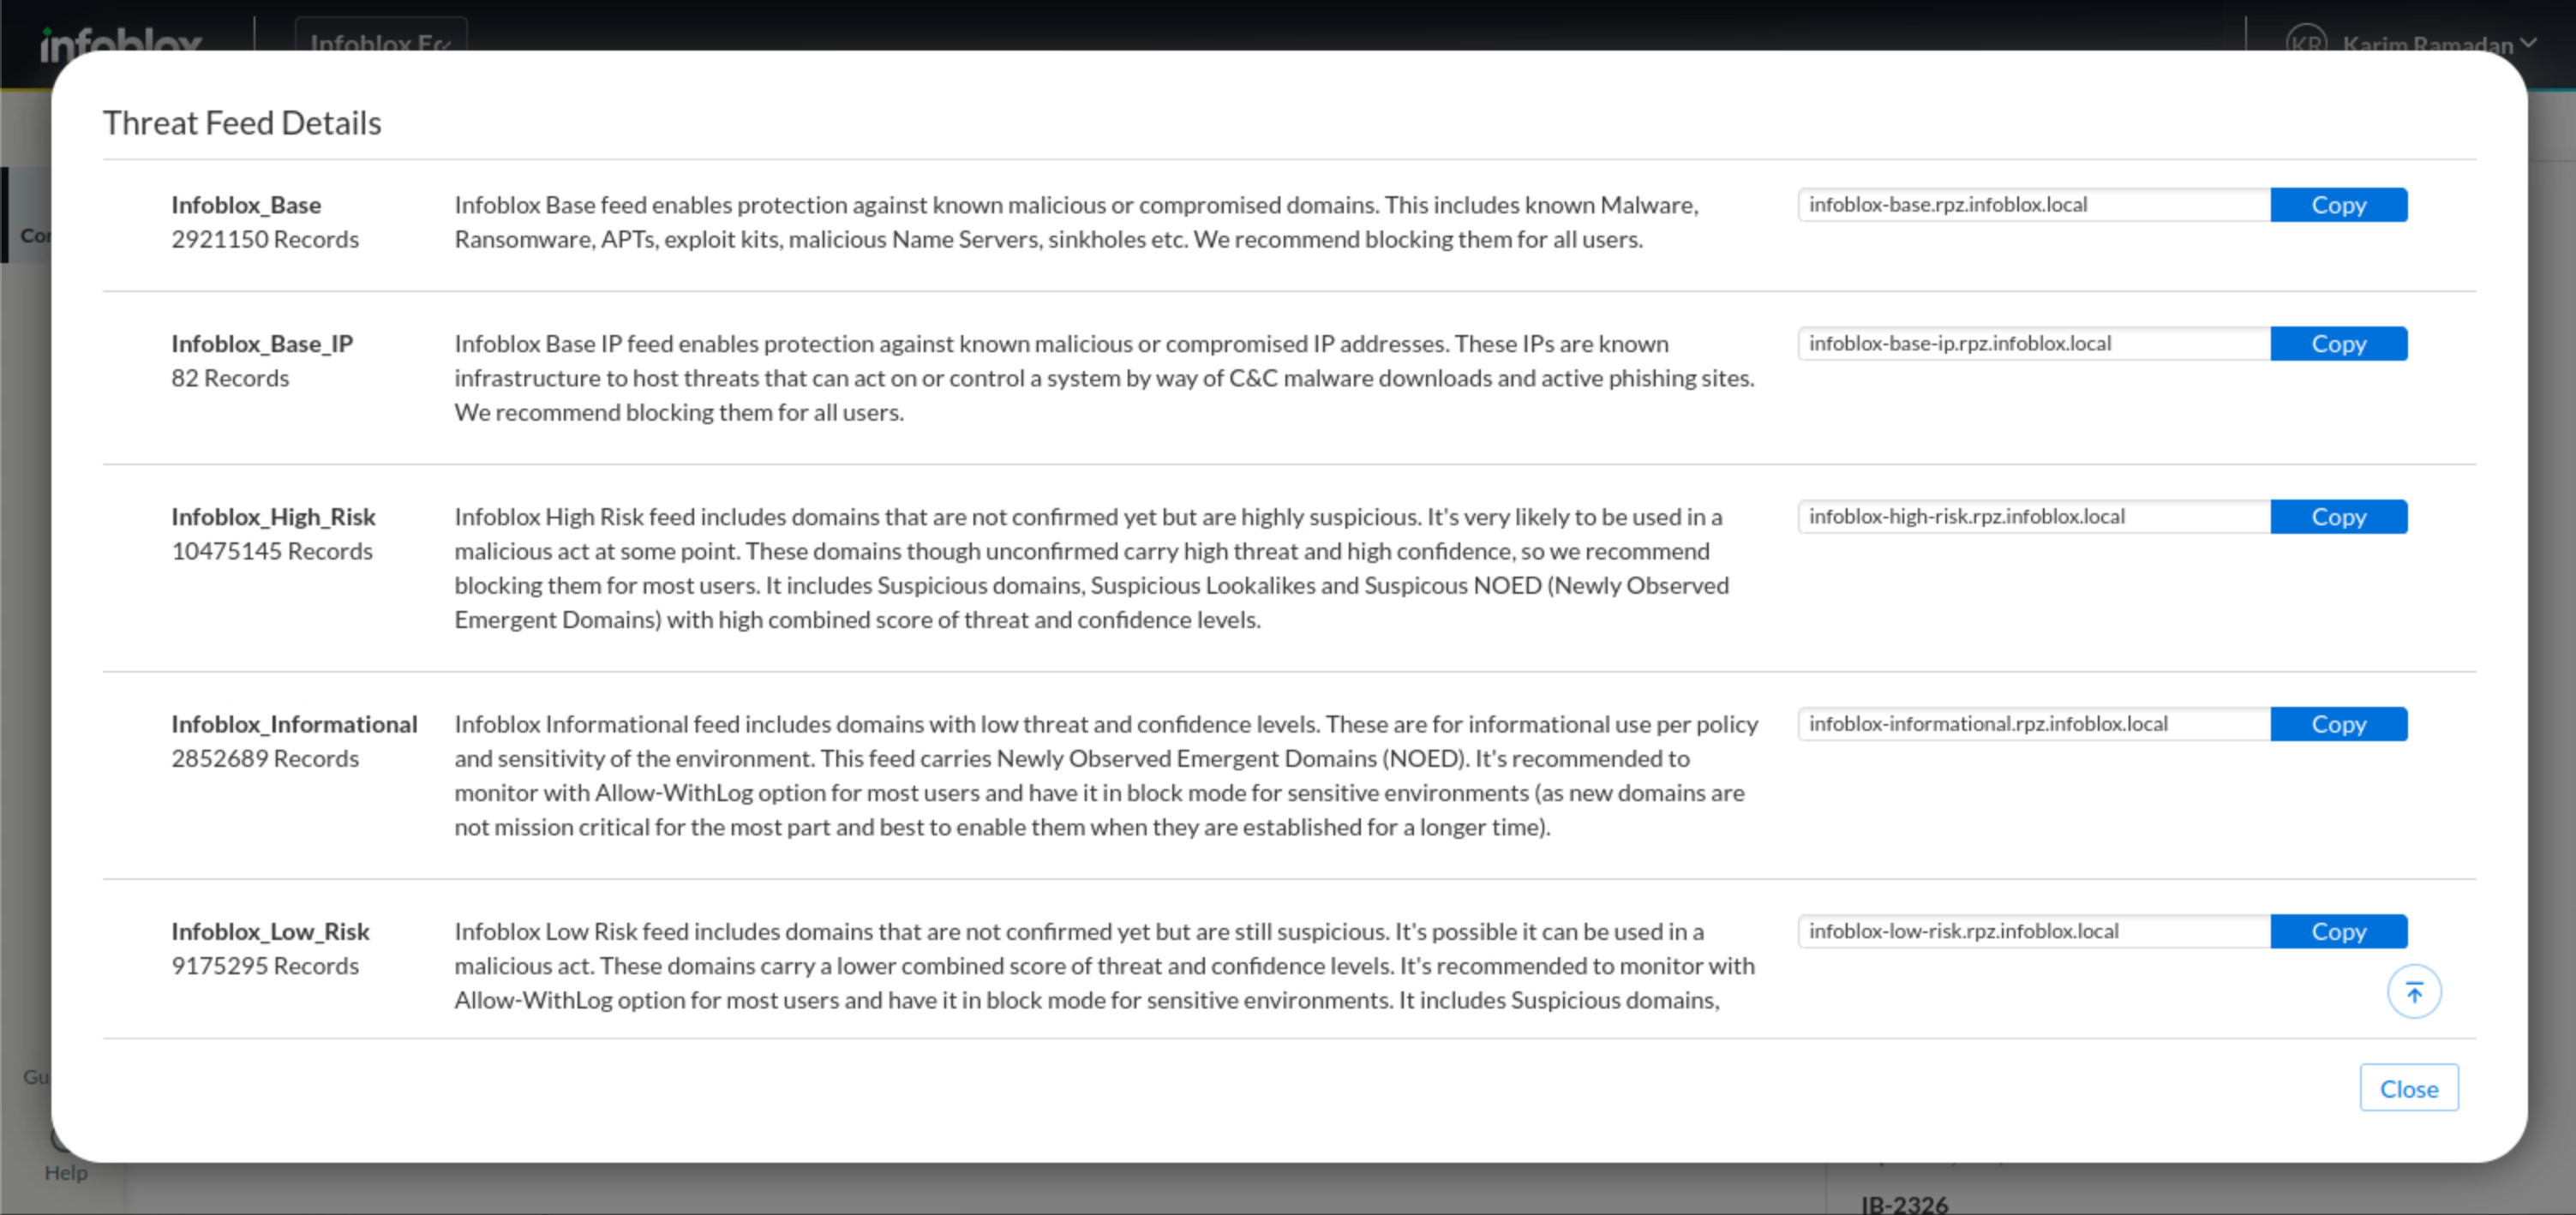
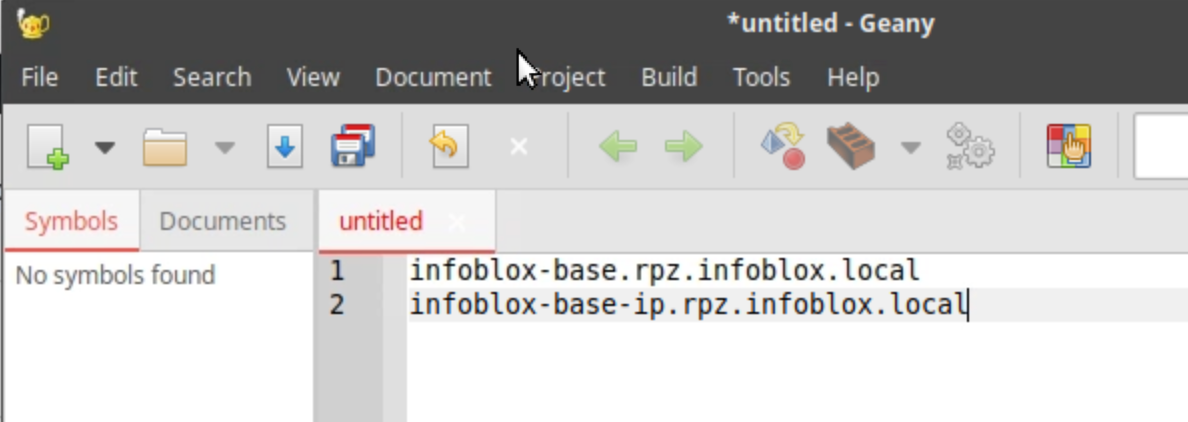
Click the Copy button to copy the RPZ name for the infoblox-base feed.
-
Paste the name of the infoblox-base RPZ into the editor.
-
Repeat the process for the Infoblox-based-ip RPZ.
-
Close the Threat Feed Details page.
-
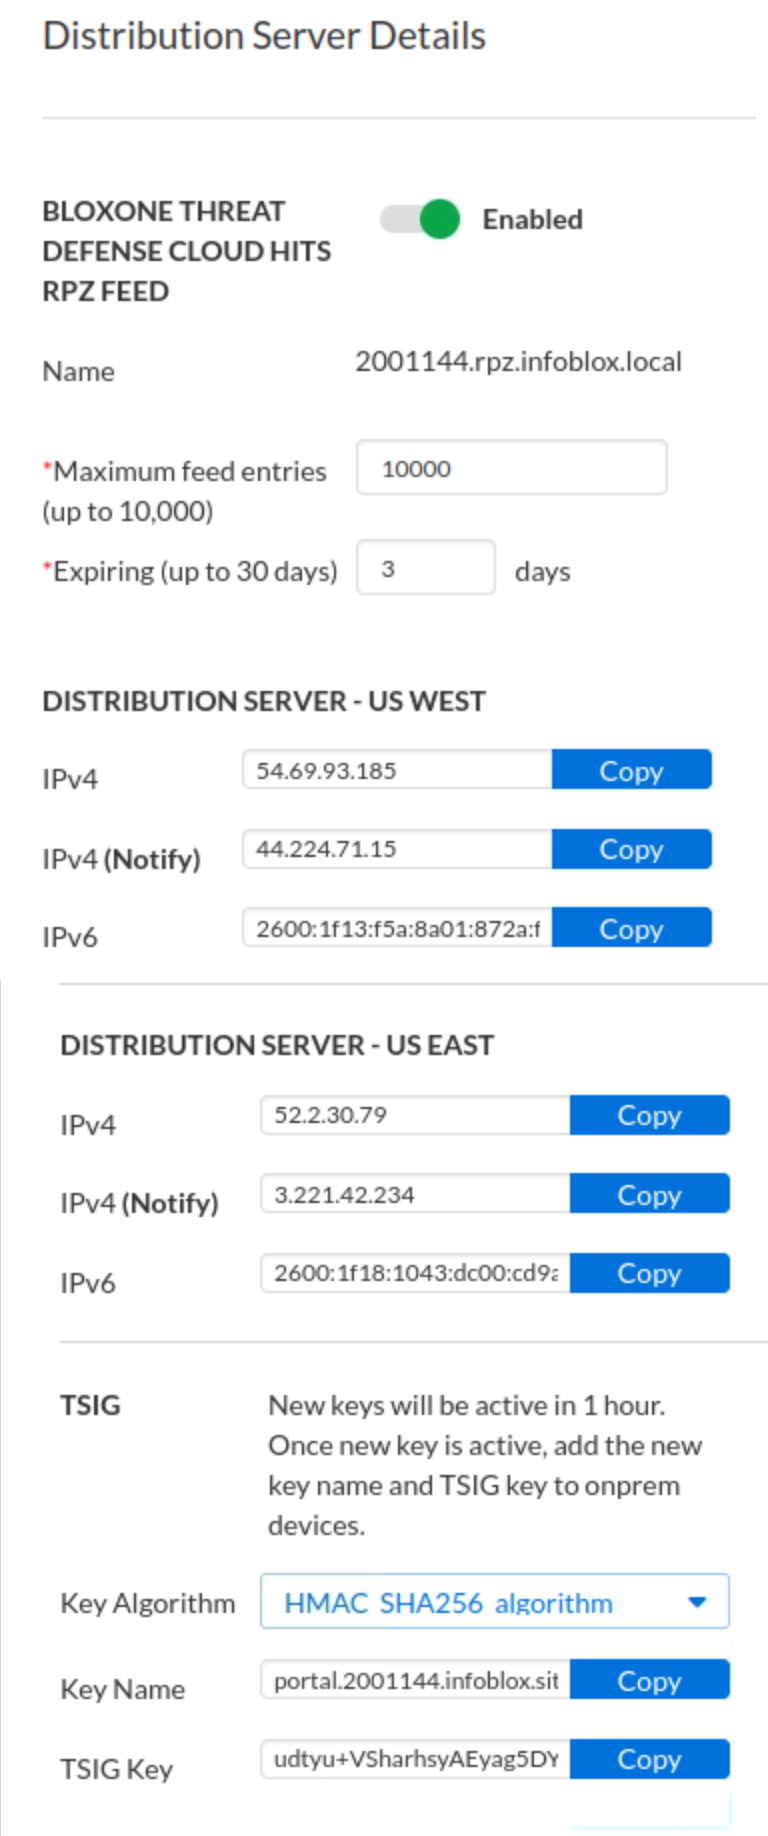
Click the Step 3 Distribution Server Configuration Values link.
-
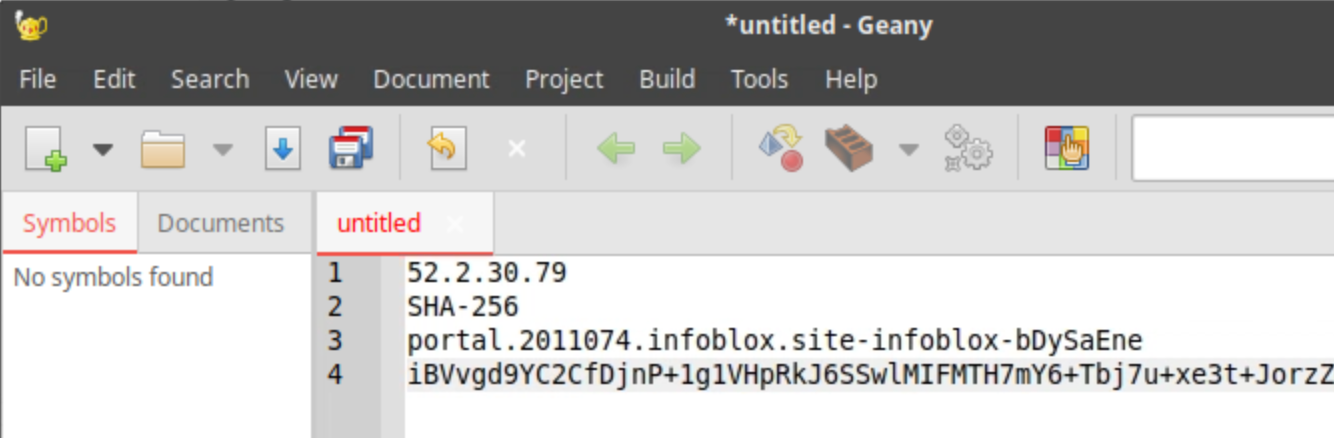
Copy the values for Distribution Server, Key Name, TSIG Key, and Key Algorithm to your text editor.
-
Make sure you use the copy button rather than highlight, select, and paste. You might not get the whole key if you don’t use the copy button.
Task 19 Solution: Create a new name server group to use the authoritative feed servers from Threat Defense
In this task, we create a name server group called RPZ DNSFW NSG. In a later step, Threat Defense RPZ feeds will use this name server group.
-
On the jump-desktop machine, open a browser window and access https://10.100.0.100
-
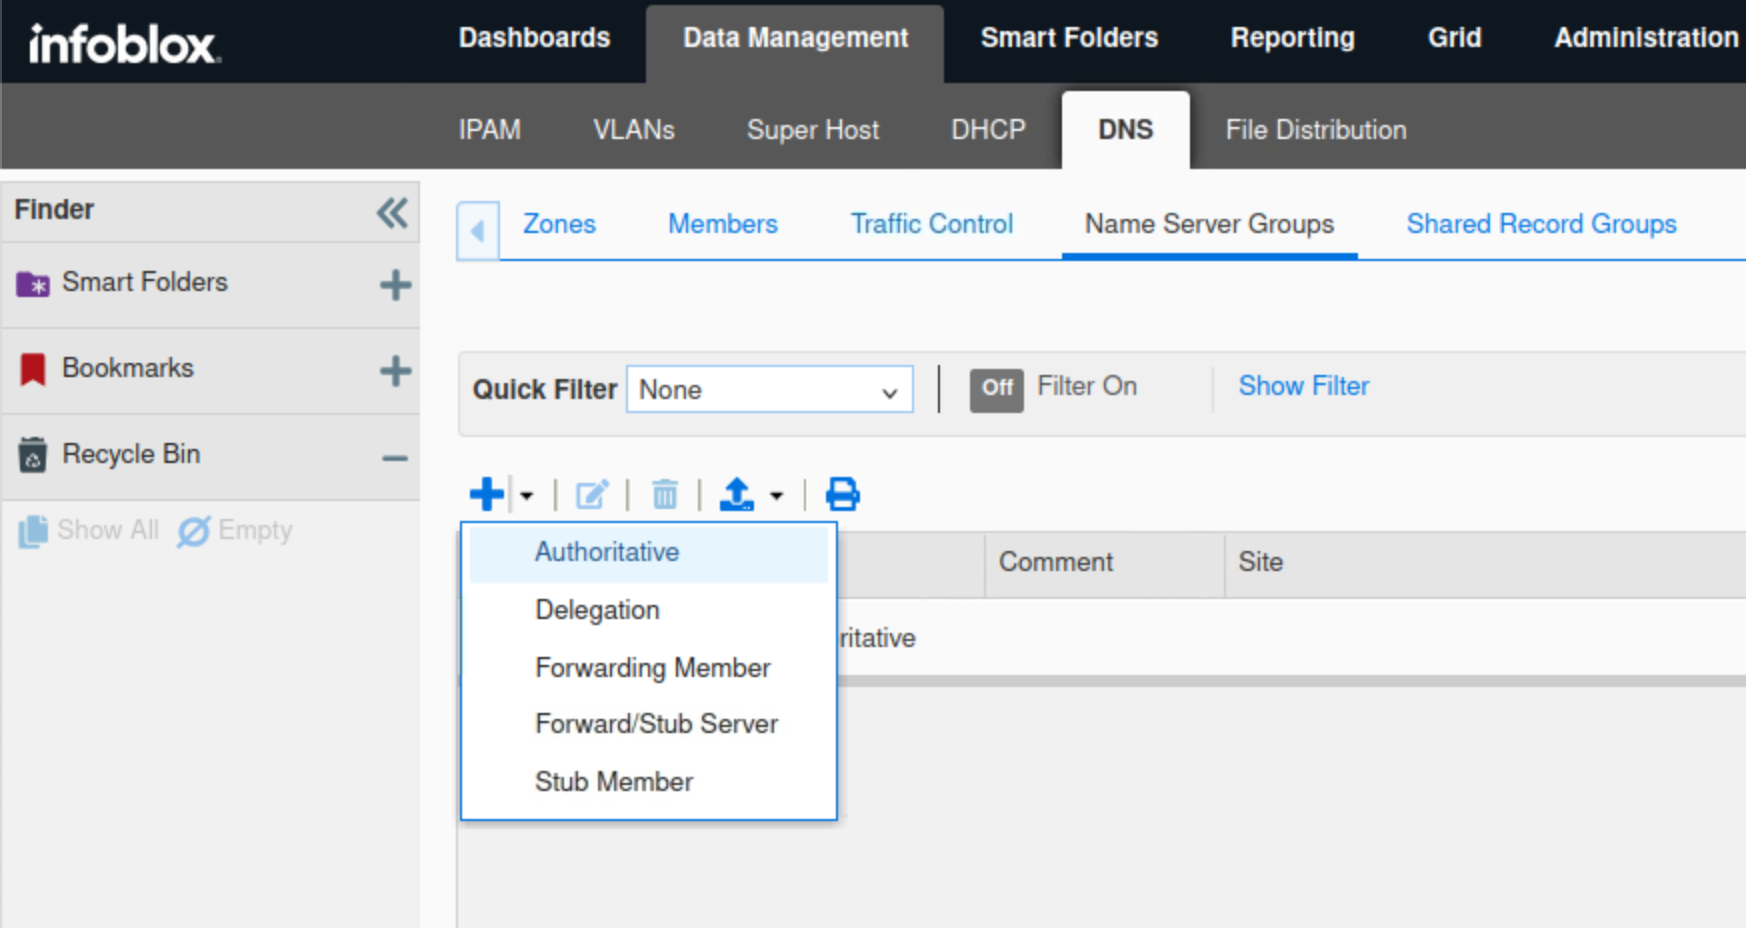
Navigate to Data Management → DNS → Name Server Groups
-
Click the drop-down arrow next to the plus (+) symbol to add a new Authoritative Name Server Group.
-
Type RPZ DNSFW NSG in the Name field.
-
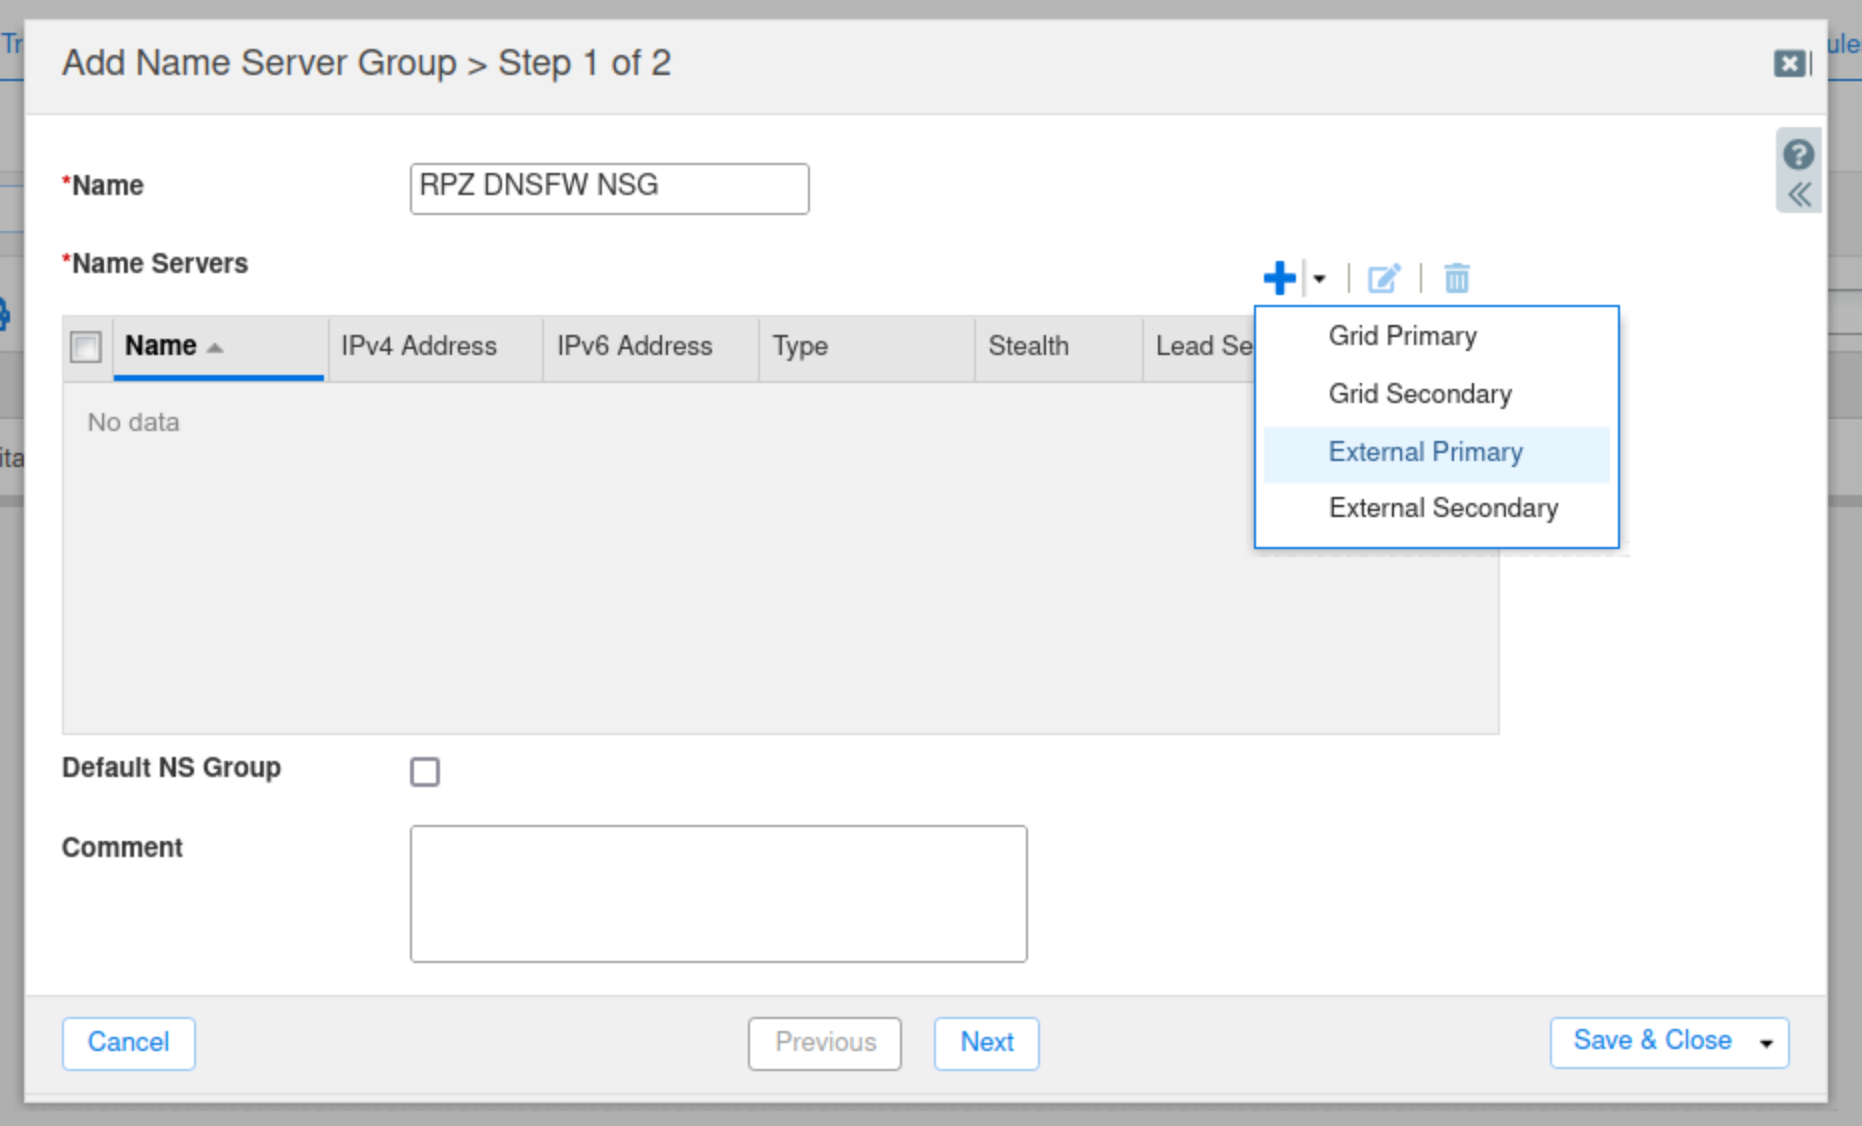
Click the drop-down arrow next to the plus (+) symbol and select External Primary.
-
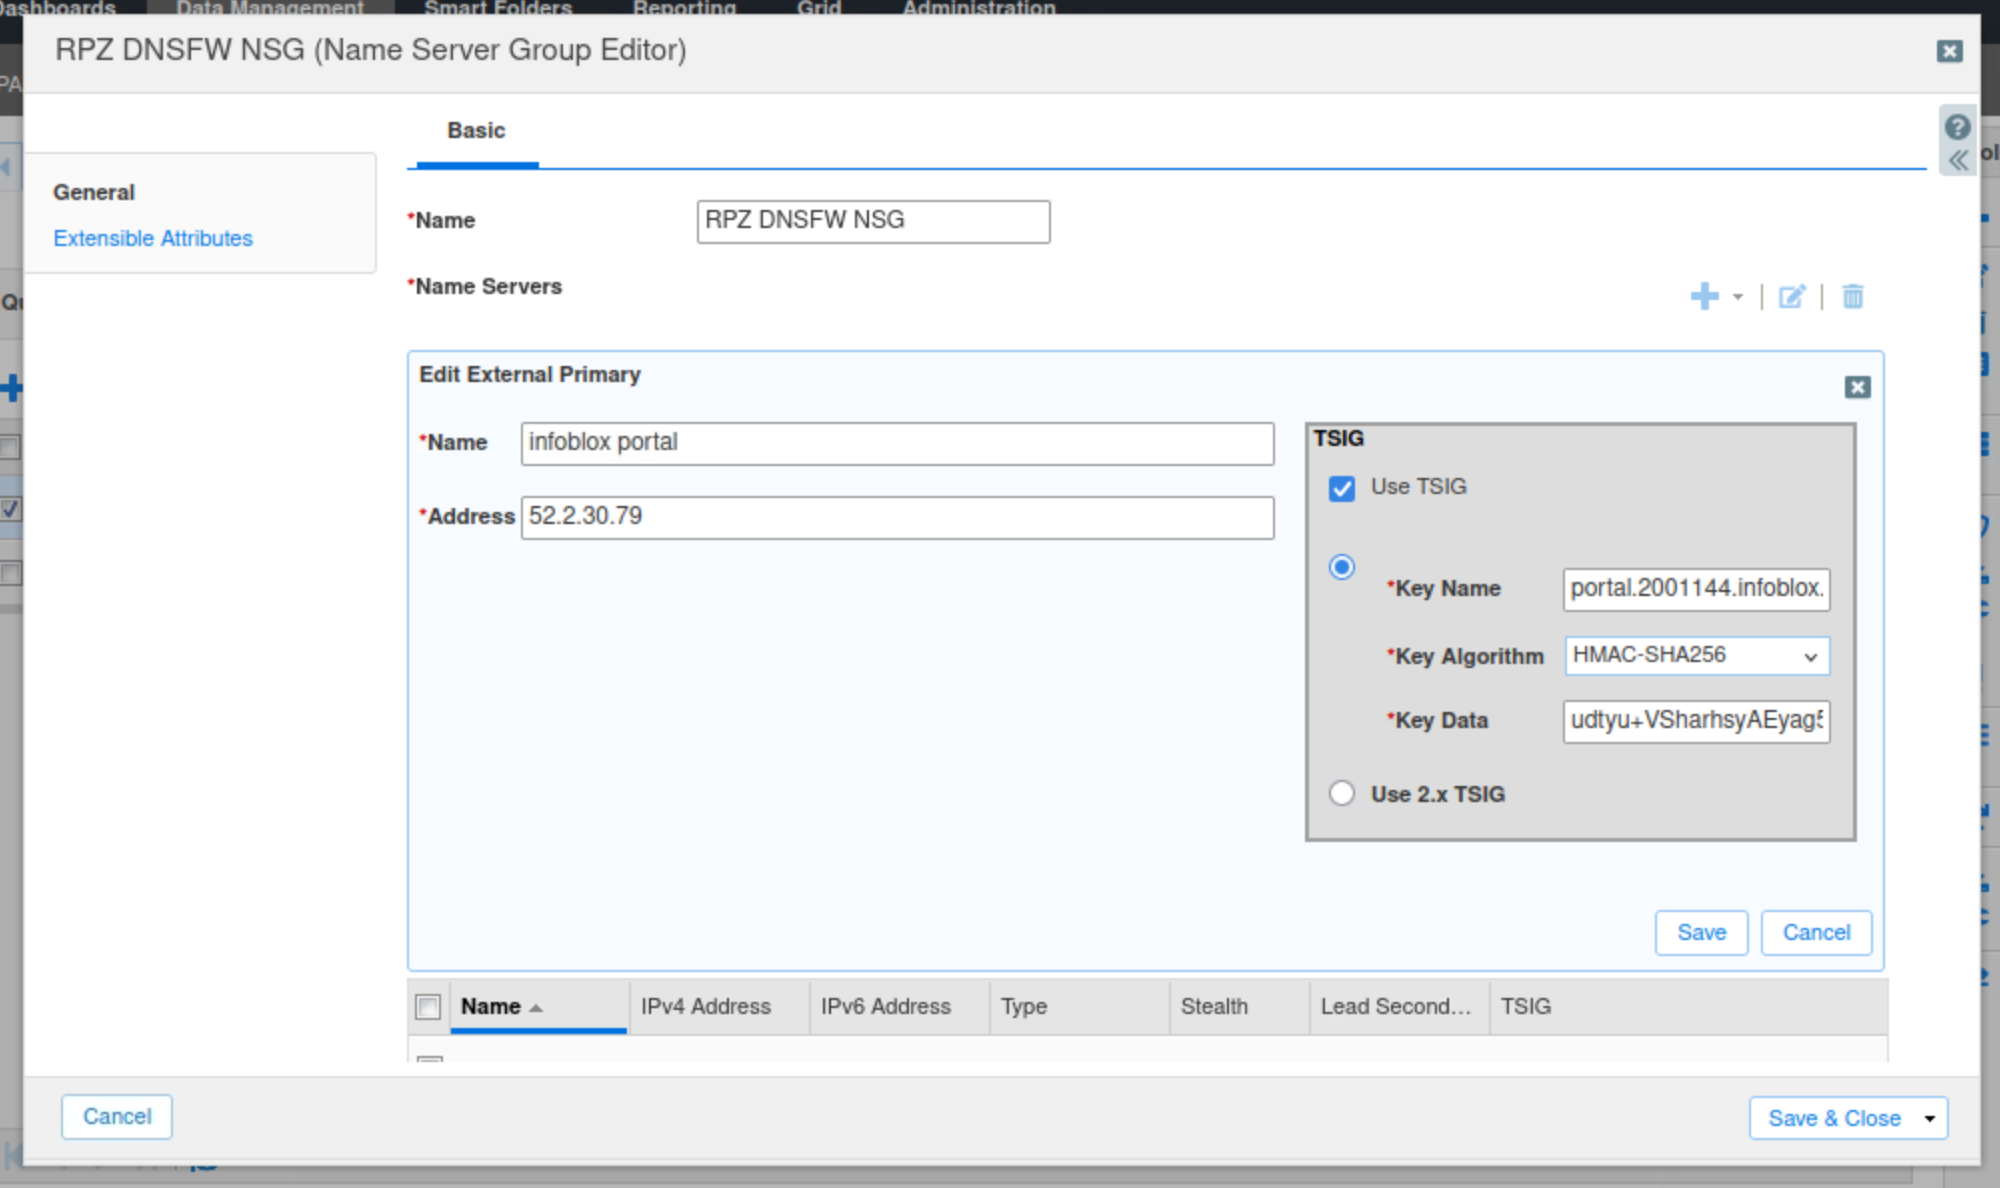
Enter a name for the Infoblox Portal Server.
-
Enter the IPv4 address of the server you saved earlier for the Infoblox Portal.
-
Click the Use TSIG button.
-
Copy your Key Name and Key Data from the Infoblox portal.
-
Click the Add button.
-
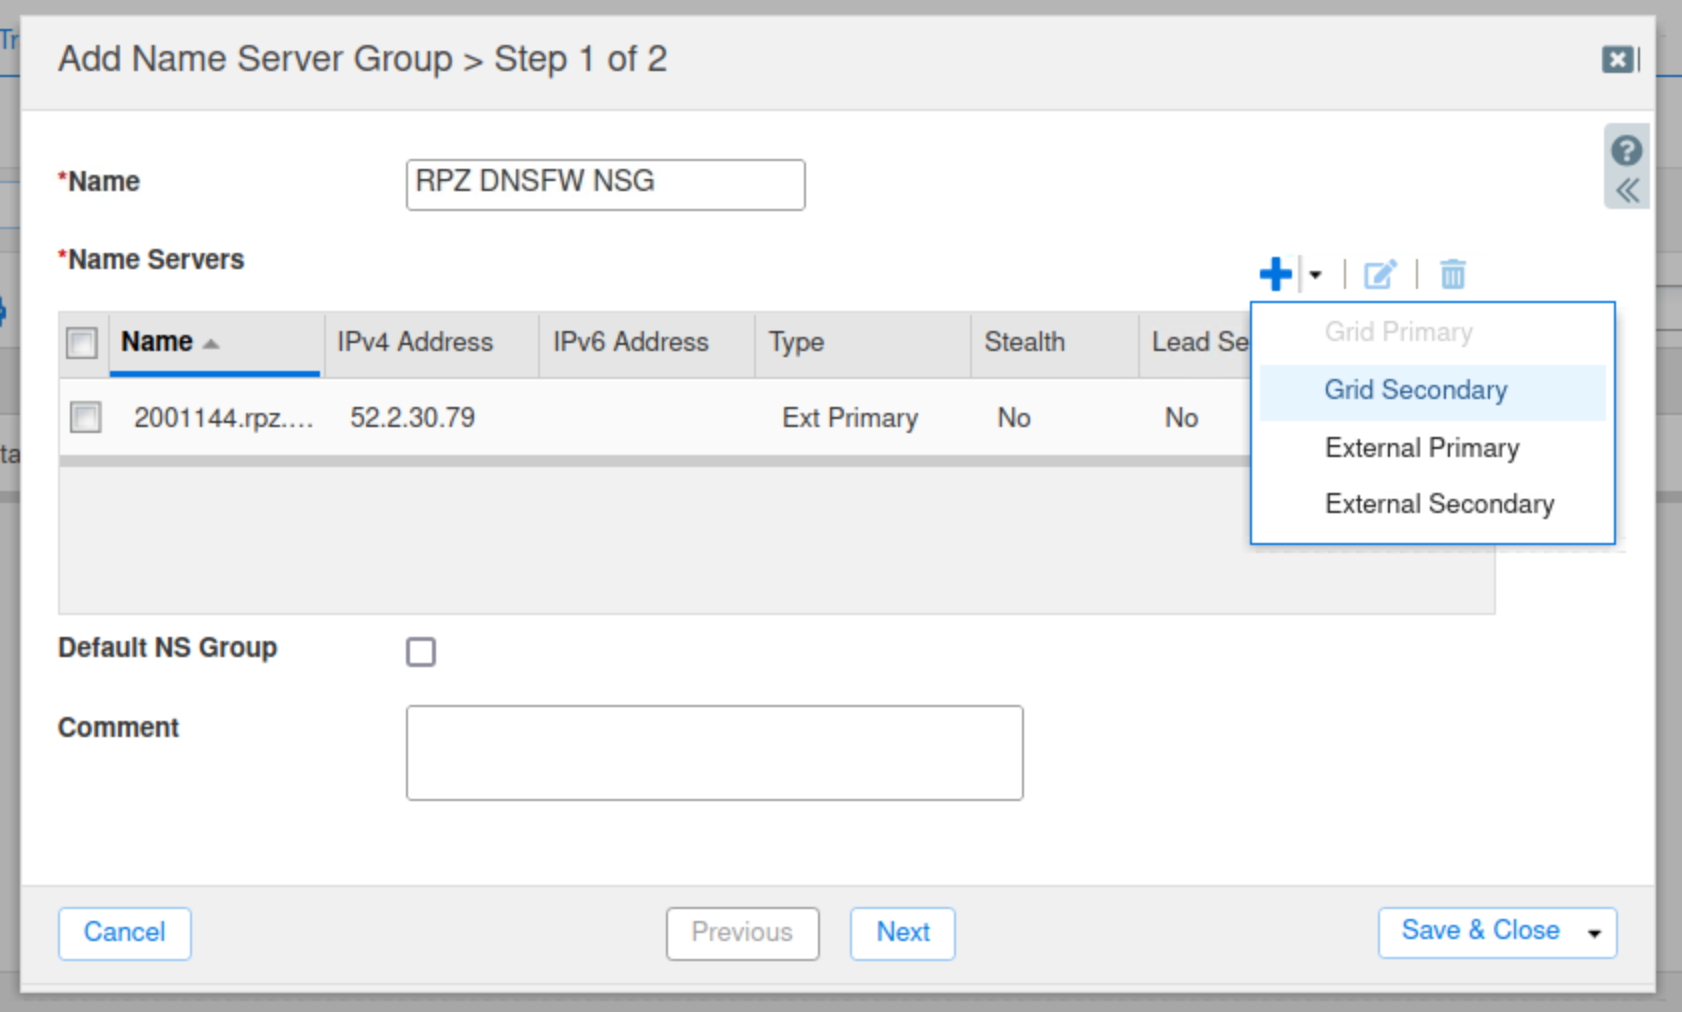
Click the drop-down arrow next to the plus (+) symbol and select Grid Secondary.
-
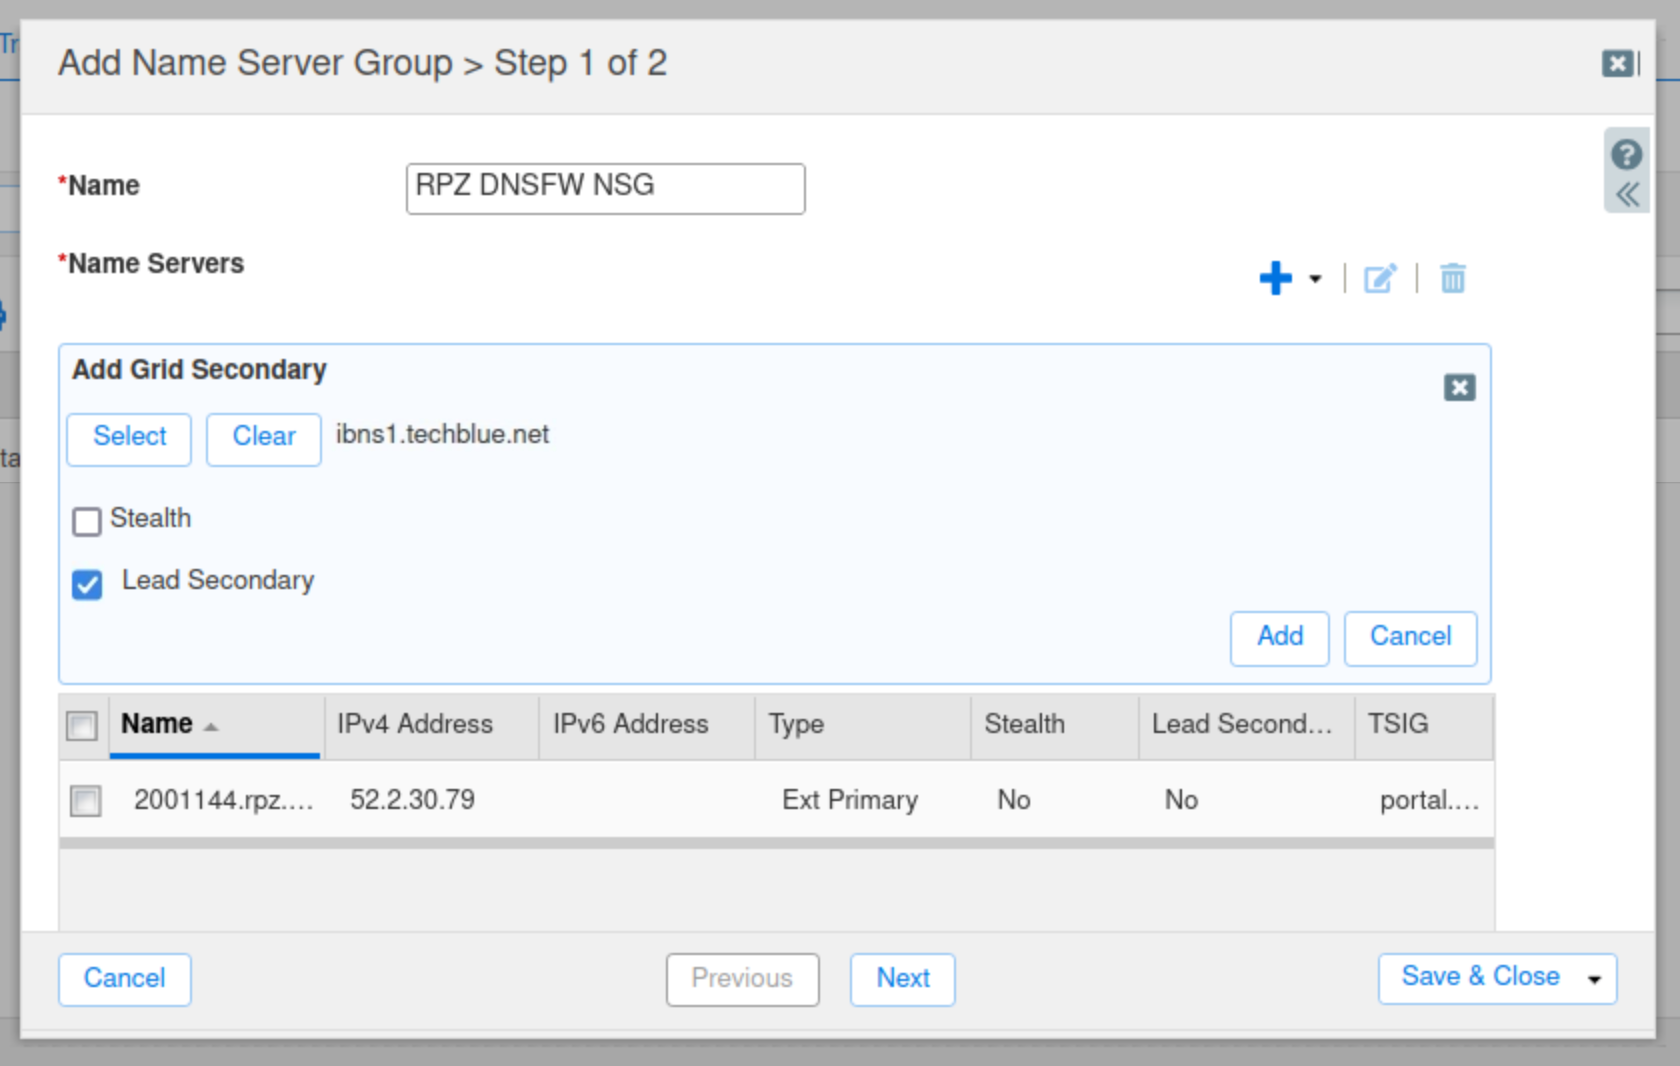
Click Select, Select ibns1.techblue.net from the Member Selector.
-
Check the Lead Secondary box.
-
Click Add.
-
Click the drop-down arrow next to the plus (+) symbol. Click Grid Secondary.
-
Click Select, Select ibns2.techblue.net from the Member Selector.
-
Click Add, then Save & Close.
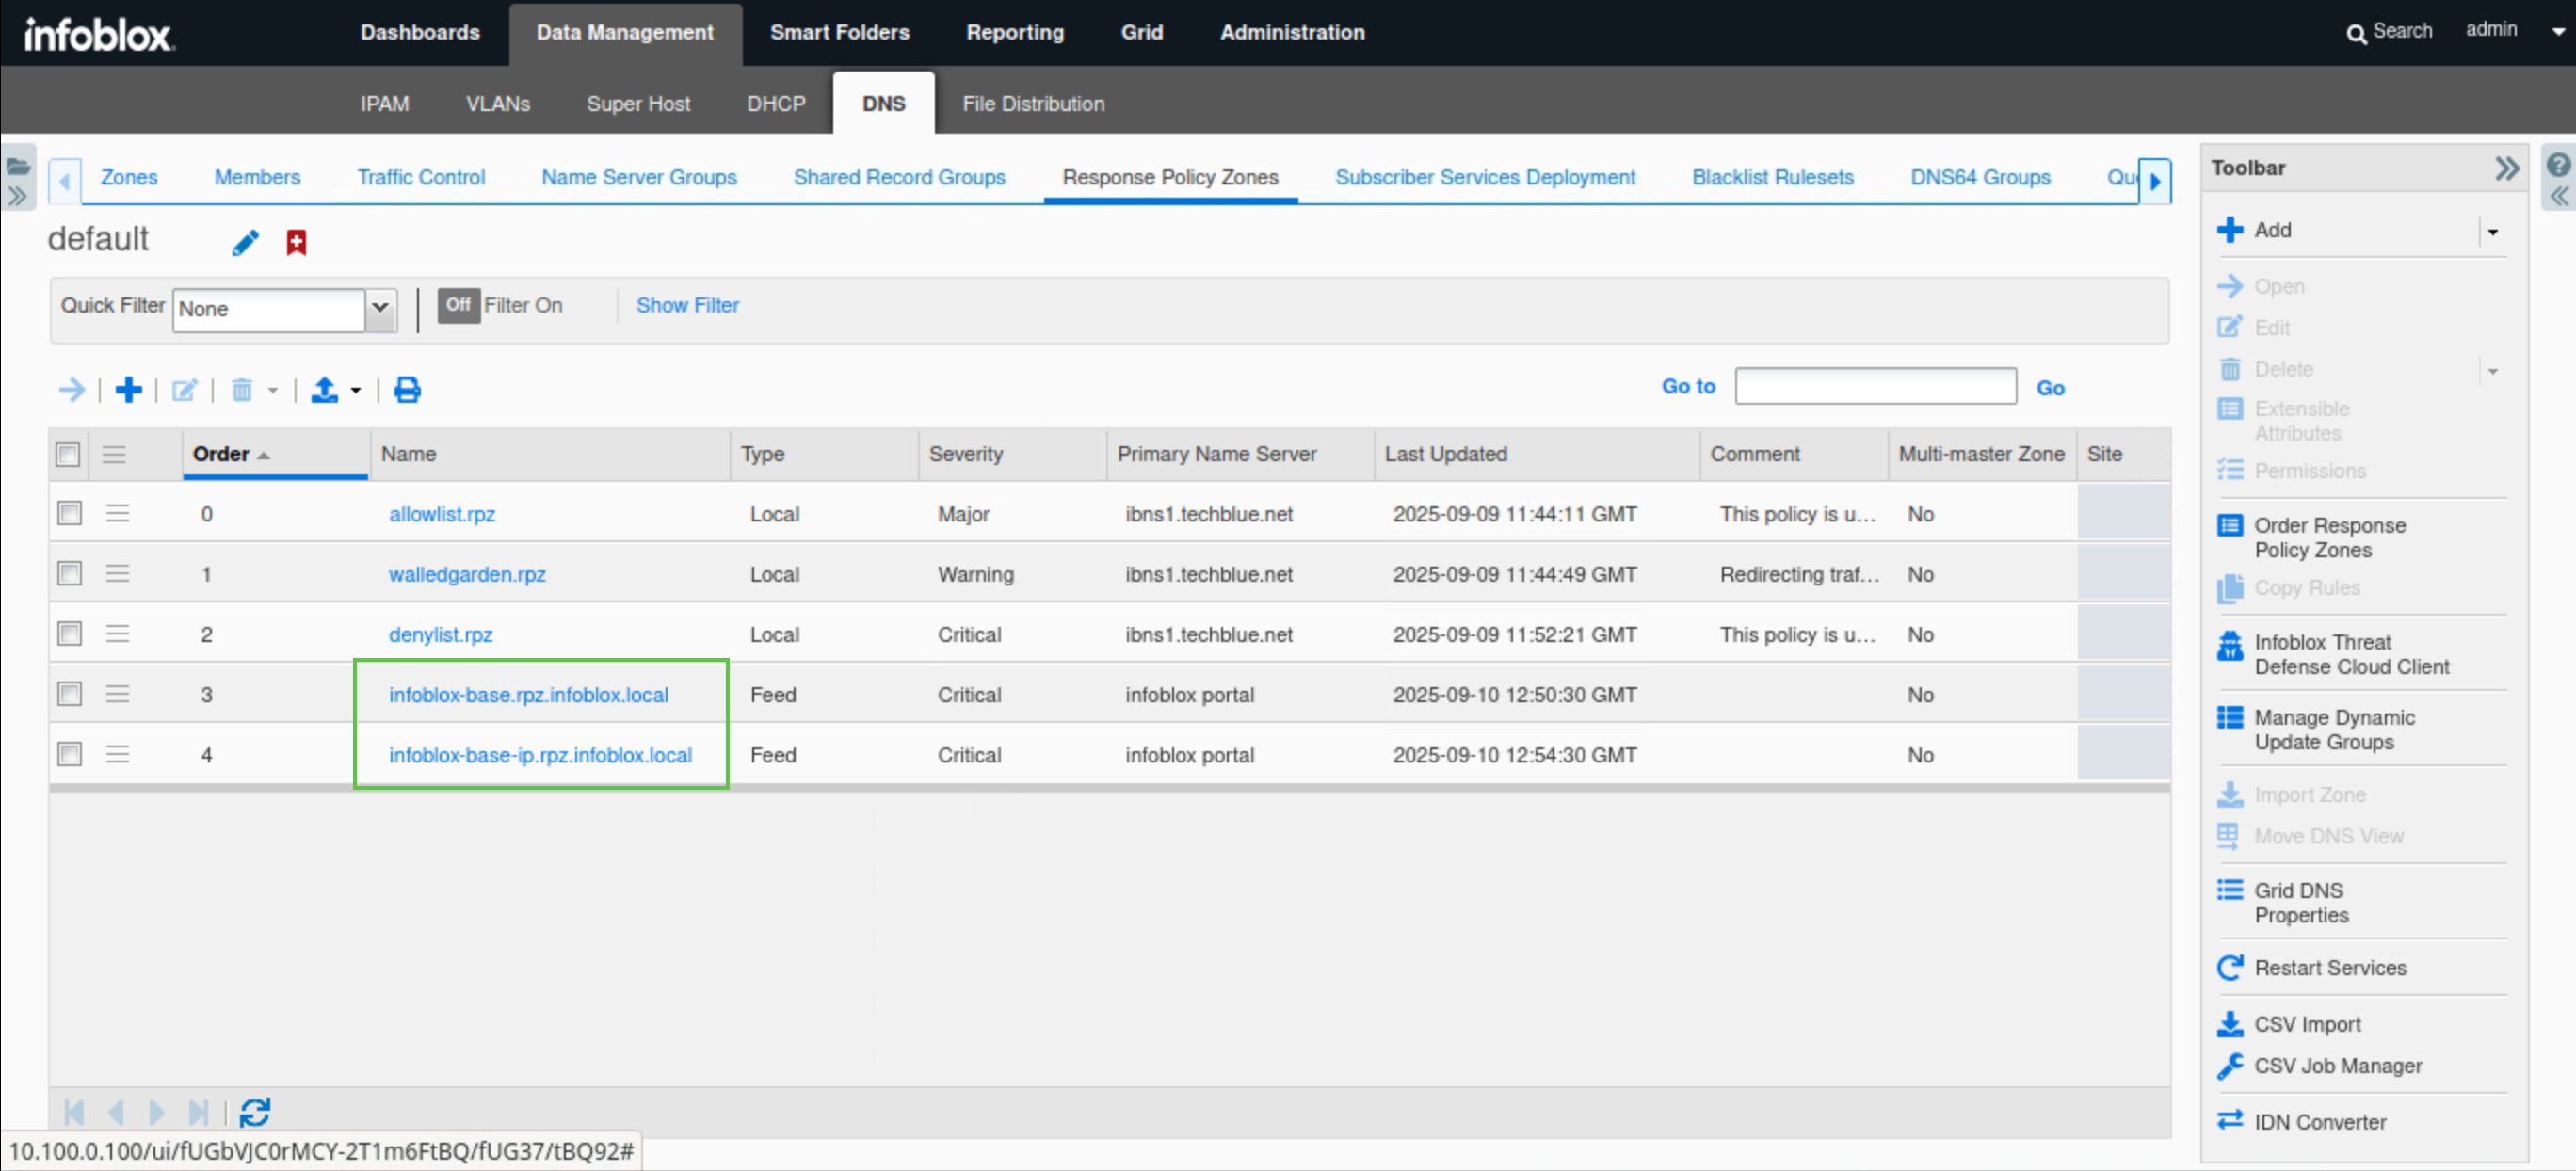
Task 20 Solution: Add Threat Defense RPZ feeds into the NIOS Grid
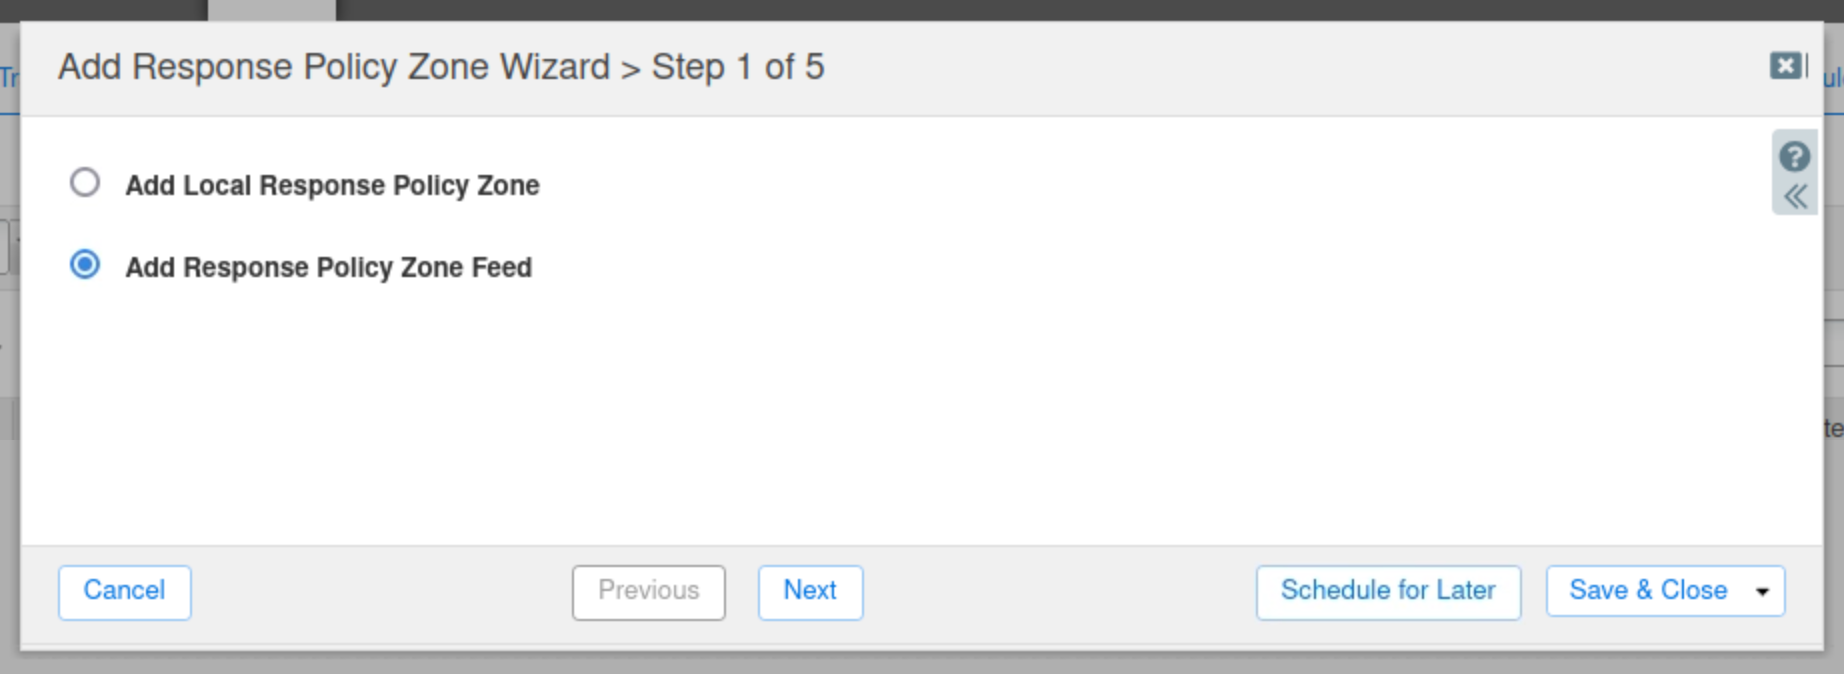
In this task, we will add an RPZ for each feed we copied separately and set the Policy Override mode to Passthru. This is to test how the feeds will affect our current DNS behaviour. If the feeds match any traffic we don't want blocked, we will change the Policy Override mode to block traffic in a later step.
-
Navigate to Data Management → DNS → Response Policy Zones.
-
Click the check button for Add Response Policy Zone Feed.
-
Click Next.
-
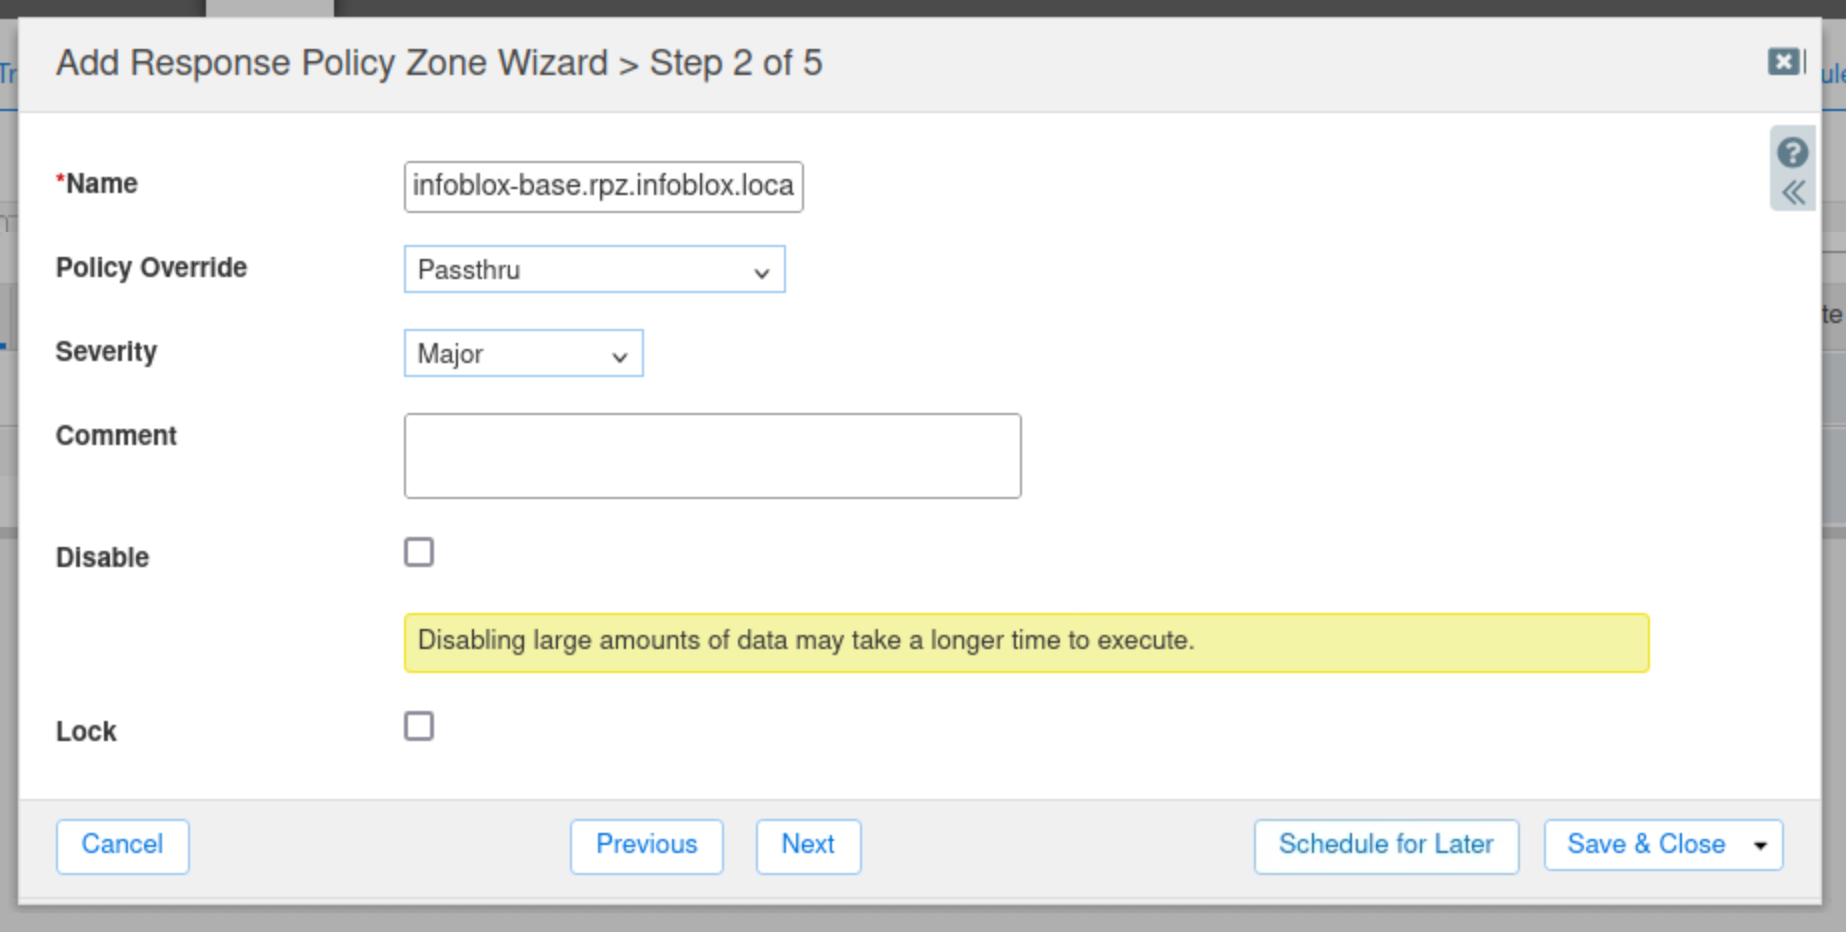
Copy the name from your text file, or type, infoblox-base.rpz.infoblox.local into the name field.
-
Select Passthru as the Policy Override value.
-
Add a description for the zone.
-
Click Next.
-
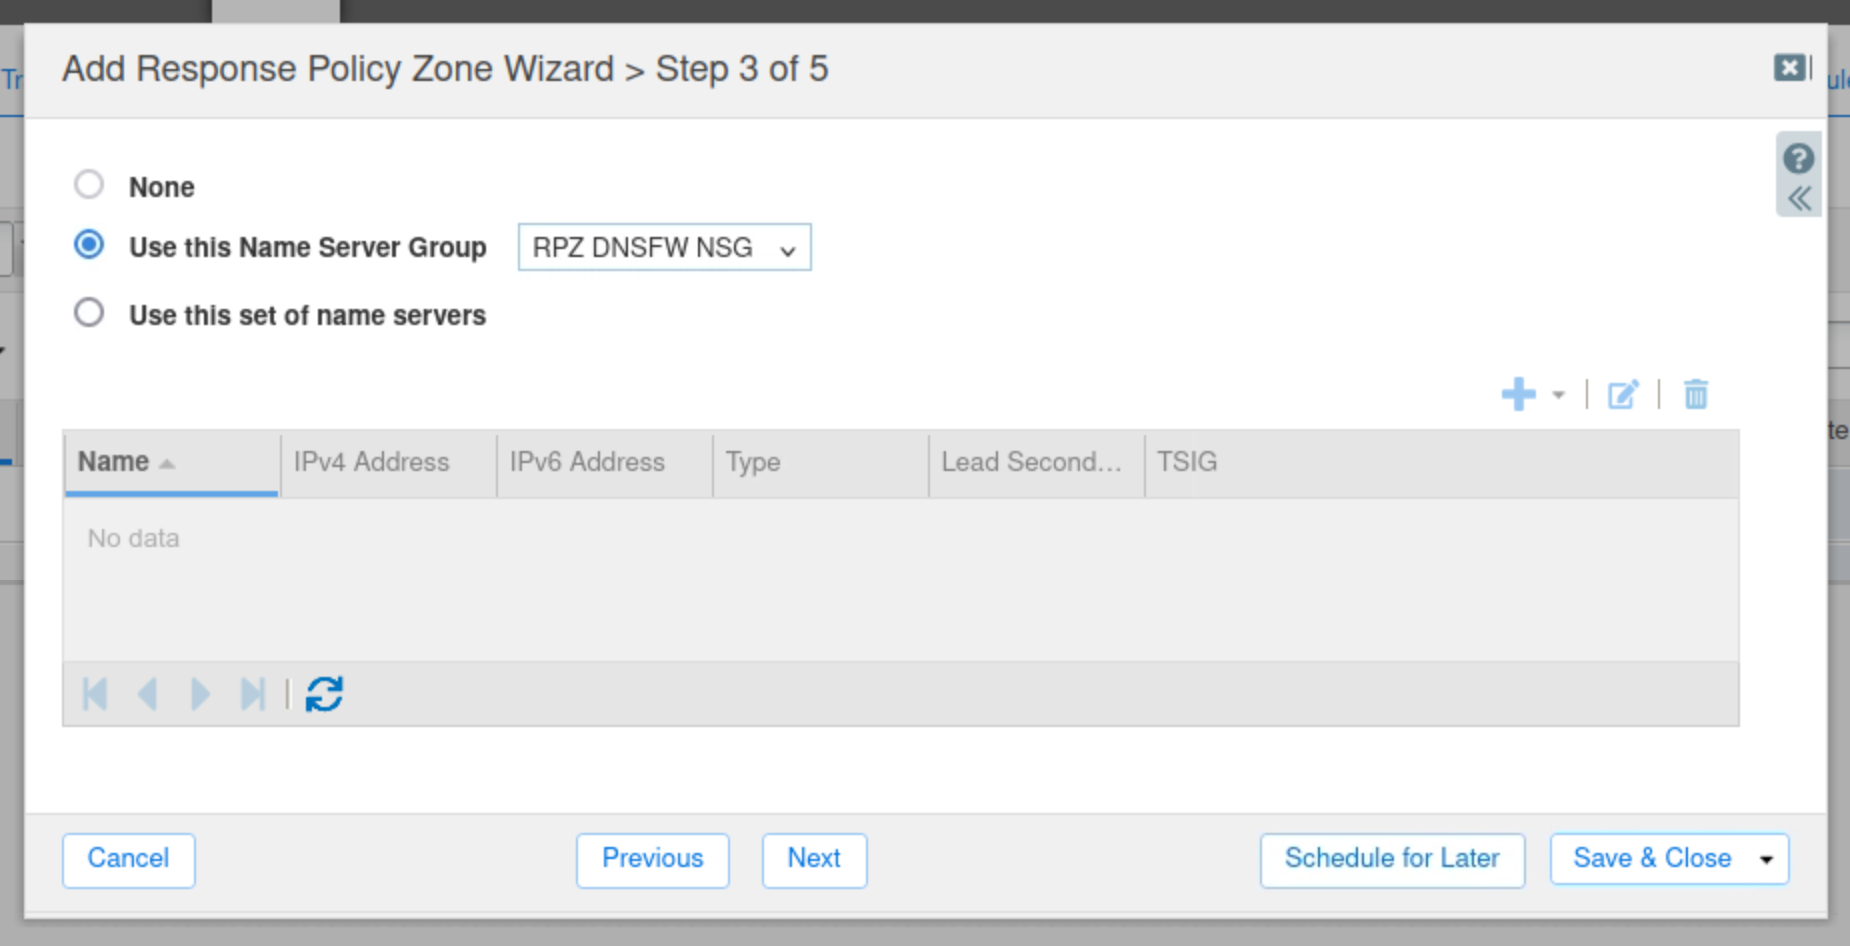
Choose to Use this Name Server Group.
-
Select RPZ DNSFW NSG
-
Click Save & Close.
-
Repeat Steps 4 to 10 to add the infoblox-base-ip RPZ Feeds.
-
Use Passthru as the Policy Override value for all feeds.
-
Restart Services when prompted.
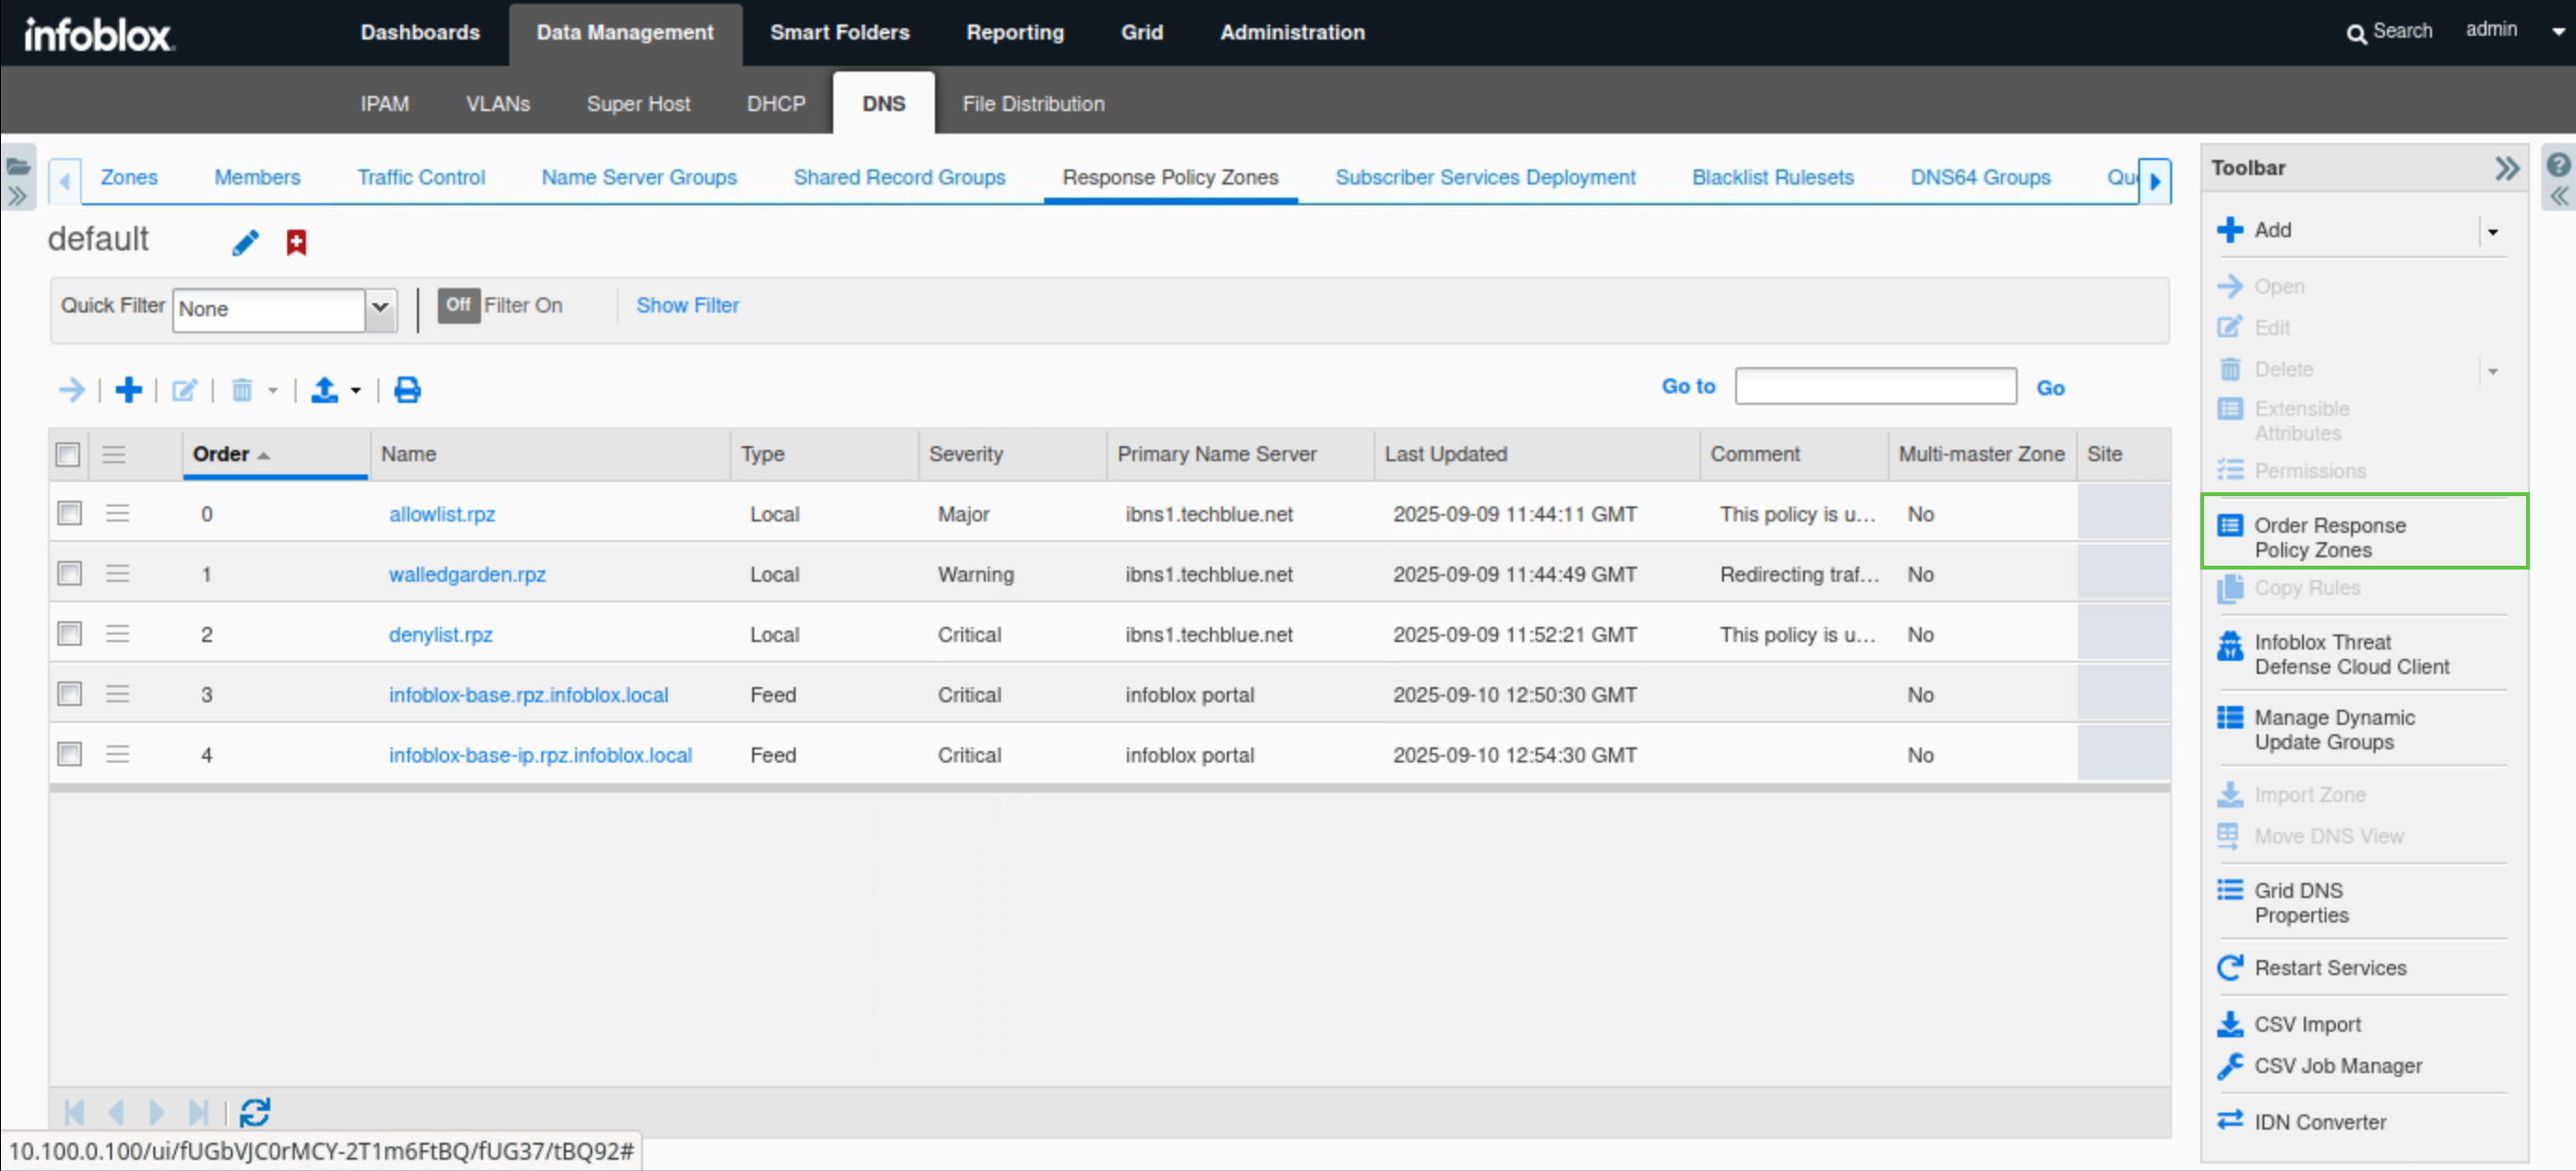
Task 21 Solution: Reorder all the RPZs to follow Infoblox guidelines
In this task, we will reorder the RPZs according to Infoblox guidelines while waiting for the Threat Defense feeds to be downloaded to our NIOS Grid.
RPZs (Response Policy Zones) should be prioritized based on a combination of Confidence and Threat Levels; the higher the Confidence and Threat Levels, the higher the RPZ's priority. In this example, we have three local RPZs: allowlist.rpz, walledgarden.rpz, and denylist.rpz. These are classified as local RPZs because their entries are manually created, and we have a high level of confidence in their effectiveness. Therefore, they are positioned at the top of our organization's priority list, followed by RPZ feeds downloaded from Threat Defense. To prioritize Threat Defense Feed RPZs against one another, we can refer to Infoblox’s documentation to obtain the Confidence and Threat Levels for each feed, allowing us to order them correctly.
-
Navigate to Data Management → DNS → Response Policy Zones.
-
Click Order Response Policy Zones on the toolbar.
-
Re-order the RPZs if required so that they are ordered as follows:
-
allowlist.rpz
-
walledgarden.rpz
-
denylist.rpz
-
infoblox-base.rpz.infoblox.local
-
infoblox-base-ip.rpz.infoblox.local
-
-
Click OK.
-
Restart services when prompted.
-
Use the refresh icon to update the Last Updated field, which shows the date and time of the last feed update.
Task 22 Solution: Verify that the newly added Threat Defense RPZ feeds are detecting malicious domains to be blocked
The feeds may take some time to download into the Grid. Before proceeding with this task, make sure the Last Updated column is populated for the feeds. This process can take approximately 15–20 minutes.
In this task, we will use dig and syslog entries to validate that infoblox-base.rpz.infoblox.local is catching malicious DNS domains. They won't be blocked yet, but we should be able to see logs verifying that the feed matches the traffic.
-
Switch over to the testing-linux virtual machine with the credentials (training/infoblox).
-
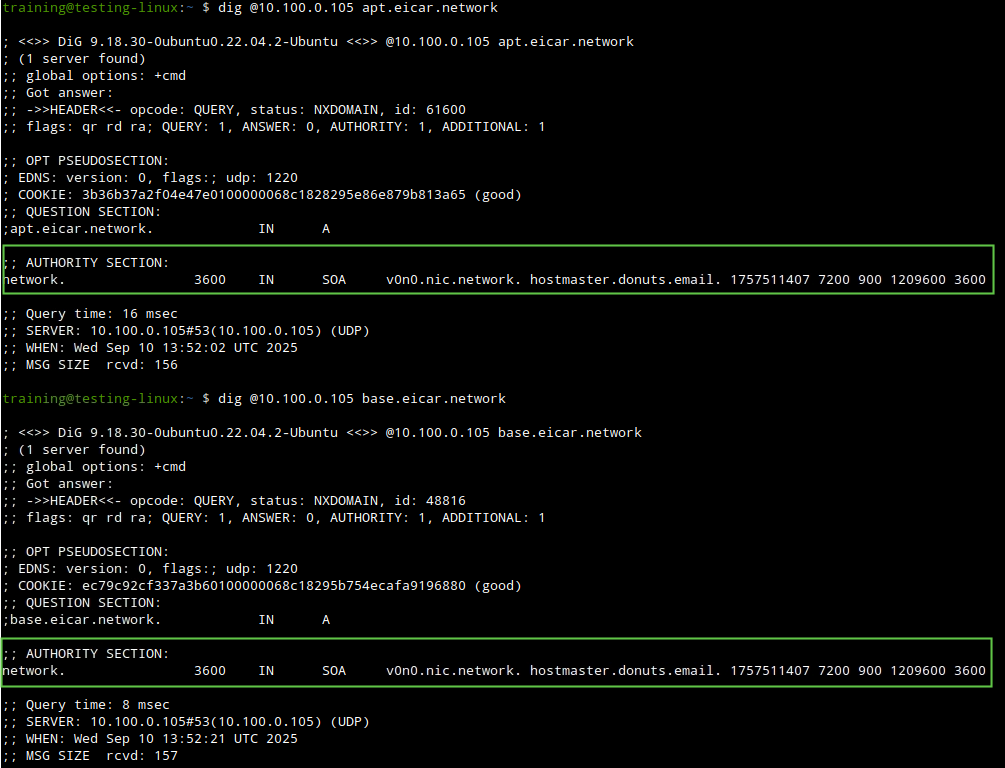
Use this dig command dig @10.100.0.105 <DOMAIN NAME> against one or more of the following domains: apt.eicar.network, base.eicar.network, compromiseddomain.eicar.network, compromisedhost.eicar.network, exploitkit.eicar.network, maliciousnameserver.eicar.network, or sinkhole.eicar.network.
-
The NXDOMAIN response here is from public DNS resolvers, not from our DNS Server. The output here is not that important; we know our servers didn’t block it. Since the SOA record is for a public DNS server and not one of our servers, we need to verify that further.
-
-
Switch back to jump-desktop.
-
Navigate to Administration → Logs → Syslog.
-
Select Member ibns1.techblue.net from the drop-down list.
-
Choose RPZ Incidents from the Quick Filter drop-down list.
-
Click the Toggle Multi line view link.
-
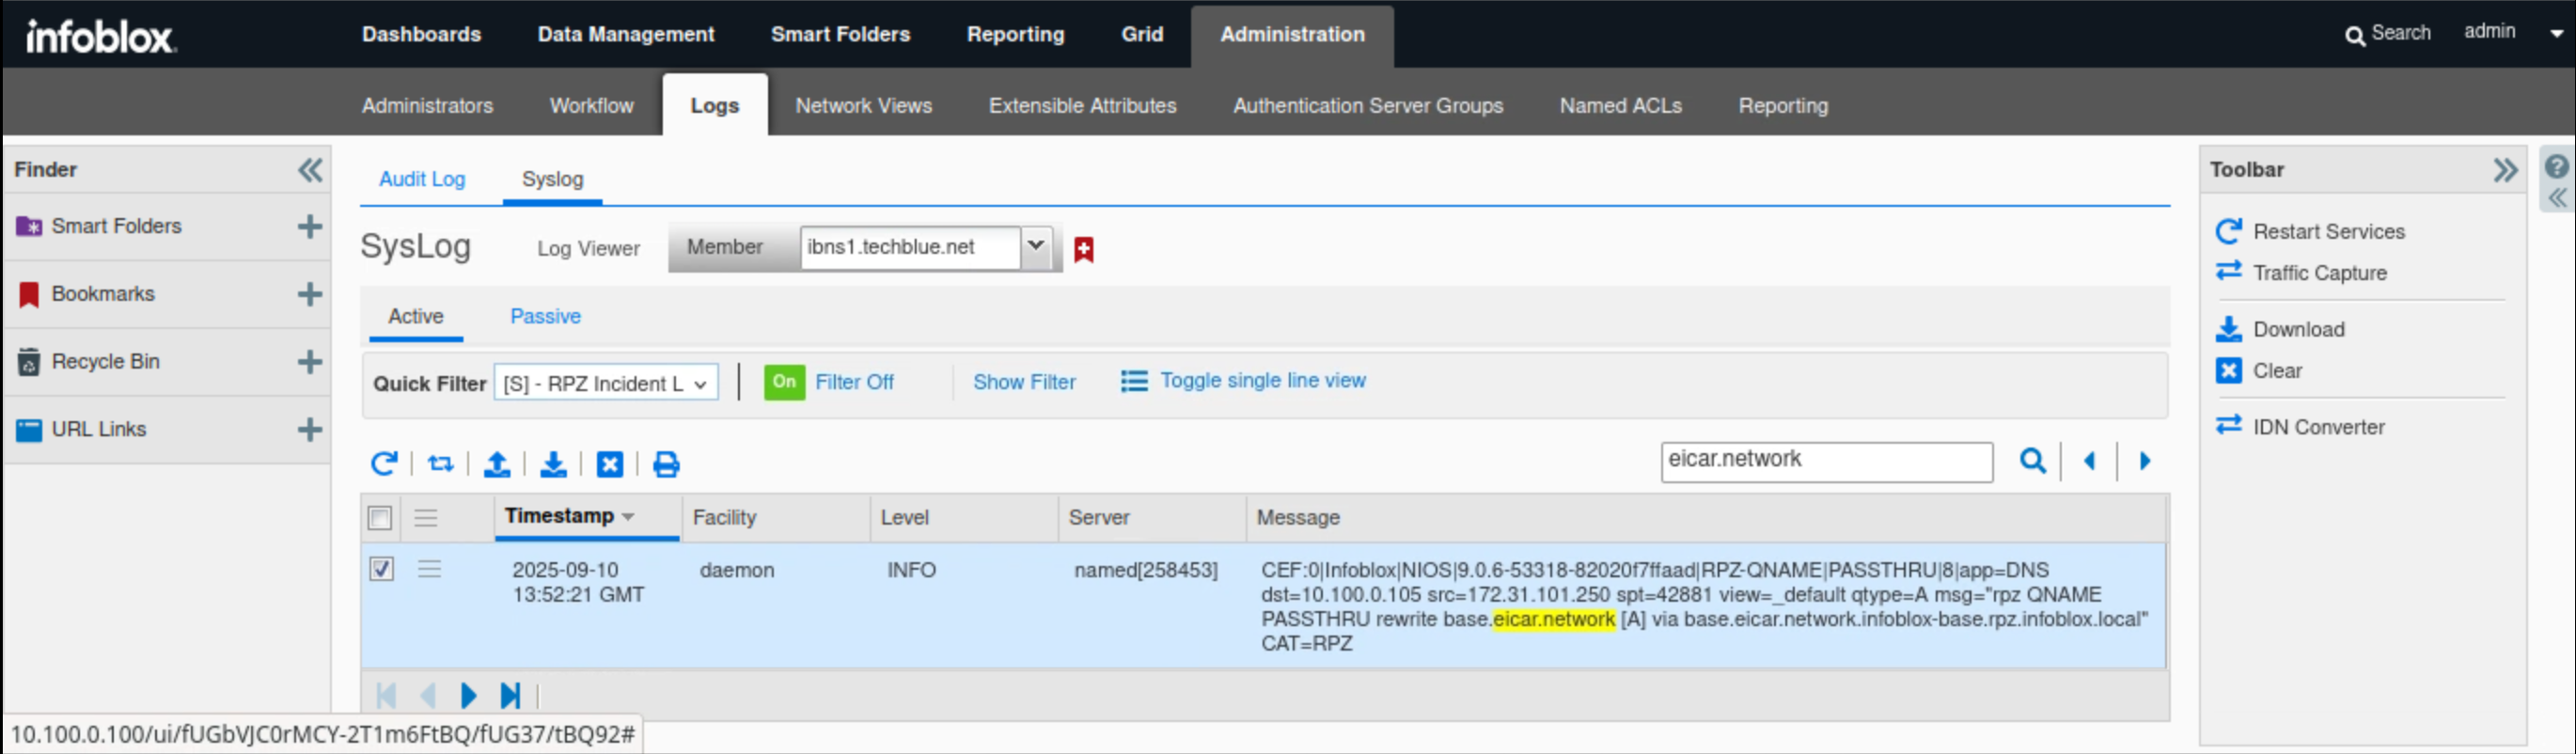
Type eicar.network in the search box.
-
In this example, the DNS Query for base.eicar.network is listed in the messages section in CEF format. The query matches a PASSTHRU rule in base.rpz.infoblox.local.
-
Task 23 Solution: Change the Override Policy for infoblox-base.rpz.infoblox.local to None (Given)
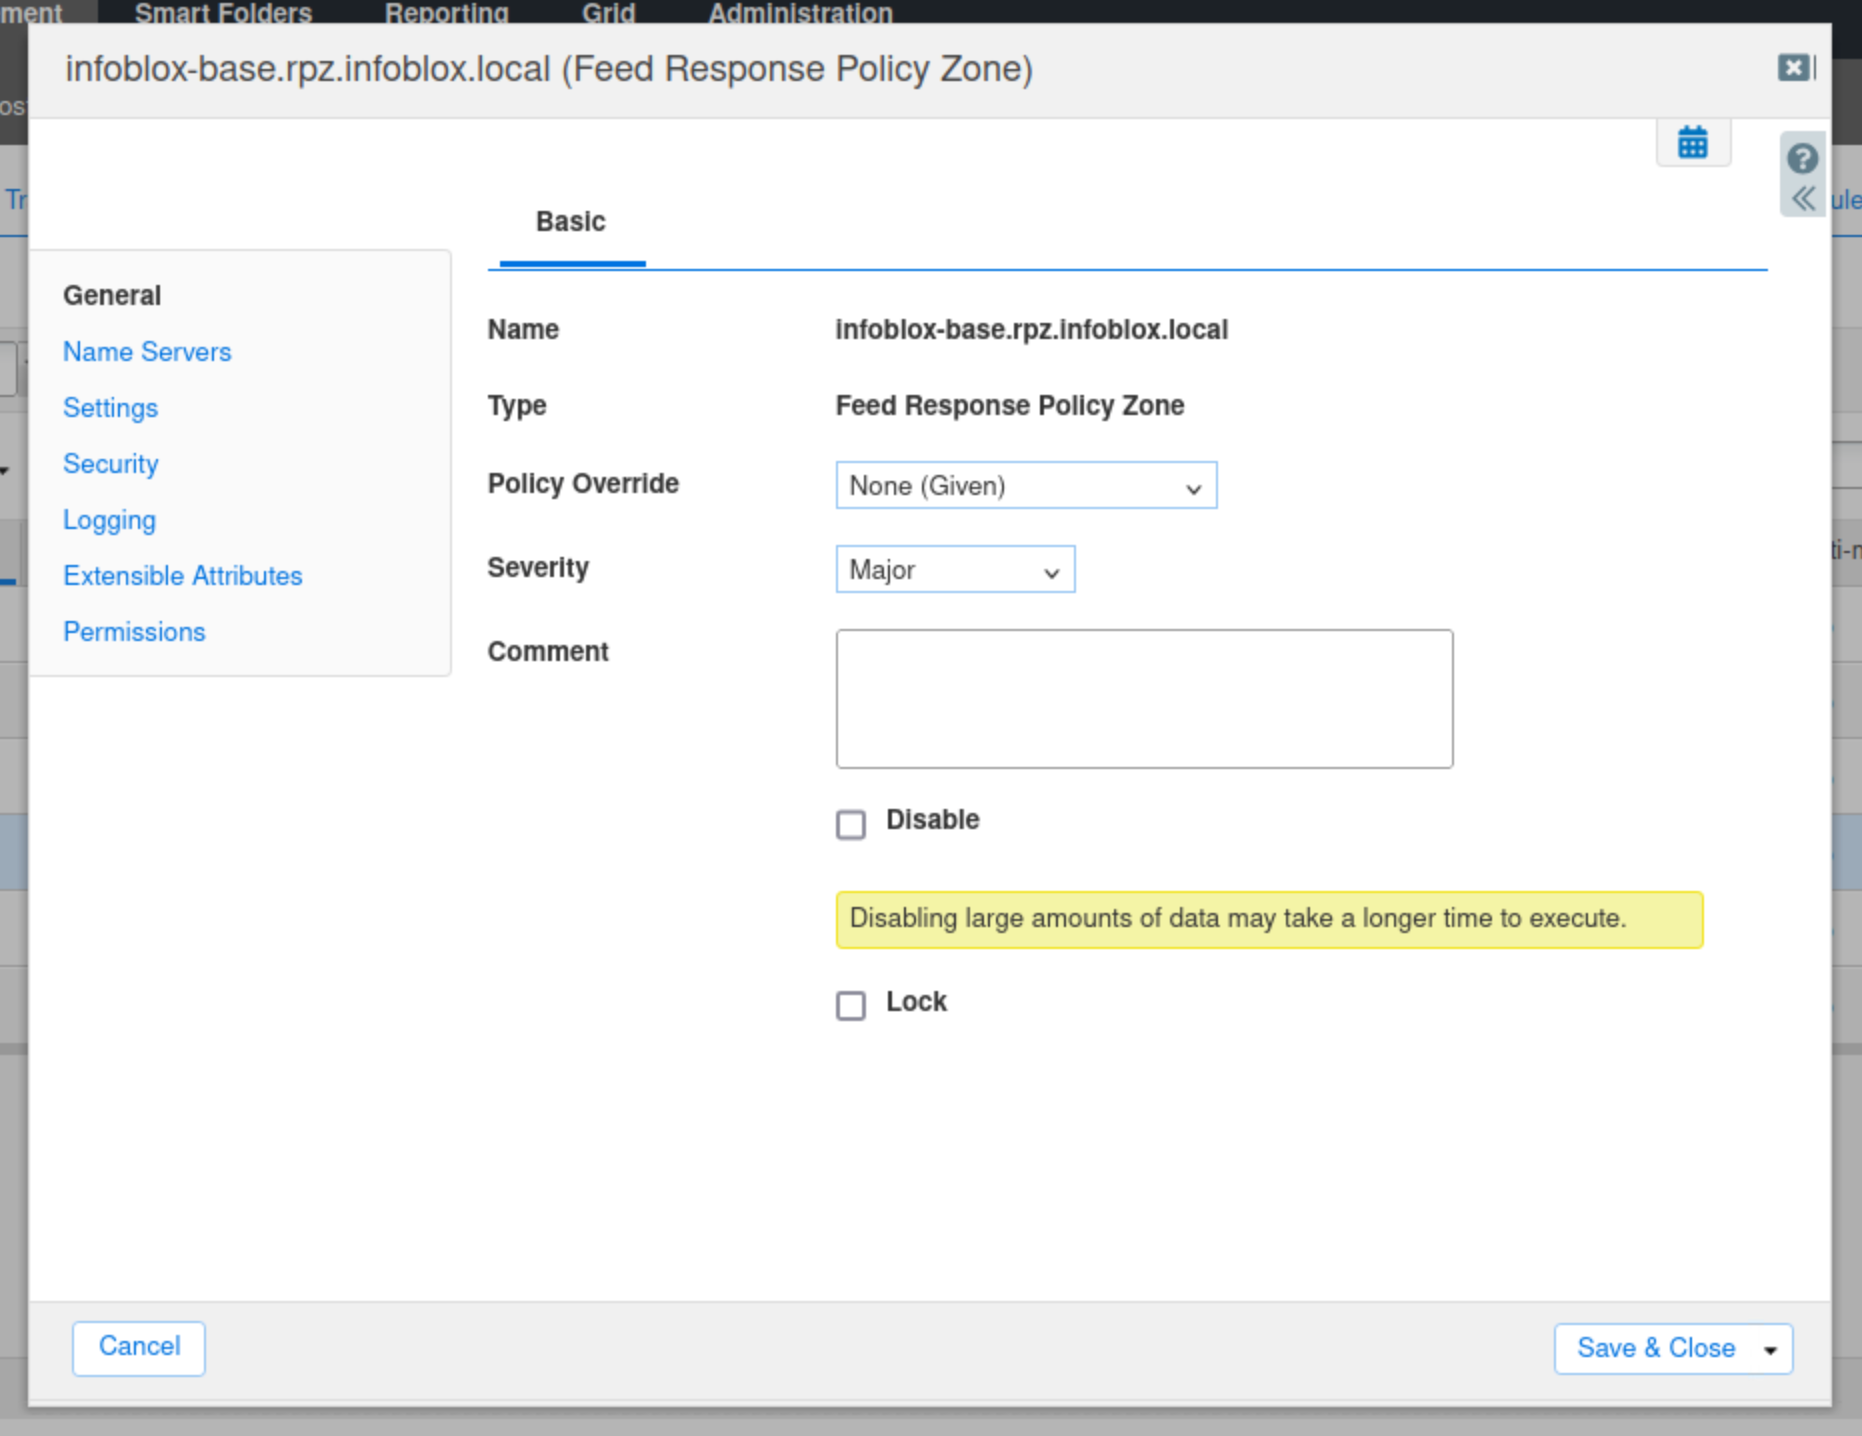
In this task, we will set the Policy Override mode to None (Given) so that the downloaded RPZ can enforce its default action on matching traffic. For the feeds we’ve selected and the test domains in use, this default action is to block traffic.
-
Navigate to Data Management → DNS → Response Policy Zones.
-
Select the infoblox-base.rpz.infoblox.local feed and click the hamburger icon.
-
Select Edit.
-
Change the Policy Override value to None(Given).
-
Click Save & Close.
-
Restart services when prompted.
Task 24 Solution: Test if the Threat Defense RPZ feeds are blocking malicious domains
-
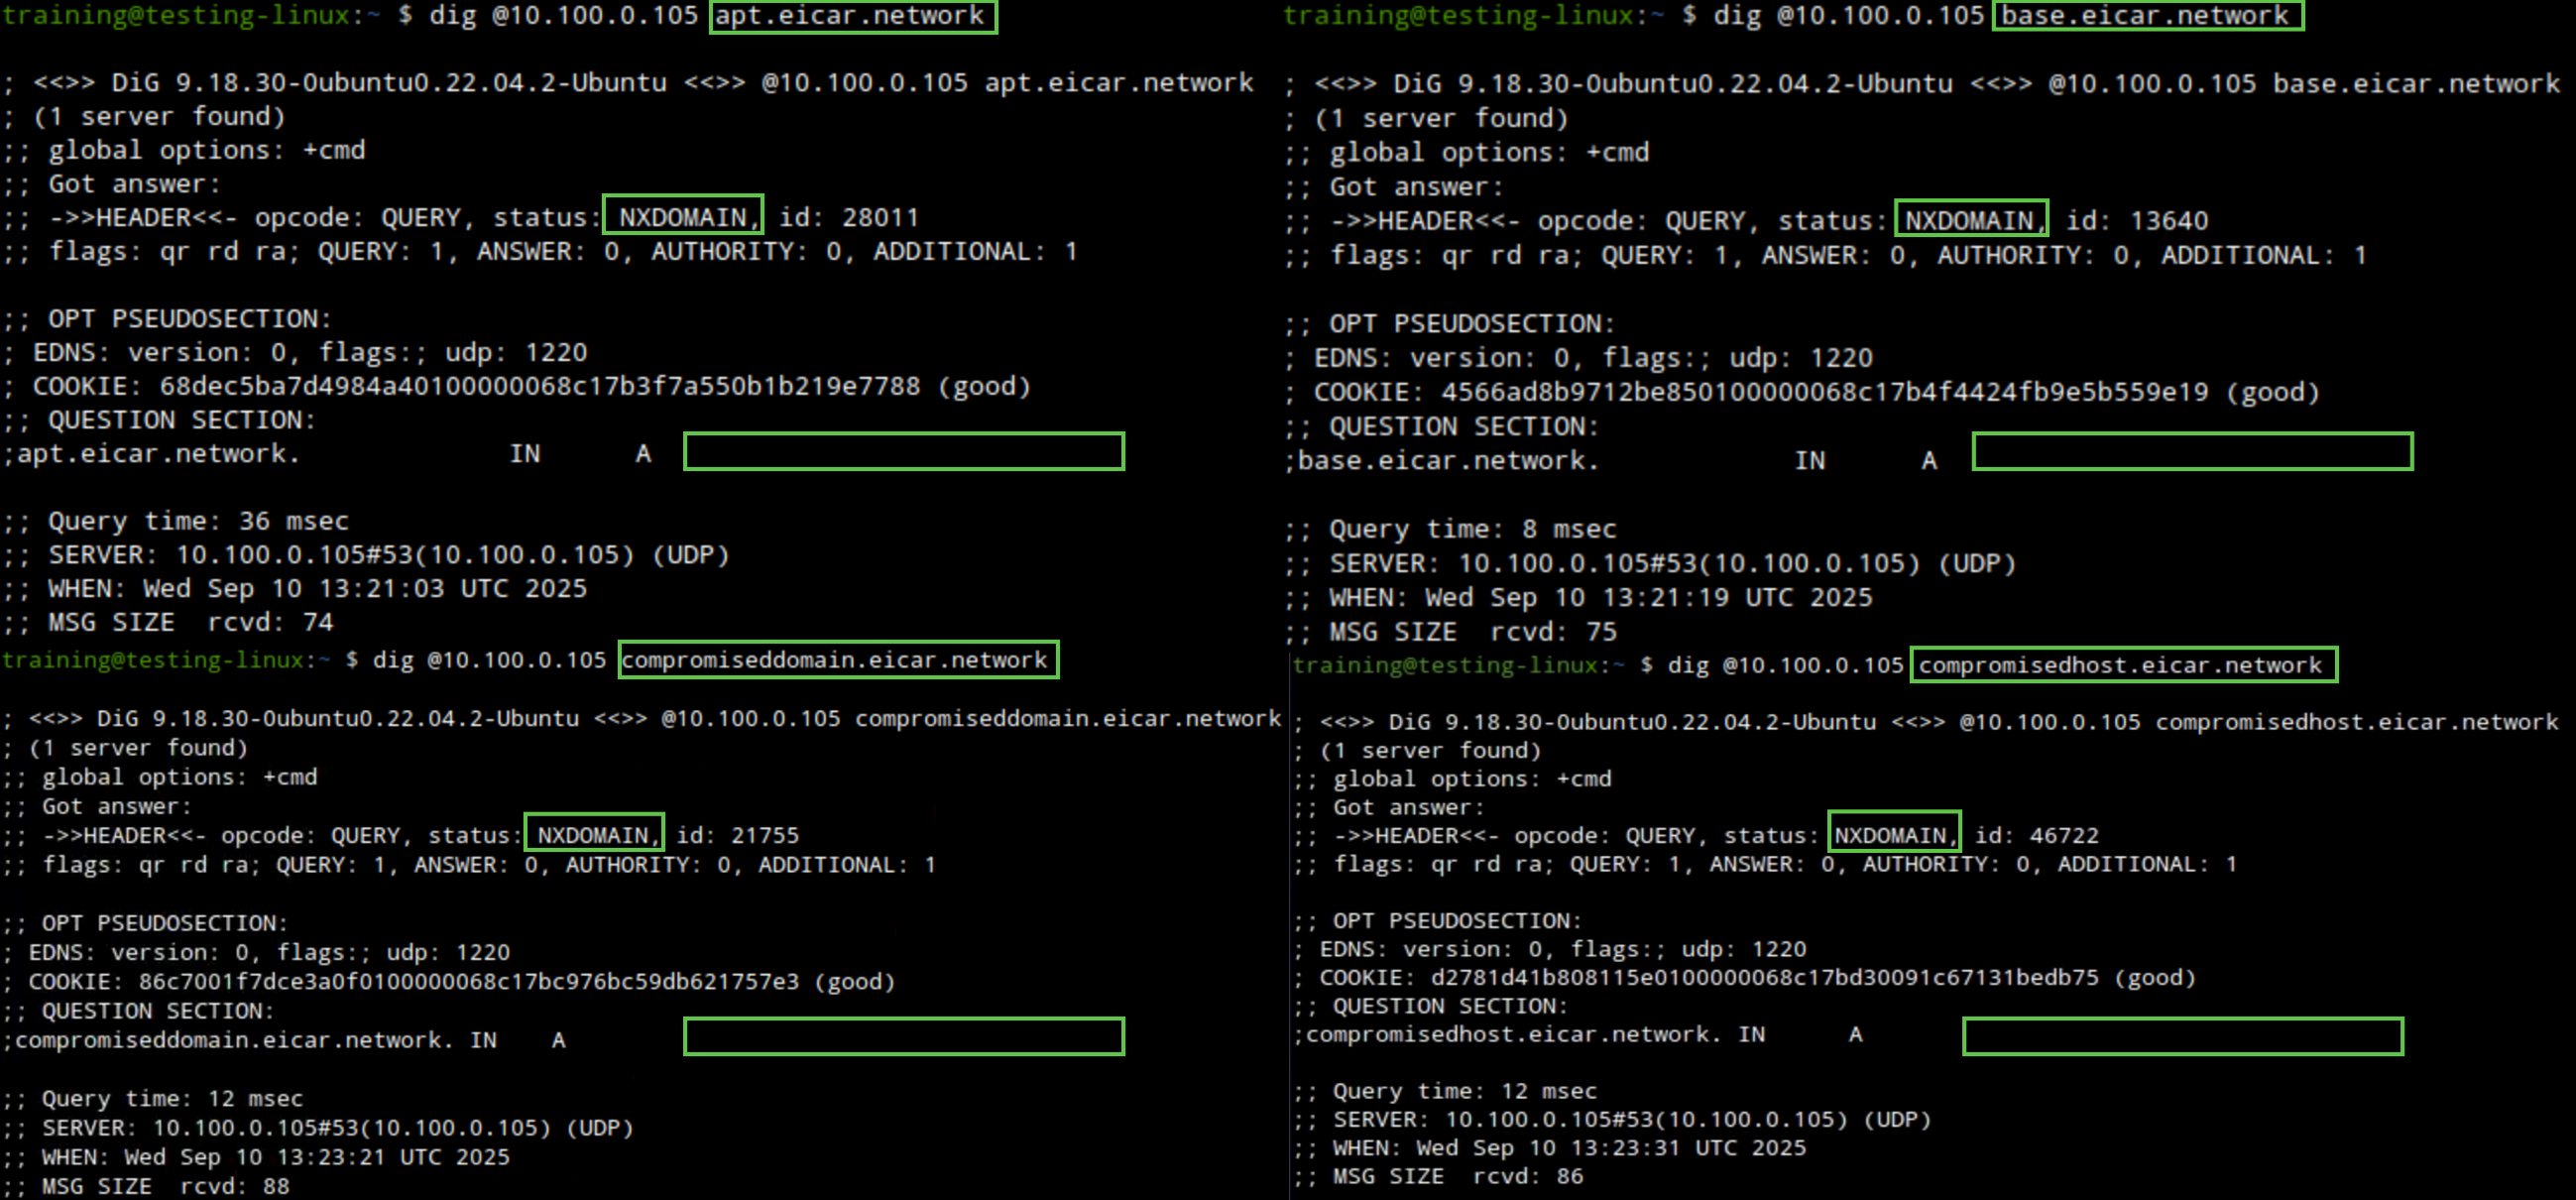
We will use the same dig command dig @10.100.0.105 <DOMAIN NAME> against one or more of the following domains: apt.eicar.network, base.eicar.network, compromiseddomain.eicar.network, compromisedhost.eicar.network, exploitkit.eicar.network, maliciousnameserver.eicar.network, or sinkhole.eicar.network.
-
We receive an NXDOMAIN response message for each query we send, this time with an. empty A record, indicating that our RPZ feed is blocking malicious traffic.
-
Switch back to jump-desktop.
-
Navigate to Administration → Logs → Syslog.
-
Select Member ibns1.techblue.net from the drop-down list.
-
Choose RPZ Incidents from the Quick Filter drop-down list.
-
Click the Toggle Multi line view link.
-
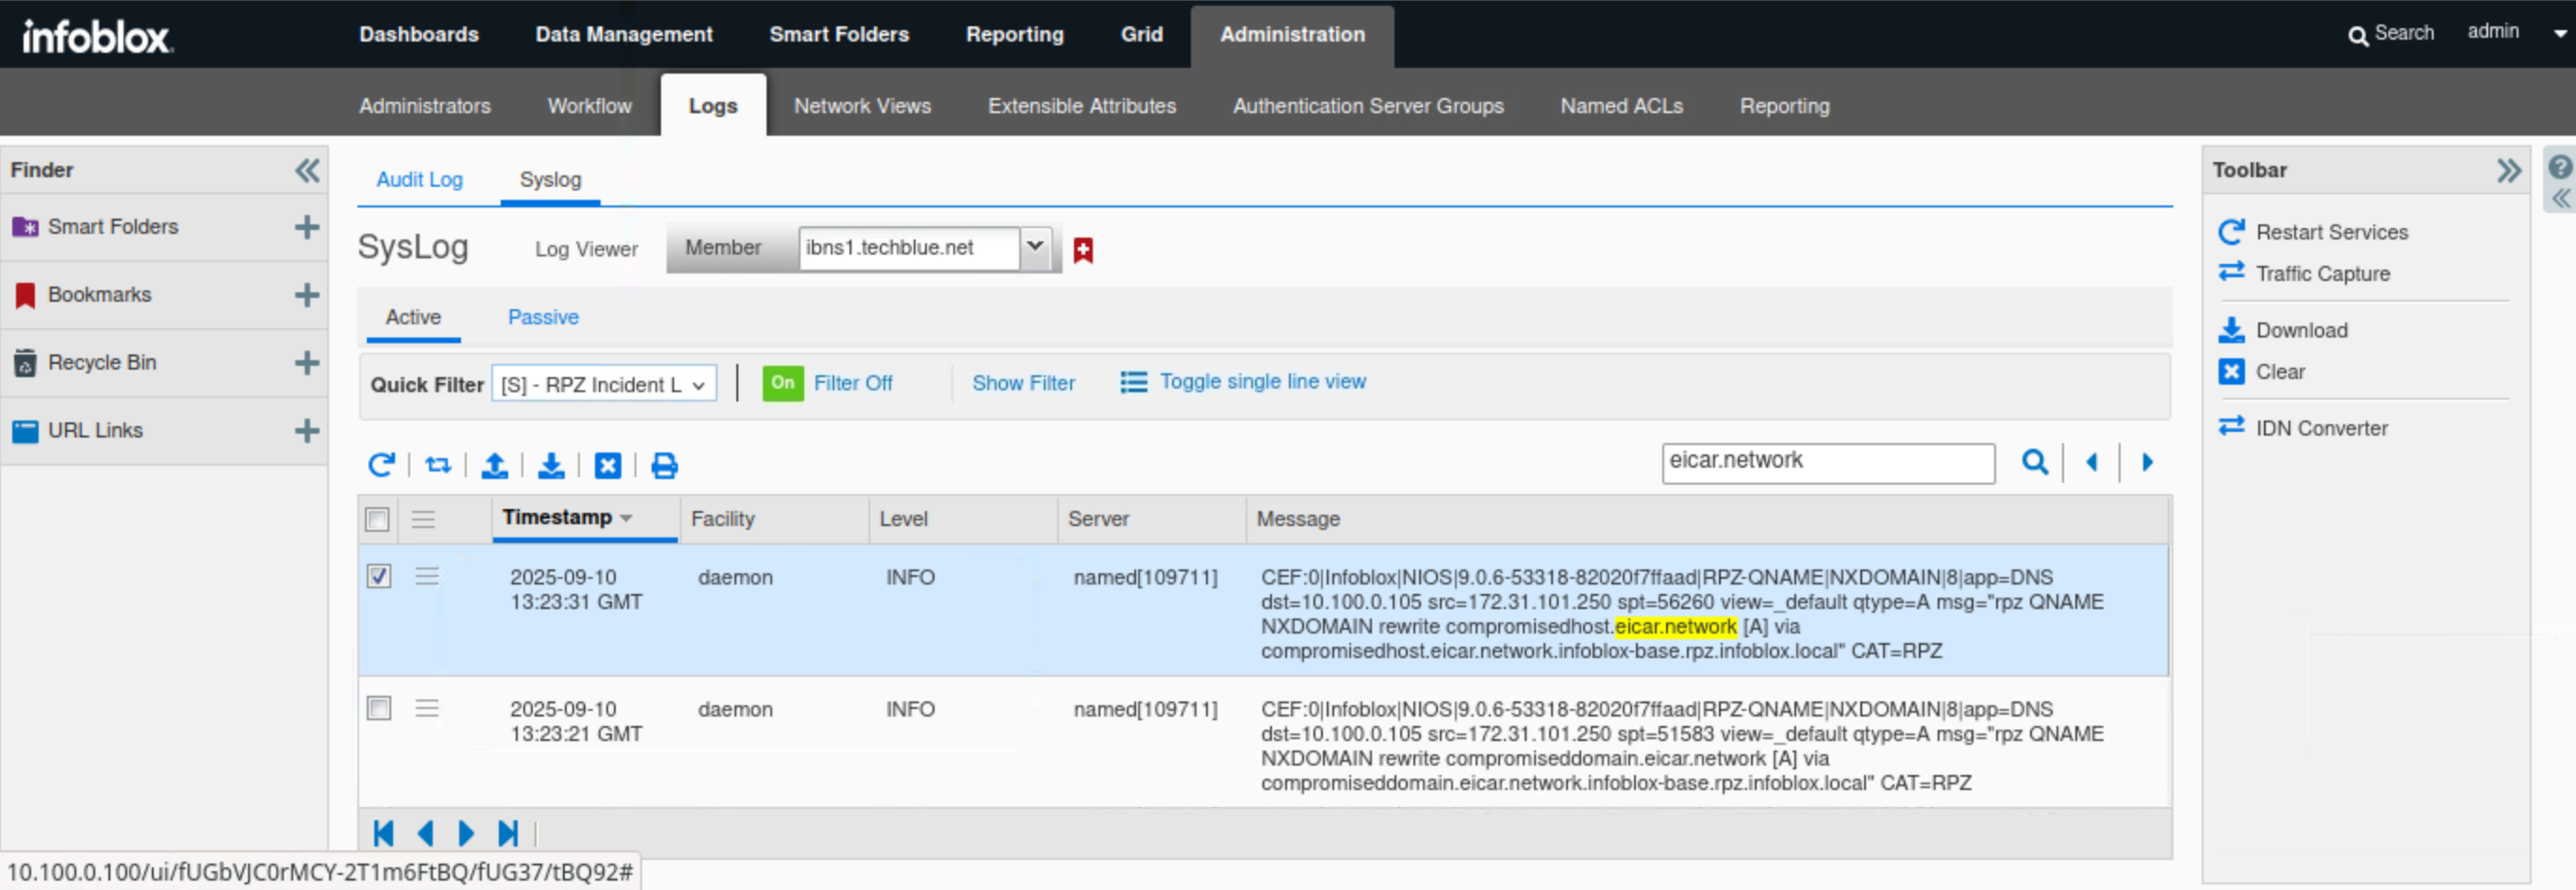
Type eicar.network in the search box.
-
In this example, the DNS Query for compromisedhost.eicar.network is listed in the messages section in CEF format. The query matches an NXDOMAIN rule in base.rpz.infoblox.local.
-