

Infoblox Portal Navigation – Read First
Do things look different? A temporary toggle in the Infoblox Portal allows you to switch between the new and classic navigation experiences while our content is being updated. The toggle will be available through December 14, 2026. Use the toggle button switch between the classic and new navigation.

Scenario
In this lab, you are a systems administrator for an organization that uses a Microsoft Active Directory environment based on the techblue.co forest. The organization wants to integrate its Microsoft infrastructure services with the Infoblox Universal DDI platform to centrally discover and manage Active Directory, DNS, DHCP, and user activity information.
The environment includes the following systems:
|
System |
Role |
|---|---|
|
WEC-Server |
Windows Event Collector (WEC) server used to host the Universal DDI Agent and collect Microsoft Event Log data |
|
Windows-Server |
Microsoft Active Directory Domain Controller for the |
|
testing-Windows |
Windows client system used to generate user login activity |
As part of the integration, you create a Join Token, install and register the Universal DDI Agent, create reusable Microsoft credentials, and configure Microsoft discovery jobs for Active Directory, DNS, DHCP, and Event Log collection.
After the discovery jobs are configured, you generate a domain login event from the testing-Windows client and verify that the Infoblox Portal displays discovered Assets, DNS and DHCP data, and user activity.
Estimated Completion Time
60 minutes
Prerequisites
-
Administrative access to the Infoblox Portal
-
Administrative access to install agents on Microsoft servers
Tasks
Task 1: Creating a Join Token
In the lab environment, from WEC-Server, use the Education Infoblox Portal credentials to log in to the Infoblox Portal and create a new Join Token so the Universal DDI Agent can register to the correct tenant.
Use the following values:
-
Join Token:
JT-MS
Task 2: Creating an IP Space
Create an IP space named Microsoft in the Infoblox Portal. You use this IP space later as the destination for Microsoft Dynamic Host Configuration Protocol (DHCP) discovery job.
Task 3: Installing the Universal DDI Agent
Download and install the Microsoft Universal DDI Agent on the WEC-Server VM, use the join token from Task 1 during installation, and then verify that the agent appears online in the Infoblox Portal and change the name of the Agent to Techblue_MSAD
Warning : This lab uses a simplified deployment model because of lab environment constraints. In a production deployment, you should install the Universal DDI Agents on multiple Microsoft servers, each dedicated to one type of discovery. For more information, please see the documentation for Installing Universal DDI Agents.
Task 4: Creating a Microsoft Credential
Create a reusable Microsoft credential in the Infoblox Portal. You use this credential for all Microsoft discovery jobs in the remaining tasks.
Use the following values:
-
Credential name:
MS_Credential -
Username:
ibuser@techblue.co -
Password:
infoblox
Task 5: Creating the Microsoft Active Directory Discovery Job
Create a Microsoft Active Directory discovery job that uses the installed Universal DDI Agent, the Microsoft credential from Task 3, and the domain controller at 10.35.22.30 on port 389.
Use the following values:
-
Job name:
AD_Discovery -
Target:
10.35.22.30 -
Port:
389 -
Credential:
MS_Credential
Note: This lab uses port 389 to simplify the exercise. In production environments, use the organization’s approved secure directory communication method and security controls.
Task 6: Creating the Microsoft Event Log Discovery Job
Create a Microsoft Event Log discovery job that uses the installed Universal DDI Agent.
Use the following value:
-
Job name:
WEC_Event_Discovery
Task 7: Creating the Microsoft DHCP Discovery Job
Create a Microsoft DHCP discovery job that uses the installed Universal DDI Agent, the Microsoft credential from Task 3, the DHCP server at 10.35.22.30, and Read/Write synchronization.
Use the following values:
-
Job name:
DHCP_Discovery -
DHCP server:
10.35.22.30 -
Sync type: Read/Write
-
Credential:
MS_Credential -
Destination IP Space: Microsoft
Task 8: Creating the Microsoft DNS Discovery Job
Create a Microsoft DNS discovery job that uses the installed Universal DDI Agent, the Microsoft credential from Task 3, the DNS server at 10.35.22.30, and Read/Write synchronization.
Use the following values:
-
Job name:
DNS_Discovery -
DNS server:
10.35.22.30 -
Destination DNS View: New DNS View
-
DNS View Name :
Microsoft -
Sync type: Read/Write
-
Credential:
MS_Credential
Task 9: Triggering a Domain Login
Log In to the testing-Windows client with the local training account and password infoblox. Run the interface-static-windows.bat script from the Tools folder as an administrator to point the client to the Windows server for DNS, and then Log Out. Log In again with the domain account techblue\training and password infoblox to generate user login activity.
Optional Task: Reviewing Microsoft DNS and DHCP configuration the Windows Server
Log in to the Windows-Server VM and review Microsoft DNS zones, DNS records, and DHCP scope information to become familiar with the local Microsoft management tools and the data synchronized with the Infoblox Portal.
Task 10: Verifying Data in the Infoblox Portal
Verify that the Infoblox Portal displays discovered Assets, DNS zones and records, DHCP scopes, user login activity, and endpoint-to-user mapping.
Check the following areas:
-
Network → DNS
-
Network → IPAM/DHCP
-
Assets → Inventory
Note: In this lab environment, user-login correlation data might not appear immediately after the domain Log In because of lab resource constraints. Wait up to 10 to 15 minutes, refresh the page, and then verify the Users section again.
Solutions
Task 1 Solution: Creating a Join Token
In this task, you create a join token in the Infoblox Portal. The Universal DDI Agent uses this token to register with the correct tenant.
-
Login to WEC-Server VM using following credentials:
-
Username:
training -
Password:
infoblox
-
-
Use your Education Infoblox Portal Credentials to log into the Infoblox Portal.
-
Navigate to System → Administration → Join Tokens.
-
Click Create.
-
Use JT-MS as the token’s name.
-
Click Save & Close.
-
-
Copy the token string from the popup window on your browser.
-
Open the text editor Notepad on wec-server and save your join token.
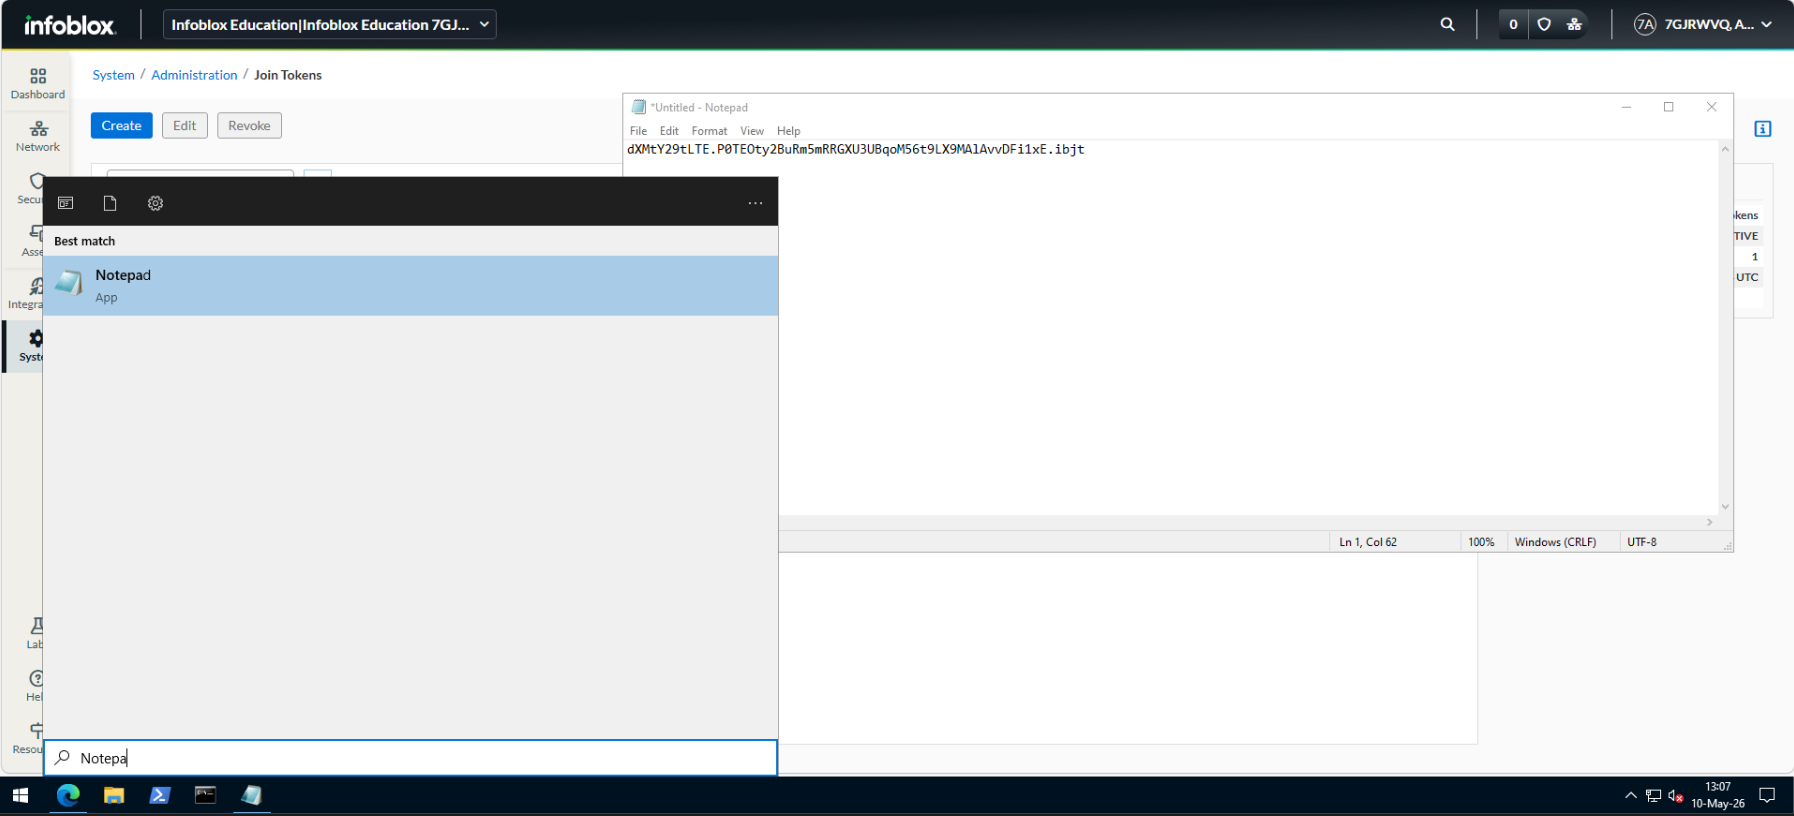
Task 2 Solution: Creating an IP Space
In this task, you create a new IP space in the Infoblox Portal. This IP space provides a dedicated destination for Microsoft DHCP data that you discover later in the lab.
-
Navigate to Network → IPAM/DHCP in the infoblox portal.
-
Click the Address Spaces horizontal tab.
-
Click Create and then choose IP Space.
-
In the Create IP Space window, enter
Microsoftin the Name field.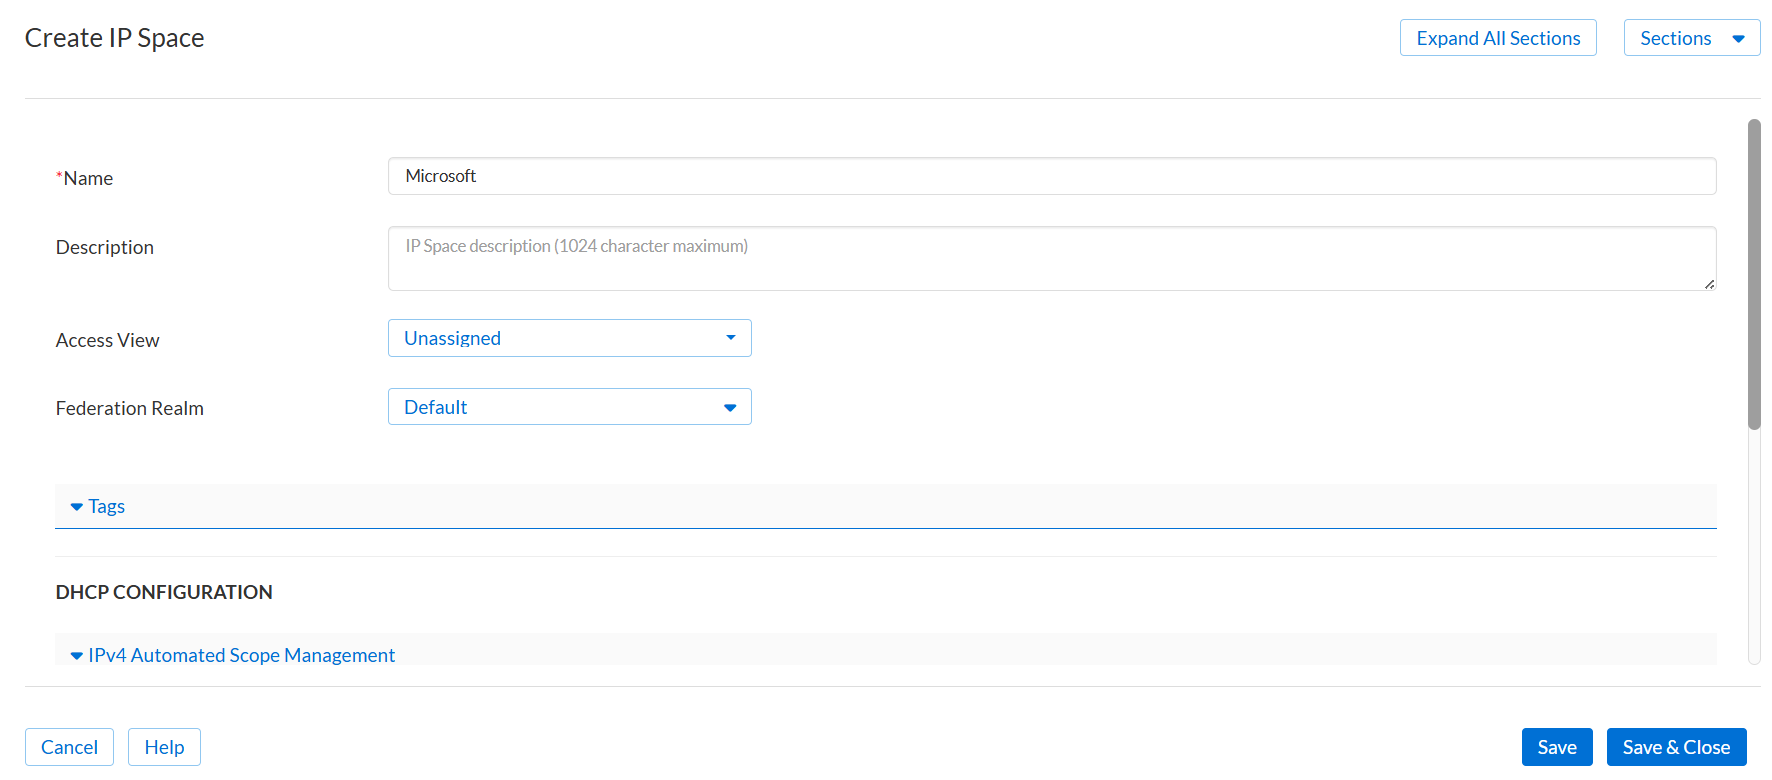
-
Click Save & Close.
Task 3 Solution: Installing the Universal DDI Agent
In this task, you install the Universal DDI Agent for Microsoft on the WEC server. After the installation completes, you verify that the agent appears online in the Infoblox Portal.
-
From the Infoblox Portal, navigate to System → Downloads.
-
Select Universal DDI Agent
-
Click Universal DDI Agent for Microsoft to Download the agent.
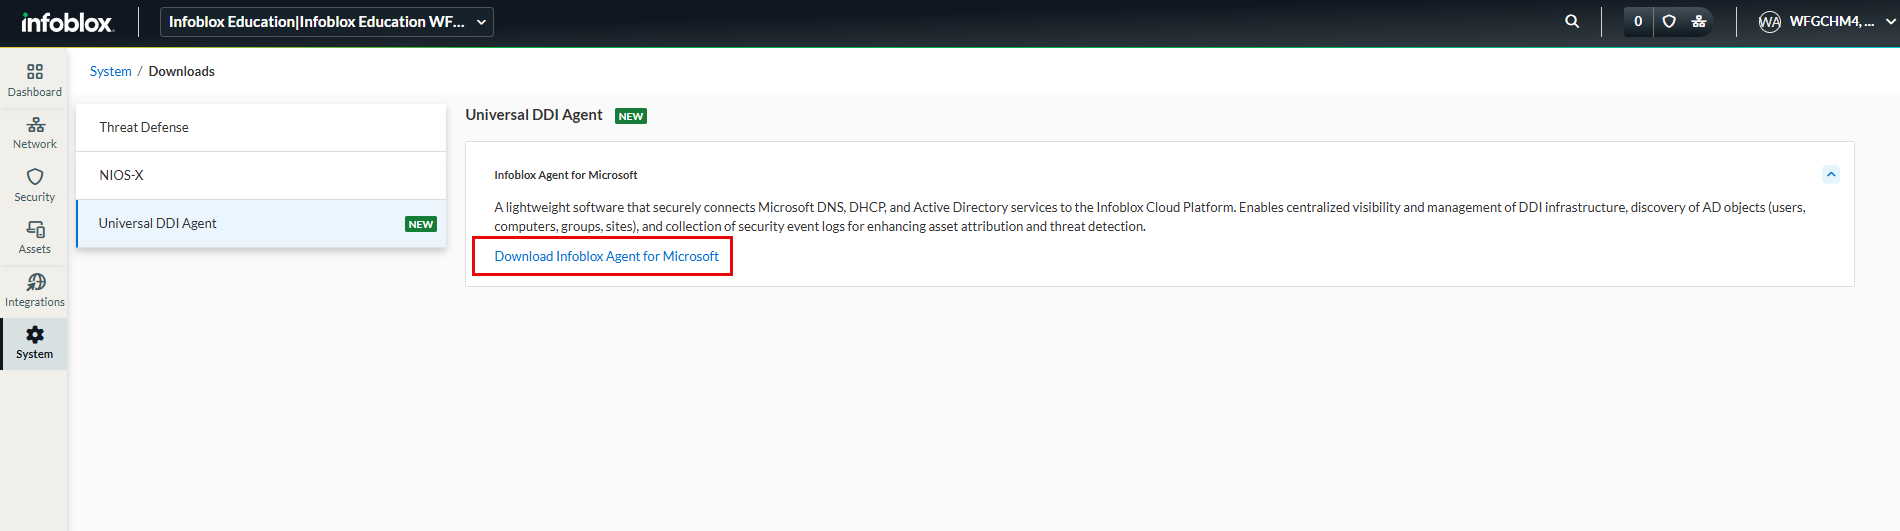
-
When the download completes, click Open file to start the installation.
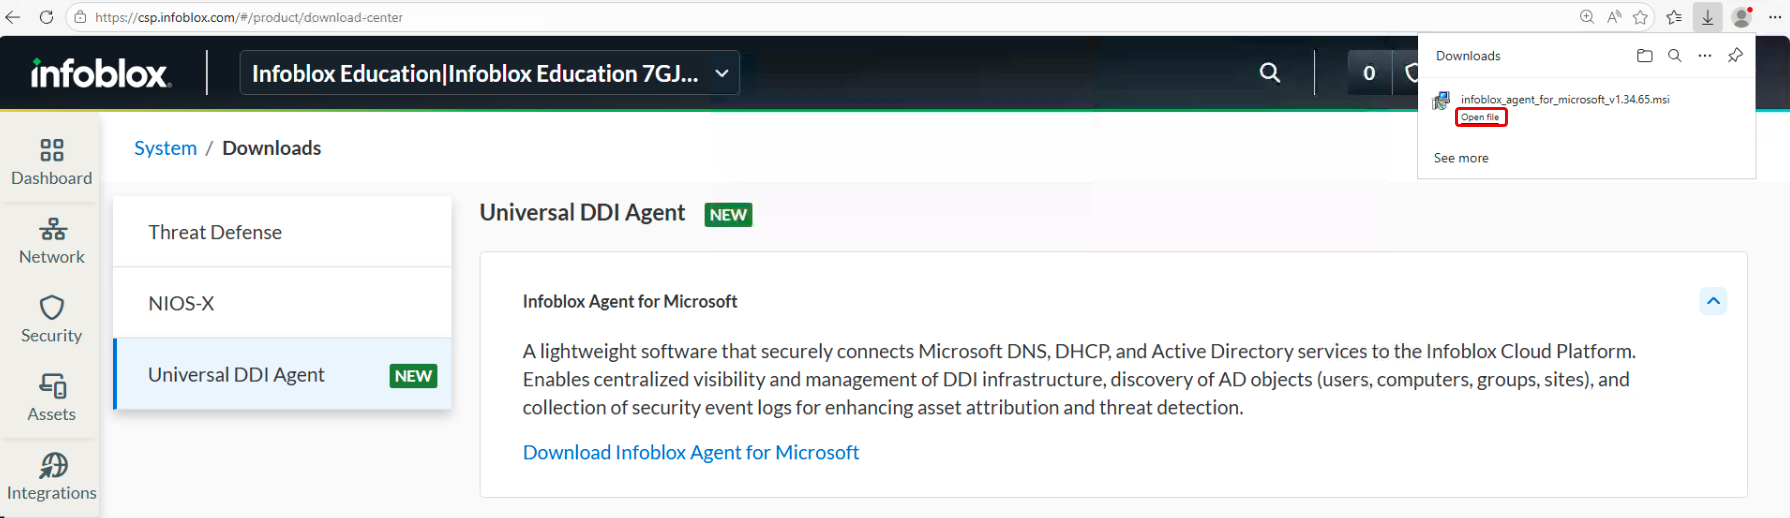
-
When the installer prompts you for input, proceed through the installation screens as needed.
-
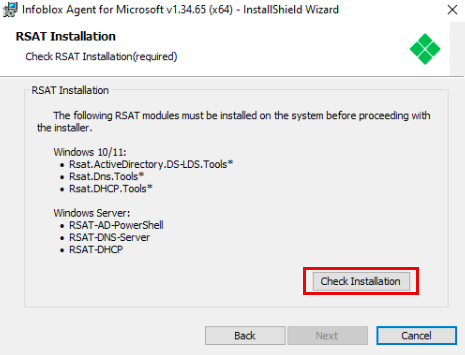
Under RSAT Installation, click Check Installation.
-
A dialog box appears stating that all RSAT modules are installed and available. Click OK and click Next.
-
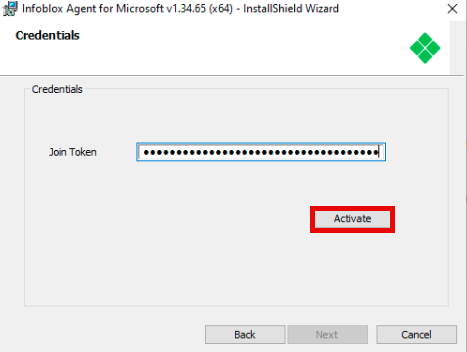
Under Credentials, paste the join token that you saved in Task 1.
-
Click Activate and wait briefly while the installer validates the join token.
-
A dialog box appears confirming that the join token is valid. Click OK and click Next.
-
Click Install.
-
If a User Account Control dialog box appears, click Yes.
-
Click Finish to complete the installation.
-
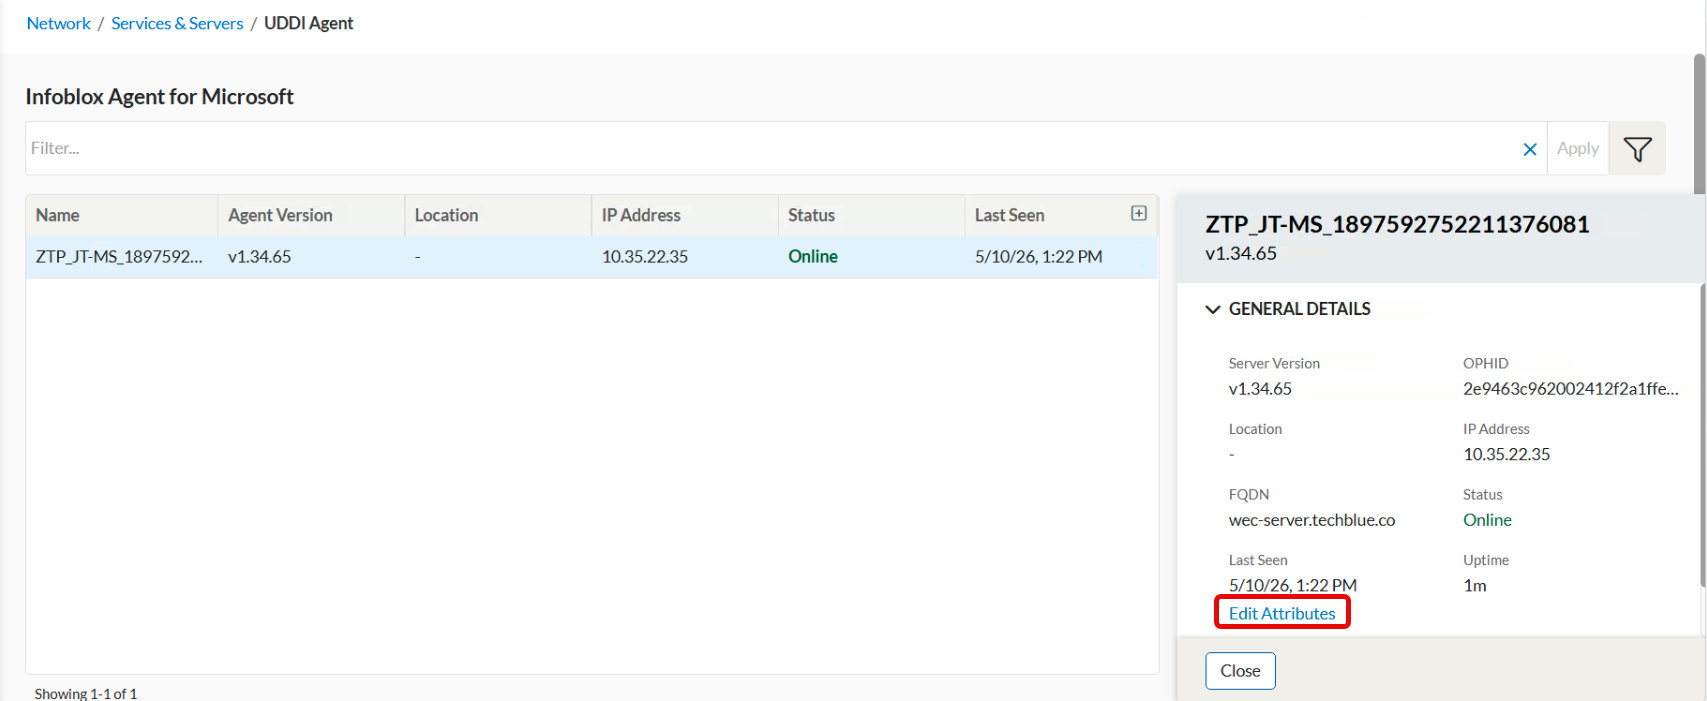
In the Infoblox Portal, navigate to Network → Services & Servers → UDDI Agent.
-
Confirm that the agent status displays as Online. It may take one to two minutes for the agent to appear online.
-
Click on the Agent Name . From the Right Panel under General Details , click Edit Attributes
-
Edit the Name of the Agent to
Techblue_MSAD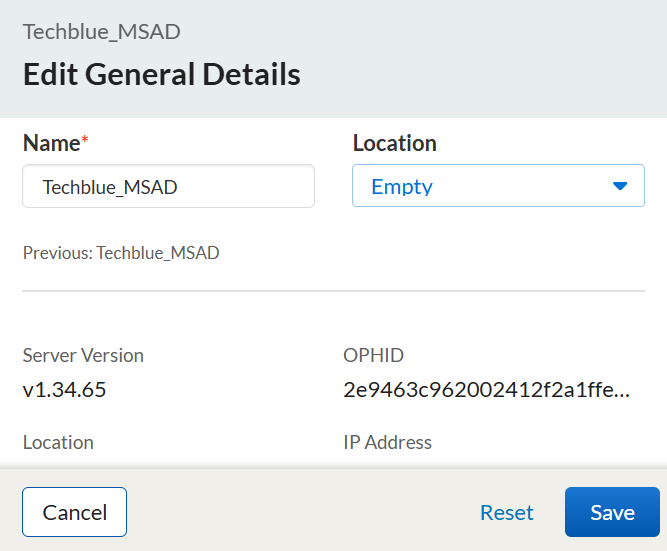
-
Click Save
Warning : This lab uses a simplified deployment model because of lab environment constraints. In a production deployment, you should install the Universal DDI Agents on multiple Microsoft servers, each dedicated to one type of discovery. For more information, please see the documentation for Installing Universal DDI Agents.
Task 4 Solution: Creating a Microsoft Credential
In this task, you create a reusable Microsoft credential in the Infoblox Portal. You use this credential for the Microsoft discovery jobs so you do not need to create a new credential for each job.
-
Navigate to System → Administration → Credentials.
-
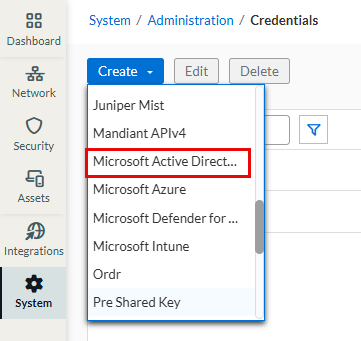
Click Create.
-
Choose Microsoft Active Directory as the credential type.
-
Configure the credential with the following values:
-
Name:
MS_Credential -
Username:
ibuser@techblue.co -
Password:
infoblox
-
Click Save & Close.
-
Confirm that the credential appears in the credentials list.
Task 5 Solution: Creating the Microsoft Active Directory Discovery Job
In this task, you create the Microsoft Active Directory discovery job. This job allows the Infoblox Portal to discover directory objects from the Microsoft domain controller.
-
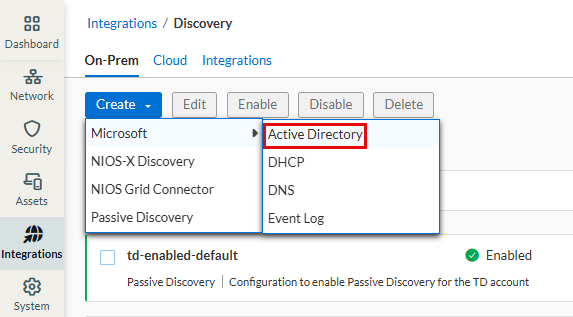
Navigate to Integrations → Discovery → Jobs
-
On the On-Prem Tab , Click Create and then choose Microsoft → Active Directory.
-
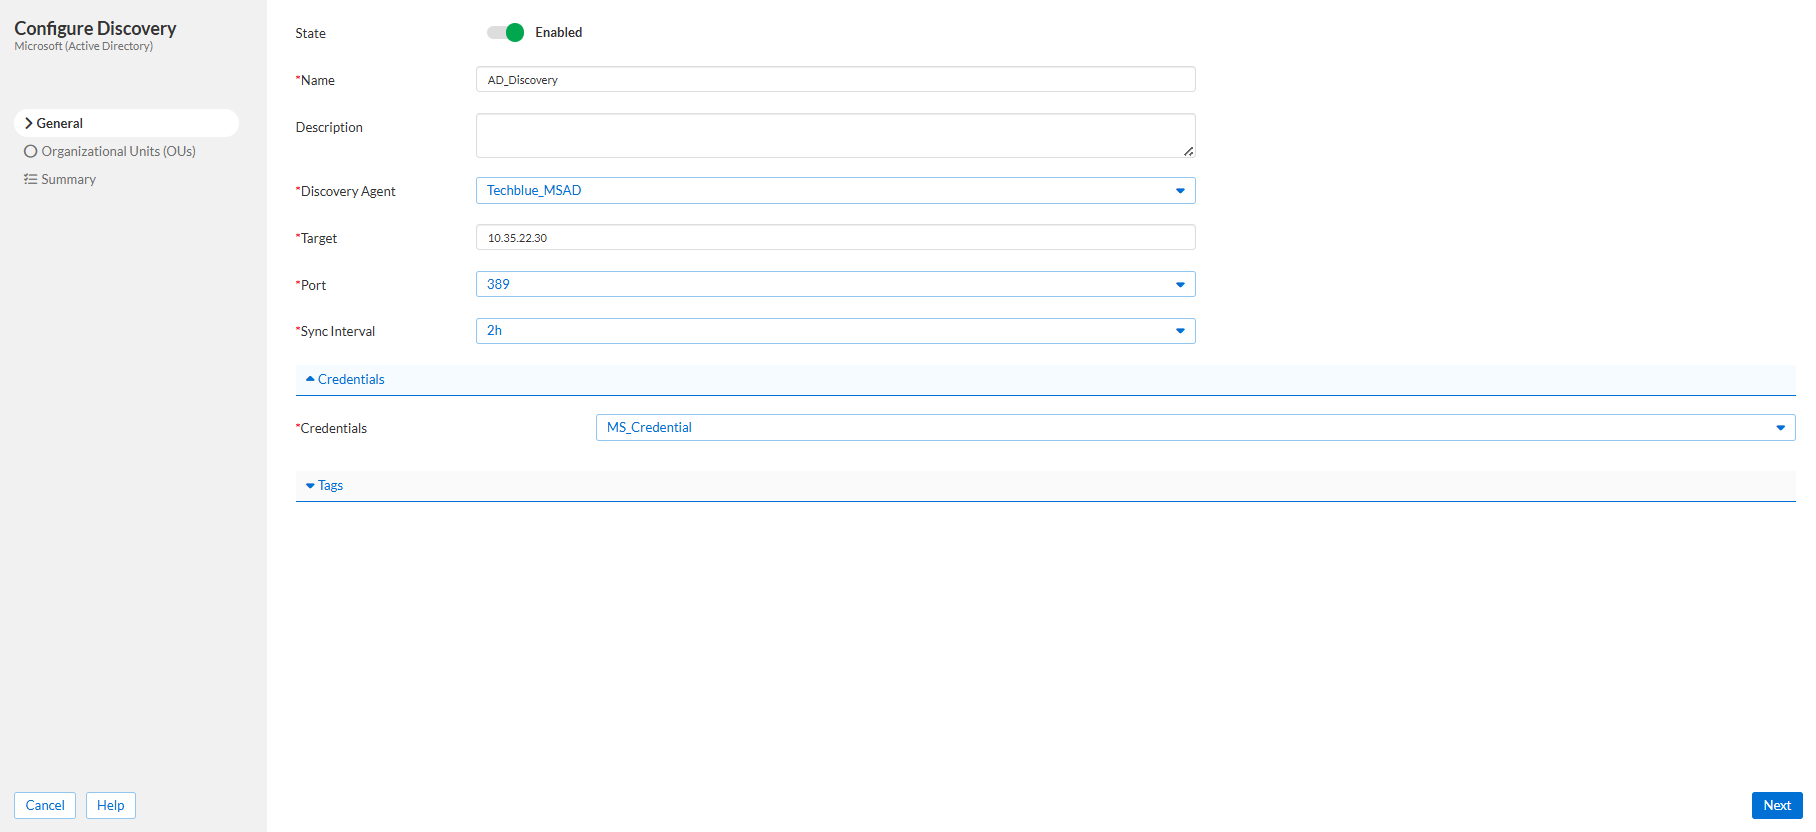
Configure the job with the following values:
-
Name:
AD_Discovery -
Discovery Agent: Techblue_MSAD
-
Target:
10.35.22.30 -
Port: 389
-
Sync Interval: 2h
-
Credential: Choose MS_Credential
-
Click Next.
-
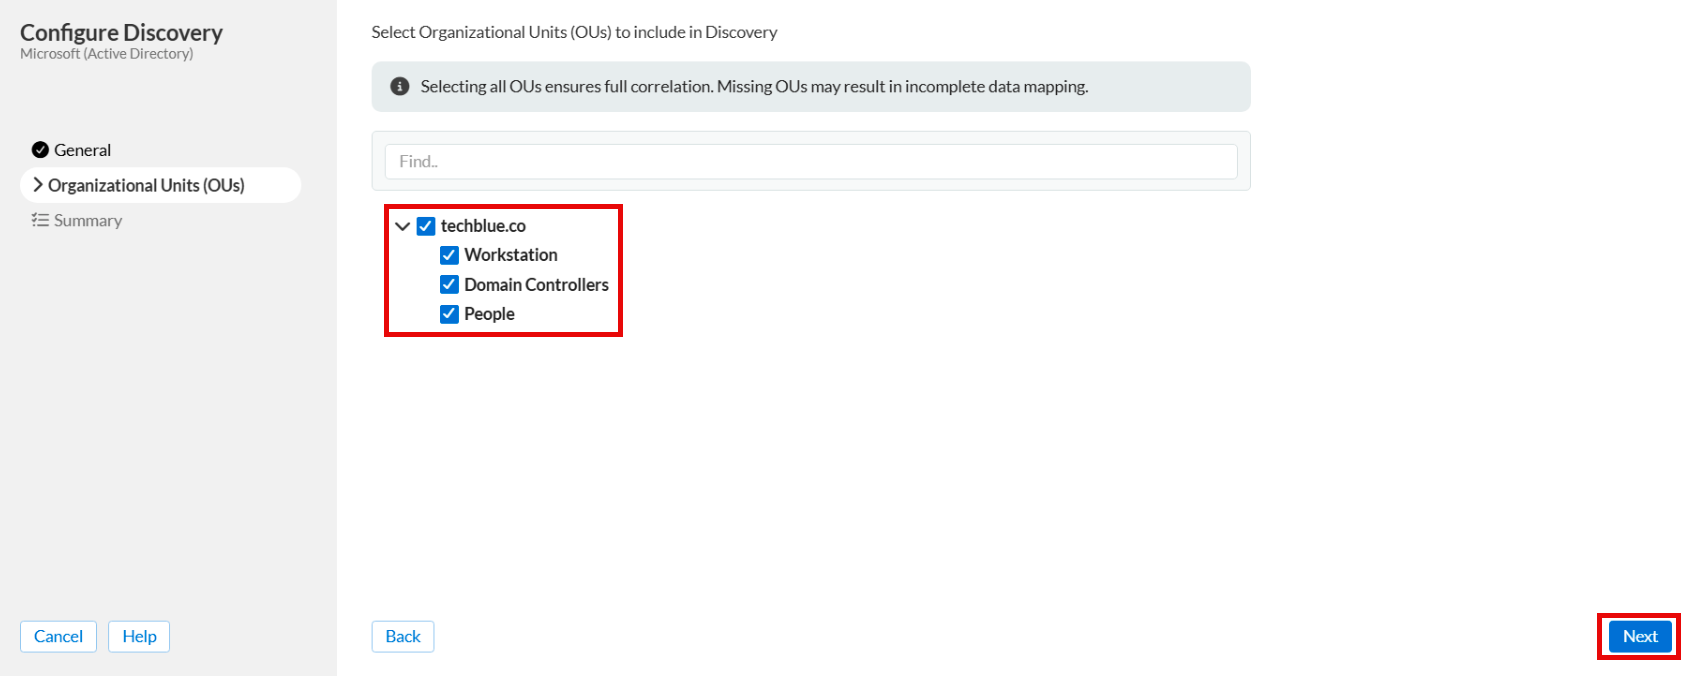
Select All Organizations Units by placing a check mark on techblue.co
-
Click Next and Save & Close.
Task 6 Solution: Creating the Microsoft Event Log Discovery Job
In this task, you create the Microsoft Event Log discovery job. This job allows the Infoblox Portal to collect user login activity for correlation and visibility.
-
Navigate to Integrations → Discovery → Jobs -> On-Prem.
-
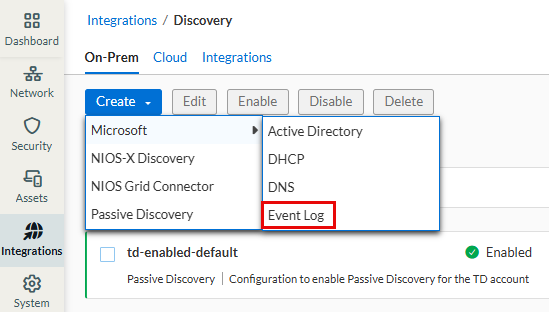
Click Create and then choose Microsoft → Event Log.
-
Configure the job with the following values:
-
Name:
WEC_Event_Discovery
-
Click Next.
-
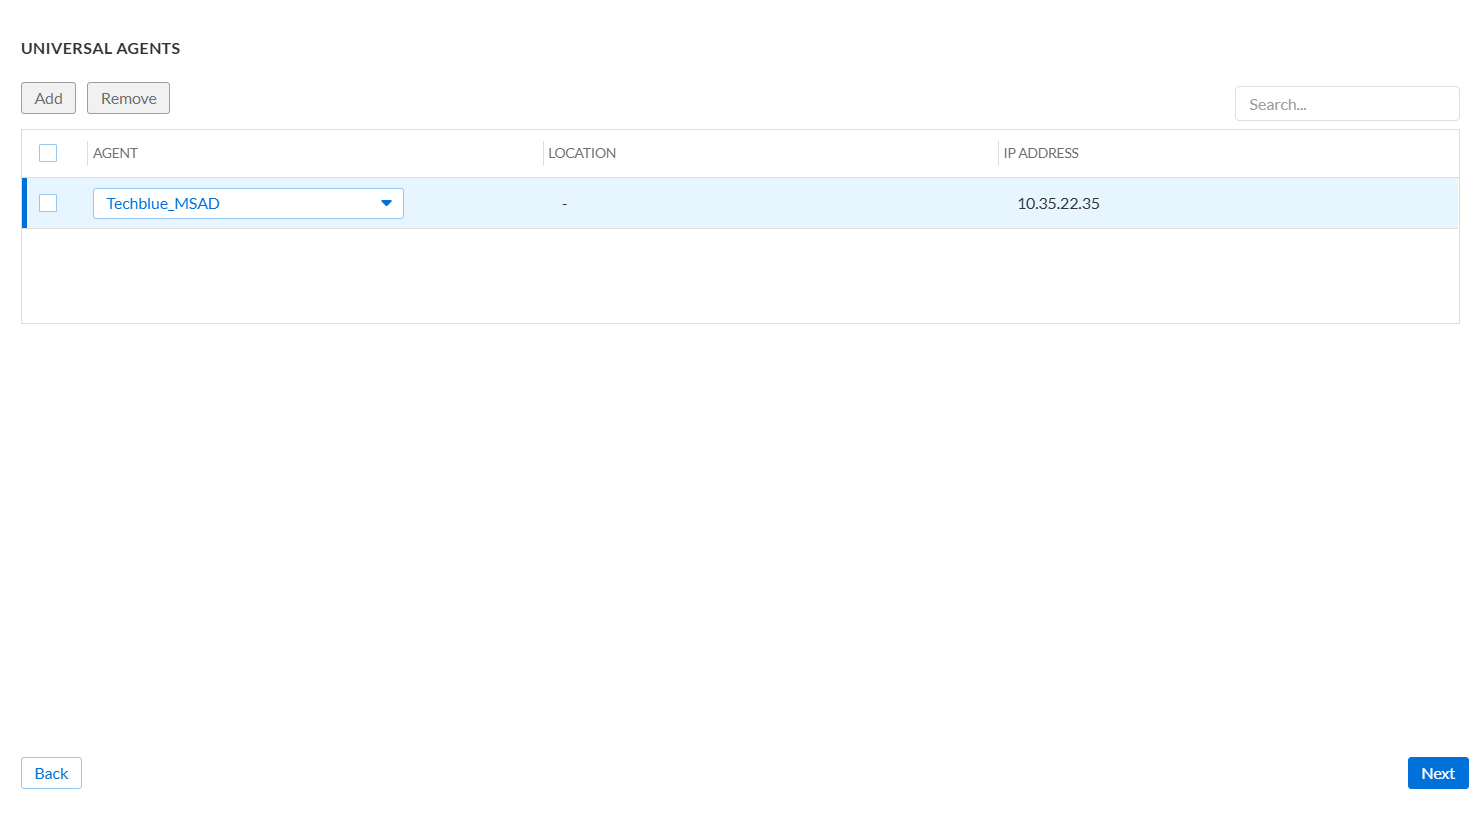
In the Universal agent section, select Techblue_MSAD.
-
Click Next and Save & Close.
Task 7 Solution: Creating the Microsoft DHCP Discovery Job
In this task, you create the Microsoft DHCP discovery job. This job allows the Infoblox Portal to synchronize DHCP scopes from the Microsoft DHCP server.
-
Navigate to Integrations → Discovery → Jobs
-
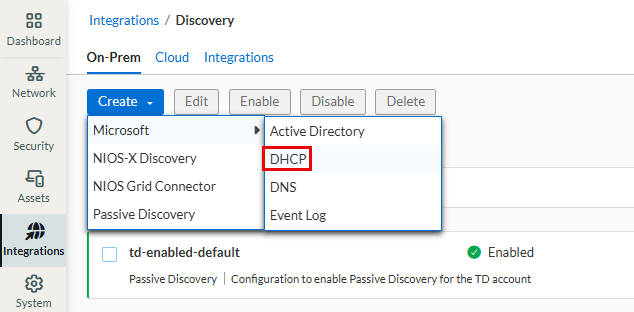
On the On-Prem Tab , Click Create and then choose Microsoft → DHCP.
-
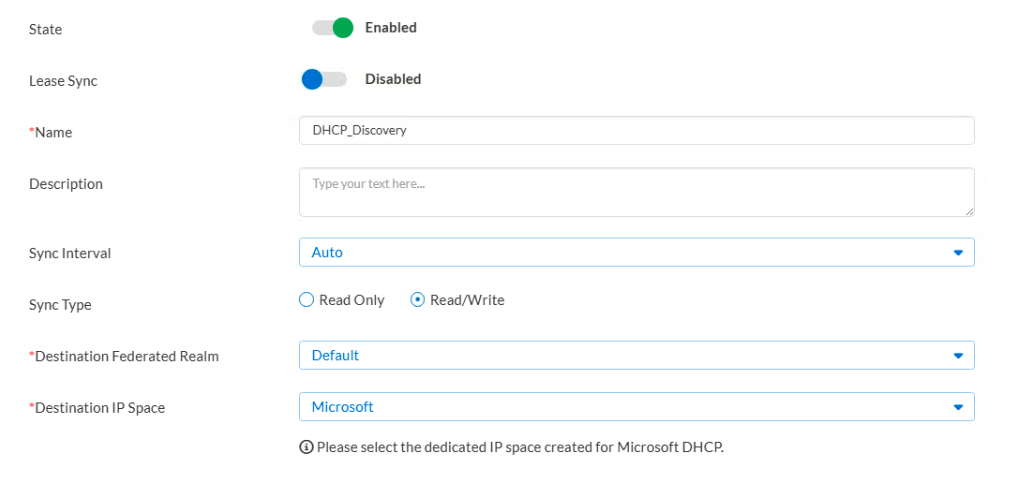
Configure the initial job settings:
-
Name:
DHCP_Discovery -
State: Enabled
-
Lease Sync: Disabled
-
Sync Interval: Auto
-
Sync Type: Read/Write
-
Destination Federated Realm : Default
-
Destination IP Space: Microsoft
-
Click Next.
Note: Read/Write synchronization is used in this lab to demonstrate integration behavior. In production, validate change-control requirements before enabling write operations.
-
In the service location section, click Add
-
For Universal Agent select Techblue_MSAD
-
Click Add under DHCP Server section, configure the following values:
-
Type : IP Address
-
DHCP Server:
10.35.22.30 -
Credential: Choose
MS_Credential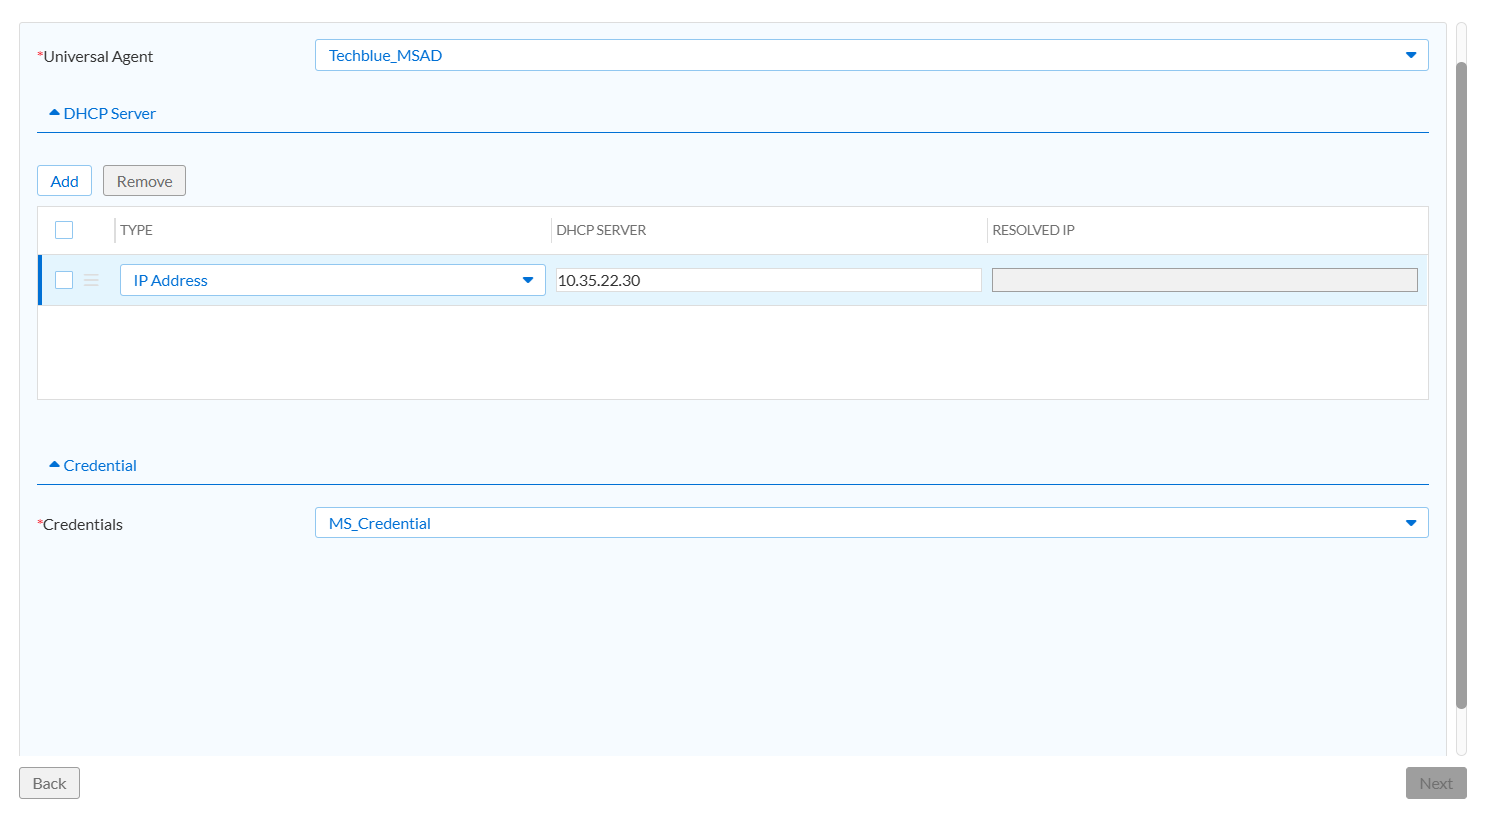
-
-
Scroll down and click Save.
-
Click Next.
-
Click Save & Close.
Task 8 Solution: Creating the Microsoft DNS Discovery Job
In this task, you create the Microsoft DNS discovery job. This job allows the Infoblox Portal to synchronize DNS zones and DNS records from the Microsoft DNS server.
-
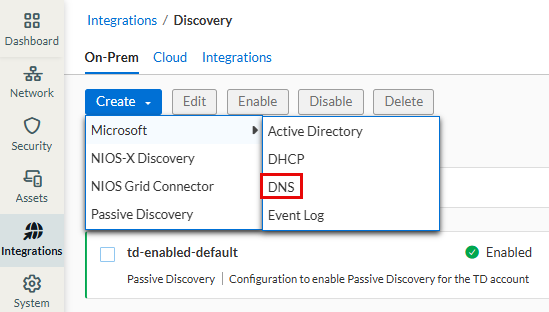
Navigate to Integrations → Discovery → Jobs
-
On the On-Prem Tab , Click Create and then choose Microsoft → DNS.
-
Configure the initial job settings:
-
Name:
DNS_Discovery -
Destination DNS View: New DNS View
-
DNS View Name :
Microsoft -
Sync Interval : Auto
-
Sync Type: Read/Write
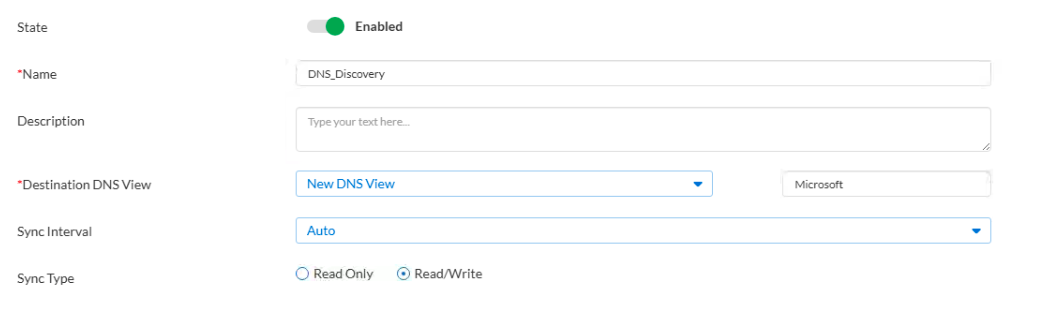
Note: Read/Write synchronization is used in this lab to demonstrate integration behavior. In production, validate change-control requirements before enabling write operations.
-
Click Next.
-
In the service location section, click Add
-
For Universal Agent select Techblue_MSAD
-
Click Add under DNS Server section, configure the following values:
-
Type: IPaddress
-
DNS Server:
10.35.22.30 -
Credential: Choose
MS_Credential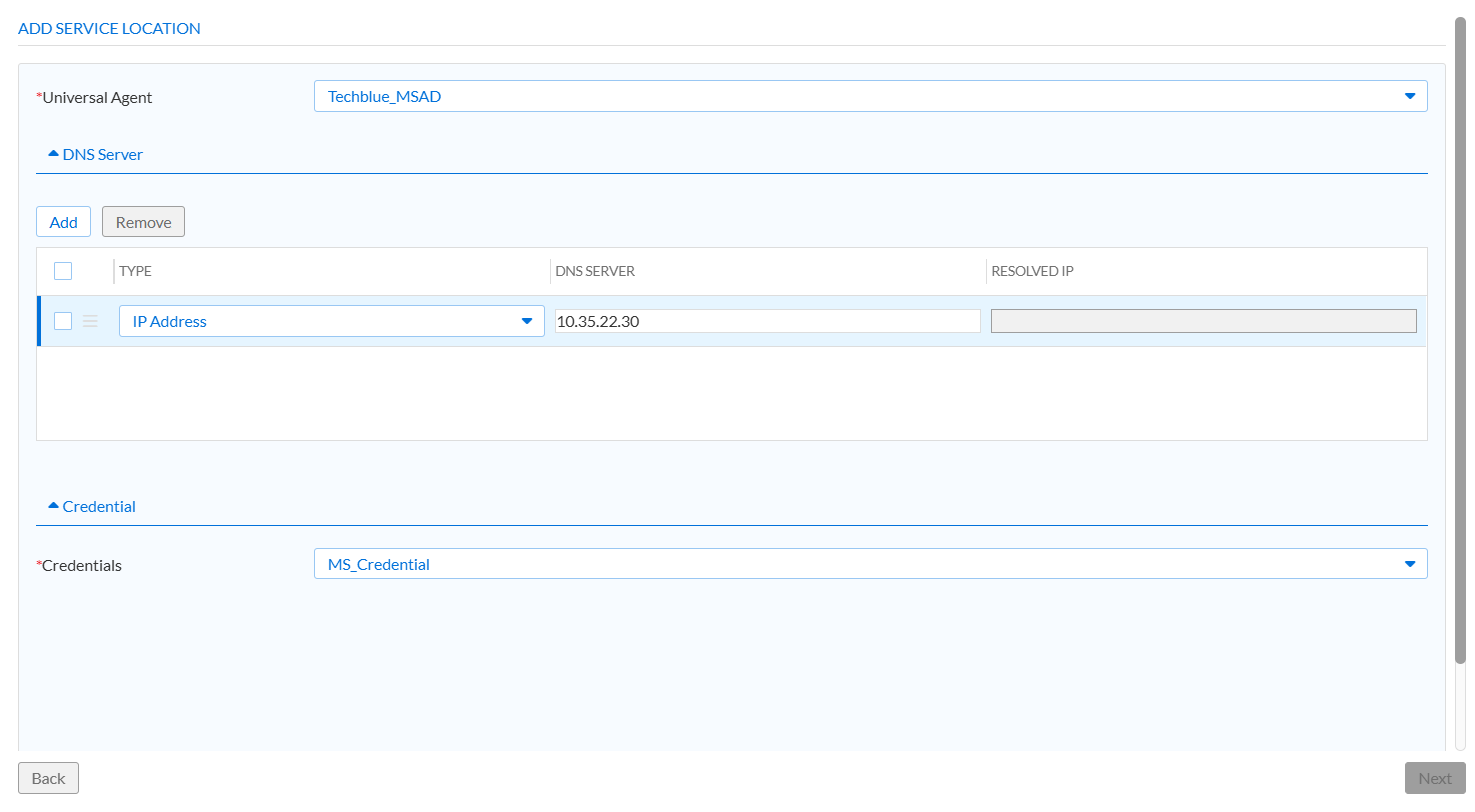
-
-
Scroll down and click Save.
-
Click Next.
-
Click Save & Close.
Task 9 Solution: Triggering a Domain Login
In this task, you generate user login activity from the testing-Windows client. This activity helps populate endpoint-to-user mapping and related event data in the Infoblox Portal.
-
Swtich to testing-windows client VM.
-
Login using the following local credentials:
-
Username:
training -
Password:
infoblox
-
Open the Tools folder from the desktop.
-
Select
interface-static-windows.bat, right-click the file, and then click Run as administrator.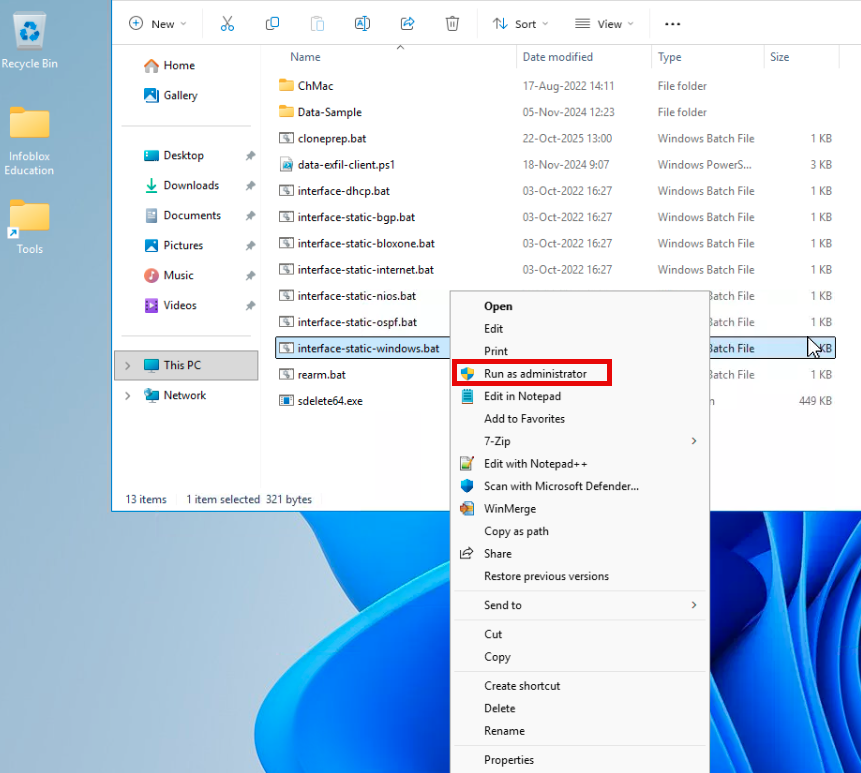
-
Log Out of the Windows client.
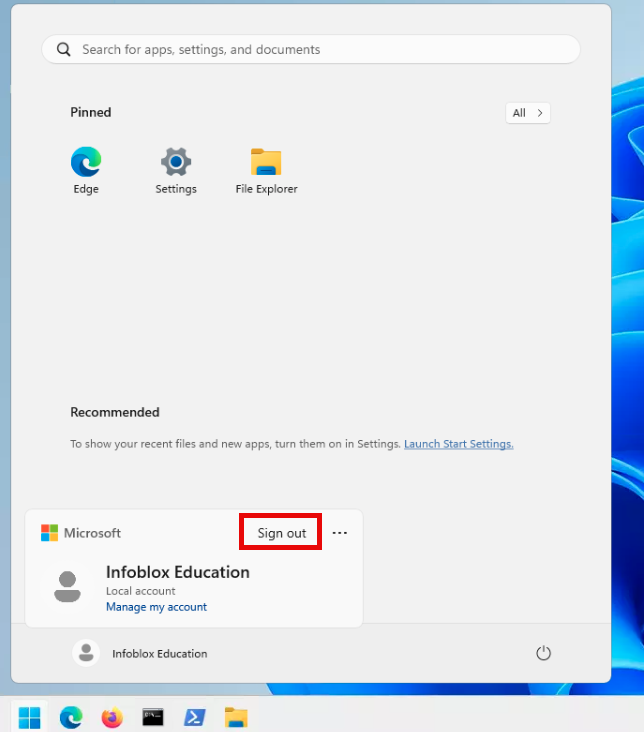
-
Log In again by using the following domain credentials:
-
Username:
techblue\training -
Password:
infoblox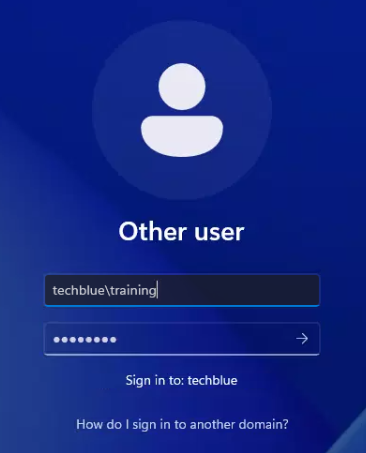
-
-
After the domain login completes, the WEC server collects the Windows security event. The Universal DDI Agent sends that event to the Infoblox Portal through the Microsoft Event Log discovery job, where it is used for MSAD Event Log Identity Mapping / user login data correlation in Asset Inventory.
Optional Task Solution: Reviewing Microsoft DNS and DHCP Configuration
In this task, you log in to the Windows-Server VM and review Microsoft DNS and DHCP information. This review helps you identify the source of the DNS and DHCP data that is synchronized with the Infoblox Portal.
-
Switch from the testing-windows VM to the Windows-Server VM.
-
Login to Windows-Server VM using following credentials:
-
Username:
training -
Password:
infoblox
-
-
Open Server Manager from the taskbar.

-
In Server Manager, click Tools → DNS.
-
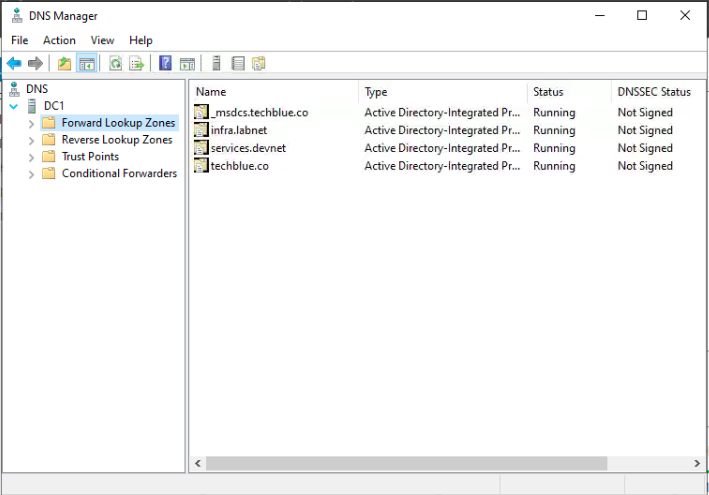
In the DNS Manager window, expand the server name.
-
Expand Forward Lookup Zones.
-
Review the available DNS zones and DNS records.
-
Expand Reverse Lookup Zones.
-
Review the available reverse lookup zones and associated records.
-
Return to Server Manager.
-
In Server Manager, click Tools → DHCP.
-
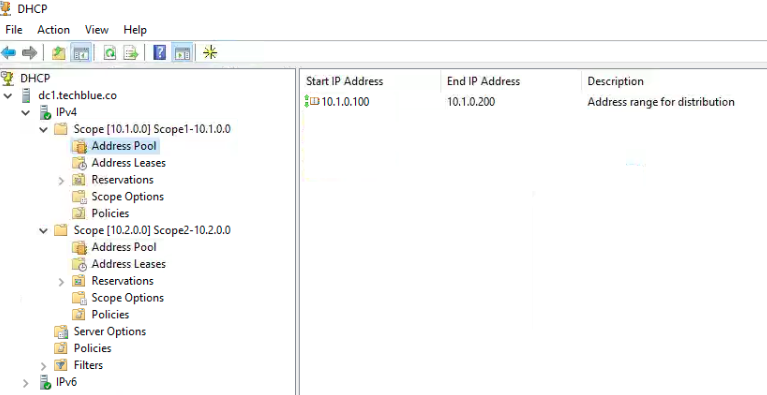
In the DHCP window, expand the DHCP server dc1.techblue.io.
-
Expand IPv4.
-
Select the configured DHCP scopes.
-
Click Address Pool.
-
Review the configured DHCP address range.
Task 10 Solution: Verifying Data in the Infoblox Portal
In this task, you verify that discovery completes successfully and that user activity data appears in the expected areas of the Infoblox Portal.
-
Switch to WEC-Server VM.
-
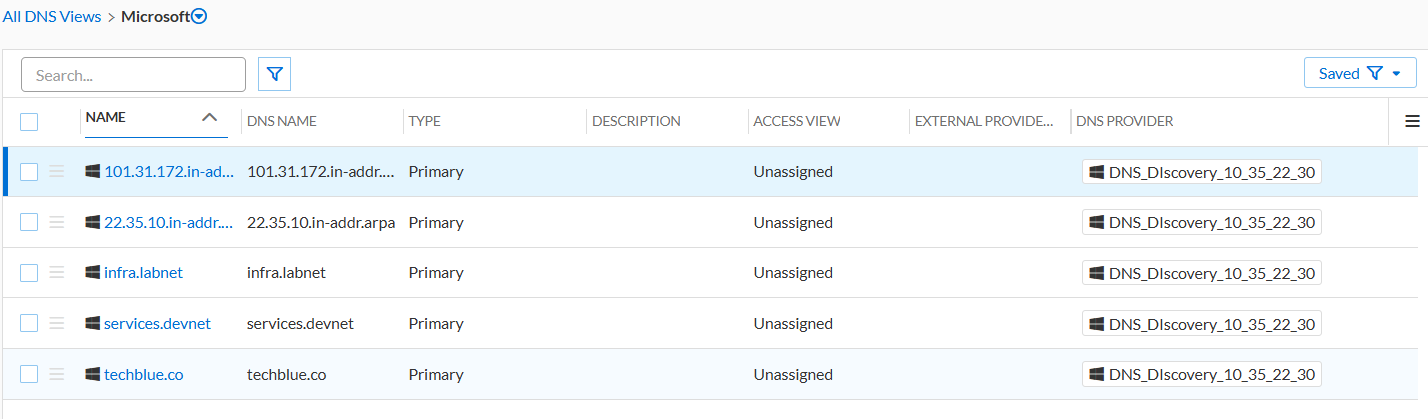
From Infoblox Portal, Navigate to Network → DNS → Zones.
-
Click Microsoft.
-
Confirm that DNS zones and records from Microsoft are visible.
-
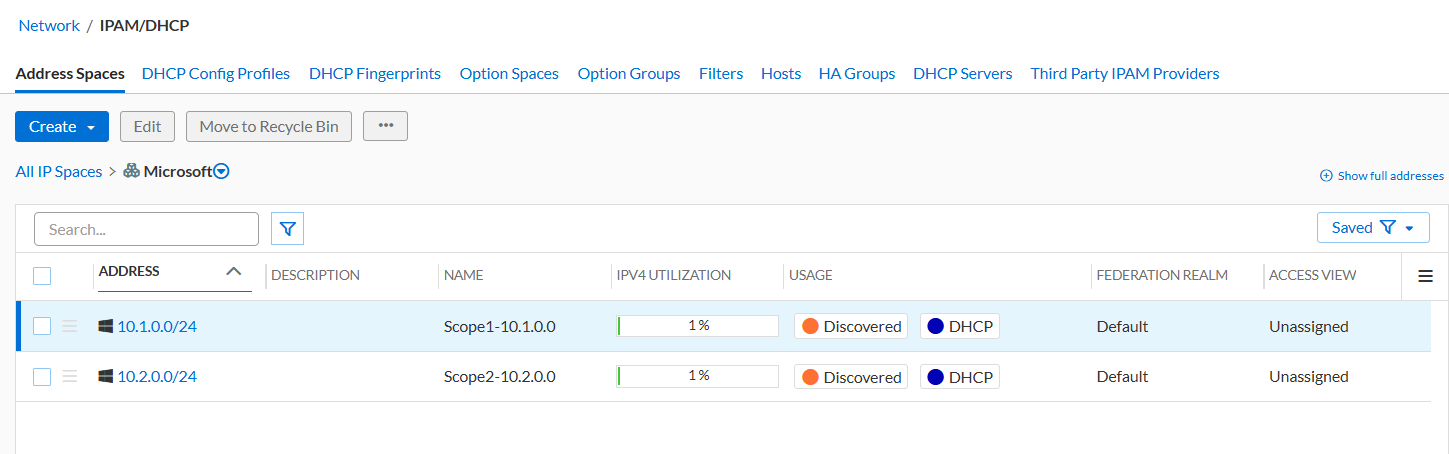
Navigate to Network → IPAM/DHCP → Address Spaces
-
Click Microsoft.
-
Confirm that DHCP network scopes from Microsoft are visible.
-
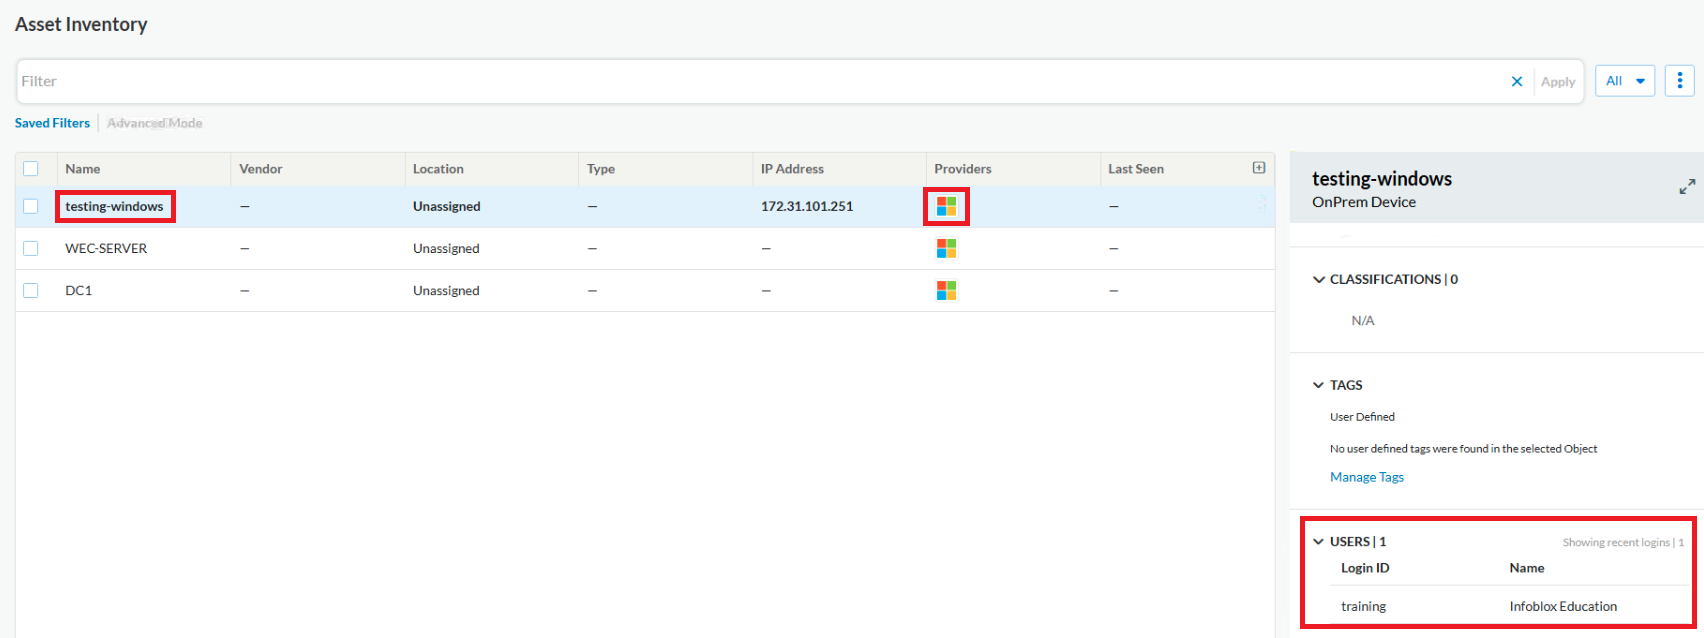
Navigate to Assets → Inventory.
-
Click Advanced Mode.
-
In the filter field, enter the following text:
asset.Providers IN ["Microsoft"] -
Click Apply.

-
Confirm that Microsoft assets are discovered and display in the inventory list.
-
Click testing-windows from the filtered list.
-
In the right panel, scroll to the Users section.
-
Confirm that user login information displays for the asset.
Note: In this lab environment, user-login correlation data might not appear immediately after the domain Log In because of lab resource constraints. Wait up to 10 to 15 minutes, refresh the page, and then verify the Users section again.